
1 PREPARATIONS 1 Reexamine patient under anesthesia confirm that testicle is nonpalpable and diagnostic laparoscopy is necessary ready lap instruments 2 Position amp prep patient ID: 934622
Download Presentation The PPT/PDF document "Port Placement For Laparoscopic Orchiope..." is the property of its rightful owner. Permission is granted to download and print the materials on this web site for personal, non-commercial use only, and to display it on your personal computer provided you do not modify the materials and that you retain all copyright notices contained in the materials. By downloading content from our website, you accept the terms of this agreement.


Slide1
Port Placement For Laparoscopic Orchiopexy
1. PREPARATIONS
1. Re-examine patient under anesthesia
- confirm that testicle is
nonpalpable
and diagnostic
laparoscopy is necessary
- ready lap instruments
2. Position & prep patient
Position
supine with arms tucked, legs spread apart , pressure points padded, and patient secured at chest with tape. Clean umbilicus well prior to prep with Q-tips and alcohol. Betadine Prep
Xyphoid
down to scrotum, and laterally to include inguinal canals.
3. Place Foley & NG/OGT
Place
appropriate sized Foley on field to empty
bladder, and request NG/OG
placement from anesthesia
(bedside drainage bag to anesthesiologist)
4. Mark camera port site
Inferior border of umbilicus is marked. Using
toothed Adson forceps the umbilicus is everted. A vertical
skin
mark
is made at midline along
umbilicus.
Mark does not extend beyond previously marked inferior limit.
2. INCISIONS
1. Superficial skin
Incise with 11 blade
through skin and dermis.
2. Deepen incision
Surgeon and assistant grasp and elevate edges of incision.
Electrocautery
or cold knife is used to
deepen incision to fascia (through dermis and
subq
fat)
3. Expose fascia and incise
Hemostat used to spread deeper to reach
fascia. Fascia
is lifted up and incised under vision.
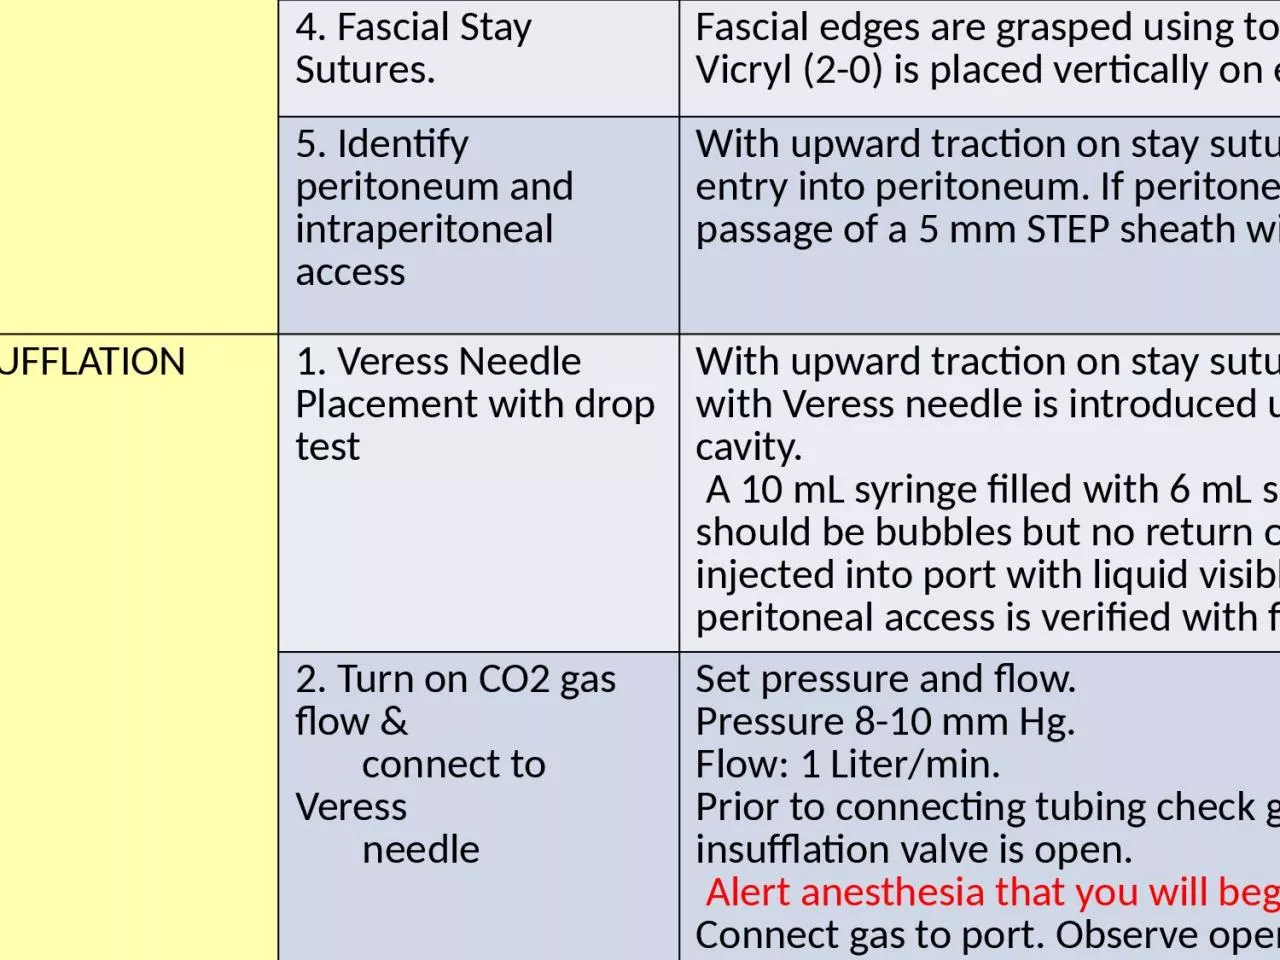
4. Fascial Stay Sutures.
Fascial
edges
are grasped
using toothed pick ups (e.g., Adson).
A
Vicryl
(2-0) is placed vertically
on each side of fascia.
5. Identify peritoneum and intraperitoneal access
With upward traction on stay sutures a hemostat is used to verify
entry into peritoneum. If peritoneum remains intact, incise to allow passage of a 5 mm STEP sheath with
Veress
needle
3. INSUFFLATION
1.
Veress
Needle
Placement with drop test
With upward traction
on stay sutures, a
5 mm
STEP port sheath with
Veress needle
is introduced under vision into peritoneal cavity.
A 10 mL syringe filled with 6 mL saline is used to
aspirate .
There should be bubbles but
no return of
succus
or blood.
2 mL saline is injected into port with liquid visible at lock. Syringe is removed and peritoneal access is verified with fluid dropping under gravity.
2. Turn on CO2 gas flow &
connect to Veress
needle
Set
pressure and flow.
Pressure 8-10 mm Hg.
Flow: 1 Liter/min.
Prior to connecting tubing check gas is flowing from tubing, and insufflation valve is open.
Alert anesthesia that you will begin insufflation.
Connect gas to port. O
bserve opening
pressure s.
Pressure should be
<5mm Hg. I
f pressure >5mm Hg manipulate Veress by withdrawing slightly (e.g., it may be up against bowel or omentum). If pressure remains high,
disconnect gas and redo Veress Needle insertion.
3. Pneumoperitoneum
As abdomen fills, confirm
pneumoperitoneum
is equal by percussing all four
quadrants.
4. Complete CO2 filling
Fill to total pressure of 8-10
mm Hg.
I
n larger
children
12mm
Hg may be used.
Increased
pressure can compromise cardiopulmonary dynamics and there should be an open line of communication with anesthesia
4
VISUALIZATION
1. Place camera port
Veress
needle is removed from the STEP sheath and a finger is placed over the hole to prevent egress of gas. A 5 mm port is then introduced into the sheath.
2. Place camera
A
5 mm lens and camera are placed into the port and used to in
spect for intrabdominal injury
- Position patient
in Trendelenberg if needed to obtain better vision
drops intestine away
3. Diagnostic laparoscopy
-
i
nspect abdominal wall, intestines,
rectum, and bladder
- assess for any anomalies (e.g., persistent
Mullerian
ducts)
- evaluate
both
internal rings
- identify status of vessels and vas. If you find:
vessels are blind-ending or cord is visualized going into the ring
-
omit placing
other ports
intrabdominal testicle requiring
pexy
, atrophic/dysmorphic testicle requiring orchiectomy, or further dissection to explore for a testicle (reflecting colon to explore retroperitoneum then proceed to place additional ports.
5.
PLACE ANCILLARY PORTS
1. Mark lateral port sites
STEP ports (
3
or 5 mm) are
used for additional ports. If cautery or clips will be used then 5 mm port is necessary. M
ark incision
approximately one
fingerbreath
below the camera port and 4
fingerbreaths
lateral to camera port. During planning ensure they are away from epigastric vessels.
2. Port site
: Superficial
skin incision
Use
a #15 blade
scalpel
to incise skin and dermis. D
eepen incision with
Bovie
.
Use a
hemostat to spread
to fascia.
3. Penetrate
fascia
Use
a
bovie
to
penetrate
fascia and peritoneum under laparoscopic vision.
4. Place lateral port
Once this tract is made a STEP sheath with
Veress
is passed under vision into the peritoneal cavity
through established tract.
Veress
is removed from sheath and a 3 or 5 mm port is placed into the sheath under laparoscopic vision
Repeat on other side