
One of the basic tools of modern biotechnology is gene splicing This is the process of removing a functional DNA fragment a gene from one organism and combining it with the DNA of another organism to study how the gene works ID: 917040
Download Presentation The PPT/PDF document "Gel Electrophoresis BIOTECHNOLOGY" is the property of its rightful owner. Permission is granted to download and print the materials on this web site for personal, non-commercial use only, and to display it on your personal computer provided you do not modify the materials and that you retain all copyright notices contained in the materials. By downloading content from our website, you accept the terms of this agreement.


Slide1
Gel Electrophoresis
Slide2BIOTECHNOLOGY
One of the basic tools of modern biotechnology is gene splicing.This is the process of removing a functional DNA fragment ( a gene) from one organism and combining it with the DNA of another organism to study how the gene works.
The desired result is to have the new organisms carry out the expression of the gene that has been inserted.
Slide3What is it?
Simply put, gel electrophoresis uses positive and negative charges to separate charged particles. Particles can be positively charged, negatively charged, or neutral.
Charged
particles are attracted to opposite charges:
Positively
charged particles are attracted to negative charges, and negatively charged particles are attracted to positive charges.
(+) ←←←← (-) OPPOSITES ATTRACT!
Slide4DNA MappingThe phosphates in the DNA backbone give the molecules a negative charge
.This makes DNA very soluble in water and gives us a way to attract them with a positive charge (like a magnet).
Slide5To prevent all of the DNA in a sample from racing to the positive charge source immediately, it is forced to move through a
Jello-like substance made from
agarose
(a polysaccharide extracted from red algae) and water.
Smaller pieces of DNA can move more quickly through the thick gel, while larger pieces may hardly move at all. This has the effect of separating out the DNA sample by the size of their strands.
Slide6How does electrophoresis work?
The gel is made from agar
DNA is a negative molecules
Molecules sort based on
Charge
Size
shape
Slide7Which image below do you think represents agarose
? A. B.
Slide8Congratulations! You have correctly identified the "secret ingredient" in
agarose. This is a picture of seaweed. Agarose
is a chain of sugar molecules, and is extracted from seaweed.
Manufacturers prepare special grades of
agarose
for scientific experimentation. Because the
agarose undergoes much commercial processing it is very expensive.
Slide9Agarose
This is the more familiar state of seaweed, as far as molecular biologists are concerned. High grade
agarose
is expensive. Guess how much this 500 gram bottle costs. Would you believe $200?!?
Slide10What is agar?
Agar is made from powdered agarose---it comes from sea weed and has no electrical charge
Slide11Slide12How does it work?
DNA is cut into smaller fragments.
Loading dye is used to indicate the fragments of DNA are behind the dye
The negative DNA molecule is attracted to the positive electrode.
The smallest fragments move the greatest distance.
Slide13BufferA
buffer is a solution that conducts electricity. Because the pH of these buffers is neutral, the phosphate backbone of DNA has a net negative charge and migrates toward the anode.
The
solution is poured into the electrophoresis chamber until it just covers the top of the casting tray. This solution slot allows the electric current to flow from the cathode, through the
positive and negative electrodes.
Slide14Slide15Since DNA dissolved in water is invisible, we need a way to be able to detect it.
Stains are the best way.
Ethidium
Bromide is a fluorescent compound
stain that
glows pink when excited by ultraviolet light.
Slide16Micropipettes
Slide17How to use a micropippet video
http://www.youtube.com/watch?v=LFFyYN9blKM&feature=related
Slide18PracticePractice measuring 15
μL: a. Put the end of the
micropipet
into the distilled water.
b. “Pull” up the water by pulling up the plunger.
c. Pull the water up to the third mark (15μL ).
d. Leave the plunger where it is, and carefully take out the micropipet without changing the volume. e. Carefully wipe off the end of the capillary tube. Touch the tube to the side of the container to make sure all 15μL is transferred. f. Push out the water into another container (it doesn’t matter what container you choose since it is only distilled water).
g. There will be some water left hanging on the end of the capillary tube. Touch the tube to the side of the container to make sure all 15μL is transferred.
h. Wipe off the end of the
micropipet
with a
Kimwipe
.
I. “Rinse” the
micropipet
by putting it in distilled water and pulling and pushing water in and out of the capillary
Slide19Loading the Gel
Slide20Loading the wells
a. After you find out what dyes you are using, draw a picture of the gel and the wells. Label which dyes you will put in each well. b. When you load a gel, it is very important that you do not damage the gel in any way. You must be very careful not to "jab" the gel with the end of your pipet. Ideally, you shouldn't even touch the gel with the
micropipet
. However, you must also be careful to put the right dye only in the right well.
c. When you are ready, carefully load the wells you are using with 15μl of the correct dye for the particular well you are putting it into. Make sure you RINSE and WIPE your
micropipet
each time you measure out a new dye. If you don't, there is a really good chance that you will contaminate the samples in the other wells.
Slide21Incorrect gel load
Slide22Correctly loaded gel after electrophoresis
Slide23ProcedureCover with buffer, making sure to allow buffer to overflow into each end of the tray.
Load gels with your samples.Connect the electrodes.
Turn on power supply.
Allow gels to run – make sure you see bubbles coming from the electrodes.
Slide24What is significant about the bubbles?
They indicate that electrolysis of water is taking place.
One electrode will have a lot of bubbles and the other will have a lesser amount.
Why the difference?
The formula for water is H
2
O and the splitting of the molecule will produce twice as many atoms of hydrogen
Slide25Procedure continued…
When everyone has placed their casting tray into the chamber place the chamber lid on top.
Plug
the black wires (from the cathode) into the black port of the power system. Plug the red wires (from the anode) into the red port of the power system. DO NOT SWITCH THE WIRES!
Set
the "Volts" setting to
150V and turn the power source ON. Make no attempt to open the chamber when the power source is on--you could get electrocuted, fried, crispy.
The
dyes will start moving very slowly. They will probably take
10-30
minutes to separate. Ideally, you want to leave the power on, uninterrupted, until the leading dye gets very close to the end of your gel.
Slide26After the dyes have finished their "run," TURN OFF THE POWER SOURCE. Take out the casting tray. Being careful not to break your gel, slide the gel out of the casting tray.
Draw a picture of your
results using colored pencils--
be sure to label
everything AND take a digital photograph (you may use your cell phone).
Clean
up. Rinse everything with water, then with distilled water. Cut out the dyed sections and place remaining gel into plastic baggie.
Slide27Digital Imaginga digital camera or a Polaroid photo is taken for documentation.
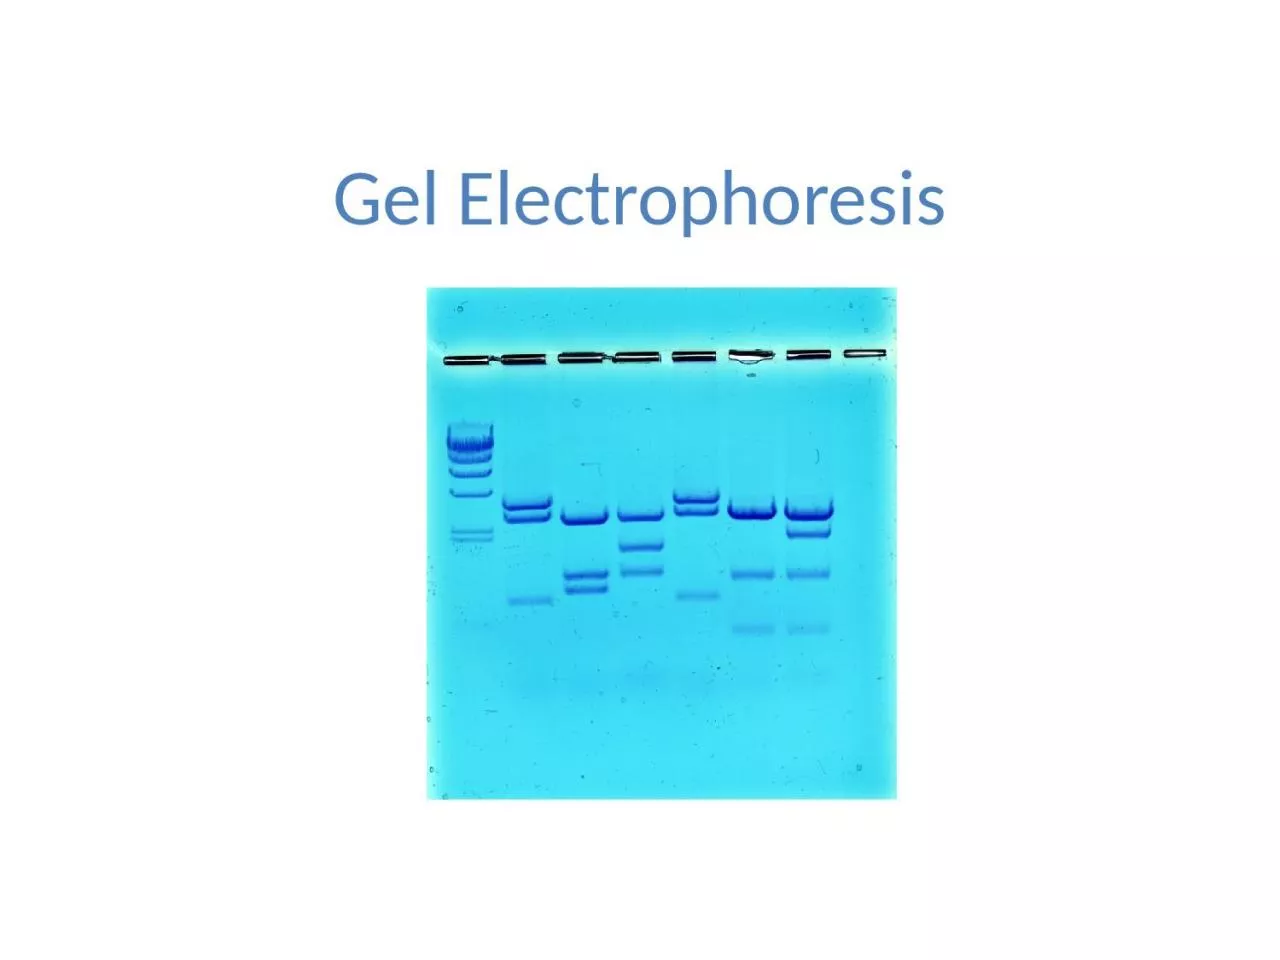
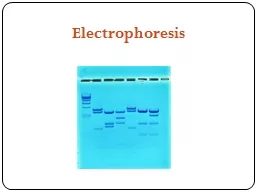
Slide28The size of the strands is judged by running them next to a standard "ladder" of known lengths.
Slide29The loading wells are the dark "holes" at the top. The position of the 2000bp ("base pairs" or nucleotides of double-stranded DNA) and 1000bp are marked.
The
first lane shows a piece of DNA about 1700
bp
long; the second lane is just under 2000bp; and the third lane is the DNA "ladder".
The
fourth lane was read as a "bad" reaction; there was not much DNA and it is all smeared out. The last lane contains a ~1500bp fragment.
Slide30As can be seen there is a match of the DNA profile of defendant 1 and the forensic sample.
Slide31Questions
1. Which one of your dyes moved the fastest? Which dye moved the slowest? Explain why you think that happened.
2. Did any of your samples leave more than one band? If they did, explain why you think it happened.
3. Do you think any of the dyes were identical? Similar? Why or why not?
4. Why do you think electrophoresis is an important technique for scientists to know?