
Page 1 NOTE You will need a laptop and barcode scanner to perform an inventory of your collection in Koha You will be scanning barcodes into a t e xt file and uploading that file into the Ko ID: 852225
Download Pdf The PPT/PDF document "Koha Inventory Process" is the property of its rightful owner. Permission is granted to download and print the materials on this web site for personal, non-commercial use only, and to display it on your personal computer provided you do not modify the materials and that you retain all copyright notices contained in the materials. By downloading content from our website, you accept the terms of this agreement.


1 Page | 1 Koha Inventory Process
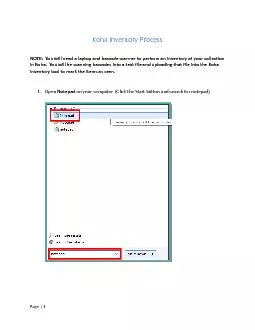
Page | 1 Koha Inventory Process NOTE: You will need a laptop and barcode scanner to perform an inventory of your collection in Koha. You will be scanning barcodes into a t e xt file and uploading that file into the Koha inventory tool to mark the items as seen. 1. Open N otepad on your computer (Click the Start button a
2 nd search for notepad) Pag
Pag")
nd search for notepad) Page | 2 2. Choose a section to start at (e.g. Adult Fiction) and take your laptop and barcode scanner to the stacks (or wheel a cart of books to your computer ) and start scanning the b arcodes into Notepad. Make a note of the first Call Number you started at (you will need this later for S
3 tep 13 .) 3. You will now have a l
3.
You will now have a l")
tep 13 .) 3. You will now have a list that looks like this: 4. Save your file of barcodes and make a note of the Call Number of the last barcode you scanned (you will need this later for Step 13 . ) 5. In Koha, navigate to Tools � Inventory . Page | 3 6. Under Use a Barcode fi
4 le , c lick Choose File . 7.
le , c lick Choose File . 7. Find you barcode file on your computer and click Open . 8. Under Set inventory date to :, the default inventory date will be set to today’s date, however you can click the calendar button to the right of the box and select the date you scanned your barcodes on. (Leaving it as today’s date i
5 s fine.) Page
Page")
s fine.) Page | 4 9. C heck the box next to Compare barcodes list to results: Page | 5 10. VERY IMPORTANT! Next, check the box next to Do not check in items scanned during inventory: ( In case something got checked out between the time you finished scanning
6 items and when you run the inventory t
items and when you run the inventory tool, make sure this is checke d.) Page | 6 11. Introduced in Koha 18.11, if you want to use your inventory as a shelf - reading tool, check the box next to Check barcodes list for items shelved out of order . Page | 7
7 12. Under Item location filters , n
12. Under Item location filters , next to Library : , click the bullet for Home library and choose your library from the drop - down menu. 13. If you were able to scan an entire shelving location section, choose that location from the Shelving location drop - down. Otherwise, enter the beginning and ending Call Numbers
8 for the items that you scanned.
for the items that you scanned. Page | 8 14. Leave the Callnumber classification scheme as default . 15. Under Optional filters for inventory list or comparing barcodes , ensure the Skip items on loan: box is checked. Page | 9 16. Under Optional filters for inventory li
9 st or comparing barcodes , check the box
st or comparing barcodes , check the box next to Skip items on hold awaiting pickup . Page | 10 17. Click Submit . 18. The resulting list will display items that were not scanned in the Call Number section you specified in Step 13 as well as items that may be shelved out of order .
10 19. If you would like to print t
19. If you would like to print this lis t to look for missing items later, use the browser’s print function. NOTE: If any of the items you scanned and saved in your barcodes file had a lost status (Long Overdue (Lost), Lost, Lost and Paid For, or Missing), Koha will automatically take it out of the lost status and make it availab