
This tutorial will walk you through the steps to get your DVR TVI series surveillance systems online and accessed via the cloud Enabling the cloud feature on the DVR bypasses port forwarding and ID: 853216
Download Pdf The PPT/PDF document "Setup Cloud Access on the DVR" is the property of its rightful owner. Permission is granted to download and print the materials on this web site for personal, non-commercial use only, and to display it on your personal computer provided you do not modify the materials and that you retain all copyright notices contained in the materials. By downloading content from our website, you accept the terms of this agreement.


1 Setup Cloud Access on the DVR This tut
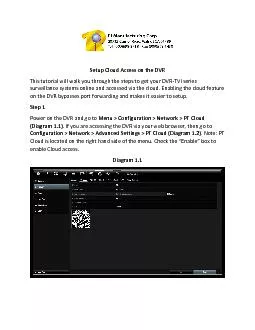
Setup Cloud Access on the DVR This tutorial will walk you through the steps to get your DVR - TVI series surveillance systems online and accessed via the cloud. Enabling the cloud feature on the DVR bypasses port forwarding and makes it easier to setup. Step 1 Power on the DVR and go to
2 �Menu Configuratio�n Ne
�Menu Configuratio�n Network � PT Cloud (Diagram 1.1) . If you are accessing the DVR via your web browser, then go to Configurati�on Network � Advanced Setting�s PT Cloud (Diagram 1.2) . Note: PT Cloud is located on the right hand side of t
3 he menu. Check the “Enable” box to
he menu. Check the “Enable” box to enable Cloud access. Diagram 1.1 Diagram 1.2 Step 2 In your browser, go to www.hicloudcam.com and register for a username ( Diagram 2.1 ) . Alternatively, you can also download iVMS - 4500 on your smartphone and register for
4 a username under the “Cloud P2P” opt
a username under the “Cloud P2P” option via the menu ( Diagram 2.2 / 2.3 ) . Diagram 2.1 Diagram 2.2 / 2.3 Diagram 2.2 / 2.3 Step 3 Once your account has been registered, login to your account either via the comput
5 er or via iVMS - 4500 on your smartphone
er or via iVMS - 4500 on your smartphone. Once logged in, t here are 2 ways to add the DVR so you can access it remotely. Web Browser (Diagram 3.1) If you are using the web browser to log into www.hicloudcam.com , then once logged in, click on the Add by Serial No. tab and input th
6 e serial number for the DVR. If you ar
e serial number for the DVR. If you are using the user interface directly from the DVR, t he serial number can be located in Menu � Maintenanc�e System Info (Diagram 3.2) . If you are using the user interface from the web browser, the serial number can be located in
7 Configuration � System Setting&#
Configuration � System Setting�s Basic Information (Diagram 3.3) . The 9 - digit serial number is located in between the letters towards the middle (e.g. 123456790PIPI 999999999 MFGC). In this case, the 9 - digit number is 999999999 . When you add the DVR, it will ask f
8 or the verification code. The verificati
or the verification code. The verification code is located under the PT Cloud settings on the DVR (Diagram 3.4) . Once added, you should be able to access the DVR on the hicloudcam.com website after you login to your account. Smartphone (iVMS - 4500) (Diagram 3.2) If you are usin
9 g iVMS - 450 0 on your smartphone, once
g iVMS - 450 0 on your smartphone, once logged into your cloud account, you can either add the DVR via the serial number or scan the QR code located on �Menu Configuratio�n Network � PT Cloud . Once the DVR has been added, you will need to input the verification cod
10 e. This can be obtained from the PT clo
e. This can be obtained from the PT cloud settings on the DVR (Diagram 3.4) . Scanning the QR code is the default option and is preferred for adding the DVR easily . Diagram 3.1 Diagram 3.2 Diagram 3.3 Diagram 3.4 Diagra