
Anatomy of the Upper Airway Internal AnatomyUpper Airway Internal AnatomyUpper Airway Start with the simple steps Positioning Clear the airway Nasal adjuncts Oral adjuncts BIAD AKA Blind Insertion Airway Devices ID: 1033861
Download Presentation The PPT/PDF document "Airway Management Anatomy Review" is the property of its rightful owner. Permission is granted to download and print the materials on this web site for personal, non-commercial use only, and to display it on your personal computer provided you do not modify the materials and that you retain all copyright notices contained in the materials. By downloading content from our website, you accept the terms of this agreement.


1. Airway Management
2.
3. Anatomy Review
4.
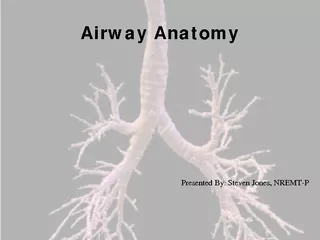
5. Anatomy of the Upper Airway
6. Internal Anatomy-Upper Airway
7. Internal Anatomy-Upper Airway
8. Start with the simple stepsPositioning - Clear the airwayNasal adjunctsOral adjunctsBIAD (AKA: Blind Insertion Airway Devices)IntubationCricothyrotomyStart with the Basics
9. Airway Maneuvers
10. Head-Tilt Chin-Lift
11. IndicationWithout suspected spinal injuryUnresponsive patient that can not protect their own airwaySimple, safe and non-invasiveDoes not protect from aspirationHead-Tilt Chin-Lift
12. MethodTilt head back with hand on patient’s foreheadFingers of other hand under bony part of lower jaw and lift chin forwardAHA standard for non-injury patientHead-Tilt Chin-Lift
13. Head-Tilt Chin-Lift Maneuver
14. Jaw Thrust
15. IndicationUsed in suspected spinal injury/history of cervical injury or fusion, etcMethodGrasp angle of lower jawLift with both hands and displace mandible forward while tilting the head backJaw Thrust
16. Jaw Thrust Maneuver
17. Airway Adjuncts
18. IndicationsHold tongue away from the posterior wall of the pharynxUnconscious, semi-conscious without a gagInfant to adult sizesOPA
19. Oropharyngeal Airway
20. MethodMeasure Clear airwayUpside-down or at 90-degree angleRotate until against posterior wall of oropharynxConfirm placementOPA
21. DisadvantagesDoes not protect from aspirationMay stimulate vomiting and laryngospasm if gag presentIf not inserted properly, pushes tongue back and causes airway obstructionOPA
22. Measuring an OPA
23. Inserting OPA
24. Nasopharyngeal Airways
25. IndicationsSemiconscious or patient unable to maintain own airwayUnconscious where OPA not usedSeizuresC-spine InjuryBefore nasotracheal intubationGuide for inserting a nasogastric tubeNPA
26. AdvantagesWell tolerated in those with a gag reflexInserted rapidlyUsed when OPA is contraindicated (facial trauma, gag reflex)NPA
27. DisadvantagesLonger length may enter esophagusLaryngospasm and vomitingInjury to nasal mucosa, bleeding, or obstructionSmall diameters can become obstructed with vomit, mucus, or bloodDoes not protect from aspirationCan’t suction throughNPA
28. MethodMeasureLubricate with water-soluble lubricantBevel tip toward nasal septum Use natural curvature of nasal passageShould rest in posterior pharynxNPA
29. Measuring a Nasal Airway
30. Bag-Valve Mask
31. Indications and AdvantagesSelf-inflating and non-rebreathing Use with airway maintenance deviceUse with apnea or ineffective effortProvides blood/body fluid barrierRoom air (21%) to 100% FiO2Sense of lung complianceBVM
32. DisadvantagesDifficult to master – tidal volume dependent on mask sealInadequate tidal volume from poor technique, poor mask seal, and gastric distentionBVM
33. MethodPosition at patient’s headClear airwayHead tilt chin lift or jaw thrustBLS or ALS airway Tight seal on mouth with E-C positioningOne and two person optionsBVM
34. BIADs
35. Forms low pressure seal over laryngeal inletLaryngeal Mask Airway: LMA
36. IndicationsSituations involving a difficult mask fitCannot be intubated, can be ventilatedETT can be passed through LMAMay be used as a “second-last-ditch” airway where a surgical airway is the only remaining optionLMA
37. ContraindicationsCannot open mouth Airway obstruction or abnormalitiesHigh risk of aspiration (obesity, late pregnancy, not NPO, etc)LMA
38. MethodHave all equipment ready, select appropriate size (sizes 1-5)Test cuff inflation/deflation system (reference point: Size 4 (adult)-30ml) Apply a water-soluble lubricant to the back of the maskLMA
39. MethodGrasp the LMA by the tube, holding it like a pen as near as possible to the mask end.Place the tip of the LMA against the inner surface of the patient’s upper teethLMA
40. MethodUnder direct vision press the mask tip upwards against the hard palate to flatten it outUsing the index finger, keep pressing upwards as you advance the mask into the pharynx to ensure the tip remains flattened and avoids the tongueLMA
41. MethodKeeping the neck flexed and head extended, press the mask into the posterior pharyngeal wall using the index fingerLMA
42. MethodContinue pushing with your index finger and guide the mask downward into position.LMA
43. MethodGrasp the tube firmly with the other hand then withdraw your index finger from the pharynxPress gently downward with your other hand to ensure the mask is fully insertedLMA
44. MethodInflate the mask with the recommended volume of airDo not touch the LMA tube while inflating unless the position is unstableThe mask can rise up slightly out of the hypopharynx as it is inflated to find its correct positionLMA
45. LMA Placement
46. MethodAttach to BVMPerform standard evaluation of lung soundsInsert a bite-block or roll of gauze to prevent occlusion of the tube should the patient bite downSecure with tape or ET tube holderLMA
47. Helpful TidbitsIf you can’t ventilate, remove itAvoid excessive lubricant on anterior surfaces Avoid LMA fold overLMA
48. King Airway
49. Pilot BalloonPrimary Ventilatory OpeningProximal CuffStabilizes tube & seals oropharynxBilateral Ventilation EyeletsDistal Tip & CuffAnatomically shaped to assist in passage behind larynx and normally collapsed esophagusDistal Opening of Gastric Access LumenMultiple Distal Ventilatory OpeningsProximal Opening of Gastric Access Lumen
50. Comes in 3 sizes:#3: 4–5 ft#4: 5–6 ft#5: > than 6 ftKing Airway
51. IndicationsWhen tracheal intubation indicated, but unsuccessful or unavailable.Access to the patient is limited (e.g., trauma patients, entrapment, etc.).Difficult or emergent airwaysCardiopulmonary arrest (optional).King Airway
52. ContraindicationsPresence of gag reflexCaustic ingestionObstructed airwayEsophageal trauma or diseaseKing Airway
53. MethodHave all equipment ready, select appropriate size (#3, #4, or #5)Test cuff inflation system for leaksApply a water-soluble lubricant to the posterior distal tip of the deviceKing Airway
54. MethodHold King Airway in dominant hand at proximal connectorPerform tongue-jaw lift while keeping head in a neutral positionKing Airway
55. MethodRotate King laterally 45-90 degrees (blue orientation line is touching the corner of the mouth)Introduce tip into mouth and advance behind base of the tongueAs the tube passes under the tongue, rotate the tube back to midline (blue orientation line faces chin)King Airway
56. MethodAdvance tube until connector is aligned with teeth and/or gums.King Airway
57. MethodUsing a syringe, inflate the cuffs with the appropriate volume of air.#3: 45-60ml #4: 60-80ml#5: 70-90mlKing Airway
58. MethodAttach BVMWhile ventilating, simultaneously withdraw until ventilation is easy and free-flowing.There should be good tidal volume with minimal resistance.King Airway
59. MethodPerform standard evaluation of lungsoundsAttach and utilize end-tidal CO2 monitoringReadjust cuff inflation as neededConsider securing with tape or ET tube holderKing Airway
60. Helpful TidbitsIf you can’t ventilate, remove itIf water soluble lubricant used, do not apply near ventilatory openingsBe prepared to add another 10–15 cc in the event of air leakage Insertion depth is criticalKing Airway
61. King Airway
62. ETTs
63. IndicationsRespiratory or cardiac arrestGCS < 8Risk of aspirationObstruction due to foreign bodies, trauma, burns, or anaphylaxis.PTX or hemothorax with distressNeed for mechanical ventilationEndotracheal Intubation
64. ComplicationsEquipment malfunctionTeeth breakage and soft tissue lacerationsHypoxiaEsophageal intubationEndobronchial intubation (right mainstem)Tension pneumothoraxEndotracheal Intubation
65. AdvantagesIsolates trachea and permits complete control of airwayImpedes gastric distentionEliminates need to maintain a mask sealOffers direct route for suctioningPermits administration of some medications Endotracheal Intubation
66. DisadvantagesRequires training and experienceRequires specialized equipmentRequires direct visualization of vocal cordsBypasses upper airway’s functionsof warming, filtering, and humidifying the inhaled airEndotracheal Intubation
67. MethodPre-ventilate patientPosition patientAssemble and check equipmentInsert laryngoscopeVisualize larynx and insert ETTConfirm placement Secure ETTEndotracheal Intubation
68.
69. Soft tissue airway obstruction a threat for all patients, but bigger problem for obese patients. Obesity increases the volume of upper airway soft tissue and subcutaneous fat.It lacks the rigidity and turgor of other tissue and threatens the airway.Special Populations