
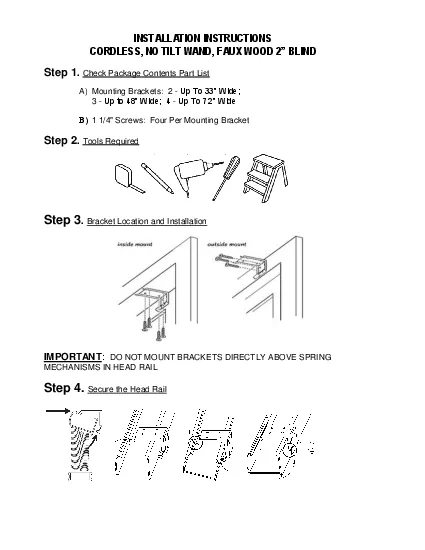
ICORDLESSNO TILT WANDFAUXWOOD 2 BLINDStep 1Check Package Contents Part ListAMounting Brackets 2 Up To 33 Wide 3 Up to 48 Wide 4 Up To 72 WideB1 14 Screws Four Per Mounting BracketStep 2Tools R ID: 865187
Download Pdf The PPT/PDF document "NSTALLATION INSTRUCTIONS" is the property of its rightful owner. Permission is granted to download and print the materials on this web site for personal, non-commercial use only, and to display it on your personal computer provided you do not modify the materials and that you retain all copyright notices contained in the materials. By downloading content from our website, you accept the terms of this agreement.


1 I NSTALLATION INSTRUCTIONS CORDLESS ,
I NSTALLATION INSTRUCTIONS CORDLESS , NO TILT WAND , FAUX WOOD 2” BLIND Step 1 . Check Package Contents Part List A) Mounting Brackets: 2 - Up To 33” Wide; 3 - Up to 48” Wide; 4 - Up To 72” Wide B) 1 1/4" Screw s: Four Per Mounting Bracket Step 2 . Tools Required Step 3 . Bracket Location and Installation IMPORTANT : DO NOT MOUNT BRACKETS DIRECTLY ABOVE SPRING MECHANISMS IN HEAD RAIL Step 4. Secure the Head Rail Blind can be inside or outside mounted. For Inside mou nt, minimum for flush mount is 3 inch depth. Minimum mounting depth is 2 inches. REMEMBER : Do not align the brackets directly over the cord spring mechanism. It can cause the blind to not operate properly. Step 5 . Operate Cordless Faux W ood Blind To lower the shade: G rip bottom rail evenly and pull down to the desir ed length. To raise the
2 shade: G rip bottom rail evenly and
shade: G rip bottom rail evenly and lift towards head rail to desired height. To adjust the angle of the slats: G rip bottom rail evenly and gently pull down or gently lift up to rotate the slats. IMPORTANT ! Always lower and raise at the center of the blind , or equally on each end of the blind , t o assure that the bottom rail remains even. RAISING FROM THE LEFT OR RIGHT HAND SIDE OF BO TTOM RAIL CAN CAUSE INNER CORDS TO TANGLE IN RETRACTING MECHANISM AND WILL MAKE BLIND UNLEVEL AND/OR INOPERABLE. If the blind is not a ble to raise to the top, try using two hands to operate the blind as illustrated above. Maintenance Of Your Cordless Blind To maintain optimal performance of the springs that make your cordless blind function, lift and lower your blind through its full range of motion – all the way up and down to reset the springs. ENJOY YOUR NEW CORDLESS 2” FAUX WOOD BLIN