
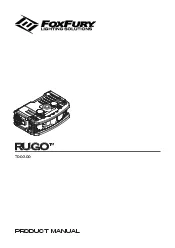
700300RUGO15323RUGO153 REFERENCE GUIDEFULL ASSEMBLYDISASSEMBLED POWER PACKDISASSEMBLEDLIGHT HEADMOUNTS INCLUDEDTRILENS153THUMBSCREWSPOWERMODE SWITCH20 MOUNTCHARGE INDICATORGUARDSPOWER CONTACTSUSB ID: 878943
Download Pdf The PPT/PDF document "PRODUCT MANUAL" is the property of its rightful owner. Permission is granted to download and print the materials on this web site for personal, non-commercial use only, and to display it on your personal computer provided you do not modify the materials and that you retain all copyright notices contained in the materials. By downloading content from our website, you accept the terms of this agreement.


1 PRODUCT MANUAL 700-300 RUGO ™ 2 3 R
PRODUCT MANUAL 700-300 RUGO ™ 2 3 R U GO ™ REFERENCE GUIDE FULL ASSEMBLY DISASSEMBLED POWER PACK DISASSEMBLED LIGHT HEAD MOUNTS INCLUDED TRI-LENS ™ THUMBSCREWS POWER/MODE SWITCH ¼ "-20 MOUNT CHARGE INDICATOR GUARDS POWER CONTACTS USB CHARGE PORT LOCKING POST LED CONTACT CAVITY (2) “O”-RING ACCESS SCREW LED MODULE SCREW HOLE (4) ¼" –20 AND COLD-SHOE MOUNT TABLE OF CONTENTS INTRODUCTION Reference Guide3 Overview 4 Physical Characteristics4 POWER PACK Charging the Power Pack5 Reassembling the Rugo ™ after Charging6 Power Pack Life6 Operational Modes6 TRI-LENS ™ Using the Tri-Lens ™ Removing the Tri-Lens ™ REMOVING/CHANGING MOUNTS Removing the Standard Mount8 Removing the Â
2 ¼ " -20 & Cold-Shoe Mount8 MOUNTING TO D
¼ " -20 & Cold-Shoe Mount8 MOUNTING TO DEVICES GoPro ® DSLR Tripod/Puck Adaptor MAINTENANCE Replacing the Seal10 Removing the Guard10 WARNINGS/WARRANTY 4, 12–13 CARE/CLEANING 12 CONTACT FOXFURY 13 THUMBSCREWS (2) STANDARD MOUNT WITH (2) KNOBS 4 5 WARNINGS When used for extended periods of time the Rugo ™ will become HOT to the touch. Do not stare into the LEDs for long periods of time or from a close range (less than 2 ft). This product is designed as an auxiliary lighting tool to be used with photo, video, and film. DO NOT use the Rugo ™ as a primary light source for activities. While using any FoxFury product, please operate at safe speeds. Be sure to rinse the Rugo ™ with fresh water immediatley after use in the ocea
3 n or a pool. It is the responsibility
n or a pool. It is the responsibility of drone/UAV users to follow the FAA laws and regulations and/or the laws and regulations applicable to the flight location. OVERVIEW The Rugo ™ is a compact and powerful LED Light which has the ability to be mounted to the GoPro ® , a DSLR, a drone, a tripod and many other devices. Having four different intensities (70–700 Lumens) with three interchangeable lens settings (Tri-Lens ™ ), makes it a powerful tool for action sports as well as photography and filming. A Charge Indicator and Quick Swap ™ Power Pack makes the Rugo ™, patents pending , one of a kind. IMPORTANT! Please fully charge the Power Pack before using the Rugo ™ for the first time. PHYSICAL CHARACTERISTI
4 CS Please read below before using your R
CS Please read below before using your Rugo™ as it relays beneficial operating and safety information. R UGO ™ DIMENSIONS 2.9” x 1.0” x 2.0” (74 x 25 x 50mm) WEIGHT 5.6 oz (158g) with Power Pack and Light Head 2.6 oz (73g) Power Pack CHARGING THE POWER PACK 1. Press and hold the Power Pack Release Lever located on the Light Head portion of the Rugo ™ . 2. While maintaining pressure on the Power Pack Release Lever, pull the Light Head and the Power Pack apart. If unable to pull apart easily (due to resistance of the internal rubber gasket), try moving the Power Pack back and forth while pulling apart. NOTE : Once apart, be sure to keep both ends dry and away from water, moisture and dust. While the Power Pack and L
5 ight Head are separated, the unit DOES
ight Head are separated, the unit DOES NOT maintain its waterproof rating. 3. Insert the provided Micro USB Cable into the Power Pack—respect the orientation/alignment. Then, insert the opposite end, USB (Type A) into a USB compatible power source or into the included AC/DC Adaptor. (Input: 100V–240VAC 50/60 Hz, Output: 5V DC 1000mAH). The Charge Indicator will be solid red while charging. Once fully charged, it will turn green. Charging time will be approximately 2.5 hours. After the Power Pack is charged, disconnect it from USB Cable. **PLEASE NOTE: The Rugo ™ in steps 1–3 is shown with no mounts and is flipped to show the Power Pack Release Lever. 1 1 2 3 2 3 ! ! ! ! ! ! 6 7 REASSEMBLING THE R UGO ™ AFTER CHA
6 RGING 1. Install the Power Pack to the L
RGING 1. Install the Power Pack to the Light Head—confirm position of alignment posts to their respected cavities. 2. Push both halves together. A ‘click’ should be heard as they become locked together. Test the light to make sure that the Power Pack is properly connected to the Light Head by pressing the Power/Mode Switch. POWER PACK LIFE MODE DURATION LUMENS HIGH 1hr 700 MEDIUM 1.5hrs 400 LOW 3.5hrs 200 DIM 6.75hrs 70 *Power Pack life may vary according to age and ambient conditions. OPERATIONAL MODES ON/DIM mode: Press the Power/Mode Switch once. LOW mode: From DIM mode, press the Power/Mode Switch once. MEDIUM mode: From LOW mode, press the Power/Mode Switch once. HIGH mode: From MEDIUM mode, press and hold the Power/Mod
7 e Switch once. OFF : From ANY mode,
e Switch once. OFF : From ANY mode, press and hold the Power/Mode Switch for 2 sec. LOW POWER INDICATOR: At a low level, the Charge Indicator will flash for approximately 0.5–1.0 sec. It is suggested that you then charge or replace the Power Pack with a fully charged one. If on a higher mode and you need to continue using the light, it is suggested that you adjust the mode to a lower setting. NOTE: The light does not retain the mode in memory. Once you turn the light ON , you will have to re-select the mode you desire. USING THE TRI-LENS ™ AREA 55 ° BEAM DISTANCE : 30 ft (10 m) USED FOR: Mid-range FLOOD 120 ° BEAM DISTANCE : 10 ft (3 m) USED FOR: Close-up SPOT BEAM DISTANCE : 1 00 ft (30 m) USED FOR: Distance 18 ° The Ru
8 go ™ Tri-Lens ™ has three (3
go ™ Tri-Lens ™ has three (3) beam emission angles which can be used for many different applications by simply sliding from left to right and vise-versa. 1. Push the Tri-Lens ™ to either the right or left side until it won’t go any further. Use your fingers to slightly pull the Guards away from the unit, while pushing the Tri-Lens ™ with your thumb. This will help the Tri-Lens ™ to overcome the ridge, (located at the end of the Guard) and will allow it to be easily released. 2. Once the Tri-Lens ™ overcomes the ridge, pull it free from the Light Head. FOR RE-INSTALLATION : Line up the Tri-Lens ™ with the ridge. Then push it back into position on the Light Head. REMOVING THE TRI-LENS ™ 1 1 2 2