
If you have any questions concerning these instructionsL please call National Customer Service 800T82QWQW Figure A Weli Table Ganging 2ecommend Tools 532 Hex Wrench or drive 0ackage Conte ID: 853159
Download Pdf The PPT/PDF document "Proper product installationL in accordan..." is the property of its rightful owner. Permission is granted to download and print the materials on this web site for personal, non-commercial use only, and to display it on your personal computer provided you do not modify the materials and that you retain all copyright notices contained in the materials. By downloading content from our website, you accept the terms of this agreement.


1 Proper product installationL in accordan
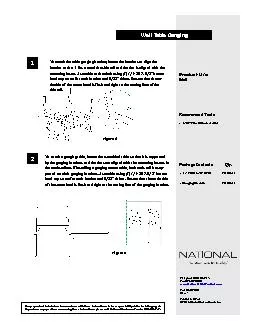
Proper product installationL in accordance with these instructionsL is the responsibility of the installing agent. If you have any questions concerning these instructionsL please call National Customer Service 800.T82.QWQW . Figure A Weli Table Ganging 2ecommend Tools • 5/32” Hex Wrench or drive 0ackage Contents Qty. • 1/4 - 20 X 5/8” BHCS Per Order • Ganging Brackets Per Order Telephone 800.T82.QWQW Fax 8Q2.T82.8800 www.NationalOfficeFurniture.com Part C 3Q02099 RevL - Printed in U.S.A i 20Q3 Kimball InternationalL Inc. 0roduct Line Weli 1 To attach the table ganging bracket; locate the brackets to align the bracket so that it fits around the side rail and the slot is aligned with the mounting insert. Assemble to the chair using (1) 1/4 - 20 X 5/8” button head cap screw for each bracket and 5/32” driver. Ensure that the un- derside of the screw head is flush and tight to the mating face of the side rail. 2 To attach a ganging table, locate the assembled table so that it is supported by the ganging brackets and the slots are aligned with the mounting inserts in the worksurface. If installing a ganging center table, both ends will be sup- ported on chair ganging brackets. Assemble using (1) 1/4 - 20 X 5/8” button head cap screw for each bracket and 5/32” driver. Ensure that the underside of the screw head is flush and tight to the mating face of the ganging bracket. Figure B