
RstAudio Page 1 of 8 The purpose of this is to help you decide if you want to build the RStAudio XONO phono preamp For me it was worth the cost and effort Without even a break in the improvemen ID: 850005
Download Pdf The PPT/PDF document "Pass XONO Clone Boards by" is the property of its rightful owner. Permission is granted to download and print the materials on this web site for personal, non-commercial use only, and to display it on your personal computer provided you do not modify the materials and that you retain all copyright notices contained in the materials. By downloading content from our website, you accept the terms of this agreement.


1 Pass XONO Clone, Boards by RstAudio
Pass XONO Clone, Boards by RstAudio Page 1 of 8 The purpose of this is to help you decide if you want to build the RStAudio XONO phono preamp. For me it was worth the cost and effort. Without even a break - in the improvement was significant, not something I had to go back and forth to figure out if and w here it was better. It has more presence, distinct bass, delicate highs, more impact, and more spacious music. How do you decide if you want to build this? All I can do is to list my equipment and you can see where your equipment may fit in, including equi pment I changed out as I think each set of equipment was better. Iâm not suggesting anything I own or have owned is good or bad. Deciding to build this is a bit of a leap of faith. After about 3 weeks the XONO is setting itself apart from my other phono pr eamps. Instruments are separated with space. The sound is natural and so pleasing. Albums sound completely different on this phono preamp. I am amazed at the sound it produces and I am completely satisfied. If you have relatively basic equipment I would say it would provide a solid foundation. If you think you have a good or very good phono preamp all I can do is say I have a DIY Allen Wright RTP5 and with this XONO I am hearing greater spaciousness and minute details. I know that my RTP5 build was not pe rfectly implemented but it is a good sounding unit and Iâll strive to make it right. I am currently using the DIY Audio Mezmerize B1 Buffer implemented as balanced with an inverter I added for single ended inputs. I have a modified Jolida JD9 and DIY Boozh ound Labs MC stage into MM board and this XONO sounds better. I do like the Boozhound MC unit but it is just not as detailed and bass is lacking some compared to the XONO. Iâm not discarding any of these
2 at least not immediately. This XONO is
at least not immediately. This XONO is now my refere nce and will be on my best turntable. Music sounds more natural with it. For music I like folk, some blues, small ensemble and pop/soft rock such as Paul Simon and Nora Jones. Instrument details can be appreciated with this music. I have most of the Toshib a Direct Cut LPs which are nice but I prefer music with vocals. Pass XONO Clone, Boards by RstAudio Page 2 of 8 My Path: Great audio has depth, focus and dynamics even at low volume and is extremely low noise. In the late 90âs I heard streaks of sound across the sound stage, not associated with an in strument. With improvements these stray sounds became focused on instruments and the music became more real. The signal source is the start of the audio chain and if great sound is not in the beginning it certainly wonât come out of the speakers. Yet a sup erior piece may be unappreciated due to a limiting part. That was my concern â that with my Rega RP8, Audio Mods Series 6 arm with a Sumiko Blackbird MC cartridge I would not hear the benefit of this XONO. Well, no worries here. (Rega Mod: the motor and co ntrol board assembly was dropped slightly below the turntable just so they do not touch and adjustable feet were added so it could be leveled each session â parts from Michael Lim lpturntables/blogspot.com in case youâre looking for turntable mods.) Equip ment list follows. The list is intended to help you figure where your equipment fits relative to mine and how this XONO will work for you. Equipment of the past: (1996?) Quick Silver M80 mono amps with the Quick Silver preamp and single box EAD (Enlighten ed Audio Designs) CD player and Systemdek turntable/SME3009 arm/Grado Gold MM; BAT60 mono amps with the VK - 05 preamp and EAD DSP - 9000
3 Pro DAC and T - 1000 CD transport. Each
Pro DAC and T - 1000 CD transport. Each of these sounded great to me for about 5 years. I sold all but the T - 1000 after buil ding Elliot Sound Products (ESP) P3A amp and a Twisted Pear Audio (TPA) DAC/Preamp that I thought sounded as good if not better. At this point my Systemdek turntable didnât sound as good as digital using the XXHighEnd player and the TPA boards. The phono s etup was flat sounding to me and lacked bass. (Note: the cartridge was wrong for that arm.) Power amps I built include: ESP P3A, Douglas Self Trimodal and Load Invariant, Ncore 400 mono amps, a 2A3 stereo tube amp, and mono build Pass Lab clone Aleph 5 (K K - PCB boards). (I donât include two high school builds one of which I still have.) DIY preamps include Twisted Pear Audio (TPA) IVY board and Buffalo IIISE DAC boards â both single board and dual DAC builds with TPA power supply boards with a series curr ent source and shunt voltage regulator; Allen Wrightâs RTP5 outlined on the Vacuum State Electronics web site and in his booklet on preamps; Boozhound Labs MM phono stage to which I added a MC stage with selection of gain and cartridge load using an Arduin o with remote control; and finally the DIY Audio Mezmerize B1 Buffer which I built in balanced form (two boards, two transformers). Speakers: 1974 Klipschorns, modified mounting the mid and high horns from the front, adding metal panel dampening material to the mid horn improved focus and separated crossover low end and high end for bi - wire support. Before improving the Rega I got a Transrotor Fat Bob Reference, Kuzma 4 - Point - 9 with VTA on the fly. Currently I am using SoundSmith Sussurro on the Kuzma a rm. The Transrotor Pass XONO Clone, Boards by RstAudio Page 3 of 8 mass wise is the opposite of the Rega. Bo
4 th now sound very good and amazing when
th now sound very good and amazing when connected to the XONO! For turntable setup I use a procedure Allen Wright mentioned â The Guru setup by Rowan McCombe which I downloaded from the Vacuum St ateâs web site. I am using the Lofgren B alignment â see Analog Planet â UNI - DIN Versus Löfgren B Just to Clarifyâ. The Build: I asked about availability and options and received answers promptly around Nov 8, 2020. My order was shipped promptly yet took about 8 weeks to reach the West Coast of the United States. I purchased two XONO PCBs, two Capacitor Multiplier PCBs, 2SK2145BL JFET option installed and RIAA matched capacitors. I am using the servo feature to eliminate output capacitors. Final cost was about $1450 USD. Schematics, BOM and installation instructions are well written and highlights the important features of the build. The PCBs are large and nicely marked even with trim pot instructions. The schematic PDF can be searched which helps when ve rifying parts before placing them. The polymer capacitor polarity in the data sheet shows the short lead as negative, something I missed at first. The part has a red mark on top but it was not obvious to me that this was negative and I didnât want to get i t wrong â make no assumptions. BC550 and BC560 transistors were not available from major distributors such as Mouser in the USA so I replaced these with BC33740BU and BC32740BU, transistors Ralph found. I bought bags of BC550/560 from China but I feel thes e have to be tested first and didnât want to do that right now. By Jan 8, 2021 I had parts on the boards except for back ordered relays, Wago and KLEI RCA connectors. Before assembling the boards I wrote part nomenclature on the bag of each part from the BOM. I put one part on each board at
5 a time checking the schematic and comp
a time checking the schematic and completed the bag before moving to another bag. When the cases arrived in December I got them ready for parts. I made up cables: one for +/ - 30VDC, a ribbon for the relay control and one for 12VDC relay power. I installed resistors, then low capacitors, small transistors and finally the tall parts. I started board assembly on Jan 5 and finished on Jan 8; a comfortable pace. The care taken to place parts was worth it as it worked. I insta lled the Wago connectors on Jan 14 and started checkout. First the capacitor multiplier power supply. Then the power supply section of the XONO boards, one at a time setting voltage with P1 and P2. Power supplies take time to come up so donât adjust right away. Installed the power jumpers on each XONO board, connected power to one board first then the other setting the bias via P3 as the boards warmed up. I left the top on, then quickly removed and measured voltage. Repeated several times. Left it powered u p with the top on for an hour and checked again. I wanted to keep the look simple with DIP switches conveniently located and didnât want a display and processor so I added a DIP board to the right side panel toward the front. The DIP Pass XONO Clone, Boards by RstAudio Page 4 of 8 switches I had were n ot rated for a two relay load so I added ULN2804A drivers which have input resistors for 12 volt operation. A ribbon cable connects this board to the XONO board relay header. I also added a simple MOSFET R - C power up time delay for the mute relay and I add ed a 12V power supply in the power supply case and 2 conductor cable/jacks between cases. I still have not installed the mute relay. I purchased parts based on the BOM. I found the SFR16S resistors to be too small and have a greater no
6 ise rating than CMF5 5, SFR25 or SRF25H
ise rating than CMF5 5, SFR25 or SRF25H types. I bought CMF55âs for most signal locations and SFR25âs for other locations but should probably have used SFR25Hâs. In a few places I used what I had â RN60 size which doesnât fit that well. For power transformers I used two AnTek AS - 1230, 100VA - 30V as they were out of the 50VA stock and I didnât find the unit RStAudio listed in the USA. I deviated from the MC load resistors specified as I prefer a higher load â 300 to 500 typically. I find this gives better spaciousness yet good d etail. The Sound Smith cartridges I have recommend greater than 450 ohms and similarly with the Sumiko Blackbird. So I wanted more choices in the 300 to 600 range. Cases came from ebay BZ4307, 70mm high (59 inside), 430 wide and 308 deep (outside dimensi ons). I needed and wanted smaller cases so a couple parts had to be changed to fit. I added MuMetal around the transformers and more to the top but still have a hint of hum in the left channel at full volume. Lifting the XONO case off the power supply eli minated the hum. For now I added lifters under the feet. A plate of MuMetal between the cases also fixed this. A 90mm power supply case would provide more distance and is what I usually use. I donât know if smaller transformers would have helped. With ar ound 59mm inside height the XONO boardâs 10,000uf capacitors in the BOM were too tall with the 3/8â stand - offs I used so I ordered NTE VHT series 50V bought at DigiKey that are 44mm high and the same diameter. Similarly with heatsinks â I used Aavid 6398BG which had to be lifted a little to clear a trace on the Capacitor Multiplier board in one location as the âslotsâ are not even and fins wrap around on one side. Because the heatsinks are shorter than the on
7 e in the BOM I drilled two ½ inch vent h
e in the BOM I drilled two ½ inch vent holes mid - bottom and two holes on each side â plugs can be inserted if not needed and to obtain the ideal operating temperature. After soldering I carefully remove rosin with a dental pick as this makes it easier to clean the board with alcohol. Audio Connectors: KLEI Perfect Harmony (#2 and #5âs) RCA and silver contact Neutrik XLR. I used 26AWG silver plated wire to the boards. I tried expensive audio connectors in the past but donât know of any benefit. Capacitance of the KLEI is less than Neutrik RCA by 5 pf or so. Does it matter? Pass XONO Clone, Boards by RstAudio Page 5 of 8 The XONO Sound: My audio equipment for this audition: - Rega RP8 with AudioMods Series Six tonearm with VTA and Sumiko Blackbird MC cartridge - DIY Audio Mezmerize B1 Buffer balanced build, a DIY inverter, two power transformers - DIY Pass Aleph 5 mono amps with 650VA transformers - DIY interconnects using Cardas solid silver wire in Teflon tubing - 1974 Klipschorns (modified) - Nordost Frey speaker cable - Transrotor turntable with a Sound Smith Sussurro cartridge and Kuzma 4 - poin t arm. Was it worth the effort and cost? Yes! Improvements were immediate and obvious without break - in or much warm - up. The next day I let it warm up for several hours and had a listen. From highs to mids to bass, everything is better balanced, more spacious and detailed. Cymbals sound like metal and are clear and distinct even when faint. Bass extends lower with more detail and authority. Background sounds such as reverberation are separated more from the primary instruments and vocals. Surprising to me was that record noise was less apparent. Three weeks later the sound with the Transrotor setup through the
8 XONO is breathtaking! It sounds so nat
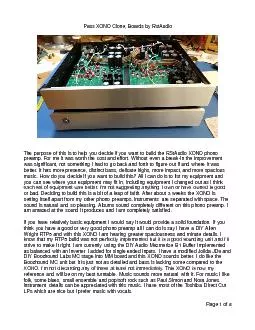
XONO is breathtaking! It sounds so natural. Before the Transrotor/RTP5 vs. Rega/Boozhound were not that much different â yes, the Transrotor set up was better but insufficiently so. Now the difference is simply wonderful! Words cannot describe it. An album played on the Transrotor/XONO really stands out and is so pleasing. The same album just doesnât sound like the same album on the other setup, th anks to the XONO! I feel I now have a piece of that top end sound I have read about. My vinyl is back on top and while I enjoy the sound I get with my digital setup I feel it is just a contender. I can relax and enjoy music and not wonder what to do next. I want to thank Ralph Stens for making this experience possible! Steve W, USA Following are some photos. My DIY projects look like prototypes. I have not labeled front panels in years. I eventually apply labels on the back as even I forget. I docu ment the panels in binders for the next owner just in case the equipment out lasts me. Pass XONO Clone, Boards by RstAudio Page 6 of 8 Power Supply before WAGO connectors. I added vent holes just in case and can put plugs in from the outside. I added a 12VDC relay supply by the transformer. MuMetal over power section is shown below. MuMetal is under the transformers and on the sides as well. Another is on the case top. Pass XONO Clone, Boards by RstAudio Page 7 of 8 XONO preamp case: Notice the lack of coupling capacitors near the front panel Dip switches added on the right side panel: Pass XONO Clone, Boards by RstAudio Page 8 of 8 Had to fill the power connector hole for the RCA. The RCA connectors shown were not the final ones installed. In my audio rack: