
8012016 Eaton 10001800 True Sine Wave Inverter Aftermarket Installation Instructions Suggested Inverter Installation Tool List DC cable kit contents Instructions for Inverter and DC cable kit Installation for all truck types ID: 546352
Download Presentation The PPT/PDF document "Eaton 1000/1800W True Sine Wave Inverter..." is the property of its rightful owner. Permission is granted to download and print the materials on this web site for personal, non-commercial use only, and to display it on your personal computer provided you do not modify the materials and that you retain all copyright notices contained in the materials. By downloading content from our website, you accept the terms of this agreement.


Slide1
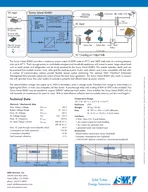
Eaton 1000/1800W True Sine Wave Inverter Aftermarket Installation Instructions
8/01/2016Slide2
Eaton 1000/1800 True Sine Wave Inverter Aftermarket Installation Instructions
Suggested Inverter Installation Tool ListDC cable kit contentsInstructions for Inverter and DC cable kit Installation for all truck types.Ref: Eaton Inverter Installation and Operation Guide # IM SP180158.Slide3
Eaton Inverter Installation Tool List
Tools/Materials Needed: Electric or cordless drill/driverTape Measure/Marker¼” drill bit1-1/8” hole saw (for floor pass thru connector holes)
5/16” and 3/8” hex head driver bit (w/magnetic head) for drill/driver10mm wrench or socket/ratchet (for
cfbar nut and case ground)13mm wrench or socket/ratchet (for main DC inverter lugs)9/16” socket/ratchet (12V battery terminals)2 pair channel lock pliers (for pass thru connector lock nuts)Wire cutters/strippers
Electrical tape (Black and Red, to secure convolute) Slide4
Installation Kit Parts Bag Contains:
2 ea
– Locknut, Steel, ¾ NPT1 ea – Bus Bar Stud Cover – Single, Red
4 ea – Tie Wrap, 2-Sided Hellerman-Tyton PN4 ea – Screw, Hex Tek, #12 x1.0 in Length1 ea
– Fuse Holder,
Bussman
MRBF, M8, Stud
1
ea
– Nut,
Flandge, M8 x 1.25, SS5 ea – Screw, Hex Tek, #10 x 1.5 in Length2 ea – Cordgrip; LTF ¾ Black Heyco1 ea – Fuse, Bussman, Marine Rated Battery 200A Fuse for 1000W Inverter 300A Fuse for 1800W Inverter
DC cable kit for 1000 and 1800W Inverter
DC cable kit includes Custom
cable assembly lengths/contents for: Freightliner Cascadia, 1.0FC or 1.8FCVolvo VNL , 1.0V or 1.8VKenworth/Peterbilt T680/1800, 1.0P or 1.8PInternational Prostar, 1.0N or 1.8NSlide5
Aftermarket Inverter
and DC Cable Kit Installation for Freightliner Cascadia
Determine a suitable dry Inverter location providing adequate air flow in the cab area. See suggested mounting location picture to right.
Mount inverter with (4) #12 X 1” HEX TEC screws provided in the cable kit, center and square unit (raise unit off floor 2-3”).Determine a clear position to route DC cables thru bunk wall and floor with pass thru connectors and lock nuts. (Look underneath cab floor to stay clear of any obstructions and hot surfaces.) Connect the 1/0 Red cable to the inverter “+” lug and 1/0 Black to the inverter “-”
lug, using the red and black boots provided with inverter.
Pay close attention to polarity, this Eaton Inverter will NOT withstand reverse polarity to main DC connections. Connect the provided 10
ga
black cable to the inverter chassis ground connection near negative terminal and bond to a good truck frame ground.
Using 2 sided tie bands and #10 x 1.5 Hex TEC screws provided, route cables securing at 12-18 inch intervals underneath cab to the cab rail channels into the battery box area. Route clear of any sharp edges, moving parts, or heated components.
Attach the provided
CFBar fuse holder, fuse and red cover to the battery positive cable and attach to the 12V positive battery stack. Attach the negative cable last to the 12V negative battery stack. (Careful the first time energizing the inverter, it will may create a spark.) A good practice is to connect to opposite ends of the battery stack for positive and negative connections, thus pulling across the full battery stack for inverter power. Fuse size provided, 200A rating for 1000W and 300A rating for 1800W kit.
2
1
3
5
4Slide6
Aftermarket Inverter and DC Cable Kit Installation for Volvo VNL
Determine a suitable dry Inverter location providing adequate air flow in the cab area.Mount inverter with (4) #12 X 1” HEX TEC screws provided in the cable kit, center and square unit. Allow 2” air clearance at rear fan.
Determine a clear position to route DC cables thru bunk wall and floor with pass thru connectors and lock nuts. (Look underneath cab floor to stay clear of any obstructions and hot surfaces.) Connect the 1/0 Red cable to the inverter “+” lug and 1/0 Black to the inverter “-” lug , using the red and black boots provided with inverter
. Pay close attention to polarity, this Eaton Inverter will NOT withstand reverse polarity to main DC connections. Connect the provided 10 ga black cable to the inverter chassis ground connection near negative terminal and bond to a good truck frame ground. Using 2 sided tie bands and #10 x 1.5 Hex TEC screws provided, route cables securing at 12-18 inch intervals underneath cab to the cab rail channels into the battery box area. Route clear of any sharp edges, moving parts, or heated components.Attach the provided
CFBar
fuse holder, fuse and red cover to the battery positive cable and attach to the 12V positive battery stack. Attach the negative cable last to the 12V negative battery stack. (Careful the first time energizing the inverter, it will may create a spark.) A good practice is to connect to opposite ends of the battery stack for positive and negative connections, thus pulling across the full battery stack for inverter power. Fuse size provided, 200A rating for 1000W and 300A rating for 1800W kit.
5
1
3
2
4
5
1Slide7
Aftermarket Inverter and DC cable kit Installation for
KW/PB T680/1500Determine a suitable dry Inverter location providing adequate air flow in the cab area.Mount inverter with (4) #12 X 1” HEX TEC screws provided in the cable kit, center and square unit.
Determine a clear position to route DC cables thru bunk wall and floor with pass thru connectors and lock nuts. (Look underneath cab floor to stay clear of any obstructions and hot surfaces.) Connect the 1/0 Red cable to the inverter “+” lug and 1/0 Black to the inverter “-” lug,
using the red and black boots provided with inverter. Pay close attention to polarity, this Eaton Inverter will NOT withstand reverse polarity to main DC connections. Connect the provided 10 ga black cable to the inverter chassis ground connection near negative terminal and bond to a good truck frame ground. Using 2 sided tie bands and #10 x 1.5 Hex TEC screws provided, route cables securing at 12-18 inch intervals underneath cab to the cab rail channels into the battery box area. Route clear of any sharp edges, moving parts, or heated components.
Attach the provided
CFBar
fuse holder, fuse and red cover to the battery positive cable and attach to the 12V positive battery stack. Attach the negative cable last to the 12V negative battery stack. (Careful the first time energizing the inverter, it will may create a spark.) A good practice is to connect to opposite ends of the battery stack for positive and negative connections, thus pulling across the full battery stack for inverter power. Fuse size provided, 200A rating for 1000W and 300A rating for 1800W kit.
1
2
2
3
5
5
4Slide8
Aftermarket Inverter and DC cable kit Install for International ProStar
Determine a suitable dry Inverter location providing adequate air flow in the cab area.Mount inverter with (4) #12 X 1” HEX TEC screws provided in the cable kit, center and square unit.Determine a clear position to route DC cables thru bunk wall and floor with pass thru connectors and lock nuts. (Look underneath cab floor to stay clear of any obstructions and hot surfaces.)
Connect the 1/0 Red cable to the inverter “+” lug and 1/0 Black to the inverter “-” lug, using the red and black boots provided with inverter
. Pay close attention to polarity, this Eaton Inverter will NOT withstand reverse polarity to main DC connections. Connect the provided 10 ga black cable to the inverter chassis ground connection near negative terminal and bond to a good truck frame ground. Using 2 sided tie bands and #10 x 1.5 Hex TEC screws provided, route cables securing at 12-18 inch intervals underneath cab to the cab rail channels into the battery box area. Route clear of any sharp edges, moving parts, or heated components.Attach the provided
CFBar2
fuse holder, fuse and
dual red
cover to the battery positive cable and attach to the 12V positive battery stack.
Remove the existing CFBar1 and move the existing fuse and cable to the new CFBar2. Attach
the negative cable last to the 12V negative battery stack. (Careful the first time energizing the inverter, it will may create a spark.) A good practice is to connect to opposite ends of the battery stack for positive and negative connections, thus pulling across the full battery stack for inverter power. Fuse size provided, 200A rating for 1000W and 300A rating for 1800W kit.
1
2
4
5
2
3Slide9