
Pro Tech IV Assembly Instrucx00740069ons 1 Unlatch and x00740069lt seat cushion forward then slide belt buckle tongue and 1 seat strap between the back and cushion Re secure seat cus ID: 848378
Download Pdf The PPT/PDF document "BESI Installax00740069on Instrucx0074006..." is the property of its rightful owner. Permission is granted to download and print the materials on this web site for personal, non-commercial use only, and to display it on your personal computer provided you do not modify the materials and that you retain all copyright notices contained in the materials. By downloading content from our website, you accept the terms of this agreement.


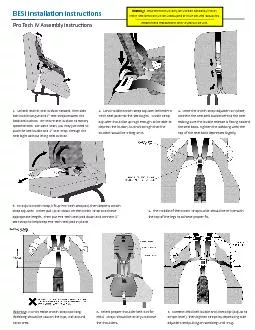
1 BESI Installa�on Instruc�
BESI Installa�on Instruc�ons Pro Tech IV Assembly Instruc�ons 1. Unlatch and �lt seat cushion forward, then slide belt buckle tongue and 1” seat strap between the back and cushion. Re - secure seat cushion to factory speci�ca�ons. For some seats, you may just need to push the belt buckle and 1” seat strap through the seat bight without li�ing seat cushion. 2. Land middle crotch strap adjuster behind Pro Tech seat pad into the seat bight. Crotch strap adjuster should be up high enough to be able to depress the bu�on, but not so high that the student would be si�ng on it. 3. Once the crotch strap adjuster is in place, connect the seat belt buckle behind the seat making sure the buckle release is facing toward the seat back. Tighten the webbing un�l the top of the seat back depresses slightly. 4. To adjust crotch strap, li� up Pro Tech seat pad, then depress crotch strap adjuster. Either pull up or down on the crotch strap to achieve appropriate length. Then put Pro Tech seat pad down and connect 1” seat strap to help keep Pro Tech seat pad in place. 5. The middle of the crotch strap buckle should be in - line with the top of the legs to achieve proper �t. Warning : Do not make crotch strap too long. Webbing should be low on the hips, not around torso area. 6. Select proper shoulder belt slot for child. Straps should be at or just above the shoulders. 7. Connect child belt buckle and chest clip (adjust to armpit level), then �ghten straps by depressing side adjusters and pulling on webbing un�l snug. Warning! Securement must only be used on school bus seats. En�re seat behind must be unoccupied or have secured occupants. Recommend replacement a�er 6 years in service.