
Technique for incorporating the Retention Cap Benefits The acrylic retention cap may be easily removed use heat from the prosthesis and replaced or repositioned if necessary ClinicalIn ID: 838909
Download Pdf The PPT/PDF document "Female in the post coping" is the property of its rightful owner. Permission is granted to download and print the materials on this web site for personal, non-commercial use only, and to display it on your personal computer provided you do not modify the materials and that you retain all copyright notices contained in the materials. By downloading content from our website, you accept the terms of this agreement.


1 Female in the post coping Technique fo
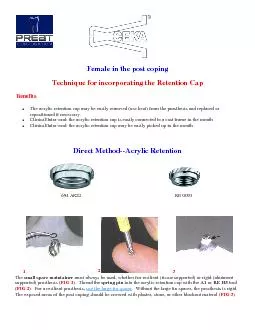
Female in the post coping Technique for incorporating the Retention Cap Benefits : The acrylic retention cap may be easily removed (use heat) from the prosthesis and replaced or repositioned if necessary. Clinical/Intra - oral: the acrylic retention cap is easily connected to a cast frame in the mouth Clinical/Intra - oral: the acrylic retention cap may be easily picked up in the mouth Direct Method -- Acrylic Retention 694 AKS2 RE 0095 1 2 3 The small space maintainer must always be used, whether for resilient (tissue supported) or rigid (abutment supported) prosthesis ( FIG 1 ). Thread the spring pin into the acrylic retention cap with the A1 or RE H5 tool ( FIG 2 ). For a resilient prosthesis, use the large tin spacer . Without the large tin spacer, the prosthesis is rigid. The exposed areas of the post coping should be covered with plaster, stone, or other bl
2 ockout materal ( FIG 3 ). Impo rt.
Impo
rt")
ockout materal ( FIG 3 ). Impo rtant: Use the big tin spacer The tin spacer is used over the crown -- or coping -- during processing to block out excess acrylic from locking in the attachment female. However, the main reason for using the big spacer can be understood by viewing figures A and B . A B Figure A is a Ceka overdenture case fabricated without the large spacer. This eliminates all movement of the prosthesis -- it is a rigid attachment. As you can see, the denture base is in direct contact with the post coping (arrow). Forces are directed to the post coping abutment. Figure B is the same overdenture case, only this time the large spacer was used. Using the large spacer all ows for movement of the prosthesis -- it is now a resilient attachment. During processing, the large spacer creates a free space between the prosthesis and the post coping to allow this free movement, and direc
3 t forces to the tissue. The greater
t forces to the tissue. The greater the area t he forces are spread over, the less force that is generated on the abutment. 4 5 Place self curing resin in the prosthesis ( FIG 4 ). Seat the denture. Do not have the patient bite. Use finger pressure over the attachment area. The male is accurately positioned in the prosthesis. The spring pin is easily adjusted or replaced ( FIG 5 ). Indirect Method -- Acrylic Retention 1 2 3 The small space maintainer must always be used, whether for resilient (tissue supported) or rigid (abutment supported) prosthesis ( FIG 1 ). Thread the spring pin into the acrylic retention cap with the A1 or H5 tool ( FIG 2 ). For a resilient prosthesis, use the large tin spacer . Without the large tin spacer, the prosthesis is rigid. Prepare the master model for duplication ( FIG 3 ). 4 5 6 The duplicate stone processing model ( FIG 4 ). The
4 male may be picked up with self curing
male may be picked up with self curing acrylic resin either on the master model, or in the patient's mouth ( FIG 5 ). Whether picking up the male from the master model or the patient's mouth, be sure to use the small space maintainer ( FIG 6 ). 7 8 Processing on the duplicate model ( F IG 7 ). The male is accurately positioned in the prosthesis ( FIG 8 ). Chrome framework -- Acrylic Technique 1 2 3 The acrylic retention cap ( FIG 1 ). An alternative to bonding would be to directly process the male in to the acrylic resin ( FIG 2 - 3 ). Seat the small space maintainer on the female. Seat the framework. Thread the spring pin into the acrylic retention cap and seat in female, over framework. Process acrylic. Remove spacer. Chrome framework -- Bonding Technique 694 AR RE 0085 1 2 3 Prepare an accurate refractory model ( FIG 1 ). Wax a hood, or cover, a minimum
5 of 0.4mm over the attachment ( FIG 2 )")
of 0.4mm over the attachment ( FIG 2 ). Complete and finish the casting ( FIG 3 ). 4 5 6 Blast the internal surface with 110u aluminum oxide prior to bonding ( FIG 4 ). Mix equal parts Ceka Site base and catalyst ( FIG 5 ). Apply to casting ( FIG 6 ). Note that you will need to prepare a fresh batch of Ceka Site for each unit. 7 8 9 The spring pin is threaded into the spacer retention part and seated over the small space maintainer on the female ( FIG 7 ). Seat the cast frame, with Ceka Site, over the attachment and allow to seat for a full 10 minutes. Note that you will need to prepare a fresh batch of Ceka Site for each unit. It is easy t o remove the excess Ceka Site from the polished post coping, as Ceka Site is an anaerobic bonding agent, thus material exposed to air will not set ( FIG 8 ). The bonded male is resistant to the heat of acrylic resin processing ( FIG 9 ). T0030.REV.0