/
Perimeter, area and volume 2 Perimeter, area and volume 2

Perimeter, area and volume 2 - PowerPoint Presentation

elena
elena . @elena
Follow
64 views
Uploaded On 2024-01-13

Perimeter, area and volume 2 - PPT Presentation

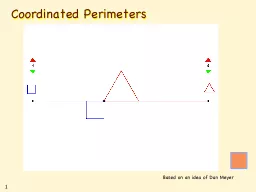
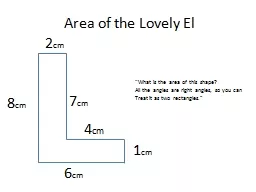
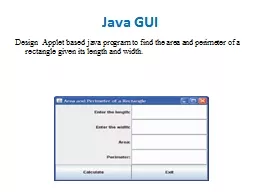
Twentyeight Checkpoint activities  Eleven additional activities Checkpoints Year 8 diagnostic mathematics activities Published in 202223 About this resource This resource is designed to be used in the classroom with Year 8 students although it may be useful for other students ID: 1039819

volume students checkpoint area students volume area checkpoint shapes cubes key stage shape understanding part perimeter question additional task

Share:

Link:

Embed:

Download Presentation from below link

Download Presentation The PPT/PDF document "Perimeter, area and volume 2" is the property of its rightful owner. Permission is granted to download and print the materials on this web site for personal, non-commercial use only, and to display it on your personal computer provided you do not modify the materials and that you retain all copyright notices contained in the materials. By downloading content from our website, you accept the terms of this agreement.


Presentation Transcript

1. Perimeter, area and volume 2Twenty-eight Checkpoint activities Eleven additional activitiesCheckpointsYear 8 diagnostic mathematics activitiesPublished in 2022/23

2. About this resourceThis resource is designed to be used in the classroom with Year 8 students, although it may be useful for other students.The Checkpoints are grouped around the key ideas in the core concept documents, 6.1 Perimeter, area and volume, part of the NCETM Secondary Mastery Professional Development materials.Before each set of Checkpoints, context is explored, to help secondary teachers to understand where students may have encountered concepts in primary school.The 10-minute Checkpoint tasks might be used as assessment activities, ahead of introducing concepts, to help teachers explore what students already know and identify gaps and misconceptions. Each Checkpoint has an optional question marked     . This will provide further thinking for those students who have completed the rest of the activities on the slide.The notes for each Checkpoint give answers (if appropriate), some suggested questions and things to consider. After each Checkpoint, a guidance slide explores suggested adaptations, potential misconceptions and follow-up tasks. These may include the additional activities at the end of this deck.

3. Using these Checkpoints This deck contains a mixture of concepts that students will have first have met in Key Stage 2, and some that are part of the Key Stage 3 curriculum.For example, although this is the first time we have explored volume within the Checkpoints materials, volume as a concept is explored throughout EYFS and Key Stage 1, before volume of a cuboid is taught in Key Stage 2. In contrast, the area of a trapezium is not taught in primary school but is included as an assessment point here as it appears in the Year 7 section of the NCETM’s sample curriculum framework.The notes for each slide make it clear how it is best used, and the guidance at the start of each section gives more detail about students’ experience at primary school. We strongly recommend you read each of these first before attempting any tasks with your students.If students need more practice of perimeter and area of triangles, rectangles or parallelograms, use the Checkpoints from the ‘Perimeter and area 1’ deck.Continuity is built in representations and structure between different Checkpoints decks: where a Checkpoint uses the word ‘again’ in the title, this indicates a similar task has been used in another deck.

4. Checkpoints 1–8 CheckpointUnderpinsCode1: BricksArea and perimeter6.2.1, 6.2.22: Swedishish3: Line drawings4: Trapezia5: Most agreeableUnderstand place value in decimals, including recognising exponent and fractional representations of the column headings1.1.1.26: Ants on a clockCircles6.2.1,6.2.27: Semi-circular path8: Not full circle*This three-digit code refers to the statement of knowledge, skills and understanding in the NCETM’s Sample Key Stage 3 Curriculum Framework (see notes below for more information).

5. Checkpoints 9–17 CheckpointUnderpinsCode9: Inside out?3D Shapes6.2.310: Hole in the wall11: Bird’s-eye view12: 3D three waysUnderstand place value in decimals, including recognising exponent and fractional representations of the column headings1.1.1.213: Wrong ’uns14: Six faced15: Four, five, six prisms16: Prism break17: Cubist18: Dienes*This three-digit code refers to the statement of knowledge, skills and understanding in the NCETM’s Sample Key Stage 3 Curriculum Framework (see notes below for more information).

6. Checkpoints 19–28 CheckpointUnderpinsCode19: Twenty-eight cubesConcept of volume6.2.320: Lunchboxes21: Cold as ice22: Blocks23: Swimming poolCalculating volume6.2.324: Cubes in a glass25: Marshall’s parcel26: Same volume27: Remembering rules28: Twice as wide, twice as tall*This three-digit code refers to the statement of knowledge, skills and understanding in the NCETM’s Sample Key Stage 3 Curriculum Framework (see notes below for more information).

7. Key ideasUnderstand the concept of perimeter and use it in a range of problem-solving situationsCodeRecognise that there is constant multiplicative relationship (π) between the diameter and circumference of a circle6.2.1.2Use the relationship C = πd to calculate unknown lengths in contexts involving the circumference of circles6.2.1.3Understand the concept of area and use it in a range of problem-solving situationsUnderstand the derivation of, and use the formula for, the area of a circle6.2.2.3*Solve area problems of composite shapes involving whole and/or part circles, including finding the radius or diameter given the area6.2.2.4Understand the concept of surface area and find the surface area of 3D shapes in an efficient way6.2.2.5**‘There are additional resources exemplifying these key ideas in the Secondary Mastery Professional Development | NCETM.

8. Key ideasUnderstand the concept of volume and use it in a range of problem-solving situationsCodeBe aware that all prisms have two congruent polygonal parallel faces (bases) with parallelogram faces joining the corresponding vertices of the bases6.2.3.1Use the constant cross-sectional area property of prisms and cylinders to determine their volume6.2.3.2*‘There are additional resources exemplifying these key ideas in the Secondary Mastery Professional Development | NCETM.

9. Area and perimeterCheckpoints 1–5

10. Area and perimeterPrevious learningKey Stage 2 curriculum:Year 4: measure and calculate the perimeter of a rectilinear figure (including squares) in centimetres and metresYear 4: find the area of rectilinear shapes by counting squaresYear 5: measure and calculate the perimeter of composite rectilinear shapes in centimetres and metresYear 5: calculate and compare the area of rectangles (including squares), and including using standard units, cm2, m2 and estimate the area of irregular shapesYear 6: recognise that shapes with the same areas can have different perimeters and vice versaYear 6: recognise when it is possible to use formulae for area and volume of shapesYear 6: calculate the area of parallelograms and trianglesFurther information about how students may have experienced this key idea in Key Stage 2:Teaching mathematics in primary schools, 4G–2:… find the perimeter of regular and irregular polygons (pp197–2011); 5G-2: compare areas and calculate the area of rectangles (including squares) using standard measures (pp269–74); 6G-1: draw, compose and decompose shapes according to given properties, including dimensions angles and area and solve related problem (pp322–26).Key Stage 3 curriculum:6.2.1.12 Use the properties of a range of polygons to deduce their perimeters6.2.2.1 Derive and use the formula for the area of a trapezium6.2.2.2 Understand that the areas of composite shapes can be found in different ways1 Page numbers reference the complete Years 1–6 document2 This four-digit code refers to the key ideas in Secondary Mastery Professional Development | NCETM; the Key Stage 2 content underpinning these ideas is assessed in the ‘Plotting coordinates’ Checkpoints deck.

11. Area and perimeterIn Key Stage 3 students need toUnderstand that perimeter is a one dimensional measure and be able to distinguish it from area, which is two-dimensional (two ideas that are often confused). When calculating perimeter, use the properties of parallelograms, isosceles triangles and trapezia, as well as non-standard shapes, and reason mathematically to deduce missing information.Appreciate the reasoning behind the formula for the perimeter of the rectangle – P = 2(l + w) or P = 2l + 2w – and know that it cannot be used for finding the perimeter of other shapes. Be aware that any parallelogram has the same area as a rectangle with the same base and perpendicular height and that any triangle has an area that is half the area of a parallelogram with the same base and perpendicular height.Calculate the area of a triangle, parallelogram and trapezium using the relevant formulae, and understand how these formulae are derived from other known facts.

12. How many bricks have been removed to allow the square of concrete and drain cover to be put in?How did you work this out? Is there more than one way to show this?Checkpoint 1: Bricks If the shortest side length of one brick is 15 cm, estimate the perimeter and area of the smaller metal drain cover square.

13. Checkpoint 1: GuidanceAdaptationsAssessing understandingSupportInitially the task is accessible, but students may need support in reasoning more deeply and justifying how they know – beyond, ‘It looks like about six bricks’. Students could have a print out of the image and draw a grid of the blocks over it, but only after spending time visualising so that the way in which students are able to ‘see’ and deconstruct the image mentally has become apparent.ChallengeThe question states that the concrete forms a square – ask students to convince you that this is true, and to justify what their reasoning is.RepresentationsOffer students the opportunity to draw a grid on the image (after spending time visualising) to support them and also offer further insight into their understanding.Checkpoint 1 offers a chance for students to visualise and reason with area, giving insight into their current knowledge and understanding.In this task, the ‘area’ is described by the number of rectangular bricks rather than the more familiar squares. While the reasoning is similar, students are less likely to have a ready-made method for finding the area and so their reasoning might become more apparent.Students who understand area as a formula rather than having a conceptual understanding are likely to look for two numbers to multiply together, or to not realise that the task is assessing area, as that terminology is not used in the main part of the task. Ask what measurement of the space they have found and whether there is another way to measure and describe the same space.Additional resourcesFurther assessment tasks exploring area can be found in the ‘Perimeter and area1’ deck in Checkpoints | NCETM.You can explore students’ primary journey for perimeter and area in Curriculum prioritisation in primary maths | NCETM – beginning with perimeter in Unit 3 of Year 4 and area and scaling in Unit 5 of Year 5. Additional activities A and B offer other real-life contexts to explore understanding of perimeter and area.

14. Checkpoint 2: SwedishishSome yellow shapes are drawn inside a blue square.For each yellow shape, decide whether its perimeter is greater or less than the perimeter of the blue square.Is it possible to arrange the shapes in order of perimeter, shortest to longest?a)b)c)d)e)f)

15. Checkpoint 2: GuidanceAdaptationsAssessing understandingSupportCarefully selecting two or three of the shapes to compare offers an opportunity to hear students' thinking, while making the task more accessible. For example, start with f, then e, followed by c and ask students what is the same and what is different; this will support them to focus on what changes and how this affects the perimeter. ChallengeThe further thinking question is quite challenging, particularly if students are used to having a definite answer to maths questions. After some time working on the task, share with students that the top length of each yellow shape is half the length of that edge of the blue square. Ask whether they are now able to offer any more details.RepresentationsEncourage students to sketch the diagram and mark equal lengths to help them to reduce the apparent complexity of the comparisons. You could offer printed versions for them to work on. Checkpoint 2 offers a context to discuss perimeter without the need to calculate. For this reason, dimensions are not given in the task (although they might offer an extension – see ‘Challenge’). Remind students that you are comparing to the whole blue square, not the blue shapes that remain when the yellow is drawn on.Look for students who can offer clear reasoning in situations where the blue and yellow shapes may have similar perimeters (such as in parts a or d). Students who identify the assumptions that they make are likely to be most secure. For example, can students explain that the perimeter of the yellow cross in part f is only the same as the square if all angles are right angles?Part e offers greater challenge, with the introduction of circles, offering further insight into students' understanding.Additional resourcesTo see how perimeter might have first been explored at primary, look at Year 4 Unit 3 of the Curriculum prioritisation in primary maths | NCETM.An example of a perimeter question can be found on p31 of the Year 6 Primary Assessment Materials | NCETM.Additional activity C explores perimeter before exploring nets.

16. Checkpoint 3: Line drawingsFour students use the line on the right as one side of a 2D shape. Each student tries to draw a different shape with the same area.Draw a rectangle, a triangle, a parallelogram and a trapezium that all have the same base length and area.I need to make my triangle twice as tall as Levi’s rectangle.My parallelogram needs to have the same length sides as Levi’s rectangle.My trapezium needs to be the same height as Cassie's triangleLevi draws a rectangle.Which of the statements below are true and which are false?CassieNicoSalma

17. Checkpoint 3: GuidanceAdaptationsAssessing understandingSupportThe line is given without a length to check students' reasoning, but students may find it easier to discuss with some values. Give the line a value of 8 cm or draw it on squared paper. If students need further support, draw Levi's rectangle as a starting point.ChallengeWork backwards: ask students to sketch a trapezium with a certain area and then ask how they would describe other shapes with the same area if they were to share a length.RepresentationsNo representations are given, to check students can reason without a visual prompt. If they are struggling, draw the shapes involved; drawing them on a grid might make it easier to compare areas.There are many resources available that ask students to find the area of rectilinear shapes. Checkpoint 3 offers an alternative way to assess students’ understanding of the formulae for area. Students are asked to think and reason about what lengths must be involved if shapes were to have the same area. The intention is to check if they understand how the formulae are related.The expectation is that many students should have an awareness of how the formula for the area of rectangles has some similarities – and key differences – with the formulae for both triangles and parallelograms. For the parallelogram, the choice of language is deliberate: students need to be specific that it is the perpendicular height that is the same, not the length.The trapezium is tricky! This is the least familiar of the formulae, first introduced in Key Stage 3, and has the most complex relationship. Look for an appreciation that, although the formulae for both trapezia and triangles involve division by two, a trapezium with the same base and height as a triangle will have a greater area. Additional resourcesYear 6 Unit 4 from Curriculum prioritisation in primary maths | NCETM, includes slides exploring relationships between triangles, rectangles and parallelograms.‘Perimeter and area 1’ from Checkpoints | NCETM has tasks checking understanding of finding the area of rectilinear shapes.Key idea 6.2.2.1 from Secondary Mastery Professional Development | NCETM explores ‘The area of a trapezium’.

18. Checkpoint 4: TrapeziaGeorge wants to find the area of some trapezia using the formula area = (a + b)h.He measures three sides and labels them a, b and h.Has he done this correctly for each trapezium below? Estimate the area of each trapezium. Is it possible to calculate any of them accurately?21 cmhba9 cm37 cmAb22 cm61 cm19 cmhaBb34 cm28 cm14 cmhaC35 cm29 cm16 cmabhD12 cm9 cm38 cmabhE

19. Checkpoint 4: GuidanceAdaptationsAssessing understandingSupportAsk students to focus on one aspect of the formula at a time, for example by identifying the parallel lines in each trapezium first. Highlight these on the printable version.ChallengeBuild on the further thinking question – give an area and ask students to sketch trapezia with that area.RepresentationsStudents should experience a range of representations of trapezia. Their understanding of what a trapezium is (and isn’t) will be shaped by the examples (and non-examples) they have seen. If they have primarily experienced a ‘classic’ image such as the one in part a (rotated 180°), this may shape their understanding of the area formula.Students will not have studied the area of a trapezium at primary school – only use this Checkpoint if you have taught it earlier in your Key Stage 3 curriculum. Rather than focusing on recall of the formula, which is given in the rubric, this task checks students understand the information that is required to use the formula successfully. There are three variables in the formula, so for each example three values are given – but it is only in example C that they are correctly labelled. Several misconceptions are handled in each example. In example A, the trapezium looks similar to the ‘classic’ trapezium example students will be familiar with, but a side length is given rather than the perpendicular height. Discuss why a and b can be either of the two parallel sides. In example B, none of the sides are correctly labelled; students might also question whether this is a trapezium, as both of the non-parallel slides ‘tilt’ in the same direction. In example D, a vertical length is given but this is not at right angles to the two parallel sides. In example E, the top and bottom are labelled, but they are not the parallel sides.Additional resourcesKey idea 6.2.2.1 from Secondary Mastery Professional Development | NCETM explores ‘the area of a trapezium’.Checkpoint 5 gives another way of assessing students understand what information they need to find the area of a trapezium.

20. Checkpoint 5: Most agreeable… the lengths of three sides.… a horizontal length.… the lengths of the parallel sides.‘To find the area of a trapezium, you need…’.Three students say how they would complete this sentence. Whose answer is most correct? Why?Think of a better statement than the three given.Sketch an example of a trapezium where each person’s rule could be used. Is it possible to sketch an example where their rule could not be used?FlavianJorisShahzeb

21. ExamplesNon-examplesNot possible – you always need the lengths of the parallel sides.Checkpoint 5: Most agreeable (solutions to the further thinking question)… the length of three sides.… a horizontal length.… the lengths of the parallel sides.‘To find the area of a trapezium, you need…’

22. Checkpoint 5: GuidanceAdaptationsAssessing understandingSupportDraw different examples of trapezia on the board (you could use the ones in Checkpoint 4) and interrogate one statement at a time. Ask if each statement gives the right information for each of the trapezia you have drawn. Record correct answers, to help students draw their own conclusions.ChallengeAsk students to create statements that are always, sometimes or never true.RepresentationsStudents’ understanding of the properties of a trapezium is key, and will be shaped by the images that they have seen. More detail is given in Representations on the Guidance slide for Checkpoint 4.Checkpoint 5 interrogates students’ understanding of the area of a trapezium without relying on recall or application of the formula. Students will not have studied this at primary, so use this task to assess understanding after teaching in Key Stage 3.None of the three statements is entirely true, which is why part a uses the wording ‘most agree with’. For each one, more information and/or a specific set of circumstances are required. The intention is that students’ reasoning will be revealed if they have understood which measurements are needed. For example, Flavian’s statement is only true if the parallel lines are horizontal and vertical. Joris’s statement only works if the parallel sides are at right angles to one of the other lengths. If students find it hard to articulate their thinking, ask them to sketch examples of when each statement would work. Shahzeb’s is arguably the most true as the lengths of the pair of parallel lines are always needed. Here the intention is to check how students describe the other measurement required. Do they use precise and transferrable terms such as perpendicular? Using a term such as vertical might suggest that are they fixed on a particular image/orientation of the trapezium. Note that, in giving students incomplete definitions to grapple with, there is a risk that students might remember these instead! Make sure the task concludes with a clear, better response in part b and emphasise to students that this is correct.Additional resourcesKey idea 6.2.2.1 from Secondary Mastery Professional Development | NCETM explores ‘The area of a trapezium’.

23. CirclesCheckpoints 6–8

24. CirclesPrevious learningIn Key Stage 3 students need toKey Stage 2 curriculum:Year 6: illustrate and name parts of circles, including radius, diameter and circumference and know that the diameter is twice the radiusThere are no explicit references to properties of a circle in either Teaching mathematics in primary schools or Primary Mastery Professional Development.Note that, if primary schools are using the Curriculum prioritisation in primary maths | NCETM to support curriculum planning, then this may have impacted on the depth to which they have explored properties of a circle with students.Continue to accurately use the terminology learnt in Key Stage 2 (radius, diameter and circumference) and to understand the relationship between radius and diameter.Be aware of the classic multiplicative relationship within every circle (i.e. no matter how large or small the circle, the ratio between its circumference and its diameter is always the same: = .)Apply this understanding to using the formula C = d to find the perimeter (circumference) of the circle. Also be aware of the corresponding multiplicative relationship between any two circles (i.e. if one circle has a diameter n times the length of another, then its circumference will be n times the circumference of the other.)Use the formula A = r2 to find the area of a circlePrevious learningIn Key Stage 3 students need toKey Stage 2 curriculum:Year 6: illustrate and name parts of circles, including radius, diameter and circumference and know that the diameter is twice the radiusThere are no explicit references to properties of a circle in either Teaching mathematics in primary schools or Primary Mastery Professional Development.Note that, if primary schools are using the Curriculum prioritisation in primary maths | NCETM to support curriculum planning, then this may have impacted on the depth to which they have explored properties of a circle with students.

25. Checkpoint 6: Ants on a clockTwo ants are sitting on a clock. Ant A walks in a straight line to 6. Ant B walks in a straight line to 4.What can you say about the distances each ant walks? If they reach their new numbers in the same time, what can you say about the speed of the ants?Both ants walk back to where they started and then ant B also walks to join ant A at 12.Which ant walks the furthest this time? Which ant has walked the furthest in total?Ant A walks around the circumference of the clock. Ant B walks from 12 to 6 and back again.If they walk at the same speed, which ant will get back to 12 first?AB

26. Checkpoint 6: GuidanceAdaptationsAssessing understandingSupportGive students a blank printed clockface so that they can model the journeys the ants take. It may help them to physically draw these lines in, so that they can see that they are a radius and diameter. Alternatively, use string to replicate the distances travelled.ChallengeAsk students to think about distance in terms of units of radius/diameter. For example, if an ant walks from the centre to a number and back, and repeats it for every number on the clock, how many ‘diameters’ would they walk?RepresentationsA clock face is used as a familiar representation to explore radius and diameter. Do students recognise that the distance from the centre to each number is always the same, and that this is a radius? Can they find pairs of numbers that are connected by a diameter?Checkpoint 6 asks students to use their understanding of the properties of a circle to reason about distance. Terminology, such as radius or diameter, is not used, so that you can ascertain whether students are fluent enough to volunteer these terms in context. Students should know both of these terms, as well as circumference.In part a, ant A has walked twice as far as ant B so must be walking twice as fast. If this comparison of rate adds confusion, you can simplify the question by asking which ant has walked further, and by how much. The relationship between the radius and diameter is in the Year 6 curriculum statements, but is not in the Ready to progress criteria, so the amount of time students spent on this may be variable. The further thinking question asks students to think about the circumference in relation to the diameter. At this stage in their learning, check that they understand that the circumference is more than twice the diameter, rather than any specific relationship between them.Additional resourcesPages 32 and 36 of the Year 6 Primary Assessment Materials | NCETM gives some examples of reasoning questions involving radius and diameter of circles.Several Checkpoints in the ‘Constructions’ deck explore the concept of a circle as a locus of a point.

27. Checkpoint 7: Semi-circular pathA garden has a semi-circular path.Alex walks from A to B to C.Brian walks from B to D to A.Colin walks from C to D to A.Dave walks from D to B to A.Put their four journeys in order from shortest to longest.How did you decide?Estimate how many times further Colin's journey was compared to Alex’s journey.

28. Checkpoint 7: GuidanceAdaptationsAssessing understandingSupportAsk students to identify two points that are an equal distance from point B. Are there more? Then ask them if they can also identify two points that are an equal distance from point D. Point A? Giving students an opportunity to reason with the diagram allows them access to the properties needed to answer the questions, as well as offering insight into their understanding.ChallengeAlthough unlikely to be formalised, the task offers a context to begin thinking about the relationship between radius and circumference. Ask students to explore and justify their estimate.RepresentationsOffer students a pair of compasses and ask them to reconstruct the diagram as accurately as they are able. Alternatively, give a copy of the diagram and ask them to annotate equal distances (as in the Support prompts above).The semi-circular path gives a context for students to identify and reason with the properties of a circle – particularly that the radius of any circle has a constant length, that the diameter is made of two radii and that a curve between two points is a longer path than a straight line.Although drawn accurately, with the points marked in the centre of the given paths, the context moves away from the perfection of a mathematical circle. This muddying of the mathematical waters offers further opportunities for students to reason. Probe their understanding by, for example, asking whether it’s possible to walk a different distance from A to D and C to DAdditional resourcesPages 32 and 36 of the Year 6 Primary Assessment Materials | NCETM gives some examples of reasoning questions involving radius and diameter of circles.Page 37 of the Secondary Assessment Materials | NCETM offer examples of where this learning goes next at Key Stage 3.Key idea 6.2.2.5 from Secondary Mastery Professional Development | NCETM explores ‘The area of a circle’.

29. Checkpoint 8: Not full circleBeau has a semi-circle. Halle has a quarter-circle.Both of their shapes are cut from the same circle.Halle says, ‘The area of my quarter-circle is half the area of your semi-circle.’Is Halle correct? Why or why not?Beau says, ‘The perimeter of my semi-circle is twice the perimeter of your quarter-circle.’Is Beau correct? Why or why not?BeauHalle cuts her quarter-circle into five equal pieces. What can you say about the area and perimeter of one of these sectors compared to Beau’s semi-circle?BeauHalle

30. Checkpoint 8: GuidanceAdaptationsAssessing understandingSupportPart b is likely harder for students to reason. Use highlighters to simultaneously draw along the edges of Beau and Halle’s shapes, showing the two radii being the same as the diameter, but the arc of the quarter-circle being shorter than the arc of the semi-circle.ChallengeThe further thinking question could be developed with other fractions of whole circles.RepresentationsHave physical circles to cut and manipulate: for example you could draw along the lengths of the semi-circle/quarter-circle, but rotating the shape so that it forms a line, to model the similarities and differences between each shape’s perimeter.Checkpoint 8 offers an opportunity to reason with the area and perimeter of part-circles. See whether students can use their knowledge of fractions, and of radius and diameter, to compare the area and perimeter of shapes. Also check students connect the terms perimeter and circumference.You should use this task before any teaching on the area or circumference of a circle, and so values are not given. We want to know whether students can recognise what will happen to the area and perimeter as the shape changes. Part a is likely to be quite instinctive – the shape has been halved, and therefore so has the area – but part b may pose more challenge. Do students recognise the equivalence of Beau’s diameter and Halle’s two radii? Can they generalise about the sector of any circle?Although calculation is not the purpose, you might revisit it after some teaching on area and circumference, to see how students’ explanations change. If you use the task in this way, introduce some values for students to work with.Additional resourcesKey idea 6.2.2.3 from Secondary Mastery Professional Development | NCETM explores how you might approach ‘The area of a circle’ in Key Stage 3 teaching.Question 19 of Paper 2 reasoning, from the Key Stage 2 SATs, gives an example of students reasoning with part circles. Past papers can be readily found online.Page 37 of the Secondary Assessment Materials | NCETM offer some examples of this learning at Key Stage 3.

31. 3D shapesCheckpoints 9–18

32. 3D shapesPrevious learningIn Key Stage 3 students need toKey Stage 2 curriculum:Year 5: identify 3D shapes, including cubes and other cuboids, from 2D representations Year 6: Recognise , describe and build simple 3D shapes, including making nets(Note that naming 3D shapes is first encountered within the Early Years Foundation Stage and Key Stage 1.)Further information about how students may have experienced this key idea in Key Stage 2:3D shapes are not referenced in the Key Stage 2 sections of Teaching mathematics in primary schools, although 3D shapes are mentioned within the Year 1 and 2 criteria.Primary Mastery Professional Development, Spine 2 Multiplication and division, Year 5 Segment 2.20 Multiplication with three factors and volume.Key Stage 3 curriculum:6.2.2.11: Derive and use the formula for the area of a trapezium.6.2.2.2: Understand that the areas of composite shapes can be found in different ways.1 This four-digit code refers to the key ideas in Secondary Mastery Professional Development | NCETM; the Key Stage 2 content underpinning these ideas is assessed in the ‘Plotting coordinates’ Checkpoints deck.Use the properties of faces, surfaces, edges and vertices of cubes, cuboids, prisms, cylinders, pyramids, cones and spheres to solve problems in 3D.Make connections between two and three dimensions by beginning to consider surface area (which will be formalised in Key Stage 4); this provides an ideal opportunity to apply and consolidate understanding of the area and properties of 3D shapes from Key Stage 2.

33. Checkpoint 9: Inside out?Are these two pictures of the same shape? How do you know?How many vertices are there on each shape?How many blue rods make up each shape?Richard cuts out shapes to cover the gaps. How many will he need? Will they all be the same shape and size?Design another 3D shape with triangular faces. How many vertices, edges and faces does it have?

34. Checkpoint 9: GuidanceAdaptationsAssessing understandingSupportAs a goal-free way to gain access to the task, ask students to describe what they can see. This still allows insight into their awareness of, and the language they use to describe, the properties of polyhedra.ChallengeAppreciating the structure of the shape is key to this task. Probe students’ understanding by making false statements such as, ‘As each vertex has five edges coming out of it, so there are five times more blues than whites.’ Ask students to explain why this is incorrect and how they might use this information to find the correct relationship between the blues and whites.RepresentationsUse materials as in the image to construct an icosahedron, or use a set of solid polyhedra or some tiles to make some. Ask students whether your set includes the shape in the picture to offer further opportunities to visualise and draw attention to the key properties of a polyhedron.‘Inside out’ offers a context for students to discuss vertices, edges and use other vocabulary associated with polyhedra. Listen for those who are able to identify and describe the structure of the two shapes, and concisely reason that the two images are of the same object.Parts b, c and d move towards the vocabulary used with 3D shapes. Check students recognise that the vertices are marked by the white circles. The words edge and face are not used, to see if students volunteer these terms when they are described in other ways.Additional resourcesQuestions exploring the key terminology of vertex, edge and face can be found in the Key Stage 2 SATS papers, such as 2022 Paper 2 reasoning, question 1 and 2018 Paper 2 reasoning question 11. Past papers can be found online.Additional activities D and F offer other starting points for open discussions about 3D shapes.

35. Checkpoint 10: Hole in the wallWill the block fit through the hole in the wall in each of these situations?a)b)c)d)e)Design a different shape that would fit through each hole.

36. Checkpoint 10: GuidanceAdaptationsAssessing understandingSupportPrompt students to sketch or draw accurately some elevations for the objects – squared paper may support their sketches and offer insight into how readily they are able to picture the objects from different viewpoints.ChallengeAsk students to draw objects that will fit through all the holes in all the walls. How many are there? Can they draw a shape that looks like it will go through two but will only go through one? Through none?Can they draw a wall that all of the given shapes will fit through? Is there more than one correct solution?RepresentationsMultilink cubes may be available in your classroom, to construct the objects and walls. However, the focus of the task is visualising so consider when and whether you use physical blocks as scaffolding. Prompting students to sketch some elevations of the blocks will offer a representation while still allowing students the chance to show their visualising skills.Visualising the two-dimensional surfaces that make up a three-dimensional object, and appreciating that different views of a 3D object will result in different 2D images, underpins fluency with 3D shape.‘Hole in the wall’ offers an accessible way for students to demonstrate how well they can imagine these 2D views for a rectilinear shape.Asking students if there is only one way that a given object will fit through the wall is likely to offer further insight into how readily they are able to mentally manipulate and visualise 3D objects.The skills needed for this task underpin many aspects of Key Stage 3 and 4 work with 3D shapes, including plans and elevations and surface area, and so there will be many different appropriate times to use it in your scheme of work.Additional resourcesCheckpoints 11 and 12, and additional activity E, explore different views of shapes

37. Checkpoint 11: Bird’s-eye viewViewed from directly above, in 2D, which of the four buildings could the sketch on the right represent?How did you decide?How about the sketch below?Choose one of the other buildings and sketch what it might look like from above.Eiffel Tower, ParisOne Canada Square, LondonElizabeth Tower, LondonGreat Pyramid, Egypt

38. Checkpoint 11: Bird’s eye view (solution to further thinking question)Choose one of the other buildings and sketch what it might look like from above.One Canada Square, LondonElizabeth Tower, London

39. Checkpoint 11: GuidanceAdaptationsAssessing understandingSupportThe context encourages students to imagine what a shape might look like using cues seen from a different angle. Use a range of 3D shapes and ask students to identify which of your shapes the image might represent. Support them by rotating your solids to show different alignments.ChallengeReverse the problem: show students a plan view and ask them to imagine the building and draw a side elevation. How many different buildings can they create with the same plan view?RepresentationsUse blocks or multilink cubes to construct multiple shapes that might look the same when viewed from above, to support the understanding that the plan offers only a limited picture of what the object might be. You could also use an online map tool, and compare the different perspectives offered by a satellite image and street view image.Checkpoint 11 offers the outline of some landmark buildings as if seen from above.The assessment point is whether students can visualise an object from a different perspective – and particularly, the way that the 2D representation does not offer perspective to give the illusion of depth.Students should be aware that 3D objects can be visualised in this way in advance of their work on 3D shape in Key Stage 3. They will need to be able to identify and visualise the shape of the constant cross section of prisms and cuboids when finding volume, and to imagine every face when finding surface area.Additional resourcesCheckpoint 12 explores the different ways we can represent 3D objects in 2D.Additional activity E explores plans and elevations of familiar objects.

40. Checkpoint 12: 3D three waysThree students represent the same cuboid but in three different ways.FinlayNeeshaBethWhat is the same and what is different about each drawing?When might each drawing be a useful way to represent a 3D shape?Imagine a square-based pyramid. What would each student’s representation of this shape look like?

41. Checkpoint 12: 3D three ways (possible solutions to further thinking question)Imagine a square-based pyramid. What would each student’s representation of this shape look like?FinlayNeeshaBeth

42. Checkpoint 12: GuidanceAdaptationsAssessing understandingSupportShow only Finlay’s response and one other, so that students can explore each representation in more depth.ChallengeOffer students one representation of a different 3D shape, and ask them to draw it the other two ways.RepresentationsA challenge with working with 3D shapes is that all 2D drawings are representations. If you have access to actual 3D shapes, or can make a cuboid to use with this task, it might help to make connections between these representations and the ‘real’ thing.The purpose of Checkpoint 12 is to explore students’ understanding of the different ways that we represent 3D shapes in 2D. There are no particular answers to try to elicit – instead, the three images act as a prompt for class discussion. The intention is to understand how confidently students can interpret different diagrams, to help you plan how you will use these different diagrams in work on 3D shapes at Key Stage 3. You might discover whether students can relate different representations to each other. Are they able to identify the same face/side/vertex on all three diagrams? You may also find out if they understand when these different representations might be useful: for example, do they know which is most likely to be used to design and build something?Students will have explored nets as part of their work on 3D shapes in upper Key Stage 2. They are less likely to be familiar with plans and elevations as these are not in the primary mathematics curriculum and are also not explicitly in the primary DT curriculum, although they may have seen other representations of 3D shapes, such as cross-sectional diagrams.Additional resourcesQuestions about nets can be found on p36 of the year 6 and p27 of the Year 5 Primary Assessment Materials | NCETM; the question on p29 of the Year 2 materials may also be of interest.Examples of Key Stage 2 SATs questions involving the net of a cube can be found in 2018 Paper 2 reasoning (question 22) and 2018 paper 3 reasoning (question 17). Past papers can be found online.

43. Checkpoint 13: Wrong ’unsWhat is wrong with these nets? How could you correct them?Draw a different correct net for each 3D shape.CuboidCubeCylinder Triangular prism CylinderTriangular prism a)b)c)d)e)f)

44. Checkpoint 13: GuidanceAdaptationsAssessing understandingSupportIf students find it challenging to consider so many nets simultaneously, explore the same misconceptions with a single net – for example, using a cube as the basis for the misconceptions in parts a and c.ChallengeAsk students for alternative ways to adapt the nets, if the shape names were not there. For example, could the five consecutive squares remain in part b? What 3D shapes could you make with that arrangement, if you can change the other faces?RepresentationsThe most obvious way to support with this task is to physically cut out the printable nets on slides 103-05 and model how the lengths or arrangement of faces does not work. Consider carefully at what stage you do this: offer students this too soon, and you might not glean as much from their explanations.Students will have encountered nets as part of their primary mathematics curriculum, and this Checkpoint gives them a chance to demonstrate their understanding. The names of the intended shapes are given. This draws attention away from naming shapes or drawing their own nets (which they may be more used to) to allow you to see how deeply they can think about nets. Are they able to identify the important features of each net by analysing these non-examples?Some of the errors in the nets are more obvious than others – students might notice the extra face in part c more readily than the incorrect arrangement of faces in parts a and b. This might suggest a more surface level understanding of nets. Students who find it hard to imagine and visualise shapes may find this task challenging. Identify these students so that you can support them with 3D shape topics such as surface area.If you have already covered Pythagoras’ theorem and the formula for the circumference of a circle within Key Stage 3, parts d and f could be used to make links to these areas of learning. Can students suggest some potential lengths for the corrected rectangles?Additional resourcesExamples of questions about nets can be found on p36 of the Year 6 and p27 of the Year 5 Primary Assessment Materials | NCETM.Additional activity C also explores nets.

45. A teacher asks her class to draw the net of a cube. Study the first five faces that five students draw in turn.Where could they put their sixth face? Is there more than one answer?Checkpoint 14: Six facedIs there a different net that doesn’t use these starting points?LoganFredPhoebeNiamhArun

46. Checkpoint 14: Six faced (animated solutions)There is one more net which doesn’t use these starting points.LoganFredPhoebeNiamhArun

47. Checkpoint 14: GuidanceAdaptationsAssessing understandingSupportOffer one net at a time, but with two versions of a sixth face, one correct and one incorrect. Can students identify the correct one? Can they suggest other correct ones?ChallengeAsk students to turn each net into a cuboid. Can they identify which faces will be opposite each other, and therefore need to be the same dimensions? RepresentationsHave nets to cut out, with spare faces to tape on, to help students who find it hard to visualise how the flat representations fold. Intersecting squares or magnet tiles could also be used to represent the task physically.Nets are part of the Year 6 curriculum and students may have seen tasks that ask them to identify possible nets of cubes. Checkpoint 14 asks them to reason with some ‘part nets’ and complete them with the sixth face. The intention is not so much to see if they have remembered the cube nets, but whether than can visualise and reason with a 2D representation of the 3D shape. Prompt them by asking if they can identify where a sixth face could not go, and explain why. For example, for Fred’s net, ask why the face can’t go to the left of the column of four.All the nets are possible, but some have more solutions than others. Niamh’s and Phoebe’s nets are likely to be the most challenging, with Logan’s and Fred’s the most familiar. Additional resourcesAdditional activity K links nets of a cube with volume.Examples of Key Stage 2 SATs questions involving the net of a cube can be found in 2018 Paper 2 reasoning (question 22) and 2018 paper 3 reasoning (question 17). Past papers can readily be found online.An example of questions involving nets of cubes can be found on p36 of Primary Assessment Materials | NCETM.

48. Checkpoint 15: Four, five, six prismsPhil has four cubes. How many prisms could Sachin make with his six cubes?Using all his cubes, how many different prisms can he make?Using all her cubes, how many different prisms can she make?Has he made a prism? If not, which cube(s) should he move?Sachin has six cubes.Rose-Marie has five cubes.

49. Checkpoint 15: Four, five, six prisms (solutions to parts a and b)

50. Checkpoint 15: Four, five, six prisms (solutions to further thinking question)There are thirty-seven possible prisms.One is two ‘rows’ of three cubes, as shown below.Thirty-six are different arrangements of six cubes, creating a prism with cross-sectional area of six and length of one. Seven of the thirty-six examples are shown below.

51. Checkpoint 15: GuidanceAdaptationsAssessing understandingSupportPart of the challenge of this task is likely to come from students’ experience of prisms offered in printed materials, with the constant cross section orientated at the front. Starting with a shape they identify as a prism, and then rotating it to a less familiar orientation, may support students in mentally manipulating the shapes as they construct them.ChallengeChallenge can come from different elements, either asking students to predict the number of possible prisms for more (or fewer) starting cubes, or to describe how they worked to ensure that all possible prisms have been found.RepresentationsAs discussed throughout this deck, using multilink or other cubes is likely to benefit both the students and teachers in this task. For more information about the limitations of this representation, see the Guidance to Checkpoint 19 on slide 62.The assessment focus here is the ways that students understand prisms and are able to use this understanding to reason with their properties. It might also be enlightening to look at the systematic ways that students work to identify whether they have found all possibilities for each situation. Using multilink cubes for this task will not only support students to model their thinking, but also give insight into students’ understanding. Do they, for example, always position their prisms so that the cross section is a side view, or can they think about the cross section at the top/bottom of their prism too? This is particularly interesting for part b, where all the prisms have a length of only one (except the cuboid, which can be seen as a prism in two ways).While not explicitly about volume, it is important that students understand that all their shapes made with, for example, four cubes will have equal volume. Question and probe this understanding.Additional resourcesCheckpoint 16, as well as Additional activities G and H, further explore the definition of prisms.

52. Checkpoint 16: Prism breakA prism is broken into three identical pieces. Sketch the original prism. What are the dimensions of your sketch? Is there more than one possible answer to part a?10 cm4 cm1 cmSketch and label your own congruent pieces for a different prism. How many different prisms could they be for?

53. Checkpoint 16: Prism break (animated solutions)30 cm4 cm1 cm10 cm12 cm1 cm10 cm4 cm3 cm2cm10 cm1 cm4 cm8 cm20 cm2 cm1 cm4 cm10 cm20 cm8 cm1 cm4 cm10 cm

54. Checkpoint 16: GuidanceAdaptationsAssessing understandingSupportStudents may conflate ‘prism’ and ‘cuboid’. Explore students’ understanding of the properties of a prism to give access to the task.ChallengeOffer students a fourth identical piece and ask how many more different prisms they can make now.RepresentationsUse a set of congruent cuboids – perhaps made from multilink cubes – to support students in accessing the task. Consider when to introduce this scaffold and the impact that any blocks will have on the level of challenge.Checkpoint 16 lets students show their understanding of the definition of a prism. Assess whether students understand what a prism is, and if can they visualise and reason with the properties of a prism. The key understanding here is that the prism has a constant cross section along its length.Students are likely to choose a cuboid for their prism: assess whether they can appreciate that a cuboid can be considered a rectangular prism in three different ways, depending on which face they take to be the constant cross section. Students with deeper understanding of prisms, who understand that the cross section can take any shape, might realise that they can arrange their cuboids so that they have L-shaped cross sections.There are also assessment opportunities to consider around volume and surface area. By showing the dimensions of one of the cuboids, students might then be asked to write down calculations to find the volume of each of their prisms. The focus of this task should be on the multiple ways to find the volume, since all shapes will have equal volume. Check that students understand this!Additional resourcesAdditional activities G and H explore the definition of prisms, if students need a reminder about their properties.

55. Pablo has exactly enough paint to cover all the faces of eight small cubes.Checkpoint 17: Cubist Before he paints them, he makes a bigger cube from the small cubes.Does he have enough paint to cover the six faces of the big cube?Will he have enough paint left over to cover another big cube of the same size?Pablo makes an even bigger cube from small cubes. What is the least number of cubes he can use?How would your answers to parts a–c change?

56. Checkpoint 17: GuidanceAdaptationsAssessing understandingSupportGive students cubes so that they can count the faces that are on the ‘outside’.ChallengeBuild on the further thinking question by considering even bigger cubes. For example, Pablo paints the outside of a large cube made of 64 smaller cubes. How many small cubes could he completely paint with the same amount of paint? RepresentationsThe larger cube is represented on the slide without any lines to denote the smaller cubes that it comprises. Consider how the task might change if you included these lines, like the image on the right. At what stage would you draw them to help students to understand the task? See also Support.Checkpoint 17 asks students to reason about the areas of the faces of cubes, without explicitly referring to surface area, which is not taught at Key Stage 2. As with Checkpoint 18, assess students’ reasoning and visualising with 3D shape so you can plan how to approach topics such as surface area more formally. Much of the mathematics used here is from much earlier in the primary curriculum. To approach part a, students need to identify that there are six faces for each small cube (so a total of 48 faces to paint), and to imagine which of these faces are visible when the cubes are arranged to make a bigger cube. Students might do this by matching the different faces of the small cubes to those in the big cube and so realising that not all will be visible.Additional resourcesKey idea 6.2.2.5 from Secondary Mastery Professional Development | NCETM explores how ‘Surface area of 3D shapes might be explored at Key Stage 3.

57. Checkpoint 18: DienesJimmi has some Dienes blocks. The length of the smallest cube is 1 cm.What is the volume of each different block?What lengths have you used to calculate each volume?Jimmi notices that each block has six faces. He writes the area of each face in a table.Face 1Face 2Face 3Face 4Face 5Face 6Ones 1 cm2Tens1 cm210 cm2Hundreds10 cm2ThousandsComplete Jimmi’s table. What do you notice?Imagine a ten thousands block. Sketch what it might look like. What could be the area of each face then? How about a hundred thousands block?

58. Checkpoint 18: Dienes (solution to further thinking question)Imagine a ten thousands block exists. Sketch what it might look like. What could be the area of each face then? How about a hundred thousands block?

59. Checkpoint 18: GuidanceAdaptationsAssessing understandingSupportRather than asking students to complete the table, focus on one block and ask them to identify the area of one face and then work out how many faces have the same area.ChallengeThe further thinking question can be extended to consider millions, tens of millions etc.RepresentationsDienes blocks are most commonly used to represent place value; this might be the first time students have been asked about them in terms of volume. They might have understood that there are 1000 small ones blocks in the thousands block, but do they also appreciate this means it has a volume of 1000?Checkpoint 18 uses a familiar representation to probe students’ understanding of the relationship between length, area and volume. Parts a and b check students appreciate that volume is key to the use of Dienes blocks as a representation, and understand the lengths that are required to calculate such volumes. Look out for students who do not offer three dimensions for any of the blocks, as they may need more support with volume. For example, confusion may arise because the value of the volume of the ones cube is the same as the value for each of its lengths/areas, and students may not appreciate that three dimensions are still needed to calculate its volume.Part c starts to nudge students’ thinking towards surface area, which is not specified in the curriculum until Key Stage 4. At this stage, just see whether students can recognise the area of different faces and invite them to share what they notice. The question is open so that students can offer any observation, to help you identify those who are most and least confident with manipulating and visualising 3D shape. See the answers in the notes for slide 57 for some suggestions of what students might say.Additional resourcesUnits of volume and Dienes blocks are referred to in Segment 2.20 Multiplication with three factors and volume in the Primary Mastery Professional Development materials.The guidance Using mathematical representations at KS3 | NCETM explains how Dienes blocks might be used to support understanding of place value in Key Stage 3.Key idea 6.2.2.5 from Secondary Mastery Professional Development | NCETM explores ‘Surface area of 3D shapes’.

60. Concept of volumeCheckpoints 19–22

61. Concept of volumePrevious learningIn Key Stage 3 students need toKey Stage 2 curriculum:Year 5: estimate volume [for example using 1 cm3 blocks to build cuboids (including cubes)] and capacity [for example, using water]Year 6: recognise when it is possible to use formulae for the area and volume of shapesYear 6: calculate, estimate and compare volume of cubes and cuboids using standard units including cm3, m3, and extending to other units [for example mm3, km3]Further information about how students may have experienced this key idea in Key Stage 2: Teaching mathematics in primary schools Although not specifically referenced in the Ready to progress criteria, volume is used as a context in both place value and fractions.Primary Mastery Professional Development, Spine 2 Multiplication and division, Year 5 Segment 2.20 Multiplication with three factors and volume.Understand that volume is a three-dimensional measure that quantifies the space inside a 3D shape, and be able to distinguish it from the one-dimensional measure of perimeter and two-dimensional measure of area (ideas that are often confused).

62. Checkpoint 19: Twenty-eight cubesGuz makes a shape out of 28 multilink cubes.Callum breaks it apart and makes a different shape using all 28 cubes.Do you agree that the volume of the shapes is the same?Gabriel breaks it apart and makes a different shape using all 28 cubes.Do you agree that the volume of the shapes is the same?Is it possible to make this shape using exactly 28 cubes? Explain your thinking.

63. Checkpoint 19: GuidanceAdaptationsAssessing understandingSupportThe task uses 28 cubes, enough that visualising is challenging and so students are perhaps working in a more generalised way. Some students might benefit by thinking first about four cubes (the minimum which allows for more ‘dimensions’ to be worked in), and considering whether the different arrangements of these blocks leads to different volumes.ChallengeThe further thinking question offers the idea of a hollow, though incomplete, shape. Challenge students to use 28 cubes to make a shape that displaces the greatest volume – are they able to make a hollow cuboid? RepresentationsCubes are a helpful representation, but be aware of their limitations when thinking about volume of non-rectilinear 3D shapes. It is important to explore other representations as well to ensure you can assess students’ full awareness of volume, and what volume is. For example, representations such as measuring jugs and ‘melted cubes’ might support deeper understanding.Checkpoint 19 gives a context for students to discuss and demonstrate their understanding of volume and capacity without the need to calculate. You will gain insight into whether they have an understanding of what volume is, and whether that understanding is based on a formula or method Intuitively, students may feel that the original shape has a different volume from that shown in part a, and their reasoning is worth exploring.Part b allows for a greater discussion around the words volume and capacity. While a definitive answer may not be forthcoming, listening to students’ conversations should offer insight into their understanding.Additional resourcesAdditional activity I offers a clarification of the terms capacity and volume; additional activity J explores volume using cubes.An example of a Key Stage 2 SATs question which uses cubes to probe understanding of volume can be found in 2019 Paper 2 reasoning, question 23. Past papers can readily be found online.If students struggle with the concept of volume as the amount of space that something occupies, look at teaching point 1 of Segment 2.20 Multiplication with three factors and volume in the Primary Mastery Professional Development materials.

64. Checkpoint 20: LunchboxesWhich of these containers has the greatest capacity?How do you know? How might you check?Fran counts the sandwiches in the containers.She says, ‘I can only fit two sandwiches into the cylindrical box but three into the cuboid box. So the cylinder must have a smaller capacity than the cuboid.’Is Fran correct? Why or why not?Both containers have the same volume. A third container also has the same volume. It is exactly wide and high enough to fit one sandwich. Sketch what this container could look like.

65. Checkpoint 20: GuidanceAdaptationsAssessing understandingSupportProvide physical containers to help students access the problem. Consider whether using sandwiches (or water, pasta etc.) might help convince them about the relative volumes.ChallengeGive students some dimensions for sandwiches, and ask them to design different boxes to fit a certain number of sandwiches. How do their answers change when you cut the sandwiches different way?RepresentationsCubes are a common representation to help visualise the space inside a 3D shape. While this helps make the connection to cubic units of volume, it can be hard to imagine how they fit into non-cuboidal spaces. Sandwiches are used to represent the space inside the containers as they are familiar and malleable – students can imagine them being broken apart and fitted into different shaped spaces.Checkpoint 20 gives students a familiar context to reason about volume. It can be challenging to think about the volume of spaces where cubes won’t fit, and so sandwiches are used as something that students will be used to seeing cut into different shapes to fit a space (see Representations).Listen for students’ justifications for which of the containers is bigger. Those with a less strong understanding of volume might be swayed by a single dimension and think that one container has a greater volume because it is taller/wider. Those with stronger understanding of volume should recognise in part a that there is not enough information to know.Students’ answers to, ‘How might you check?’ in part b will be illuminating. As they will not yet know a calculation for the volume of a cylinder, encourage them to think of strategies that don’t involve measurement. This might remind them of the practical maths of their very earliest days in school!Additional resourcesAdditional activity I looks at the definitions of volume and capacity.

66. Becky fills this cup of water.Becky then pours the water into an ice cube tray, without spilling any, and puts the tray in the freezer.Finally, Becky tips the frozen ice cubes from the tray back into the cup.Will the ice cubes fit? Why or why not?How about if the ice cubes were smaller? How about if the cup was a cylinder? Or a cuboid?Checkpoint 21: Cold as iceEach space in the tray is cubic and has a length of 3 cm.When the water is poured into the tray, it fills two-thirds of the spaces. Does the cup have a volume greater than 100 cm3?

67. Checkpoint 21: GuidanceAdaptationsAssessing understandingSupportIf you have the resources, this task is likely to be more accessible if modelled live. You will need two identical ice cube trays, so that you can have one to pour the water into and one pre-frozen. You could also use different-sized cubes (as in Checkpoint 24) to model the situation.ChallengeBuild on the further thinking question by asking students how many cubes would be created with ice cube trays of different dimensions.RepresentationsIn the early stages of learning about area, it is common to draw irregular shapes onto square grids to help students appreciate how square units can be used to describe spaces even when they are not bound by rectilinear shapes. This task attempts to create an equivalent experience for cubic units and volume.Checkpoint 21 explores the concept of volume by using water in two states: liquid and solid. See how readily students handle the tricky concept of cubic units. Much like square units for area, these can be challenging to fully comprehend: how do we think about volume measured in cubes when 3D space is so rarely cube-shaped? Students should appreciate that the water will not fit into the cup in the same way when it is frozen into cubes. Question to check that they understand that the total amount of water is the same, and so the cup and the cubes still have the same volume.There are some scientific details that are glossed over to ensure the premise of the task works – see ‘Things to think about’ in the notes for more information. Additional resourcesCheckpoint 24 explores a similar idea using classroom resources, but extends to thinking about actual estimates for volume.

68. Checkpoint 22: Blocks This cube is made from 27 blocksEach of the corner blocks (coloured white) is removed.Does the volume of the shape increase, decrease or stay the same?How about the number of faces?How about the total area of the faces?Is it possible to make a shape with a greater volume but the same surface area? How about the same volume but a greater surface area? Justify your answers.

69. Checkpoint 22: GuidanceAdaptationsAssessing understandingSupportUsing blocks to construct and transform the shapes described in the task can be beneficial. Since the focus of the task is not visualising, the blocks can be introduced early without impacting on the assessment focus.ChallengeChallenge students to work with both surface area and volume. For example, is it possible to create a block with double the surface area and double the volume of this one? Or half the surface area and volume of this one? How about surface area and volume increased by two? By four?RepresentationsMultilink cubes or other blocks will be particularly helpful here (see Support). Encourage students to represent the shape in other ways. For example, by sketching elevations of the objects on squared paper.As in Checkpoint 19, this task allows students to show what they understand by volume without calculating. They should recognise that, as cubes are removed, the volume decreases.Part b extends this to consider understanding of surface area. This has not been taught at Key Stage 2 and so the task refers instead to ‘the area on the outside of the shape. Students can respond to this without the need to calculate, thinking only about the concept. For example, they can recognise that for every cube that is removed, removing the three faces that make up the vertex, there are still three visible faces on the ‘outside’. This keeps the level of mathematics at Key Stage 2 to 3.Encourage students to think about plans and elevations of the original and transformed shape. Checkpoints 10, 11 and 12 assess these skills and may support their reasoning to justify why the surface area remains constant when the white cubes are removed.Additional resourcesPaper 3 reasoning, Question 12, from the 2022 Key Stage 2 SATs papers asks students to reason about the lengths in a 3D shape, and might be an interesting counterpoint to this focus on area and volume.Key idea 6.2.2.5 from Secondary Mastery Professional Development | NCETM explores how ‘Surface area of 3D shapes’, hinted at in part b, might be explored at Key Stage 3.

70. Calculating volumeCheckpoints 23–28

71. Calculating volumePrevious learningIn Key Stage 3 students need toKey Stage 2 curriculum:Year 6: recognise when it is possible to use formulae for the area and volume of shapesYear 6: calculate, estimate and compare volume of cubes and cuboids using standard units including cm3, m3, and extending to other units [for example mm3, km3]Further information about how students may have experienced this key idea in Key Stage 2: Teaching mathematics in primary schools Volume calculations are not specifically referenced in the Ready to progress criteria.Primary Mastery Professional Development, Spine 2 Multiplication and division, Year 5 Segment 2.20 Multiplication with three factors and volume.Develop their understanding of finding the volume of cubes and cuboids (using the formula Volume = width × height × length or similar) to include the volume of prisms more generally. For example, realise that the volume of a cuboid is actually the area of one of the faces multiplied by the other dimension and then generalise to other prisms with the formula Volume of a prism = area of cross-section × length.Use and apply their knowledge of the area of 2D shapes to calculate the cross-sectional area of a variety of prisms.Appreciate that, although a cylinder is not strictly a prism (a prism has a polygonal uniform cross section), it has the same structure as a prism (with the uniform cross section being a circle) and its volume can be calculated in a similar way.

72. Checkpoint 23: Swimming poolRussell is renovating an old outdoor swimming pool. It has a rectangular surface and is the same depth at all points.What does he need to measure to ensure he has the items listed in parts a to c?Enough fencing to go around the perimeter of the pool.A big enough cover to go over the top of the pool.Enough water to fill the pool.Russell measures one dimension to be 25 m. Which dimension of the pool is this likely to be? What would be a reasonable estimate for the perimeter, area and volume?

73. Checkpoint 23: GuidanceAdaptationsAssessing understandingSupportRather than asking which lengths are needed, ask directly whether a specific length is required each time. For example, sketch the swimming pool on the board, point to a line and ask, ‘Is this length needed? Does Russell need to measure it?’.ChallengeThe situation here has been simplified; challenge students to think about how these simplifications have made the problem more accessible. Would they need the same lengths if the pool’s surface was not a rectangle or if, like most pools, it had variable depths?RepresentationsSketch a cuboid and highlight the relevant lengths and/or spaces for each part of the question. Similarly, ‘making’ the pool out of multilink cubes may help students visualise.Often, students are given the information that they need in perimeter, area and volume problems. This task gives checks that they understand what dimensions are really required. A swimming pool is a context where perimeter, area and volume can all be feasibly and usefully calculated. Students might identify that all four lengths are needed to calculate the perimeter but should recognise that they only need to measure two different lengths for both this and the area. It is worth asking students to generalise at this stage. Ask, ‘How do I find the perimeter/area of any rectangle?’.A connection could be made between area and volume – imagine ‘layers’ of areas stacked on top of each other until the depth of the pool is achieved; model this with multilink cubes (see Representations).Some debate might ensue as to whether the measurements needed would be exactly the same as the lengths of the cuboid. Realistically, the volume of water would be less than the cuboid as the pool would not be full to the brim, and the perimeter of the fence would be greater than the perimeter of the pool as you would not build a fence right on the edge. These are valid points – accept them, but still encourage students to generalise about which lengths you need to work out for each measurement.Additional resourcesCheckpoints 26 and 27 also explore the dimensions needed to calculate volume in cuboids.

74. Shona fills a glass with cubes of length 2 cm. Courtney fills an identical glass with cubes of length 1 cm.Estimate how many of each type of cube are in the glasses.There are 14 in Shona’s glass and 160 in Courtney’s.Why are these numbers so different? Shona and Courtney use their cubes to estimate the volume of their glasses.Whose estimate is most likely to be accurate? Why?Checkpoint 24: Cubes in a glassShona estimates her glass has a volume of 28 cm3.Courtney estimates her glass has a volume of 160 cm3.Do you agree with these estimates? Why? How could they be improved?

75. Checkpoint 24: GuidanceAdaptationsAssessing understandingSupportIf students find it hard to accept that there are eight smaller cubes for every one bigger cube in this example, then model it, using a cuboid so that it is more obvious.ChallengeChallenge students to think about how many cubes of length 0.5 cm will fit in the glass. Each 1 cm cube is worth eight of the 0.5cm cubes, so there would be at least 160 × 8.RepresentationsThe images offered as prompts here could be recreated with equipment from the classroom. Consider whether students might interpret the situation more readily if they see the cylinders filled ‘live’ rather than as pictures.Sometimes, volume can be counterintuitive! It is unlikely that students will anticipate quite how different the two values will be. Collect several responses to part a so you can get a sense of understanding across the class. Are they surprised when the actual values are revealed?In part b, students are likely to recognise that the gaps in Shona’s glass will be largely filled by Courtney’s smaller cubes, accounting for some of the difference in the number of cubes. Listen for those that also appreciate that, for every one of Shona’s cubes there are eight of Courtney’s – they are likely to have a deeper understanding of calculating volume to build on. A common misconception is that Courtney’s cubes are worth two of Shona’s – this is not the main focus of the task, but is unpicked in the further thinking question.In part c, see that students can effectively explain why Courtney’s estimate is more accurate. The language they use is likely to indicate how they understand volume, and how confident they are to reason about it. Do they refer specifically to the 3D space within the cylinder? Do they understand that the true volume cannot be measured using cubes, but will be given in cubic units? If their responses are secure, prompt further and ask how Courtney’s estimate can be improved.Additional resourcesAdditional activity I looks at the definitions of volume and capacity.

76. Marshall is sending a parcel and needs a box with a minimum volume of 420 cm3. Which of these boxes could he use?Checkpoint 25: Marshall’s parcelSketch some other boxes that Marshall could use.The item in Marshall’s parcel is a book 21 cm long. Does this information change your answer to part a?A2 cm5 cm42 cm20 cm2 cm10 cmB8 cm6 cm10 cmC8 cm8 cm8 cmED22 cm2 cm10 cm

77. Checkpoint 25: GuidanceAdaptationsAssessing understandingSupportLook at fewer boxes to discuss the same point. Use just boxes A, B and C (so only A and C would be possible for part a, and no boxes for part b) then ask students to design their own box to fit Marshall’s book.ChallengeAsk students to create their own problems, where there are several boxes with the right volume but only one with the right dimensions.RepresentationsThe parcels are represented as 2D images and as nets. Students should be familiar with both, but are more likely to have used the former to calculate volume. Understanding that volume represents the space inside a 3D shape, but that the same volume can involve very differently shaped spaces, is important for being able to solve problems and understand volume in real-life contexts. Look out for students who anticipate in part a that we cannot be sure that the boxes are the correct size; they are likely to have more secure understanding.In part b, the reasoning is more obvious for some boxes than others. For example, it is obvious that none of the lengths for C or E are long enough. However, it takes more thinking to realise that the total volume for A was exactly right, so if the parcel is twice as long as the book, at least one of the remaining dimensions must be half what is required. Students who reason this without prompting are likely to have a more secure starting point.As described in ‘Representations’, students may be more familiar with calculating volume from a 2D image of a box than a net: can they make connections between the two representations, for example by sketching the net as a box first?In this example, the assessment point is focused on whether the boxes are the right volume/size, so the three required dimensions are given. Solely relying on examples like this can lead to misconceptions, such as, ‘You multiply all the sides,’ rather than an understanding of the three dimensions needed to find the volume. Other Checkpoints assess this directly; see ‘Additional resources’ below.Additional resourcesIn this example, only the values that are needed for the calculation are labelled. This can lead to misconceptions, so it is advised that you also check understanding with Checkpoint 26 or 27 too.

78. What is the volume of cuboid A?ACheckpoint 26: Same volume6 cm5 cm4 cm4 cmCuboids B to E all have the same volume as cuboid A. What are the missing lengths?B10 cm? cm2 cm5 cmC? cm3 cmSketch some other boxes with the same volume. Can you sketch a cube? Why or why not?D12 cm10 cm? cmE8 cm6 cm? cm? cm

79. Checkpoint 26: GuidanceAdaptationsAssessing understandingSupportYou could support students to link part b to the volume of a cuboid by providing a structure for the first: _ × _ × _ = 120 cm3. Ask students to write in the lengths they know and suggest values for the missing length.ChallengeDelve deeper into the further thinking question by adding constraints, such as, ‘One length must be x times the other length’, ‘One length must be less than 1 cm’, or, ‘Give each length in different units’.RepresentationsConsider the variation in the representations that students see for cuboids within your scheme of work. For example, do students see cuboids with one much longer length, or three very similar lengths (so nearly a cube)? Do they see cuboids with varying numbers of labelled sides?Part a of this task assesses a very specific and common misconception. Sometimes, students are so used to working with examples where the information they need is given, that they misinterpret the process for finding volume. Rather than recognising that they need to multiply the three relevant dimensions together, they multiply all the numbers given. So, look out for students who multiply all four given dimensions together as they may need grounding in the concept of volume and how to find the volume of a cuboid before moving on to other 3D shapes. Look out also for students who know they need three values but struggle to identify which three they need. Support them to assign the terms length, width and depth to different dimensions consistently.Part b checks depth of understanding of volume of a cuboid by seeing if students can work backwards to find lengths once they know the total volume. Additional resourcesThe misconception addressed in part a is handled more thoroughly in Checkpoint 27.Additional activity K looks at volume in the context of cubes, if students need to practise thinking in terms of counting cubes to make the link with multiplying dimensions.An example of a Key Stage 2 SATs question that checks the same understanding as part b is question 24 of 2017 paper 3 reasoning. Past papers are readily available online.

80. Billy says, ‘To find the volume of a shape you just need to multiply the lengths together.’Which of these shapes does Billy’s rule work for?Checkpoint 27: Remembering rules Can you improve Billy’s rule?Find the volume of each of the shapes. Are they all possible?Can you estimate the volume of any that are not?5 m5 m5 m2 m2 m3 m3 mA20 cm60 cm1 mB4 m4 m3 mC1 m4 m5 m4 m3 m1 mD

81. Checkpoint 27: GuidanceAdaptationsAssessing understandingSupportWork with just A and B at first, and focus on which lengths are needed: draw students’ attention by highlighting them. Then look at C, to remind students that this rule only applies to cuboids.ChallengeShow students a volume calculation and ask them to sketch the shape that the calculation might refer to. For example, what shape might the calculation 7 × 4 × 3 give the volume for? How about 7 × 4 × 3 + 1? 7 × 4 × 3 + 2 × 2 × 2? RepresentationsUnderstanding the ‘multiply the lengths together’ rule might be supported using arrays. By constructing shapes from multilink cubes, students can build and identify that, for example, Shape A consists of a 5 by 3 array of cubes on the base, with two layers of these cubes leading to the calculation 5 × 3 × 2. Checkpoint 27 devotes more time to the misconception that might have arisen in part a of Checkpoint 26. It allows students to show not just how well they remember a rule, but how well they understand it. It is common for students to recall that, to find the volume, you ‘multiply the numbers together’. This is likely to have arisen from always working with examples where the information they need is given. Here, they consider which numbers are multiplied, and when this rule is valid.Look for students who can identify the key features of the shapes being worked on. There is some ambiguity in shape A where some of the numbers need to be multiplied; and in shape B where the numbers need to be changed so that all measurements are given in the same unit.Students who apply Billy’s method to shapes C and D are likely to have not understood that their method for finding volume only applies to cuboids, not to all 3D shapes. Clarify this and then ask if they can still find the volume of either shape. Until they have learnt how to find the volume of prisms more generally, C is likely to be inaccessible, but they can break D down into smaller cuboids. Additional resourcesExamples of Key Stage 2 SATs questions featuring calculating volume can be found in 2019 Paper 2 reasoning (question 23), 2018 Paper 2 reasoning (question 22) and 2017 Paper 3 reasoning (question 24). Past papers can readily be found online.

82. Checkpoint 28: Twice as wide, twice as tall ABCOn the right are three cylinders.Cylinder B is twice as wide as cylinder A.Cylinder C is twice as tall as cylinder A.Does B or C have the greater volume, or do they have the same volume?On the right now are three cuboids.Cuboid E is twice as wide as cuboid D.Cuboid F is twice as tall as cuboid D.Does E or F have the greater volume, or do they have the same volume?DEFHow would your answers change if the shapes were triangular prisms?

83. AABCheckpoint 28: Twice as wide, twice as tall (solutions) ACDEFAADDDD

84. Checkpoint 28: GuidanceAdaptationsAssessing understandingSupportThe assessment focus here is visualising so try to resist offering cylinders or cubes to work with. Instead, support students to step through the visualisation, perhaps by doubling the shape in one direction, then another.ChallengeAsk students to imagine repeated transformations – maybe doubling the height of the cuboid, stretching it so that it’s three times as long and five times as deep – and ask them to visualise how many of the original cuboids could fit in that new block.RepresentationsThe focus of the task is to visualise, but some students may find sketching is a support for this. Invite them to sketch the enlarged shapes and the original shapes inside themCheckpoint 28 explores how students visualise and manipulate 3D shapes, imagining the changes that will take place when objects are enlarged.The focus is not to calculate the volume, or to manipulate formulae. Year 8 students may not be familiar with the formula for the volume of a cylinder. Rather, the doubling of the dimensions is to give a chance to see how well students can mentally manipulate and combine images.The order of the tasks, with what might be considered the more challenging cylinder first, is to encourage this manipulation rather than generalising from a cuboid. Change that order to better fit your class if necessary.Student justifications for the cylinder might include that they can imagine fitting four of the blue cylinder in the red, but only two in the yellow. Encourage them to justify their statements, and to describe the arrangements of the cylinders to further probe their understanding.Additional resourcesAdditional activity H looks at cuboids and cylinders, and might be a useful precursor.Question 23 from 2019 Key Stage 2 SATs Paper 2 reasoning also looks at volume when the dimensions of a 3D shape change. Past papers can readily be found online.

85. Additional activities Activities A–K

86. Activity A: TilesThe picture shows a tiled doorstep.The yellow square is 20 tiles across and 20 tiles high.Jake says 2020 = 400, so there are 400 tiles in the square.Vanessa says that 400 is a good estimate, but not an accurate answer.Who is correct? Explain why. Do you think that Jake’s answer is likely to over- or under-estimate? Explain why. 

87. A tray of cups is placed in the staffroom for breaktime.How many more cups are needed to fill the tray? How do you know?Each cup has a radius of 5 cm. Use this to estimate the perimeter and area of the tray the cups are on.Activity B: Cups Trays of cups are stacked on top of each other for a school event. How many trays are needed if there are 211 attendees? How many attendees might there be if four trays are provided?

88. Put shapes A to E in ascending order of perimeter. What do you notice?Put the shapes in ascending order of area. What do you notice?Priya uses her shapes as nets. She cuts out around the perimeters and folds along the internal linesWhich 3D shapes has she made nets for?Activity C: NetsABCDECan you make any other nets for the same shapes? Where would they go in your orders for part a and b?Priya uses some smaller shapes to make bigger shapes, A to E.Each length in the smaller shapes is 1 cm.

89. Activity C: Nets (animated solutions to further thinking question)ABCDECan you make any other nets for the same shapes? Where would they go in your order for part a?There are no other nets for a tetrahedron.

90. Activity D: Magnet tilesLucy is working with some magnetic tiles.She has two equilateral triangle tiles and two square tilesLucy says, ‘I can make a 3D shape out of these tiles.’ Is she correct? Why or why not?Lucy adds one more tile. She can now make a 3D shape.What must the tile have been? What shape can she make?How would your answer to part b have changed if she’d added two tiles?What other 3D shapes could Lucy make if she added more square or triangle tiles?

91. Mike draws:Three students each draw the outline of an ice lolly from a different angle. Activity E: Lolly Najma draws:Ollie draws:Is it possible they are all correct? If not, who has made a mistake?From what perspective did they each draw their picture?What would Mike, Najma and Ollie draw for each of the three ice lollies below?

92. Activity E: Lolly (solutions to further thinking question)Mike:Najma:Ollie:What would Mike, Najma and Ollie draw for each of these lollies?

93. This building in Birmingham is called The Cube.Can you see any cubes within the picture?Is this shape the net of a cube? Why or why not?What other 2D shapes can you see?What other 3D shapes can you see?Activity F: The CubeWhat 2D and 3D shapes can you see around you?

94. Activity G: Pandora’s boxesPandora is making boxes from rectangles of card.When she uses three rectangles of card, she then cuts out two triangles for either end of her box.Pandora cuts out a circle for the top and bottom.How many rectangles might she have used?What shapes would she have needed for the ends of her box if she had used:five rectangles six rectangleseight rectanglestwelve rectangles?How many faces will her box have if she uses:seven rectangles nine rectangles twenty rectanglesone hundred rectangles?What is the same and what is different about all her boxes?

95. Rosie and Marie each have a cake that is shaped like a cuboid.Rosie cuts her cake into horizontal slices.Marie cuts her cake into vertical slices.What can you say about the size and shape of their slices?How would your answers change if their cakes were cylindrical?Activity H: Slices of cakeHere is one of Marie’s slices from a different cake. What will Rosie’s slices look like?

96. Does the word capacity mean the same thing in both these statements?Could you replace the word capacity with volume in both statements? Why or why not?Activity I: CapacityThis tanker has a capacity of 90 000. Create other examples of statements that use the word capacity. Can you think of an example that could also use the word volume?This stadium has a capacity of 90 000.

97. Activity J: Cube frame Robbie has built a frame out of cubes.How many cubes will he need to completely fill the space inside the frame? How do you know?How many cubes will he need to put a lid on the frame? Imagine Robbie took the top layer of his frame and used it to make the frame two cubes high, but longer and wider. Would your answers change?

98. Which of A to F are nets for a cube with volume 8 cm3? For those that are not, what would need to change so that they are?Activity K: Cube 8Draw three more different possible nets for a cube of volume 8 cm3.ABCDEF

99. Printable resources

100. a)b)c)d)e)f)

101.

102.

103.

104.

105.

106. Images on slides 25, 27 (diagram only), 37/38 (diagram only), 40/41, 45/46, 57/58, 64, 66, 72, 91/92, 95, 96 and 102: credit – Steve Evans.Images on slides 37/38 (photo only) and 96: credit – Shutterstock.Image on slide 93: credit – John Bennetts.All other images taken or created by Richard Perring and Becky Donaldson.Image acknowledgements