
Objective To visualize pieces of DNA by size using a gel matrix and an electrical current Background The chromosomes in our cell nuclei consist of large strands of DNA These strands are very u ID: 952900
Download Pdf The PPT/PDF document "Gel Electrophoresis" is the property of its rightful owner. Permission is granted to download and print the materials on this web site for personal, non-commercial use only, and to display it on your personal computer provided you do not modify the materials and that you retain all copyright notices contained in the materials. By downloading content from our website, you accept the terms of this agreement.


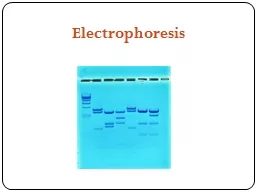


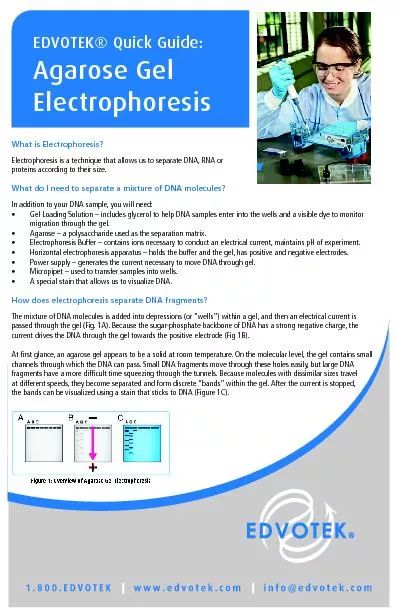

Gel Electrophoresis Objective: To visualize pieces of DNA by size, using a gel matrix and an electrical current. Background The chromosomes in our cell nuclei consist of large strands of DNA. These strands are very unwieldy when they are all in one piece. Very often, scientists use enzymes to cut—or digest, as it is called—these large strands of DNA into smaller segments. These smaller segments can then be studied in a variety of ways. One very useful activity, called gel electrophoresis, allows a scientist to easily separate fragments of DNA by size. Manual DNA sequencing and DNA fingerprinting, which are techniques you have likely heard much about, both involve g Today we will study agarose gel electrophoresis, which is the most flexible and versatile type of gel electrophoresis. It is also the easiest and safest to perform. Agarose gels are used in a wide variety of applications, including checking the yield of an experiment designed to digest, extr Discussion The Agarose Gel Our gel is made with a 0.8% agarose solution. When heated in solution, powdered agarose melts. When it resolidifies, it polymerizes, creating a matrix of gel very similar to the agar plates we have used this semester to culture bacteria. This gel matrix may look solid, but if we could look Once we have placed our gel in the electrophoresis chamber and loaded it with DNA, we will hook up the chamber to a power source designed to send an electrical current through the gel. DNA is negatively charged at a neutral pH (which is something else our TAE buffer helps us achieve), so if we expose the end of the gel nearest the DNA to a negative charge and the end of the gel farthest from the DNA to a positive charge, the DNA will migrate away from G e l Electro phor esis, B I O 2420 1 SK L- 12 /01 the negative charge and toward the other end of the gel. (Opposites attract, remember.) The smaller pieces of DNA will move readily through the tiny holes of the gel matrix while the larger pieces will get caught up more often and will migrate more slowly. The longer we run an electrical current through the gel, the more the different-sized pieces of DNA will separate from each other, allowing us to see distinct bands of different sizes of DNA fragments. Now that we have a general overview of what we’re doing and why, let’s go back and talk in more detail about how our gel was made and what all these solutions are. Our gel was made, again, using a 0.8% agarose/TAE solution. This means we added 0.4g of agarose to 50mL of TAE buffer. Then we heated the mixture until the agarose melted. This solution is far too hot to pour right away, so we let it cool, stirring it periodically to make sure it cools evenly and doesn’t solidify on the bottom. While we wait for it to cool, we seal the gel casting tray with autoclave tape, being sure the ends of the tray—which are open otherwise—are well-sealed; we don’t want our molten agarose to pour out. Once the flask holding the agarose solution is cool enough to press against our wrist without discomfort, we add 5L of a staining solution. This is a shortcut step that allows us to bypass the lengthy gel staining process and visualize our gel right after we remove it from the electrophoresis chamber. The standard staining solution used in most labs is ethidium bromide (EtBr); however, EtBr is toxic and a mutagen, so we use a safe alternative called SYBR green. We stir the stain into the agarose solution, being careful to avoid creating bubbles, then we pour the agarose solution into the sealed gel casting tray. Once the agarose is all poured, we insert the comb into the molten gel.
We let the gel cool and solidify completely. When the gel is completely cool, we very carefully remove the comb. This leaves spaces, called wells, in the gel. We load our DNA mixture into these wells. The wells serve the purpose of inserting the DNA mixture into the matrix of the gel without damaging the gel. The DNA sample The sample we load into the wells contains three things: water, loading dye, and DNA. The water adds volume to make it easier for us to mix the DNA and loading dye together, and it also makes it easier for us to load the sample into the wells. The loading dye is a mixture of glycerol and three dyes that move through the gel at differing rates. We cannot see the distinct bands of DNA as they migrate through the gel, but we can see the bands of dye. The dyes have been chosen because they migrate through the gel at a specific rate in relation to the bands of DNA. Because of this, we know that our bands of DNA are somewhere between the bands of dye. Therefore, we can be sure to avoid running our gel so long that we flush our bands of DNA out the far end of the gel into the chamber. Actually, the DNA we are using today will be somewhere between the top two bands of dye, so we can safely allow the very bottom band of dye to run off the end of the gel. The loading dye also weighs down the DNA, thanks to the glycerol; this ensures that DNA stays down in the well where it can migrate through the gel rather than diffusing out into the buffer as soon as we load it. Finally, the loading dye makes it a little easier to see what we’re doing when we load our DNA mixture into the wells of the gel. The DNA we are using is a DNA ladder. This is a carefully-calibrated mixture of different-sized fragments of DNA. Our ladder has fifteen fragments from 250bp-12,000bp (12kb). These fragments are 250bp, 500bp, 750bp, 1kb, 1.5kb, 2kb, 3kb, 4kb, 5kb, 6kb, 7kb, 8kb, 9kb, 10kb, and 12kb in length. A DNA ladder is typically used as a sort of ruler against which a scientist can measure the size of an unknown DNA fragment. Typically, in at least two lanes of the gel—one on the left and one on the right, and sometimes in one or more lanes in the middle of a big gel—the scientist will load DNA ladder. Then s/he will load DNA fragments of an unknown length in between the lanes of ladder. When the gel has run, the scientist can see where in comparison to the fragments of known size the unknown samples are, and from there, s/he can determine the size of the fragments. If a fragment of unknown size was parallel with known fragments that were 750bp long, how long would you expect the unknown fragment to be? Why would a scientist run multiple lanes of ladder instead of just one? (Do gels always run evenly?) Our mixture includes 4L water, which we add first, 4L DNA, and 2L loading dye, for a total of 10L. G e l Electro phor esis, B I O 2420 2 SK L- 12 /01 Procedure Wear gloves!!!!! Pouring the gel 1. Use a graduated cylinder to measure 50mL of TAE buffer. 2. Obtain a 250-mL Erlenmeyer flask and a magnetic stir bar. Place the stir bar in the flask. 3. Pour your 50mL of TAE buffer into your flask. 4. Weigh out 0.4g of agarose. Pour it into your flask with the TAE buffer. Cover the top of the flask with foil. 5. Place the flask with TAE and agarose on a heat/stir plate. Allow the mixture to stir as it heats to boiling. 6. While you let the agarose heat, securely seal the ends of the gel casting tray with autoclave tape. 7. As soon as the agarose melts (the solution will be clear), remove the flask from the hot plate. *****NOTE: THE FLASK WILL BE HOT. Use “Hot Hands”! Do not let the agarose boil
over!!!!! 8. Being careful to not burn yourself or spill the agarose, swirl the flask periodically as it cools. 9. When you can touch the bottom of the flask to the inside of your wrist without discomfort, add 3L of SYBR green and swirl gently to mix. Avoid making bubbles. 10. Pour the agarose into the gel casting tray. Insert the comb. 11. Allow the gel to cool and solidify completely (30-45 min.) Mix the DNA while you are waiting. 12. When the gel is ready, carefully remove the comb. Remove the tape from the ends of the gel casting tray. 13. Be sure the gel electrophoresis chamber is OFF. 14. Place the gel into the electrophoresis chamber. Pour enough TAE buffer into the chamber to cover the gel. Add 5L of SYBR green at one end of the chamber and 5L at the other end. Mix gently with a stir rod. Mixing the DNA 1. Obtain an empty Eppendorf tube, a micropipetter, and clean pipet tips. Put a fresh tip on your pipetter. 2. Add 4L water to the VERY BOTTOM of the Eppendorf tube. Discard your tip. 3. Put on a fresh tip. Add 2L of DNA to the VERY BOTTOM of your Eppendorf tube. Discard your tip. 4. Put on a fresh tip. Add 2L of loading dye to the VERY BOTTOM of your Eppendorf tube. Discard your tip. Loading the DNA 1. When you are ready to load the DNA mixture into the gel (and not before), set your pipetter to 10L and put a fresh tip on your pipetter. Take up the DNA mixture from the Eppendorf tube. Be sure to not get any air bubbles mixed in with the liquid; air will cause problems when loading the gel. 2. Hold your micropipetter in your operating hand and brace it with your other hand. 3. Insert only the very tip of the pipet into the well in the gel. Be very careful to avoid puncturing the well, as that will allow the DNA to drain out the bottom of the well, and your sample will not run properly. 4. Gently expel the DNA mixture into the well of the gel. Running the Gel 1. As soon as you are done loading the DNA, put the top on the electrophoresis chamber. The black lead will be attached at the end of the gel nearest the DNA. The red lead will be attached at the other end. 2. Be sure the range is set to “low” and the units are set to volts. 3. The voltage select should be the fourth or fifth click up from the minimum setting. 4. Turn on the power supply. Ensure that there are tiny bubbles rising from both the anode and cathode. Ensure that the LCD number reads somewhere between 70 and 100 volts. 5. Allow the gel to run until the top two bands of dye have reached their maximum separation. (45 min.-1 hr.) 6. Turn off the power supply and remove the lid from the electrophoresis chamber. Visualizing the Gel (Since we added the SYBR green to the gel and buffer, we do not have to stain the gel after we run it.) 1. Very carefully remove the gel and gel casting tray (together) from the electrophoresis chamber. 2. Take the gel over to the Dark Reader. Very carefully slide it off the gel casting tray onto the blue surface. 3. Place the amber screen over the gel. Turn off the lights and close the blinds. 4. Turn on the Dark Reader. The Dark Reader performs the function of a UV transilluminator without emitting any harmful UV rays. No special precautions apart from your regular good lab technique are necessary. 5. You should be able to see the bands of DNA illuminated on the reader. 6. See if you can determine which band is the 250bp band and which band is the 12kb band. Critique the gel. Did it run evenly? Did you achieve good separation? 7. Dispose of your gel in the biohazard bag and your used TAE buffer in the labeled beaker. Clean up your mess. G e l Electro phor esis, B I O 2420 3 SK L- 12 /0