
olo Manufacturing Corporation ID: 824197
Download Pdf The PPT/PDF document "INSTALLATION INSTRUCTIONSModel 125 DOMIN..." is the property of its rightful owner. Permission is granted to download and print the materials on this web site for personal, non-commercial use only, and to display it on your personal computer provided you do not modify the materials and that you retain all copyright notices contained in the materials. By downloading content from our website, you accept the terms of this agreement.

![expressiveimpactofnominalschemasingeneral[5].Beyondthissingularresult,](https://thumbs.docslides.com/484247/expressiveimpactofnominalschemasingeneral-5-beyondthissingu.jpg)


INSTALLATION INSTRUCTIONSModel 125 DOMIN
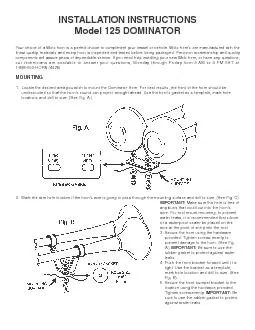
INSTALLATION INSTRUCTIONSModel 125 DOMINATORour choice of a Wolo horn is a perfect choice to compliment your vessel or vehicle. Wolo hornÕs are manufactured with thecomponents will assure years of dependable service. If you need help installing your new Wolo horn, or have any questions,our technicians are available to answer your questions, Monday through Friday from 9 AM to 4 PM ESTat1.Locate the desired area you wish to mount the Dominator Horn. For best results, the front of the horn should beunobstructed so that the hornÕs sound can project straight ahead. Use the hornÕs gasket as a template, mark holelocations and drill to size. (See Fig. A.)2.Mark the wire hole location if the hornÕs wire is going to pass through the mounting surface and drill to size. (See Fig. C)IMPORTANT:any burrs that could cut into the hornÕsprovided. Tighten screws evenly toIMPORTANT:ighten screw evenly. IMPORTANT:olo Manufacturing Corporation (ÒWoloÓ) warranties to the original purchaser, for three months from the date ofolo, at its option, will either repair or replace the item free of charge, if it is returned to Wolo within three monthsfrom the date of purchase together with proof of purchase as described below. Wolo reserves the right to inspectany defect prior to settling any warranty claim by repair or replacement. This warranty is
limited as above providedand Wolo will
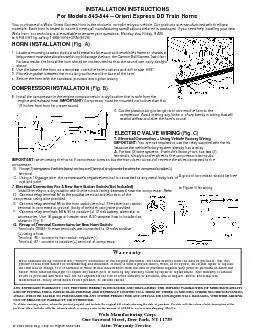
limited as above providedand Wolo will not be responsible for fire or other casualty or accident, due to neglect, abuse, abnormal use,ANYEXPRESSED WARRANTYNOTPROVIDED HEREIN IS EXCLUDED AND DISCLAIMED. THE IMPLIEDARRANTIES OF MERCHANTABILITYAND OF FITNESS FOR APARTICULAR PURPOSE ARE EXPRESSLYLIMITED TO ATERM OF THREE (3) MONTHS. UNDER NO CIRCUMSTANCES SHALLWOLO BE LIABLE TOPURCHASER OR ANYOTHER PERSON FOR ANYSPECIALOR CONSEQUENTIALDAMAGES, WHETHER ARISINGOUTOF BREACH OF WARRANTYOR OTHERWISE.Provide with the return a brief description of the problem. Also, include with the return a check or money order in theOne Saxwood Street, Deer Park, NY11729 Attn: Warranty Service2007 Wolo Mfg. Corp All Rights Reserved.6. Connect one wire from each horn to (+) 12-volts positive, the battery, alternator, etc. A8 amp inline fuse should be8. Connect the horn switchÕs other wire toWIRING to Factory Horn System With Two (2)9. If the factory horn has two wire terminals,connect one wire to each of The DominatorWIRING to Factory Horn System With One (1)remove the wire from the factory horn and connect to one wire of each of The Dominator horns.1. The other horn wire from each of The Dominator horns is connected to ground, under any metal bolt that is clean ofIMPORTANT: Make sure all wires are secured and connections are properly taped.