
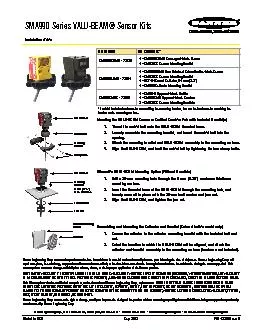
Kit Model SMA990CVMB 73030 1 150 SMA990CVMB ConvergentMode Sensor SMA990LVMB 72854 1 150 SMA990LVMB NonPolarized RetroreflectiveMode Sensor 1 150 SMB30SC Sensor Mounting Bracket 1 15 ID: 827553
Download Pdf The PPT/PDF document "Kit Contents*" is the property of its rightful owner. Permission is granted to download and print the materials on this web site for personal, non-commercial use only, and to display it on your personal computer provided you do not modify the materials and that you retain all copyright notices contained in the materials. By downloading content from our website, you accept the terms of this agreement.


![[satellite image]Contents](https://thumbs.docslides.com/104538/satellite-image-contents.jpg)
Kit ModelKit Contents*SMA990CVMB - 730
Kit ModelKit Contents*SMA990CVMB - 730301 – SMA990CVMB Convergent-Mode SensorSMA990LVMB - 728541 – SMA990LVMB Non-Polarized Retroreflective-Mode Sensor1 – SMB30SC Sensor Mounting Bracket1 – BRT-84 Round Reflector, 84 mm (3.3")1 – RMB85 Reflector Mounting BracketSMA9ERMBK - 730291 – SMA91E Opposed-Mode Emitter1 – SMA99RMB Opposed-Mode Receiver2 – SMB30SC Sensor Mounting Brackets* Each kit includes hardware for assembling the mounting bracket, but not the hardware for attaching the bracket to the mounting surface.Mounting the VALU-BEAM Sensor or Emitter/Receiver Pair with Included Bracket(s)Thread the swivel ball onto the VALU-BEAM threaded base. 2.Loosely assemble the mounting bracket, and insert the swivel ball into the opening.3.Attach the mounting bracket and VALU-BEAM assembly to the mounting surface. 4.Align the VALU-BEAM, and lock the swivel ball by tightening the two clamp bolts.VALU-BEAMSwivel BallMounting BracketClamp BoltsVALU-BEAMMounting Surface 6 mm (0.25") max. thicknessLock WasherJam NutReflector Mounting BracketReflectorBanner Engineering Corp. warrants its products to be free from defects in material and workmanship for one year following the date of shipment. Banner Engineering Corp. will repair or replace, free of charge, any product of its manufacture which, at the time it is returned to the factory, is found to have been defective during the warranty period. This warranty does not cover damage or liability for misuse, abuse, or the improper application of the Banner product.THIS LIMITED WARRANTY IS EXCLUSIVE AND IN LIEU OF ALL OTHER WARRANTIES WHETHER EXPRESS OR IMPLIED (INCLUDING, WITHOUT LIMITATION, ANY WARRANTY OF MERCHANTABILITY OR FITNESS FOR A PARTICULAR PURPOSE), AND WHETHER ARISING UNDER COURSE OF PERFORMANCE, COURSE OF DEALING OR TRADE USAGE.This Warranty is exclusive and limited to repair or, at the discretion of Banner Engineering Corp., replacement. IN NO EVENT SHALL BANNER ENGINEERING CORP. BE LIABLE DAMAGES RESULTING FROM ANY PRODUCT DEFECT OR FROM THE USE OR INABILITY TO USE THE PRODUCT, WHETHER ARISING IN CONTRACT OR WARRANTY, STATUTE, TORT, STRICT LIABILITY, NEGLIGENCE, OR OTHERWISE.Banner Engineering Corp. reserves the right to change, modify or improve the design of the product without assuming any obligations or liabilities relating to any product previously manufactured by Banner Engineering Corp.Assembling and Mounting the Reflector and Bracket (Retroreflective model only)1.Secure the reflector to the reflector mounting bracket with the included bolt and nut.2.SMA990 Series VALU-BEAM® Sensor KitsInstallation GuidePrinted in USAP/N 123835 rev. BBanner Engineering Corp., 9714 Tenth Ave. No., Minneapolis, MN USA 55441 • Phone:763.544.3164 • www.bannerengineering.com • Email: sensors@bannerengineering.comreflector-and-bracket assembly to the mounting surface (hardware not included).Alternative VALU-BEAM Mounting Option (Without Brackets)1.Drill a 30-mm mounting hole through the 6 mm (0.25") maximum thickness mounting surface. 2.Insert the threaded base of the VALU-BEAM through the mounting hole, and loosely secure it in place with the 30-mm lock washer and jam nut.3.Align the VALU-BEAM, and tighten the jam nut.