
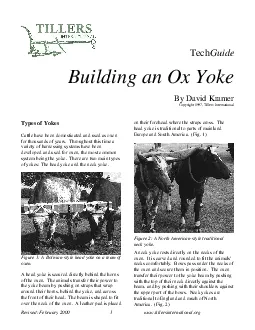
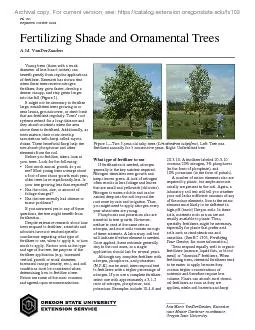
A head yoke is secured directly behind the horns of the oxen The animals transfer their power to the front of their head The beam is shaped to fit on their forehead where the straps cross The head ID: 868382
Download Pdf The PPT/PDF document "Revised February 2000 1 wwwtillersint..." is the property of its rightful owner. Permission is granted to download and print the materials on this web site for personal, non-commercial use only, and to display it on your personal computer provided you do not modify the materials and that you retain all copyright notices contained in the materials. By downloading content from our website, you accept the terms of this agreement.


1 Revised: February 2000 1 www.tillersi
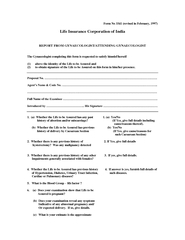
Revised: February 2000 1 www.tillersinternational.org Copyright 1997, Tillers International Types of Yokes Cattle have been domesticated and used as oxen for thousands of years. Throughout this time a variety of harnessing systems have been developed and used for oxen, the most common system being the yoke. There are two main types A head yoke is secured directly behind the horns of the oxen. The animals transfer their power to the front of their head. The beam is shaped to fit on their forehead where the straps cross. The head yoke is traditional to parts of mainland Europe and South America. (Fig. 1) ican-style traditional unded to fit the animals' necks comfortably. Bows pass under the necks of with the top of their neck directly against the beam, and by pushing with their shoulders against traditional to England and much of North America. (Fig.
2 2) Tillers TechGuide 2 Building an Ox
Tillers TechGuide 2 Building an Ox")
2) Tillers TechGuide 2 Building an Ox Yoke Figure 3: Parts of a traditional neck yoke: A yoke beam; B bows; C bow width and size of yoke; D There are advantages and disadvantages to each of the yokes mentioned above. The head yoke limits the individual movement of each ox, and the team must learn to operate together. The force of draft from the head yoke is transferred yoke must be placed to prevent the head from load. The head yoke cannot be used on animals young calves whose horns are very small. An the animals stop a moving load. Some teamsters see an advantage in the limited individual movement the head yoke forces upon the ox team, especially with an animal that likes to swing its head or tends to misbehave. The neck yoke allows more freedom of individual movement for oxen, making sharp corners easier to turn. The force of draft from a ne
3 ck yoke begins farther down the spine, a
ck yoke begins farther down the spine, and some of the very young animals at an age when they respond quickly to training. When holding back a load, the neck yoke will ride disturbing to the animals, and sometimes they get their ears pinched between the yoke beam and an added expense in equipment and time spent on preparing the animals for work. A brichen is a belt that wraps around an animals rear quarters and permits it to hold back a load with its rump. Revised: February 2000 3 www.tillersinternational.org Full Scale Copies of these Plans and Templates are available from: Figure 4: Tillers Plans for a Tr Tillers TechGuide 4 Building an Ox Yoke In pulling contests there seems to be little difference in performance by yoke style. Teams of oxen with similar body weights will pull fairly carefully fitted. Tillerwill need to consider the styles and
4 choose the possible to train a team to
choose the possible to train a team to work in both styles of We generally use neck yokes at Tillers. Neck the oxen do not need to do much braking. We also use the neck yoke because we prefer to train grown. The focus of this TechGuide will be on the construction of neck yokes. Design and Fit of a Neck Yoke Before construction begins it is important to properly fit a team of oxen. This information is team may need as many as five or six yokes before it reaches maturity. A well-fitted yoke will allow an ox team to pull to its full potential. injure the oxen, and will not allow the team to bow width, is one of the most critical dimensions in fitting a yoke. Because this measurement is so by the width of its bows. A 7-inch yoke will have oxen. When the yoke is on the oxen you should Tillers Yoke Plan (Fig. 4) is designed to give dimensions for a genera
5 l-determined the correct bow width (fact
l-determined the correct bow width (factors of these dimensions. For example, if you are making a yoke with a 7-inch bow width, plug Bw. Full-scale yoke templates can be ordered from Tillers for yoke sizes ranging from 4 inches TABLE 1: Common Name Botanical Name Pine Pinus Aspen Populus tremuloides Alder Alnus glutinosa Sassafras Sassafras For Heavy Use Yoke Beams Common Name Botanical Name Elm Ulmus americana Shagbark Hickory Carya ovata Hard Maple Acer saccharum Hornbeam Carpinus caroliniana Sycamore Acer pseudoplatanus Yellow Birch Betula alleghaniensis Common Name Botanical Name Hackberry Celtis occidentalis Hickory Carya White Ash Fraxinus americana White Oak Quercus alba Red Oak Quercus rubru English Walnut Juglans regia Tillers TechGuide 6 Building an Ox Yoke Figure 5: A yoke beam split from a large log is less likely to c
6 heck when drying than one made Construct
heck when drying than one made Construction on the yoke beam may begin with a sawmill. If you begin with a log you will need wedges to split out the yoke beam. Try to find a yoke from one piece. (Fig. 5) The circular grain structure left in beams made from a small log will cause more internal stress during drying, and will be more likely to develop checks and splits. (Fig. 6) and dried under similar conditions. The beam on a section of a 14-inch log. It dried without checking. If you choose to begin with a beam from a sawmill you should check the end grain and look for a beam that was taken from one side of a large Even a good piece of wood will split and check if it is not carefully seas Revised: February 2000 7 www.tillersinternational.org you have a log it is best to split out the section you need for the yoke beam immediately. The smaller th
7 e piece of wood have time to carve the b
e piece of wood have time to carve the beam right away store the beam in a cool shady place, off the ground so that it will not absorb ground moisture. Do not store the wood inside a heated or dehumidified ends to slow the drying. Plastic can be draped moisture to escape. too slowly and it may rot if the plastic is not removed. Some of the old time yoke makers recommend seasoning the yoke beam by burying it in loose hay. The hay will allow the beam to rate. A large beam of make our yokes from green wood, paint them turpentine (mixed in a 2:them immediately. At first they are qubut after some months of lose much of their moisture. Some yoke builders may prefer to begin work on a beam that is already seasoned and dry. In this case any checks or splits will be evident before time is invested in shaping the beam. Power wood. Many of the traditional
8 hand tools work A good place to look f
hand tools work A good place to look for wood is at a tree trimming/tree removal business, or at a small sawmill. Small band saw mills are becoming woods that larger sawmiLumberyards usually do not carry hardwood beams, and if they make a special order the cost will be very high. Look Small knots are acceptable if they do not weaken the beam and if they do not occur in the neck seat beam develops checks, then the yoke pattern can be shifted to eliminate thaway from the neck seat. Shaping the Yoke Beam Figure 8: Mark the cross section of the beam on When splitting the yoke beam from a log, mark the beam blank at the top of the log and use wedges to rough split outside your lines. (Fig. 8) Trees usually split better from the top end down. Figure 9: Use care when adzing in the traditional method. Tillers TechGuide 8 Building an Ox Yoke Use a foot adze
9 to hew the beam down to size. Stakes d
to hew the beam down to size. Stakes driven into the ground will help to hold the beam stationary. Experienced workers like to from under the toe of their ith my feet out of the way. Both methods have their dangers. With With your feet to the side a glancing blow may strike your shin. I have you get the feel of how it cuts. I usually make perpendicular into the wood, and follow these with lighter planing strokes parallel to the surface of the wood. With some practice you will find that the adze can be used to do some very nice finish work. When I plane or smooth the of my arms against the sides of my chest and swing the adze in a smooth arc with my lower arms. Keeping my upper arms rigid against my chest helps to give me better control and allows me to make fine adjustments in the arc as I cut. trapezoid in cross section. marked out at the opposite
10 end of the wood, and The yoke beam is w
end of the wood, and The yoke beam is wider at the top than the bottom, so we usually use the adze to hew out a beam that is a trapezoid The bow holes should be marked out and drilled in the beam when it has stthe beam is carved there are no straight reference lines and it is very difficult to get the holes drilled chalk line will ensure that all the bow holes are in traditional tool used to bore the bow holes. (Fig. than the finished bow stock diameter. If you have access to a traditional barn builders boring mill, it is an excellent toolperpendicular to the surface. A strong electric will also drill the bow holes. Assistants watching from different angles can help to make sure the holes are drilled straight. A drill press can also be will ensure that the holes are drilled straight if the beam is square. On some historical yokebow holes were drilled at
11 a slight angle, making This angle may ha
a slight angle, making This angle may have been used to fit the bows sometimes tapered thinner than the bottom. This Revised: February 2000 9 www.tillersinternational.org system limits the depth adjustment of the bows, making the taper of the bows critical to fitting the matching tapered bows can be difficult for a novice yoke maker. For starters I would recommend keeping bows and bow holes straight direction of cut will move from high points to digging in or leaving a rough cut, try reversing and cutting from the opposite direction. Cardboard or thin plywood templates of the yoke plan are useful to layout the profile on the beam. A black marking pen leaves an outline that can be easily seen during work. The adze is again used to rough out the profile of the yoke. When using the wood must be considered. The cuts used to remove waste wood will start
12 at the high points of the beam and work
at the high points of the beam and work to the low points. The direction of cut will have to be changed many times to complete the profile. (Fig. 12) If the adze is making rough cuts, or is carve the yoke profile are a small hand adze, and mallet. Power tools are also commonly used to make yokes. A band saw can be used to rough out many yokes in a el and mallet to knock a 45-degree chamfer off the edge of the neck seat. round over the edges. (Fig. 15) Direction of the wood grain is again important for determining the direction of cut. Smoothing the surface of wood with a cutting tool is a lot like petting a cat with your hand. If you pet a cat from the head to the tail its fur will lay smooth and flat. If you pet backwards from the tail to the head the hair will stand up and be uneven. The grain of wood Tillers TechGuide 10 Building an Ox Yoke no
13 rmally runs out one direction on the sur
rmally runs out one direction on the surface. smoothed down, or it can be roughened up it. In most cases you can follow the directions of Note the cross section of the neck seat on the Tillers Yoke Plan. (Fig. 5) It is a smooth flowing elliptical shape right from the center of and smooth the surface of the neck seat to a smooth hard finish. (Fig. 16) It is a temptation to fiof the yoke beam to make it more comfortable for the oxen. Avoid this temptation. Soft pads added to the neck seat or bowcause sores on the animals necks and shoulders, much like a loose sock can cause a blister on your foot. A hard smooth surface is better for the oxen ol for shaping the neck sanding disc for heavy stock removal. Finer nders can be used for removes stock quickly when pushed across the The neck seats must be carefully finished, smooth can be left rough-hewn.
14 For a more finished look smooth the si
For a more finished look smooth the sides, top, and bottom of the yoke beam. (Fig. 17) The top edges of the yoke and the edges of the bow holes may be rounded or very important to any type of woodworking. Tillers TechGuide 12 Building an Ox Yoke around a form or simply around a tree of the outside fibers of the wood from tearing out. The traditional method of bending described above was tried at Tillers and our success rate was not We normally use a steam box to heat the wooden bow stock before bending. Even with steam, the ock are critical to a successful bend. Instead of splitting wood for bows, we saw out bow blanks from select straight-grained lumber. Kiln dried lumber does not bend well. Air-dried lumber cut in the last steaming is helpful. Since the bark is removed from our bow blanks, we use a metal strap to The bow stock is steamed at least
15 one hour before bending, and the steam
one hour before bending, and the steam sLarger bows should be steamed longer. One hour of steaming for each square inch of cross section is a good rule. We have a wood stove with a water tank built into it. The steam flows out of No part of our system is pressurized. There are a tank for a steam box make sure you include a wood is removed from the steam box it should be too hot to handle with bare hands. The steam together, allowing them to slide past each other Figure 20a: Tillers bends bows on a simple jig Before the wood cools it must be bent into the desired shape. We use a bending jig to hold the forms for any size of bow. (Fig. 20 & 21) A metal supporting strap made of 1/8-inch thick mild steel is placed behind the bow stock. Figure 21: bending a bow on the jig. Tillers TechGuide 14 Building an Ox Yoke Alternative Bows There are many people w
16 ith the tools and skills to make a yoke
ith the tools and skills to make a yoke beam. Bending bows is more difficult. Tillers has been experimenting with some optional materials for bows. A variety of metal and plastic pipes and conduit can be bent Look for a thick walled pipe section. Fill the pipe soil. Heat the plastic pipe over a small bed of hot coals, or with a propane torch. Work outside or in a well ventilated area. off poisonous fumes. Keprevent burning it. When it becomes soft like a cooked noodle bend it around a wooden form and hold it in place until it cools. The sand will prevent the walls of the pipe from collapsing of steam pressure in the pipe. Remove the sand after bending. For small training yokes up to 5 or pe alone may be strong small carts. We found them to be strong enough for this purpose. An ox driver in Wisconsin informed us he was using plastic bows with wooden
17 inserts to pull sma Electrical shops car
inserts to pull sma Electrical shops carry a metal conduit, and they often have equipment to Heavier walled metal pipe can also be bent into red color first. A coal heat. Do not use water pipe because it has a galvanized coating that will give off poisonous fumes when heated. Black pipe, which is used heat. Have a metal form (brake drum, wheel rim, etc.) ready to bend the metal around. The metal will bend quickly where it is the hottest, so try to stop and add more heat to the section that is not problem in cold climates. During winter months the oxen may not appreciate a cold piece of pipe I do not recommend plastic or metal pipe bows offered for those who might have difficulty making or purchasing wooden bows. If you choose an alternative bow you will need to carefully experiment with the load limits of the plastic or metal tubing/pmade of plastic, met
18 al, or wood, has the potential Bow Pins
al, or wood, has the potential Bow Pins and Spacers Wooden pins can be made to hold the bows in position. The wooden pin shown below will the pin is locked into position so that it cannot slide out. adjustment. The easiest way to get a metal pin is can also be hand forged. Small coil springs made of stock 3/16 to 1/4 inch in diameter can be used to make bow pins. Heat the spring in a forge, Revised: February 2000 15 www.tillersinternational.org place the red hot spring over a pipe clamped in a wire. Use a hot chisel to cut off a piece 8 inches bent into the curve and will be easier to flex than can be used to form the pin into a shape that will fork set in the hardy hole of the anvil. and tempered to retain tempering colors. Place the pin in your kitchen When the blue appears remove the pins from the heat them at a higher temperature in the temper
19 ing process. Hardening and tempering ca
ing process. Hardening and tempering can be tricky on small stock. At Tillers we often use mild steel stock to make bow pins, then quench the red hot finished pins in a hardening solution to give them some Spacers are made from blocks of wood and/or leather. They are placed under the bow pins and adjustment in the bow. Many teamsters like to at least put a leather spacer under the bow pins, as this keeps the bow pin from digging into the yoke beam. Holes for the bow pins are usually drilled on the ter of the yoke. Normally only one shaft of the bow is pinned. When fitting a on the team of oxen, adjust the bows for depth, and mark the correct location for the bow pin. This will eliminate the need to drill many holes or use a lot of spacers. Yoke Hardware: St The hardware for a neck yoke consists of a staple, listed in table 2. All parts are made of mild
20 steel. A form can be made to bend a st
steel. A form can be made to bend a staple, or the staple can be bent without a form following the steps in Fig. 27. The metal will need to be heated red hot to make the bends. When the staple is finished use a small piece of stock to form an S shaped washer that fits over 32 oz Dawn dishwashing liquid (blue) 8 oz Shaklee Basic I (wetting agent) Quench at 1550 F (light cherry red) Expect 43 to 45 Rockwell C on 1018 mild steel Tillers TechGuide 16 Building an Ox Yoke shaped chain grab link (lower right). The round pole ring can be formed on the horn of the anvil. Scarf the ends of the stock and forge shaping of the ring is done on a floor mandrel, or weld is made. (Fig. Figure 27: A staple can be formed in these cornered U-shape over anvil corners, C & D- A pole ring with an inside diameter of 4 to 4.5 inches is large enough to hold most implem