
2 3 Contents 1 3 2 Safety Precautions ID: 848538
Download Pdf The PPT/PDF document "About this edition of user manual" is the property of its rightful owner. Permission is granted to download and print the materials on this web site for personal, non-commercial use only, and to display it on your personal computer provided you do not modify the materials and that you retain all copyright notices contained in the materials. By downloading content from our website, you accept the terms of this agreement.


1 2 3 Contents 1. About this
2 3 Contents 1. About this edition of user manual ................................ ................................ ............. 3 2. Safety Precautions ................................ ................................ ................................ ... 4 3. General Information ................................ ................................ ................................ . 5 4. Getting started ................................ ................................ ................................ .......... 6 5. Operation ................................ ................................ ................................ ................. 7 6. Unit verification ................................ ................................ ................................ ....... 10 7. Specifications ................................ ................................ ................................ ......... 11 8. Maintenance ................................ ................................ ................................ ........... 13 9. Warranty and Claims ................................ ................................ ...........
2 ................... 14 10. EU Dec
................... 14 10. EU Declaration of Conformity ................................ ................................ ................. 15 1. About this edition of user manual The manual applies to the following versions of microplate photometer and control software: HiPo MPP - 96 versions V.1AW, V.1WW QuantAssay version 0.6.9.8 and newer 4 2. Safety Precautions The following symbol means: Caution: Make sure you have fully read and understood the present Manual before using the equipment. Please pay special attention to sections marked by this symbol. GENERAL SAFETY Use only as sp ecified in the operating manual provided. Save the unit from shocks and falling. Store and transport the unit at ambient temperatures between - 20 °C and +60 °C and maximum relative humidity of 80%. After transportation or storage, keep the unit under room t emperature for 2 to 3 h before connecting it to the mains . Before using any cleaning or decontamination methods except those recommended by the manufacturer, check with the manufacturer that the proposed method will not damage the e
3 quipment. Do not make modificati
quipment. Do not make modifications in design of the unit. Do not place the optic parts under direct light. ELECTRICAL SAFETY Connect only to a n external power supply with voltage corresponding to that on the serial number label. Use only the external power supply provided with this product. Ensure that the power switch and external power supply are easily accessible during use. Disconnect the unit from the external power supply before moving. This equipment is connected and controlled by PC. Please ensure that the attached PC itself conforms to safety and EMC standards. If liquid penetrates into the unit, disconnect it from the external power supply and have it checked by a repair and maintenance technician. Do not operate the unit in premises where condensation ca n form. Operating condi- tions of the unit are defined in the Specifications section. DURING OPERATION Do not operate the unit in environments with aggressive or explosive chemical mix- tures. Please contact manufacturer for possible operation of the unit in specific at- mospheres. Do not operate the unit if it is
4 faulty or was installed incorrectly.
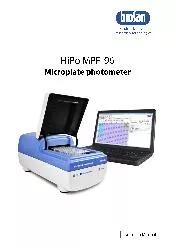
faulty or was installed incorrectly. Do not use outside laboratory rooms. Set up the PC display with the correct viewing position, free from glare and with ap- propriate brightness and contrast setting s. Close the lid after placing or removing the microplates. Do not open the lid during measurements. BIOLOGICAL SAFETY It is the ser’s responsibility to carry ot appropriate decontamination if hazardos material is spilt on or penetrates into the equipment. 5 3. General Information Microplate Photometer HiPo MPP - 96 is a compact tabletop device for analysing the results of ELISA and microbiological studies by measuring optical density in 96 - well micro- plates. Instrument is controlled by and outputs data t o computer. Scheme 1. Optical scheme of the unit HiPo MPP - 96 is supplied with analysis software QuantAssay. Software performs a single scan ning with option of a second scanning on reference channel available. When using QuantAssay, it is possible to program the analysis of the following assays: Quantitative assays: the ability to install up 20 standards and choose fit model fro
5 m 5/4 parameter logistic, linear and pi
m 5/4 parameter logistic, linear and piecewise linear models. BestFit function for the selection of the best calibration curve. Multiplex analysis - up to 7 different tests on the same plate. Qualitative assays: the ability to install up to 8 types of controls (weak positive, strong positive, negative, etc.). Avidity / affinity assay. Save, load and export results. Create visual reports. Together with stand ard light filters (with wavelengths of 405, 450, 492, 620 nm), it is possible to order light filters in the range from 400 to 700 nm, installed by manufacturer. See the list on page 11 in the Specifications section. H i Po MPP - 96 is factory calibrated using certified verification plate . Certificate of ver- ification is included with the unit. 8 Si photodiodes 8 apertures 8 - well row #0, for self - calibration of OD 8 - channel optical fiber White LED (430 - 700 nm) Purple LED (400 - 430 nm) Mechanical Mirror Filter wheel with 8 places Lens 6 4. Getting started 4.1. Unpacking . Remove packing materials carefully and retain them for future shipment or storage of the unit. Examine
6 the unit carefully for any damage incur
the unit carefully for any damage incurred during transit. The warranty does not cover in - transit damage. Warranty cover s only the units tra nsported in the original package. 4.2. Complete set . Package contents: 4.2.1. Standard set - HiPo MPP - 96 Microplate photometer wit h installed i nterference filters (405, 450, 492, 620 nm) ................................ ...................... 1 pce. - USB flash drive with software and operating manual ................................ ....... 1 pce. - USB connector cable ................................ ................................ ....................... 1 pce. - E xternal power supply ................................ ................................ ..................... 1 pce. - O perating m anual , declaration of conformity ................................ ................... 1 copy - C ertificate of verification ................................ ................................ .................. 1 copy 4.2.2. Optional accessories - Light filters (custom, 400 - 700 nm) ................................ ............................ on request - Verification
7 microplate set ...............
microplate set ................................ ................................ ..... on request Verification microplate set 4.3. Setup. - Plug the external power supply into the socket at the rear side of the unit (fig. 2 /2). - Place the unit on the horizontal even working surface; - Insert the US B flash drive with software and install the QuantAssay software , follow- ing the instructions provided in the software installation and operation manual . 4.4. Custom light filters. If you are using custom filters, fill in the following table. The manuals and software reference channels with custom filters as Channels from 1 to 4. Channel Wavelength Channel Wavelength Channel 1 nm Channel 1 nm Channel 2 nm Channel 2 nm 7 5. O peration 5.1. Connect the external power supply to the mains . Switch the Power switch on the rear panel of the unit to position I (on, fig. 2 /1). The Power LED light (fig. 1/3) turns on. 5.2. Connect the unit port (fig. 2 /2) and the PC port with the USB cable. Turn on the PC
8 . The PC LED light (fig. 1/1) tu rns tu
rns")
. The PC LED light (fig. 1/1) tu rns on. 5.3. Lift the lid and place the microplate on the sliding platform. Position the microplate so that the top left corner of the microplate ( designated A 1 ) is placed next to the A1 label (fig. 3/1) . Slide the end of the microplate in the farthest end of the platform, then push down the nearest end to install the microplate. Close the lid. Note. Measurements can be affected by uneven or heterogeneous well contents. Visu ally inspect the plate for foaming, opaqueness, bubbles or particles in the well 5.4. Starting the measurement . Attention! Make sure that the QuantAssay software is installed on the PC. Attention! Full description of the software can be found in the included software installation and operation manual. 5.4.1. Launch the software on the PC. Navigate to the Available units tab. 5.4.2. Select the wavelengths required for measurements. 5.4.3. Optionally: choose a referen ce channel and an option to shake before measurement . 8 Four mixing speeds are available; mixing time can be set between 3 and 1 5 seconds. 5.4.4. Press Start button .
9 The Measurement LED light (fig. 1/
The Measurement LED light (fig. 1/2) turns on. Attention! Do not open the lid during measurements! 5.5. Measurement processing . After an 8 - second measurement, the software automat- ically opens the I nput data tab that displays all measurement results . 9 5.6. Data export . To export data in PDF, XLS or CSV formats, press the corresponding button. 5.7. To save the data in Quant Assay file format, press Save button. 5.8. To export the data in the microplate format, press XLS 96 well button. 5.9. After completing the measurements, remove the microplate . Open the lid. Lift the nearest end of the microplate and slide it out of the unit. Close the lid. Attention ! Do not leave the microplate in the unit ! 5.10. After finishing the operation switch the Power switch to position O (off, fig. 2 /1). Re- move the external power supply from the unit. Fig. 1. Front view of the unit Fig . 2 . Rear panel of the unit. Fig. 3. Correct microplate placement 10 6. Unit v erification 6.1. Checking the calibration. If the user have any doubts in measuring precision, he may perform a basic control
10 check as follows: 6.1.1. Remove micr
check as follows: 6.1.1. Remove microplate and close the lid. 6.1.2. In the software, open Kinetic mode panel and select all available channels (including additional, if they have filter installed) and also measurement frequency and number, as shown on the picture below. 6.1.1. Press Start button to launch the measuring. After finishing, press Results button to view results. These should be between - 0.003 and 0.005. 6.2. Using the verification microplate . Please consult the OD plate manual on the USB flash drive that comes in the verification microplate set, section Perform a Verifica- tion Test with OD Plate Verification Software . 11 7. Specifications The unit is designed for operation in cold rooms, incubators a nd closed laboratory rooms at ambient temperature from +4 ° C to +40 ° C in a non - condensing atmosphere and maximm relative hmidity 80% for temperatres p to 31°C decreasing linearly to 50% relative hmidity at 40°C. Manufacturer is committed to a continuo us program of improvement and reserves the right to alter design and specifications of the equipment without additional notice. 7.1. Detection m
11 ode ................................ .
ode ................................ ................................ ............... light absorbance 7.2. Light source ................................ ................................ ................ LED , self - calibrating 7.3. Photodetector ................................ ................................ ........... 8 silicon photodiodes 7.4. Microplate requirements ....................... ANSI/SLAS compliant 96 - well (see Table 1) .............................. MicroWell™ MaxiSorp™, flat - bottomed, transparent polystyrene 7.5. Reading time , not more ................................ ................................ 5 s per wavelength 7.6. Measuring modes ................................ .. endpoint, kinetic, multi - label measurements 7.7. Measurement channels ................................ ................................ ............................ 8 7.8. Reference channel ................................ ................................ ................................ ... 1 7.9. Optica l density measurement range ................................ .......................... 0 - 4.3 OD 7.10. Re
12 solution .............................
solution ................................ ................................ ................................ 0. 0 001 OD 7.11. Accuracy ( at 405, 450 , 492 , 620 nm) 0.000 – 2.000 OD ................................ ................................ ..... ≤ (0.5 % + 0.010 OD) 2.000 – 3.000 OD ................................ ................................ ........ ≤ ( 1 % + 0.010 OD) 7.12. Precision / r eproducibility (at 405, 450, 492, 620 nm) 0.000 – 2.000 OD ................................ ................................ ..... ≤ (0.5 % + 0.0 05 OD) 2.000 – 3.000 OD ................................ ................................ ..... ≤ (1.0 % + 0.005 OD) 7.13. Linearity 0.000 – 2.000 OD ................................ ................................ ........................... ≤ 1.0 % 2.000 – 3.000 OD ................................ ................................ ........................... ≤ 1.5 % 7.14. Filter optical range ................................ ................................ ................. 400 - 700 nm 7.15. Wavelength selection ...................
13 ............. 4 standard filters, spac
............. 4 standard filters, space for up to 4 more 7.16. Standard filters ................................ ................................ . 405, 450, 492 and 620 nm 7.17. Linear shaking ................................ ................................ ....... 4 amplitudes, 4 speeds 7.18. Linear shaking time setting ................................ ................................ ............. 3 - 15 s 7.19. Software ................................ ................................ ................................ QuantAssay 7.20. P C requirements ..................... Intel/AMD processor, 1 GB RAM, Windows Vista/7/8 7.21. PC connectivity ................................ ................................ ................................ .. USB 7.22. Dimensions (WxDxH) ................................ ................................ ... 140х30 0х130 mm 7.23. Weight 1 ................................ ................................ ................................ ............. 4.6 kg 7.24. Input current / power consumption ................................ ................... 12 V, 5 A / 60
14 W 7.25. External power supply ..
W 7.25. External power supply ....................... input AC 100 - 240 V 50/60 Hz, output DC 12 V 1 Accrate within ±10%. 12 Up to four bandpass filters of wavelength s other than the standard can be fitted in the unit per request. Following wavelength s are available (see LEDs ’ spectral power specifica- tion on figure 6 ) : 400 nm, 455 nm, 458 nm, 460 nm, 470 nm, 480 nm, 486 nm, 488 nm; 500 nm, 508 nm, 510 nm, 515 nm, 520 nm, 532 nm, 535 nm, 540 nm, 546 nm, 550 nm, 560 nm, 568 nm, 580 nm, 589 nm, 594 nm; 600 nm, 610 nm, 632 nm, 636 nm, 640 nm, 647 nm, 650 nm, 656 nm, 660 nm, 671 nm, 676 nm, 680 nm, 685 nm, 690 nm, 694 nm. Fig. 6. Relative spectral power in relation to wavelength for photodiodes (white and purple led maximum spectral power are not equal) Table 1. 96 - well plate dimensions 96 - well plate Dimension (mm) Plate height 14.35 Plate length 85.48 Plate width 127.76 First well position X 14.38 First well location Y 11.24 Corner distance X 99 Corner distance Y 63 O
15 ptional accessories Description Cata
ptional accessories Description Catalogue number Verification microplate Microplate for annual verification of the unit BS - 050108 - AK Custom light filter Up to four custom filters in the unit - 0,0 0,1 0,2 0,3 0,4 0,5 0,6 0,7 0,8 0,9 1,0 300 350 400 450 500 550 600 650 700 750 800 850 Relative Spectral Power Wavelength (nm) White LED Purple LED 13 8. Maintenance 8.1. If the unit requires maintenance, disconnect the unit from the electric circuit and con- tact Manufacturer . 8.2. All maintenance and repair operations must be performed only by qualified and spe- cially trained personnel. 8.3. Cleaning and disinfection. 8.3.1. Standard ethanol (75%) or other cleaning agents recommended for cleaning of labor- atory equipment can be used for cleaning and decontamination of the external parts of the unit. 8.3.2. Do not use liquids to clean optical parts. Use air from rubber siphon to blow away any particles. 14 9. Warranty and Claims 9.1. The Manufacturer guarantees the compliance of the unit with the requirements of Specifications, provided the Customer follows the operation, storage and transporta- tion instructions. 9.2. The
16 warranted service life of the unit from
warranted service life of the unit from the date of its delivery to the Customer is 24 months. Contact your local Biosan representativ e or our service department through the Technical support section on our website at the link below . 9.3. The certificate of verification of the unit warrants the measurements for 12 months. 9.4. Warranty covers only the units transported in the original package. 9.5. If any manufacturing defects are discovered by the Customer, an unsatisfactory equipment claim shall be compiled, certified and sent to the local distributor address. To obtain the claim form, visit section Technical support on our website at link be- low. Tech nical support biosan.lv/en/support 9.6. The following information will be required in the event that warranty or post - warranty service comes necessary. Complete the table below and retain for your records. Model HiPo MPP - 96 Microplate photometer Serial number Date of sale 15 10. EU Declaration of Conformity Biosan SIA Ratsupites 7, build.2, Riga, LV - 1067, Latvia Phone: +371 67426137 Fax: +371 67428101 http://www.biosan.lv Edition 1. 10 – January 2