
httpwwwpixarcombehindthescenesSculpting node3834 Objectives Review the different techniques of building with clay Understand the importance of clay rules Demonstrate Knowledge by becoming an expert at a technique and showing the class ID: 460055
Download Presentation The PPT/PDF document "The Rules of Clay" is the property of its rightful owner. Permission is granted to download and print the materials on this web site for personal, non-commercial use only, and to display it on your personal computer provided you do not modify the materials and that you retain all copyright notices contained in the materials. By downloading content from our website, you accept the terms of this agreement.


Slide1
The Rules of Clay
http://www.pixar.com/behind_the_scenes/Sculpting#/
node/3834
Slide2
Objectives
Review the different techniques of building with clay
Understand the importance of clay rules
Demonstrate Knowledge by becoming an “expert” at a technique and showing the class.
Create a clay sculpture representing your emotion.
Paint or glaze the clay sculpture to better demonstrate the emotion chosen
Reflect on the entire creative processSlide3
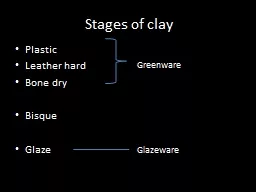
Stages of Clay
Slip
Plastic
Leather hard
Greenware
(bone-dry)
Bisqueware
( once-fired)
Earthenware ( glaze-fired)
Stoneware (2
nd
glaze, high fired)Slide4
Slip
Clay mixed with water
Yogurt like texture
Used to join two
leatherhard
piecesSlide5
Plastic
Wet clay
Easily moldable
Cannot always support itself
Does not need as much slip to connect piecesSlide6
Leatherhard
Can support itself and hold it’s own shape, but still workable
Carvable
and joinable by score and slipSlide7
Greenware
Bone dry and fragile – must dry slowly!
No moisture left in the clay
Not fired yet
Not workableSlide8
BisqueWare
Fired once in
the kiln at
1000°C/1800°F
Once cooled, it can be glazed or painted
Very porous- not capable of holding waterSlide9
Earthenware
2
nd
fire, low temperature
If it is not glazed, it is still porous and cannot hold liquid
Oldest form of potterySlide10
Stoneware
High fired, 2
nd
firing
Does not require glaze
Glass like (vitreous) - can hold liquidSlide11
Building Techniques
Slab
Coil
PinchSlide12
Why Wedge?
Prevents air bubbles- keeps your piece from exploding in the kiln!
Creates smooth all-over texture
Gets you to the PLASTIC stage by taking out some moistureSlide13
SCORING AND SLIPPING
Technique needed to join two pieces together
Create scratches in both surfaces
Add slip on surface to prevent air bubbles
Firmly Stick together
Blend joining
REMEMBER: SCORE, SLIP, SMOOTHSlide14
Slab
Wedge Clay
Create a slab no more than 1 inch thick by rolling clay between two rulers
If pieces are thin, let them dry to
leatherhard
Score and Slip all jointsSlide15
Coil
Create a bottom shape
Create an even coil
Using scoring and slipping, coil a form.
Smooth out inside and outside coils to form a stronger bond – smoother during
plastic
stage.Slide16
Pinch
Wedge, then form ball (hand-sized)
Stick your thumb in it
Put even pressure starting at the bottom and building up
Remember to keep it 1 inch thick or less- but keep it even!
Join two pinch pots together with newspaper to hold form to create hollow ball
ALWAYS poke an air hole in a hollowed out space!Slide17
Adding Texture
Use a STAMPING tool
Do at plastic stage Slide18
Add Texture
Etch Into clay with tools- do at leather-hard stage!Slide19
Color After Bisque
Acrylic Paint
Watercolor paint
GlazeSlide20
Glazing
Bottom MUST NOT be covered in glaze- protect with wax/ wash off with sponge if you accidentally get some on the bottom
WASH
bisque ware off first and let dry
Brush
to get specific colors- be aware they may melt into each other in the kiln.
Pour
glaze on the inside, roll around, and pour left over glaze out.
Dip
glaze and let excess drip off
Fire
at
2350 degrees FSlide21
Basic Rules
CLAY RULES
1. Soft clay cannot be attached to
hard
clay, and only pieces that are
leather
hard or wetter can be
attached
with much chance of staying
together
. This is due to the shrinking
and flattening of clay particles as
the
water leaves during drying.
2. Pieces of clay to be attached must
be
scored with a
needle
, painted with
slip,
or slurry, to glue them together. Careful pinching and rubbing of
seams
may also join very wet pieces. Slide22
Clay pieces may be no thicker than 1 inch unless they are hollow, and if hollow spaces are enclosed, a pinhole must be made in the piece to allow gasses and trapped air to escape. Thicker pieces should be allowed to dry THOROUGHLY before firing.
4. Dry pots slowly, away from temperature extremes, to prevent uneven drying, shrinkage, and cracking. This is especially true of pieces, which have been joined, such as handles, slab pots etc. Slide23
5. Avoid stress when building or throwing clay pieces. Unnatural bending or forcing will cause particles to become unaligned, resulting in cracks, either in the drying or in firing.
6. Clay must be wedged before using to insure proper alignment of particles, create uniform texture, and most importantly, to drive air bubbles out. Air bubbles cause clay to explode in the kiln, because of the air expanding with no place to go.
7. Unused clay must be covered and wrapped with plastic to prevent drying, or returned to the recycling container. Slide24