
1Prepare a wooden blank about 1 square X 6 long or use PSI lure making blanks offered in the catalog2Mark the center ofeach blank on both ends3To hold the wood on the latheyou may use either a chuck o ID: 871782
Download Pdf The PPT/PDF document "PSI Woodworking ProductsPKLK4Lure Featur..." is the property of its rightful owner. Permission is granted to download and print the materials on this web site for personal, non-commercial use only, and to display it on your personal computer provided you do not modify the materials and that you retain all copyright notices contained in the materials. By downloading content from our website, you accept the terms of this agreement.


1 PSI Woodworking ProductsPKLK4Lure Featur
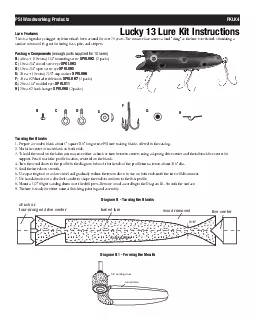
PSI Woodworking ProductsPKLK4Lure FeaturesThis is a legendary chugger style lure that's been around for over 75 years.The concave face causes a loud "chug" as the lure is twitched- simulating aace minnow.It's great for luring bass,pike,and stripers.) 40 ea.+ (10 extra) 1/4" mounting screw (2 packs)10 ea.3/4" closed screw eye 10 ea.3/4" open screw eye 20 ea.+ (5 extra) 7/32" cup washer ) 30 ea.#2 Mustad treble hook (3 packs)) 20 ea.1/4" molded eyes 20 ea.#2 hook hanger(2 packs) 1.Prepare a wooden blank about 1" square X 6" long or use PSI lure making blanks offered in the catalog.2.Mark the center ofeach blank on both ends.3.To hold the wood on the lathe,you may use either a chuck or turn between centers using a 4-prong drive center and the tailstock live center forsupport.Pencil mark the profile location,centered on the blank.4.Turn the wood down to the profile in the diagram below.At both ends ofthe profile turn a tenon about 3/16" dia.5.Sand the lure down smooth.6.Use a parting tool or a skew chisel and gradually reduce the tenon down in size on both ends until the lure will disconnect.7.Use hand abrasive or a disc/belt sander to shape the ends to conform to the fish profile.8.Mount a 1/2" 80 grit sanding drum over the drill press.Remove wood according to the Diagram B1.Smooth the surface.9.The lure is ready for either natural finishing,painting and assembly. turned lurewood removed live center chuck orfour-pronged drive center3/16" Diagram B - Turning the BlanksDiagram B1 - Forming the Mouth 1/2" sanding drumturned blank © 2006 PSI Woodworking Products Philadelphia,PA 19115 inting Your Lure (If you wish to leave a natural look to the lure skip ahead to the final step of this section.)¥ First and foremost,paint in a well ventilated area.Follow the manufacturer's safety instructions.Wear plastic gloves,eye and breathing protection.Ifpossible,paint in a clean dry outside environment where there is plenty ofnatural ventilation and sun to assist in drying.Always spray away fromyourself.¥ Sealing- Locate the center point ofthe lure in the front and back.Tap or press finishing nails about 2" long securely into the centers for handling whilepainting.The nail holes will later be pilot holes for the screw eyes after the paining is completed.Use a wood sealer to seal the wood prior to painting.Allow to dry then sand the surface smooth with 600 grit sandpaper.Handle the lure with the nails while painting and place them on an appropriaterack,resting on the nails while drying.¥ Priming- Prime the wood with a white wood primer paint fo
2 r the undercoat.Allow each coat to dry 
r the undercoat.Allow each coat to dry continue with primer coats until the woodunderneath is no longer visible.Ifdrips form on the surface,allow the paint to dry then sand the surface smooth with 600 grit sandpaper.After thelast coat is applied,bring the lure to a fine smooth surface finish with 600 grit sandpaper.¥ Color painting- Use an enamel or epoxy enamel for final painting.Use a spray for a good consistent coat.Wear a glove or plastic bag on your handwhile holding the nail end ofthe lure.Select a color green is common favorite for lures.Spray across the length ofthe lure spray lightly until thelure is faintly coated.Hold the lure from the tail end and spray the mouth area head on with red paint.Allow to dry and repeat over and over ifnecessary until solid and fully coated.Next repeat spraying the body with enough layers until the lure is fully covered with a solid color repeat withlight coats to avoid the paint from running.Ifthe red mouth is over sprayed,touch it up with red to cover the over spray.Many other techniques are available that are beyond the scope ofthese instructions these include blending,splattering,air brushing using netting tosimulate scales.You can mask the body then paint the head a different color.Many lure makers paint the under belly a different color.Experiment withpainting techniques and colors to create your own unique style lure.¥ Eyes- Once all ofthe paint is dry you can either apply the 3-D eyes or paint eyes onto the lure.To paint the eyes,use a drop ofyellow hobby paint (usea nail or a wood splinter) to form the round iris.Practice on a scrap piece ofpainted wood to refine this technique.Apply the black pupil over the irisin the same manner.Let the eyes dry.¥ Sign your work- Use a Sharpie fine point marker and sign your name on the rear under section ofthe lure.Make sure you place the signature in a spotwhere it will not interfere with the hardware that will be installed.¥ Final finish Coat- Spray the entire lure surface with numerous coats ofclear gloss varnish.Apply at least 3 or 4 thin coats.When done,let the finish drycompletely.Dry more quickly by exosing to an incandescent light. 1 ea.closed screw eye (4 ea.1/4" mounting screw (1 ea.3/4" open screw eye (2 ea.7/32" cup washer (3 ea.#2 Mustad Treble hook (2 ea.1/4" molded eyes (2 ea.#2 hook hanger (¥ Use a scratch awl or another sharpinstrument to locate and start screws andscrew eyes.¥ After connecting hooks,close the openscrew eyes () with pliers.¥ Connect hook () to hanger ()prior toscrewing hanger () to the lure body.