

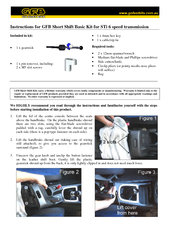
Cut out a preprogrammed design Modify a preprogrammed design Capture a design from another source import modify and convert it to a useable format Drawdesign your own designproject Cut out a preprogrammed Design ID: 669713
Download Presentation The PPT/PDF document "Plasma Cam Instructions Basic Opportunit..." is the property of its rightful owner. Permission is granted to download and print the materials on this web site for personal, non-commercial use only, and to display it on your personal computer provided you do not modify the materials and that you retain all copyright notices contained in the materials. By downloading content from our website, you accept the terms of this agreement.


Slide1Slide2
Plasma Cam InstructionsSlide3
Basic Opportunities
Cut out a “pre-programmed” design
Modify a pre-programmed design
Capture a design from another source, import, modify, and convert it to a useable format
Draw/design your own design/projectSlide4
Cut out a pre-programmed Design
We have purchased several “art disks” you may use
Classic Collection
Charming Favorites
Old Frontier
Classic Cars
19
th
CenturySlide5
Tyler Williams-Roping
19
th
Century Art ImagesSlide6
Camron Sudbury-Elk Hills
Old Frontier Art ImagesSlide7
Modify a pre-programmed Design
After learning basic procedures, you can take “parts” of one design and use them.
You can either use them alone, or combine them with other things to make the design you want.Slide8
Towel Rack Elk Hills-Isolated the Elk
Old Frontier Art ImagesSlide9
Toilet Paper Holder Elk Hills-Isolated the Elk
Old Frontier Art ImagesSlide10
Capture a design
From a photo
From the internet
From a copied itemSlide11
From a PhotoSlide12
A Copied ItemSlide13
A Copied ItemSlide14
Draw or Design Your Own ItemsSlide15
Basic Information
Uses a plasma cutter, combined with a CNC (Computer Numerical Controlled) cutting machine to cut out the desired items.Slide16
Basic Information
Sheet metal of various thicknesses may be used
METAL MUST BE KEPT FLAT AND STAY IN POSITIONSlide17
Basic Information
Exhaust system must be on
Under the hood and on the wall
# 5 face shield used
Only with teacher supervisionSlide18
Basic Information
Must allow time for the project to cut out before class ends
Must clean up after use
Never leave unattendedSlide19
Basic Information
Operates on X,Y,Z coordinates
X=left & right
Y=top to bottom
Z=torch height
0,0 is bottom left corner of table
Home is the top left cornerSlide20
Commands
New
Open
Import
Save
Save AsSlide21
Line Colors
Green-Selected Line
Purple-Closed Path
White-Open Path
Blue-Cut PathSlide22
Commands
Q=Circle
G=Rectangle
L=Line
U=Bulge
Ctl
. Z=UndoSlide23
Commands
M=Move
C=Copy
R=Rotate
S=Scale
H=Scale HeightSlide24
Commands
B=Break Path
T=Trim or Extend
K=Link SegmentsSlide25
Zoom Commands
F1 then pick an area
F2=Zoom Previous
F3=Zoom in on Selected Item
F5=Whole Screen
F6=Out 1 StepSlide26
Cutting Commands
Initialize the machine
V=View where the item is on the metal
Auto Cut Control
CutSlide27