

Applications Corel Draw X6 Work Space context sensitive menu drawing tools document paste board rulers click amp drag for guides standard menus Swatch click to expand dockers pagination ID: 671569
Download Presentation The PPT/PDF document "Basics of CorelDraw X6 For Laser Engravi..." is the property of its rightful owner. Permission is granted to download and print the materials on this web site for personal, non-commercial use only, and to display it on your personal computer provided you do not modify the materials and that you retain all copyright notices contained in the materials. By downloading content from our website, you accept the terms of this agreement.


Slide1
Basics of CorelDraw X6For Laser EngravingApplicationsSlide2
Corel Draw X6 Work Space
context sensitive menu
drawing tools
document
paste board
rulers /
click & drag for guides
standard menus
Swatch
/ click to expand
dockers
pagination
drawn
objectsSlide3
Pick (select, move, resize objects)
Shape (modify the shape of objects)
Crop (crop images)
Zoom (zoom in and out of the workspace)
Freehand / line (draw lines or freehand shapes)Smart fill ()Rectangle (use ‘Ctrl’ on keyboard will constrain a square, ‘Shift’ to expand from centre)Elipse (use keyboard short cuts as above for Circles and other effects)PolygonBasic shapesTextTableInteractive effects (Drop shadows, transparency and more…)Colour picker and fillOutline (also known as ‘stroke’, control weight and colour)
Fill (flat colour, gradients and textures)Interactive fill (fill effects)Slide4
S
Bitmaps
Vector shapes
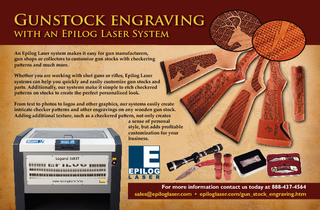
Raster images for Engraving
Vector images for Vector engraving and
Vector cuttingSlide5
Grids
can be used to
divide the page into rows and columns and provide clarity through a recognizable
flow of information.
StructureSlide6
Rulers
appear on the left and top of the paste board.
You can set the units of measurement from the drop down list on the main tool (property) bar.
Guides
are used to align objects, Corel supports horizontal and vertical guides, as well as a rotating feature.when using Text Boxes, tab guides and indent options appear embedded within the rulers.
Rulers and GuidesSlide7
A flat colour within a shape is called a
Fill
Gradient Fills
and Textured Fills are available from the Fill Tool (Bucket icon)Colors indicate to the laser software how deeply to engrave, darker colors engrave deepest, lighter colors very lightly engrave. To vector cut lines must be hairline (0.1 or less) thickness and R=255 G=0 B=0 (Red)To vector engrave lines must be hairline thickness and R=0 G=0 B=255 (Blue)
ColorSlide8
Aligning Objects
All assets on the page
can
be aligned
in relation to the page and / or each other using the Align option. This is one of the most useful tools within
Corel.Slide9
Drawing
On the left of the workspace are all the tools available for drawing. If the tool has a black arrow head pointing bottom right, this means that if you click and hold the mouse button for a few seconds, further tools in that series will become visible. This is called a ‘Flyout’.
Draw basic shapes and lines with the tools available.
There are two types of drawn assets:
A ‘Curve’ or an ‘Object’.all vector illustrations are combinations of manipulated / geometric shapes and freehand drawn shapes.Slide10
CURVES
If a shape is a ‘curve’, the context sensitive tool bar at the top of the workspace allows you to change line thickness, add arrow heads etc. This will appear if you have the Pick Tool selected and not the drawing tool
.
When using Drawn objects, you may need to alter the stacking order, so that the object of your choice is visible in front of another.
DrawingSlide11
Objects
Right click on the object for a list of options. Select
Properties
from the docker that opens you can alter line thickness etc.Use the Outline Tool to add or remove outlines from an object or curve.To color an object or curve, select it with the Pick Tool, and then select a color from the color swatch.Drawn objects are useful for background shapes
(columns etc.) as well as diagrams.
DrawingSlide12
Layers
Layers are visible in the Object Manager
Layers are useful for separating Backgrounds, Diagrams, Labels
and Text. This can simplify selecting objects on a complex poster.Create a new layer using the icons in the top of the Object Manager window.
You can also Lock individual layers to prevent accidental alterations. Click on the Eye icon to hide other obscuring layers while working on a specific layer.NOTE: If you ‘Group’ objects which are on different layers, they will all be moved and grouped on to the top most layer.You can still use the normal stacking order options on individual layers.Slide13
Screen Views
Setting the screen
view
(drop menu) allows you to find hidden objects, it also allows you to work easily in a lower resolution.
Wire frame
This option will show traced outlines of all objects on the page. This helps you to find an object obscured by something above it in the stacking order.Draft / Normal / EnhancedThese options allow you to view the page at differing resolutions.Use the Normal option as default. Use Enhanced to preview final artwork and EPS embedded objects.Slide14
Text
Break the content into a clear title and sub-sections.
Type the text in Word for ease, but formatting can be done in Corel Draw.
Choose a clear, readable font. (Arial etc.)
Check any scientific symbols in Corel Draw as they
may alter when imported. Font sizes e.g.: Titles 48 – 200pt Sub Titles 30 - 44pt Text 20 - 24ptIf the bulk of page is covered in text that is below 20pt there is too muchSlide15
Importing text from Word (or other source)
There are many ways to add text from an external document to your poster.
If the text is prepared in Word - Copy & Paste. Copy the text from source file, then in Corel, use the Text tool, draw a text box and click into it to see a cursor, then paste.
TextSlide16
Using Text Symbols - e.g.
b
µCorel Draw has an ‘insert character’ docker available from:
Text | Insert Symbol Characterthis will appear on the right of the workspace, select the font of your choice from the drop down menu, a list of symbols will appear.If you have a text box selected, double click on the symbol of your choice in the docker window. the symbol will appear where your cursor is in the text box.If you do not have a text box selected, you can ‘Drag and Drop’ a symbol from the docker onto the document as an independent Artistic Text object.
TextSlide17
Using Text Symbols
cont…
Occasionally the Corel Draw symbols insertion method can prove unreliable. The alternative is:
Select Start | Programs | Accessories | System Tools | Character Map choose a font of your choice, click on a character to view it larger, choose the character you want, click select then copy The character is then in the clip board, and ready to paste into a Corel Draw text box or as an artistic text object.You may then need to set the font size and colour.
The Character Map is useful for finding symbols and special bullets.
TextSlide18
Importing Photos / Bitmaps
Corel Draw is not a bitmap editor, but has some functionality to aid the use of bitmaps within its workspace
GIF files, generally found on the Internet are low resolution and are unsuitable for use in a large poster. The size of the final print stresses the low quality of the Gif image.
Copying images from Word or PowerPoint to Corel Draw. This process is unreliable. Images that are copied from these two programs can easily become corrupted in the process
.Slide19
Images
Important
considerations for bitmap images are:
Resolution - the lowest resolution you should use is 150dpi to 100% of print size, the largest is 300dpi.
Color Mode - Printers use Cyan Magenta Yellow blacK Inks. Your photo files may be in Red Green Blue (screen colors). Slide20
Charts
Excel or other.
if possible export from originating software, as either high res bitmap (Tiff, JPG, PNG) or vector file (EMF, WMF, EPS), then import into Corel Draw
Alternatively, ‘copy’ the chart, and use the Paste Special option in Corel Draw, and select a vector format
(this is trial and error as neither of these options will always work effectively)