
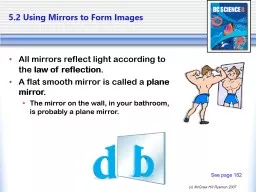
Terms Plane mirror a smooth reflecting surface Virtual image images formed by a plane mirror CANNOT be projected onto a screen Real image images that can be projected onto a screen ie pin hole camera ID: 798548
Download The PPT/PDF document "Plane mirrors Unit 3: Light" is the property of its rightful owner. Permission is granted to download and print the materials on this web site for personal, non-commercial use only, and to display it on your personal computer provided you do not modify the materials and that you retain all copyright notices contained in the materials. By downloading content from our website, you accept the terms of this agreement.


Slide1
Plane mirrors
Unit 3: Light
Slide2Terms:
Plane mirror- a smooth reflecting surface
Virtual image- images formed by a plane mirror. CANNOT be projected onto a screen
Real image- images that can be projected onto a screen (ie. pin hole camera)
Slide3Characteristics of plane mirrors
The image is located the same distance behind the mirror (
di
) as the object is in front of the mirror (do)di=-doThe image (H
i) is the same size as the object (Ho)Hi=Ho
Slide4Characteristics con’t
The image is formed upright but laterally inverted (facing the object)
Slide5Mirror Equations
Slide6Drawing Ray diagrams
You draw a ray diagram to find where an image is formed in a mirror
Important points:
Diagrams need to be neat, labeled and drawn to scaleSolid lines represent the path of a light ray, arrows show the directionDotted lines are used to show where the light ray appears to coming from
Slide7Drawing Ray diagrams
There are 4 important image characteristics to consider:
Magnification
Attitude (upright or inverted)Type (real or virtual)
Position (di)
Slide8Seeing how the eye sees point objects
Draw a perpendicular line from the object to the mirror
Extend the line behind the mirror
Find the image using
di=doDraw a straight line from the image to the top of the eye (dotted on the image side)Draw another line from the bottom of the eyeWhere the line strikes the mirror draw a line back to the objectDraw arrows to indicate direction
Slide9See handout
Slide10Drawing large objects
Rules:
Draw perpendicular lines from the top and bottom of the object to the mirror
Use do=di to find the image location
Extend the perpendicular lines past the mirror to the top or bottom of the imageDraw a straight line from the top of the image to the top of the eye (dotted line on image side)Draw another line from the bottom of the eye to the bottom of the imageWhere the ‘image to eye lines’ strike the mirror, draw lines back to the eyeDraw arrows on the lines to the eye to indicate direction
Slide11Slide12