
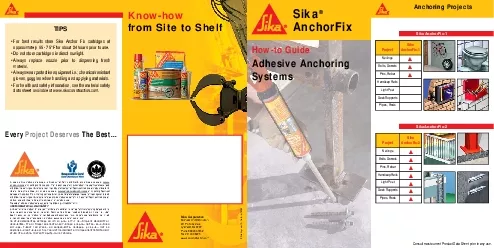
AnchorFixHowto GuideAdhesive AnchoringFor best results store Sika Anchor Fix cartridges at approximately 65 75F for about 24 hours prior to use Every Project Deserves The BestAll sales of Sika prod ID: 866438
Download Pdf The PPT/PDF document "Business Unit Distribution 201 Polito Av..." is the property of its rightful owner. Permission is granted to download and print the materials on this web site for personal, non-commercial use only, and to display it on your personal computer provided you do not modify the materials and that you retain all copyright notices contained in the materials. By downloading content from our website, you accept the terms of this agreement.


1 Business Unit Distribution 201 Polito Av
Business Unit Distribution 201 Polito Avenue Lyndhurst, NJ 07071 Phone 800 933 7452 Fax 201 933 6225 www.sikaconstruction.comSika Corporation / BU Distribution / 07.09Know-howfrom Site to Shelf AnchorFixHow-to GuideAdhesive Anchoring For best results store Sika Anchor Fix cartridges at approximately 65 - 75°F for about 24 hours prior to use. Every Project Deserves The Best... All sales of Sika products are subject to Sika’s current Terms and Conditions of Sale available at www.sikacorp.com or by calling 201-933-8800. Prior to each use of any Sika product, the user must always read and follow the warnings and instructions on the product’s most current Technical Data Sheet, product label and Material Safety Data Sheet, which are available at www.sikaconstruction.comor by calling Technical Services at 1-800-933-7452. Nothing contained in any Sika materials relieves the user of the obligation to read and follow the warnings and instructions for each Sika product as set forth in the current Technical Data Sheet, product label and Material Safety Data Sheet prior to product use.The sale of all Sika products are subject to the following Limited Warranty: Anchoring Projects AnchorFix-2 AnchorFix-2 AnchorFix-1 AnchorFix-1 Solvent and styrene-free. 10 or 20 �. oz. cartridges AnchorFix-1 Anchoring AdhesiveConsult most current Product Data Sheet prior to any use at www.sikaconstruction.com. AnchorFix-2 1 Drill the hole to the correct diameter and depth using a rotary Blow the hole clean with compressed air, brush clean with a nylon brush and blow clean again. Hole may be dry or damp but must be free from stand-ing water. 3 Unscrew and remove 4 7 Insert the mixer nozzle to the far end of the hole and half �ll hole (depending upon application). Withdraw nozzle as you �ll the hole. For deep hol
2 es 6Place the cartridge into the trude
es 6Place the cartridge into the truded adhesive to waste until a 5 Screw on the static mixer 8 surface contami- This should be done slowly with a slight twisting motion. Excess resin should be removed from the mouth of the hole before it sets. Use 9 Leave the an-chor undisturbed until curing time has elapsed, then attach the �xture and Fast set time. Can be dispensed/mixed Solvent and styrene-free. 10 or 20 �. oz. cartridges Methods of Use Drill the hole to the correct diameter and depth. This can be done with either a hammer drill or rotary-only machine depending upon the Blow the hole clean with compressed air, brush clean with a nylon brush and blow clean again. Hole may be dry or damp but must be free from standing water. Attach the static mix- adhesive to waste until a Insert mixer nozzle to the far end of the per-forated sleeve and completely �ll the sleeve with resin. Withdraw the mixer Prior to use, remove surface contaminants such as oil or grease from anchor to avoid inadequate bond. Immediately insert the anchoring hardware. This should be done slowly with a slight twisting motion. Leave the anchor undisturbed until the cure time has elapsed, then at- Insert the correct Unscrew and 5 Anchoring Adhesive Application TemperatureGel TimeCure Time86°F (30°C)3 minutes25 minutes68°F (20°C) 7 minutes50 minutes50°F (10°C) 22 minutes150 minutes41°F (5°C) 50 minutes200 minutes14°F (-10°C) 80 minutes24 hours Application TemperatureGel TimeCure Time95°F (35°C)2 minutes25 minutes86°F (30°C)3 minutes35 minutes68°F (20°C)5 minutes40 minutes50°F (10°C)8 minutes70 minutes41°F (5°C)12 minutes90 minutes32°F (0°C)20 minutes3 hours23°F (-5°C)50 minutes15 hours14°F (-10°C)80 minutes24 hoursAnchorFix 1 Gel and Cure Times:AnchorFix 2 Gel and Cure Times:Methods of Us