
Turn to look over your right shoulder hold then switch sides Add gentle hand pressure at the chin as tolerated Bend your ear toward your right shoulder while looking straight ahead hold then al ID: 939751
Download Pdf The PPT/PDF document "Stretching exercises help to restore joi..." is the property of its rightful owner. Permission is granted to download and print the materials on this web site for personal, non-commercial use only, and to display it on your personal computer provided you do not modify the materials and that you retain all copyright notices contained in the materials. By downloading content from our website, you accept the terms of this agreement.


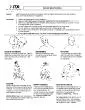
Stretching exercises help to restore joint range of motion by lengthening shortened muscles and connective tissue, which helps to reduce pain and tightness. Instructions: 1. Perform highlighted stretches initially 1-2 x/day Turn to look over your right shoulder; hold, then switch sides. Add gentle hand pressure at the chin as tolerated Bend your ear toward your right shoulder while looking straight ahead; hold, then alternate. FLEXION / EXTENSION pp ort. Sit with your right hand holding edge of chair. Place your left hand over your right collarbone to stabilize. Pull chin back, tip ear toward left shoulder, turn to look over left shoulder and UPPER TRAPEZIUS Sit with right hand holding edge of chair. Move chin your left ear toward your left shoulder turn right the ceiling. Left hand can be used for overpressure-DON’T PULLRepeat to right side. LEVATOR SCAPULAE Thoracic Spine & Postural Stretches Stand either in a doorway or facing a corner. Place your palms/forearms on each side o
f the corner or doorframe. Place one foot in front of the other and lean your chest forward and hold. Support your body with your legs, not with your arms. Keep your head and chest up in a good posture. Sit, stand or lie on your backPlace your elbows, forearms and palms your chest. Keep your elbows as close together as possible while you raise your elbows over head. Turn your palms up then out. If your arms to the Lower your elbows down the sides of your body. If lying, continue to keep your elbows in contact with the floor. Keep palms turned out as if you’re opening curtains. Lie on your back with knees bent, and place a towel roll across shoulder blades. Relax for as long as tolerated up to 5 minutes, 1-3 times per day. As this becomes more tolerable, raise arms above head and tuck chin for a bemuscles, tuck chin and place arms at sides, elbows bent and positioned at 90 degrees. ALTERNATE: Place towel vertically. Using a Theracane, tennis ball, or trigger ball, give gentle direct pressure to tight muscles and knots. Hold or gently massage areas 60-90 seconds each, once balls in a sock w
orks well to release the suboccipitals and improve headaches; use the tennis ball against the wall for knots along shoulder blades. LOWER TRAPEZIUS MOBILIZATION your elbows and pull your hands down along you sides. Pause and relax while breathing stretch 2-3 times. Pull chin straight back (without tucking it down). Squeeze shoulder blades down and together, then rotate palms outward and hold. ilization Exercises The most common muscles to become weak for those with neck dysfunction are the cervical flexors. The deep Sit upright with good posture. Hold your neck with your hands or sit or stand against a wall with the back of your head against the wall for some support. Gently nod head by bringing your chin toward your Adam’s apple. You should feel the back of your neck stretch and the front of your neck tighten. DO NOT ALLOW THE LARGE MUSCLESYOUR NECK TO TIGHTEN (you can place your fingers on the Lie on your back with your head on a firm surface and a towel roll under your neck. Gently nod your head by bringing your chin towards your Adam&
#146;s apple. Do not lift your head off of the table, and maintain contact with the towel roll. Feel the back of your neck lengthen and the front of your neck tighten. Lie on your back with your head on a firm surface and a towel roll supporting your neck. Gently nod your chin toward your Adam’s apple and lift your head up slightly. Do not lose contact with the towel roll. Feel the back of your neck lengthen and the front of your neck tighten. Cervical Isometric Exercises To strengthen muscles in the neck and/or maintain strength gained in the MedX machines. Instructions: 1. Do only the exercises There should be no movement of your head while pushing; however, your therapist may instruct you on how to do each exercise in various positions throughout the range of motion. _________________________________________________________________________________________________________ Place the heel of your right hand against the side of your forehead. Attempt to turn your head to the right while resisting with your hand. Repeat on the other side g with
y our hands Place the ball on your right shoulder. Push head in and down against the ball as if toward your shoulder EXTENSION Cradle ball at base of skull. Push head back into the ball then tip your head back as if trying to look at the ceiling Place ball at right side of forehead. Push cheek into ball and turn your head in the direction of the ball. Do not turn your body. Purpose: These exercises will strengthen and improve coordination of the trunk muscles which is needed to help maintain active balanced posture and lumbar stability. Core strength helps decrease strain on the spine and ultimately helps 1. Lower Abdominal Exercise: Maintain DLC Bring one leg up to 90 degrees, and then bring the other one up to meet it. Lower one leg down to the floor. Lower the other leg down to the floor. Alternate lead leg and repeat. Bring one leg up to 90 degrees, and then bring the other one up to meet it. Lower one leg down and just tap your toe on the floor, and return back up to 90 degrees. Alternate and repeat. Either bring one leg up past 90 degrees (easier), or stop at 90 de
grees (harder). Lower it slowly back down to the floor. Alternate and repeat. Bring one leg up to 90 degrees, and then bring the other one up to meet it. Straighten one leg out and drop down to just above floor. Return to starting position. Alternate and repeat. ng one leg up to 90 degrees, and then bring the other one up to meet it. Bring one leg up to 90 degrees, and then bring the other one up to meet it. Straighten both legs and drop slightly (less than 45 degree angle). Return to starting position and repeat. 2. Level 1: Alternate Arm or Leg Lift: Maintain DLC N: This exercise can also be performed on your stomach if you have a wrist, shoulder or knee problem. Position on hands and knees. Maintaining a deep core contraction, lift one arm out in front of you. Hold this position for Repeat with the other arm. Return arm to floor and lift one leg behind you, keeping a level pelvis and tight core. Hold this position for and then repeat with the other leg. Repeat up to 12 repetitions (2 minutes). Level 2: Alternate Arm and Leg Lift: Maintain DLC Main
taining a deep core contraction, simultaneously raise one arm out in front of you, and raise the opposite leg. Hold this position for . Alternate sides, and keep your pelvis level. Repeat up to 12 repetitions (2 minutes).ALTERNATE: Perform on ball, placing ball under abdomen and help balance on toes and hands (don’t put all of your weight through your hands and toes). N: This exercise can also be performed on your stomach if you have a wrist, shoulder or knee problem. Level 3: Alternate Arm and Leg Lift: Maintain DLC Perform on ball, balancing on toes and abdomen. Perform a swimming motion with arms, i.e. as right arm is out in front of you, left arm is at your side and your left leg is raised behind you. Repeat on the other side. up to 12 repetitions (2 minutes). Level 2 Bridge: Maintain DLC Level 3 Bridge: Maintain DLC Position lying on back with legs bent, and arms at sides. Placing palms up aids in facilitation, so do this if able. Lift hips off of floor using abdominal muscles (not buttocks), rolling up one vertebra at a time. Hold 10 secondsLower hips slig
htly and lift again focusing on abdominals to do the work. Repeat up to 6-12 repetitions (1-2 minutes). Lift hips off floor using hips and buttock muscles this time, rolling up one vertebra at a time. Hold 10 seconds.Lower hips slightly and lift again using buttocks to push hips up. Repeat up to 6-12 repetitions (1-2 minutes).ALTERNATE: Perform on ball, placing ball under legs below the knee. Hold arms to the ceiling and complete as in level one. Complete the two sets described in level 1. In an extended bridge, lift one leg off the floor or ball and hile maintaining a level pelvis. Repeat with the other leg, keeping hips up from the floor. Continue for up to 12 reps (2 minutes). Core Stabilization Exercises – Page 3 Maintain DLC Level 2 Trunk Lie on stomach over the ball with your feet against the wall, arms at your side or behind you. Lift your trunk or chest off the ball. Maintain spine in a neutral position, careful not to arch your back. Hold for 10 seconds, lower slowly and repeat up to ALTERNATE: Perform exercise on the floor, lifting both legs. Progress By: Positioning
arms out in front of you Holding weights in your hands as arms are out in front of you Active Balanced Posture: 4-Step Deep Layer Core Contraction The core is where the body’s center of gravity is located and where all movement begins. A strong, efficient core is necessary for building and maintaining proper muscle balance and posture throughout the entire body. 1. These exercises should be pain-free. You will feel a deep sense of fatigue after completion. Performed in sitting, supine (lying on back) with knees bent, quadruped (on hands and knees), & standing. Lightly contract the muscle as if you were going to cut off the flow of urine midstream. Pain management techniques are aimed at reducing daily pain and inflammation and/or expedite recovery from a flare up or exacerbation. 1. If you are flared up, try not to panic, and practice pain management techniques as described below. ICING DIRECTIONS To avoid skin irritation and achieve maximal benefit from ice treatments, ice properly. 1. Apply the cold pack to the affected area using a towel layer over the skin. 2.
Icing will create four progressive sensations: COLD — BURNING — TINGLING — NUMBING 3. Once reaching the numbing stage you will want to continue icing no more than 10 additional minutes. Use ice approximately 15-20 minutes per session Purpose: Stretching exercises help to restore joint range of motion by lengthening shortened muscles and connective tissues, which help to reduce pain and tightness. Instructions: Lie on your back with your knees bent, feet flat on the floor. Slowly lower both bent knees to HIP FLEXOR STRETCH Kneel with weight on one knee and the opposite foot. Tuck your hips under, squeeze buttocks, lean slightly forward and hold. Avoid arching your back. You should feel stretch to the front of the trunk or hip, not in your lower back. MODIFICATION: Lay on back with buttocks at very edge of table SINGLE KNEE TO CHEST Lie on your back, knees bent and feet flat on floor. Bring one t pulling gently with your hands, hold, and alternate. SIJ MODIFICATION: Extend one knee flat to the ground. Gently push the knee at your chest into your
hands and count to five. Relax, and pull the knee up and slightly outward closer to your chest. Repeat this cycle 3-5 times on each leg. Lie on your back, knees bent and feet flat on floor. Bring both knees toward your chest pulling gently with your hands and hold. Lumbar Spine & Related Hip Stretches Lie on you back with knees bent and feet on the floor. Place left ankle over the outside of right knee and use left leg to push right leg toward the floor until a stretch is felt to the outside of the right hip. Hold, and repeat on other leg. TRIGGER POINT RELEASE: Using a Foam Roller, tennis ball, or trigger ball, give gentle direct pressure to tight muscles and knots. Hold or gently massage areas 60-90 seconds each, once daily. PIRIFORMIS STRETCH Lie on you back with knees bent and feet on the floor. Cross p left thigh and bring your left knee toward your chest and hold. Repeat on the other side. MODIFICATION: May also be performed by pulling knee toward opposite shoulder or can be done in seated position. HAMSTRING STRETCH Lying on your back, bend your hip and grasp your thigh just abo
ve your knee. Slowly straighten your knee with your foot in a relaxed position and hold. If able, flex your ankle several times. Modify by keeping other leg bent as needed. MODIFICATION: May also be performed in standing or sitting with leg straight and elevated on a stool. With upright posture, bend forward at hips until stretch is felt. Lie on you stomach with your weight on your elbows and contact with the floor. Allow your low back and buttocks to relax. Extend elbows and press up as able. Hold, or gently repeat movement several repetitions. Hold ______________ x ____________ Reps On hands and knees, sit back on you heels and tuck your hips under. Stretch your arms straight in front of you until a stretch is felt in your mid to low back and hold. QUADRATUS MODIFICATION: Shift weight diagonally over hip, and sidebend to the opposite side, elongating the side of the back and hold. Repeat to the other side. On hands and knees, slowly round pelvis and hips up towards ceiling to arch back like a cat. Drop pelvis and hips toward the floor. Avoid rocking forward and backward on knees. Hold eac
h position, or gently repeat movement several repetitions. Midback Stabilization Exercises These exercises will strengthen the midback (between and underneath the shoulder blades) which will contribute to improved posture and decreased pain by decreasing strain on the spine. Instructions: Place your hands on the wall and feet away from the wall enough that you are leaning forward slightly. Keep elbows straight but . By moving only the shoulder blades, allow your chest to move toward the wall, pause, and then push your chest as far away from the wall as you can. MODIFICATION: y ou have wrist/thumb p ain or car p al tunnel. 1. Straight Arm Push-ups: Maintain DLC Use Level 1 positioning but place hands on a Swiss ball Place your hands on the floor directly beneath your shoulders. Keep your spine in a neutral position. Keep elbows straight but not locked. Allow your chest pause, and then push your chest as far away from the floor as you can. 20 reps. Position yourself on your hands and knees. Keep your spine in a neutral position. Keep elbows str
aight but en push your chest as far away from the floor as you can. 20 reps. Midback Stabilization Exercises- Page 2 2. Reverse Wall Push-u p s: Maintain DLC Begin in the same position, now push your body forward by pushing your elbows into the wall. Your hips should be in line with your shoulders. Your elbows should not slide on the wall. Hold yourself away from the wall for 10 seconds. 6-12 reps. 3. Scapular Depression: Maintain DLC Sit or stand (one foot forward if standing) with good posture. Bend your elbows to 90 degrees and push your elbows straight down r 10 seconds. 6-12 reps. Sit with your forearms on a table in front of you. Squeeze shoulder blades down and push your arms into the table as if attempting to lift your body. Hold for 10 seconds. 6-12 reps. 4. Postural Exercises: Maintain DLC Stand with your head and back against the wall and your feet 8-12 inches away from the wall (or further away for more challenge) and your knees slightly bent. You should be leaning back slightly into the wall. Hold your arms at your sides with you elbows bent to 90 degree
s. Push your elbows into the wall. Your elbows should not slide on the wall. Hold for 10 seconds. 6-12 reps. Level 2 Level 1 Exercise A Stand against the wall with feet 6”-8” away from wall. Keep elbows straight and arms/hands against the wall. Maintaining a slight backward pressure against the wall, slowly raise arms out the side until reaching the positions of 10 o’clock and 2 o’clock STOP raising your arms if you cannot keep your shoulders from shrugging, and complete in a shorter motion. Repeat 12-20 reps. Exercise B d against the wall as in exercise A Press head, back, and hips against the wall Place arms/hands against the wall at shoulder level, and avoid shoulder shrugging. Keep contact with the wall, by maintaining a slight backward pressure with your arms, as you bend your elbows to 90 degrees then straighten. Repeat 12- 20 reps. Trigger point release or self-massage tec aids in the healing process, and breakpart of the secondary pain cycle. 1. Use a tennis ball,Combine self release with stretchi Theracane or tenn
is ball against the wall for knots in shoulder blades Suboccipital Release using two in a sock Piriformis and gluteal release using tennis or trigger ball under buttock ITB release using foam roller Proper Body Mechanics with Sweeping and Vaccuuming Use long handle equipment to avoid stoopting Keep broom or vacuum close to your body Stay upright, step or lunge with your legs to push the Avoid bending at the waist or reaching with your arm Pivot with your feet, don’t twist your trunk Keep basket at waist height when sorting laundry Squat or half kneel to get clothes in and out of front loading washer or dryer, avoid bending at waist Use golfer’s lift to get clothes out of top loading washer lift laundry basket from floor. Sitting Posture & Computer Ergonomics Forward ready position the typical upright posture with the back supported or, if the seat is tilted, sitting for short periods of time without using the backrest to work on postural endurance. Semi-reclining position: use if the chair has a reclining feature. This position may work best while talking on the phon
e if there is little or no need to write. Standing: Rest one hand on the desk and bend at hips if needing to write. Place on an elevated surface Add an external monitor, keyboard, and Use a port replicator or docking station Rest forearms or elbows on work surface to Balanced Posture Alignment Ears and shoulders in line with hips Height Adjustment Feet flat on floor, or use a foot stoolKeep thighs parallel to floor, create 90-110 degree hip angleEnsure leg clearance from desk or keyboard tray Monitor Height & Distance Lumbar Su pp ort Seat Pan Adjustment increased efficiency in stretching, and better body actively collaborate in your therapy. 1) Follow the steps as indicated by your therapist. 2) Perform steps daily, at least 3 to 4 times 3) Devise a visual reminder as a prompt to remind you to breathe deeply _________________________________________________________________________________________________ Close your eyes if it feels comfortable. Lie down or relax in a chair Close your eyes if it feels comfortable your belly and relax as you exhale. Focus on breathing in thr