
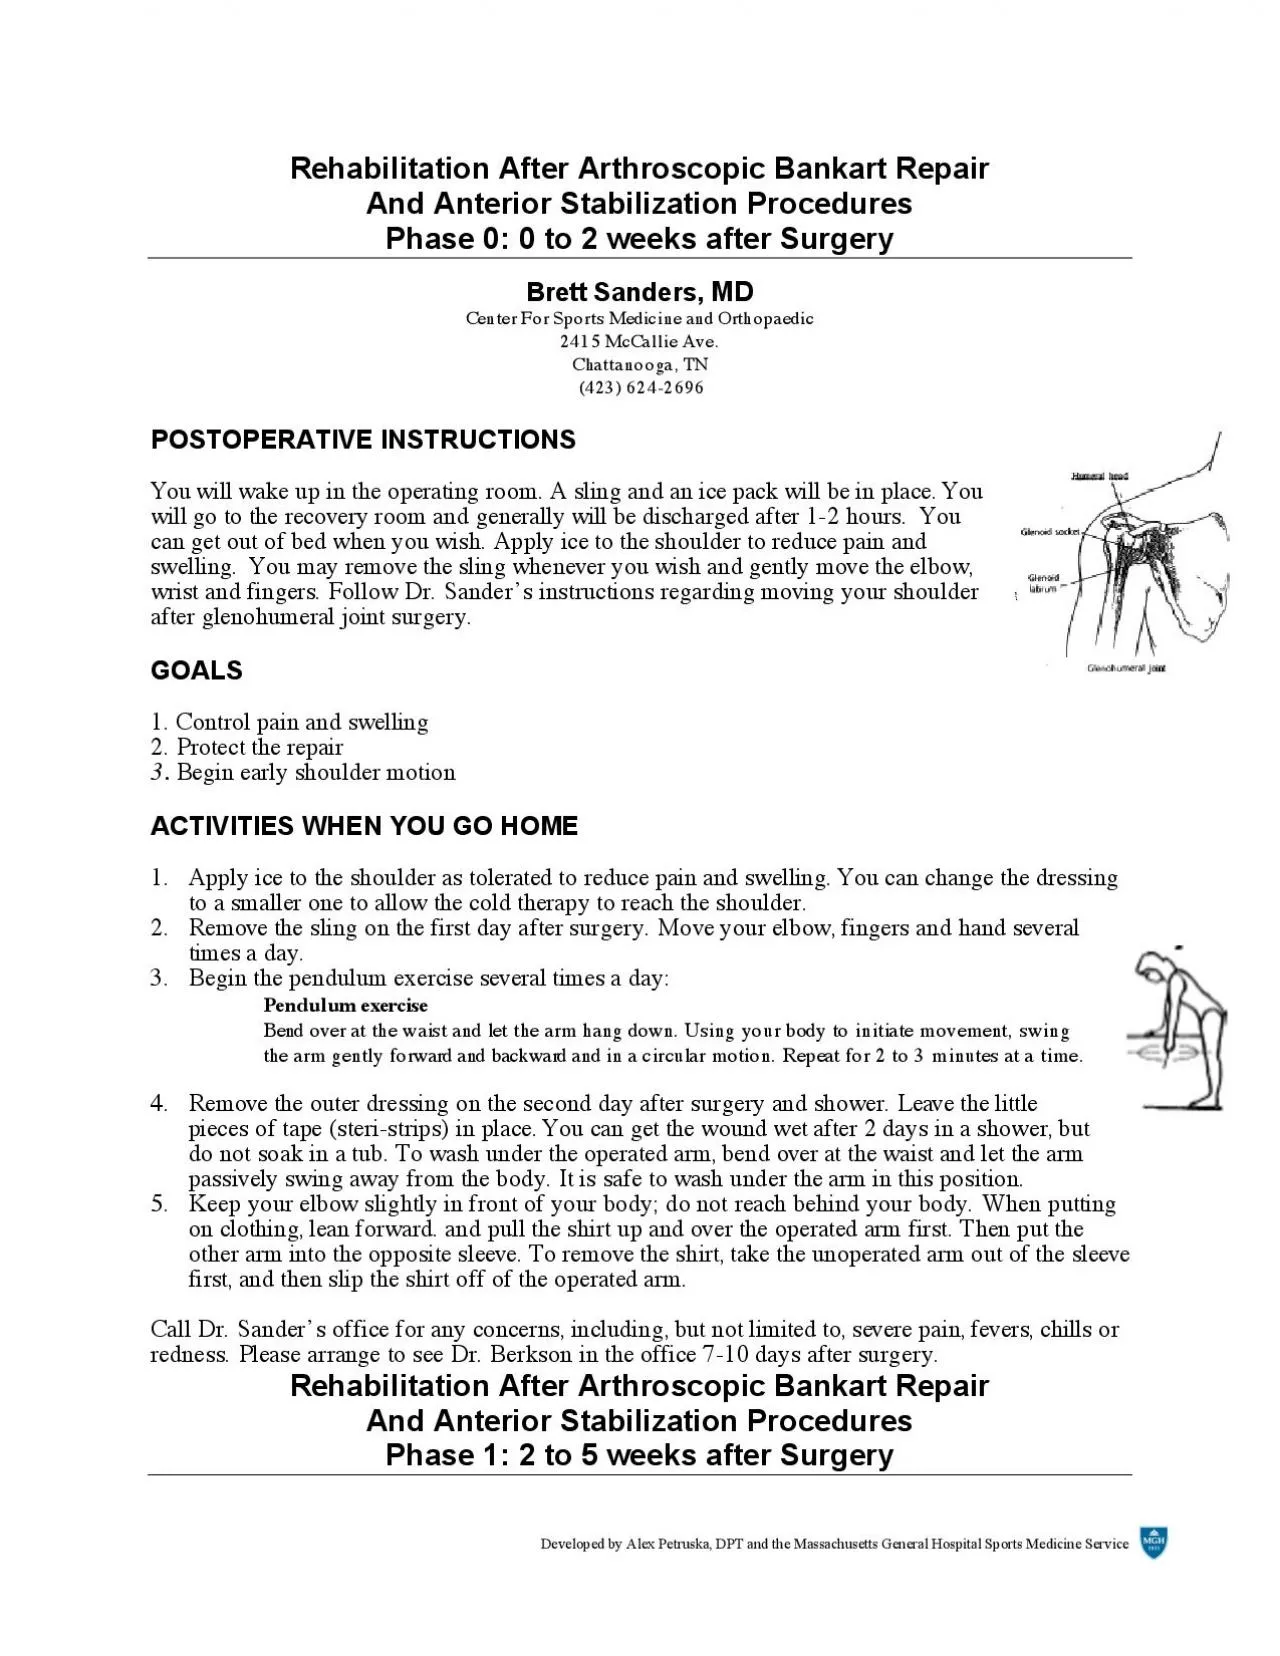
Rehabilitation After Arthroscopic Bankart Repair And Anterior Stabilization Procedures Phase 0 0 to 2 weeks after Surgery Brett Sanders Center For Sports Medicine and Orthopaedic 2415 McCallie Ave ID: 936568
Download Pdf The PPT/PDF document "Developed by Alex Petruska DPT and the M..." is the property of its rightful owner. Permission is granted to download and print the materials on this web site for personal, non-commercial use only, and to display it on your personal computer provided you do not modify the materials and that you retain all copyright notices contained in the materials. By downloading content from our website, you accept the terms of this agreement.


Developed by Alex Petruska, DPT and the Massachusetts General Hospital Sports Medicine Service Rehabilitation After Arthroscopic Bankart Repair And Anterior Stabilization Procedures Phase 0: 0 to 2 weeks after Surgery Brett Sanders, Center For Sports Medicine and Orthopaedic 2415 McCallie Ave. Developed by Alex Petruska, DPT and the Massachusetts General Hospital Sports Medicine Service Brett Sanders, Center For Sports Medicine and Orthopaedic 2415 McCallie Ave. Chattanooga, TN (423) 624-2696 GOALS 1. Protect the repair 2. Ensure wound healing 3. Prevent shoulder stiffness ACTIVITIES 1. Sling Use your sling as instructed by Dr. Berkson. You may remove it whenever you wish if you are careful and keep the shoulder safe. Put the sling on when you are outside or in a crowd. Keep the sling on when sleeping at night for the first three or four weeks. 2. Use of the operated arm You may use your hand on the operated arm as long as you do not rotate the armexternally or away from your body. You should bend your arm at the elbow and use your fingers and hand, such as to reach up and touch your face. Keep your elbow in front of you. 3. Bathing and showering You may shower or bath and wash the incision area. To wash under the operated arm, bend over at the waist and let the arm passively swing away from the body. It is safe to wash under the arm in this position. This is the same position as the pendulum exercise. Do not submerge the incisions under water. Developed by Alex Petruska, DPT and the Massachuse
tts General Hospital Sports Medicine Service EXERCISE PROGRAMICE Days per Week: 7 As necessary Times per Day: 4-5 STRETCHING PASSIVE MOTION Days per Week: 7 Times per day4-5 15- 20 minutes Program Pendulum exercises 1-2 sets 20-30 reps Supine External Rotation 1-2 sets 10-15 reps Weeks 1 and 2: limit to 0 degrees (straight up) Weeks 3 to 6: limit to 30 degrees Supine forward arm elevation 1-2 sets 5-10 reps Starting at 3rd week after surgery: Behind the back internal rotation 1-2 sets 5-10 reps Shoulder stretching is divided into two phases. Phase 1, or passive range of motion, is always performed with the uninjured arm assisting or helping the operated arm. Phase 2, or active range of motion with a terminal stretch, is performed by the operated arm with the uninjured arm assisting for a "terminal stretch". In most instances, wean off passive range of motion by using the uninjured arm in isolated incidents to assist the operated arm. The other major difference between passive and active stretching is the "terminal stretch". During active stretching and upon reaching your "endpoint" of pain or movement, push the operated arm with the uninjured hand another 5-10 degrees for additional movement. This final movement is labeled "terminal stretch". Maximum motion for each person remains the goal and terminal stretching will assist in achieving that goal. All stretching exercises should be done slowly to maximize muscle and soft connective tissue involvement. When stretching, your goal is to
reach the maximum range of motion for you. There is a reason for multiple sets and repetitions. This reason stems fiom "warming up" the shoulder so it can actually stretch further in the last few repetitions that you will do. The first few repetitions prepare the stiffened or swollen shoulder for initial movement. Since there is more than one repetition per set, allow the first one or two repetitions to be warm-up reps, with very little pain. Gradually work into more and more range of motion. It is also important to allow pain to be your guide. Move the arm to an "endpoint" (that endpoint is dictated by the amount of pain). Your goal is to increase the endpoint as often as possible until you have reached the full range of motion. As far as pain, you want to avoid excruciating pain, but "discomfort" is tolerated as long as the pain does not remain for a prolonged period of time. A basic rule to follow when stretching is, if the pain does not linger, you did not stretch too far. Developed by Alex Petruska, DPT and the Massachusetts General Hospital Sports Medicine Service 1. Pendulum exercise Bend over at the waist and let the arm hang down. Using your body to initiate movement, swing the arm gently forward and backward and in a circular motion. 2. Shoulder shrug Shrug shoulders upward as illustrated. 3. Shoulder blade pinches Pinch shoulder blades backward and together, as illustrated. 4. Supine forward arm elevation Lie on your back. Hold the affected arm at the elbow with the opposite hand. Ass
isting with the opposite arm, lift the affected arm upward, as if to bring the arm overhead, slowly lower the arm back to the bed. 5. Supine external rotation Lie on your back. Keep the elbow of the affected arm against your side with the elbow bent at 90 degrees. Using a cane or long stick in the opposite hand, push against the hand of the affected arm so that the affected arm rotates outward. Hold 10 seconds, relax and repeat. 6. Behind-the-back internal rotation Sitting in a chair or standing, place the hand of the operated arm behind your back at the waistline. Use your opposite hand, as illustrated, to help the other hand higher toward the shoulder blade. Hold 10 seconds, relax and repeat. Office Visit Please arrange to see Dr. Sanders approximately 4 weeks following your first post-operative visit (6 weeks after surgery). Rehabilitation After Arthroscopic Bankart Repair And Anterior Stabilization Procedures Phase 2: 5 to 8 weeks after Surgery Brett Sanders, Developed by Alex Petruska, DPT and the Massachusetts General Hospital Sports Medicine Service Center For Sports Medicine and Orthopaedic 2415 McCallie Ave. Chattanooga, TN (423) 624-2696 GOALS 1. Protect the shoulder and avoid overstressing the repair 2. Improve range of motion of the shoulder 3. Begin strengthening exercises ACTIVITIES 1. Sling The sling is no longer necessary. 2. Use of the operated arm You may now use your arm. Avoid having the arm forcefully pulled behind you. Continue to avoid heavy weight lifting or manual labor
. Follow any further instructions given to you by Dr. Berkson. 3. Precautions Do not lift heavy weights overhead with the weight going behind the head. In other words, keep the weights in front of you where you can see them. EXERCISE PROGRAM ICE Days per week: 7 Times per day 4-5 As necessary 15-20 minutes STRETCHING ACTIVE MOTION Days per week: 7 Times per day 3-4 Program: Pendulum exercises 1-2 sets 20-30 reps Supine External Rotation 1 set 10-15 reps Standing External Rotation 1 set 10-15 reps Week 3: limit to 30 degrees Week 4: limit to 45 degrees Supine passive arm elevation 1 set 5-10 reps Seated-Standing ArmElevation 1 set 5-10 reps Behind the back internal rotation 1-2 sets 5-10 reps Developed by Alex Petruska, DPT and the Massachusetts General Hospital Sports Medicine Service Exercises 1. Seated/Standinp Forward Elevation (Overhead Elbow Lift) During this phase, you can sit in a chair. If it is easier, begin in a supine position until you achieve maximal motion, then use a seated position. Assume an upright position with erect posture, looking straight ahead. Place your hands on either thigh with the operated thumb facing up. This stretch is not performed solely with the operated arm, but use the uninjured hand for assistance going up and coming down. Begin by pulling the operated arm toward your feet, as if to lengthen the arm (establish slight traction). Keep your elbow slightly flexed. The operated arm is lifted as high as possible, or to your endpoint of pain. Upon re
aching that endpoint, take the uninjured hand and actually push on the outstretched forearm of the operated arm. Push 1 or 2 inches to achieve a "terminal stretch". Hold 10seconds per repetition. Release and slowly return to the start position 2. Supine cross-chest stretch Lying on your back, hold the elbow of the operated arm with the opposite hand. Gently stretch the elbow toward the opposite shoulder. Hold for 10 seconds. 3. Standing external rotation Stand with the operated shoulder toward a door as illustrated. While keeping the operated arm firmly against your side and the elbow at a right (90 degree) angle, rotate your body away from the door to produce outward rotation at the shoulder. 4. Supine passive arm elevation Continue this exercise from phase two, stretching the arm overhead. Hold for 10 seconds. Developed by Alex Petruska, DPT and the Massachusetts General Hospital Sports Medicine Service Behind-the-back internal rotation Sitting in a chair or standing, place the hand of the operated arm behind your back at the waistline. Use your opposite hand to pull on a towel as illustrated, to help the other hand higher toward the shoulder blade. Hold 10 seconds, relax and repeat. Developed by Alex Petruska, DPT and the Massachusetts General Hospital Sports Medicine Service Rehabilitation After Arthroscopic Bankart Repair And Anterior Stabilization Procedures Phase 3: 8 to 10 weeks after Surgery Brett Sanders, Center For Sports Medicine and Orthopaedic 2415 McCallie Ave. Chattanooga, TN
(423) 624-2696Goals 1. Protect the shoulder repair 2. Regain full range of motion 3. Continue gentle strengthening Activities 1.Sling The sling is no longer necessary. 2. Use of the operated arm You may now use your arm in a more normal fashion. You may move the arm into all positions including external rotation and behind the back if it is comfortable. Avoid having the arm forcefully pulled behind you. Continue to avoid heavy weight lifting or manual labor. Follow any further instructions given to you by Dr. Berkson. 3. Precautions Do not lift heavy weights overhead with the weight going behind the head. In other words, keep the weights in front of you where you can see them. Exercise Program STRETCHING ACTIVE MOTION Days per week: 7 Times per day 1-2 Pendulum exercises 1-2 sets 20-30 reps Standing External Rotation Doorway 1 set 5-10 reps Wall Climb Stretch 1 set 5-10 reps Standing Forward Flexion 2 sets 10-20 reps Behind the back internal rotation 1-2 sets 5-10 reps Supine External Rotation with Abduction 1 set 5-10 reps Supine Cross Chest Stretch 1 set 5-10 reps Side-lying External Rotation 1 set 10-20 reps Prone Horizontal arm Raises 1 set 10-20 reps STRENGTHENING I THERABANDExternal Rotation 1-2 sets 15-20 reps Internal Rotation 1-2 sets 15-20 reps Developed by Alex Petruska, DPT and the Massachusetts General Hospital Sports Medicine Service Standing Forward
Punch 1-2 sets 15-20 reps Shoulder Shrug 1-2 sets 15-20 reps Seated Row 1-2 sets 15-20 reps Biceps Curl 1-2 sets 15-20 reps 1. Standing external rotation Stand with the operated shoulder toward a door asillustrated. While keeping the operated arm firmly against your side and the elbow at a right (90 degree) angle, rotate your body away from the door to produce outward rotation at the shoulder. Hold 10 seconds. 2. Supine external rotation with abduction Lie on your back. Plyour hands behind your head as shown in the top illustration. Slowly lower your elbows to stretch the shoulders toward the position shown in the lower illustration. Hold for ten seconds, then return to the starting position. 3. Wall climb Stand facing a wall, place the fingers of the affected arm on the wall. Using the fingers as "feet", climb the hand and arm upward. As you are able to stretch the hand and arm higher, you should move your body closer to the wall. Hold 10 seconds, lower the arm by pressing the hand into the wall and letting it slide slowly down. 4. Standing forward flexion Stand facing a mirror with the hands rotated so that the thumbs face forward. Raise the arm upward keeping the elbow straight. Try to raise the arm by hinging at the shoulder as opposed to raising the arm with the shoulder blade. Do 10 repetitions to 90 degrees. If you can do this without hiking the shoulder blade, do ten repetitions fully overhead. 5. Side-lying external rotation Lying on the non-operated side, bend the elbow to
a 90 degree angle and keep the operated arm firmly against your side with your hand resting on your abdomen. By externally rotating the shoulder, raise the hand upward, toward the ceiling through a comfortable range of motion. Hold this position for 1 to 2 seconds, then slowly lower the hand. Developed by Alex Petruska, DPT and the Massachusetts General Hospital Sports Medicine Service 6. Prone or bent-over horizontal arm raise Lie face down on your bed with the operated arm hanging freely off of the side (or bend over at the waist asif doing pendulum exercises). Rotate your hand so that the thumb faces away from you. Slowly raise the arm away from your body through a pain-free range of motion. Hold that position for 1 to 2 seconds and slowly lower. Developed by Alex Petruska, DPT and the Massachusetts General Hospital Sports Medicine Service Theraband StrengtheningThese resistance exercises should be done very slowly in directions. Your goal is to achieve a maximum amount of strengthening while listening to your endpoint of pain. Obviously, we want to strengthen you throughout the full range of motion. It is very important that this exercise be done very slowly, not only when you complete the exercise (concentric), but also as you come back to the start position (eccentric). The slower the motion, the more maximal the contraction throughout a full range of motion. 1. External Rotation Attach the theraband at waist level in a door jamb or other. While standing sideways to the door and looking st
raight ahead, grasp one end of the band and pull the band all the way through until it is taut. Feet are shoulder width apart and the knees are slightly flexed. The injured elbow is placed next to the side with the injured hand as close to your chest as possible (think of this elbow as being a hinge on a gate). Taking the cord in the injured hand, move the hand away from the body as far as it feels comfortable (at least 90 degrees is our goal), or to where the endpoint of pain limits you. Return to the start position; if you would like, during future repetitions go a few more degrees to work more of a range of motion. 2. Internal Rotation Attach the Theraband at waist level in a doorjamb or other. While standing sideways to the door and looking straight ahead, grasp one end of the handle and pull the cord all the way through until it is taut. Feet are shoulder width apart and the knees are slightly flexed. The injured elbow is placed next to the side and is flexed at 90 degrees (think of this elbow as being a hinge on a gate). Taking the cord in the injured hand, move the hand toward the chest as far as it feels comfortable, or to where the endpoint of pain limits you. Return to the start position 3. Shoulder Shrug Stand on the theraband with your feet at should width apart and. Look straight ahead. Next, straighten up, keeping the knees slightly flexed, with your arms straight down at the sides (palms in). Slowly raise the shoulders in a shrug (toward the ears), then rotate the shoulders backward i
n a circular motion, and finally down to the original position. This movement is completed while keeping constant tension on the cord. 4. Seated Standing Row Attach the theraband in a door jamb or other. Sit or stand facing the door. Use a wide flat-footed stance and keep your back straight. Begin with the arms slightly flexed, hands together at waist level in front of your body, thumbs pointing upward, and with the cord taut. You are producing a rowing motion. Pull the cord all the way toward the chest. While pulling the cord, the elbows should be drawn along the side of the body until the hands touch the lower ribs. Always return slowly to the start position. Developed by Alex Petruska, DPT and the Massachusetts General Hospital Sports Medicine Service Theraband Exercises, continued5. Standing Forward Punch Attach the theraband at waist level in the door jamb. Facing away from the door, stand in a boxing position with one leg ahead of the other (stride position). Do not bend at the waist and remain in an upright position. If the right shoulder is the injured extremity, you will want to grasp the handle in the right hand and step out until the cord is taut. If you use the right hand, the left foot should be forward in the stride position. Begin with your right arm at waist level and bend the elbow at a 90 degree angle, with the elbow remaining near your side. Slowly punch forward while slightly raising the right arm in a forward, upward punching motion. The hand should reach approximately neck
level with the right arm almost straight. 6. Biceps Curls Place your feet on the cord, shoulder width apart, knees slightly bent. Keeping your elbows close to the sides of your body, slowly bend the arm at the elbow and curl towards the shoulder. Alternate arms while performing this exercise. Guidelines for Returning to Weight Training After Bankart Repair for Shoulder InstabilityYou should not return to training using heavy weights on weight machines until Dr. Berkson determines that it is safe. In general, it is usually safe to return to heavy weight training at three months following Bankart repair. Developed by Alex Petruska, DPT and the Massachusetts General Hospital Sports Medicine Service Before embarking on a weight training program, you should have full range of shoulder motion and normal strength in the rotator cuff and scapular muscles. Your motion and strength will be tested by Dr. Berkson or a physical therapist before you start weight training. When starting your weight training program, you can start with sets of 15-20 repetitions. Training with high repetition sets ensures that the weights that you are using are not too heavy. NEVER perform any weight training exercise to the point of muscle failure. "Muscle failure" occurs when, in performing a weight training exercise, the muscle is no longer able to provide the energy necessary to contract and move the joint(s) involved in the particular exercise. Joint, muscle and tendon injuries are more likely to occur when muscle failure oc
curs. The following weight training exercises should be avoided after Bankart repair for shoulder instability: 1. Pull downs behind-the-neck (wide-grip) 2. Behind-the-neck shoulder press Wide-grip bench press 4. Standing lateral deltoid raises 5. Triceps press overhead The following exercises require special cautions: Pull downs should only be done in front of the head, to the chest, with a medium(not wide) grip. Shoulder press overhead should be done carefully, avoiding heavy weights. If doing shoulder presses, always start with the hand in front of the shoulder and end overhead where you can still see your hand. For persons using barbells, this is the "military press. If bench pressing, your grip should be no wider than the wider than the width of your shoulders. Avoid any exercises using grips wider or narrower than shoulder width. Lateral deltoid raises should be avoided because of the impinging and wearing effect on the rotator cuff. Forward raises in the "thumb-up" position are usually safer and can be done with reasonable weights. Lateral raises from the prone or bent over position can be done as a substitute for standing lateral deltoid raises. When doing incline bench press with barbells, there is a danger of shoulder dislocation if the lifter loses control of the bar when returning the barbell to the rack of the incline bench. Always have a spotter for removing and replacing the barbell in this exercise. Developed by Alex Petruska, DPT and the Massachusetts General Hospital Sports Medicine
Service If you are doing any type of "chest-fly", keep in mind the following precuations. Do not do any chest-fly exercise with straight elbows. Always allow the elbows to bend and never lower your hands (holding dumbbells) below the level of your chest.If you are using a "Pa-Deck" machine, never let the weight stretch the arms so that your elbows pass behind your chin. You can set the arms on this machine a few clicks forward to adjust the maximum motion allowed. If you a performing "dips" using a set of parallel bars, never lower yourself below the point where the elbows reach a 90 degree angle. For triceps exercises, triceps push-downs on a pulley system are safe as well as bentover triceps extensions. When doing the upright-rowing exercise, keep your grip at least 12 inches apart. When pulling the bar upward toward the chin, do not raise the bar higher than the point at which the elbow reaches shoulder level. Exercises Usually Problem-Free 1. Biceps Curls 2. Cable and bent-over rowing 3. Shoulder shrugs If your goal is returning to high level weight training or weight lifting, it will take to 6 months of cautious, gradual progression to return to top form. In general, avoid increasing the amount of weight lifted by more than 10-1 5% (at a time) of your present working weight every 10- 14 days. Remember: Weight training is beneficial to improve muscular strength and protect the joints from injury. If done improperly by using too much weight and/or improper technique, weight training can cause se