
1 1 To create an account go to httpswwwglobusorgdata transfer and choose Log In Globus needs to know your identity This can be done by signing in with your Google or ORCiD i D credent ID: 958856
Download Pdf The PPT/PDF document "Create a Globus Account" is the property of its rightful owner. Permission is granted to download and print the materials on this web site for personal, non-commercial use only, and to display it on your personal computer provided you do not modify the materials and that you retain all copyright notices contained in the materials. By downloading content from our website, you accept the terms of this agreement.


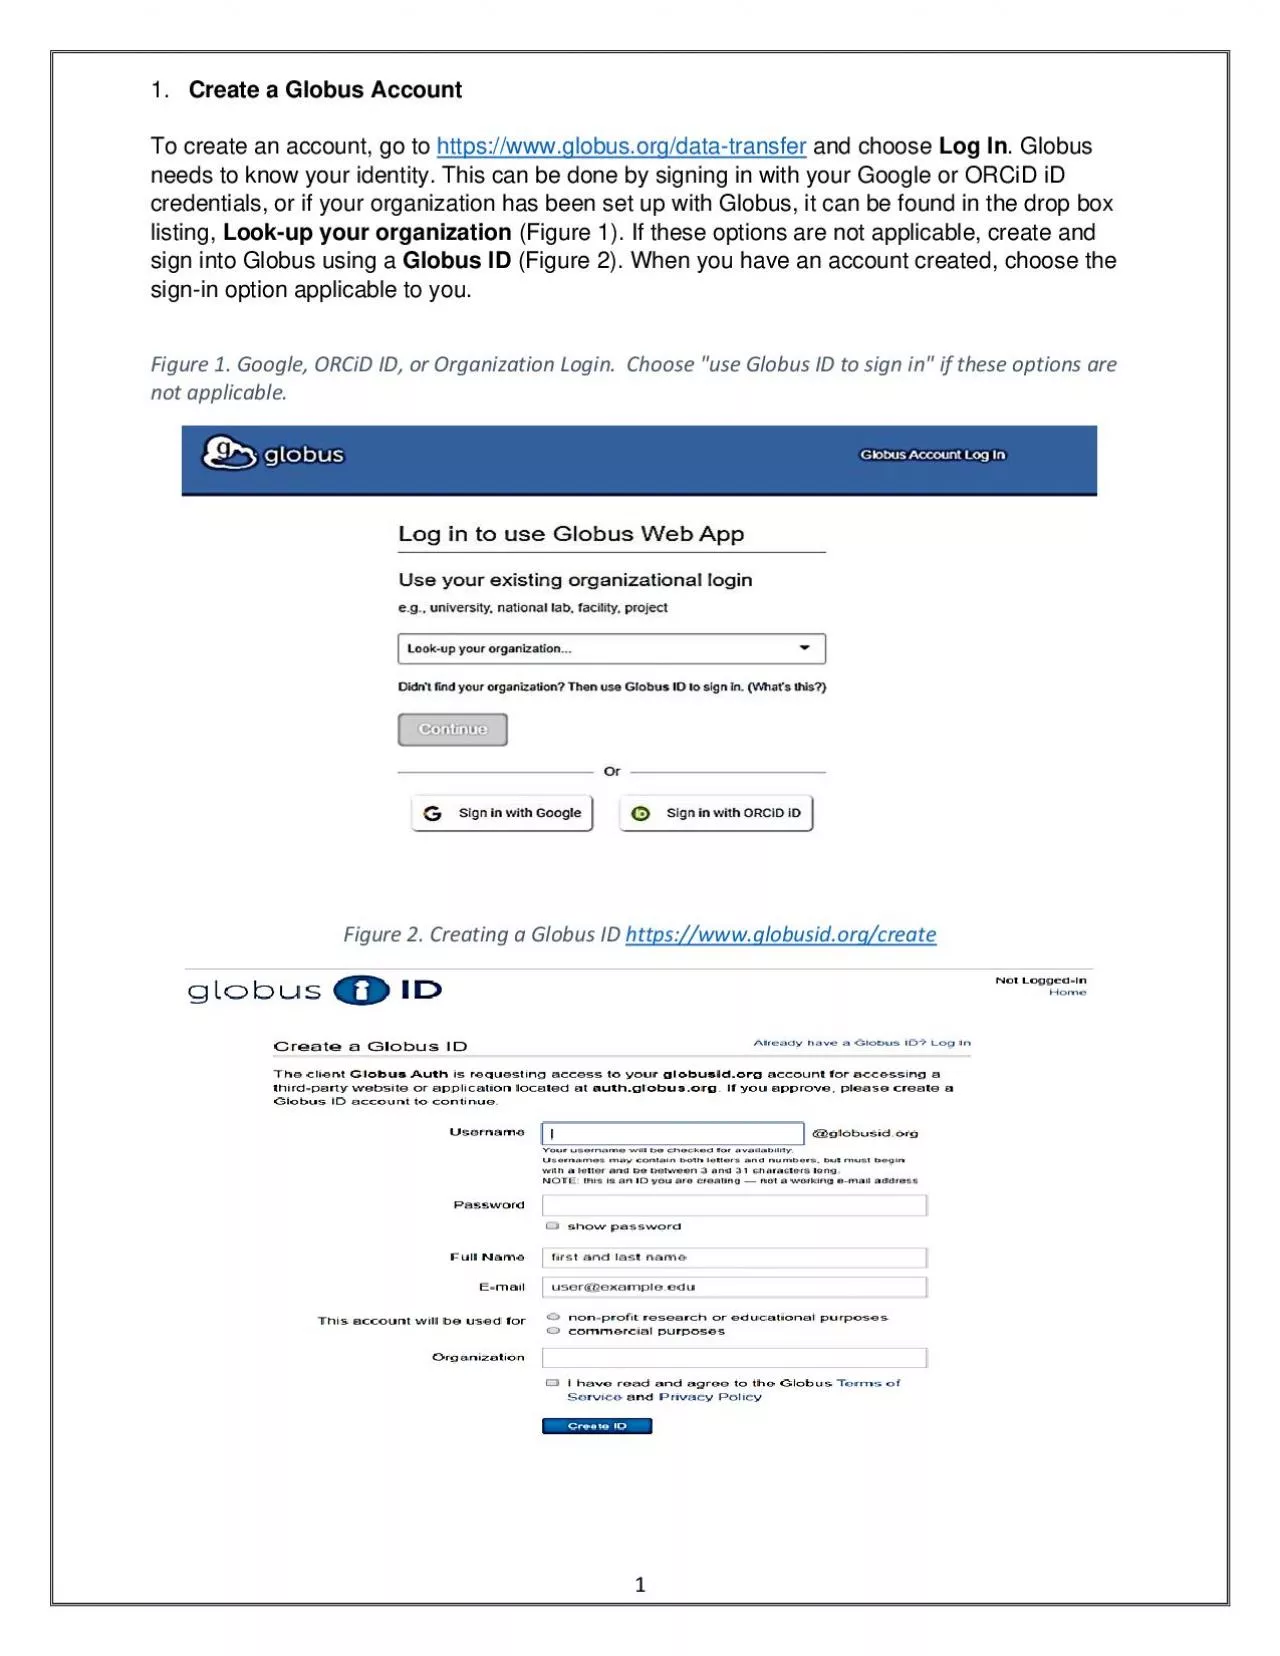
1 1. Create a Globus Account To create an account, go to https://www.globus.org/data - transfer and choose Log In . Globus needs to know your identity. This can be done by signing in with your Google or ORCiD i D credentials, or if your organization has been set up with Globus, it can be found in the drop box listing, Look - up your organization (Figure 1). If these opti ons are not applicable, create and sign into Globus using a Globus ID (Figure 2). When you have an account created, choose the sign - in option applicable to you. Figure 1 . Google, ORCiD ID, or Organization Login. Choose "use Globus ID to sign in" if these options are not applicable. Figure 2 . Creat ing a Globus ID https://www.globusid.org/create 2 2. Globus Connect Personal Installation and Endpoint Setup To transfer files to your computer, create an endpoint for yourself. An endpoint is either the source or the destination between which files will move. You are
only authorized to view specific endpoin ts. Once logged into Globus, choose Endpoints from the menu on the left - hand side (Figure 3) . This page will allow you to Create a personal endpoint . You will be directed to Download Globus Connect Personal based on your operating system. ( Figure 4 ). O nce you have installed Globus Connect Personal, your endpoint will automatically be saved to your desktop. You will not need to install GCP every time you use Globus. I f you experience any errors installing the GCP, you may need to run the download as an admi nistrator requiring administrative credentials. Figure 3 . Installing Globus Connect Personal Figure 4. Download Globus Connect Personal 3 Globus Connect Personal Setup will appear. Y ou will be prompted to identify the owner of the endpoint, create a display name for the endpoint, and a quick description of the machine linked to that endpoint. (Figure 5 ) . Click Save . You will receive a no
tification that your endpoint is connected. Figure 5 . Globus Connect Personal Setup to create an Owner Identity and Collection Name I f you need any additional assistance on installing Globus Connect Personal g o to : https://www.globus.org/globus - connect - personal 3. A c cessing Your Data Once you can login to Globus and have a personal endpoint, you can start accessing your data. To begin, click on File Manager from the menu on the left - hand side. In order to view your per sonal endpoint and the DCS endpoint which you will be collecting your data from, click on the split screen panel shown in Figure 5 . To search your data from the DCS endpoint, type in aps#data in the upper left box titled Collection . Press continue and you will be prompted to authenticate your account using your APS credentials. The username is dour badge num&#xy-20;ber . Example: d123456. Don’t forget the d in front of the badge number , there should be no other letters .
Enter your APS pas sword . Once you have authenticated, navigate to /gdata/dm/DCS/ . 4 Folders are listed based on the organization and date of your experimental time at the DCS. Your folder will be authenticated to your group only and will not be accessible to anyone else. 4. Transferring Your Data Under File Manager with your panel enabled as split screen , choose the endpoint which you made after installing Globus Connect Personal. Your endpoint name can be found easily by clicking on Endpoints from the menu on the left side and then clicking on the Administered by You tab. ( Figure 6 ) . Figure 5 . The name of your endpoint can be found in the Administered by You tab of the Endpoints section of the menu On the right - hand side, search your personal endpoint in the collection search box (Figure 7). Before starting your transfer, you can customize the settings to only transfer new files which currently do not exist on yo
ur endpoint. To do so, choose the Transfer and Sync Options . In the settings, you can check the sync box in the Transfer Settings . In the drop down, change the option to where the files do not exist on your destination (Figure 7). This will only save new files instead of rewriting the entire directory . Figure 4 . Search for aps#data and select split screen panel in the upper right - hand corner to view the DCS endpoint and your personal endpoint 5 Figure 6 . Transfer settings to configure sync to transfer new files which currently do no exist on your endpoint. Once your settings are configured, select Start in the bottom of the DCS endpoint (Figure 8). You will be notified of a successful data transfer via email and the file will be accessible in the documents folder of your personal computer. Figure 8 . Transferring collected data to your personal endpoint. Left - hand side as the DCS endpoint and your personal endpoint on the right - s