
Electronic Medical Record eMAR Introduction An eMAR user is able to log in and out of the eMAR by entering hisher credentials in the appropriate fields Procedure On the eMAR touch screen touch PCC icon on the desk top screen ID: 759384
Download Presentation The PPT/PDF document "2018 Overview of Point Click Care" is the property of its rightful owner. Permission is granted to download and print the materials on this web site for personal, non-commercial use only, and to display it on your personal computer provided you do not modify the materials and that you retain all copyright notices contained in the materials. By downloading content from our website, you accept the terms of this agreement.


Slide1
2018 Overview of Point Click CareElectronic Medical Record - eMAR
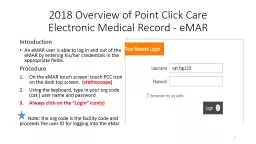
IntroductionAn eMAR user is able to log in and out of the eMAR by entering his/her credentials in the appropriate fields.ProcedureOn the eMAR touch screen: touch PCC icon on the desk top screen. (stethoscope)Using the keyboard, type in your org code (cat.) user name and passwordAlways click on the “Login” icon(s) Note: the org code is the facility code and proceeds the user ID for logging into the eMar
1
cat.bg123
Slide2eMAR
Step 1.
Click onto “Clinical Tab”
Step 2.
In the drop down
box under Module
Select “eMAR”
Slide33
Step 3.
Make sure your PCC assignment matches your Resident assignment by clicking on the Edit Assignment/Date button
Your assignment will also show here
Slide44
Step 4.
Click on the Assignment drop down box and select your resident assignment. Click “OK”.
Slide55
Your assignment will show here.
Slide6eMAR
6
Step 5.
All patients/residents in your assignment/team will appear.
Slide7eMAR
7
The color red indicates the administration documentation is overdue according to schedule
The color yellow indicates the administration documentation is due according to the schedule. Yellow is also displayed in cases where a PRN medication requires follow-up
The color green indicates the administration documentation is complete
The color white indicates that the scheduled administration documentation is not due yet. Administering meds at this time will generate a warning.
*NOTE – the patient icon will remain white until all of his/her scheduled medications are complete for the shift.
FYI:
Color Codes
Slide8eMAR
8
The heart icon indicates that supplementary documentation (vitals, labs or other documentation is required prior to administration. You will be prompted to record when you click the “Y” button
The page icon indicates there are Administration Notes specific to this pass time
The
N icon indicates that the medication is a narcotic
FYI:
icon indicators
Slide9eMAR
9
Step 6.
Click on your patient’s name
Slide10eMAR
10
Step 7.
Prepare medication(s) listed for administration
Slide11eMAR
11
Step 8.
Click on the “Y” box next to each medication you are going to administer
Slide12eMAR
12
Step 9.
Click on the padlock icon to lock the eMAR while administering the medications
Slide13eMAR
13
Step 10.
After the medications have been administered, click on the word “Locked” to unlock the eMAR.
Slide14eMAR
14
Step 11.
If patient/resident took all the prepared medications Click
“Save”
If patient/resident refused a medication, or the medication could not be administered for some other reason, click the
“N”
box (see next slide)
Slide15eMAR
15
Step 12.
If the patient/resident refuses a medication, or there is another reason why the medication could not be administered, after clicking on the “N” box, this screen will display. Select “Administration Details”.
Slide16eMAR
16
Step 13.
Select reason for refusal/inability to administer medication.
Slide17eMAR
17
Step 14.
Select “Record”
Slide18eMAR
18
Step 15
.Select “SAVE”
Slide19eMAR
19
FYI:
To check recorded medications, select
“Other Actions”
in the drop down box select
“Administration Record”
Slide20eMAR
20
FYI:
Recorded Administration of Medications
Slide21eMAR
21
Administering Insulin per sliding scale
Step 1.
Select “Y” box next to insulin order
Slide22eMAR
22
Step 2.Select “Supplementary Documentation”
Slide23eMAR
23
Step 3.
Select “Record New Entry”
Slide24eMAR
24
Step 4.
Enter results of Blood Sugar
Slide25eMAR
25
Step 5.
Click on the drop down box and select appropriate site; click on “Add Location”
Slide26eMAR
26
Step 6.
Select
“Chart Code”
Select
“Record”
c. Select
“Save”
on the next screen
Slide27eMAR
27
Administering ordered dose of insulin
Step 2
. Under site, select “Not Applicable”
Step 1.
Select “Supplementary Documentation”
Step 3
. Under witness, select “Record New Entry” the nurse verifying the correct insulin/dose was drawn up, records his/her initials.
Step 4. In the drop down box select appropriate site and the click on “Add Location”
Slide28eMAR
28
Administering PRN Medications
Step 1.
Click the “Y” box
Slide29eMAR
29
Step 2.
Select “Administration Details”Under “Chart Code” select O - Administered
Slide30eMAR
30
Step 3.
Select
“Supplementary Documentation”If administering APAP for a temperature, click on “Record New Entry”, enter temperature next to New Value, select Route, and then click “Record” at the bottom of the screen, and then electronically sign with your password.
Slide31eMAR
31
Step 4.
If administering a PRN pain medication, under “Supplementary Documentation,” select “Record New Entry” and then select a number on the numerical pain scale, click “Record” at the bottom of the screen.
Slide32eMAR
32
Step 5.
Enter your
“Password”
under
“Attestation Statement”
and then click
“Sign”
Slide33eMAR
33
Step 6.
Click on “SAVE”
Slide34eMAR
34
Step 7.
Once you have clicked “Saved”, the PRN medication order turns “yellow” indicating that a follow up is required.
Slide35eMAR
35
Step 8.
Click on “Follow Up”, this action brings you to the “PRN Progress Note(s) screen. Fill in the Effective Date and Time boxes, and the click on “Enter Follow up Pain Level”
Slide36eMAR
36
Step 9.
Select the appropriate number on the numerical pain scale and click “OK”. Click “Record” at the bottom of the screen and then sign electronically with your Password.
Slide37eMAR
37
Step 10.
The medication window now displays the color “Yellow” and the “gold box” indicates that the medication was effective, click “Save” to complete the follow up documentation. The window will now disappear.
Slide38Overview of Point Click CareElectronic Medical Record- Documenting Nurses’ Notes
Step 1.
Log into PCC and left click “Clinical” tab; to get list of residents/patients.
38
Slide39Nursing Documentation
Step 2.
Selecting your resident/patient: If resident/patient isn’t already listed; left click on the “All Residents” tab and then click on the first letter of their last name. To select your resident/patient, double click on his/her name.
39
Slide40Nursing Documentation
Step 3.
Selected Patient/Resident
40
Slide41Nursing Documentation
Step 4.
Left click “Prog Note” tab
41
Slide42Nursing Documentation
Step 5.
Left click drop down box in “Select Appropriate Type” field
42
Slide43Nursing Documentation
Step 6.
Select “Health Status Note” from the list by left clicking on the heading. Document in the field labeled “Note Text”
43
Slide44Nursing Documentation
Step 7.
Once documentation is complete, left click the abc icon to spell check the note. Next click “Sign” located at the bottom of the screen
44
Slide45Nursing Documentation
Step 8.
Enter password here
Step 9.
Left click “Sign” this step saves your documentation to the EMR
45