
Overall Project Objectives You will develop your marking out skills You will develop your ability to read and follow working drawings Master the use of practical hand tool Develop your exposure to power tools and machines ID: 627656
Download Presentation The PPT/PDF document "2nd Year Helicopter Project" is the property of its rightful owner. Permission is granted to download and print the materials on this web site for personal, non-commercial use only, and to display it on your personal computer provided you do not modify the materials and that you retain all copyright notices contained in the materials. By downloading content from our website, you accept the terms of this agreement.


Slide1
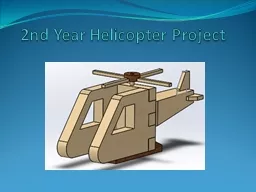
2nd Year Helicopter ProjectSlide2
Overall Project Objectives
You will develop your marking out skills.You will develop your ability to read and follow working drawings
Master the use of practical hand tool
Develop your exposure to power tools and machines.
Understand how woodwork joints can be used in different ways.Slide3
What does the Helicopter project include?
The digger project in cooperates a number of woodworking joints:
Finger joint
Bridle Joint
Housing Joint
Plug Mortise & Tenon
Screwed joint
It also entails shaping of the body which will include processes such as, sawing, drilling, sanding, chiselling and band sawing, spoke shaving.
Accuracy and patience is very important for the completion of this project.Slide4
What materials are we using?
The materials we are using to make this project is called red deal, its is a soft wood and falls under the pine wood classification.
It is called red deal as its grain has a reddish colour through it.
The wood is quarter sawing for maximum strength.
Red deal comes from the scots pine treeSlide5
5 steps to Marking out
Face side / Face edgeOverall Length
Joint Position
Joint Detail
Any other Detail
FOLLOW THIS PROCEDURE AND NO OTHER!!!!!!!Slide6
Orthographic ProjectionSlide7
Marking Out tools
Pencil
Steel Rule
Try Square
Marking Gauge
Mortise Gauge
Circles Template / CompassSlide8
Step one: The BodySlide9
Back PieceSlide10
Tail PieceSlide11
Marking out for tail pieceSlide12
ContinuedSlide13
ContinuedSlide14
Tail PartsSlide15
StandSlide16
Preparation for finish
Using the belt sander and sand paper and the sanding block, sand the whole digger down using the different grits of paper. Make sure all pencil marks are removedSlide17
Assembly Slide18
Choose from which finish you prefer.
Varnish
Danish Oil
It would be better to disassemble the project, apply the finish and re assemble.