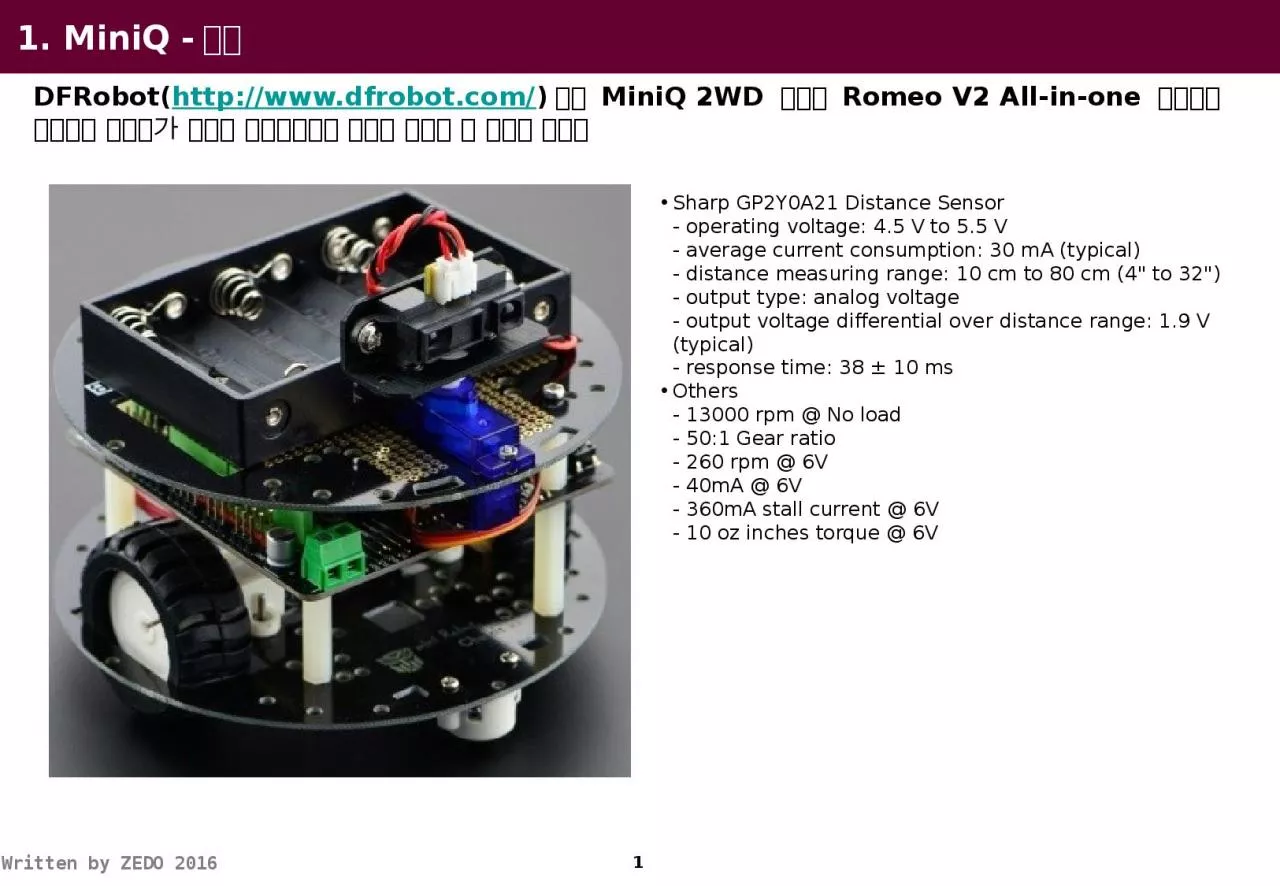
httpwwwdfrobotcom 에서 MiniQ 2WD 기반에 Romeo V2 Allinone 컨트롤러 사용하여 사용자가 다양한 컨스터마이징 작업을 수행할 수 있도록 제공함 ID: 810350
Download The PPT/PDF document "1 1. MiniQ - 개요 DFRobot" is the property of its rightful owner. Permission is granted to download and print the materials on this web site for personal, non-commercial use only, and to display it on your personal computer provided you do not modify the materials and that you retain all copyright notices contained in the materials. By downloading content from our website, you accept the terms of this agreement.
Slide1
1
1. MiniQ -개요
DFRobot(http://www.dfrobot.com/)에서 MiniQ 2WD 기반에 Romeo V2 All-in-one 컨트롤러 사용하여 사용자가 다양한 컨스터마이징 작업을 수행할 수 있도록 제공함
Sharp GP2Y0A21 Distance Sensor
- operating voltage: 4.5 V to 5.5 V
- average current consumption: 30
mA
(typical)
- distance measuring range: 10 cm to 80 cm (4" to 32")
- output type: analog voltage
- output voltage differential over distance range: 1.9 V (typical)
- response time: 38 ± 10 ms
Others
- 13000 rpm @ No load
- 50:1 Gear ratio
- 260 rpm @ 6V
- 40mA @ 6V
- 360mA stall current @ 6V
- 10 oz inches torque @ 6V
Slide22
2. MiniQ -연결도
A1LEFT
RIGHT
DIO 4~6
는 모터 제어를 위해 사용함
A0
A2
Slide33
3. MiniQ-조립 방법
(1/3)
Slide44
3. MiniQ-조립 방법
(2/3)
Slide53.
MiniQ-조립 방법(3/3)
서버 모타의 방향을반대로 설치 필요(그렇게 하지 않을 경우밧데리 홀더에 걸림
)
Slide66
4. Code-IR Avoidance(1/3)/*
# This Sample code is for testing the MiniQ Discovery Kit. # Editor : Phoebe # Date : 2014.6.19 # Ver : 0.1 # Product: MiniQ Discovery Kit # SKU : KIT0071 # Description: # Obstacle avoidance function of MiniQ
Discovery Kit */
#include <
math.h
>
#include <
Servo.h
> //Include Servo library
Servo
irservo
; // create servo object to control a servo
#define
Svo_Pin 9int posnow;
int ir_sensor = A1;
int S1 = 5; //D1 Speed Control(왼쪽
)int S2 = 6; //D2 Speed Control(
오른쪽
)
int
D1 = 4; //D1 Direction Control(
왼쪽
)
int
D2 = 7; //D1 Direction Control(
오른쪽
)
void stop(void) //Stop
{
digitalWrite
(S1,0); digitalWrite(D1,LOW); digitalWrite(S2,0); digitalWrite(D2,LOW); } void advance(char a,char b) //Move forward{ analogWrite (S1,a); //PWM Speed Control digitalWrite(D1,HIGH); analogWrite (S2,b); digitalWrite(D2,HIGH);} void back_off (char a,char b) //Move backward{ analogWrite (S1,a); digitalWrite(D1,LOW); analogWrite (S2,b); digitalWrite(D2,LOW);}
DFRobot
에서 제공하는
Sample
코드의 경우 모타 동작이 반대로 되어 수정 완료
.
Slide77
4. Code-IR Avoidance(2/3)void turn_L
(char a,char b) //Turn Left(왼쪽으로 빙빙 돌기){ analogWrite (S1,a); digitalWrite(D1,LOW); // 왼쪽 모터가 뒤로 돌기 analogWrite (S2,b);
digitalWrite(D2,HIGH); // 오른쪽 모터가 앞으로 돌기
}
void
turn_R
(char
a,char
b) //Turn Right(
오른쪽으로 빙빙 돌기
)
{
analogWrite (S1,a); digitalWrite(D1,HIGH); //
왼쪽 모터가 앞으로로 돌기 analogWrite (S2,b);
digitalWrite(D2,LOW); // 오른쪽 모터가 뒤로 돌기
}
void setup()
{
int
i
;
for(
i
=4;i<=7;i++)
pinMode
(
i
, OUTPUT); digitalWrite(S1,LOW); digitalWrite(S2,LOW); irservo.attach(Svo_Pin); //attaches the servo on pin 9 to the servo object Serial.begin(9600); //Set Baud Rate advance(80,80);} int pos=0; // variable to store the servo position float distance;
Slide88
4. Code-IR Avoidance(3/3)void loop(){
// digitalWrite(2,HIGH); for (int i=0;i<180;i++) { irservo.write(i); int x=analogRead
(ir_sensor); // connect the GP2Y0A21 distance sensor to Analog A1
Serial.println
(x); // print distance
if(x>350) //13.7cm
보다 클 경우
(
POWER(3027.4/x, 1.2134))
{
if(
i
<135) //43.5cm 보다 작을 경우(POWER(3027.4/x, 1.2134))
{ back_off(80,80);delay(300);
turn_L(80,80);delay(300); } else
{
back_off
(80,80);delay(300);
turn_R
(80,80);delay(300);
}
advance(80,80);
}
delay(4);
}
for(
int
i
=180;i>0;i--)
{ irservo.write(i); int x=analogRead(ir_sensor); Serial.println(x); // print distance if(x>350) //13.7cm 보다 클 경우(POWER(3027.4/x, 1.2134)) { if(i<135) //43.5cm 보다 작을 경우(POWER(3027.4/x, 1.2134)) { back_off(80,80);delay(300); turn_L(80,80);delay(300); } else { back_off(80,80);delay(300); turn_R(80,80);delay(300); } advance(80,80); } delay(4); }
}
Slide99
4. Code-IR(GP2Y0A21) Distance/* Read values from Sharp GP2Y0A21 distance sensor and output to serial
Sharp Distance Sensor GP2Y0A21 (10-80cm) 3.1V at 10cm to 0.3V at 80cm*/int ir_sensor = A1; void setup() { //initialize serial communications at 9600 bps Serial.begin(9600);}
void loop() {
int
sensor_value
=
analogRead
(
ir_sensor
); //read the sensor value
Serial.println
(sensor_value); //print the sensor vlue delay(500); //delay 500ms (0.5 second)
}
Slide1010
4. Code-IR(GP2Y0A21) Distance with Averageint
ir_sensor = A1; // Analog A1 void setup() { Serial.begin(9600);} void loop() { Serial.println(value_average(10)); //loop 10 times and get its average delay(500);}
int
value_average
(
int
average_count
) {
int
sum = 0;
for (int i=0; i<
average_count; i++) {
int sensor_value =
analogRead(ir_sensor
);
sum = sum +
sensor_value
;
}
return(sum/
average_count
);
}
IR Sensor
에서 읽어 들이는 거리값에 대한 평균을 구하여 반영함
(Noise
고려
)
Slide1111
4. Code-IR(GP2Y0A21) Distance with Voltageint
ir_sensor = A1; // Analog A1 void setup() { Serial.begin(9600);} void loop() { Serial.println(value_average(10)); //loop 10 times and get its average delay(500);}
int
value_average
(
int
average_count
) {
int
sum = 0;
for (int i=0; i<
average_count; i++) {
int sensor_value =
analogRead(ir_sensor
);
sum = sum +
sensor_value
;
}
return(sum/
average_count
);
}
IR Sensor
를 통해 전달되는
Analog
값은
10bit
해상도
(2^10=1024)로 전달되며, 5V에서는 1023, 2.5V에서는 512값을 가짐(센서에 가까울 수록 높은 값, 멀어질수록 낮음 값)
Slide1212
4. Code-IR(GP2Y0A21) Distance(cm)int
ir_sensor = A1; void setup() { //initialize serial communications at 9600 bps Serial.begin(9600);} void loop() { int sensor_value = analogRead
(ir_sensor); //read the sensor value
int
distance_cm
=
pow
(3027.4/
sensor_value
, 1.2134); //convert readings to distance(cm)
Serial.println(distance_cm); //print the sensor value delay(500); //delay 500ms (0.5 second)}
IR Sensor
를 통해 전달되는 값(0(remote)~1023(near))
을 meter
로 환산한다
.
Slide1313
4. Code-IR(GP2Y0A21) Distance(cm) with Averageint
ir_sensor = A1; void setup() { //initialize serial communications at 9600 bps Serial.begin(9600);} void loop() { int distance = average_value(100); //loop 100 times and get its average
Serial.println(distance); //print the sensor value
delay(500); //delay 500ms (0.5 second)
}
int
average_value
(
int
average_count
) {
int sum = 0; for (int
i=0; i<
average_count; i++) { int
sensor_value =
analogRead
(
ir_sensor
); //read the sensor value
int
distance_cm
=
pow
(3027.4/
sensor_value
, 1.2134); //convert readings to distance(cm)
sum = sum +
distance_cm
; } return(sum/average_count); }IR Sensor를 통해 전달되는 값(0(remote)~1023(near))을 meter로 환산한다.(평균값 고려)
Slide1414
4. Code-Remeo V2 Button Control(1/2)
char msgs[5][15] = { "Right Key OK ", "Up Key OK ", "Down Key OK ", "Left Key OK ", "Select Key OK" };char start_msg[15] = { "Start loop "};
int adc_key_val
[5] ={
30, 150, 360, 535, 760 };
int
NUM_KEYS = 5;
int
adc_key_in
;
int
key=-1;
int oldkey=-1;void setup() {
// pinMode(13, OUTPUT); //we'll use the debug LED to output a heartbeat
Serial.begin(9600); /* Print that we made it here */
Serial.println(start_msg
);
}
DFRduino
RoMeo
는
5
개의 버튼
(S1-S5)
이 있으며 하나의
Analog
입력
(0)
을 사용함
6개의 Key를 사용하기
Slide1515
4. Code-Remeo V2 Button Control(2/2)
void loop() { adc_key_in = analogRead(0); // read the value from the sensor // digitalWrite(13, HIGH); /* get the key */ key = get_key(adc_key_in
); // convert into key press if (key != oldkey
) { // if
keypress
is detected
delay(50); // wait for
debounce
time
adc_key_in
=
analogRead
(0); // read the value from the sensor key = get_key(adc_key_in); // convert into key press
if (key != oldkey) {
oldkey = key; if (key >=0){
Serial.println(adc_key_in
, DEC);
Serial.println
(
msgs
[key]);
}
}
}
//
digitalWrite
(13, LOW);
}
// Convert ADC value to key number
int
get_key(unsigned int input){ int k; for (k = 0; k < NUM_KEYS; k++) { if (input < adc_key_val[k]) { return k; } } if (k >= NUM_KEYS) k = -1; // No valid key pressed return k;}DFRduino RoMeo는 5개의 버튼(S1-S5)이 있으며 하나의 Analog 입력(0)을 사용함
Slide1616
4. Code-Remeo V2 Moter Control(1/2)
//Standard PWM DC controlint S1 = 5; //D1 Speed Control(왼쪽)int S2 = 6; //D2 Speed Control(오른쪽)int D1 = 4; //D1 Direction Control(왼쪽)int D2 = 7; //D1 Direction Control(오른쪽) void stop(void) //Stop{ digitalWrite(S1,0);
digitalWrite(D1,LOW); digitalWrite(S2,0);
digitalWrite
(D2,LOW); }
void advance(char
a,char
b) //Move forward
{
analogWrite (S1,a); //PWM Speed Control
digitalWrite(D1,HIGH); analogWrite (S2,b);
digitalWrite(D2,HIGH);}
Romeo V2의 PWM
직렬 모터 제어는 2개의 디지털 IO
핀(4,6)
과
2
개의
PWM
핀
(5, 6)
으로 구성됨
1
번 모터
(
오른쪽
)
2
번 모터
(
왼쪽)
Slide1717
4. Code-Remeo V2 Moter Control(2/2)
void back_off (char a,char b) //Move backward{ analogWrite (S1,a); digitalWrite(D1,LOW); analogWrite (S2,b); digitalWrite(D2,LOW);}void turn_L (char a,char b) //Turn Left(왼쪽으로 빙빙 돌기
){ analogWrite (S1,a);
digitalWrite
(D1,LOW); //
왼쪽 모터가 뒤로 돌기
x
analogWrite
(S2,b);
digitalWrite(D2,HIGH); //
오른쪽 모터가 앞으로 돌기}void turn_R (char
a,char b) //Turn Right(오른쪽으로 빙빙 돌기){ analogWrite (S1,a); digitalWrite(D1,HIGH); // 왼쪽 모터가 앞으로로 돌기
analogWrite (S2,b); digitalWrite(D2,LOW); // 오른쪽 모터가 뒤로 돌기
}void setup(void) { int i; for(
i=4;i<=7;i++) pinMode(i
, OUTPUT);
Serial.begin
(9600); //Set Baud Rate
Serial.println
("Run keyboard control"); //
키보드로 제어하기
digitalWrite
(S1,LOW);
digitalWrite
(S2,LOW);
}
Romeo V2의 PWM 직렬 모터 제어는 2개의 디지털 IO 핀(4,6)과 2개의 PWM 핀(5, 6)으로 구성됨void loop(void) { if(Serial.available()){ char val = Serial.read(); if(val != -1) { switch(val) { case 'w'://Move Forward Serial.println("Move Forward"); advance (40,40); //move forward in max speed break; case 's'://Move Backward Serial.println("Move Backward"); back_off (40,40); //move back in max speed break; case 'a'://Turn Left Serial.println("Turn Left"); turn_L (40,40); break; case 'd'://Turn Right Serial.println("Turn Right"); turn_R (40,40); break; case 'z':
Serial.println
("Hello");
break;
case 'x':
Serial.println
("Stop");
stop();
break;
}
}
else stop();
}
}
Slide1818
4. Code-적외선 원격 제어(키값 읽기)
포토 트랜지스터를 Romeo V2에 설치하여 리모콘에서 전달되는 값을 읽어 보자
포토 트랜지스터를
Romeo V2
의 아나로그
단자
(A2)
에 연결한다
.
- A1
은 거리 측정 센서 사용
// Photo Transistor example
#include <
IRremote.h
>//IR
라이브러리 포함
int RECV_PIN = A2;//포트선언
IRrecv
irrecv
(RECV_PIN);
decode_results
results;//
구조선언
void setup() {
Serial.begin
(9600);
irrecv.enableIRIn
();
}
void loop() { if(irrecv.decode(&results)){ Serial.println(results.value, HEX); irrecv.resume(); // Receive the next value }}
Slide1919
4. Code-적외선 원격 제어(리모콘의 제조사 확인
)포토 트랜지스터에 신호를 전달하는 리모콘의 제조사와 키값을 확인하자.#include <IRremote.h>//IR 라이브러리 포함int RECV_PIN = A2;//포토 트랜지스터 포트 설정long on1 = 0x00FF6897;//수신된 신호long off1 = 0x00ff30CF;long on2 = 0x00FF9867;
long off2 = 0x00FF18E7;long on3 = 0x00FFB04F;long off3 = 0x00FF7A85;long on4 = 0x00FF10EF;
long off4 = 0x00FF42BD;
long on5 = 0x00FF38C7;
long off5 = 0x00FF4AB5;
long on6 = 0x00FF5AA5;
long off6 = 0x00FF52AD;
IRrecv
irrecv
(RECV_PIN);decode_results
results;//구조 선언void dump(decode_results *results)
{ int count = results->rawlen; if (results->decode_type == UNKNOWN) { Serial.println("Could not decode message");
} else { if (results->decode_type == NEC)
{ Serial.print("Decoded NEC: "); } else if (results->decode_type == SONY) {
Serial.print("Decoded SONY: "); } else if (results->
decode_type
== RC5)
{
Serial.print
("Decoded RC5: ");
}
else if (results->
decode_type
== RC6)
{
Serial.print
("Decoded RC6: ");
}
Serial.print(results->value, HEX); Serial.print(" ("); Serial.print(results->bits, DEC); Serial.println(" bits)"); } Serial.print("Raw ("); Serial.print(count, DEC); Serial.print("): "); for (int i = 0; i < count; i++) { if ((i % 2) == 1) { Serial.print(results->rawbuf[i]*USECPERTICK, DEC); } else { Serial.print(-(int)results->rawbuf[i]*USECPERTICK, DEC); } Serial.print(" "); } Serial.println("");}void setup(){ pinMode(RECV_PIN, INPUT); //포트모드,입력 Serial.begin(9600); //전송속도 9600bps irrecv.enableIRIn(); // Start the receiver}int on = 0;unsigned long last = millis();void loop() { if (
irrecv.decode
(&results)) //
디코딩
{
//
If it's been at least 1/4 second since the last
// IR received, toggle the relay
if (
millis
() - last > 250)
{
on = !on;
digitalWrite
(13, on ? HIGH : LOW);
dump(&results);
}
if (
results.value
== on1 )
Serial.println
("on1");
if (
results.value
== off1 )
Serial.println
("off1");
if (
results.value
== on2 )
Serial.println
("on2");
if (
results.value
== off2 )
Serial.println
("off2");;
if (
results.value
== on3 )
Serial.println
("on3");
if (
results.value
== off3 )
Serial.println
("off3");
if (
results.value
== on4 )
Serial.println
("on4");
if (
results.value
== off4 )
Serial.println
("off4");;
if (
results.value
== on5 )
Serial.println
("on5");
if (
results.value
== off5 )
Serial.println
("off5");
if (
results.value
== on6 )
Serial.println
("on6");
if (
results.value
== off6 )
Serial.println
("off6");
last =
millis
();
irrecv.resume
(); // Receive the next value
}
}
Slide2020
4. Code-적외선 원격 제어(MiniQ
제어)적외선 원격 제어를 통해 MiniQ를 구동해 보자#include <IRremote.h>//IR 라이브러리 포함
int RECV_PIN = A2;//포토 트랜지스터 포트 설정long go = 0x00FF18E7;//버튼
2
long back = 0x00FF4AB5;//
버튼
8
long left = 0x00FF10EF;//
버튼
4
long right = 0x00FF5AA5;//
버튼6long stop = 0x00FF38C7;//
버튼5IRrecv
irrecv(RECV_PIN);decode_results results;//구조 선언unsigned long last = millis();int S1 = 5; // Speed Control(
왼쪽)int S2 = 6; // Speed Control(오른쪽)int
D1 = 4; // Direction Control(왼쪽)int D2 = 7; // Direction Control(오른쪽) void brake(void) //Stop
{ analogWrite(S1,0);
digitalWrite
(D1,LOW);
analogWrite
(S2,0);
digitalWrite
(D2,LOW);
}
void advance(char
a,char
b) //Move forward
{
analogWrite (S1,a); //PWM Speed Control digitalWrite(D1,HIGH); analogWrite (S2,b); digitalWrite(D2,HIGH);} void back_off (char a,char b) //Move backward{ analogWrite (S1,a); digitalWrite(D1,LOW); analogWrite (S2,b); digitalWrite(D2,LOW);}void turn_L (char a,char b) //Turn Left(왼쪽으로 빙빙 돌기){ analogWrite (S1,a); digitalWrite(D1,LOW); // 왼쪽 모터가 뒤로 돌기 analogWrite (S2,b); digitalWrite(D2,HIGH); // 오른쪽 모터가 앞으로 돌기}void turn_R (char a,char b) //Turn Right(오른쪽으로 빙빙 돌기){ analogWrite (S1,a); digitalWrite(D1,HIGH); // 왼쪽 모터가 앞으로로 돌기 analogWrite (S2,b); digitalWrite(D2,LOW); // 오른쪽 모터가 뒤로 돌기} void setup(){ Serial.begin(9600); //Set Baud Rate for(int i=4;i<=7;i++) pinMode(i, OUTPUT); pinMode(RECV_PIN, INPUT); //포트모드,입력
irrecv.enableIRIn
(); // Start the receiver
analogWrite
(S1,0);
analogWrite
(S2,0);
}
void dump(
decode_results
*results)
{
if (results->
decode_type
== UNKNOWN)
{
//
Serial.println
("Could not decode message");
brake();
}
}
void loop()
{
if (
irrecv.decode
(&results)) //
디코딩
{
//
If it's been at least 1/4 second since the last
// IR received, toggle the relay
if (
millis
() - last > 250) //1/4
초 이후 신호 수신의 경우
{
dump(&results);//
적외선 신호 디코딩
}
if (
results.value
== go )
advance(80,80);
else if (
results.value
== back )
back_off
(80,80);
else if (
results.value
== left )
turn_L
(80,80);
else if (
results.value
== right )
turn_R
(80,80);
else if (
results.value
== stop )
brake();
last =
millis
();
irrecv.resume
(); // Receive the next value
}
}
Slide2121
유첨. Romeo V2 - Arduino with Motor Driver
로미오 보드는 아두이노 우노와 같은 ATmega328 칩을 사용하며 2개의 DC 모터 드라이버와 블루투스 소켓이 내장되어 다양한 프로젝트에서 구현 가능함
MiniQ
에서
A0
에서 적외선 센서 미동작 사유는
S1~S5
사용을
On
했기 때문
(A0
사용
)
Slide2222
유첨. Micro Metal Gear Motor with Connector (50:1))
MiniQ에 장착된 DFRobot사의 기어 비율 50:1의 6V 메탈 기어드 모터
Operating Voltage: 1.0~6.0V
Motor Speed: 260rpm@6V
Gear Ratio: 50:1
Rated Current: 30mA@6V
Stall Current: 350mA@6V
Stall Torque: 0.39kg*cm@6V
Weight: 15g