/
Surgical Technique Surgical Technique

Surgical Technique - PDF document

marina-yarberry
marina-yarberry . @marina-yarberry
Follow
450 views
Uploaded On 2015-08-05

Surgical Technique - PPT Presentation

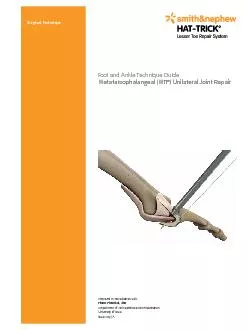
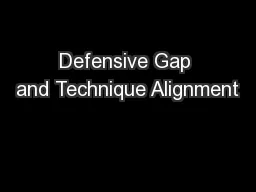
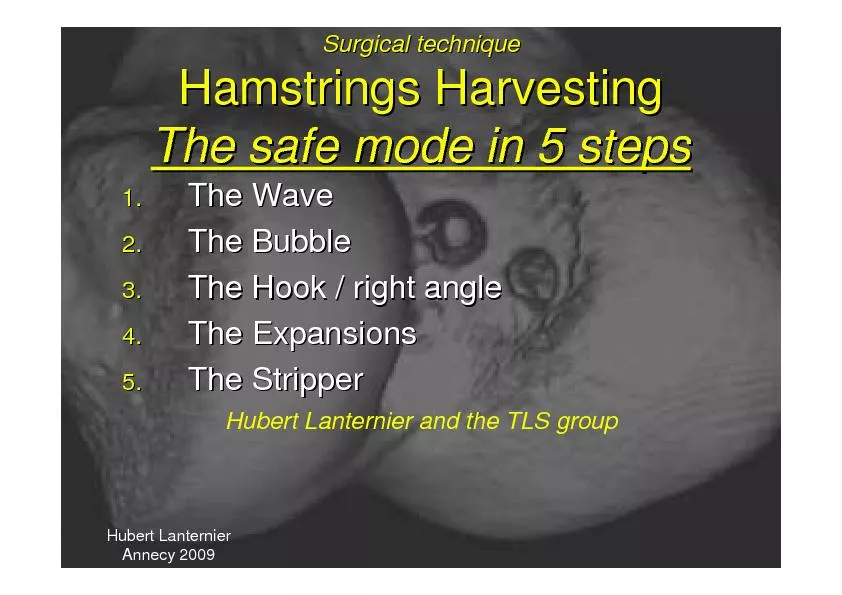
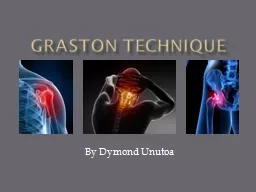
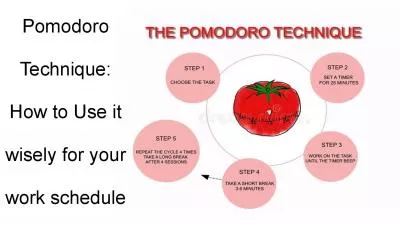
Prepared in consultation with Phinit Phisitkul MDDepartment of Orthopedics and RehabilitationUniversity of IowaIowa City IAFoot and Ankle Technique GuideMetatarsophalangeal MTP Unilateral Joint R ID: 100969

Prepared consultation with: Phinit

Share:

Link:

Embed:

Download Presentation from below link

Download Pdf The PPT/PDF document "Surgical Technique" is the property of its rightful owner. Permission is granted to download and print the materials on this web site for personal, non-commercial use only, and to display it on your personal computer provided you do not modify the materials and that you retain all copyright notices contained in the materials. By downloading content from our website, you accept the terms of this agreement.


Presentation Transcript

Surgical Technique Prepared in consultation with: Phinit Phisitkul, MDDepartment of Orthopedics and RehabilitationUniversity of IowaIowa City, IAFoot and Ankle Technique GuideMetatarsophalangeal (MTP) Unilateral Joint Repair The following technique guide contains a summary of medical techniquesand opinions based upon the training and expertise of the surgeon advisory team, along with its knowledge of the Smith & Nephew HAT-TRICK Lesser Toe Repair System. Smith & Nephew does not provide medical advice and recommends that surgeons exercise their own professional judgment when determining a patient’s course of treatment. This guide is presented for educational purposes only.Ned Amendola, MDFlorian Nickisch, MDPhinit Phisitkul, MD Charles Saltzman, MD Emily Cook, DPMJeremy Cook, DPMDavid Edwards, DPMMickey Stapp, DPMHAT-TRICK™ Lesser Toe Repair SystemMTP Unilateral Joint Repair Surgical TechniqueTable of contentsIntroduction......................................................................................................Position the patientTP Unilateral Joint Repair TechniqueExpose the joint and prepare for the repairPlace the sutures in the plantar plate and collateral ligamentsDrill the bone tunnel using the Phalangeal Drill GuideComplete the repairPostoperative careOrdering information 3 The HAT-TRICK™ Lesser Toe Repair System is a three-part solution to lessertoe injuries: The HAT-TRICK MTP Joint Repair System (Unilateral and Bilateral) The HAT-TRICK Osteotomy Guide for metatarsal shortening procedures The HAT-TRICK PIP Fusion System This technique guide provides a description of the procedure for the HAT-TRICK MTP Unilateral Joint Repair. For information about additional lesser toe repair solutions using the HAT-TRICK Lesser Toe Repair System, please refer to those specific techniques. HAT-TRICK MTP Unilateral Joint Repair System Flexor tendon transfers and Weil osteotomies often lead to loss of ROM, stiffness and residual pain.1, 2, 3, 4 The HAT-TRICK MTP Unilateral Joint Repair System provides a complete repair of the lesser MTP joint that is less invasive and more anatomic than standard of care techniques. Benefits of the HAT-TRICK System include: Anatomic reattachment of collateral ligaments Anatomic distal reattachment of the plantar plate Preservation of the biomechanical axis, which can be lost when performinga metatarsal osteotomy Elimination of the need to release the plantar plate from the metatarsus Controlled tensioning of collateral ligaments and plantar plate The HAT-TRICK MTP Joint Repair System consists of individual single-use disposable procedure packs for both unilateral or bilateral ligament repair,and a sterilization tray with reusable instruments. Information regarding the instruments used in each procedure can be found in the “Ordering Information” section at the end of this document. 4 MTP Unilateral Joint Repair Technique Prior to performing this technique, consult the Instructions for Use contraindications, warnings, cautions and instructions. Position the patientPlace the patient in the supine position with a thigh tourniquet and the foot at the end of the bed. Place a sterile bump underneath the knee of the operative leg so that the foot is in plantar flexion, almost parallel to the ground.Expose the joint and prepare for the repairCreate a longitudinal curvilinear skin incision from the mid-metatarsalto the mid-proximal phalanx while protecting the digital nerve branches. Ensure that the Extensor Digitorum Longus (EDL) Tendon is not damaged during the procedure.Release the extensor hood longitudinally on the side of collateral ligament attenuation to expose the metatarsophalangeal (MTP) joint capsule (Figure 1). If necessary, retract the tissue to expose the site using the Trigger Retractor (REF 72204348) (Figure 2). Figure 1Figure 2 5 Dissect into the extra-articular recess adjacent to the attenuated collateral ligament, down to the level of the deep transverse intermetatarsal ligament. If needed, place a small laminar spreader between the metatarsal necks to increase the working space.Distract the MTP joint using the Small Joint Pin Distractor (REF 72204347)and 1.6mm or 1.1mm K-wires on both sides, approximately 1cm from thejoint (Figure 3).Under tension, dissect the collateral ligament (Figure 4) and approximately 50% of the plantar plate ligament (Figure 5) using a #15 blade precisely at the level of the metatarsal head. Ensure that the Flexor Digitorum Longus Tendon (FDL) is not damaged during the dissection. Figure 3Figure 4 Figure 5 6 Remove the residual parts of the collateral ligament and the plantar plate on the base of the proximal phalanx using rongeurs and a curved blade.To promote healing, denude the ligament insertion sites using the Double Ended Rasp (REF 72204349) (Figure 6). Figure 6 7 Place the sutures in the plantar plate andcollateral ligamentsIdentify the FDL tunnel just underneath the plantar plate using the probe side of the Cottle Elevator (REF 72204346). Place the HAT-TRICK™ DART uture Passer Needle into the DART Passer (REF 72204320) by depressing the button on suture passer. Ensure that the bottom of the “” mark on the needle aligns with the top of the suture passer (Figures 7a and 7b). Figure 7aFigure 7b Button 8 Load the 2-0 ULTRABRAID™ Suture from the procedure pack onto the DART uture Passer (Figure 8).Wind the suture around one of the suture passer posts. Ensure that the suture is taut (Figure 9). Figure 8Figure 9 9 Place the suture passer tip into the FDL tunnel and advance the tip as proximally as possible to obtain the maximal hold on the plantar plate(Figure 11). A Cottle Elevator can be placed just dorsal to the plantar plateto provide clearance from the metatarsal head. Hold the DART uture Passer in place, fully depress the spring-loaded needle, and slowly release the needle to engage the suture (Figure 10).Unwind the suture from the suture passer post. This will allow the needle to retract while retrieving a suture loop. Retract the suture passer and needle assembly from the surgical site with a gentle rocking motion to expose the suture loops. Do not remove the needle from the suture passer at this time.Slightly depress the needle to release the suture loop from the needle tip. Grasp the loop of the suture and remove the suture passer/needle assembly from the joint space (Figure 11). Figure 10Figure 11: Release the suture from the DARTuture Passer 10 Pass the free ends of the suture through the loop to create a double girth stitch (Figure 12). Identify the collateral ligament and insert the prong of the DART Passer intra-articularly into the gutter of the joint. Then aim the suturepasser outward toward the proximal aspect of the collateral ligament. Repeat steps 2–10 with the second, different colored, ULTRABRAID™ 2-0 Suture on the collateral ligament (Figures 13a and 13b). If additional sutures are needed, ULTRABRAID 2-0 sutures with needles and without needles are available. Refer to the “Ordering Information” section of this document.Remove the distractor and the K-wires. Figure 12: Completed double girth stitch Figure 13aFigure 13b 11 Drill the bone tunnel using the Phalangeal Drill GuidePlace the distal tip of the Phalangeal Drill Guide, Short Offset (REF 72204321) at the ligament attachment site on the boney rise of the phalanx. Place the curve of the drill guide on the concavity of the phalanx. Place the proximal end of the drill guide 30° – 45° to the sagittal plane (Figure 14). If a freehand tunnel is desired, use the Extra-Articular Drill Guide(REF 72204323). Drill the K-wire until the proximal end of the depth mark on the K-wire is flush with the proximal end of the drill guide (Figure 15). Figure 14: Concavity of the phalanx fully engaged Figure 15 30º – 45º 12 Insert the HAT-TRICK™ Suture Shuttle assembly from the Unilateral Sterile Procedure Pack (REF 72204325) into the phalangeal drill guide (Figure 16a) until the suture shuttle bottoms out on proximal face of the drill guide(Figure 16b). Grasp the suture shuttle handle and remove the suture shuttle assembly, leaving the suture loop in place. Ensure that the suture’s free ends are not through the loop. Figure 16a Figure 16b 13 Place the sutures in the groove on the proximal face of the drill guide(Figure 18). Retract the T-Handle and gently rock the guide out of the joint space. Do not pull the suture when removing the drill guide (Figure 17).Cut the suture between the distal suture knot and the pledget to free the drill guide (Figure 18).Leave the suture loop in the tunnel. Grasp the distal suture loop knot with a hemostat and remove the drill guide. Cut the monofilament suture at the proximal knot to create two monofilament suture strands. Figure 17: Remove the phalangeal drill guide from the joint space Figure 18 14 Assemble the Modular Handle (REF 72204337) and HAT-TRICK™ CannulatedScrew Tap (REF 72204339). Insert the Nitinol Suture Passer from the Unilateral Procedure Pack through the handle and tap assembly. Pass the two strands of the monofilament sutures through the loop of the Nitinol Suture Passer and pull the suture through the handle and tap assembly. Tap the hole until the top of the laser mark is flush with the bone (Figure 19). Remove the handle and tap assembly the distal knot of the monofilament suture. Figure 19 Nitinol Suture PasserHandle andTap assembly 15 Pass all the sutures on the plantar side of the tunnel through the suture loop and pull them through the bone tunnel to the dorsal side (Figures 20a and 20b).Retrieve the sutures on the dorsal side of the tunnel (Figure 20c). The Nitinol Suture Passer, 8.8 inches (223.52mm) can be used to pass the sutures through the bone tunnels. Figure 20a: Pass the sutures through bone tunnel Figure 20bFigure 20c: Retrieve the sutures on the dorsal side 16 Figure 21b Complete the repairAssemble the cannulated screw, HAT-TRICK™ Driver (REF 72204338) and the modular handle (not shown). and screw assembly (Figure 21a).If fixing both the collateral ligament and the plantar plate, pass one limb from each of the plantar plate and collateral ligament sutures through the handle, driver and screw assembly (Figure 21b). Figure 21a 17 Hold the MTP joint in the reduced position with plantar flexion and a slight deviation to the repair side. Maintaining the suture tension, insert the cannulated screw into the tunnel until it is flush with the surface of the bone, being careful not to exert excessive force (Figure 22). Tie the desired fixation knot over the shoulder of the screw to complete the repair (Figure 23). Figure 22Figure 23: Final construct 18 Postoperative care* Apply a light bulky dressing, keeping the MTP joint in slight plantar flexion. The patient can do heel weight bearing as tolerated in a postoperative shoe withor without a walking aid. Gentle active ankle and MTP motion is encouraged.Allow weight bearing as tolerated in a hard-sole shoe. Limit activity towalking only.Return to low impact sports e.g. bike, pool, hiking, gym. No jumping, turning, twisting or high impact sports.Resume full activities as tolerated.The views and opinions expressed for postoperative care are solely those of the surgeon(s) and do not reflect the views of Smith & Nephew, Inc. In no event shall Smith & Nephew, Inc. be liable for any damages whatsoever (including, without limitation, damages for loss of business profits, business interruption, loss of business information, or other pecuniary loss) arising out of the use of or inability to use the expressed views. 19 HAT-TRICK™ MTP Repair Instrument SetREF 72204305 HAT-TRICK DART Suture Passer HAT-TRICK Phalangeal Drill Guide, Short OffsetHAT-TRICK Phalangeal Drill Guide, Long OffsetHAT-TRICK Extra Articular Drill GuideHAT-TRICK Suture TensionerHAT-TRICK Modular HandleHAT-TRICK Driver Shaft, Cannulated ScrewHAT-TRICK TAP, Cannulated ScrewCottle ElevatorRasp, Double Ended Small Joint Pin DistractorTrigger RetractorSnap ClampHAT-TRICK MTP Repair and Osteotomy Sterilization TrayHAT-TRICK Unilateral Sterile Procedure PackREF 722043251 ea HAT-TRICK Cannulated Screw, 2.5mm x 7.7mm1 ea HAT-TRICK DART uture Passer Needle1 ea HAT-TRICK Suture Shuttle 1 ea HAT-TRICK Nitinol Suture Passer, 8.8 inches3 ea 1.6mm Drill Tip Wire, 150mm1 ea ULTRABRAID™ 2-0 Co-braid White/Blue Suture, 24 inches1 eaULTRABRAID 2-0 White Suture, 24 inchesULTRABRAID 2-0 Sutures (10 Pack)72204329 (10) ULTRABRAID 2-0 White suture, 24 inches72204330 (10) ULTRABRAID 2-0 Co-braid White/Blue suture, 24 inchesOrdering InformationTo order the items used in these techniques, call +1 800 238 7538 in the US or contact an authorized Smith & Nephew representative. Prior to performing these techniques, consult the Instructions for Use documentation provided with individual components – including indications, contraindications, warnings, cautions and instructions. Smith & Nephew, Inc.150 Minuteman Road Andover, MA 01810Telephone: 1-901-396-2121Information: 1-800-821-5700Orders and Inquiries: 1-800-238-7538Trademark of Smith & Nephew. Certain marks Reg. US Pat. & TM Office.www.smith-nephew.com©2014 Smith & Nephew, Inc.All rights reserved.02488 V2 08/14ReferencesHofstaetter SG, Hofstaetter, JG, Petroutsas, JA, Gruber F, Ritschl P, Trinka HJ. The Weil Osteotomy: A Seven-Year Follow-up. J Bone Joint Srg (Br) 2005;87-B:1507-11. Beech I, Rees S, Tagoe M. A Retrospective Review of the Weil Metatarsal Osteotomy for Lesser Metatarsal Deformities: An Intermediate Follow-up Analysis. J Foot Ankle Surg 2005; 44(5):358-364. Highlander P, VonHerbulis E, Gonzalez A, Britt J, Buchman J. Complications of the Weil Osteotomy. Foot Ankle Spec 2011; 4: 165-170. Myerson M, Jung HG. The Role of Toe Flexor-to-Extensor Transfer in Correcting Metatarsophalangeal Joint Instability of the Second Toe. Foot Ankle Int 2005; 26: 675-679. Internal Testing.