/
If you have a problem or complaint, please call our dedicated UK based If you have a problem or complaint, please call our dedicated UK based

If you have a problem or complaint, please call our dedicated UK based - PDF document

pasty-toler
pasty-toler . @pasty-toler
Follow
486 views
Uploaded On 2016-06-22

If you have a problem or complaint, please call our dedicated UK based - PPT Presentation

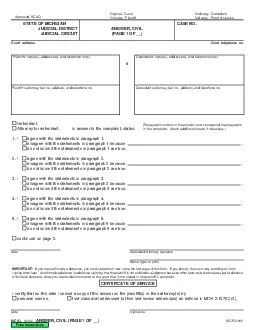
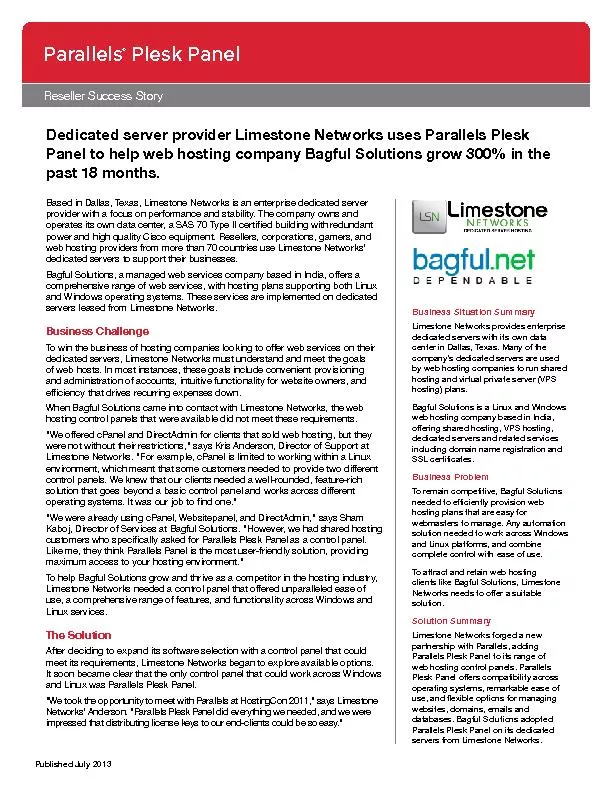
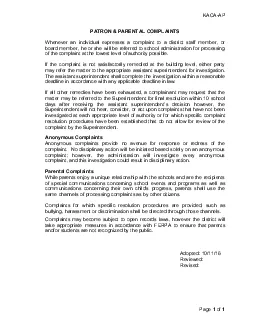
Daily LoafPlease read and keep these instructionsMaking your own bread easily The aroma of homemade bread wafting around the home is oneof those great food experiences Bread fresh out of the oven ID: 372674

Daily LoafPlease read and keep

Share:

Link:

Embed:

Download Presentation from below link

Download Pdf The PPT/PDF document "If you have a problem or complaint, plea..." is the property of its rightful owner. Permission is granted to download and print the materials on this web site for personal, non-commercial use only, and to display it on your personal computer provided you do not modify the materials and that you retain all copyright notices contained in the materials. By downloading content from our website, you accept the terms of this agreement.


Presentation Transcript

If you have a problem or complaint, please call our dedicated UK based helpline beforereturning your product to the retailer from where it was purchased.UK Helpline: 0844 871 0944 Replacement Parts: 0844 873 0710Ireland Helpline: 1800 409 119 Daily LoafPlease read and keep these instructionsMaking your own bread easily... The aroma of homemade bread wafting around the home is oneof those great food experiences. Bread, fresh out of the oven,with melting butter is a memorable taste sensation. The MorphyRichards breadmaker can create that experience every morning.There's very little effort on the part of the baker, because the Register online for your 2 yearguarantee. See back of thisinstruction book for details.(UK and Ireland customers only) www.morphyrichards.co.uk 48330 rev2_x 24/06/2010 11:58 Page 1 UK Hee 0844 871 0944 t Pats 0844 873 0710 Hee 1800 409 119 2 Important safety The use of any electrical appliancerequires the following common sensesafety rules.Primarily there is danger of injury ordeath and secondly the danger ofdamage to the appliance. These areindicated in the text by the followingWARNING: Danger to the person!IMPORTANT: Damage to the appliance!In addition, we offer the following safety This appliance is intended to be usedin household and similar applicationsby clients in hotels, motels and otherresidential type environments;bed and breakfast type environments. It is not suitable for use in staffkitchen areas in shops, offices andother working environments.Always locate your appliance awayfrom the edge of a worktop.Ensure that the appliance is used on aDo not use the appliance outdoors, ornear water.  The mains cable should reach from thesocket to the base unit without strainingthe connections. Do not let the mains cable hang overthe edge of a worktop where a childcould reach it. Do not let the cable run across an openspace e.g. between a low socket and Do not let the cable run across acooker or toaster or other hot areaIf the supply cable is damaged, it mustbe replaced by the manufacturer, it’sservice agent or similarly qualifiedpersons in order to avoid a hazard. WARNING: To protect against fire,electric shock and personal injury, donot immerse cord, plug andappliance in water or any other WARNING: Do not touch hot surfaces.Use oven mitts or oven gloves whenremoving the hot bread pan. Do notcover the steam vent openings underany circumstances. WARNING: Avoid contact with moving To protect against electrical shock, donot immerse cord or plug in water orother liquid. Extreme caution must be observedwhen moving an appliance with hot Do not use breadmaker for storagethey may create a fire or electric shockhazard. Do not use the appliance with wet orThis appliance is not intended for useby persons (including children) withreduced physical, sensory or mentalcapabilities, or lack of experience andknowledge, unless they have beengiven supervision or instructionconcerning the use of the appliance bya person responsible for their safety. ChildrenNever allow a child to operate thisChildren are vulnerable in thekitchen, particularly when unsupervisedand if appliances are being used orcooking is being carried out.Teach children to be aware of dangersin the kitchen, warn them of thedangers of reaching up to areas wherethey cannot see properly or should notbe reaching. Children should be supervised toensure that they do not play with the Treating scaldsRun cold water over the affected areaimmediately. Do not stop to removeclothing, get medical help quickly. Other safety  If the mains lead of this appliance isdamaged do not use it. The lead mayonly be replaced by Morphy RichardsLtd or an agent of the company, sincespecial purpose tools are required.Telephone Morphy Richards helpline for The use of accessory attachments notrecommended by the manufacturer maycause damage to the breadmaker. Do not place the appliance on or nearheat sources such as gas or electricstove ovens, or burners. To avoid damaging the appliance, donot place the baking pan or any objecton top of the unit. Do not clean with scouring pads. Donot wash the baking pan, kneadingblade measuring cup or spoon in adishwasher. Keep the appliance and the cable awayfrom heat, direct sunlight, moisture,The baking pan must be in place priorto switching on the appliance. Always remove the plug from thesocket whenever the machine is not inuse, when attaching accessory parts,cleaning the machine or whenever adisturbance occurs. Pull on the plug,This appliance is not intended to beoperated by means of an external timeror separate remote control. Electrical requirementsCheck that the voltage on the ratingplate of your appliance correspondswith your house electricity supplywhich must be A.C. (AlternatingCurrent).If the socket outlets in your home arenot suitable for the plug supplied withthis appliance, the plug should beremoved and the appropriate onefitted. 48330 rev2_x 24/06/2010 11:58 Page 2 3 For details of other Morphy Richards products, please see our website: Note: The plug removed from the mainscable, if severed, must be destroyed asa plug with bared flexible cord ishazardous if engaged into a live socketWARNING: THIS APPLIANCE MUSTBE EARTHED.Should the fuse in the 13 amp plugrequire changing a 13 amp BS1362fuse must be fitted. Safety instructions 2Electrical requirements 2Features 4Introduction4Before first use4About this breadmaker4Before first use4About the recipes4Programme descriptions4Using your breadmaker5Beeper5Slicing and storing bread5Care and cleaning5Storing the unit6Understanding baking6Important note on flours6Other ingredients6Measuring ingredients7Ingredients temperatures8Creating your own yeast breads8Special glazes for yeast breads9Other tips9Conversion charts11Need help?12Trouble shooting13Helpline14Website14 About the Recipes9General Method 9Basic white breads9White bread9Sugar and salt free bread9Cheese and onion bread9Cranberry and orange bread9Rasin bread9Milk free bread9Sun dried tomato bread9Wholemeal breads 9Wholewheat bread 9Granary bread 9Seeded wholewheat loaf1050/50 granary white mixed10Fast Bake 10Fast bake bread 10White bread rolls 10Pizza dough 10Teacakes10 UK Hee 0844 871 0944 t Pats 0844 873 0710 Hee 1800 409 119 4 IntroductionThe aroma of fresh baked bread isone of these great food experencesand with the Morphy Richards DailyLoaf breadmaker, you can create iteveryday in your own kitchen, quicklyand easily.Simply follow the three step process; Put in the ingredients.Select the programme and pressstart.Wait for your bread.But don't stop at baking bread in thisBesides being able to do all kinds ofspeciality breads, includingwholewheat, you can also preparedoughs for bread rolls and pizza.Everything is easy and tasteshomemade - because it is. Before First UseBefore first use, please take a fewminutes to read this instruction bookand to find a place to keep it handyfor reference. Pay particular attentionto the safety instructions.Carefully unpack the breadmaker andremove all packaging materials.Remove any dust that may haveaccumulated during packing.Wash the baking pan, kneadingblade in hot soapy water and wipethe outside surface of thebreadmaker with a clean, dampcloth. The bread pan is non-stickcoated. Do not use scouring pads orany abrasives on any part of thebreadmaker.For first time, use oil, butter ormargarine to grease the bread panbefore adding ingredients.Clean once more.Place the kneading blade on the axlein the baking pan.During manufacturing, it is necessaryto lightly grease some parts of theappliance. This may result in the unitemitting some vapour when firstused, this is normal. Breadmaker  It is specially designed to bake asmall 1lB loaf. Perfect for daily use!  The daily loaf breadmaker signalswith a beep when extra ingredientscan be added so they don’t getchopped by the kneading blade.(Basic and wholewheat settings only) About the RecipesThe recipes in this booklet have beenthoroughly tested to ensure bestresults. Recipes have been createdby home economists specifically forthis machine and may not produceacceptable results in other similarmachines. Always add ingredients in the orderthey are listed in the recipe. Accurate measuring of ingredients isvital. Do not use larger amounts. Programme 1 Basic white (2:25)For white and brown bread. Also forflavoured breads with added herbsand raisins.2 Wholewheat (3:25)For the baking of bread containingsignificant amounts of wholewheat.This setting has longer preheat timeto allow the grain to soak up thewater and expand. Wholewheatusually produces a crispy thick crust.3 Fastbake (1:30)For preparation of a white loaf in areduced time period. Loaves madeon this setting can be shorter, andthe texture more moist, with a lightercrust. ‡¤ˆ‰“”‚·‘Œ FeaturesViewing windowLid handleStart stop buttonAir ventsBaking panKneading bladeRotating shaftBlade removal hook ‹ 5 For details of other Morphy Richards products, please see our website: 4 Dough (1:30)This setting only makes the doughand will not bake the final bread.Remove the dough and shape it tomake bread rolls, pizza, etc. Anydough can be prepared on thissetting. Do not exceed 500g (1lb) ofcombined ingredients.5 Bake (0:30)This setting is only used afterprograms 1,2 or 3 if you require alonger bake time. Do not use afterthe dough setting. Using Your Breadmaker1Take out the panOpen the lid and remove the pan bylifting the handle, turning anti-clockwise and lifting out. Place onthe work surface. It is important thatthe pan is filled with ingredientsoutside the machine so that anyaccidental spillage is not ignited bythe heating elements.2 Attach the bladeAttach the kneading blade to theshaft by pushing on.3 Measure ingredientsMeasure the ingredients required andadd them all into the pan in the orderlisted. See later section (‘Measuringyour ingredients’). When adding the yeast to the bakingpan, take care that the yeast doesnot come into contact with the wateror any other liquid, as it will start toactivate immediately. Use tepid water 21-284 Put pan back inPlace the baking pan back in thebreadmaker, turning clockwise tolock into place. Close the lid.5 Plug inPlug into the power supply. 6 Select programmeChoose the desired setting bypressing the Menu button the setting you require is highlightedby the indicator light.Press the Start Stop button start the machine. 8ProgressThe breadmaker will automaticallyproceed through the programmed Fruits and nuts can be added to themix for certain recipes, these shouldbe added when the add ingredientsbeep is heard. See recipes for times.  It is possible that steam will escapethrough the vents during baking, thisis normal.When the programme is completedand the bread is baked, the beeper10 Keep warmThe keep warm function will circulatehot air for a further 60 minutes onmost settings (see ‘Baking cycletimes’ section). For best results,remove the baking pan and loafwithin this period or when the initialprogramme is completed. A beep willbe heard when the keep warm periodis finished.Press Stop. Open the lid.WARNING: Use oven gloves whenremoving the baking pan and takecare as it is very hot.12 Turn out the breadAllow the bread to cool in the pan for15 minutes, then turn the pan upsidedown and tap the bread from the panonto a rack to cool. Fill the pan withwarm water immediately to preventthe blade from sticking to the shaft. Occasionally the kneading blade willstay in the loaf. Wait until the loaf iscool and then remove the blade withthe metal utensil provided.13 Always unplug the appliance after Do not open the lid whilst thebreadmaker is operating as this willaffect the quality of the bread,especially it’s ability to rise properly.Only open the lid when the recipeneeds you to add additionalingredients, (see recipes).Room temperature noteThe breadmaker will work well in awide range of temperatures, butthere could be a difference in loafsize between a very warm room anda very cold room. We recommend theroom temperature should bebetween 15C and 34 The beeper sounds: when pressing any button; during the second kneading cycle ofcertain programmes to indicate thatcereals, fruit, nuts or otheringredients can be added;37 minutes for the basic setting.44 minutes for the wholewheatsetting. when the programme finishes; when keep warm finishes. Slicing and storing breadFor best results, place bread on awire rack and allow to cool for 15-30minutes before slicing.Use an electric knife or a sharp knifewith a serrated blade for even slices.Store unused bread tightly covered ina plastic bag at room temperature forup to three days. If weather is hotand humid, store in the refrigeratorovernight.For longer storage (up to one month),place bread in a tightly coveredcontainer in the freezer.If you store the bread in therefrigerator, leave it out to bring it toroom temperature before serving.Since homemade bread has nopreservatives, it tends to dry out andbecome stale faster thancommercially made bread.Leftover slightly hardened bread maybe cut into 1.3 cm (half inch) or2.5cm (1 inch) cubes and used infavourite recipes to make croutons,bread pudding, or stuffing. Care and cleaningWARNING: To prevent electricalshock, unplug the unit beforecleaning.Wait until the breadmaker has IMPORTANT: Do not immerse orsplash either the body or lid in anyliquid as this may cause damageand/or electric shock. 48330 rev2_x 24/06/2010 11:58 Page 5 UK Hee 0844 871 0944 t Pats 0844 873 0710 Hee 1800 409 119 6 Exterior: Wipe the lid and outer bodyof the unit with a damp cloth orslightly dampened sponge.Interior: Use a damp cloth or spongeto wipe the interior of thebreadmaker.Baking pan: Clean the baking panwith warm water, soap is notnecessary. Avoid scratching the non-stick surface. Dry it thoroughly beforeplacing it back in the bakingchamber. Do not wash the baking pan,measuring cup, spoon or kneadingblades in the dishwasher. Do not soak the baking pan for longperiods, as this could interfere withthe working of the drive shaft. If the kneading blade becomes stuckin the bread pan, pour hot water overit and allow to soak for 30 minutes.This will enable you to remove thekneading blade more easily.Be sure the appliance is completelycooled before storing away.Do not use any of these when Paint thinner Steel wool pads Polishing powder Chemical dust clothSpecial care for the non-stick finishAvoid damaging the coating. Do notuse metal utensils such as spatulas,knives or forks.The coating may change colour afterlong use, this is only caused bymoisture and steam and will notaffect the performance of the unit orquality of your bread.The hole in the centre of thekneading blade should be cleaned,then add a drop of cooking oil andreplace it on the spindle in the bakingpan. This will prevent the bladesticking. Keep all air vents and openings clearof dust. Storing the unitBe sure to dry all parts beforestoring, including wiping anymoisture from the viewing window.Close the lid and do not storeanything on top of the lid. Understanding It is often said that cooking is an art,relying on the creativity of the chef,while baking bread is much more ofa science. This means that theprocess of combining flour, waterand yeast results in a reaction thatproduces bread. You have toremember that when the ingredientscombine with each other theyproduce a specific result. Read thefollowing information carefully to gaina better understanding of theimportance each ingredient plays inthe breadmaking process. Important note on Flours, while visibly similar, can bevery different by virtue of how theywere grown, milled, stored, etc. Youmay find that you will have toexperiment with different brands offlour to help you make that perfectloaf.Storage is also very important, as allflours should be kept in an airtightcontainer.Strong white flour/bread flourBread flour is a high gluten/proteinflour that has been treated withconditioners that give dough agreater suitability for kneading. BreadFlour typically has a higher glutenconcentration than All purpose flour;however, depending on differentmilling practices, this may vary.Strong plain flour or bread flour arerecommended for use with thisbreadmaker.Whole wheat flour/wholemeal flour ismilled from the entire wheat kernelwhich contains the bran and germand makes it heavier and richer innutrients than white flour. Breadsmade with this flour are usuallysmaller and heavier than whiteloaves. To overcome this, wholewheat flour/wholemeal flour can bemixed with Bread flour or strongplain flour to produce a high, lighttextured bread.Self-raising flourSelf-raising Flour containsunnecessary leavening ingredientsthat will interfere with bread and cakemaking. It is not recommended forBran (unprocessed) & Wheat Germare the coarse outer portions of thewheat or rye grains separated fromflour by sifting or bolting. They areoften added in small quantities tobread for nutritional enrichment,heartiness and flavour. They are alsoused to enhance the texture ofbread.Oatmeal comes from rolled or steel-cut oats. They are usedprimarily to enhance flavour andtexture. Other ingredientsYeasts (active dry yeast)Yeast, through a fermentationprocess, produces gas (carbondioxide) necessary to make the breadrise. Yeast must be able to feed onsugar and flour carbohydrates inorder to produce this gas. Fast actiongranular yeast is used in all recipesthat call for yeast.There are basically three differenttypes of yeast available: fresh,traditional dry active and fast action.It is recommended that fast actionyeast is used. Fresh or compressedcake yeast are not recommended asthey will produce poor results. Storeyeast according to manufacturer’sinstructions. Ensure your yeast isfresh by checking it’s expiration date.Once a package or can of yeast isopened, it is important that theremaining contents be immediatelyresealed and refrigerated as soon aspossible for future use. Often breador dough, which fails to rise, is due 48330 rev2_x 24/06/2010 11:58 Page 6 7 For details of other Morphy Richards products, please see our website: to stale yeast being used. Thefollowing test can be used todetermine whether your yeast is staleand inactive:Place half a cup of lukewarm waterinto a small bowl or cup.Stir 1 tsp. of sugar into the waterthen sprinkle 2 tsp. of yeast over thesurface.Place bowl or cup in a warm areaand allow to sit for 10 minutesThe mixture should foam andproduce a strong yeast aroma. If thisdoes not occur, discard mixture andstart again with another packet ofdried yeast.Sugar is important for the colour andflavour of breads. It is also food forthe yeast as it is part of thefermentation process. Artificialsweeteners cannot be used as asubstitute for sugar as the yeast willnot react properly with them.Salt is necessary to balance theflavour of breads and cakes, as wellas for the crust colour that developsduring baking. Salt also limits thegrowth of yeast, so the amountsshown in the recipes should not beincreased. It may be reduced fordietary reasons, however, your bakingmay suffer.Liquids such as milk or acombination of powdered milk andwater, can be used when makingbread. Milk will improve flavour,provide a velvety texture and softenthe crust, while water alone willproduce a crispier crust. Someliquids call for juice (orange, apple,etc) to be added as a flavourenhancer. Note: For most recipes, we suggestthe use of dry skimmed milk.Eggs add richness and a velvetytexture to bread doughs and cakes.Sunflower oilSunflower oil ‘shortens’ or tenderisesthe texture of yeast breads. Butter ormargarine can be used as asubstitute. If butter or margarine isused direct from the refrigerator, itshould be softened for easierblending during the mixing cycle.Baking powderBaking powder is a raising agentused in cakes. This type of raisingagent does not require rising timebefore baking as the chemicalreaction works when liquidingredients are added.Bicarbonate of soda Bicarbonate of soda is anotherraising agent not to be confused orsubstituted for baking powder. It alsodoes not require rising time beforebaking as the chemical reactionworks during the baking process.Vitamin C - Ascorbic acidAscorbic acid helps improve thevolume of the loaf. Vitamin C powderor tablets should be used. You canalso use the orange flavour vitamin CThese are usually marked in mg(milligrams) strength. If they are200mg tablets, use 1/2 tablet for100mg dose. The tablet must becrushed between 2 spoons to createa powder. If using powder, refer tothe packet instructions, but a 1/4 of ateaspoon is usually recommended. Measuring IngredientsThe key and most important stepwhen using your breadmaker ismeasuring your ingredients preciselyand accurately. It is extremelyimportant to measure each liquid anddry ingredient properly or it couldresult in a poor or unacceptablebaking result. The ingredients mustalso be added into the baking pan inthe order in which they are given ineach recipe. Liquid and drymeasurements are done somewhatdifferently and are as follows:Liquid measurements Use the cup provided reading amounts, the measuring cupmust be placed on a horizontal flatsurface and viewed at eye level (noton an angle). The liquid level linemust be aligned to the mark ofmeasurement. A ‘guesstimate’ is not good enoughas it could throw out the criticalbalance of the recipe.Dry measurementsDry measurements (especially flours)must be done using the measuringcup provided. The measuring cup isbased on the American standard 8fluid oz cup -British cup is 10 fluidDry measuring must be done bygently spooning the ingredients intothe measuring cup and then oncefilled, levelling off with a knife.Scooping or tapping a measuringcup will pack the ingredients and youwill end up with more than isrequired. This extra amount couldaffect the balance of the recipe. Donot sift the flour, unless stated.When measuring small amounts ofdry or liquid ingredients (ie yeast,sugar, salt, powdered milk, honey,molasses), the measuring spoonwhich is provided must be used.Measurements must be level, notheaped, as this small differencecould throw out the critical balanceof the recipe.DO NOT USE NORMAL KITCHENTEASPOONS OR TABLESPOONS.Hints on measuring ingredients The cup is marked in various ‘volumemeasurement’ scales. The recipes inthis book use the ‘cup’ volume whichis based on the ‘American’ cup of8floz and is conveniently marked in1/16 divisions. If you prefer to use weight (gms) as ameasurement, fill and weigh therequired number of cups and recordthis conversion. ie: 2 cups = xx gmsYou must use a good quality set ofaccurate scales, we prefer to use the‘cup’ measure for consistency andaccuracy.A conversion table is provided onpage 11. A UK Hee 0844 871 0944 t Pats 0844 873 0710 Hee 1800 409 119 8  There are 2 spoons provided to coverall combinations of quantities in therecipes Tablespoon (tbsp) and teaspoonFor 1/2 teaspoon measurements, use1 tsp = 5 millilitres1 tbsp = 3 tsp = 15 millilitresHint: measure dry ingredients firstwith the tablespoon, then wet (oil)Your breadmaker produces deliciousbaked goods with ease. This machinerequires only that you carefully followthe recipe instructions. In basiccooking, normally ‘a pinch of this anda dash of that’ is fine, but not forbreadmakers. Using an automaticbreadmaker requires you accuratelymeasure each ingredient for bestresults. Ingredient temperaturesAll ingredients, including themachine and pan, and especiallyliquids (water or milk), should bewarmed to room temperature 21°CIf ingredients are too cold, below10°C (50°F), they will not activate theyeast. Extremely hot liquids, above40°C (104°F), may kill the yeast. Creating your own yeast breadsWith the breadmaker, even the mostinexperienced baker can achieve thesatisfying experience of baking a loafof bread. All of the mystery and hardwork is gone.Inside this versatile machine, thedough is mixed, kneaded, proofedand baked without you beingpresent. The automatic breadmakercan also just prepare the dough, andwhen it's ready, you shape, allow torise and bake in a conventional oven.The recipes on the following pagesare ‘tailored’ for this breadmaker.Each recipe features ingredients thatbest compliment a particular loaf ofbread, and each was tested in ourmachines. It is extremely importantnot to exceed the amounts of flourspecified in each of the recipes orelse it could result in unsatisfactorybaking performance. When creatingyour own yeast bread recipes orbaking an old favourite, use therecipes in this cookbook as a guidefor converting portions from yourrecipe to your breadmaker. Special glazes for yeast breadsGive your just baked bread aprofessional finish. Select one of thefollowing special glazes to enhanceyour bread.Beat 1 large egg and 1 tablespoon ofwater together, brush generously.Note: apply only to doughs beforebaking.Melted butter crustBrush melted butter over just bakedbread for a softer, tender crust.For a softer, shiny crust, brush justbaked bread with milk or cream.Sweet icing glazeMix 1 cup of sifted icing sugar with 1or 2 tablespoons of milk to make aglaze consistency and drizzle overraisin bread or sweet breads.Sprinkle your choice of these seedsgenerously over just glazed bread.  Place all recipe ingredients into thebaking pan so that yeast is nottouching any liquid. After completing the process ofmaking dough in your breadmaker,typically when letting dough riseoutside the breadmaker, allow 30minutes or until dough doubles insize. Dough should be lightly greasedand covered with grease proof paperand a dry towel. It should be placedin a warm area free from draughts. Humidity can cause problems,therefore humidity and high altitudesrequire adjustments. For highhumidity, add an extra tablespoon offlour if consistency is not right. Forhigh altitudes, decrease yeastamount by approximately 1/4teaspoon, and decrease sugarand/or water or milk slightly. The DOUGH setting is great formixing, kneading and proofing,allowing dough to rise. Use theautomatic breadmaker to preparethis dough so all you need to do isshape and bake it according to yourrecipe. When recipes call for a ‘lightly flouredsurface,’ use 1 or 2 tablespoons offlour on the surface. You may want tolightly flour your fingers or rolling pinfor easy dough manipulation. When you let dough ‘rest’ and ‘rise’according to a recipe, place it in awarm, draught-free area. If the doughdoes not double in size, it may notproduce a tender product. If the dough you are rolling shrinksback, let it rest covered for a fewminutes before rolling again. Dough may be wrapped in plasticand stored in a freezer for later use.Bring the dough to room temperaturebefore using. After 5 minutes of kneading, openthe lid and check the doughconsistency. The dough should forma soft, smooth ball. If too dry, addliquid. If too wet, add flour (1/2 to 1tablespoon at a time). When using honey, malt extract,golden syrup or treacle, coat thespoon or cup with oil first, this willprevent these ingredients fromsticking to the spoon or cup. BB 9 For details of other Morphy Richards products, please see our website: All of the following recipes use thissame general method:Measure ingredients into the bakingUse tepid water 21-28Insert the baking pan securely intothe unit, close the lid.Select the appropriate bread setting.Push the start button.When the bread is done, remove thepan from the unit using oven mitts.Remove the bread from the bakingpan (and the kneading blade fromthe bread if necessary).Allow to cool before slicing.This method is modified by notes, ifapplicable, at the end of each recipe.These recipes have been developedusing Allinson flours and EasybakeAllinson yeast. Recipes for basic white breads Water Skimmed milk powder2 tbsp Oil2 tbsp Sugar1/2 Salt1 tsp Strong white bread flour2 cups Fast action yeast Use settingBasic sa Water Skimmed milk powder2 tbsp Sunflower oil2 tbsp Strong white bread flour2 cups Fast action yeast Use settingBasic Cheese andn d Water140 ml Skimmed milk powder1 tbsp Sugar1 tbsp Salt/2 Strong white bread flour2 cups Fast action yeast1 tsp Onion granules1 tsp Cheese, grated2/3 Use settingBasic rry Water Orange juice1/3 Orange zest1 orange Oiltbsp Skimmed milk powder Sugar5 tsp Salt1 tsp Strong white bread flour2 cups Nutmeg/2 Fast action yeast Dried Cranberries* Use settingBasic *add when beep sounds at 37 minutes Water Skimmed milk powder tbsp Sugar1 Salt1 tsp Strong white bread flour2 cups Fast action yeast Cinnamon/2 Raisins*/4 Use settingBasic *add when beep sounds at 37 minutes Water tbsp Sugar1/2 Salt1 tsp Strong white bread flour2 cups Fast action yeast Use setting1 Basic dri to Water Skimmed milk powder1 Oil1 Sugar1 Salt/2 Mixed herbs1 tsp Sun dried tomatoes Strong white bread flour2 cups Fast action yeast Use settingBasic Recipes for whole wheat breads Water Skimmed milk powder1 Oil1 Brown sugar1 Salt1 tsp Wholemeal bread flour2 cups Fast action yeast Vitamin c tablet, crushed60mg Use settingWholemeal Granad Water Skimmed milk powder1 Oil1 Brown sugar1 Salt1 tsp Granary bread flour2 cups Fast action yeast Vitamin c tablet, crushed60mg Use settingWholemeal 48330 rev2_x 24/06/2010 11:58 Page 9 UK Hee 0844 871 0944 t Pats 0844 873 0710 Hee 1800 409 119 10 ed whole whd Water Skimmed milk powder1 Oil1 Brown sugar1 Salt1 tsp Wholemeal bread flour2 cups Fast action yeast Vitamin c tablet, crushed60mg Sunflower seeds* Pumpkin seeds* Sesame seeds*1/2 Use settingWholemeal *add when beep sounds at 44 minutes Water Skimmed milk powder1 Oil1 Brown sugar1 Salt1 tsp Granary bread flour1 cup White bread flour1 cup Fast action yeast Use settingWholemeal Recipes for fast bake bread Warm water Skimmed milk powder Salt/4 Sugar3 tsp 1/2 Strong white bread flour2 cups Fast action yeast Use settingFast Bake Recipes for dough Water Skimmed milk powder Butter1 tbsp Sugar1 tbsp Salt/4 Strong white bread flour1 Fast action yeast Use settingDough Knead and shape the dough into 4rolls.Place on a greased baking tray.Brush lightly with melted butter.Cover for 20-25 minutes.Allow to rise until they are double insize then glaze, if required.Bake for approx 15-20 minutes at190°C (gas mark 5, 375°F). Water Oil1 Sugar1 tbsp Salt/4 Strong White bread flour1 Fast action yeast1 tsp Use settingDough Pre-heat oven.Shape into a flat round shape. Place ona greased baking tray. Brush lightlyCover for 15 minutes and allow to rise.Add your desired topping.Bake at approx 200ºC (400°F, gas mark6) until golden brown.Teacakes Warm water Butter37g Salt/4 Sugar37g Skimmed milk powder1 Mixed spice Strong white bread flour300g Fast yeast Currants Use settingDough Place all ingredients except currants inbreadmaker and set to dough setting. After the cycle has finished knead inthe currants. Make into 8-10 balls and place ongreased baking sheet and leave to risefor 30 minutes.Cook at 200ºc (400°F, gas mark 6) for15-20 minutes until golden brown. Bread mixes Follow the information for breadmixes on the bread mix packet. 1Just add water These mixes are complete and theyhave all the necessary ingredientsprovided, even the yeast. You onlyadd water.IMPORTANT: Follow the packetinstructions as some mixes containmore than the normal amount ofyeast, which could over rise in theThese mixes are more prone to over-rising and collapsing when theweather is hot and humid. Sincethese mixes are complete, we cannotadvise how to adjust, as with ourown recipes. Bake in the coolest partof the day, use water between 21-For this 1lb machine, use 250g ofmix which is usually half a packet,mix with 160ml (water 48330 rev2_x 24/06/2010 11:58 Page 10 11 For details of other Morphy Richards products, please see our website: Conversion chartLiquids, flour and othersWe recommend that you use the cupprovided for all recipes forconsistency between brands andtypes of flour.The cup provided is based on theAmerican cup measurement of 8For people who prefer to use theirown measuring utensils, alternativemeasurements are in millilitres (ml)and cubic centimetres (cc) for liquidmeasurement and grams (gm) forweight of flour, sugar and fruit.Note: A good quality set of accuratekitchen scales with divisions andaccuracy to 2 grams are required.A measuring jug with divisions of 2ml is required.The tablespoon and teaspoonprovided are required to measure thesmaller quantities. A set of Britishstandard spoons with ‘scrape’ leveltops can be used.Do not use a kitchen tablespoonor teaspoon as they are 1/16 15ml 120ml 180ml 1 1/8 270ml 1 1/4 300ml 1 5/16 315ml 1 1/2 360ml 1 5/8 390ml 1 15/16 465ml Soft grain Brown 18g 19g 17g 108g 117g 113g 144g 156g 150g 132g 1 1/8 162g 176g 169g 149g 1 1/4 180g 195g 188g 165g 1 1/2 216g 198g 312g 300g 1/4 cup 41g 123g 164g 100g 150g 200g 400g Preserving or 55g 110g 165g Granulated sugar 57g 113g 169g Chopped freshapple 1/2 cube 31g 124g Frozen raspberriesor fresh plumbs 25g 100g 200g Water and UK Hee 0844 871 0944 t Pats 0844 873 0710 Hee 1800 409 119 12 Need Help? Questions about general performance What should I do if the kneadingblade comes out with the bread?Remove it with the spplied utensil.Since the blade can be disconnectedfrom the pan, it is not a malfunction ifit comes out in your bread.Why does my bread sometimeshave some flour on the side crust?In some cases, the flour mix mayremain on the corners of the bakingpan. When this happens, it usuallycan be eaten or simply trim off thatportion of the outer crust with asharp knife.Why isn't the dough mixing? I canhear the motor running.The Kneading Blade or baking panmay not be inserted properly. Makesure the pan is facing the right wayand that it has ‘clicked’ and seatedinto the bottom of the breadmaker.How long does it take to makebread?Timings for each setting are outlinedearlier.Why do I have to add theingredients in a certainorder?This allows the breadmaker to mixthe ingredients in the most efficientmanner possible. It also serves tokeep the yeast from combining withthe liquid before the dough is startedto mix, which is essential on the timedelay.The kneading blade is stuck in thebread pan. After baking, how do IThe kneading blade may ‘stick’ inplace after baking. Running warm orhot water over the blade shouldloosen it enough to be removed. Ifstill stuck, soak in hot water for aboutCan I wash the baking pan in theNo. The baking pan and kneadingblade must be washed by hand.finished bread in the baking pan?Whilst still in the breadmaker for thefirst hour after baking is complete,the bread ’keeps warm’ to prevent itbecoming ‘soggy’.Leaving the bread in the breadmakerafter the keep warm period mayresult in a ‘soggy’ loaf of bread asexcess steam (moisture) would notbe able to escape.Remove and allow to cool on a wirerack after baking to prevent this.Why did the dough only partiallymix? Why didn't it mix completely?The dough may be too heavy or dry.Also, the kneading blade or bakingpan may not be inserted properly.Ingredients may have been added inthe wrong order.Why didn't the bread rise? The yeast could be bad, past it’s sellby date or possibly no yeast wasadded at all. Also, if the mixing wasnot complete, rising problems coulddevelop. ingredients and recipesHow do I know when to addraisins, nuts, etc. to the bread?There is a beeper tone to signal thatyou may add raisins, nuts, etc.during the second kneading cycle.In some cases, ingredients can bebroken up during the initial kneadingcycle. Each recipe indicates the besttime to add fruit and nuts to theHow come my bread comes outtoo moist? What can I do?Humidity may affect the dough. Addan extra tablespoon of flour. Also,high altitude may have the sameeffect. Decrease the amount of yeastby 1/4 teaspoon and decrease thesugar and/or water/milk slightly.Why do I get air bubbles at the topof the bread?This can be caused by using toomuch yeast. Decrease the yeast by1/4 tsp.Why does my bread rise and thencollapse or crater?The bread may be rising too much.To reduce the rate of rising, reducethe amount of yeast and/or increasethe amount of salt.Can I use my favourite breadrecipes (traditional yeast bread) inmy bread machine?Yes, but you will need to experimentto get the right proportion ofingredients. Become familiar with theunit and make several loaves ofbread before you beginexperimenting. Never exceed a totalamount of 2 cups of dry ingredients(that includes the total amount offlour, oats, oatmeal, bran). Use therecipes in this book to helpdetermine the ratio of dry ingredientsto liquid and amounts of yeast, sugar,salt, and oil/butter/margarine to use.We advise creating your own breadrecipes using the basic mode, thenprogress to the others, using theBaking cycle times chart as a guide.Is it important for ingredients to beat room temperature beforeadding them to the baking pan?Yes, even when the delay timer isbeing used. (Water must be betweenC and 28breads are always shorter. Am Idoing something wrong?No, it is normal for Whole wheat andWholemeal breads to be shorter anddenser than Basic or French breads.Whole Wheat and Wholemeal flourare heavier than white bread flour,therefore they don’t rise as muchduring the bread making process.This is also true for bread containingfruit, nuts, oats and bran. 48330 rev2_x 24/06/2010 11:59 Page 12 13 For details of other Morphy Richards products, please see our website: Can I premix the yeast with water?No, the yeast must be kept dry andput into the baking pan last, abovethe flour. This is especially importantwhen the delay timer is being used.Why is there a large hole in thebase of the bread?This hole has been created by thekneading blade. Sometimes this holeis larger than normal. This is becausethe dough has rested to the side ofthe blade after the second kneadingcycle - normal with bread makers.You could position the dough evenlyin the base of the pan. Trouble Shooting Bread Sinks in the centre. Too much liquid or liquid tooMeasure ingredients accurately. Useliquids at temperatures between21°C and 28°C.Salt was not added, causing breadto over rise and collapse.Measure ingredients accurately.Too much yeast was addedMeasure ingredients accurately, ifproblem persists, reduce yeast by 14High humidity and hot ambienttemperatures can cause bread toover rise and collapse.Bake during the coolest part of theday, Try reducing the yeast by 14teaspoon or use liquids direct fromthe refrigerator. Do not use the timerHigh altitudes can cause the breadto over rise and then collapseduring baking.Try reducing the yeast by 14 Lid is open during baking.Do not open the lid during baking. Bread did not rise Not enough yeast was added.Measure ingredients accurately.Yeast is outdated or inactive.Never use outdated yeast. Store in aToo little sugar was added.Measure ingredients accurately.Too much salt was added,reducing the action of the yeast.Measure ingredients accurately.Water was too hot and killed theUse liquids at temperatures between 21°C and 28°CYeast has been activated beforeprogramme has started.Take care that yeast does not comein contact with liquid beforeprogramme has started. Bread rises too High humidity and hot ambienttemperatures can cause bread toover rise.Bake during the coolest part of the day. Try reducing the yeast by14 teaspoon or use liquids directlyfrom the refrigerator. Do not use theToo much yeast.Measure ingredients accurately.Too much liquid.Measure ingredients accurately.Hot liquids accelerated the yeastUse liquids at temperatures between 21°C and 28°C.Too much flour or not enough salt.Measure ingredients accurately. Bread dry with dense texture.Not enough liquid added. Measure ingredients accurately.Flour may be passed the use bydate, or be dry causing wet/dryTry increasing liquid by 1 tbsp at a Bread under baked with soggy centre. Too much liquid from fresh orcanned fruit.Always drain liquids well as specifiedin the recipe. Water may have to bereduced slightly.Large amounts of rich ingredientslike nuts, butter, dried fruits,syrups and grains will make doughheavy. This will slow down therising and prevent the bread frombaking through.Measure ingredients accurately.Never exceed the amounts in therecipe. Bread over brownedToo much sugar.Measure ingredients accurately.Crust colour set too high.Set crust colour to light. Bread has large holes in texture.Water was too hot and killed theUse liquids at temperatures between21°C and 28°CToo much liquid.Measure ingredients accurately.Too much yeast.Measure ingredients accurately.High humidity and hot ambienttemperatures increase yeastactivity. Bake during the coolest part of the day. Try reducing the yeast by14 teaspoon or use liquids directfrom the refrigerator. Do not use thetimer function.Water was too hot and killed theUse liquids at temperatures between21°C and 28°C. 48330 rev2_x 24/06/2010 11:59 Page 13 UK Hee 0844 871 0944 t Pats 0844 873 0710 Hee 1800 409 119 14 Bread surface is sticky. Bread was left in the machine toolong and condensation collectedon the baking pan.Whenever possible, remove breadfrom the baking pan and cool on awire rack before keep warm period The wet/dry balance of theingredients may be incorrect.Measure ingredients accurately. Difficult to remove from the panThe bread is sticking to the pan.The surface of the pan needs to beoiled before everyday use. Wash thepan in hot soapy water andthoroughly dry. Liberally coat theinner surface of the pan with oil, butter or margarine. Follow the guideon page 6, ‘Using your breadmaker’.When the bread pan is removed fromthe machine after the bakingprogramme allow the bread to cool inthe pan for 15 minutes before turningout onto a rack. Only slice the breadwhen fully cooled after 20-40 If you have any difficulty with yourappliance, do not hesitate to call us.We are more likely to be able to helpthan the store from where youbought it. Please have the followinginformation ready to enable our staffto deal with your query quickly.Name of the product.Model number as shown on theunderside of the appliance.Serial number as shown onunderside of the appliance.UK Helpline 0844 871 0944 Replacement Parts0844 873 0710 Ireland Helpline 1800 409 119 WebsiteYou may also contact us through ourwebsite, or visit the site to browseand purchase appliances, spareparts and accessories from theextensive Morphy Richards range. 48330 rev2_x 24/06/2010 11:59 Page 14 15 For details of other Morphy Richards products, please see our website: This page is left intentionally blank 48330 rev2_x 24/06/2010 11:59 Page 15 Registering Your Two Year GuaranteeYour standard one year guarantee isextended for an additional 12 monthswhen you register the product within28 days of purchase with MorphyRichards. If you do not register withMorphy Richards within 28 days,your product is guaranteed for 1 year.To validate your 2 year guaranteeregister with us online atwww.morphyrichards.co.ukN.B. Each qualifying product needsto be registered with MorphyRichards individually. guarantee is only available in theUK and Ireland.Please refer to theone year guarantee for moreinformation. Your One Year It is important to retain the retailer’sreceipt as proof of purchase. Stapleyour receipt to this back cover forfuture reference.Please quote the followinginformation if the product develops afault. These numbers can be foundon the base of the product.Model no.Serial no.All Morphy Richards products areindividually tested before leaving thefactory. In the unlikely event of anyappliance proving to be faulty within28 days of purchase, it should bereturned to the place of purchase forit to be replaced.If the fault develops after 28 daysand within 12 months of originalpurchase, you should contact theHelpline number quoting Modelnumber and Serial number on theproduct, or write to Morphy Richardsat the address shown.You may be asked to return a copy ofproof of purchase.Subject to the exclusions set outbelow (see Exclusions), the faultyappliance will then be repaired orreplaced and dispatched usuallywithin 7 working days of receipt.If, for any reason, this item isreplaced during the 1 year guaranteeperiod, the guarantee on the newitem will be calculated from originalpurchase date. Therefore it is vital toretain your original till receipt orinvoice to indicate the date of initialpurchase.To qualify for the 1 year guarantee,the appliance must have been usedaccording to the instructionssupplied. For example, crumb traysshould have been emptied regularly. Morphy Richards shall not be liableto replace or repair the goods underthe terms of the guarantee where:The fault has been caused or isattributable to accidental use,misuse, negligent use or usedcontrary to the manufacturer’srecommendations or where the faulthas been caused by power surges ordamage caused in transit.The appliance has been used on avoltage supply other than thatstamped on the products.Repairs have been attempted bypersons other than our service staff(or authorised dealer).The appliance has been used for hirepurposes or non domestic use.The appliance is second hand. Morphy Richards are not liable tocarry out any type of servicing work,under the guarantee.Plastic filters for all Morphy Richardskettles and coffee makers are notcovered by the guarantee.Batteries and damage from leakageare not covered by the guarantee.This guarantee does not confer anyrights other than those expressly setout above and does not cover anyclaims for consequential loss ordamage. This guarantee is offered asan additional benefit and does notaffect your statutory rights as aconsumer.The After Sales DivisionMorphy Richards LtdMexborough, South Yorkshire, Helplines (office hours)UK 0844 871 0944Spare Parts 0844 873 0710Republic of Ireland 1800 409 119BM48330 MUK Rev2 06/10 For electrical products sold within theEuropean Community. At the end of theelectrical products useful life, it should notbe disposed of with household waste. Please recycle where facilities exist. Checkwith your Local Authority or retailer forrecycling advice in your country. Morphy Richards products are intended for household use only.See usage limitations within the location safety instructions.Morphy Richards has a policy of continuous improvement in product qualityand design. The company, therefore reserves the right to change thespecification of it’s models at any time. 48330 rev2_x 24/06/2010 11:59 Page 16