PDF-Adobe Photoshop 6.0 for Photographers
Author : sherrill-nordquist | Published Date : 2016-06-21
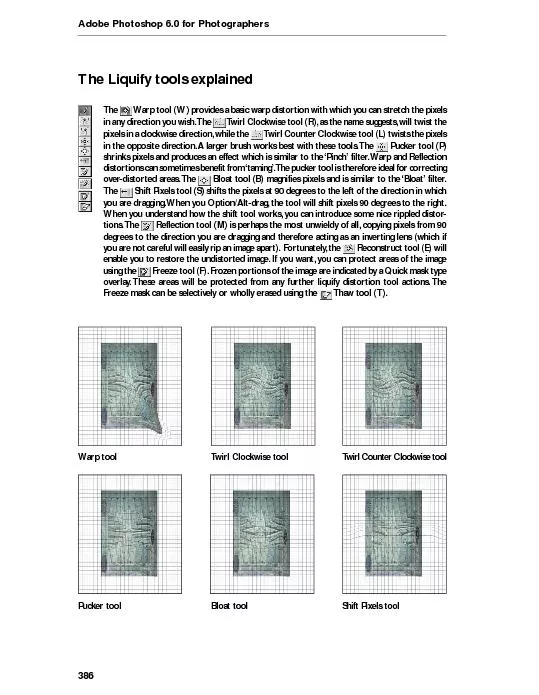
Warp tool W provides a basic warp distortion with which you can stretch the pixelsin any direction you wish The Twirl Clockwise tool R as the name suggests will
Presentation Embed Code
Download Presentation
Download Presentation The PPT/PDF document "Adobe Photoshop 6.0 for Photographers" is the property of its rightful owner. Permission is granted to download and print the materials on this website for personal, non-commercial use only, and to display it on your personal computer provided you do not modify the materials and that you retain all copyright notices contained in the materials. By downloading content from our website, you accept the terms of this agreement.
Adobe Photoshop 6.0 for Photographers: Transcript
Warp tool W provides a basic warp distortion with which you can stretch the pixelsin any direction you wish The Twirl Clockwise tool R as the name suggests will twist thepixels in a clockwis. Radar Imagery. The Center for Remote Sensing of Ice Sheets (CReSIS) has developed many radars that operate over the frequency range from 140 to 230 MHz with multiple receivers developed for airborne sounding, and imaging of ice sheets. Understanding the echogram data depends on knowing the process of how radar waves interact with natural surfaces. . Processing and Exporting Images. Ivan . Zhekov. Telerik Web Design Course. html5course.telerik.com. . Front-end Developer. http://joneff.info. . Table of Contents. Adobe . Photoshop. Photoshop Toolboxes. Marcus J. Davis. Southern New Hampshire University. Professor Clayborn. 503 Digital E commerce. Purpose Of Site. To place my art out into the open. To gain exposure. To start my music production business with a website. are one of the handiest time-saving tools you can have in your utility belt.. . Really they're like magic, allowing you to transform your photos and designs with a single click. For those of you that have never ventured into the wonderful world of Photoshop actions, this guide is for you.. . SYFTET. Göteborgs universitet ska skapa en modern, lättanvänd och . effektiv webbmiljö med fokus på användarnas förväntningar.. 1. ETT UNIVERSITET – EN GEMENSAM WEBB. Innehåll som är intressant för de prioriterade målgrupperna samlas på ett ställe till exempel:. and the enjoyment of photography in a convivial atmosphereOceanside Photographers Club Welcomes VisitorsVisitors may attend two free meetings either/or general meeting or education meeting before deci The Benefits of Reading Books,Most people read to read and the benefits of reading are surplus. But what are the benefits of reading. Keep reading to find out how reading will help you and may even add years to your life!.The Benefits of Reading Books,What are the benefits of reading you ask? Down below we have listed some of the most common benefits and ones that you will definitely enjoy along with the new adventures provided by the novel you choose to read.,Exercise the Brain by Reading .When you read, your brain gets a workout. You have to remember the various characters, settings, plots and retain that information throughout the book. Your brain is doing a lot of work and you don’t even realize it. Which makes it the perfect exercise! The Benefits of Reading Books,Most people read to read and the benefits of reading are surplus. But what are the benefits of reading. Keep reading to find out how reading will help you and may even add years to your life!.The Benefits of Reading Books,What are the benefits of reading you ask? Down below we have listed some of the most common benefits and ones that you will definitely enjoy along with the new adventures provided by the novel you choose to read.,Exercise the Brain by Reading .When you read, your brain gets a workout. You have to remember the various characters, settings, plots and retain that information throughout the book. Your brain is doing a lot of work and you don’t even realize it. Which makes it the perfect exercise! The Benefits of Reading Books,Most people read to read and the benefits of reading are surplus. But what are the benefits of reading. Keep reading to find out how reading will help you and may even add years to your life!.The Benefits of Reading Books,What are the benefits of reading you ask? Down below we have listed some of the most common benefits and ones that you will definitely enjoy along with the new adventures provided by the novel you choose to read.,Exercise the Brain by Reading .When you read, your brain gets a workout. You have to remember the various characters, settings, plots and retain that information throughout the book. Your brain is doing a lot of work and you don’t even realize it. Which makes it the perfect exercise! The Benefits of Reading Books,Most people read to read and the benefits of reading are surplus. But what are the benefits of reading. Keep reading to find out how reading will help you and may even add years to your life!.The Benefits of Reading Books,What are the benefits of reading you ask? Down below we have listed some of the most common benefits and ones that you will definitely enjoy along with the new adventures provided by the novel you choose to read.,Exercise the Brain by Reading .When you read, your brain gets a workout. You have to remember the various characters, settings, plots and retain that information throughout the book. Your brain is doing a lot of work and you don’t even realize it. Which makes it the perfect exercise! The Benefits of Reading Books,Most people read to read and the benefits of reading are surplus. But what are the benefits of reading. Keep reading to find out how reading will help you and may even add years to your life!.The Benefits of Reading Books,What are the benefits of reading you ask? Down below we have listed some of the most common benefits and ones that you will definitely enjoy along with the new adventures provided by the novel you choose to read.,Exercise the Brain by Reading .When you read, your brain gets a workout. You have to remember the various characters, settings, plots and retain that information throughout the book. Your brain is doing a lot of work and you don’t even realize it. Which makes it the perfect exercise! The Benefits of Reading Books,Most people read to read and the benefits of reading are surplus. But what are the benefits of reading. Keep reading to find out how reading will help you and may even add years to your life!.The Benefits of Reading Books,What are the benefits of reading you ask? Down below we have listed some of the most common benefits and ones that you will definitely enjoy along with the new adventures provided by the novel you choose to read.,Exercise the Brain by Reading .When you read, your brain gets a workout. You have to remember the various characters, settings, plots and retain that information throughout the book. Your brain is doing a lot of work and you don’t even realize it. Which makes it the perfect exercise!
Download Document
Here is the link to download the presentation.
"Adobe Photoshop 6.0 for Photographers"The content belongs to its owner. You may download and print it for personal use, without modification, and keep all copyright notices. By downloading, you agree to these terms.
Related Documents