PDF-ORDERING TOOL USER GUIDE All contents are Copyright
Author : tatiana-dople | Published Date : 2015-09-16
Setting or Changing the Default Shipping Method To set or change default shipping method information 1 Click the Shipping Address Method hyperlink on the Set Defaults 2
Presentation Embed Code
Download Presentation
Download Presentation The PPT/PDF document "ORDERING TOOL USER GUIDE All contents ar..." is the property of its rightful owner. Permission is granted to download and print the materials on this website for personal, non-commercial use only, and to display it on your personal computer provided you do not modify the materials and that you retain all copyright notices contained in the materials. By downloading content from our website, you accept the terms of this agreement.
ORDERING TOOL USER GUIDE All contents are Copyright : Transcript
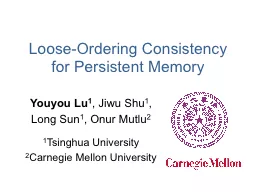
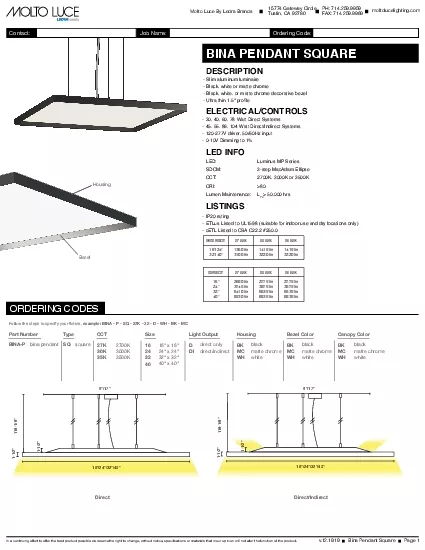
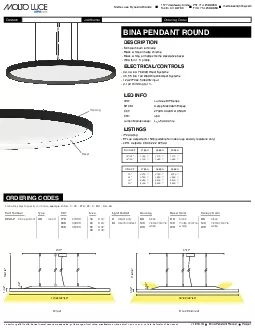
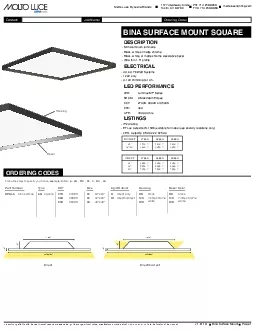
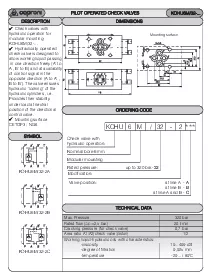
Setting or Changing the Default Shipping Method To set or change default shipping method information 1 Click the Shipping Address Method hyperlink on the Set Defaults 2 Select a shipping prefere. 1 07 01 05 04 02 2 16 28 19 21 11 3 34 26 57 32 22 4 43 21 18 25 5 11 07 05 26 03 6 05 32 28 01 24 7 16 61 06 60 26 8 14 11 17 15 9 57 52 57 62 22 10 42 51 14 45 76 brPage 2br Ordering Decimal Fractions 2 Write out each list of decimals in order sta Youyou. Lu. 1. , . Jiwu. Shu. 1. , . Long Sun. 1. , . Onur. Mutlu. 2. 1. Tsinghua University. 2. Carnegie Mellon University. Problem:. . Strict write ordering . required for storage consistency dramatically degrades performance in persistent memory. I can . order. . adjectives. in sentences . according to conventional patterns.. ELACC4L1. Demonstrate . command of the conventions of standard English grammar and usage when writing or speaking.. d. MSgt Mike Ventura. TSgt Marcus Webb. Det 1, 823 RHS/CON. Overview. Centralized vs. Decentralized Contracting. Ordering Officer Appointment and Authority. Customer / Ordering Officer Training. Unauthorized Commitments. R. ational Numbers. TeacherTwins©2014. 2). Warm Up. Identify all sets to which each number belongs. . 1). . . 2). -45. 3). 3.76. 4). . 5). Simplify the following fraction: . . . Rational number. Comparing . & Ordering Fractions. Please . do not . be these people!. Comparing . & Ordering Fractions. Objective:. . 7.1.02. Essential Questions:. . How can I compare and order fractions?. Department of Internal Medicine. DSR2 Cost-Conscious . Project. 4/6/15. Brain . natriuretic. peptide (BNP). Hormone . initially identified in the brain but released primarily from the heart, particularly the . Aasheesh Kolli. Jeff Rosen. Stephan . Diestelhorst. Ali . Saidi. . Steven Pelley. Sihang. Liu. Peter M. Chen. Thomas F. . Wenisch. MICRO 2016 - Taipei. Promise of Persistent Memory (PM). 2. Non-volatility. What Will Be Covered?. How to Spend Money On and . O. ff Campus. Ordering through Chemistry Stores. What We Sell. How to Order. Special Orders. Gas Cylinder Rental. Equipment Purchases. cyBUY Orders. October 11, 2018. A.F. Cooper. Context and Motivation. How can we synchronize an asynchronous distributed system?. How do we make global state consistent? . Snapshots / checkpoints. Example: Buying a ticket on Ticketmaster. v121919Page 1 ContactJob NameORDERING CODES9/171-1/2118-1/81-1/216/24/32/409/171-1/2118-1/81-1/216/24/32/40TypeCCTSLHBDirectDirect/IndirectsquareHousingBezelBINA PENDANT SQUARE30 40 60 78 Watt Direct v121819Page 1 ContactJob NameORDERING CODES9/171-1/2118-1/81-1/216/24/32/409/171-1/2118-1/81-1/216/24/32/40TypeCCTSLHBdirect onlydirect/indirectmatte chromematte chromematte chromeFoppow tli stits to v12119Page 1 ContactJob NameHousingBezelORDERING CODES1-1/224/32/4017-3/81-1/21-1/224/32/4017-3/81-1/2TypeCCTSLHDirectDirect/Indirectdirect onlydirect/indirectmatte chromematte chromesquare40 60 78 Wa 19Check valve with hydraulic operationConnecting threads M18x15 - 1815 M26x15 - 2615 DESCRIPTIONORDERING CODEModification
Download Rules Of Document
"ORDERING TOOL USER GUIDE All contents are Copyright "The content belongs to its owner. You may download and print it for personal use, without modification, and keep all copyright notices. By downloading, you agree to these terms.
Related Documents