/
Please visithttp://buildyourownclone.com/board Please visithttp://buildyourownclone.com/board

Please visithttp://buildyourownclone.com/board - PDF document

tatiana-dople
tatiana-dople . @tatiana-dople
Follow
389 views
Uploaded On 2015-09-17

Please visithttp://buildyourownclone.com/board - PPT Presentation

for any technical supportcopyright 2010BYOC LLC
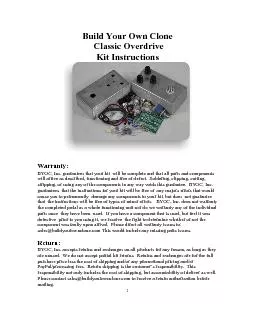
 Operating Overview LEVEL DRIVE TONE Do you really need an explaination of what these knobs doDC power supply Use a 25mm negative tip 9VDC ID: 131398

for any technical supportcopyright 2010B.Y.O.C.

Share:

Link:

Embed:

Download Presentation from below link

Download Pdf The PPT/PDF document "Please visithttp://buildyourownclone.com..." is the property of its rightful owner. Permission is granted to download and print the materials on this web site for personal, non-commercial use only, and to display it on your personal computer provided you do not modify the materials and that you retain all copyright notices contained in the materials. By downloading content from our website, you accept the terms of this agreement.


Presentation Transcript

30 should be reading the exact same voltage as your power supply. You could however, backwards or you have an incorrect resistor value at R14. Q2 are R14/10k are the If you need further technical support, please visit tp://buildyourownclone.com/board copyright 2020 B.Y.O.C., Inc. 29 The following voltages are based on 9.0VDC supply voltage. Your voltages may vary by a few mV depending on your exact supply voltage. TP1: 4.5VDC TP2: 4.5VDC TP3: 4.5VDC TP4: 0 VDC TP5: 4.5VDC TP6: 4.5VDC TP7: 4.5VDC TP8: 9VDC 28 perfect. Here are some other common issues. You probably oriented your LED backwards 100ohm resistor is commonly mistaken for a different value. Taking Voltage ReadingsSet your DMM (digital multimeter) to read DC Voltage for at least 9 volts. Now you are ready to take voltage readings. Touch the black probe to ground. The sleeve or either jack is a good ground point. Touch the red probe to the 27 26 Operating Overview LEVELDRIVE: Controls the amount of overdrive. TONE: Controls the tone of the effect. fx style adaptor). If using battery power, only use a single 9V battery. Current Draw - ~2.5mA Input Impedance - 511k ohms Output Impedance - 10k ohms 25 Installing the ICs and Finishing Up Don't forget to put the cover on the enclosure and apply the bumpers to the cover if you 24 tip and sleeve of the IN jack and the tip of the OUT jack to the PCB. ring of the IN jack to the ring eyelet on the PCB. easier this way, but you may burn a small amount of the PVC coating on the wires. This is purely asthetic and won't damage the wires in anyway. But you can avoid this by assembly will still be attached to the enclosure via the DC jack wiring) so that you have 23 The PCB says REV1.0, but the final wiring is the exact same for all the REV versions. Step 3: Connect the pre stripped and tinned wires to the 1/4Ó jacks. 22 21 Step 2: Install the footswitch. Orient the footswitch so that the flat sides of the solder degrees of each other. Either way is fine. It does not matter as long as the flat sides of the solder lugs are running horizontal, not vertical. 20 Wiring Step 1: Install the 1/4Ó jacks to the enclosure. Be sure to turn the OUT jack a 1/4 turn counter clockwise so that solder terminal for the tip does not short out against the enclosure. 19 B100k(LEVEL),A500k(DRIVE), B25K(TONE) potentiometers, and the LED into the bottom side of the PCB. DO NOT SOLDER ANYTHING YET!!! The LED will have one lead that is longer than the other. The longer lead goes in the hole with the square solder pad. pots and LED all go into their respective holes. Once the PCB assembly is in place, the PCB. After you have soldered them in place, be sure to tighten up their nuts. 18 inches of hook up wire. Connect the SLEEVE of the DC adaptor jack to the Ò+Ó eyelet on the far right sideof the PCB with 2 inches of hook up wire. Connect the battery disconnect terminal of the DC adaptor jack to the Ò+Ó eyelet more towards the center of the PCB with 2Ó of hookup wire. Load the wires in from the bottom of the PCB and solder on the topside.The PCB says REV1.0, but the power wiring is the exact same through all the REV Step 3: Flip the PCB over so that the bottom or solder side is up. Insert the 17 Main PCB Assembly Step 2: Connect the TIP (negative) terminal of the DC adaptor jack to the ÒÓ eyelet on the PCB with 2 16 2.5Ó pieces of wire and one 1.5Ó piece of wire. Strip 1/4Ó off each end and tin the ends. each of the IN, OUT, and Ground eyelets on the PCB. Solder the 1.5Ó piece of wire to The PCB says REV 1.0, but the jack wiring is exactly the same through all the REV 15 the black wire goes in the Ò-Ó hole. The PCB says REV 1.0, but the wiring of the battery snap is exactly the same in all REV versions. 14 have a shorter lead with a black or white stripe running down the body of the capacitor. 13 The capacitor highlighted in yellow is the ceramic disc cap. Your kit may come with The caps highlighted in blue are where you would use a different value to perform 12 Step 4: Add the Transistors. Be sure to orient the transistors so that the flat side of the transistor body matches up with the flat side on the PCB layout. 11 inserted into the sockets. The actual IC chip itself, never gets soldered. You will insert the IC into the socket after the entire pedal has been built. 10 goes in which solder pad. Take your time and be sure not to confuse similarly banded highlighted in yellow are for modifications. Refer to page 7 for more info. 9 Populating the Circuit Board highlighted in yellow is for the asymmetric clipping modification. Make a jumper with left over clipping lead if youÕre building to stock. Refer to page 7 for more 8 with an * symbol will create asymmetrical clipping. This very subtle change will increase the input impedance. This is another very subtle modification. A higher resistor with a 22k, you reduce the minimum gain limit allowing for less of a clean boost, than an actual overdrive. resistor with a 2k7, you can increase the maximum amount of gain. Who doesnÕt want more gain? However, it is HIGHLY RECOMMENDED that you also you reduce the amount of low frequencies that are being cut. The roll off frequency is determined by both the R7 and C4 capacitor. The stock roll off stock Tubescreamer is so midrange heavyÉitÕs got one filter cutting low the 224 capacitor located next to the 220 resistor. 7 MODIFICATIONS component value or a ÒmodÓ component value. Be aware that while all of these mods are to do the modification, you will still need to install the ÒstockÓ component. 6 Example of finished build. Yours may look slightly different depending on the REV number, but they are still the same circuit and will ultimately look like pictured 5 IC's: 1 - 4558 op 1 - 8 pin socket Potentiometers: Be sure to snap off the small tab on the side of each panel mounted pot. Hardware: 4 Parts Checklist for BYOC ClassicOverdrive KitResistors: Metal Film (5-band) / Carbon (4-band) 1 - 100ohm (brown/black/black/black/brown) (brown/black/brown/gold) 1 - 220ohm (red/red/black/black/brown) (red/red/brown/gold) 4 - 1k (brown/black/black/brown/brown) (brown/black/red/gold) 1 Ð 2k7 (red/purple/black/brown/brown (red/purple/red/gold) 2 - 4k7 (yellow/purple/black/brown/brown) (yellow/purple/red/gold) 7 - 10k (brown/black/black/red/brown) (brown/black/orange/gold) 1 Ð 22k (red/red/black/red/brown) (red/red/orange/gold) 1 - 51k (green/brown/black/red/brown) (green/brown/orange/gold) 3 - 510k (green/brown/black/orange/brown) (green/brown/orange/gold) 1 Ð 1M (brown/black/black/yellow/brown) (brown/black/green/gold) 3 CLASSIC OVERDRIVE KITINSTRUCTION INDEXParts ChecklistÉÉÉÉÉÉÉÉ..............ÉÉ.....page 4 Ð 5 ModificationsÉÉÉÉÉÉÉÉÉÉÉÉÉÉÉ.page 6 - 8 Populating the Circuit BoardÉÉÉÉ...................page 8 - Main PCB AssemblyÉÉ.........................................page 17 - Wiring........................................................................page 20 - Installing the IC's and Finishing Up.....................age 25Operation Overview.................................................page 26Schematic...................................................................page Trouble ShootingÉÉÉÉÉÉÉÉÉÉÉÉÉ..page 2 Tech Support:receive any technical support. Purchasing a product from BYOC, Inc. does not entitle lounge, and please title your thread appropriately. If everyone titles their threads ÒHELP!make it easier to see if someone else is having or has had the same problem as you. The question you are about to ask may already be answered. Here is a list of things that you should include in the body of your tech support thread: 6. Is bypass working? 7. Does the LED come on? 8. If you answer yes to 6 and 7, what does the pedal do when it is "on"? 9. Battery or adapter.(if battery, is it good? If adapter, what type?) Also, please only post pics that are in focus. You're only wasting both parties' time if you Rev 1.1: Tantalum Caps replaced with 5mm film cap spacing. Rev 1.2: Added markers for common modifications. 1 Build Your Own CloneClassic OverdriveKit Instructions Warranty:will arrive as described, functioning and free of defect. Soldering, clipping, cutting, stripping, or using any of the components in any way voids this guarantee. BYOC, Inc. the completed pedal as a whole functioning unit nor do we warranty any of the individual feelcomponent was faulty upon arrival. Please direct all warranty issues to: Return:Please contact sales@buildyourownclone.com to receive a return authorization before 30 should be reading the exact same voltage as your power supply. You could however, backwards or you have an incorrect resistor value at R14. Q2 are R14/10k are the If you need further technical support, please visit tp://buildyourownclone.com/board copyright 2020 B.Y.O.C., Inc. 29 The following voltages are based on 9.0VDC supply voltage. Your voltages may vary by a few mV depending on your exact supply voltage. TP1: 4.5VDC TP2: 4.5VDC TP3: 4.5VDC TP4: 0 VDC TP5: 4.5VDC TP6: 4.5VDC TP7: 4.5VDC TP8: 9VDC 28 perfect. Here are some other common issues. You probably oriented your LED backwards 100ohm resistor is commonly mistaken for a different value. Taking Voltage ReadingsSet your DMM (digital multimeter) to read DC Voltage for at least 9 volts. Now you are ready to take voltage readings. Touch the black probe to ground. The sleeve or either jack is a good ground point. Touch the red probe to the 27 26 Operating Overview LEVELDRIVE: Controls the amount of overdrive. TONE: Controls the tone of the effect. fx style adaptor). If using battery power, only use a single 9V battery. Current Draw - ~2.5mA Input Impedance - 511k ohms Output Impedance - 10k ohms 25 Installing the ICs and Finishing Up Don't forget to put the cover on the enclosure and apply the bumpers to the cover if you 24 tip and sleeve of the IN jack and the tip of the OUT jack to the PCB. ring of the IN jack to the ring eyelet on the PCB. easier this way, but you may burn a small amount of the PVC coating on the wires. This is purely asthetic and won't damage the wires in anyway. But you can avoid this by assembly will still be attached to the enclosure via the DC jack wiring) so that you have 23 The PCB says REV1.0, but the final wiring is the exact same for all the REV versions. Step 3: Connect the pre stripped and tinned wires to the 1/4Ó jacks. 22 21 Step 2: Install the footswitch. Orient the footswitch so that the flat sides of the solder degrees of each other. Either way is fine. It does not matter as long as the flat sides of the solder lugs are running horizontal, not vertical. 20 Wiring Step 1: Install the 1/4Ó jacks to the enclosure. Be sure to turn the OUT jack a 1/4 turn counter clockwise so that solder terminal for the tip does not short out against the enclosure. 19 B100k(LEVEL),A500k(DRIVE), B25K(TONE) potentiometers, and the LED into the bottom side of the PCB. DO NOT SOLDER ANYTHING YET!!! The LED will have one lead that is longer than the other. The longer lead goes in the hole with the square solder pad. pots and LED all go into their respective holes. Once the PCB assembly is in place, the PCB. After you have soldered them in place, be sure to tighten up their nuts. 18 inches of hook up wire. Connect the SLEEVE of the DC adaptor jack to the Ò+Ó eyelet on the far right sideof the PCB with 2 inches of hook up wire. Connect the battery disconnect terminal of the DC adaptor jack to the Ò+Ó eyelet more towards the center of the PCB with 2Ó of hookup wire. Load the wires in from the bottom of the PCB and solder on the topside.The PCB says REV1.0, but the power wiring is the exact same through all the REV Step 3: Flip the PCB over so that the bottom or solder side is up. Insert the 17 Main PCB Assembly Step 2: Connect the TIP (negative) terminal of the DC adaptor jack to the ÒÓ eyelet on the PCB with 2 16 2.5Ó pieces of wire and one 1.5Ó piece of wire. Strip 1/4Ó off each end and tin the ends. each of the IN, OUT, and Ground eyelets on the PCB. Solder the 1.5Ó piece of wire to The PCB says REV 1.0, but the jack wiring is exactly the same through all the REV 15 the black wire goes in the Ò-Ó hole. The PCB says REV 1.0, but the wiring of the battery snap is exactly the same in all REV versions. 14 have a shorter lead with a black or white stripe running down the body of the capacitor. 13 The capacitor highlighted in yellow is the ceramic disc cap. Your kit may come with The caps highlighted in blue are where you would use a different value to perform 12 Step 4: Add the Transistors. Be sure to orient the transistors so that the flat side of the transistor body matches up with the flat side on the PCB layout. 11 inserted into the sockets. The actual IC chip itself, never gets soldered. You will insert the IC into the socket after the entire pedal has been built. 10 goes in which solder pad. Take your time and be sure not to confuse similarly banded highlighted in yellow are for modifications. Refer to page 7 for more info. 9 Populating the Circuit Board highlighted in yellow is for the asymmetric clipping modification. Make a jumper with left over clipping lead if youÕre building to stock. Refer to page 7 for more 8 with an * symbol will create asymmetrical clipping. This very subtle change will increase the input impedance. This is another very subtle modification. A higher resistor with a 22k, you reduce the minimum gain limit allowing for less of a clean boost, than an actual overdrive. resistor with a 2k7, you can increase the maximum amount of gain. Who doesnÕt want more gain? However, it is HIGHLY RECOMMENDED that you also you reduce the amount of low frequencies that are being cut. The roll off frequency is determined by both the R7 and C4 capacitor. The stock roll off stock Tubescreamer is so midrange heavyÉitÕs got one filter cutting low the 224 capacitor located next to the 220 resistor. 7 MODIFICATIONS component value or a ÒmodÓ component value. Be aware that while all of these mods are to do the modification, you will still need to install the ÒstockÓ component. 6 Example of finished build. Yours may look slightly different depending on the REV number, but they are still the same circuit and will ultimately look like pictured 5 IC's: 1 - 4558 op 1 - 8 pin socket Potentiometers: Be sure to snap off the small tab on the side of each panel mounted pot. Hardware: 4 Parts Checklist for BYOC ClassicOverdrive KitResistors: Metal Film (5-band) / Carbon (4-band) 1 - 100ohm (brown/black/black/black/brown) (brown/black/brown/gold) 1 - 220ohm (red/red/black/black/brown) (red/red/brown/gold) 4 - 1k (brown/black/black/brown/brown) (brown/black/red/gold) 1 Ð 2k7 (red/purple/black/brown/brown (red/purple/red/gold) 2 - 4k7 (yellow/purple/black/brown/brown) (yellow/purple/red/gold) 7 - 10k (brown/black/black/red/brown) (brown/black/orange/gold) 1 Ð 22k (red/red/black/red/brown) (red/red/orange/gold) 1 - 51k (green/brown/black/red/brown) (green/brown/orange/gold) 3 - 510k (green/brown/black/orange/brown) (green/brown/orange/gold) 1 Ð 1M (brown/black/black/yellow/brown) (brown/black/green/gold) 3 CLASSIC OVERDRIVE KITINSTRUCTION INDEXParts ChecklistÉÉÉÉÉÉÉÉ..............ÉÉ.....page 4 Ð 5 ModificationsÉÉÉÉÉÉÉÉÉÉÉÉÉÉÉ.page 6 - 8 Populating the Circuit BoardÉÉÉÉ...................page 8 - Main PCB AssemblyÉÉ.........................................page 17 - Wiring........................................................................page 20 - Installing the IC's and Finishing Up.....................age 25Operation Overview.................................................page 26Schematic...................................................................page Trouble ShootingÉÉÉÉÉÉÉÉÉÉÉÉÉ..page 2 Tech Support:receive any technical support. Purchasing a product from BYOC, Inc. does not entitle lounge, and please title your thread appropriately. If everyone titles their threads ÒHELP!make it easier to see if someone else is having or has had the same problem as you. The question you are about to ask may already be answered. Here is a list of things that you should include in the body of your tech support thread: 6. Is bypass working? 7. Does the LED come on? 8. If you answer yes to 6 and 7, what does the pedal do when it is "on"? 9. Battery or adapter.(if battery, is it good? If adapter, what type?) Also, please only post pics that are in focus. You're only wasting both parties' time if you Rev 1.1: Tantalum Caps replaced with 5mm film cap spacing. Rev 1.2: Added markers for common modifications. 1 Build Your Own CloneClassic OverdriveKit Instructions Warranty:will arrive as described, functioning and free of defect. Soldering, clipping, cutting, stripping, or using any of the components in any way voids this guarantee. BYOC, Inc. the completed pedal as a whole functioning unit nor do we warranty any of the individual feelcomponent was faulty upon arrival. Please direct all warranty issues to: Return:Please contact sales@buildyourownclone.com to receive a return authorization before