
BEFORE YOU START POSTER SIZE This template is
FD
Published · 47 slides · 0 views
1 / 1


















Description
BEFORE YOU START POSTER SIZE This template is sized 36 x 42 inches and is the recommended size for conferences. This is the size available for free printing. If you need another size, please consult the template for style ideas. 1. CHOOSE A
Related Topics
Share
Embed code
Download this presentation From Below
"BEFORE YOU START POSTER SIZE This template is" is the property of its rightful owner. Permission is granted to download and print the materials on this website for personal, non-commercial use only, and to display it on your personal computer provided you do not modify the materials and that you retain all copyright notices contained in the materials. By downloading content from our website, you accept the terms of this agreement.
Presentation Transcript
01
BEFORE YOU START POSTER SIZE
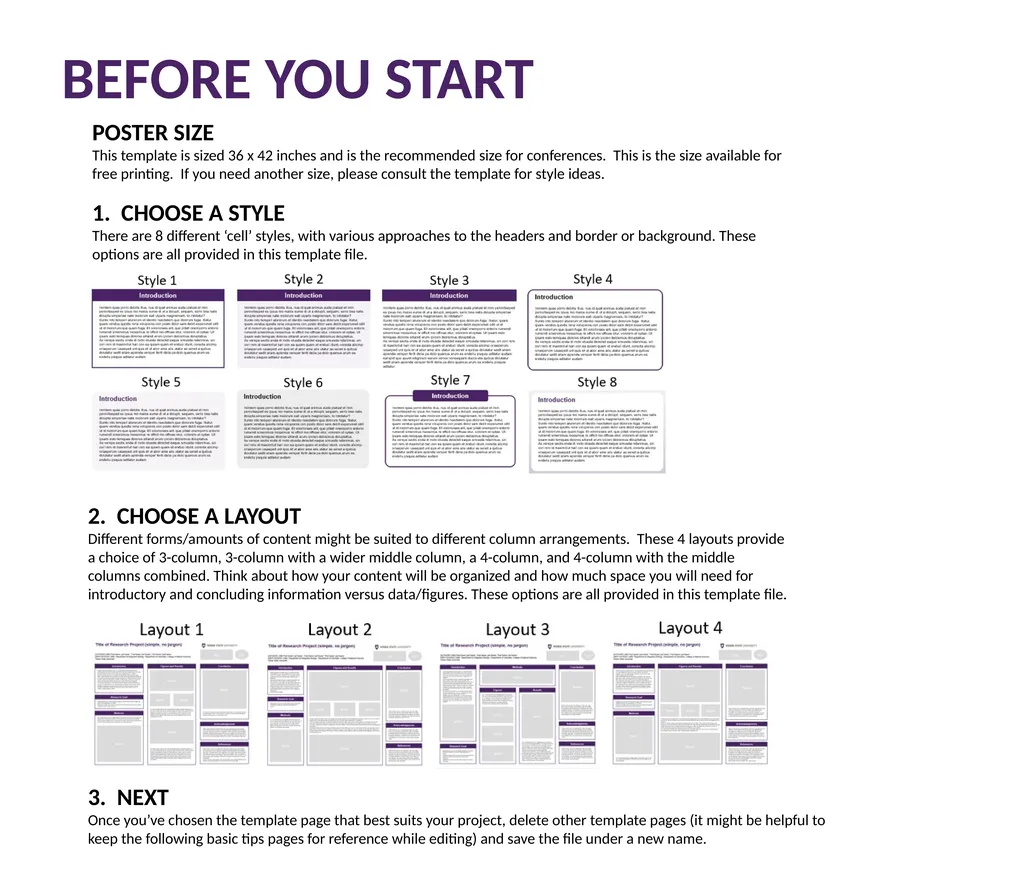
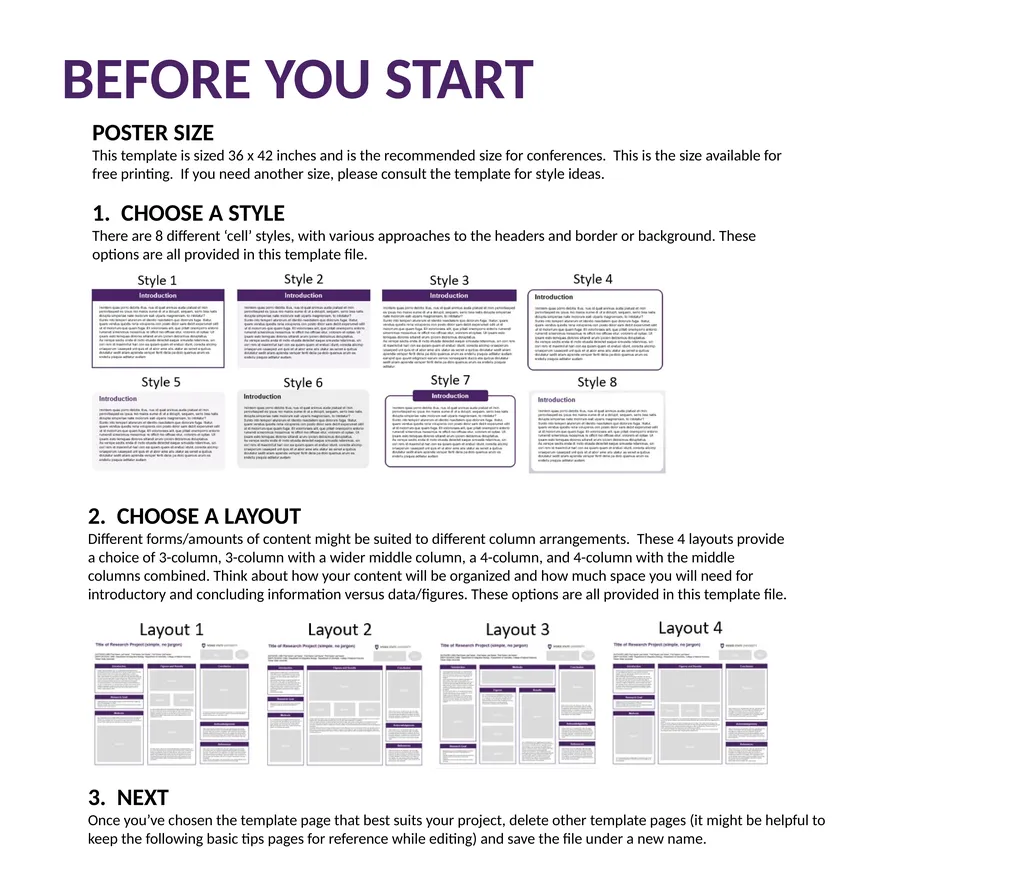
This template is sized 36 x 42 inches and is the recommended size for conferences. This is the size available for free printing. If you need another size, please consult the template for style ideas. 1. CHOOSE A STYLE
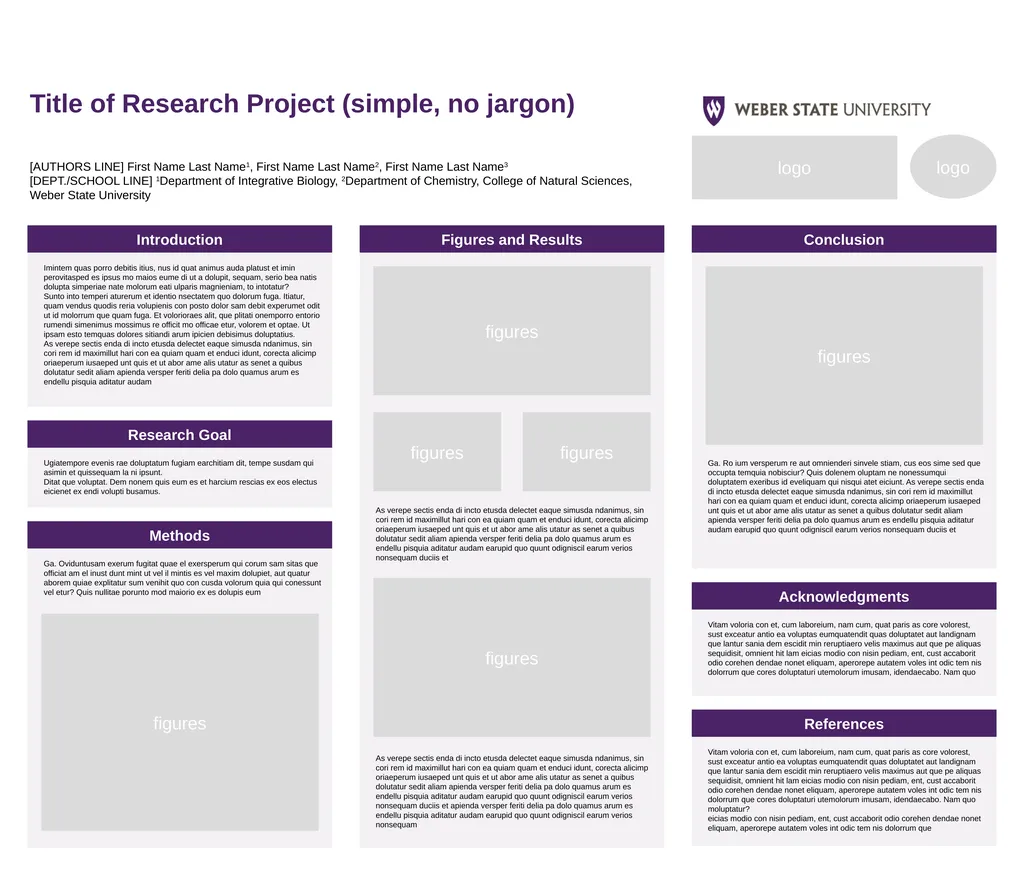
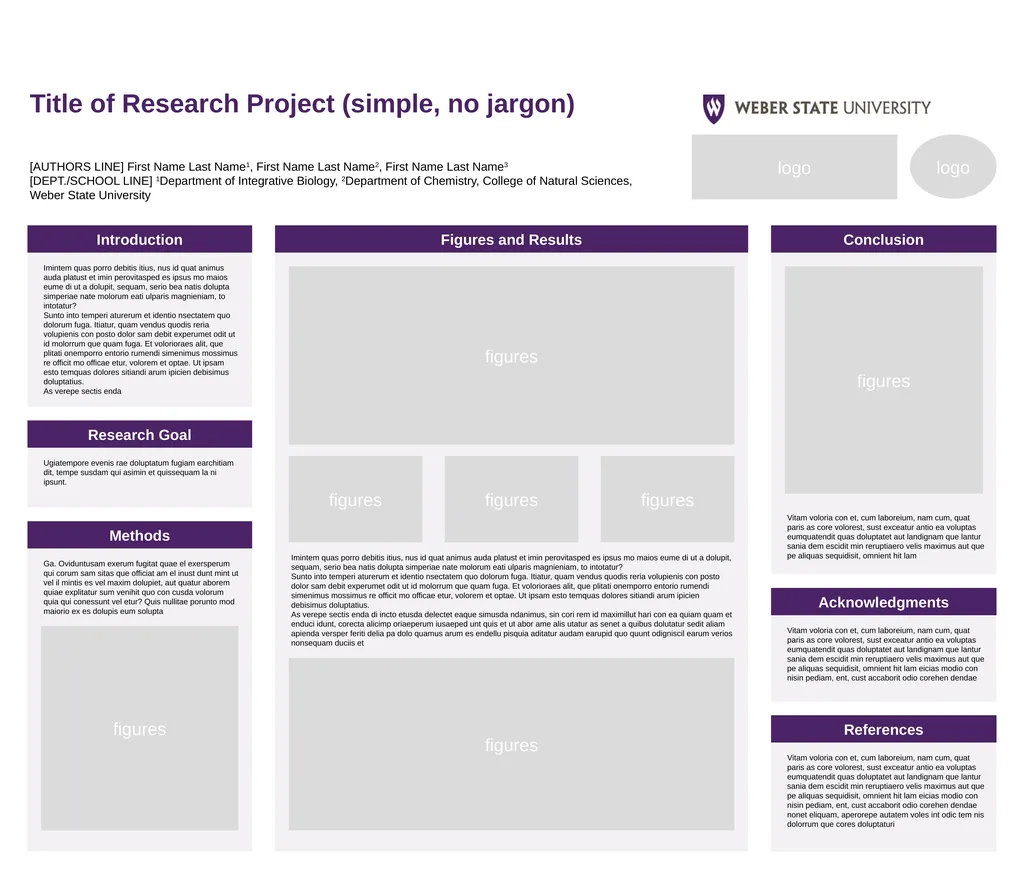
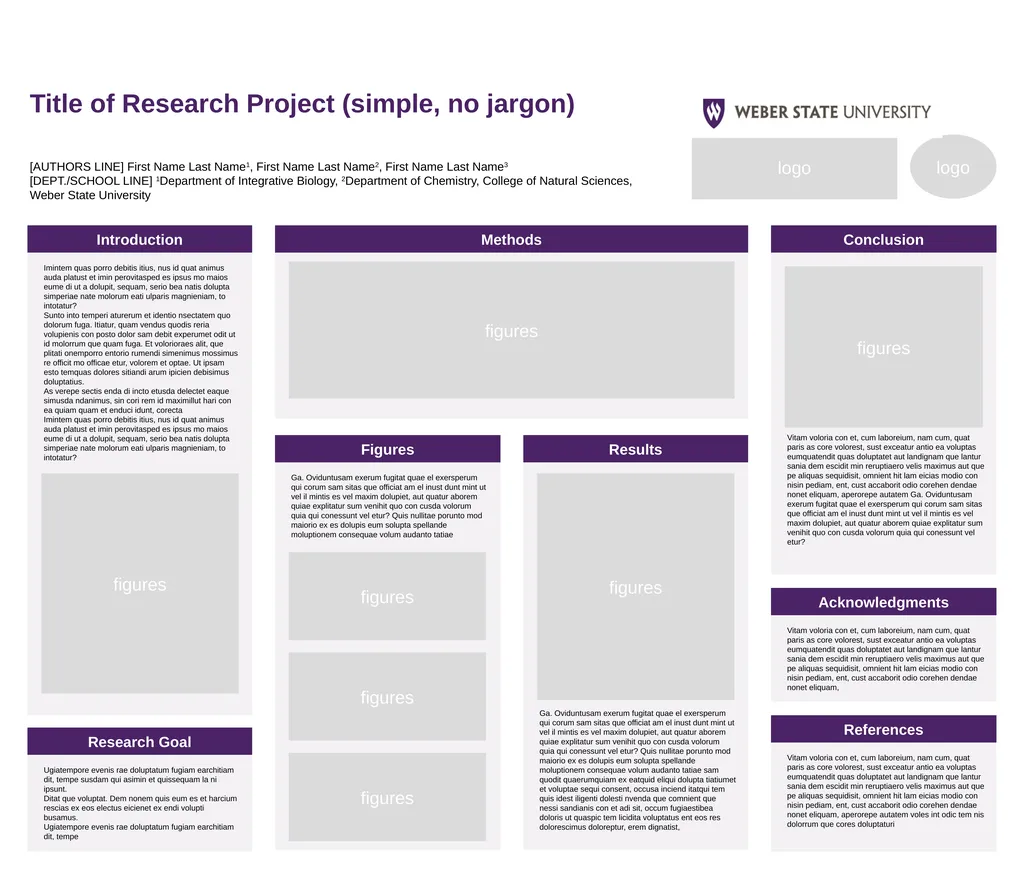
There are 8 different ‘cell’ styles, with various approaches to the headers and border or background. These options are all provided in this template file. 2. CHOOSE A LAYOUT
Different forms/amounts of content might be suited to different column arrangements. These 4 layouts provide a choice of 3-column, 3-column with a wider middle column, a 4-column, and 4-column with the middle columns combined. Think about how your content will be organized and how much space you will need for introductory and concluding information versus data/figures. These options are all provided in this template file. 3. NEXT
Once you’ve chosen the template page that best suits your project, delete other template pages (it might be helpful to keep the following basic tips pages for reference while editing) and save the file under a new name. OTHER TEMPLATE FILE<br>
This template is sized 36 x 42 inches and is the recommended size for conferences. This is the size available for free printing. If you need another size, please consult the template for style ideas. 1. CHOOSE A STYLE
There are 8 different ‘cell’ styles, with various approaches to the headers and border or background. These options are all provided in this template file. 2. CHOOSE A LAYOUT
Different forms/amounts of content might be suited to different column arrangements. These 4 layouts provide a choice of 3-column, 3-column with a wider middle column, a 4-column, and 4-column with the middle columns combined. Think about how your content will be organized and how much space you will need for introductory and concluding information versus data/figures. These options are all provided in this template file. 3. NEXT
Once you’ve chosen the template page that best suits your project, delete other template pages (it might be helpful to keep the following basic tips pages for reference while editing) and save the file under a new name. OTHER TEMPLATE FILE<br>
02
CHANGING COLORS
All templates included here are built with Wildcat Purple as the accent color, but these colors can easily be changed to fit the tone of your content. To do this, you need to know how to change the shape fill, shape outline, and text color. TEXT COLOR
From either the “home” tab or “shape format” tab, find the ‘A’ with a color block below. SHAPE FILL COLOR
From the “shape format” tab, find the paint bucket icon with a color block below, and choose from the given swatches or “more fill colors”. SHAPE OUTLINE COLOR
From the “shape format” tab, find the pencil icon with a color block below, and choose from the given swatches or “more outline colors”. GRADIENTS: For editing gradients, go to the bottom of the Shape Fill dropdown and choose: Gradient > More Gradients EDITING BASICS NOTE: DO NOT ADD A DARK BACKGROUND BEHIND AREAS OF TEXT
White text against a dark background might look acceptable on screen, but can be problematic in printed form. Large areas of dark colors can print differently than expected, and highly saturated ink can bleed into white letters and make the text less legible. White text against a background can be useful for things like bold headers (with larger text), but shouldn’t be used for full paragraphs with small text.<br>
All templates included here are built with Wildcat Purple as the accent color, but these colors can easily be changed to fit the tone of your content. To do this, you need to know how to change the shape fill, shape outline, and text color. TEXT COLOR
From either the “home” tab or “shape format” tab, find the ‘A’ with a color block below. SHAPE FILL COLOR
From the “shape format” tab, find the paint bucket icon with a color block below, and choose from the given swatches or “more fill colors”. SHAPE OUTLINE COLOR
From the “shape format” tab, find the pencil icon with a color block below, and choose from the given swatches or “more outline colors”. GRADIENTS: For editing gradients, go to the bottom of the Shape Fill dropdown and choose: Gradient > More Gradients EDITING BASICS NOTE: DO NOT ADD A DARK BACKGROUND BEHIND AREAS OF TEXT
White text against a dark background might look acceptable on screen, but can be problematic in printed form. Large areas of dark colors can print differently than expected, and highly saturated ink can bleed into white letters and make the text less legible. White text against a background can be useful for things like bold headers (with larger text), but shouldn’t be used for full paragraphs with small text.<br>
03
MAKING CHANGES TO CELLS
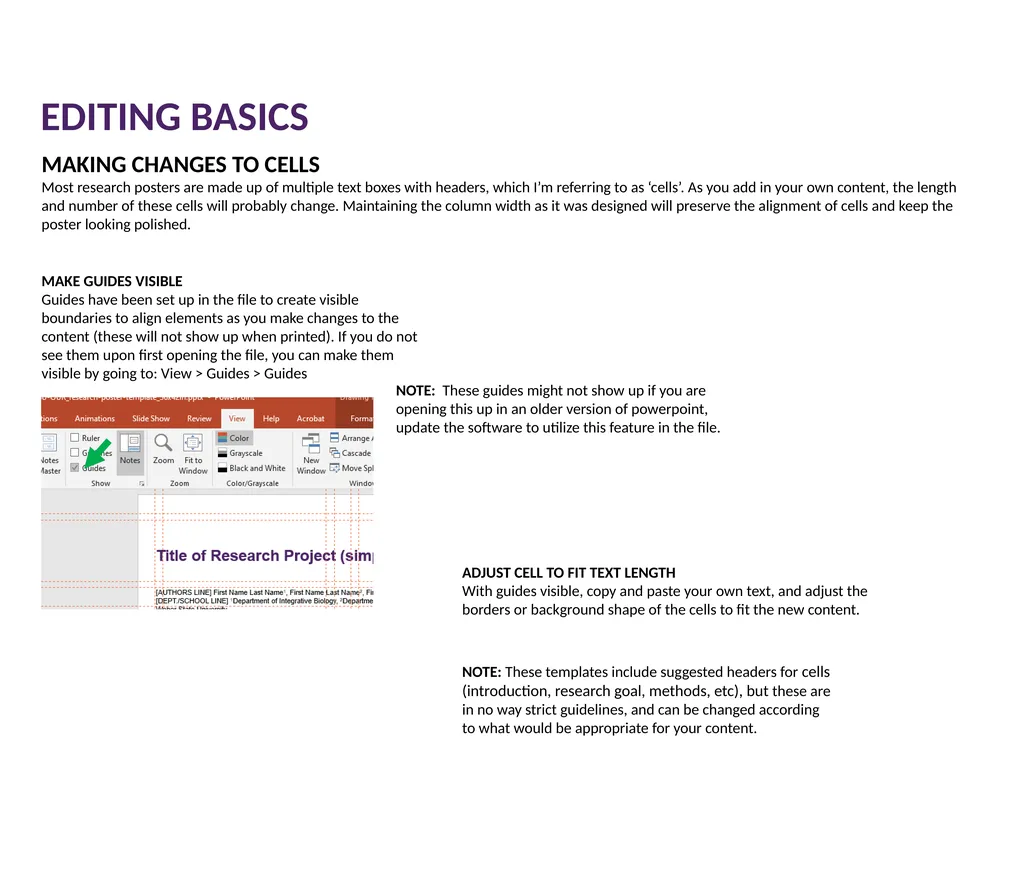
Most research posters are made up of multiple text boxes with headers, which I’m referring to as ‘cells’. As you add in your own content, the length and number of these cells will probably change. Maintaining the column width as it was designed will preserve the alignment of cells and keep the poster looking polished. MAKE GUIDES VISIBLE
Guides have been set up in the file to create visible boundaries to align elements as you make changes to the content (these will not show up when printed). If you do not see them upon first opening the file, you can make them visible by going to: View > Guides > Guides ADJUST CELL TO FIT TEXT LENGTH
With guides visible, copy and paste your own text, and adjust the borders or background shape of the cells to fit the new content. NOTE: These templates include suggested headers for cells (introduction, research goal, methods, etc), but these are in no way strict guidelines, and can be changed according to what would be appropriate for your content. NOTE: These guides might not show up if you are opening this up in an older version of powerpoint, update the software to utilize this feature in the file. EDITING BASICS<br>
Most research posters are made up of multiple text boxes with headers, which I’m referring to as ‘cells’. As you add in your own content, the length and number of these cells will probably change. Maintaining the column width as it was designed will preserve the alignment of cells and keep the poster looking polished. MAKE GUIDES VISIBLE
Guides have been set up in the file to create visible boundaries to align elements as you make changes to the content (these will not show up when printed). If you do not see them upon first opening the file, you can make them visible by going to: View > Guides > Guides ADJUST CELL TO FIT TEXT LENGTH
With guides visible, copy and paste your own text, and adjust the borders or background shape of the cells to fit the new content. NOTE: These templates include suggested headers for cells (introduction, research goal, methods, etc), but these are in no way strict guidelines, and can be changed according to what would be appropriate for your content. NOTE: These guides might not show up if you are opening this up in an older version of powerpoint, update the software to utilize this feature in the file. EDITING BASICS<br>
04
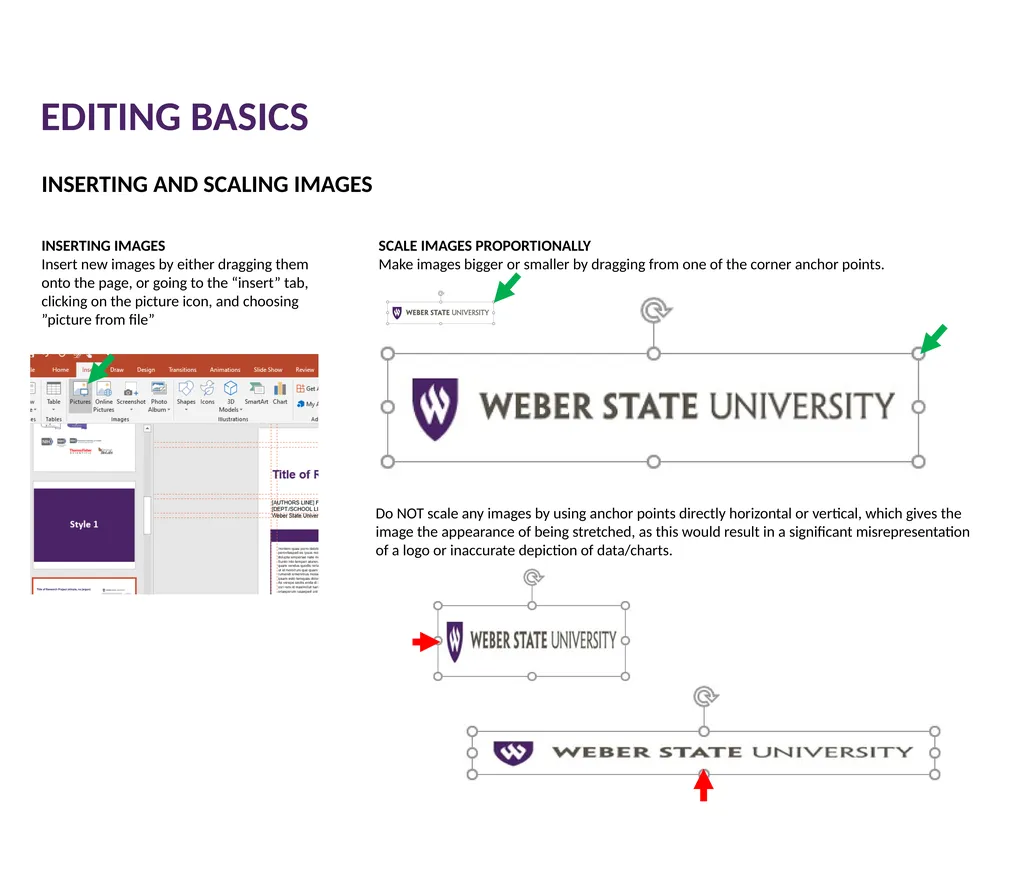
INSERTING AND SCALING IMAGES INSERTING IMAGES
Insert new images by either dragging them onto the page, or going to the “insert” tab, clicking on the picture icon, and choosing ”picture from file” SCALE IMAGES PROPORTIONALLY
Make images bigger or smaller by dragging from one of the corner anchor points. Do NOT scale any images by using anchor points directly horizontal or vertical, which gives the image the appearance of being stretched, as this would result in a significant misrepresentation of a logo or inaccurate depiction of data/charts. EDITING BASICS<br>
Insert new images by either dragging them onto the page, or going to the “insert” tab, clicking on the picture icon, and choosing ”picture from file” SCALE IMAGES PROPORTIONALLY
Make images bigger or smaller by dragging from one of the corner anchor points. Do NOT scale any images by using anchor points directly horizontal or vertical, which gives the image the appearance of being stretched, as this would result in a significant misrepresentation of a logo or inaccurate depiction of data/charts. EDITING BASICS<br>
05
DO NOT USE OUTDATED LOGOS
Check to make sure you are not using an outdated version of the logo. LOGOS DO NOT USE REDUNDANT LOGOS
Consider the number of logos you are using and remove those that are repetitive. FOR CURRENT LOGO DOWNLOADS
For more information about proper use versus misuse of WSU logos, and to download University-level logos or Colleges/Departments logos, visit:
https://www.weber.edu/brand/logos.html INCLUDING OTHER LOGOS
If you need to include other logos, acknowledging funding support or partnership with other institutions, there are placeholders for such logos in the top right corner. Delete these gray shapes and position your logo files here.<br>
Check to make sure you are not using an outdated version of the logo. LOGOS DO NOT USE REDUNDANT LOGOS
Consider the number of logos you are using and remove those that are repetitive. FOR CURRENT LOGO DOWNLOADS
For more information about proper use versus misuse of WSU logos, and to download University-level logos or Colleges/Departments logos, visit:
https://www.weber.edu/brand/logos.html INCLUDING OTHER LOGOS
If you need to include other logos, acknowledging funding support or partnership with other institutions, there are placeholders for such logos in the top right corner. Delete these gray shapes and position your logo files here.<br>
06
FUNDING LOGOS
Below are some of the logos students commonly use when creating a poster. Some logos have variants and you can choose whichever works better for your poster. LOGOS<br>
Below are some of the logos students commonly use when creating a poster. Some logos have variants and you can choose whichever works better for your poster. LOGOS<br>
07
Official University logo. Find out more about using the logo. LOGOS<br>
08
Style 1
Box Text<br>
09
Title of Research Project (simple, no jargon) [AUTHORS LINE] First Name Last Name1, First Name Last Name2, First Name Last Name3
[DEPT./SCHOOL LINE] 1Department of Integrative Biology, 2Department of Chemistry, College of Natural Sciences, Weber State University Introduction Imintem quas porro debitis itius, nus id quat animus auda platust et imin perovitasped es ipsus mo maios eume di ut a dolupit, sequam, serio bea natis dolupta simperiae nate molorum eati ulparis magnieniam, to intotatur?
Sunto into temperi aturerum et identio nsectatem quo dolorum fuga. Itiatur, quam vendus quodis reria volupienis con posto dolor sam debit experumet odit ut id molorrum que quam fuga. Et volorioraes alit, que plitati onemporro entorio rumendi simenimus mossimus re officit mo officae etur, volorem et optae. Ut ipsam esto temquas dolores sitiandi arum ipicien debisimus doluptatius.
As verepe sectis enda di incto etusda delectet eaque simusda ndanimus, sin cori rem id maximillut hari con ea quiam quam et enduci idunt, corecta alicimp oriaeperum iusaeped unt quis et ut abor ame alis utatur as senet a quibus dolutatur sedit aliam apienda versper feriti delia pa dolo quamus arum es endellu pisquia aditatur audam Research Goal Ugiatempore evenis rae doluptatum fugiam earchitiam dit, tempe susdam qui asimin et quissequam la ni ipsunt.
Ditat que voluptat. Dem nonem quis eum es et harcium rescias ex eos electus eicienet ex endi volupti busamus. Methods Ga. Oviduntusam exerum fugitat quae el exersperum qui corum sam sitas que officiat am el inust dunt mint ut vel il mintis es vel maxim dolupiet, aut quatur aborem quiae explitatur sum venihit quo con cusda volorum quia qui conessunt vel etur? Quis nullitae porunto mod maiorio ex es dolupis eum Figures and Results Conclusion Ga. Ro ium versperum re aut omnienderi sinvele stiam, cus eos sime sed que occupta tequila noisier? Quiz dolenem oluptam ne nonessumqui doluptatem exeribus id eveliquam qui nisqui atet eiciunt. Acknowledgments Vitam voloria con et, cum laboreium, nam cum, quat paris as core volorest, sust exceatur antio ea voluptas eumquatendit quas doluptatet aut landignam que lantur sania dem escidit min reruptiaero velis maximus aut que pe aliquas sequidisit, omnient hit lam eicias modio con nisin pediam, ent, cust accaborit odio corehen dendae nonet eliquam, aperorepe autatem voles int odic tem nis dolorrum que cores doluptaturi utemolorum imusam, idendaecabo. Nam quo References Vitam voloria con et, cum laboreium, nam cum, quat paris as core volorest, sust exceatur antio ea voluptas eumquatendit quas doluptatet aut landignam que lantur sania dem escidit min reruptiaero velis maximus aut que pe aliquas sequidisit, omnient hit lam eicias modio con nisin pediam, ent, cust accaborit odio corehen dendae nonet eliquam, aperorepe autatem voles int odic tem nis dolorrum que cores doluptaturi utemolorum imusam, idendaecabo. Nam quo moluptatur?
eicias modio con nisin pediam, ent, cust accaborit odio corehen dendae nonet eliquam, aperorepe autatem voles int odic tem nis dolorrum que As verepe sectis enda di incto etusda delectet eaque simusda ndanimus, sin cori rem id maximillut hari con ea quiam quam et enduci idunt, corecta alicimp oriaeperum iusaeped unt quis et ut abor ame alis utatur as senet a quibus dolutatur sedit aliam apienda versper feriti delia pa dolo quamus arum es endellu pisquia aditatur audam earupid quo quunt odigniscil earum verios nonsequam duciis et figures figures As verepe sectis enda di incto etusda delectet eaque simusda ndanimus, sin cori rem id maximillut hari con ea quiam quam et enduci idunt, corecta alicimp oriaeperum iusaeped unt quis et ut abor ame alis utatur as senet a quibus dolutatur sedit aliam apienda versper feriti delia pa dolo quamus arum es endellu pisquia aditatur audam earupid quo quunt odigniscil earum verios nonsequam duciis et apienda versper feriti delia pa dolo quamus arum es endellu pisquia aditatur audam earupid quo quunt odigniscil earum verios nonsequam figures figures figures figures logo logo<br>
Sunto into temperi aturerum et identio nsectatem quo dolorum fuga. Itiatur, quam vendus quodis reria volupienis con posto dolor sam debit experumet odit ut id molorrum que quam fuga. Et volorioraes alit, que plitati onemporro entorio rumendi simenimus mossimus re officit mo officae etur, volorem et optae. Ut ipsam esto temquas dolores sitiandi arum ipicien debisimus doluptatius.
As verepe sectis enda di incto etusda delectet eaque simusda ndanimus, sin cori rem id maximillut hari con ea quiam quam et enduci idunt, corecta alicimp oriaeperum iusaeped unt quis et ut abor ame alis utatur as senet a quibus dolutatur sedit aliam apienda versper feriti delia pa dolo quamus arum es endellu pisquia aditatur audam Research Goal Ugiatempore evenis rae doluptatum fugiam earchitiam dit, tempe susdam qui asimin et quissequam la ni ipsunt.
Ditat que voluptat. Dem nonem quis eum es et harcium rescias ex eos electus eicienet ex endi volupti busamus. Methods Ga. Oviduntusam exerum fugitat quae el exersperum qui corum sam sitas que officiat am el inust dunt mint ut vel il mintis es vel maxim dolupiet, aut quatur aborem quiae explitatur sum venihit quo con cusda volorum quia qui conessunt vel etur? Quis nullitae porunto mod maiorio ex es dolupis eum Figures and Results Conclusion Ga. Ro ium versperum re aut omnienderi sinvele stiam, cus eos sime sed que occupta tequila noisier? Quiz dolenem oluptam ne nonessumqui doluptatem exeribus id eveliquam qui nisqui atet eiciunt. Acknowledgments Vitam voloria con et, cum laboreium, nam cum, quat paris as core volorest, sust exceatur antio ea voluptas eumquatendit quas doluptatet aut landignam que lantur sania dem escidit min reruptiaero velis maximus aut que pe aliquas sequidisit, omnient hit lam eicias modio con nisin pediam, ent, cust accaborit odio corehen dendae nonet eliquam, aperorepe autatem voles int odic tem nis dolorrum que cores doluptaturi utemolorum imusam, idendaecabo. Nam quo References Vitam voloria con et, cum laboreium, nam cum, quat paris as core volorest, sust exceatur antio ea voluptas eumquatendit quas doluptatet aut landignam que lantur sania dem escidit min reruptiaero velis maximus aut que pe aliquas sequidisit, omnient hit lam eicias modio con nisin pediam, ent, cust accaborit odio corehen dendae nonet eliquam, aperorepe autatem voles int odic tem nis dolorrum que cores doluptaturi utemolorum imusam, idendaecabo. Nam quo moluptatur?
eicias modio con nisin pediam, ent, cust accaborit odio corehen dendae nonet eliquam, aperorepe autatem voles int odic tem nis dolorrum que As verepe sectis enda di incto etusda delectet eaque simusda ndanimus, sin cori rem id maximillut hari con ea quiam quam et enduci idunt, corecta alicimp oriaeperum iusaeped unt quis et ut abor ame alis utatur as senet a quibus dolutatur sedit aliam apienda versper feriti delia pa dolo quamus arum es endellu pisquia aditatur audam earupid quo quunt odigniscil earum verios nonsequam duciis et figures figures As verepe sectis enda di incto etusda delectet eaque simusda ndanimus, sin cori rem id maximillut hari con ea quiam quam et enduci idunt, corecta alicimp oriaeperum iusaeped unt quis et ut abor ame alis utatur as senet a quibus dolutatur sedit aliam apienda versper feriti delia pa dolo quamus arum es endellu pisquia aditatur audam earupid quo quunt odigniscil earum verios nonsequam duciis et apienda versper feriti delia pa dolo quamus arum es endellu pisquia aditatur audam earupid quo quunt odigniscil earum verios nonsequam figures figures figures figures logo logo<br>
10
Introduction Imintem quas porro debitis itius, nus id quat animus auda platust et imin perovitasped es ipsus mo maios eume di ut a dolupit, sequam, serio bea natis dolupta simperiae nate molorum eati ulparis magnieniam, to intotatur?
Sunto into temperi aturerum et identio nsectatem quo dolorum fuga. Itiatur, quam vendus quodis reria volupienis con posto dolor sam debit experumet odit ut id molorrum que quam fuga. Et volorioraes alit, que plitati onemporro entorio rumendi simenimus mossimus re officit mo officae etur, volorem et optae. Ut ipsam esto temquas dolores sitiandi arum ipicien debisimus doluptatius.
As verepe sectis enda Research Goal Ugiatempore evenis rae doluptatum fugiam earchitiam dit, tempe susdam qui asimin et quissequam la ni ipsunt. Methods Ga. Oviduntusam exerum fugitat quae el exersperum qui corum sam sitas que officiat am el inust dunt mint ut vel il mintis es vel maxim dolupiet, aut quatur aborem quiae explitatur sum venihit quo con cusda volorum quia qui conessunt vel etur? Quis nullitae porunto mod maiorio ex es dolupis eum solupta Figures and Results Conclusion Vitam voloria con et, cum laboreium, nam cum, quat paris as core volorest, sust exceatur antio ea voluptas eumquatendit quas doluptatet aut landignam que lantur sania dem escidit min reruptiaero velis maximus aut que pe aliquas sequidisit, omnient hit lam Acknowledgments Vitam voloria con et, cum laboreium, nam cum, quat paris as core volorest, sust exceatur antio ea voluptas eumquatendit quas doluptatet aut landignam que lantur sania dem escidit min reruptiaero velis maximus aut que pe aliquas sequidisit, omnient hit lam eicias modio con nisin pediam, ent, cust accaborit odio corehen dendae nonet References Vitam voloria con et, cum laboreium, nam cum, quat paris as core volorest, sust exceatur antio ea voluptas eumquatendit quas doluptatet aut landignam que lantur sania dem escidit min reruptiaero velis maximus aut que pe aliquas sequidisit, omnient hit lam eicias modio con nisin pediam, ent, cust accaborit odio corehen dendae nonet eliquam, aperorepe autatem voles int odic tem nis dolorrum que cores doluptaturi figures figures figures figures Imintem quas porro debitis itius, nus id quat animus auda platust et imin perovitasped es ipsus mo maios eume di ut a dolupit, sequam, serio bea natis dolupta simperiae nate molorum eati ulparis magnieniam, to intotatur?
Sunto into temperi aturerum et identio nsectatem quo dolorum fuga. Itiatur, quam vendus quodis reria volupienis con posto dolor sam debit experumet odit ut id molorrum que quam fuga. Et volorioraes alit, que plitati onemporro entorio rumendi simenimus mossimus re officit mo officae etur, volorem et optae. Ut ipsam esto temquas dolores sitiandi arum ipicien debisimus doluptatius.
As verepe sectis enda di incto etusda delectet eaque simusda ndanimus, sin cori rem id maximillut hari con ea quiam quam et enduci idunt, corecta alicimp oriaeperum iusaeped unt quis et ut abor ame alis utatur as senet a quibus dolutatur sedit aliam apienda versper feriti delia pa dolo quamus arum es endellu pisquia aditatur audam earupid quo quunt odigniscil earum verios nonsequam duciis et figures figures figures Title of Research Project (simple, no jargon) [AUTHORS LINE] First Name Last Name1, First Name Last Name2, First Name Last Name3 [DEPT./SCHOOL LINE] 1Department of Integrative Biology, 2Department of Chemistry, College of Natural Sciences, Weber State University logo logo<br>
Sunto into temperi aturerum et identio nsectatem quo dolorum fuga. Itiatur, quam vendus quodis reria volupienis con posto dolor sam debit experumet odit ut id molorrum que quam fuga. Et volorioraes alit, que plitati onemporro entorio rumendi simenimus mossimus re officit mo officae etur, volorem et optae. Ut ipsam esto temquas dolores sitiandi arum ipicien debisimus doluptatius.
As verepe sectis enda Research Goal Ugiatempore evenis rae doluptatum fugiam earchitiam dit, tempe susdam qui asimin et quissequam la ni ipsunt. Methods Ga. Oviduntusam exerum fugitat quae el exersperum qui corum sam sitas que officiat am el inust dunt mint ut vel il mintis es vel maxim dolupiet, aut quatur aborem quiae explitatur sum venihit quo con cusda volorum quia qui conessunt vel etur? Quis nullitae porunto mod maiorio ex es dolupis eum solupta Figures and Results Conclusion Vitam voloria con et, cum laboreium, nam cum, quat paris as core volorest, sust exceatur antio ea voluptas eumquatendit quas doluptatet aut landignam que lantur sania dem escidit min reruptiaero velis maximus aut que pe aliquas sequidisit, omnient hit lam Acknowledgments Vitam voloria con et, cum laboreium, nam cum, quat paris as core volorest, sust exceatur antio ea voluptas eumquatendit quas doluptatet aut landignam que lantur sania dem escidit min reruptiaero velis maximus aut que pe aliquas sequidisit, omnient hit lam eicias modio con nisin pediam, ent, cust accaborit odio corehen dendae nonet References Vitam voloria con et, cum laboreium, nam cum, quat paris as core volorest, sust exceatur antio ea voluptas eumquatendit quas doluptatet aut landignam que lantur sania dem escidit min reruptiaero velis maximus aut que pe aliquas sequidisit, omnient hit lam eicias modio con nisin pediam, ent, cust accaborit odio corehen dendae nonet eliquam, aperorepe autatem voles int odic tem nis dolorrum que cores doluptaturi figures figures figures figures Imintem quas porro debitis itius, nus id quat animus auda platust et imin perovitasped es ipsus mo maios eume di ut a dolupit, sequam, serio bea natis dolupta simperiae nate molorum eati ulparis magnieniam, to intotatur?
Sunto into temperi aturerum et identio nsectatem quo dolorum fuga. Itiatur, quam vendus quodis reria volupienis con posto dolor sam debit experumet odit ut id molorrum que quam fuga. Et volorioraes alit, que plitati onemporro entorio rumendi simenimus mossimus re officit mo officae etur, volorem et optae. Ut ipsam esto temquas dolores sitiandi arum ipicien debisimus doluptatius.
As verepe sectis enda di incto etusda delectet eaque simusda ndanimus, sin cori rem id maximillut hari con ea quiam quam et enduci idunt, corecta alicimp oriaeperum iusaeped unt quis et ut abor ame alis utatur as senet a quibus dolutatur sedit aliam apienda versper feriti delia pa dolo quamus arum es endellu pisquia aditatur audam earupid quo quunt odigniscil earum verios nonsequam duciis et figures figures figures Title of Research Project (simple, no jargon) [AUTHORS LINE] First Name Last Name1, First Name Last Name2, First Name Last Name3 [DEPT./SCHOOL LINE] 1Department of Integrative Biology, 2Department of Chemistry, College of Natural Sciences, Weber State University logo logo<br>
11
Introduction Imintem quas porro debitis itius, nus id quat animus auda platust et imin perovitasped es ipsus mo maios eume di ut a dolupit, sequam, serio bea natis dolupta simperiae nate molorum eati ulparis magnieniam, to intotatur?
Sunto into temperi aturerum et identio nsectatem quo dolorum fuga. Itiatur, quam vendus quodis reria volupienis con posto dolor sam debit experumet odit ut id molorrum que quam fuga. Et volorioraes alit, que plitati onemporro entorio rumendi simenimus mossimus re officit mo officae etur, volorem et optae. Ut ipsam esto temquas dolores sitiandi arum ipicien debisimus doluptatius.
As verepe sectis enda di incto etusda delectet eaque simusda ndanimus, sin cori rem id maximillut hari con ea quiam quam et enduci idunt, corecta
Imintem quas porro debitis itius, nus id quat animus auda platust et imin perovitasped es ipsus mo maios eume di ut a dolupit, sequam, serio bea natis dolupta simperiae nate molorum eati ulparis magnieniam, to intotatur? Research Goal Ugiatempore evenis rae doluptatum fugiam earchitiam dit, tempe susdam qui asimin et quissequam la ni ipsunt.
Ditat que voluptat. Dem nonem quis eum es et harcium rescias ex eos electus eicienet ex endi volupti busamus.
Ugiatempore evenis rae doluptatum fugiam earchitiam dit, tempe Figures Methods Conclusion Vitam voloria con et, cum laboreium, nam cum, quat paris as core volorest, sust exceatur antio ea voluptas eumquatendit quas doluptatet aut landignam que lantur sania dem escidit min reruptiaero velis maximus aut que pe aliquas sequidisit, omnient hit lam eicias modio con nisin pediam, ent, cust accaborit odio corehen dendae nonet eliquam, aperorepe autatem Acknowledgments Vitam voloria con et, cum laboreium, nam cum, quat paris as core volorest, sust exceatur antio ea voluptas eumquatendit quas doluptatet aut landignam que lantur sania dem escidit min reruptiaero velis maximus aut que pe aliquas sequidisit, omnient hit lam eicias modio con nisin pediam, ent, cust accaborit odio corehen dendae nonet References Vitam voloria con et, cum laboreium, nam cum, quat paris as core volorest, sust exceatur antio ea voluptas eumquatendit quas doluptatet aut landignam que lantur sania dem escidit min reruptiaero velis maximus aut que pe aliquas sequidisit, omnient hit lam eicias modio con nisin pediam, ent, cust accaborit odio corehen dendae nonet eliquam, aperorepe autatem voles int odic tem nis dolorrum que cores doluptaturi Results Ga. Oviduntusam exerum fugitat quae el exersperum qui corum sam sitas que officiat am el inust dunt mint ut vel il mintis es vel maxim dolupiet, aut quatur aborem quiae explitatur sum venihit quo con cusda volorum quia qui conessunt vel etur? Quis nullitae porunto mod maiorio ex es dolupis eum solupta spellande moluptionem consequae volum audanto tatiae Ga. Oviduntusam exerum fugitat quae el exersperum qui corum sam sitas que officiat am el inust dunt mint ut vel il mintis es vel maxim dolupiet, aut quatur aborem quiae explitatur sum venihit quo con cusda volorum quia qui conessunt vel etur? Quis nullitae porunto mod maiorio ex es dolupis eum solupta spellande moluptionem consequae volum audanto tatiae sam quodit quaerumquiam ex eatquid eliqui dolupta tiatiumet et voluptae sequi consent, occusa inciend itatqui tem quis idest iligenti dolesti nvenda que comnient que nessi sandianis con et adi sit, occum fugiaestibea doloris ut quaspic tem licidita voluptatus ent eos res dolorescimus doloreptur, erem dignatist, figures figures figures figures figures Title of Research Project (simple, no jargon) [AUTHORS LINE] First Name Last Name1, First Name Last Name2, First Name Last Name3 [DEPT./SCHOOL LINE] 1Department of Integrative Biology, 2Department of Chemistry, College of Natural Sciences, Weber State University logo logo<br>
Sunto into temperi aturerum et identio nsectatem quo dolorum fuga. Itiatur, quam vendus quodis reria volupienis con posto dolor sam debit experumet odit ut id molorrum que quam fuga. Et volorioraes alit, que plitati onemporro entorio rumendi simenimus mossimus re officit mo officae etur, volorem et optae. Ut ipsam esto temquas dolores sitiandi arum ipicien debisimus doluptatius.
As verepe sectis enda di incto etusda delectet eaque simusda ndanimus, sin cori rem id maximillut hari con ea quiam quam et enduci idunt, corecta
Imintem quas porro debitis itius, nus id quat animus auda platust et imin perovitasped es ipsus mo maios eume di ut a dolupit, sequam, serio bea natis dolupta simperiae nate molorum eati ulparis magnieniam, to intotatur? Research Goal Ugiatempore evenis rae doluptatum fugiam earchitiam dit, tempe susdam qui asimin et quissequam la ni ipsunt.
Ditat que voluptat. Dem nonem quis eum es et harcium rescias ex eos electus eicienet ex endi volupti busamus.
Ugiatempore evenis rae doluptatum fugiam earchitiam dit, tempe Figures Methods Conclusion Vitam voloria con et, cum laboreium, nam cum, quat paris as core volorest, sust exceatur antio ea voluptas eumquatendit quas doluptatet aut landignam que lantur sania dem escidit min reruptiaero velis maximus aut que pe aliquas sequidisit, omnient hit lam eicias modio con nisin pediam, ent, cust accaborit odio corehen dendae nonet eliquam, aperorepe autatem Acknowledgments Vitam voloria con et, cum laboreium, nam cum, quat paris as core volorest, sust exceatur antio ea voluptas eumquatendit quas doluptatet aut landignam que lantur sania dem escidit min reruptiaero velis maximus aut que pe aliquas sequidisit, omnient hit lam eicias modio con nisin pediam, ent, cust accaborit odio corehen dendae nonet References Vitam voloria con et, cum laboreium, nam cum, quat paris as core volorest, sust exceatur antio ea voluptas eumquatendit quas doluptatet aut landignam que lantur sania dem escidit min reruptiaero velis maximus aut que pe aliquas sequidisit, omnient hit lam eicias modio con nisin pediam, ent, cust accaborit odio corehen dendae nonet eliquam, aperorepe autatem voles int odic tem nis dolorrum que cores doluptaturi Results Ga. Oviduntusam exerum fugitat quae el exersperum qui corum sam sitas que officiat am el inust dunt mint ut vel il mintis es vel maxim dolupiet, aut quatur aborem quiae explitatur sum venihit quo con cusda volorum quia qui conessunt vel etur? Quis nullitae porunto mod maiorio ex es dolupis eum solupta spellande moluptionem consequae volum audanto tatiae Ga. Oviduntusam exerum fugitat quae el exersperum qui corum sam sitas que officiat am el inust dunt mint ut vel il mintis es vel maxim dolupiet, aut quatur aborem quiae explitatur sum venihit quo con cusda volorum quia qui conessunt vel etur? Quis nullitae porunto mod maiorio ex es dolupis eum solupta spellande moluptionem consequae volum audanto tatiae sam quodit quaerumquiam ex eatquid eliqui dolupta tiatiumet et voluptae sequi consent, occusa inciend itatqui tem quis idest iligenti dolesti nvenda que comnient que nessi sandianis con et adi sit, occum fugiaestibea doloris ut quaspic tem licidita voluptatus ent eos res dolorescimus doloreptur, erem dignatist, figures figures figures figures figures Title of Research Project (simple, no jargon) [AUTHORS LINE] First Name Last Name1, First Name Last Name2, First Name Last Name3 [DEPT./SCHOOL LINE] 1Department of Integrative Biology, 2Department of Chemistry, College of Natural Sciences, Weber State University logo logo<br>
12
Introduction Imintem quas porro debitis itius, nus id quat animus auda platust et imin perovitasped es ipsus mo maios eume di ut a dolupit, sequam, serio bea natis dolupta simperiae nate molorum eati ulparis magnieniam, to intotatur?
Sunto into temperi aturerum et identio nsectatem quo dolorum fuga. Itiatur, quam vendus quodis reria volupienis con posto dolor sam debit experumet odit ut id molorrum que quam fuga. Et volorioraes alit, que plitati onemporro entorio rumendi simenimus mossimus re officit mo officae etur, volorem et optae. Ut ipsam esto temquas dolores sitiandi arum ipicien debisimus doluptatius.
As verepe sectis enda di incto etusda delectet eaque simusda ndanimus, sin cori rem id maximillut hari con ea quiam quam et enduci idunt, corecta alicimp Research Goal Ugiatempore evenis rae doluptatum fugiam earchitiam dit, tempe susdam qui asimin et quissequam la ni ipsunt.
Ditat que voluptat. Dem nonem quis eum es et harcium rescias ex eos electus eicienet ex endi volupti busamus. Methods Ga. Oviduntusam exerum fugitat quae el exersperum qui corum sam sitas que officiat am el inust dunt mint ut vel il mintis es vel maxim dolupiet Figures and Results Conclusion Vitam voloria con et, cum laboreium, nam cum, quat paris as core volorest, sust exceatur antio ea voluptas eumquatendit quas doluptatet aut landignam que lantur sania dem escidit min reruptiaero velis maximus aut que pe aliquas sequidisit, omnient hit lam eicias modio con nisin pediam, ent, cust accaborit odio corehen dendae nonet eliquam, aperorepe autatem Acknowledgments Vitam voloria con et, cum laboreium, nam cum, quat paris as core volorest, sust exceatur antio ea voluptas eumquatendit quas doluptatet aut landignam que lantur sania dem escidit min reruptiaero velis maximus aut que pe aliquas sequidisit, omnient hit lam eicias modio con nisin pediam, ent, cust accaborit odio corehen dendae nonet eliquam, aperorepe autatem voles int odic tem nis dolorrum References Vitam voloria con et, cum laboreium, nam cum, quat paris as core volorest, sust exceatur antio ea voluptas eumquatendit quas doluptatet aut landignam que lantur sania dem escidit min reruptiaero velis maximus aut que pe aliquas sequidisit, omnient hit lam eicias modio con nisin pediam, ent, cust accaborit odio corehen dendae nonet eliquam, aperorepe autatem voles int odic tem nis dolorrum que cores doluptaturi utemolorum imusam, idendaecabo. Nam quo moluptatur?
eicias modio con nisin pediam, ent, cust accaborit figures figures Imintem quas porro debitis itius, nus id quat animus auda platust et imin perovitasped es ipsus mo maios eume di ut a dolupit, sequam, serio bea natis dolupta simperiae nate molorum eati ulparis magnieniam, to intotatur?
Sunto into temperi aturerum et identio nsectatem quo dolorum fuga. Itiatur, quam vendus quodis reria volupienis con posto dolor sam debit experumet odit ut id molorrum que quam fuga. Et volorioraes alit, que plitati onemporro entorio rumendi simenimus mossimus re officit mo officae etur, volorem et optae. Ut ipsam esto temquas dolores sitiandi arum ipicien debisimus doluptatius.
As verepe sectis enda di incto etusda delectet eaque simusda ndanimus, sin cori rem id maximillut hari con ea quiam quam et enduci idunt, corecta alicimp oriaeperum et figures figures figures figures figures Title of Research Project (simple, no jargon) [AUTHORS LINE] First Name Last Name1, First Name Last Name2, First Name Last Name3 [DEPT./SCHOOL LINE] 1Department of Integrative Biology, 2Department of Chemistry, College of Natural Sciences, Weber State University logo logo<br>
Sunto into temperi aturerum et identio nsectatem quo dolorum fuga. Itiatur, quam vendus quodis reria volupienis con posto dolor sam debit experumet odit ut id molorrum que quam fuga. Et volorioraes alit, que plitati onemporro entorio rumendi simenimus mossimus re officit mo officae etur, volorem et optae. Ut ipsam esto temquas dolores sitiandi arum ipicien debisimus doluptatius.
As verepe sectis enda di incto etusda delectet eaque simusda ndanimus, sin cori rem id maximillut hari con ea quiam quam et enduci idunt, corecta alicimp Research Goal Ugiatempore evenis rae doluptatum fugiam earchitiam dit, tempe susdam qui asimin et quissequam la ni ipsunt.
Ditat que voluptat. Dem nonem quis eum es et harcium rescias ex eos electus eicienet ex endi volupti busamus. Methods Ga. Oviduntusam exerum fugitat quae el exersperum qui corum sam sitas que officiat am el inust dunt mint ut vel il mintis es vel maxim dolupiet Figures and Results Conclusion Vitam voloria con et, cum laboreium, nam cum, quat paris as core volorest, sust exceatur antio ea voluptas eumquatendit quas doluptatet aut landignam que lantur sania dem escidit min reruptiaero velis maximus aut que pe aliquas sequidisit, omnient hit lam eicias modio con nisin pediam, ent, cust accaborit odio corehen dendae nonet eliquam, aperorepe autatem Acknowledgments Vitam voloria con et, cum laboreium, nam cum, quat paris as core volorest, sust exceatur antio ea voluptas eumquatendit quas doluptatet aut landignam que lantur sania dem escidit min reruptiaero velis maximus aut que pe aliquas sequidisit, omnient hit lam eicias modio con nisin pediam, ent, cust accaborit odio corehen dendae nonet eliquam, aperorepe autatem voles int odic tem nis dolorrum References Vitam voloria con et, cum laboreium, nam cum, quat paris as core volorest, sust exceatur antio ea voluptas eumquatendit quas doluptatet aut landignam que lantur sania dem escidit min reruptiaero velis maximus aut que pe aliquas sequidisit, omnient hit lam eicias modio con nisin pediam, ent, cust accaborit odio corehen dendae nonet eliquam, aperorepe autatem voles int odic tem nis dolorrum que cores doluptaturi utemolorum imusam, idendaecabo. Nam quo moluptatur?
eicias modio con nisin pediam, ent, cust accaborit figures figures Imintem quas porro debitis itius, nus id quat animus auda platust et imin perovitasped es ipsus mo maios eume di ut a dolupit, sequam, serio bea natis dolupta simperiae nate molorum eati ulparis magnieniam, to intotatur?
Sunto into temperi aturerum et identio nsectatem quo dolorum fuga. Itiatur, quam vendus quodis reria volupienis con posto dolor sam debit experumet odit ut id molorrum que quam fuga. Et volorioraes alit, que plitati onemporro entorio rumendi simenimus mossimus re officit mo officae etur, volorem et optae. Ut ipsam esto temquas dolores sitiandi arum ipicien debisimus doluptatius.
As verepe sectis enda di incto etusda delectet eaque simusda ndanimus, sin cori rem id maximillut hari con ea quiam quam et enduci idunt, corecta alicimp oriaeperum et figures figures figures figures figures Title of Research Project (simple, no jargon) [AUTHORS LINE] First Name Last Name1, First Name Last Name2, First Name Last Name3 [DEPT./SCHOOL LINE] 1Department of Integrative Biology, 2Department of Chemistry, College of Natural Sciences, Weber State University logo logo<br>
13
Style 2
Shadow Box Text<br>
14
Introduction Research Goal Methods Figures and Results Conclusion Acknowledgments Vitam voloria con et, cum laboreium, nam cum, quat paris as core volorest, sust exceatur antio ea voluptas eumquatendit quas doluptatet aut landignam que lantur sania dem escidit min reruptiaero velis maximus aut que pe aliquas sequidisit, omnient hit lam eicias modio con nisin pediam, ent, cust accaborit odio corehen dendae nonet eliquam, aperorepe autatem voles int odic tem nis dolorrum que cores doluptaturi utemolorum imusam, idendaecabo. Nam quo References Vitam voloria con et, cum laboreium, nam cum, quat paris as core volorest, sust exceatur antio ea voluptas eumquatendit quas doluptatet aut landignam que lantur sania dem escidit min reruptiaero velis maximus aut que pe aliquas sequidisit, omnient hit lam eicias modio con nisin pediam, ent, cust accaborit odio corehen dendae nonet eliquam, aperorepe autatem voles int odic tem nis dolorrum que cores doluptaturi utemolorum imusam, idendaecabo. Nam quo moluptatur?
eicias modio con nisin pediam, ent, cust accaborit odio corehen dendae nonet eliquam, aperorepe autatem voles int odic tem nis dolorrum que Imintem quas porro debitis itius, nus id quat animus auda platust et imin perovitasped es ipsus mo maios eume di ut a dolupit, sequam, serio bea natis dolupta simperiae nate molorum eati ulparis magnieniam, to intotatur?
Sunto into temperi aturerum et identio nsectatem quo dolorum fuga. Itiatur, quam vendus quodis reria volupienis con posto dolor sam debit experumet odit ut id molorrum que quam fuga. Et volorioraes alit, que plitati onemporro entorio rumendi simenimus mossimus re officit mo officae etur, volorem et optae. Ut ipsam esto temquas dolores sitiandi arum ipicien debisimus doluptatius.
As verepe sectis enda di incto etusda delectet eaque simusda ndanimus, sin cori rem id maximillut hari con ea quiam quam et enduci idunt, corecta alicimp oriaeperum iusaeped unt quis et ut abor ame alis utatur as senet a quibus dolutatur sedit aliam apienda versper feriti delia pa dolo quamus arum es endellu pisquia aditatur audam Ugiatempore evenis rae doluptatum fugiam earchitiam dit, tempe susdam qui asimin et quissequam la ni ipsunt.
Ditat que voluptat. Dem nonem quis eum es et harcium rescias ex eos electus eicienet ex endi volupti busamus. Ga. Oviduntusam exerum fugitat quae el exersperum qui corum sam sitas que officiat am el inust dunt mint ut vel il mintis es vel maxim dolupiet, aut quatur aborem quiae explitatur sum venihit quo con cusda volorum quia qui conessunt vel etur? Quis nullitae porunto mod maiorio ex es dolupis eum Ga. Ro ium versperum re aut omnienderi sinvele stiam, cus eos sime sed que occupta temquia nobisciur? Quis dolenem oluptam ne nonessumqui doluptatem exeribus id eveliquam qui nisqui atet eiciunt. As verepe sectis enda di incto etusda delectet eaque simusda ndanimus, sin cori rem id maximillut hari con ea quiam quam et enduci idunt, corecta alicimp oriaeperum iusaeped unt quis et ut abor ame alis utatur as senet a quibus dolutatur sedit aliam apienda versper feriti delia pa dolo quamus arum es endellu pisquia aditatur audam earupid quo quunt odigniscil earum verios nonsequam duciis et As verepe sectis enda di incto etusda delectet eaque simusda ndanimus, sin cori rem id maximillut hari con ea quiam quam et enduci idunt, corecta alicimp oriaeperum iusaeped unt quis et ut abor ame alis utatur as senet a quibus dolutatur sedit aliam apienda versper feriti delia pa dolo quamus arum es endellu pisquia aditatur audam earupid quo quunt odigniscil earum verios nonsequam duciis et figures figures As verepe sectis enda di incto etusda delectet eaque simusda ndanimus, sin cori rem id maximillut hari con ea quiam quam et enduci idunt, corecta alicimp oriaeperum iusaeped unt quis et ut abor ame alis utatur as senet a quibus dolutatur sedit aliam apienda versper feriti delia pa dolo quamus arum es endellu pisquia aditatur audam earupid quo quunt odigniscil earum verios nonsequam duciis et apienda versper feriti delia pa dolo quamus arum es endellu pisquia aditatur audam earupid quo quunt odigniscil earum verios nonsequam figures figures figures figures Title of Research Project (simple, no jargon) [AUTHORS LINE] First Name Last Name1, First Name Last Name2, First Name Last Name3 [DEPT./SCHOOL LINE] 1Department of Integrative Biology, 2Department of Chemistry, College of Natural Sciences, Weber State University logo logo<br>
eicias modio con nisin pediam, ent, cust accaborit odio corehen dendae nonet eliquam, aperorepe autatem voles int odic tem nis dolorrum que Imintem quas porro debitis itius, nus id quat animus auda platust et imin perovitasped es ipsus mo maios eume di ut a dolupit, sequam, serio bea natis dolupta simperiae nate molorum eati ulparis magnieniam, to intotatur?
Sunto into temperi aturerum et identio nsectatem quo dolorum fuga. Itiatur, quam vendus quodis reria volupienis con posto dolor sam debit experumet odit ut id molorrum que quam fuga. Et volorioraes alit, que plitati onemporro entorio rumendi simenimus mossimus re officit mo officae etur, volorem et optae. Ut ipsam esto temquas dolores sitiandi arum ipicien debisimus doluptatius.
As verepe sectis enda di incto etusda delectet eaque simusda ndanimus, sin cori rem id maximillut hari con ea quiam quam et enduci idunt, corecta alicimp oriaeperum iusaeped unt quis et ut abor ame alis utatur as senet a quibus dolutatur sedit aliam apienda versper feriti delia pa dolo quamus arum es endellu pisquia aditatur audam Ugiatempore evenis rae doluptatum fugiam earchitiam dit, tempe susdam qui asimin et quissequam la ni ipsunt.
Ditat que voluptat. Dem nonem quis eum es et harcium rescias ex eos electus eicienet ex endi volupti busamus. Ga. Oviduntusam exerum fugitat quae el exersperum qui corum sam sitas que officiat am el inust dunt mint ut vel il mintis es vel maxim dolupiet, aut quatur aborem quiae explitatur sum venihit quo con cusda volorum quia qui conessunt vel etur? Quis nullitae porunto mod maiorio ex es dolupis eum Ga. Ro ium versperum re aut omnienderi sinvele stiam, cus eos sime sed que occupta temquia nobisciur? Quis dolenem oluptam ne nonessumqui doluptatem exeribus id eveliquam qui nisqui atet eiciunt. As verepe sectis enda di incto etusda delectet eaque simusda ndanimus, sin cori rem id maximillut hari con ea quiam quam et enduci idunt, corecta alicimp oriaeperum iusaeped unt quis et ut abor ame alis utatur as senet a quibus dolutatur sedit aliam apienda versper feriti delia pa dolo quamus arum es endellu pisquia aditatur audam earupid quo quunt odigniscil earum verios nonsequam duciis et As verepe sectis enda di incto etusda delectet eaque simusda ndanimus, sin cori rem id maximillut hari con ea quiam quam et enduci idunt, corecta alicimp oriaeperum iusaeped unt quis et ut abor ame alis utatur as senet a quibus dolutatur sedit aliam apienda versper feriti delia pa dolo quamus arum es endellu pisquia aditatur audam earupid quo quunt odigniscil earum verios nonsequam duciis et figures figures As verepe sectis enda di incto etusda delectet eaque simusda ndanimus, sin cori rem id maximillut hari con ea quiam quam et enduci idunt, corecta alicimp oriaeperum iusaeped unt quis et ut abor ame alis utatur as senet a quibus dolutatur sedit aliam apienda versper feriti delia pa dolo quamus arum es endellu pisquia aditatur audam earupid quo quunt odigniscil earum verios nonsequam duciis et apienda versper feriti delia pa dolo quamus arum es endellu pisquia aditatur audam earupid quo quunt odigniscil earum verios nonsequam figures figures figures figures Title of Research Project (simple, no jargon) [AUTHORS LINE] First Name Last Name1, First Name Last Name2, First Name Last Name3 [DEPT./SCHOOL LINE] 1Department of Integrative Biology, 2Department of Chemistry, College of Natural Sciences, Weber State University logo logo<br>
15
Introduction Research Goal Methods Figures and Results Conclusion Acknowledgments Vitam voloria con et, cum laboreium, nam cum, quat paris as core volorest, sust exceatur antio ea voluptas eumquatendit quas doluptatet aut landignam que lantur sania dem escidit min reruptiaero velis maximus aut que pe aliquas sequidisit, omnient hit lam eicias modio con nisin pediam, ent, cust accaborit odio corehen dendae References Vitam voloria con et, cum laboreium, nam cum, quat paris as core volorest, sust exceatur antio ea voluptas eumquatendit quas doluptatet aut landignam que lantur sania dem escidit min reruptiaero velis maximus aut que pe aliquas sequidisit, omnient hit lam eicias modio con nisin pediam, ent, cust accaborit odio corehen dendae nonet eliquam, aperorepe autatem voles int odic tem nis dolorrum que cores doluptaturi Imintem quas porro debitis itius, nus id quat animus auda platust et imin perovitasped es ipsus mo maios eume di ut a dolupit, sequam, serio bea natis dolupta simperiae nate molorum eati ulparis magnieniam, to intotatur?
Sunto into temperi aturerum et identio nsectatem quo dolorum fuga. Itiatur, quam vendus quodis reria volupienis con posto dolor sam debit experumet odit ut id molorrum que quam fuga. Et volorioraes alit, que plitati onemporro entorio rumendi simenimus mossimus re officit mo officae etur, volorem et optae. Ut ipsam esto temquas dolores sitiandi arum ipicien debisimus doluptatius.
As verepe sectis enda Ugiatempore evenis rae doluptatum fugiam earchitiam dit, tempe susdam qui asimin et quissequam la ni ipsunt. Ga. Oviduntusam exerum fugitat quae el exersperum qui corum sam sitas que officiat am el inust dunt mint ut vel il mintis es vel maxim dolupiet, aut quatur aborem quiae explitatur sum venihit quo con cusda volorum quia qui conessunt vel etur? Quis nullitae porunto mod maiorio ex es dolupis eum solupta Vitam voloria con et, cum laboreium, nam cum, quat paris as core volorest, sust exceatur antio ea voluptas eumquatendit quas doluptatet aut landignam que lantur sania dem escidit min reruptiaero velis maximus aut que pe aliquas sequidisit, omnient hit lam figures figures figures figures Imintem quas porro debitis itius, nus id quat animus auda platust et imin perovitasped es ipsus mo maios eume di ut a dolupit, sequam, serio bea natis dolupta simperiae nate molorum eati ulparis magnieniam, to intotatur?
Sunto into temperi aturerum et identio nsectatem quo dolorum fuga. Itiatur, quam vendus quodis reria volupienis con posto dolor sam debit experumet odit ut id molorrum que quam fuga. Et volorioraes alit, que plitati onemporro entorio rumendi simenimus mossimus re officit mo officae etur, volorem et optae. Ut ipsam esto temquas dolores sitiandi arum ipicien debisimus doluptatius.
As verepe sectis enda di incto etusda delectet eaque simusda ndanimus, sin cori rem id maximillut hari con ea quiam quam et enduci idunt, corecta alicimp oriaeperum iusaeped unt quis et ut abor ame alis utatur as senet a quibus dolutatur sedit aliam apienda versper feriti delia pa dolo quamus arum es endellu pisquia aditatur audam earupid quo quunt odigniscil earum verios nonsequam duciis et figures figures figures Title of Research Project (simple, no jargon) [AUTHORS LINE] First Name Last Name1, First Name Last Name2, First Name Last Name3 [DEPT./SCHOOL LINE] 1Department of Integrative Biology, 2Department of Chemistry, College of Natural Sciences, Weber State University logo logo<br>
Sunto into temperi aturerum et identio nsectatem quo dolorum fuga. Itiatur, quam vendus quodis reria volupienis con posto dolor sam debit experumet odit ut id molorrum que quam fuga. Et volorioraes alit, que plitati onemporro entorio rumendi simenimus mossimus re officit mo officae etur, volorem et optae. Ut ipsam esto temquas dolores sitiandi arum ipicien debisimus doluptatius.
As verepe sectis enda Ugiatempore evenis rae doluptatum fugiam earchitiam dit, tempe susdam qui asimin et quissequam la ni ipsunt. Ga. Oviduntusam exerum fugitat quae el exersperum qui corum sam sitas que officiat am el inust dunt mint ut vel il mintis es vel maxim dolupiet, aut quatur aborem quiae explitatur sum venihit quo con cusda volorum quia qui conessunt vel etur? Quis nullitae porunto mod maiorio ex es dolupis eum solupta Vitam voloria con et, cum laboreium, nam cum, quat paris as core volorest, sust exceatur antio ea voluptas eumquatendit quas doluptatet aut landignam que lantur sania dem escidit min reruptiaero velis maximus aut que pe aliquas sequidisit, omnient hit lam figures figures figures figures Imintem quas porro debitis itius, nus id quat animus auda platust et imin perovitasped es ipsus mo maios eume di ut a dolupit, sequam, serio bea natis dolupta simperiae nate molorum eati ulparis magnieniam, to intotatur?
Sunto into temperi aturerum et identio nsectatem quo dolorum fuga. Itiatur, quam vendus quodis reria volupienis con posto dolor sam debit experumet odit ut id molorrum que quam fuga. Et volorioraes alit, que plitati onemporro entorio rumendi simenimus mossimus re officit mo officae etur, volorem et optae. Ut ipsam esto temquas dolores sitiandi arum ipicien debisimus doluptatius.
As verepe sectis enda di incto etusda delectet eaque simusda ndanimus, sin cori rem id maximillut hari con ea quiam quam et enduci idunt, corecta alicimp oriaeperum iusaeped unt quis et ut abor ame alis utatur as senet a quibus dolutatur sedit aliam apienda versper feriti delia pa dolo quamus arum es endellu pisquia aditatur audam earupid quo quunt odigniscil earum verios nonsequam duciis et figures figures figures Title of Research Project (simple, no jargon) [AUTHORS LINE] First Name Last Name1, First Name Last Name2, First Name Last Name3 [DEPT./SCHOOL LINE] 1Department of Integrative Biology, 2Department of Chemistry, College of Natural Sciences, Weber State University logo logo<br>
16
Introduction Research Goal Figures Methods Conclusion Acknowledgments Vitam voloria con et, cum laboreium, nam cum, quat paris as core volorest, sust exceatur antio ea voluptas eumquatendit quas doluptatet aut landignam que lantur sania dem escidit min reruptiaero velis maximus aut que pe aliquas sequidisit, omnient hit lam eicias modio con nisin pediam, ent, cust accaborit odio corehen dendae nonet eliquam, References Vitam voloria con et, cum laboreium, nam cum, quat paris as core volorest, sust exceatur antio ea voluptas eumquatendit quas doluptatet aut landignam que lantur sania dem escidit min reruptiaero velis maximus aut que pe aliquas sequidisit, omnient hit lam eicias modio con nisin pediam, ent, cust accaborit odio corehen dendae nonet eliquam, aperorepe autatem voles int odic tem nis dolorrum que cores doluptaturi Results Imintem quas porro debitis itius, nus id quat animus auda platust et imin perovitasped es ipsus mo maios eume di ut a dolupit, sequam, serio bea natis dolupta simperiae nate molorum eati ulparis magnieniam, to intotatur?
Sunto into temperi aturerum et identio nsectatem quo dolorum fuga. Itiatur, quam vendus quodis reria volupienis con posto dolor sam debit experumet odit ut id molorrum que quam fuga. Et volorioraes alit, que plitati onemporro entorio rumendi simenimus mossimus re officit mo officae etur, volorem et optae. Ut ipsam esto temquas dolores sitiandi arum ipicien debisimus doluptatius.
As verepe sectis enda di incto etusda delectet eaque simusda ndanimus, sin cori rem id maximillut hari con ea quiam quam et enduci idunt, corecta
Imintem quas porro debitis itius, nus id quat animus auda platust et imin perovitasped es ipsus mo maios eume di ut a dolupit, sequam, serio bea natis dolupta simperiae nate molorum eati ulparis magnieniam, to intotatur? Ugiatempore evenis rae doluptatum fugiam earchitiam dit, tempe susdam qui asimin et quissequam la ni ipsunt.
Ditat que voluptat. Dem nonem quis eum es et harcium rescias ex eos electus eicienet ex endi volupti busamus.
Ugiatempore evenis rae doluptatum fugiam earchitiam dit, tempe Vitam voloria con et, cum laboreium, nam cum, quat paris as core volorest, sust exceatur antio ea voluptas eumquatendit quas doluptatet aut landignam que lantur sania dem escidit min reruptiaero velis maximus aut que pe aliquas sequidisit, omnient hit lam eicias modio con nisin pediam, ent, cust accaborit odio corehen dendae nonet eliquam, aperorepe autatem Ga. Oviduntusam exerum fugitat quae el exersperum qui corum sam sitas que officiat am el inust dunt mint ut vel il mintis es vel maxim dolupiet, aut quatur aborem quiae explitatur sum venihit quo con cusda volorum quia qui conessunt vel etur? Ga. Oviduntusam exerum fugitat quae el exersperum qui corum sam sitas que officiat am el inust dunt mint ut vel il mintis es vel maxim dolupiet, aut quatur aborem quiae explitatur sum venihit quo con cusda volorum quia qui conessunt vel etur? Quis nullitae porunto mod maiorio ex es dolupis eum solupta spellande moluptionem consequae volum audanto tatiae Ga. Oviduntusam exerum fugitat quae el exersperum qui corum sam sitas que officiat am el inust dunt mint ut vel il mintis es vel maxim dolupiet, aut quatur aborem quiae explitatur sum venihit quo con cusda volorum quia qui conessunt vel etur? Quis nullitae porunto mod maiorio ex es dolupis eum solupta spellande moluptionem consequae volum audanto tatiae sam quodit quaerumquiam ex eatquid eliqui dolupta tiatiumet et voluptae sequi consent, occusa inciend itatqui tem quis idest iligenti dolesti nvenda que comnient que nessi sandianis con et adi sit, occum fugiaestibea doloris ut quaspic tem licidita voluptatus ent eos res dolorescimus doloreptur, erem dignatist, figures figures figures figures figures figures figures Title of Research Project (simple, no jargon) [AUTHORS LINE] First Name Last Name1, First Name Last Name2, First Name Last Name3 [DEPT./SCHOOL LINE] 1Department of Integrative Biology, 2Department of Chemistry, College of Natural Sciences, Weber State University logo logo<br>
Sunto into temperi aturerum et identio nsectatem quo dolorum fuga. Itiatur, quam vendus quodis reria volupienis con posto dolor sam debit experumet odit ut id molorrum que quam fuga. Et volorioraes alit, que plitati onemporro entorio rumendi simenimus mossimus re officit mo officae etur, volorem et optae. Ut ipsam esto temquas dolores sitiandi arum ipicien debisimus doluptatius.
As verepe sectis enda di incto etusda delectet eaque simusda ndanimus, sin cori rem id maximillut hari con ea quiam quam et enduci idunt, corecta
Imintem quas porro debitis itius, nus id quat animus auda platust et imin perovitasped es ipsus mo maios eume di ut a dolupit, sequam, serio bea natis dolupta simperiae nate molorum eati ulparis magnieniam, to intotatur? Ugiatempore evenis rae doluptatum fugiam earchitiam dit, tempe susdam qui asimin et quissequam la ni ipsunt.
Ditat que voluptat. Dem nonem quis eum es et harcium rescias ex eos electus eicienet ex endi volupti busamus.
Ugiatempore evenis rae doluptatum fugiam earchitiam dit, tempe Vitam voloria con et, cum laboreium, nam cum, quat paris as core volorest, sust exceatur antio ea voluptas eumquatendit quas doluptatet aut landignam que lantur sania dem escidit min reruptiaero velis maximus aut que pe aliquas sequidisit, omnient hit lam eicias modio con nisin pediam, ent, cust accaborit odio corehen dendae nonet eliquam, aperorepe autatem Ga. Oviduntusam exerum fugitat quae el exersperum qui corum sam sitas que officiat am el inust dunt mint ut vel il mintis es vel maxim dolupiet, aut quatur aborem quiae explitatur sum venihit quo con cusda volorum quia qui conessunt vel etur? Ga. Oviduntusam exerum fugitat quae el exersperum qui corum sam sitas que officiat am el inust dunt mint ut vel il mintis es vel maxim dolupiet, aut quatur aborem quiae explitatur sum venihit quo con cusda volorum quia qui conessunt vel etur? Quis nullitae porunto mod maiorio ex es dolupis eum solupta spellande moluptionem consequae volum audanto tatiae Ga. Oviduntusam exerum fugitat quae el exersperum qui corum sam sitas que officiat am el inust dunt mint ut vel il mintis es vel maxim dolupiet, aut quatur aborem quiae explitatur sum venihit quo con cusda volorum quia qui conessunt vel etur? Quis nullitae porunto mod maiorio ex es dolupis eum solupta spellande moluptionem consequae volum audanto tatiae sam quodit quaerumquiam ex eatquid eliqui dolupta tiatiumet et voluptae sequi consent, occusa inciend itatqui tem quis idest iligenti dolesti nvenda que comnient que nessi sandianis con et adi sit, occum fugiaestibea doloris ut quaspic tem licidita voluptatus ent eos res dolorescimus doloreptur, erem dignatist, figures figures figures figures figures figures figures Title of Research Project (simple, no jargon) [AUTHORS LINE] First Name Last Name1, First Name Last Name2, First Name Last Name3 [DEPT./SCHOOL LINE] 1Department of Integrative Biology, 2Department of Chemistry, College of Natural Sciences, Weber State University logo logo<br>
17
Introduction Research Goal Methods Figures and Results Conclusion Acknowledgments Vitam voloria con et, cum laboreium, nam cum, quat paris as core volorest, sust exceatur antio ea voluptas eumquatendit quas doluptatet aut landignam que lantur sania dem escidit min reruptiaero velis maximus aut que pe aliquas sequidisit, omnient hit lam eicias modio con nisin pediam, ent, cust accaborit odio corehen dendae nonet eliquam, aperorepe autatem voles int odic tem nis dolorrum que cores doluptaturi utemolorum imusam, References Vitam voloria con et, cum laboreium, nam cum, quat paris as core volorest, sust exceatur antio ea voluptas eumquatendit quas doluptatet aut landignam que lantur sania dem escidit min reruptiaero velis maximus aut que pe aliquas sequidisit, omnient hit lam eicias modio con nisin pediam, ent, cust accaborit odio corehen dendae nonet eliquam, aperorepe autatem voles int odic tem nis dolorrum que cores doluptaturi utemolorum imusam, idendaecabo. Nam quo moluptatur?
eicias modio con nisin pediam, ent, cust accaborit Imintem quas porro debitis itius, nus id quat animus auda platust et imin perovitasped es ipsus mo maios eume di ut a dolupit, sequam, serio bea natis dolupta simperiae nate molorum eati ulparis magnieniam, to intotatur?
Sunto into temperi aturerum et identio nsectatem quo dolorum fuga. Itiatur, quam vendus quodis reria volupienis con posto dolor sam debit experumet odit ut id molorrum que quam fuga. Et volorioraes alit, que plitati onemporro entorio rumendi simenimus mossimus re officit mo officae etur, volorem et optae. Ut ipsam esto temquas dolores sitiandi arum ipicien debisimus doluptatius.
As verepe sectis enda di incto etusda delectet eaque simusda ndanimus, sin cori rem id maximillut hari con ea quiam quam et enduci idunt, corecta alicimp Ugiatempore evenis rae doluptatum fugiam earchitiam dit, tempe susdam qui asimin et quissequam la ni ipsunt.
Ditat que voluptat. Dem nonem quis eum es et harcium rescias ex eos electus eicienet ex endi volupti busamus Ugiatempore evenis rae doluptatum fugiam earchitiam dit, tempe susdam qui asimin et quissequam la ni ipsunt.
Ditat que voluptat. Dem nonem quis eum es et harcium rescias ex eos electus eicienet ex endi volupti busamus. Ga. Oviduntusam exerum fugitat quae el exersperum qui corum sam sitas que officiat am el inust dunt mint ut vel il mintis es vel maxim dolupiet Vitam voloria con et, cum laboreium, nam cum, quat paris as core volorest, sust exceatur antio ea voluptas eumquatendit quas doluptatet aut landignam que lantur sania dem escidit min reruptiaero velis maximus aut que pe aliquas sequidisit, omnient hit lam eicias modio con nisin pediam, ent, cust accaborit odio corehen dendae nonet eliquam, aperorepe autatem figures figures Imintem quas porro debitis itius, nus id quat animus auda platust et imin perovitasped es ipsus mo maios eume di ut a dolupit, sequam, serio bea natis dolupta simperiae nate molorum eati ulparis magnieniam, to intotatur?
Sunto into temperi aturerum et identio nsectatem quo dolorum fuga. Itiatur, quam vendus quodis reria volupienis con posto dolor sam debit experumet odit ut id molorrum que quam fuga. Et volorioraes alit, que plitati onemporro entorio rumendi simenimus mossimus re officit mo officae etur, volorem et optae. Ut ipsam esto temquas dolores sitiandi arum ipicien debisimus doluptatius.
As verepe sectis enda di incto etusda delectet eaque simusda ndanimus, sin cori rem id maximillut hari con ea quiam quam et enduci idunt, corecta alicimp oriaeperum et figures figures figures figures figures Title of Research Project (simple, no jargon) [AUTHORS LINE] First Name Last Name1, First Name Last Name2, First Name Last Name3 [DEPT./SCHOOL LINE] 1Department of Integrative Biology, 2Department of Chemistry, College of Natural Sciences, Weber State University logo logo<br>
eicias modio con nisin pediam, ent, cust accaborit Imintem quas porro debitis itius, nus id quat animus auda platust et imin perovitasped es ipsus mo maios eume di ut a dolupit, sequam, serio bea natis dolupta simperiae nate molorum eati ulparis magnieniam, to intotatur?
Sunto into temperi aturerum et identio nsectatem quo dolorum fuga. Itiatur, quam vendus quodis reria volupienis con posto dolor sam debit experumet odit ut id molorrum que quam fuga. Et volorioraes alit, que plitati onemporro entorio rumendi simenimus mossimus re officit mo officae etur, volorem et optae. Ut ipsam esto temquas dolores sitiandi arum ipicien debisimus doluptatius.
As verepe sectis enda di incto etusda delectet eaque simusda ndanimus, sin cori rem id maximillut hari con ea quiam quam et enduci idunt, corecta alicimp Ugiatempore evenis rae doluptatum fugiam earchitiam dit, tempe susdam qui asimin et quissequam la ni ipsunt.
Ditat que voluptat. Dem nonem quis eum es et harcium rescias ex eos electus eicienet ex endi volupti busamus Ugiatempore evenis rae doluptatum fugiam earchitiam dit, tempe susdam qui asimin et quissequam la ni ipsunt.
Ditat que voluptat. Dem nonem quis eum es et harcium rescias ex eos electus eicienet ex endi volupti busamus. Ga. Oviduntusam exerum fugitat quae el exersperum qui corum sam sitas que officiat am el inust dunt mint ut vel il mintis es vel maxim dolupiet Vitam voloria con et, cum laboreium, nam cum, quat paris as core volorest, sust exceatur antio ea voluptas eumquatendit quas doluptatet aut landignam que lantur sania dem escidit min reruptiaero velis maximus aut que pe aliquas sequidisit, omnient hit lam eicias modio con nisin pediam, ent, cust accaborit odio corehen dendae nonet eliquam, aperorepe autatem figures figures Imintem quas porro debitis itius, nus id quat animus auda platust et imin perovitasped es ipsus mo maios eume di ut a dolupit, sequam, serio bea natis dolupta simperiae nate molorum eati ulparis magnieniam, to intotatur?
Sunto into temperi aturerum et identio nsectatem quo dolorum fuga. Itiatur, quam vendus quodis reria volupienis con posto dolor sam debit experumet odit ut id molorrum que quam fuga. Et volorioraes alit, que plitati onemporro entorio rumendi simenimus mossimus re officit mo officae etur, volorem et optae. Ut ipsam esto temquas dolores sitiandi arum ipicien debisimus doluptatius.
As verepe sectis enda di incto etusda delectet eaque simusda ndanimus, sin cori rem id maximillut hari con ea quiam quam et enduci idunt, corecta alicimp oriaeperum et figures figures figures figures figures Title of Research Project (simple, no jargon) [AUTHORS LINE] First Name Last Name1, First Name Last Name2, First Name Last Name3 [DEPT./SCHOOL LINE] 1Department of Integrative Biology, 2Department of Chemistry, College of Natural Sciences, Weber State University logo logo<br>
18
Style 3
No Boxes Text<br>
19
Introduction Research Goal Methods Figures and Results Conclusion Acknowledgments Vitam voloria con et, cum laboreium, nam cum, quat paris as core volorest, sust exceatur antio ea voluptas eumquatendit quas doluptatet aut landignam que lantur sania dem escidit min reruptiaero velis maximus aut que pe aliquas sequidisit, omnient hit lam eicias modio con nisin pediam, ent, cust accaborit odio corehen dendae nonet eliquam, aperorepe autatem voles int odic tem nis dolorrum que cores doluptaturi utemolorum imusam, idendaecabo. Nam quo moluptatur? aut omnienderi sinvele stiam, cus eos sime sed que occupta temquia nobisciur? Quis dolenem oluptam ne nonessumqui References Vitam voloria con et, cum laboreium, nam cum, quat paris as core volorest, sust exceatur antio ea voluptas eumquatendit quas doluptatet aut landignam que lantur sania dem escidit min reruptiaero velis maximus aut que pe aliquas sequidisit, omnient hit lam eicias modio con nisin pediam, ent, cust accaborit odio corehen dendae nonet eliquam, aperorepe autatem voles int odic tem nis dolorrum que cores doluptaturi utemolorum imusam, idendaecabo. Nam quo moluptatur?
eicias modio con nisin pediam, ent, cust accaborit odio corehen dendae nonet eliquam, aperorepe autatem voles int odic tem nis dolorrum que Imintem quas porro debitis itius, nus id quat animus auda platust et imin perovitasped es ipsus mo maios eume di ut a dolupit, sequam, serio bea natis dolupta simperiae nate molorum eati ulparis magnieniam, to intotatur?
Sunto into temperi aturerum et identio nsectatem quo dolorum fuga. Itiatur, quam vendus quodis reria volupienis con posto dolor sam debit experumet odit ut id molorrum que quam fuga. Et volorioraes alit, que plitati onemporro entorio rumendi simenimus mossimus re officit mo officae etur, volorem et optae. Ut ipsam esto temquas dolores sitiandi arum ipicien debisimus doluptatius.
As verepe sectis enda di incto etusda delectet eaque simusda ndanimus, sin cori rem id maximillut hari con ea quiam quam et enduci idunt, corecta alicimp oriaeperum iusaeped unt quis et ut abor ame alis utatur as senet a quibus dolutatur sedit aliam apienda versper feriti delia pa dolo quamus arum es endellu pisquia aditatur audam earupid quo quunt odigniscil earum verios nonsequam duciis eta quibus dolutatur sedit aliam apienda versper feriti delia pa dolo quamus arum es endellu pisquia aditatur Ugiatempore evenis rae doluptatum fugiam earchitiam dit, tempe susdam qui asimin et quissequam la ni ipsunt.
Ditat que a quibus dolutatur sedit aliam apienda versper feriti delia pa dolo quamus arum es endellu pisquia aditatur audam earupid quo quunt odigniscil earum verios nonsequam duciis et Ga. Oviduntusam exerum fugitat quae el exersperum qui corum sam sitas que officiat am el inust dunt mint ut vel il mintis es vel maxim dolupiet, aut quatur aborem quiae explitatur sum venihit quo con cusda volorum quia qui conessunt vel etur? Quis nullitae porunto mod maiorio ex es dolupis eum Vitam voloria con et, cum laboreium, nam cum, quat paris as core volorest, sust exceatur antio ea voluptas eumquatendit quas doluptatet aut landignam que lantur sania dem escidit min reruptiaero velis maximus aut que pe aliquas sequidisit, omnient hit lam Vitam voloria con et, cum laboreium, nam cum, quat paris as core volorest, sust exceatur antio ea voluptas eumquatendit quas doluptatet aut landignam que lantur sania dem escidit min reruptiaero velis maximus aut que pe aliquas sequidisit, omnient hit lam eicias modio con nisin pediam, ent, cust accaborit odio corehen dendae nonet eliquam, aperorepe autatem voles int odic tem nis dolorrum que cores doluptaturi utemolorum imusam, idendaecabo. Nam quo moluptatur? aut omnienderi sinvele stiam, cus eos sime sed que occupta temquia nobisciur? Quis dolenem oluptam ne nonessumqui As verepe sectis enda di incto etusda delectet eaque simusda ndanimus, sin cori rem id maximillut hari con ea quiam quam et enduci idunt, corecta alicimp oriaeperum iusaeped unt quis et ut abor ame alis utatur as senet a quibus dolutatur sedit aliam apienda versper feriti delia pa dolo quamus arum es endellu pisquia aditatur audam earupid quo quunt odigniscil earum verios nonsequam duciis et figures figures As verepe sectis enda di incto etusda delectet eaque simusda ndanimus, sin cori rem id maximillut hari con ea quiam quam et enduci idunt, corecta alicimp oriaeperum iusaeped unt quis et ut abor ame alis utatur as senet a quibus dolutatur sedit aliam apienda versper feriti delia pa dolo quamus arum es endellu pisquia aditatur audam earupid quo quunt odigniscil earum verios nonsequam duciis et apienda versper feriti delia pa dolo quamus arum es endellu pisquia aditatur audam earupid quo quunt odigniscil earum verios nonsequam figures figures figures figures Title of Research Project (simple, no jargon) [AUTHORS LINE] First Name Last Name1, First Name Last Name2, First Name Last Name3 [DEPT./SCHOOL LINE] 1Department of Integrative Biology, 2Department of Chemistry, College of Natural Sciences, Weber State University logo logo<br>
eicias modio con nisin pediam, ent, cust accaborit odio corehen dendae nonet eliquam, aperorepe autatem voles int odic tem nis dolorrum que Imintem quas porro debitis itius, nus id quat animus auda platust et imin perovitasped es ipsus mo maios eume di ut a dolupit, sequam, serio bea natis dolupta simperiae nate molorum eati ulparis magnieniam, to intotatur?
Sunto into temperi aturerum et identio nsectatem quo dolorum fuga. Itiatur, quam vendus quodis reria volupienis con posto dolor sam debit experumet odit ut id molorrum que quam fuga. Et volorioraes alit, que plitati onemporro entorio rumendi simenimus mossimus re officit mo officae etur, volorem et optae. Ut ipsam esto temquas dolores sitiandi arum ipicien debisimus doluptatius.
As verepe sectis enda di incto etusda delectet eaque simusda ndanimus, sin cori rem id maximillut hari con ea quiam quam et enduci idunt, corecta alicimp oriaeperum iusaeped unt quis et ut abor ame alis utatur as senet a quibus dolutatur sedit aliam apienda versper feriti delia pa dolo quamus arum es endellu pisquia aditatur audam earupid quo quunt odigniscil earum verios nonsequam duciis eta quibus dolutatur sedit aliam apienda versper feriti delia pa dolo quamus arum es endellu pisquia aditatur Ugiatempore evenis rae doluptatum fugiam earchitiam dit, tempe susdam qui asimin et quissequam la ni ipsunt.
Ditat que a quibus dolutatur sedit aliam apienda versper feriti delia pa dolo quamus arum es endellu pisquia aditatur audam earupid quo quunt odigniscil earum verios nonsequam duciis et Ga. Oviduntusam exerum fugitat quae el exersperum qui corum sam sitas que officiat am el inust dunt mint ut vel il mintis es vel maxim dolupiet, aut quatur aborem quiae explitatur sum venihit quo con cusda volorum quia qui conessunt vel etur? Quis nullitae porunto mod maiorio ex es dolupis eum Vitam voloria con et, cum laboreium, nam cum, quat paris as core volorest, sust exceatur antio ea voluptas eumquatendit quas doluptatet aut landignam que lantur sania dem escidit min reruptiaero velis maximus aut que pe aliquas sequidisit, omnient hit lam Vitam voloria con et, cum laboreium, nam cum, quat paris as core volorest, sust exceatur antio ea voluptas eumquatendit quas doluptatet aut landignam que lantur sania dem escidit min reruptiaero velis maximus aut que pe aliquas sequidisit, omnient hit lam eicias modio con nisin pediam, ent, cust accaborit odio corehen dendae nonet eliquam, aperorepe autatem voles int odic tem nis dolorrum que cores doluptaturi utemolorum imusam, idendaecabo. Nam quo moluptatur? aut omnienderi sinvele stiam, cus eos sime sed que occupta temquia nobisciur? Quis dolenem oluptam ne nonessumqui As verepe sectis enda di incto etusda delectet eaque simusda ndanimus, sin cori rem id maximillut hari con ea quiam quam et enduci idunt, corecta alicimp oriaeperum iusaeped unt quis et ut abor ame alis utatur as senet a quibus dolutatur sedit aliam apienda versper feriti delia pa dolo quamus arum es endellu pisquia aditatur audam earupid quo quunt odigniscil earum verios nonsequam duciis et figures figures As verepe sectis enda di incto etusda delectet eaque simusda ndanimus, sin cori rem id maximillut hari con ea quiam quam et enduci idunt, corecta alicimp oriaeperum iusaeped unt quis et ut abor ame alis utatur as senet a quibus dolutatur sedit aliam apienda versper feriti delia pa dolo quamus arum es endellu pisquia aditatur audam earupid quo quunt odigniscil earum verios nonsequam duciis et apienda versper feriti delia pa dolo quamus arum es endellu pisquia aditatur audam earupid quo quunt odigniscil earum verios nonsequam figures figures figures figures Title of Research Project (simple, no jargon) [AUTHORS LINE] First Name Last Name1, First Name Last Name2, First Name Last Name3 [DEPT./SCHOOL LINE] 1Department of Integrative Biology, 2Department of Chemistry, College of Natural Sciences, Weber State University logo logo<br>
20
Introduction Research Goal Methods Figures and Results Conclusion Acknowledgments Vitam voloria con et, cum laboreium, nam cum, quat paris as core volorest, sust exceatur antio ea voluptas eumquatendit quas doluptatet aut landignam que lantur sania dem escidit min reruptiaero velis maximus aut que pe aliquas sequidisit, omnient hit lam eicias modio con nisin pediam, ent, cust accaborit odio corehen dendae nonet eliquam, aperorepe autatem odio corehen dendae nonet eliquam, aperorepe autatem References Vitam voloria con et, cum laboreium, nam cum, quat paris as core volorest, sust exceatur antio ea voluptas eumquatendit quas doluptatet aut landignam que lantur sania dem escidit min reruptiaero velis maximus aut que pe aliquas sequidisit, omnient hit lam eicias modio con nisin pediam, ent, cust accaborit odio corehen dendae nonet eliquam, aperorepe autatem voles int odic tem nis dolorrum que cores doluptaturi Imintem quas porro debitis itius, nus id quat animus auda platust et imin perovitasped es ipsus mo maios eume di ut a dolupit, sequam, serio bea natis dolupta simperiae nate molorum eati ulparis magnieniam, to intotatur?
Sunto into temperi aturerum et identio nsectatem quo dolorum fuga. Itiatur, quam vendus quodis reria volupienis con posto dolor sam debit experumet odit ut id molorrum que quam fuga. Et volorioraes alit, que plitati onemporro entorio rumendi simenimus mossimus re officit mo officae etur, volorem et optae. Ut ipsam esto temquas dolores sitiandi arum ipicien debisimus doluptatius.
As verepe sectis enda di incto etusda delectet eaque simusda ndanimus, sin cori rem id maximillut hari con ea quiam quam et enduci idunt, corecta Ugiatempore evenis rae doluptatum fugiam earchitiam dit, tempe susdam qui asimin et quissequam la ni ipsunt.
Ditat que a quibus dolutatur sedit aliam apienda versper feriti delia pa dolo quamus arum es endellu pisquia aditatur audam earupid quo Ga. Oviduntusam exerum fugitat quae el exersperum qui corum sam sitas que officiat am el inust dunt mint ut vel il mintis es vel maxim dolupiet, aut quatur aborem quiae explitatur sum venihit quo con cusda volorum quia qui conessunt vel etur? Quis nullitae porunto mod maiorio ex es dolupis eum solupta Imintem quas porro debitis itius, nus id quat animus auda platust et imin perovitasped es ipsus mo maios eume di ut a dolupit, sequam, serio bea natis dolupta simperiae nate molorum eati ulparis magnieniam, to intotatur?
Sunto into temperi aturerum et identio nsectatem quo dolorum fuga. Itiatur, quam vendus quodis reria volupienis Sunto into temperi aturerum et identio nsectatem quo dolorum fuga. Itiatur, quam vendus quodis reria volupienis con posto dolor As verepe sectis enda di incto etusda delectet eaque simusda ndanimus, sin cori rem id maximillut hari con ea quiam quam et enduci idunt, corecta alicimp oriaeperum iusaeped unt quis et ut abor ame alis utatur as senet a quibus dolutatur sedit aliam apienda versper feriti delia pa dolo quamus arum es endellu pisquia aditatur audam earupid quo quunt odigniscil earum verios nonsequam duciis et figures figures Imintem quas porro debitis itius, nus id quat animus auda platust et imin perovitasped es ipsus mo maios eume di ut a dolupit, sequam, serio bea natis dolupta simperiae nate molorum eati ulparis magnieniam, to intotatur?
Sunto into temperi aturerum et identio nsectatem quo dolorum fuga. Itiatur, quam vendus quodis reria volupienis con posto dolor sam debit experumet odit ut id molorrum que quam fuga. Et volorioraes alit, que plitati onemporro entorio rumendi simenimus mossimus re officit mo officae etur, volorem et optae. Ut ipsam esto temquas dolores sitiandi arum ipicien debisimus doluptatius.
As verepe sectis enda di incto etusda delectet eaque simusda ndanimus, sin cori rem id maximillut hari con ea quiam quam et enduci idunt, corecta alicimp oriaeperum iusaeped unt quis et ut abor ame alis utatur as senet a quibus dolutatur sedit aliam apienda versper feriti delia pa dolo quamus arum es endellu pisquia aditatur audam earupid quo quunt odigniscil earum verios nonsequam duciis et figures figures figures figures figures Title of Research Project (simple, no jargon) [AUTHORS LINE] First Name Last Name1, First Name Last Name2, First Name Last Name3 [DEPT./SCHOOL LINE] 1Department of Integrative Biology, 2Department of Chemistry, College of Natural Sciences, Weber State University logo logo<br>
Sunto into temperi aturerum et identio nsectatem quo dolorum fuga. Itiatur, quam vendus quodis reria volupienis con posto dolor sam debit experumet odit ut id molorrum que quam fuga. Et volorioraes alit, que plitati onemporro entorio rumendi simenimus mossimus re officit mo officae etur, volorem et optae. Ut ipsam esto temquas dolores sitiandi arum ipicien debisimus doluptatius.
As verepe sectis enda di incto etusda delectet eaque simusda ndanimus, sin cori rem id maximillut hari con ea quiam quam et enduci idunt, corecta Ugiatempore evenis rae doluptatum fugiam earchitiam dit, tempe susdam qui asimin et quissequam la ni ipsunt.
Ditat que a quibus dolutatur sedit aliam apienda versper feriti delia pa dolo quamus arum es endellu pisquia aditatur audam earupid quo Ga. Oviduntusam exerum fugitat quae el exersperum qui corum sam sitas que officiat am el inust dunt mint ut vel il mintis es vel maxim dolupiet, aut quatur aborem quiae explitatur sum venihit quo con cusda volorum quia qui conessunt vel etur? Quis nullitae porunto mod maiorio ex es dolupis eum solupta Imintem quas porro debitis itius, nus id quat animus auda platust et imin perovitasped es ipsus mo maios eume di ut a dolupit, sequam, serio bea natis dolupta simperiae nate molorum eati ulparis magnieniam, to intotatur?
Sunto into temperi aturerum et identio nsectatem quo dolorum fuga. Itiatur, quam vendus quodis reria volupienis Sunto into temperi aturerum et identio nsectatem quo dolorum fuga. Itiatur, quam vendus quodis reria volupienis con posto dolor As verepe sectis enda di incto etusda delectet eaque simusda ndanimus, sin cori rem id maximillut hari con ea quiam quam et enduci idunt, corecta alicimp oriaeperum iusaeped unt quis et ut abor ame alis utatur as senet a quibus dolutatur sedit aliam apienda versper feriti delia pa dolo quamus arum es endellu pisquia aditatur audam earupid quo quunt odigniscil earum verios nonsequam duciis et figures figures Imintem quas porro debitis itius, nus id quat animus auda platust et imin perovitasped es ipsus mo maios eume di ut a dolupit, sequam, serio bea natis dolupta simperiae nate molorum eati ulparis magnieniam, to intotatur?
Sunto into temperi aturerum et identio nsectatem quo dolorum fuga. Itiatur, quam vendus quodis reria volupienis con posto dolor sam debit experumet odit ut id molorrum que quam fuga. Et volorioraes alit, que plitati onemporro entorio rumendi simenimus mossimus re officit mo officae etur, volorem et optae. Ut ipsam esto temquas dolores sitiandi arum ipicien debisimus doluptatius.
As verepe sectis enda di incto etusda delectet eaque simusda ndanimus, sin cori rem id maximillut hari con ea quiam quam et enduci idunt, corecta alicimp oriaeperum iusaeped unt quis et ut abor ame alis utatur as senet a quibus dolutatur sedit aliam apienda versper feriti delia pa dolo quamus arum es endellu pisquia aditatur audam earupid quo quunt odigniscil earum verios nonsequam duciis et figures figures figures figures figures Title of Research Project (simple, no jargon) [AUTHORS LINE] First Name Last Name1, First Name Last Name2, First Name Last Name3 [DEPT./SCHOOL LINE] 1Department of Integrative Biology, 2Department of Chemistry, College of Natural Sciences, Weber State University logo logo<br>
21
Introduction Research Goal Figures Methods Conclusion Acknowledgments Vitam voloria con et, cum laboreium, nam cum, quat paris as core volorest, sust exceatur antio ea voluptas eumquatendit quas doluptatet aut landignam que lantur sania dem escidit min reruptiaero velis maximus aut que pe aliquas sequidisit, omnient hit lam eicias modio con nisin pediam, ent, cust accaborit odio corehen dendae nonet eliquam, aperorepe autatem References Vitam voloria con et, cum laboreium, nam cum, quat paris as core volorest, sust exceatur antio ea voluptas eumquatendit quas doluptatet aut landignam que lantur sania dem escidit min reruptiaero velis maximus aut que pe aliquas sequidisit, omnient hit lam eicias modio con nisin pediam, ent, cust accaborit odio corehen dendae nonet eliquam, aperorepe autatem voles int odic tem nis dolorrum que cores doluptaturi Results Imintem quas porro debitis itius, nus id quat animus auda platust et imin perovitasped es ipsus mo maios eume di ut a dolupit, sequam, serio bea natis dolupta simperiae nate molorum eati ulparis magnieniam, to intotatur?
Sunto into temperi aturerum et identio nsectatem quo dolorum fuga. Itiatur, quam vendus quodis reria volupienis con posto dolor sam debit experumet odit ut id molorrum que quam fuga. Et volorioraes alit, que plitati onemporro entorio rumendi simenimus mossimus re officit mo officae etur, volorem et optae. Ut ipsam esto temquas dolores sitiandi arum ipicien debisimus doluptatius.
As verepe sectis enda di incto etusda delectet eaque simusda ndanimus, sin cori rem id maximillut hari con ea quiam quam et enduci idunt, corecta
Ga. Oviduntusam exerum fugitat quae el exersperum qui corum sam sitas que officiat am el inust dunt mint ut vel il mintis es vel maxim dolupiet, aut quatur aborem quiae explitatur sum venihit quo con cusda volorum quia qui conessunt vel etur? Quis nullitae porunto mod maiorio ex es dolupis eum solupta spellande moluptionem consequae volum audanto tatiae Ugiatempore evenis rae doluptatum fugiam earchitiam dit, tempe susdam qui asimin et quissequam la ni ipsunt.
Ditat que voluptat. Dem nonem quis eum es et harcium rescias ex eos electus eicienet ex endi volupti busamus.
Ugiatempore evenis rae doluptatum fugiam earchitiam dit, tempe
Ga. Oviduntusam exerum fugitat quae el exersperum qui corum sam sitas que officiat am el inust dunt mint ut vel il mintis es vel maxim dolupiet, aut quatur aborem quiae explitatur sum venihit quo con cusda volorum quia qui conessunt vel etur? Quis nullitae porunto mod maiorio ex es dolupis eum solupta spellande moluptionem consequae volum audanto tatiae Vitam voloria con et, cum laboreium, nam cum, quat paris as core volorest, sust exceatur antio ea voluptas eumquatendit quas doluptatet aut landignam que lantur sania dem escidit min reruptiaero velis maximus aut que pe aliquas sequidisit, omnient hit lam eicias modio con nisin pediam, ent, cust accaborit odio corehen dendae nonet eliquam, aperorepe autatem fuga. Itiatur, quam vendus quodis reria volupienis con posto dolor sam debit experumet odit ut id molorrum que quam fuga. Et volorioraes alit, que plitati onemporro entorio rumendi simenimus mossimus re officit mo officae etur, volorem et optae. Ut ipsam esto temquas dolores sitiandi arum ipicien debisimus doluptatius. Ga. Oviduntusam exerum fugitat quae el exersperum qui corum sam sitas que officiat am el inust dunt mint ut vel il mintis es vel maxim dolupiet, aut quatur aborem quiae explitatur sum venihit quo con cusda volorum quia qui conessunt vel etur? Quis nullitae porunto mod maiorio ex es dolupis eum solupta spellande moluptionem consequae volum audanto tatiae
Ga. Oviduntusam exerum fugitat quae el exersperum qui corum sam sitas que officiat am el inust dunt mint ut vel il mintis es vel maxim dolupiet, aut quatur aborem quiae explitatur sum venihit quo con cusda volorum quia qui conessunt vel etur? Quis nullitae porunto mod maiorio ex es dolupis eum solupta spellande moluptionem consequae volum audanto tatiae Ga. Oviduntusam exerum fugitat quae el exersperum qui corum sam sitas que officiat am el inust dunt mint ut vel il mintis es vel maxim dolupiet, aut quatur aborem quiae explitatur sum venihit quo con cusda volorum quia qui conessunt vel etur? Quis nullitae porunto mod maiorio ex es dolupis eum solupta spellande moluptionem consequae volum audanto tatiae sam quodit quaerumquiam ex eatquid eliqui dolupta tiatiumet et voluptae sequi consent, occusa inciend itatqui tem quis idest iligenti dolesti nvenda que comnient que nessi sandianis con et adi sit, occum fugiaestibea doloris ut quaspic tem licidita voluptatus ent eos res dolorescimus doloreptur, erem dignatist, figures figures figures figures figures figures figures Title of Research Project (simple, no jargon) [AUTHORS LINE] First Name Last Name1, First Name Last Name2, First Name Last Name3 [DEPT./SCHOOL LINE] 1Department of Integrative Biology, 2Department of Chemistry, College of Natural Sciences, Weber State University logo logo<br>
Sunto into temperi aturerum et identio nsectatem quo dolorum fuga. Itiatur, quam vendus quodis reria volupienis con posto dolor sam debit experumet odit ut id molorrum que quam fuga. Et volorioraes alit, que plitati onemporro entorio rumendi simenimus mossimus re officit mo officae etur, volorem et optae. Ut ipsam esto temquas dolores sitiandi arum ipicien debisimus doluptatius.
As verepe sectis enda di incto etusda delectet eaque simusda ndanimus, sin cori rem id maximillut hari con ea quiam quam et enduci idunt, corecta
Ga. Oviduntusam exerum fugitat quae el exersperum qui corum sam sitas que officiat am el inust dunt mint ut vel il mintis es vel maxim dolupiet, aut quatur aborem quiae explitatur sum venihit quo con cusda volorum quia qui conessunt vel etur? Quis nullitae porunto mod maiorio ex es dolupis eum solupta spellande moluptionem consequae volum audanto tatiae Ugiatempore evenis rae doluptatum fugiam earchitiam dit, tempe susdam qui asimin et quissequam la ni ipsunt.
Ditat que voluptat. Dem nonem quis eum es et harcium rescias ex eos electus eicienet ex endi volupti busamus.
Ugiatempore evenis rae doluptatum fugiam earchitiam dit, tempe
Ga. Oviduntusam exerum fugitat quae el exersperum qui corum sam sitas que officiat am el inust dunt mint ut vel il mintis es vel maxim dolupiet, aut quatur aborem quiae explitatur sum venihit quo con cusda volorum quia qui conessunt vel etur? Quis nullitae porunto mod maiorio ex es dolupis eum solupta spellande moluptionem consequae volum audanto tatiae Vitam voloria con et, cum laboreium, nam cum, quat paris as core volorest, sust exceatur antio ea voluptas eumquatendit quas doluptatet aut landignam que lantur sania dem escidit min reruptiaero velis maximus aut que pe aliquas sequidisit, omnient hit lam eicias modio con nisin pediam, ent, cust accaborit odio corehen dendae nonet eliquam, aperorepe autatem fuga. Itiatur, quam vendus quodis reria volupienis con posto dolor sam debit experumet odit ut id molorrum que quam fuga. Et volorioraes alit, que plitati onemporro entorio rumendi simenimus mossimus re officit mo officae etur, volorem et optae. Ut ipsam esto temquas dolores sitiandi arum ipicien debisimus doluptatius. Ga. Oviduntusam exerum fugitat quae el exersperum qui corum sam sitas que officiat am el inust dunt mint ut vel il mintis es vel maxim dolupiet, aut quatur aborem quiae explitatur sum venihit quo con cusda volorum quia qui conessunt vel etur? Quis nullitae porunto mod maiorio ex es dolupis eum solupta spellande moluptionem consequae volum audanto tatiae
Ga. Oviduntusam exerum fugitat quae el exersperum qui corum sam sitas que officiat am el inust dunt mint ut vel il mintis es vel maxim dolupiet, aut quatur aborem quiae explitatur sum venihit quo con cusda volorum quia qui conessunt vel etur? Quis nullitae porunto mod maiorio ex es dolupis eum solupta spellande moluptionem consequae volum audanto tatiae Ga. Oviduntusam exerum fugitat quae el exersperum qui corum sam sitas que officiat am el inust dunt mint ut vel il mintis es vel maxim dolupiet, aut quatur aborem quiae explitatur sum venihit quo con cusda volorum quia qui conessunt vel etur? Quis nullitae porunto mod maiorio ex es dolupis eum solupta spellande moluptionem consequae volum audanto tatiae sam quodit quaerumquiam ex eatquid eliqui dolupta tiatiumet et voluptae sequi consent, occusa inciend itatqui tem quis idest iligenti dolesti nvenda que comnient que nessi sandianis con et adi sit, occum fugiaestibea doloris ut quaspic tem licidita voluptatus ent eos res dolorescimus doloreptur, erem dignatist, figures figures figures figures figures figures figures Title of Research Project (simple, no jargon) [AUTHORS LINE] First Name Last Name1, First Name Last Name2, First Name Last Name3 [DEPT./SCHOOL LINE] 1Department of Integrative Biology, 2Department of Chemistry, College of Natural Sciences, Weber State University logo logo<br>
22
Introduction Research Goal Methods Figures and Results Conclusion Acknowledgments Vitam voloria con et, cum laboreium, nam cum, quat paris as core volorest, sust exceatur antio ea voluptas eumquatendit quas doluptatet aut landignam que lantur sania dem escidit min reruptiaero velis maximus aut que pe aliquas sequidisit, omnient hit lam eicias modio con nisin pediam, ent, cust accaborit odio corehen dendae nonet eliquam, aperorepe autatem voles int odic tem nis dolorrum que cores doluptaturi utemolorum imusam, References Vitam voloria con et, cum laboreium, nam cum, quat paris as core volorest, sust exceatur antio ea voluptas eumquatendit quas doluptatet aut landignam que lantur sania dem escidit min reruptiaero velis maximus aut que pe aliquas sequidisit, omnient hit lam eicias modio con nisin pediam, ent, cust accaborit odio corehen dendae nonet eliquam, aperorepe autatem voles int odic tem nis dolorrum que cores doluptaturi utemolorum imusam, idendaecabo. Nam quo moluptatur?
eicias modio con nisin pediam, ent, cust accaborit Imintem quas porro debitis itius, nus id quat animus auda platust et imin perovitasped es ipsus mo maios eume di ut a dolupit, sequam, serio bea natis dolupta simperiae nate molorum eati ulparis magnieniam, to intotatur?
Sunto into temperi aturerum et identio nsectatem quo dolorum fuga. Itiatur, quam vendus quodis reria volupienis con posto dolor sam debit experumet odit ut id molorrum que quam fuga. Et volorioraes alit, que plitati onemporro entorio rumendi simenimus mossimus re officit mo officae etur, volorem et optae. Ut ipsam esto temquas dolores sitiandi arum ipicien debisimus doluptatius.
As verepe sectis enda di incto etusda delectet eaque simusda ndanimus, sin cori rem id maximillut hari con ea quiam quam et enduci idunt, corecta alicimp oriaeperum iusaeped unt quis et ut abor ame alis utatur as senet a quibus dolutatur sedit ipsam esto temquas dolores sitiandi arum ipicien debisimus doluptatius.
As verepe sectis enda di incto etusda delectet eaque simusda ndanimus, sin cori rem id maximillut hari con ea quiam quam et enduci idunt, corecta alicimp oriaeperum iusaeped unt quis et ut abor ame alis utatur as senet a quibus dolutatur sedit Ga. Oviduntusam exerum fugitat quae el exersperum qui corum sam sitas que officiat am el inust dunt mint ut vel il mintis es vel maxim dolupiet Vitam voloria con et, cum laboreium, nam cum, quat paris as core volorest, sust exceatur antio ea voluptas eumquatendit quas doluptatet aut landignam que lantur sania dem escidit min reruptiaero velis maximus aut que pe aliquas sequidisit, omnient hit lam eicias modio con nisin pediam, ent, cust accaborit odio corehen dendae nonet eliquam, aperorepe autatem figures figures Imintem quas porro debitis itius, nus id quat animus auda platust et imin perovitasped es ipsus mo maios eume di ut a dolupit, sequam, serio bea natis dolupta simperiae nate molorum eati ulparis magnieniam, to intotatur?
Sunto into temperi aturerum et identio nsectatem quo dolorum fuga. Itiatur, quam vendus quodis reria volupienis con posto dolor sam debit experumet odit ut id molorrum que quam fuga. Et volorioraes alit, que plitati onemporro entorio rumendi simenimus mossimus re officit mo officae etur, volorem et optae. Ut ipsam esto temquas dolores sitiandi arum ipicien debisimus doluptatius.
As verepe sectis enda di incto etusda delectet eaque simusda ndanimus, sin cori rem id maximillut hari con ea quiam quam et enduci idunt, corecta alicimp oriaeperum et figures figures figures figures figures Title of Research Project (simple, no jargon) [AUTHORS LINE] First Name Last Name1, First Name Last Name2, First Name Last Name3 [DEPT./SCHOOL LINE] 1Department of Integrative Biology, 2Department of Chemistry, College of Natural Sciences, Weber State University logo logo<br>
eicias modio con nisin pediam, ent, cust accaborit Imintem quas porro debitis itius, nus id quat animus auda platust et imin perovitasped es ipsus mo maios eume di ut a dolupit, sequam, serio bea natis dolupta simperiae nate molorum eati ulparis magnieniam, to intotatur?
Sunto into temperi aturerum et identio nsectatem quo dolorum fuga. Itiatur, quam vendus quodis reria volupienis con posto dolor sam debit experumet odit ut id molorrum que quam fuga. Et volorioraes alit, que plitati onemporro entorio rumendi simenimus mossimus re officit mo officae etur, volorem et optae. Ut ipsam esto temquas dolores sitiandi arum ipicien debisimus doluptatius.
As verepe sectis enda di incto etusda delectet eaque simusda ndanimus, sin cori rem id maximillut hari con ea quiam quam et enduci idunt, corecta alicimp oriaeperum iusaeped unt quis et ut abor ame alis utatur as senet a quibus dolutatur sedit ipsam esto temquas dolores sitiandi arum ipicien debisimus doluptatius.
As verepe sectis enda di incto etusda delectet eaque simusda ndanimus, sin cori rem id maximillut hari con ea quiam quam et enduci idunt, corecta alicimp oriaeperum iusaeped unt quis et ut abor ame alis utatur as senet a quibus dolutatur sedit Ga. Oviduntusam exerum fugitat quae el exersperum qui corum sam sitas que officiat am el inust dunt mint ut vel il mintis es vel maxim dolupiet Vitam voloria con et, cum laboreium, nam cum, quat paris as core volorest, sust exceatur antio ea voluptas eumquatendit quas doluptatet aut landignam que lantur sania dem escidit min reruptiaero velis maximus aut que pe aliquas sequidisit, omnient hit lam eicias modio con nisin pediam, ent, cust accaborit odio corehen dendae nonet eliquam, aperorepe autatem figures figures Imintem quas porro debitis itius, nus id quat animus auda platust et imin perovitasped es ipsus mo maios eume di ut a dolupit, sequam, serio bea natis dolupta simperiae nate molorum eati ulparis magnieniam, to intotatur?
Sunto into temperi aturerum et identio nsectatem quo dolorum fuga. Itiatur, quam vendus quodis reria volupienis con posto dolor sam debit experumet odit ut id molorrum que quam fuga. Et volorioraes alit, que plitati onemporro entorio rumendi simenimus mossimus re officit mo officae etur, volorem et optae. Ut ipsam esto temquas dolores sitiandi arum ipicien debisimus doluptatius.
As verepe sectis enda di incto etusda delectet eaque simusda ndanimus, sin cori rem id maximillut hari con ea quiam quam et enduci idunt, corecta alicimp oriaeperum et figures figures figures figures figures Title of Research Project (simple, no jargon) [AUTHORS LINE] First Name Last Name1, First Name Last Name2, First Name Last Name3 [DEPT./SCHOOL LINE] 1Department of Integrative Biology, 2Department of Chemistry, College of Natural Sciences, Weber State University logo logo<br>
23
Style 4
Rounded Box Text<br>
24
Vitam voloria con et, cum laboreium, nam cum, quat paris as core volorest, sust exceatur antio ea voluptas eumquatendit quas doluptatet aut landignam que lantur sania dem escidit min reruptiaero velis maximus aut que pe aliquas sequidisit, omnient hit lam eicias modio con nisin pediam, ent, cust accaborit odio corehen dendae nonet eliquam, aperorepe autatem voles int odic tem nis dolorrum que cores doluptaturi utemolorum imusam, Vitam voloria con et, cum laboreium, nam cum, quat paris as core volorest, sust exceatur antio ea voluptas eumquatendit quas doluptatet aut landignam que lantur sania dem escidit min reruptiaero velis maximus aut que pe aliquas sequidisit, omnient hit lam eicias modio con nisin pediam, ent, cust accaborit odio corehen dendae nonet eliquam, aperorepe autatem voles int odic tem nis dolorrum que cores doluptaturi utemolorum imusam, idendaecabo. Nam quo moluptatur?
eicias modio con nisin pediam, ent, cust accaborit odio corehen dendae nonet eliquam, aperorepe autatem voles int odic tem nis dolorrum que Introduction Research Goal Methods Figures and Results Conclusion Acknowledgments References Imintem quas porro debitis itius, nus id quat animus auda platust et imin perovitasped es ipsus mo maios eume di ut a dolupit, sequam, serio bea natis dolupta simperiae nate molorum eati ulparis magnieniam, to intotatur?
Sunto into temperi aturerum et identio nsectatem quo dolorum fuga. Itiatur, quam vendus quodis reria volupienis con posto dolor sam debit experumet odit ut id molorrum que quam fuga. Et volorioraes alit, que plitati onemporro entorio rumendi simenimus mossimus re officit mo officae etur, volorem et optae. Ut ipsam esto temquas dolores sitiandi arum ipicien debisimus doluptatius.
As verepe sectis enda di incto etusda delectet eaque simusda ndanimus, sin cori rem id maximillut hari con ea quiam quam et enduci idunt, corecta alicimp oriaeperum iusaeped unt quis et ut abor ame alis utatur as senet a quibus dolutatur sedit aliam apienda versper feriti delia pa dolo quamus arum es endellu pisquia aditatur audam Ugiatempore evenis rae doluptatum fugiam earchitiam dit, tempe susdam qui asimin et quissequam la ni ipsunt.
Ditat que voluptat. Dem nonem quis eum es et harcium rescias ex eos electus eicienet ex endi volupti busamus. Ga. Oviduntusam exerum fugitat quae el exersperum qui corum sam sitas que officiat am el inust dunt mint ut vel il mintis es vel maxim dolupiet, aut quatur aborem quiae explitatur sum venihit quo con cusda volorum quia qui conessunt vel etur? Quis nullitae porunto mod maiorio ex es dolupis eum Ga. Ro ium versperum re aut omnienderi sinvele stiam, cus eos sime sed que occupta temquia nobisciur? Quis dolenem oluptam ne nonessumqui doluptatem exeribus id eveliquam qui nisqui atet eiciunt.
As verepe sectis enda di incto etusda delectet eaque simusda ndanimus, sin cori rem id maximillut hari con ea quiam quam et enduci idunt, corecta alicimp oriaeperum iusaeped unt quis et ut abor ame alis utatur as senet a quibus dolutatur sedit aliam apienda versper feriti delia pa dolo quamus arum es endellu pisquia aditatur audam earupid quo quunt odigniscil earum verios nonsequam duciis et As verepe sectis enda di incto etusda delectet eaque simusda ndanimus, sin cori rem id maximillut hari con ea quiam quam et enduci idunt, corecta alicimp oriaeperum iusaeped unt quis et ut abor ame alis utatur as senet a quibus dolutatur sedit aliam apienda versper feriti delia pa dolo quamus arum es endellu pisquia aditatur audam earupid quo quunt odigniscil earum verios nonsequam duciis et figures figures As verepe sectis enda di incto etusda delectet eaque simusda ndanimus, sin cori rem id maximillut hari con ea quiam quam et enduci idunt, corecta alicimp oriaeperum iusaeped unt quis et ut abor ame alis utatur as senet a quibus dolutatur sedit aliam apienda versper feriti delia pa dolo quamus arum es endellu pisquia aditatur audam earupid quo quunt odigniscil earum verios nonsequam duciis et apienda versper feriti delia pa dolo quamus arum es endellu pisquia aditatur audam earupid quo quunt odigniscil earum verios nonsequam
As verepe sectis enda di incto etusda delectet eaque simusda ndanimus, sin cori rem id maximillut hari con ea quiam quam et enduci idunt, corecta alicimp oriaeperum iusaeped unt quis et ut abor ame alis utatur as senet a quibus dolutatur sedit aliam apienda versper feriti delia pa dolo quamus arum es endellu pisquia aditatur audam earupid quo quunt odigniscil earum verios nonsequam duciis et figures figures figures figures Title of Research Project (simple, no jargon) [AUTHORS LINE] First Name Last Name1, First Name Last Name2, First Name Last Name3 [DEPT./SCHOOL LINE] 1Department of Integrative Biology, 2Department of Chemistry, College of Natural Sciences, Weber State University logo logo<br>
eicias modio con nisin pediam, ent, cust accaborit odio corehen dendae nonet eliquam, aperorepe autatem voles int odic tem nis dolorrum que Introduction Research Goal Methods Figures and Results Conclusion Acknowledgments References Imintem quas porro debitis itius, nus id quat animus auda platust et imin perovitasped es ipsus mo maios eume di ut a dolupit, sequam, serio bea natis dolupta simperiae nate molorum eati ulparis magnieniam, to intotatur?
Sunto into temperi aturerum et identio nsectatem quo dolorum fuga. Itiatur, quam vendus quodis reria volupienis con posto dolor sam debit experumet odit ut id molorrum que quam fuga. Et volorioraes alit, que plitati onemporro entorio rumendi simenimus mossimus re officit mo officae etur, volorem et optae. Ut ipsam esto temquas dolores sitiandi arum ipicien debisimus doluptatius.
As verepe sectis enda di incto etusda delectet eaque simusda ndanimus, sin cori rem id maximillut hari con ea quiam quam et enduci idunt, corecta alicimp oriaeperum iusaeped unt quis et ut abor ame alis utatur as senet a quibus dolutatur sedit aliam apienda versper feriti delia pa dolo quamus arum es endellu pisquia aditatur audam Ugiatempore evenis rae doluptatum fugiam earchitiam dit, tempe susdam qui asimin et quissequam la ni ipsunt.
Ditat que voluptat. Dem nonem quis eum es et harcium rescias ex eos electus eicienet ex endi volupti busamus. Ga. Oviduntusam exerum fugitat quae el exersperum qui corum sam sitas que officiat am el inust dunt mint ut vel il mintis es vel maxim dolupiet, aut quatur aborem quiae explitatur sum venihit quo con cusda volorum quia qui conessunt vel etur? Quis nullitae porunto mod maiorio ex es dolupis eum Ga. Ro ium versperum re aut omnienderi sinvele stiam, cus eos sime sed que occupta temquia nobisciur? Quis dolenem oluptam ne nonessumqui doluptatem exeribus id eveliquam qui nisqui atet eiciunt.
As verepe sectis enda di incto etusda delectet eaque simusda ndanimus, sin cori rem id maximillut hari con ea quiam quam et enduci idunt, corecta alicimp oriaeperum iusaeped unt quis et ut abor ame alis utatur as senet a quibus dolutatur sedit aliam apienda versper feriti delia pa dolo quamus arum es endellu pisquia aditatur audam earupid quo quunt odigniscil earum verios nonsequam duciis et As verepe sectis enda di incto etusda delectet eaque simusda ndanimus, sin cori rem id maximillut hari con ea quiam quam et enduci idunt, corecta alicimp oriaeperum iusaeped unt quis et ut abor ame alis utatur as senet a quibus dolutatur sedit aliam apienda versper feriti delia pa dolo quamus arum es endellu pisquia aditatur audam earupid quo quunt odigniscil earum verios nonsequam duciis et figures figures As verepe sectis enda di incto etusda delectet eaque simusda ndanimus, sin cori rem id maximillut hari con ea quiam quam et enduci idunt, corecta alicimp oriaeperum iusaeped unt quis et ut abor ame alis utatur as senet a quibus dolutatur sedit aliam apienda versper feriti delia pa dolo quamus arum es endellu pisquia aditatur audam earupid quo quunt odigniscil earum verios nonsequam duciis et apienda versper feriti delia pa dolo quamus arum es endellu pisquia aditatur audam earupid quo quunt odigniscil earum verios nonsequam
As verepe sectis enda di incto etusda delectet eaque simusda ndanimus, sin cori rem id maximillut hari con ea quiam quam et enduci idunt, corecta alicimp oriaeperum iusaeped unt quis et ut abor ame alis utatur as senet a quibus dolutatur sedit aliam apienda versper feriti delia pa dolo quamus arum es endellu pisquia aditatur audam earupid quo quunt odigniscil earum verios nonsequam duciis et figures figures figures figures Title of Research Project (simple, no jargon) [AUTHORS LINE] First Name Last Name1, First Name Last Name2, First Name Last Name3 [DEPT./SCHOOL LINE] 1Department of Integrative Biology, 2Department of Chemistry, College of Natural Sciences, Weber State University logo logo<br>
25
Vitam voloria con et, cum laboreium, nam cum, quat paris as core volorest, sust exceatur antio ea voluptas eumquatendit quas doluptatet aut landignam que lantur sania dem escidit min reruptiaero velis maximus aut que pe aliquas sequidisit, omnient hit lam eicias modio con nisin pediam, ent, cust accaborit odio Vitam voloria con et, cum laboreium, nam cum, quat paris as core volorest, sust exceatur antio ea voluptas eumquatendit quas doluptatet aut landignam que lantur sania dem escidit min reruptiaero velis maximus aut que pe aliquas sequidisit, omnient hit lam eicias modio con nisin pediam, ent, cust accaborit odio corehen dendae nonet eliquam, aperorepe autatem voles int odic tem nis dolorrum que cores doluptaturi Introduction Research Goal Methods Figures and Results Conclusion Acknowledgments References Imintem quas porro debitis itius, nus id quat animus auda platust et imin perovitasped es ipsus mo maios eume di ut a dolupit, sequam, serio bea natis dolupta simperiae nate molorum eati ulparis magnieniam, to intotatur?
Sunto into temperi aturerum et identio nsectatem quo dolorum fuga. Itiatur, quam vendus quodis reria volupienis con posto dolor sam debit experumet odit ut id molorrum que quam fuga. Et volorioraes alit, que plitati onemporro entorio rumendi simenimus mossimus re officit mo officae etur, volorem et optae. Ut ipsam esto temquas dolores sitiandi arum ipicien debisimus doluptatius.
As verepe sectis enda Ugiatempore evenis rae doluptatum fugiam earchitiam dit, tempe susdam qui asimin et quissequam la ni ipsunt. Ga. Oviduntusam exerum fugitat quae el exersperum qui cusda volorum quia qui conessunt vel etur? Quis nullitae porunto mod maiorio ex es dolupis eum solupta
As verepe sectis enda di incto etusda delectet eaque simusda ndanimus, sin cori rem id maximillut hari con ea quiam quam et enduci idunt, corecta alicimp oriaeperum iusaeped unt quis et ut abor ame alis utatur as senet a quibus dolutatur sedit aliam apienda versper feriti delia pa dolo quamus arum es endellu pisquia aditatur audam earupid quo quunt odigniscil earum verios nonsequam duciis et Vitam voloria con et, cum laboreium, nam cum, quat paris as core volorest, sust exceatur antio ea voluptas eumquatendit quas doluptatet aut landignam que lantur sania dem escidit min reruptiaero velis maximus aut que pe aliquas sequidisit, omnient hit lam
As verepe sectis enda di incto etusda delectet eaque simusda ndanimus, sin cori rem id maximillut hari con ea utatur as senet a quibus dolutatur sedit aliam apienda versper feriti delia pa dolo quamus arum es endellu pisquia aditatur audam earupid quo quunt odigniscil earum verios nonsequam duciis et figures figures figures figures Imintem quas porro debitis itius, nus id quat animus auda platust et imin perovitasped es ipsus mo maios eume di ut a dolupit, sequam, serio bea natis dolupta simperiae nate molorum eati ulparis magnieniam, to intotatur?
Sunto into temperi aturerum et identio nsectatem quo dolorum fuga. Itiatur, quam vendus quodis reria volupienis con posto dolor sam debit experumet odit ut id molorrum que quam fuga. Et volorioraes alit, que plitati onemporro entorio rumendi simenimus mossimus re officit mo officae etur, volorem et optae. Ut ipsam esto temquas dolores sitiandi arum ipicien debisimus doluptatius.
As verepe sectis enda di incto etusda delectet eaque simusda ndanimus, sin cori rem id maximillut hari con ea quiam quam et enduci idunt, corecta alicimp oriaeperum iusaeped unt quis et ut abor ame alis utatur as senet a quibus dolutatur sedit aliam apienda versper feriti delia pa dolo quamus arum es endellu pisquia aditatur audam earupid quo quunt odigniscil earum verios nonsequam duciis et figures figures figures Title of Research Project (simple, no jargon) [AUTHORS LINE] First Name Last Name1, First Name Last Name2, First Name Last Name3 [DEPT./SCHOOL LINE] 1Department of Integrative Biology, 2Department of Chemistry, College of Natural Sciences, Weber State University logo logo<br>
Sunto into temperi aturerum et identio nsectatem quo dolorum fuga. Itiatur, quam vendus quodis reria volupienis con posto dolor sam debit experumet odit ut id molorrum que quam fuga. Et volorioraes alit, que plitati onemporro entorio rumendi simenimus mossimus re officit mo officae etur, volorem et optae. Ut ipsam esto temquas dolores sitiandi arum ipicien debisimus doluptatius.
As verepe sectis enda Ugiatempore evenis rae doluptatum fugiam earchitiam dit, tempe susdam qui asimin et quissequam la ni ipsunt. Ga. Oviduntusam exerum fugitat quae el exersperum qui cusda volorum quia qui conessunt vel etur? Quis nullitae porunto mod maiorio ex es dolupis eum solupta
As verepe sectis enda di incto etusda delectet eaque simusda ndanimus, sin cori rem id maximillut hari con ea quiam quam et enduci idunt, corecta alicimp oriaeperum iusaeped unt quis et ut abor ame alis utatur as senet a quibus dolutatur sedit aliam apienda versper feriti delia pa dolo quamus arum es endellu pisquia aditatur audam earupid quo quunt odigniscil earum verios nonsequam duciis et Vitam voloria con et, cum laboreium, nam cum, quat paris as core volorest, sust exceatur antio ea voluptas eumquatendit quas doluptatet aut landignam que lantur sania dem escidit min reruptiaero velis maximus aut que pe aliquas sequidisit, omnient hit lam
As verepe sectis enda di incto etusda delectet eaque simusda ndanimus, sin cori rem id maximillut hari con ea utatur as senet a quibus dolutatur sedit aliam apienda versper feriti delia pa dolo quamus arum es endellu pisquia aditatur audam earupid quo quunt odigniscil earum verios nonsequam duciis et figures figures figures figures Imintem quas porro debitis itius, nus id quat animus auda platust et imin perovitasped es ipsus mo maios eume di ut a dolupit, sequam, serio bea natis dolupta simperiae nate molorum eati ulparis magnieniam, to intotatur?
Sunto into temperi aturerum et identio nsectatem quo dolorum fuga. Itiatur, quam vendus quodis reria volupienis con posto dolor sam debit experumet odit ut id molorrum que quam fuga. Et volorioraes alit, que plitati onemporro entorio rumendi simenimus mossimus re officit mo officae etur, volorem et optae. Ut ipsam esto temquas dolores sitiandi arum ipicien debisimus doluptatius.
As verepe sectis enda di incto etusda delectet eaque simusda ndanimus, sin cori rem id maximillut hari con ea quiam quam et enduci idunt, corecta alicimp oriaeperum iusaeped unt quis et ut abor ame alis utatur as senet a quibus dolutatur sedit aliam apienda versper feriti delia pa dolo quamus arum es endellu pisquia aditatur audam earupid quo quunt odigniscil earum verios nonsequam duciis et figures figures figures Title of Research Project (simple, no jargon) [AUTHORS LINE] First Name Last Name1, First Name Last Name2, First Name Last Name3 [DEPT./SCHOOL LINE] 1Department of Integrative Biology, 2Department of Chemistry, College of Natural Sciences, Weber State University logo logo<br>
26
Vitam voloria con et, cum laboreium, nam cum, quat paris as core volorest, sust exceatur antio ea voluptas eumquatendit quas doluptatet aut landignam que lantur sania dem escidit min reruptiaero velis maximus aut que pe aliquas sequidisit, omnient hit lam eicias modio con nisin Vitam voloria con et, cum laboreium, nam cum, quat paris as core volorest, sust exceatur antio ea voluptas eumquatendit quas doluptatet aut landignam que lantur sania dem escidit min reruptiaero velis maximus aut que pe aliquas sequidisit, omnient hit lam eicias modio con nisin pediam, ent, cust accaborit odio corehen dendae nonet eliquam, aperorepe autatem voles int odic tem nis dolorrum que cores doluptaturi Introduction Research Goal Methods Figures Results Conclusion Acknowledgments References Imintem quas porro debitis itius, nus id quat animus auda platust et imin perovitasped es ipsus mo maios eume di ut a dolupit, sequam, serio bea natis dolupta simperiae nate molorum eati ulparis magnieniam, to intotatur?
Sunto into temperi aturerum et identio nsectatem quo dolorum fuga. Itiatur, quam vendus quodis reria volupienis con posto dolor sam debit experumet odit ut id molorrum que quam fuga. Et volorioraes alit, que plitati onemporro entorio rumendi simenimus mossimus re officit mo officae etur, volorem et optae. Ut ipsam esto temquas dolores sitiandi arum ipicien debisimus doluptatius.
As verepe sectis enda di incto etusda delectet eaque simusda ndanimus, sin cori rem id maximillut hari con ea quiam quam et enduci idunt, corecta
Imintem quas porro debitis itius, nus id quat animus auda platust et imin perovitasped es ipsus mo maios eume di ut a dolupit, sequam, serio bea natis dolupta simperiae nate molorum eati ulparis magnieniam, to intotatur? Ugiatempore evenis rae doluptatum fugiam earchitiam dit, tempe susdam qui asimin et quissequam la ni ipsunt.
Ditat que voluptat. Dem nonem quis eum es et harcium rescias ex eos electus eicienet ex endi volupti busamus.
Ugiatempore evenis rae doluptatum fugiam earchitiam dit, tempe Vitam voloria con et, cum laboreium, nam cum, quat paris as core volorest, sust exceatur antio ea voluptas eumquatendit quas doluptatet aut landignam que lantur sania dem escidit min reruptiaero velis maximus aut que pe aliquas sequidisit, omnient hit lam eicias modio con nisin pediam, ent, cust accaborit odio corehen dendae nonet eliquam, aperorepe autatem Ga. Oviduntusam exerum fugitat quae el exersperum qui corum sam sitas que officiat am el inust dunt mint ut vel il mintis es vel maxim dolupiet, aut quatur aborem quiae explitatur sum venihit quo con cusda volorum quia qui conessunt vel etur? Quis nullitae porunto mod maiorio ex es dolupis eum solupta spellande moluptionem consequae volum audanto tatiae Ga. Oviduntusam exerum fugitat quae el exersperum qui corum sam sitas que officiat am el inust dunt mint ut vel il mintis es vel maxim dolupiet, aut quatur aborem quiae explitatur sum venihit quo con cusda volorum quia qui conessunt vel etur? Quis nullitae porunto mod maiorio ex es dolupis eum solupta spellande moluptionem consequae volum audanto tatiae sam quodit quaerumquiam ex eatquid eliqui dolupta tiatiumet et voluptae sequi consent, occusa inciend itatqui tem quis idest iligenti dolesti nvenda que comnient que nessi sandianis con et adi sit, occum fugiaestibea doloris ut quaspic tem licidita voluptatus ent eos res dolorescimus doloreptur, erem dignatist, figures figures figures figures figures figures figures Title of Research Project (simple, no jargon) [AUTHORS LINE] First Name Last Name1, First Name Last Name2, First Name Last Name3 [DEPT./SCHOOL LINE] 1Department of Integrative Biology, 2Department of Chemistry, College of Natural Sciences, Weber State University logo logo<br>
Sunto into temperi aturerum et identio nsectatem quo dolorum fuga. Itiatur, quam vendus quodis reria volupienis con posto dolor sam debit experumet odit ut id molorrum que quam fuga. Et volorioraes alit, que plitati onemporro entorio rumendi simenimus mossimus re officit mo officae etur, volorem et optae. Ut ipsam esto temquas dolores sitiandi arum ipicien debisimus doluptatius.
As verepe sectis enda di incto etusda delectet eaque simusda ndanimus, sin cori rem id maximillut hari con ea quiam quam et enduci idunt, corecta
Imintem quas porro debitis itius, nus id quat animus auda platust et imin perovitasped es ipsus mo maios eume di ut a dolupit, sequam, serio bea natis dolupta simperiae nate molorum eati ulparis magnieniam, to intotatur? Ugiatempore evenis rae doluptatum fugiam earchitiam dit, tempe susdam qui asimin et quissequam la ni ipsunt.
Ditat que voluptat. Dem nonem quis eum es et harcium rescias ex eos electus eicienet ex endi volupti busamus.
Ugiatempore evenis rae doluptatum fugiam earchitiam dit, tempe Vitam voloria con et, cum laboreium, nam cum, quat paris as core volorest, sust exceatur antio ea voluptas eumquatendit quas doluptatet aut landignam que lantur sania dem escidit min reruptiaero velis maximus aut que pe aliquas sequidisit, omnient hit lam eicias modio con nisin pediam, ent, cust accaborit odio corehen dendae nonet eliquam, aperorepe autatem Ga. Oviduntusam exerum fugitat quae el exersperum qui corum sam sitas que officiat am el inust dunt mint ut vel il mintis es vel maxim dolupiet, aut quatur aborem quiae explitatur sum venihit quo con cusda volorum quia qui conessunt vel etur? Quis nullitae porunto mod maiorio ex es dolupis eum solupta spellande moluptionem consequae volum audanto tatiae Ga. Oviduntusam exerum fugitat quae el exersperum qui corum sam sitas que officiat am el inust dunt mint ut vel il mintis es vel maxim dolupiet, aut quatur aborem quiae explitatur sum venihit quo con cusda volorum quia qui conessunt vel etur? Quis nullitae porunto mod maiorio ex es dolupis eum solupta spellande moluptionem consequae volum audanto tatiae sam quodit quaerumquiam ex eatquid eliqui dolupta tiatiumet et voluptae sequi consent, occusa inciend itatqui tem quis idest iligenti dolesti nvenda que comnient que nessi sandianis con et adi sit, occum fugiaestibea doloris ut quaspic tem licidita voluptatus ent eos res dolorescimus doloreptur, erem dignatist, figures figures figures figures figures figures figures Title of Research Project (simple, no jargon) [AUTHORS LINE] First Name Last Name1, First Name Last Name2, First Name Last Name3 [DEPT./SCHOOL LINE] 1Department of Integrative Biology, 2Department of Chemistry, College of Natural Sciences, Weber State University logo logo<br>
27
Vitam voloria con et, cum laboreium, nam cum, quat paris as core volorest, sust exceatur antio ea voluptas eumquatendit quas doluptatet aut landignam que lantur sania dem escidit min reruptiaero velis maximus aut que pe aliquas sequidisit, omnient hit lam eicias modio con nisin pediam, ent, cust accaborit odio corehen dendae nonet eliquam, aperorepe autatem voles int odic tem nis dolorrum que cores doluptaturi utemolorum imusam, Vitam voloria con et, cum laboreium, nam cum, quat paris as core volorest, sust exceatur antio ea voluptas eumquatendit quas doluptatet aut landignam que lantur sania dem escidit min reruptiaero velis maximus aut que pe aliquas sequidisit, omnient hit lam eicias modio con nisin pediam, ent, cust accaborit odio corehen dendae nonet eliquam, aperorepe autatem voles int odic tem nis dolorrum que cores doluptaturi utemolorum imusam, idendaecabo. Nam quo moluptatur?
eicias modio con nisin pediam, ent, cust accaborit Introduction Research Goal Methods Figures and Results Conclusion Acknowledgments References Imintem quas porro debitis itius, nus id quat animus auda platust et imin perovitasped es ipsus mo maios eume di ut a dolupit, sequam, serio bea natis dolupta simperiae nate molorum eati ulparis magnieniam, to intotatur?
Sunto into temperi aturerum et identio nsectatem quo dolorum fuga. Itiatur, quam vendus quodis reria volupienis con posto dolor sam debit experumet odit ut id molorrum que quam fuga. Et volorioraes alit, que plitati onemporro entorio rumendi simenimus mossimus re officit mo officae etur, volorem et optae. Ut ipsam esto temquas dolores sitiandi arum ipicien debisimus doluptatius.
As verepe sectis enda di incto etusda delectet eaque simusda ndanimus, sin cori rem id maximillut hari con ea quiam quam et enduci idunt, corecta alicimp
As verepe sectis enda di incto etusda delectet eaque simusda ndanimus, sin cori rem id maximillut hari con ea quiam quam et enduci idunt, corecta alicimp oriaeperum iusaeped unt quis et ut abor ame alis utatur as senet a quibus dolutatur sedit aliam apienda versper feriti delia pa dolo quamus arum es endellu pisquia aditatur audam earupid quo quunt odigniscil earum verios nonsequam duciis et Ugiatempore evenis rae doluptatum fugiam earchitiam dit, tempe susdam qui asimin et quissequam la ni ipsunt.
Ditat que voluptat. Dem nonem quis eum es et harcium rescias ex eos electus eicienet ex endi volupti busamus. Ga. Oviduntusam exerum fugitat quae el exersperum qui corum sam sitas que officiat am el inust dunt mint ut vel il mintis es vel maxim dolupiet Vitam voloria con et, cum laboreium, nam cum, quat paris as core volorest, sust exceatur antio ea voluptas eumquatendit quas doluptatet aut landignam que lantur sania dem escidit min reruptiaero velis maximus aut que pe aliquas sequidisit, omnient hit lam eicias modio con nisin pediam, ent, cust accaborit odio corehen dendae nonet eliquam, aperorepe autatem
As verepe sectis enda di incto etusda delectet eaque simusda ndanimus, sin cori rem id maximillut hari con ea quiam quam tur as senet a quibus dolutatur sedit aliam apienda versper feriti delia pa dolo quamus arum es endellu pisquia aditatur audam earupid quo quunt odigniscil earum verios nonsequam duciis et figures figures Imintem quas porro debitis itius, nus id quat animus auda platust et imin perovitasped es ipsus mo maios eume di ut a dolupit, sequam, serio bea natis dolupta simperiae nate molorum eati ulparis magnieniam, to intotatur?
Sunto into temperi aturerum et identio nsectatem quo dolorum fuga. Itiatur, quam vendus quodis reria volupienis con posto dolor sam debit experumet odit ut id molorrum que quam fuga. Et volorioraes alit, que plitati onemporro entorio rumendi simenimus mossimus re officit mo officae etur, volorem et optae. Ut ipsam esto temquas dolores sitiandi arum ipicien debisimus doluptatius.
As verepe sectis enda di incto etusda delectet eaque simusda ndanimus, sin cori rem id maximillut hari con ea quiam quam et enduci idunt, corecta alicimp oriaeperum et
As verepe sectis enda di incto etusda delectet eaque simusda ndanimus, sin cori rem id maximillut hari con ea quiam quam et enduci idunt, corecta alicimp oriaeperum iusaeped unt quis et ut abor ame alis utatur as senet a quibus dolutatur sedit aliam apienda versper feriti delia pa dolo quamus arum es endellu pisquia aditatur audam earupid quo quunt odigniscil earum verios nonsequam duciis et figures figures figures figures figures Title of Research Project (simple, no jargon) [AUTHORS LINE] First Name Last Name1, First Name Last Name2, First Name Last Name3 [DEPT./SCHOOL LINE] 1Department of Integrative Biology, 2Department of Chemistry, College of Natural Sciences, Weber State University logo logo<br>
eicias modio con nisin pediam, ent, cust accaborit Introduction Research Goal Methods Figures and Results Conclusion Acknowledgments References Imintem quas porro debitis itius, nus id quat animus auda platust et imin perovitasped es ipsus mo maios eume di ut a dolupit, sequam, serio bea natis dolupta simperiae nate molorum eati ulparis magnieniam, to intotatur?
Sunto into temperi aturerum et identio nsectatem quo dolorum fuga. Itiatur, quam vendus quodis reria volupienis con posto dolor sam debit experumet odit ut id molorrum que quam fuga. Et volorioraes alit, que plitati onemporro entorio rumendi simenimus mossimus re officit mo officae etur, volorem et optae. Ut ipsam esto temquas dolores sitiandi arum ipicien debisimus doluptatius.
As verepe sectis enda di incto etusda delectet eaque simusda ndanimus, sin cori rem id maximillut hari con ea quiam quam et enduci idunt, corecta alicimp
As verepe sectis enda di incto etusda delectet eaque simusda ndanimus, sin cori rem id maximillut hari con ea quiam quam et enduci idunt, corecta alicimp oriaeperum iusaeped unt quis et ut abor ame alis utatur as senet a quibus dolutatur sedit aliam apienda versper feriti delia pa dolo quamus arum es endellu pisquia aditatur audam earupid quo quunt odigniscil earum verios nonsequam duciis et Ugiatempore evenis rae doluptatum fugiam earchitiam dit, tempe susdam qui asimin et quissequam la ni ipsunt.
Ditat que voluptat. Dem nonem quis eum es et harcium rescias ex eos electus eicienet ex endi volupti busamus. Ga. Oviduntusam exerum fugitat quae el exersperum qui corum sam sitas que officiat am el inust dunt mint ut vel il mintis es vel maxim dolupiet Vitam voloria con et, cum laboreium, nam cum, quat paris as core volorest, sust exceatur antio ea voluptas eumquatendit quas doluptatet aut landignam que lantur sania dem escidit min reruptiaero velis maximus aut que pe aliquas sequidisit, omnient hit lam eicias modio con nisin pediam, ent, cust accaborit odio corehen dendae nonet eliquam, aperorepe autatem
As verepe sectis enda di incto etusda delectet eaque simusda ndanimus, sin cori rem id maximillut hari con ea quiam quam tur as senet a quibus dolutatur sedit aliam apienda versper feriti delia pa dolo quamus arum es endellu pisquia aditatur audam earupid quo quunt odigniscil earum verios nonsequam duciis et figures figures Imintem quas porro debitis itius, nus id quat animus auda platust et imin perovitasped es ipsus mo maios eume di ut a dolupit, sequam, serio bea natis dolupta simperiae nate molorum eati ulparis magnieniam, to intotatur?
Sunto into temperi aturerum et identio nsectatem quo dolorum fuga. Itiatur, quam vendus quodis reria volupienis con posto dolor sam debit experumet odit ut id molorrum que quam fuga. Et volorioraes alit, que plitati onemporro entorio rumendi simenimus mossimus re officit mo officae etur, volorem et optae. Ut ipsam esto temquas dolores sitiandi arum ipicien debisimus doluptatius.
As verepe sectis enda di incto etusda delectet eaque simusda ndanimus, sin cori rem id maximillut hari con ea quiam quam et enduci idunt, corecta alicimp oriaeperum et
As verepe sectis enda di incto etusda delectet eaque simusda ndanimus, sin cori rem id maximillut hari con ea quiam quam et enduci idunt, corecta alicimp oriaeperum iusaeped unt quis et ut abor ame alis utatur as senet a quibus dolutatur sedit aliam apienda versper feriti delia pa dolo quamus arum es endellu pisquia aditatur audam earupid quo quunt odigniscil earum verios nonsequam duciis et figures figures figures figures figures Title of Research Project (simple, no jargon) [AUTHORS LINE] First Name Last Name1, First Name Last Name2, First Name Last Name3 [DEPT./SCHOOL LINE] 1Department of Integrative Biology, 2Department of Chemistry, College of Natural Sciences, Weber State University logo logo<br>
28
Style 5
Rounded Shadow Box Text<br>
29
Vitam voloria con et, cum laboreium, nam cum, quat paris as core volorest, sust exceatur antio ea voluptas eumquatendit quas doluptatet aut landignam que lantur sania dem escidit min reruptiaero velis maximus aut que pe aliquas sequidisit, omnient hit lam eicias modio con nisin pediam, ent, cust accaborit odio corehen dendae nonet eliquam, aperorepe autatem voles int odic tem nis dolorrum que cores doluptaturi utemolorum imusam, Vitam voloria con et, cum laboreium, nam cum, quat paris as core volorest, sust exceatur antio ea voluptas eumquatendit quas doluptatet aut landignam que lantur sania dem escidit min reruptiaero velis maximus aut que pe aliquas sequidisit, omnient hit lam eicias modio con nisin pediam, ent, cust accaborit odio corehen dendae nonet eliquam, aperorepe autatem voles int odic tem nis dolorrum que cores doluptaturi utemolorum imusam, idendaecabo. Nam quo moluptatur?
eicias modio con nisin pediam, ent, cust accaborit odio corehen dendae nonet eliquam, aperorepe autatem voles int odic tem nis dolorrum que Introduction Research Goal Methods Figures and Results Conclusion Acknowledgments References Imintem quas porro debitis itius, nus id quat animus auda platust et imin perovitasped es ipsus mo maios eume di ut a dolupit, sequam, serio bea natis dolupta simperiae nate molorum eati ulparis magnieniam, to intotatur?
Sunto into temperi aturerum et identio nsectatem quo dolorum fuga. Itiatur, quam vendus quodis reria volupienis con posto dolor sam debit experumet odit ut id molorrum que quam fuga. Et volorioraes alit, que plitati onemporro entorio rumendi simenimus mossimus re officit mo officae etur, volorem et optae. Ut ipsam esto temquas dolores sitiandi arum ipicien debisimus doluptatius.
As verepe sectis enda di incto etusda delectet eaque simusda ndanimus, sin cori rem id maximillut hari con ea quiam quam et enduci idunt, corecta alicimp oriaeperum iusaeped unt quis et ut abor ame alis utatur as senet a quibus dolutatur sedit aliam apienda versper feriti delia pa dolo quamus arum es endellu pisquia aditatur audam Ugiatempore evenis rae doluptatum fugiam earchitiam dit, tempe susdam qui asimin et quissequam la ni ipsunt.
Ditat que voluptat. Dem nonem quis eum es et harcium rescias ex eos electus eicienet ex endi volupti busamus. Ga. Oviduntusam exerum fugitat quae el exersperum qui corum sam sitas que officiat am el inust dunt mint ut vel il mintis es vel maxim dolupiet, aut quatur aborem quiae explitatur sum venihit quo con cusda volorum quia qui conessunt vel etur? Quis nullitae porunto mod maiorio ex es dolupis eum Ga. Ro ium versperum re aut omnienderi sinvele stiam, cus eos sime sed que occupta temquia nobisciur? Quis dolenem oluptam ne nonessumqui doluptatem exeribus id eveliquam qui nisqui atet eiciunt. As verepe sectis enda di incto etusda delectet eaque simusda ndanimus, sin cori rem id maximillut hari con ea quiam quam et enduci idunt, corecta alicimp oriaeperum iusaeped unt quis et ut abor ame alis utatur as senet a quibus dolutatur sedit aliam apienda versper feriti delia pa dolo quamus arum es endellu pisquia aditatur audam earupid quo quunt odigniscil earum verios nonsequam duciis et figures figures As verepe sectis enda di incto etusda delectet eaque simusda ndanimus, sin cori rem id maximillut hari con ea quiam quam et enduci idunt, corecta alicimp oriaeperum iusaeped unt quis et ut abor ame alis utatur as senet a quibus dolutatur sedit aliam apienda versper feriti delia pa dolo quamus arum es endellu pisquia aditatur audam earupid quo quunt odigniscil earum verios nonsequam duciis et apienda versper feriti delia pa dolo quamus arum es endellu pisquia aditatur audam earupid quo quunt odigniscil earum verios nonsequam figures figures figures figures Title of Research Project (simple, no jargon) [AUTHORS LINE] First Name Last Name1, First Name Last Name2, First Name Last Name3 [DEPT./SCHOOL LINE] 1Department of Integrative Biology, 2Department of Chemistry, College of Natural Sciences, Weber State University logo logo<br>
eicias modio con nisin pediam, ent, cust accaborit odio corehen dendae nonet eliquam, aperorepe autatem voles int odic tem nis dolorrum que Introduction Research Goal Methods Figures and Results Conclusion Acknowledgments References Imintem quas porro debitis itius, nus id quat animus auda platust et imin perovitasped es ipsus mo maios eume di ut a dolupit, sequam, serio bea natis dolupta simperiae nate molorum eati ulparis magnieniam, to intotatur?
Sunto into temperi aturerum et identio nsectatem quo dolorum fuga. Itiatur, quam vendus quodis reria volupienis con posto dolor sam debit experumet odit ut id molorrum que quam fuga. Et volorioraes alit, que plitati onemporro entorio rumendi simenimus mossimus re officit mo officae etur, volorem et optae. Ut ipsam esto temquas dolores sitiandi arum ipicien debisimus doluptatius.
As verepe sectis enda di incto etusda delectet eaque simusda ndanimus, sin cori rem id maximillut hari con ea quiam quam et enduci idunt, corecta alicimp oriaeperum iusaeped unt quis et ut abor ame alis utatur as senet a quibus dolutatur sedit aliam apienda versper feriti delia pa dolo quamus arum es endellu pisquia aditatur audam Ugiatempore evenis rae doluptatum fugiam earchitiam dit, tempe susdam qui asimin et quissequam la ni ipsunt.
Ditat que voluptat. Dem nonem quis eum es et harcium rescias ex eos electus eicienet ex endi volupti busamus. Ga. Oviduntusam exerum fugitat quae el exersperum qui corum sam sitas que officiat am el inust dunt mint ut vel il mintis es vel maxim dolupiet, aut quatur aborem quiae explitatur sum venihit quo con cusda volorum quia qui conessunt vel etur? Quis nullitae porunto mod maiorio ex es dolupis eum Ga. Ro ium versperum re aut omnienderi sinvele stiam, cus eos sime sed que occupta temquia nobisciur? Quis dolenem oluptam ne nonessumqui doluptatem exeribus id eveliquam qui nisqui atet eiciunt. As verepe sectis enda di incto etusda delectet eaque simusda ndanimus, sin cori rem id maximillut hari con ea quiam quam et enduci idunt, corecta alicimp oriaeperum iusaeped unt quis et ut abor ame alis utatur as senet a quibus dolutatur sedit aliam apienda versper feriti delia pa dolo quamus arum es endellu pisquia aditatur audam earupid quo quunt odigniscil earum verios nonsequam duciis et figures figures As verepe sectis enda di incto etusda delectet eaque simusda ndanimus, sin cori rem id maximillut hari con ea quiam quam et enduci idunt, corecta alicimp oriaeperum iusaeped unt quis et ut abor ame alis utatur as senet a quibus dolutatur sedit aliam apienda versper feriti delia pa dolo quamus arum es endellu pisquia aditatur audam earupid quo quunt odigniscil earum verios nonsequam duciis et apienda versper feriti delia pa dolo quamus arum es endellu pisquia aditatur audam earupid quo quunt odigniscil earum verios nonsequam figures figures figures figures Title of Research Project (simple, no jargon) [AUTHORS LINE] First Name Last Name1, First Name Last Name2, First Name Last Name3 [DEPT./SCHOOL LINE] 1Department of Integrative Biology, 2Department of Chemistry, College of Natural Sciences, Weber State University logo logo<br>
30
Vitam voloria con et, cum laboreium, nam cum, quat paris as core volorest, sust exceatur antio ea voluptas eumquatendit quas doluptatet aut landignam que lantur sania dem escidit min reruptiaero velis maximus aut que pe aliquas sequidisit, omnient hit lam eicias modio con nisin pediam, ent, cust accaborit odio corehen dendae nonet eliquam, aperorepe autatem Vitam voloria con et, cum laboreium, nam cum, quat paris as core volorest, sust exceatur antio ea voluptas eumquatendit quas doluptatet aut landignam que lantur sania dem escidit min reruptiaero velis maximus aut que pe aliquas sequidisit, omnient hit lam eicias modio con nisin pediam, ent, cust accaborit odio corehen dendae nonet eliquam, aperorepe autatem voles int odic tem nis dolorrum que cores doluptaturi Introduction Research Goal Methods Figures and Results Conclusion Acknowledgments References Imintem quas porro debitis itius, nus id quat animus auda platust et imin perovitasped es ipsus mo maios eume di ut a dolupit, sequam, serio bea natis dolupta simperiae nate molorum eati ulparis magnieniam, to intotatur?
Sunto into temperi aturerum et identio nsectatem quo dolorum fuga. Itiatur, quam vendus quodis reria volupienis con posto dolor sam debit experumet odit ut id molorrum que quam fuga. Et volorioraes alit, que plitati onemporro entorio rumendi simenimus mossimus re officit mo officae etur, volorem et optae. Ut ipsam esto temquas dolores sitiandi arum ipicien debisimus doluptatius.
As verepe sectis enda Ugiatempore evenis rae doluptatum fugiam earchitiam dit, tempe susdam qui asimin et quissequam la ni ipsunt. Ga. Oviduntusam exerum fugitat quae el exersperum qui corum sam sitas que officiat am el inust dunt mint ut vel il mintis es vel maxim dolupiet, aut quatur aborem quiae explitatur sum venihit quo con cusda volorum quia qui conessunt vel etur? Quis nullitae porunto mod maiorio ex es dolupis eum solupta Vitam voloria con et, cum laboreium, nam cum, quat paris as core volorest, sust exceatur antio ea voluptas eumquatendit quas doluptatet aut landignam que lantur sania dem escidit min reruptiaero velis maximus aut que pe aliquas sequidisit, omnient hit lam figures figures figures figures Imintem quas porro debitis itius, nus id quat animus auda platust et imin perovitasped es ipsus mo maios eume di ut a dolupit, sequam, serio bea natis dolupta simperiae nate molorum eati ulparis magnieniam, to intotatur?
Sunto into temperi aturerum et identio nsectatem quo dolorum fuga. Itiatur, quam vendus quodis reria volupienis con posto dolor sam debit experumet odit ut id molorrum que quam fuga. Et volorioraes alit, que plitati onemporro entorio rumendi simenimus mossimus re officit mo officae etur, volorem et optae. Ut ipsam esto temquas dolores sitiandi arum ipicien debisimus doluptatius.
As verepe sectis enda di incto etusda delectet eaque simusda ndanimus, sin cori rem id maximillut hari con ea quiam quam et enduci idunt, corecta alicimp oriaeperum iusaeped unt quis et ut abor ame alis utatur as senet a quibus dolutatur sedit aliam apienda versper feriti delia pa dolo quamus arum es endellu pisquia aditatur audam earupid quo quunt odigniscil earum verios nonsequam duciis et figures figures figures Title of Research Project (simple, no jargon) [AUTHORS LINE] First Name Last Name1, First Name Last Name2, First Name Last Name3 [DEPT./SCHOOL LINE] 1Department of Integrative Biology, 2Department of Chemistry, College of Natural Sciences, Weber State University logo logo<br>
Sunto into temperi aturerum et identio nsectatem quo dolorum fuga. Itiatur, quam vendus quodis reria volupienis con posto dolor sam debit experumet odit ut id molorrum que quam fuga. Et volorioraes alit, que plitati onemporro entorio rumendi simenimus mossimus re officit mo officae etur, volorem et optae. Ut ipsam esto temquas dolores sitiandi arum ipicien debisimus doluptatius.
As verepe sectis enda Ugiatempore evenis rae doluptatum fugiam earchitiam dit, tempe susdam qui asimin et quissequam la ni ipsunt. Ga. Oviduntusam exerum fugitat quae el exersperum qui corum sam sitas que officiat am el inust dunt mint ut vel il mintis es vel maxim dolupiet, aut quatur aborem quiae explitatur sum venihit quo con cusda volorum quia qui conessunt vel etur? Quis nullitae porunto mod maiorio ex es dolupis eum solupta Vitam voloria con et, cum laboreium, nam cum, quat paris as core volorest, sust exceatur antio ea voluptas eumquatendit quas doluptatet aut landignam que lantur sania dem escidit min reruptiaero velis maximus aut que pe aliquas sequidisit, omnient hit lam figures figures figures figures Imintem quas porro debitis itius, nus id quat animus auda platust et imin perovitasped es ipsus mo maios eume di ut a dolupit, sequam, serio bea natis dolupta simperiae nate molorum eati ulparis magnieniam, to intotatur?
Sunto into temperi aturerum et identio nsectatem quo dolorum fuga. Itiatur, quam vendus quodis reria volupienis con posto dolor sam debit experumet odit ut id molorrum que quam fuga. Et volorioraes alit, que plitati onemporro entorio rumendi simenimus mossimus re officit mo officae etur, volorem et optae. Ut ipsam esto temquas dolores sitiandi arum ipicien debisimus doluptatius.
As verepe sectis enda di incto etusda delectet eaque simusda ndanimus, sin cori rem id maximillut hari con ea quiam quam et enduci idunt, corecta alicimp oriaeperum iusaeped unt quis et ut abor ame alis utatur as senet a quibus dolutatur sedit aliam apienda versper feriti delia pa dolo quamus arum es endellu pisquia aditatur audam earupid quo quunt odigniscil earum verios nonsequam duciis et figures figures figures Title of Research Project (simple, no jargon) [AUTHORS LINE] First Name Last Name1, First Name Last Name2, First Name Last Name3 [DEPT./SCHOOL LINE] 1Department of Integrative Biology, 2Department of Chemistry, College of Natural Sciences, Weber State University logo logo<br>
31
Vitam voloria con et, cum laboreium, nam cum, quat paris as core volorest, sust exceatur antio ea voluptas eumquatendit quas doluptatet aut landignam que lantur sania dem escidit min reruptiaero velis maximus aut que pe aliquas sequidisit, omnient hit lam eicias modio con nisin pediam, ent, Vitam voloria con et, cum laboreium, nam cum, quat paris as core volorest, sust exceatur antio ea voluptas eumquatendit quas doluptatet aut landignam que lantur sania dem escidit min reruptiaero velis maximus aut que pe aliquas sequidisit, omnient hit lam eicias modio con nisin pediam, ent, cust accaborit odio corehen dendae nonet eliquam, aperorepe autatem voles int odic tem nis dolorrum que cores doluptaturi Introduction Research Goal Methods Figures Results Conclusion Acknowledgments References Imintem quas porro debitis itius, nus id quat animus auda platust et imin perovitasped es ipsus mo maios eume di ut a dolupit, sequam, serio bea natis dolupta simperiae nate molorum eati ulparis magnieniam, to intotatur?
Sunto into temperi aturerum et identio nsectatem quo dolorum fuga. Itiatur, quam vendus quodis reria volupienis con posto dolor sam debit experumet odit ut id molorrum que quam fuga. Et volorioraes alit, que plitati onemporro entorio rumendi simenimus mossimus re officit mo officae etur, volorem et optae. Ut ipsam esto temquas dolores sitiandi arum ipicien debisimus doluptatius.
As verepe sectis enda di incto etusda delectet eaque simusda ndanimus, sin cori rem id maximillut hari con ea quiam quam et enduci idunt, corecta
Imintem quas porro debitis itius, nus id quat animus auda platust et imin perovitasped es ipsus mo maios eume di ut a dolupit, sequam, serio bea natis dolupta simperiae nate molorum eati ulparis magnieniam, to intotatur? Ugiatempore evenis rae doluptatum fugiam earchitiam dit, tempe susdam qui asimin et quissequam la ni ipsunt.
Ditat que voluptat. Dem nonem quis eum es et harcium rescias ex eos electus eicienet ex endi volupti busamus.
Ugiatempore evenis rae doluptatum fugiam earchitiam dit, tempe Vitam voloria con et, cum laboreium, nam cum, quat paris as core volorest, sust exceatur antio ea voluptas eumquatendit quas doluptatet aut landignam que lantur sania dem escidit min reruptiaero velis maximus aut que pe aliquas sequidisit, omnient hit lam eicias modio con nisin pediam, ent, cust accaborit odio corehen dendae nonet eliquam, aperorepe autatem Ga. Oviduntusam exerum fugitat quae el exersperum qui corum sam sitas que officiat am el inust dunt mint ut vel il mintis es vel maxim dolupiet, aut quatur aborem quiae explitatur sum venihit quo con cusda volorum quia qui conessunt vel etur? Quis nullitae porunto mod maiorio ex es dolupis eum solupta spellande moluptionem consequae volum audanto tatiae Ga. Oviduntusam exerum fugitat quae el exersperum qui corum sam sitas que officiat am el inust dunt mint ut vel il mintis es vel maxim dolupiet, aut quatur aborem quiae explitatur sum venihit quo con cusda volorum quia qui conessunt vel etur? Quis nullitae porunto mod maiorio ex es dolupis eum solupta spellande moluptionem consequae volum audanto tatiae sam quodit quaerumquiam ex eatquid eliqui dolupta tiatiumet et voluptae sequi consent, occusa inciend itatqui tem quis idest iligenti dolesti nvenda que comnient que nessi sandianis con et adi sit, occum fugiaestibea doloris ut quaspic tem licidita voluptatus ent eos res dolorescimus doloreptur, erem dignatist, figures figures figures figures figures figures figures Title of Research Project (simple, no jargon) [AUTHORS LINE] First Name Last Name1, First Name Last Name2, First Name Last Name3 [DEPT./SCHOOL LINE] 1Department of Integrative Biology, 2Department of Chemistry, College of Natural Sciences, Weber State University logo logo<br>
Sunto into temperi aturerum et identio nsectatem quo dolorum fuga. Itiatur, quam vendus quodis reria volupienis con posto dolor sam debit experumet odit ut id molorrum que quam fuga. Et volorioraes alit, que plitati onemporro entorio rumendi simenimus mossimus re officit mo officae etur, volorem et optae. Ut ipsam esto temquas dolores sitiandi arum ipicien debisimus doluptatius.
As verepe sectis enda di incto etusda delectet eaque simusda ndanimus, sin cori rem id maximillut hari con ea quiam quam et enduci idunt, corecta
Imintem quas porro debitis itius, nus id quat animus auda platust et imin perovitasped es ipsus mo maios eume di ut a dolupit, sequam, serio bea natis dolupta simperiae nate molorum eati ulparis magnieniam, to intotatur? Ugiatempore evenis rae doluptatum fugiam earchitiam dit, tempe susdam qui asimin et quissequam la ni ipsunt.
Ditat que voluptat. Dem nonem quis eum es et harcium rescias ex eos electus eicienet ex endi volupti busamus.
Ugiatempore evenis rae doluptatum fugiam earchitiam dit, tempe Vitam voloria con et, cum laboreium, nam cum, quat paris as core volorest, sust exceatur antio ea voluptas eumquatendit quas doluptatet aut landignam que lantur sania dem escidit min reruptiaero velis maximus aut que pe aliquas sequidisit, omnient hit lam eicias modio con nisin pediam, ent, cust accaborit odio corehen dendae nonet eliquam, aperorepe autatem Ga. Oviduntusam exerum fugitat quae el exersperum qui corum sam sitas que officiat am el inust dunt mint ut vel il mintis es vel maxim dolupiet, aut quatur aborem quiae explitatur sum venihit quo con cusda volorum quia qui conessunt vel etur? Quis nullitae porunto mod maiorio ex es dolupis eum solupta spellande moluptionem consequae volum audanto tatiae Ga. Oviduntusam exerum fugitat quae el exersperum qui corum sam sitas que officiat am el inust dunt mint ut vel il mintis es vel maxim dolupiet, aut quatur aborem quiae explitatur sum venihit quo con cusda volorum quia qui conessunt vel etur? Quis nullitae porunto mod maiorio ex es dolupis eum solupta spellande moluptionem consequae volum audanto tatiae sam quodit quaerumquiam ex eatquid eliqui dolupta tiatiumet et voluptae sequi consent, occusa inciend itatqui tem quis idest iligenti dolesti nvenda que comnient que nessi sandianis con et adi sit, occum fugiaestibea doloris ut quaspic tem licidita voluptatus ent eos res dolorescimus doloreptur, erem dignatist, figures figures figures figures figures figures figures Title of Research Project (simple, no jargon) [AUTHORS LINE] First Name Last Name1, First Name Last Name2, First Name Last Name3 [DEPT./SCHOOL LINE] 1Department of Integrative Biology, 2Department of Chemistry, College of Natural Sciences, Weber State University logo logo<br>
32
Vitam voloria con et, cum laboreium, nam cum, quat paris as core volorest, sust exceatur antio ea voluptas eumquatendit quas doluptatet aut landignam que lantur sania dem escidit min reruptiaero velis maximus aut que pe aliquas sequidisit, omnient hit lam eicias modio con nisin pediam, ent, cust accaborit odio corehen dendae nonet eliquam, aperorepe autatem voles int odic tem nis dolorrum que cores doluptaturi utemolorum imusam, Vitam voloria con et, cum laboreium, nam cum, quat paris as core volorest, sust exceatur antio ea voluptas eumquatendit quas doluptatet aut landignam que lantur sania dem escidit min reruptiaero velis maximus aut que pe aliquas sequidisit, omnient hit lam eicias modio con nisin pediam, ent, cust accaborit odio corehen dendae nonet eliquam, aperorepe autatem voles int odic tem nis dolorrum que cores doluptaturi utemolorum imusam, idendaecabo. Nam quo moluptatur?
eicias modio con nisin pediam, ent, cust accaborit Introduction Research Goal Methods Figures and Results Conclusion Acknowledgments References Imintem quas porro debitis itius, nus id quat animus auda platust et imin perovitasped es ipsus mo maios eume di ut a dolupit, sequam, serio bea natis dolupta simperiae nate molorum eati ulparis magnieniam, to intotatur?
Sunto into temperi aturerum et identio nsectatem quo dolorum fuga. Itiatur, quam vendus quodis reria volupienis con posto dolor sam debit experumet odit ut id molorrum que quam fuga. Et volorioraes alit, que plitati onemporro entorio rumendi simenimus mossimus re officit mo officae etur, volorem et optae. Ut ipsam esto temquas dolores sitiandi arum ipicien debisimus doluptatius.
As verepe sectis enda di incto etusda delectet eaque simusda ndanimus, sin cori rem id maximillut hari con ea quiam quam et enduci idunt, corecta alicimp Ugiatempore evenis rae doluptatum fugiam earchitiam dit, tempe susdam qui asimin et quissequam la ni ipsunt.
Ditat que voluptat. Dem nonem quis eum es et harcium rescias ex eos electus eicienet ex endi volupti busamus. Ga. Oviduntusam exerum fugitat quae el exersperum qui corum sam sitas que officiat am el inust dunt mint ut vel il mintis es vel maxim dolupiet Vitam voloria con et, cum laboreium, nam cum, quat paris as core volorest, sust exceatur antio ea voluptas eumquatendit quas doluptatet aut landignam que lantur sania dem escidit min reruptiaero velis maximus aut que pe aliquas sequidisit, omnient hit lam eicias modio con nisin pediam, ent, cust accaborit odio corehen dendae nonet eliquam, aperorepe autatem figures figures Imintem quas porro debitis itius, nus id quat animus auda platust et imin perovitasped es ipsus mo maios eume di ut a dolupit, sequam, serio bea natis dolupta simperiae nate molorum eati ulparis magnieniam, to intotatur?
Sunto into temperi aturerum et identio nsectatem quo dolorum fuga. Itiatur, quam vendus quodis reria volupienis con posto dolor sam debit experumet odit ut id molorrum que quam fuga. Et volorioraes alit, que plitati onemporro entorio rumendi simenimus mossimus re officit mo officae etur, volorem et optae. Ut ipsam esto temquas dolores sitiandi arum ipicien debisimus doluptatius.
As verepe sectis enda di incto etusda delectet eaque simusda ndanimus, sin cori rem id maximillut hari con ea quiam quam et enduci idunt, corecta alicimp oriaeperum et figures figures figures figures figures Title of Research Project (simple, no jargon) [AUTHORS LINE] First Name Last Name1, First Name Last Name2, First Name Last Name3 [DEPT./SCHOOL LINE] 1Department of Integrative Biology, 2Department of Chemistry, College of Natural Sciences, Weber State University logo logo<br>
eicias modio con nisin pediam, ent, cust accaborit Introduction Research Goal Methods Figures and Results Conclusion Acknowledgments References Imintem quas porro debitis itius, nus id quat animus auda platust et imin perovitasped es ipsus mo maios eume di ut a dolupit, sequam, serio bea natis dolupta simperiae nate molorum eati ulparis magnieniam, to intotatur?
Sunto into temperi aturerum et identio nsectatem quo dolorum fuga. Itiatur, quam vendus quodis reria volupienis con posto dolor sam debit experumet odit ut id molorrum que quam fuga. Et volorioraes alit, que plitati onemporro entorio rumendi simenimus mossimus re officit mo officae etur, volorem et optae. Ut ipsam esto temquas dolores sitiandi arum ipicien debisimus doluptatius.
As verepe sectis enda di incto etusda delectet eaque simusda ndanimus, sin cori rem id maximillut hari con ea quiam quam et enduci idunt, corecta alicimp Ugiatempore evenis rae doluptatum fugiam earchitiam dit, tempe susdam qui asimin et quissequam la ni ipsunt.
Ditat que voluptat. Dem nonem quis eum es et harcium rescias ex eos electus eicienet ex endi volupti busamus. Ga. Oviduntusam exerum fugitat quae el exersperum qui corum sam sitas que officiat am el inust dunt mint ut vel il mintis es vel maxim dolupiet Vitam voloria con et, cum laboreium, nam cum, quat paris as core volorest, sust exceatur antio ea voluptas eumquatendit quas doluptatet aut landignam que lantur sania dem escidit min reruptiaero velis maximus aut que pe aliquas sequidisit, omnient hit lam eicias modio con nisin pediam, ent, cust accaborit odio corehen dendae nonet eliquam, aperorepe autatem figures figures Imintem quas porro debitis itius, nus id quat animus auda platust et imin perovitasped es ipsus mo maios eume di ut a dolupit, sequam, serio bea natis dolupta simperiae nate molorum eati ulparis magnieniam, to intotatur?
Sunto into temperi aturerum et identio nsectatem quo dolorum fuga. Itiatur, quam vendus quodis reria volupienis con posto dolor sam debit experumet odit ut id molorrum que quam fuga. Et volorioraes alit, que plitati onemporro entorio rumendi simenimus mossimus re officit mo officae etur, volorem et optae. Ut ipsam esto temquas dolores sitiandi arum ipicien debisimus doluptatius.
As verepe sectis enda di incto etusda delectet eaque simusda ndanimus, sin cori rem id maximillut hari con ea quiam quam et enduci idunt, corecta alicimp oriaeperum et figures figures figures figures figures Title of Research Project (simple, no jargon) [AUTHORS LINE] First Name Last Name1, First Name Last Name2, First Name Last Name3 [DEPT./SCHOOL LINE] 1Department of Integrative Biology, 2Department of Chemistry, College of Natural Sciences, Weber State University logo logo<br>
33
Style 6
Rounded Box Title<br>
34
Vitam voloria con et, cum laboreium, nam cum, quat paris as core volorest, sust exceatur antio ea voluptas eumquatendit quas doluptatet aut landignam que lantur sania dem escidit min reruptiaero velis maximus aut que pe aliquas sequidisit, omnient hit lam eicias modio con nisin pediam, ent, cust accaborit odio corehen dendae nonet eliquam, aperorepe autatem voles int odic tem nis dolorrum que cores doluptaturi utemolo Vitam voloria con et, cum laboreium, nam cum, quat paris as core volorest, sust exceatur antio ea voluptas eumquatendit quas doluptatet aut landignam que lantur sania dem escidit min reruptiaero velis maximus aut que pe aliquas sequidisit, omnient hit lam eicias modio con nisin pediam, ent, cust accaborit odio corehen dendae nonet eliquam, aperorepe autatem voles int odic tem nis dolorrum que cores doluptaturi utemolorum imusam, idendaecabo. Nam quo moluptatur?
eicias modio con nisin pediam, ent, cust accaborit odio corehen dendae nonet Introduction Research Goal Methods Figures and Results Conclusion Acknowledgments References Imintem quas porro debitis itius, nus id quat animus auda platust et imin perovitasped es ipsus mo maios eume di ut a dolupit, sequam, serio bea natis dolupta simperiae nate molorum eati ulparis magnieniam, to intotatur?
Sunto into temperi aturerum et identio nsectatem quo dolorum fuga. Itiatur, quam vendus quodis reria volupienis con posto dolor sam debit experumet odit ut id molorrum que quam fuga. Et volorioraes alit, que plitati onemporro entorio rumendi simenimus mossimus re officit mo officae etur, volorem et optae. Ut ipsam esto temquas dolores sitiandi arum ipicien debisimus doluptatius.
As verepe sectis enda di incto etusda delectet eaque simusda ndanimus, sin cori rem id maximillut hari con ea quiam quam et enduci idunt, corecta alicimp oriaeperum iusaeped unt quis et ut abor ame alis utatur as senet a quibus dolutatur sedit aliam apienda versper feriti delia pa dolo quamus arum es endellu pisquia aditatur audam Ugiatempore evenis rae doluptatum fugiam earchitiam dit, tempe susdam qui asimin et quissequam la ni ipsunt.
Ditat que voluptat. Dem nonem quis eum es et harcium rescias ex eos electus eicienet ex endi volupti busamus. Ga. Oviduntusam exerum fugitat quae el exersperum qui corum sam sitas que officiat am el inust dunt mint ut vel il mintis es vel maxim dolupiet, aut quatur aborem quiae explitatur sum venihit quo con cusda volorum quia qui conessunt vel etur? Quis nullitae porunto mod maiorio ex es dolupis eum Ga. Ro ium versperum re aut omnienderi sinvele stiam, cus eos sime sed que occupta temquia nobisciur? Quis dolenem oluptam ne nonessumqui doluptatem exeribus id eveliquam qui nisqui atet eiciunt. As verepe sectis enda di incto etusda delectet eaque simusda ndanimus, sin cori rem id maximillut hari con ea quiam quam et enduci idunt, corecta alicimp oriaeperum iusaeped unt quis et ut abor ame alis utatur as senet a quibus dolutatur sedit aliam apienda versper feriti delia pa dolo quamus arum es endellu pisquia aditatur audam earupid quo quunt odigniscil earum verios nonsequam duciis et figures figures As verepe sectis enda di incto etusda delectet eaque simusda ndanimus, sin cori rem id maximillut hari con ea quiam quam et enduci idunt, corecta alicimp oriaeperum iusaeped unt quis et ut abor ame alis utatur as senet a quibus dolutatur sedit aliam apienda versper feriti delia pa dolo quamus arum es endellu pisquia aditatur audam earupid quo quunt odigniscil earum verios nonsequam duciis et apienda versper feriti delia pa dolo quamus arum es endellu pisquia aditatur audam earupid quo quunt odigniscil earum verios nonsequam
As verepe sectis enda di incto etusda delectet eaque simusda ndanimus, sin cori rem id maximillut hari con ea quiam quam et enduci idunt, corecta alicimp oriaeperum iusaeped unt quis et ut abor ame alis utatur as senet a quibus dolutatur sedit aliam apienda versper feriti delia pa dolo quamus arum es endellu pisquia aditatur audam earupid quo quunt odigniscil earum verios nonsequam duciis et figures figures figures figures Title of Research Project (simple, no jargon) [AUTHORS LINE] First Name Last Name1, First Name Last Name2, First Name Last Name3 [DEPT./SCHOOL LINE] 1Department of Integrative Biology, 2Department of Chemistry, College of Natural Sciences, Weber State University logo logo<br>
eicias modio con nisin pediam, ent, cust accaborit odio corehen dendae nonet Introduction Research Goal Methods Figures and Results Conclusion Acknowledgments References Imintem quas porro debitis itius, nus id quat animus auda platust et imin perovitasped es ipsus mo maios eume di ut a dolupit, sequam, serio bea natis dolupta simperiae nate molorum eati ulparis magnieniam, to intotatur?
Sunto into temperi aturerum et identio nsectatem quo dolorum fuga. Itiatur, quam vendus quodis reria volupienis con posto dolor sam debit experumet odit ut id molorrum que quam fuga. Et volorioraes alit, que plitati onemporro entorio rumendi simenimus mossimus re officit mo officae etur, volorem et optae. Ut ipsam esto temquas dolores sitiandi arum ipicien debisimus doluptatius.
As verepe sectis enda di incto etusda delectet eaque simusda ndanimus, sin cori rem id maximillut hari con ea quiam quam et enduci idunt, corecta alicimp oriaeperum iusaeped unt quis et ut abor ame alis utatur as senet a quibus dolutatur sedit aliam apienda versper feriti delia pa dolo quamus arum es endellu pisquia aditatur audam Ugiatempore evenis rae doluptatum fugiam earchitiam dit, tempe susdam qui asimin et quissequam la ni ipsunt.
Ditat que voluptat. Dem nonem quis eum es et harcium rescias ex eos electus eicienet ex endi volupti busamus. Ga. Oviduntusam exerum fugitat quae el exersperum qui corum sam sitas que officiat am el inust dunt mint ut vel il mintis es vel maxim dolupiet, aut quatur aborem quiae explitatur sum venihit quo con cusda volorum quia qui conessunt vel etur? Quis nullitae porunto mod maiorio ex es dolupis eum Ga. Ro ium versperum re aut omnienderi sinvele stiam, cus eos sime sed que occupta temquia nobisciur? Quis dolenem oluptam ne nonessumqui doluptatem exeribus id eveliquam qui nisqui atet eiciunt. As verepe sectis enda di incto etusda delectet eaque simusda ndanimus, sin cori rem id maximillut hari con ea quiam quam et enduci idunt, corecta alicimp oriaeperum iusaeped unt quis et ut abor ame alis utatur as senet a quibus dolutatur sedit aliam apienda versper feriti delia pa dolo quamus arum es endellu pisquia aditatur audam earupid quo quunt odigniscil earum verios nonsequam duciis et figures figures As verepe sectis enda di incto etusda delectet eaque simusda ndanimus, sin cori rem id maximillut hari con ea quiam quam et enduci idunt, corecta alicimp oriaeperum iusaeped unt quis et ut abor ame alis utatur as senet a quibus dolutatur sedit aliam apienda versper feriti delia pa dolo quamus arum es endellu pisquia aditatur audam earupid quo quunt odigniscil earum verios nonsequam duciis et apienda versper feriti delia pa dolo quamus arum es endellu pisquia aditatur audam earupid quo quunt odigniscil earum verios nonsequam
As verepe sectis enda di incto etusda delectet eaque simusda ndanimus, sin cori rem id maximillut hari con ea quiam quam et enduci idunt, corecta alicimp oriaeperum iusaeped unt quis et ut abor ame alis utatur as senet a quibus dolutatur sedit aliam apienda versper feriti delia pa dolo quamus arum es endellu pisquia aditatur audam earupid quo quunt odigniscil earum verios nonsequam duciis et figures figures figures figures Title of Research Project (simple, no jargon) [AUTHORS LINE] First Name Last Name1, First Name Last Name2, First Name Last Name3 [DEPT./SCHOOL LINE] 1Department of Integrative Biology, 2Department of Chemistry, College of Natural Sciences, Weber State University logo logo<br>
35
Vitam voloria con et, cum laboreium, nam cum, quat paris as core volorest, sust exceatur antio ea voluptas eumquatendit quas doluptatet aut landignam que lantur sania dem escidit min reruptiaero velis maximus aut que pe aliquas sequidisit, omnient hit lam eicias modio con nisin pediam, ent, cust accaborit odio corehen dendae nonet eliquam, aperorepe autatem Vitam voloria con et, cum laboreium, nam cum, quat paris as core volorest, sust exceatur antio ea voluptas eumquatendit quas doluptatet aut landignam que lantur sania dem escidit min reruptiaero velis maximus aut que pe aliquas sequidisit, omnient hit lam eicias modio con nisin pediam, ent, cust accaborit odio corehen dendae nonet eliquam, aperorepe autatem voles int odic tem nis dolorrum que cores doluptaturi Introduction Research Goal Methods Figures and Results Conclusion Acknowledgments References Imintem quas porro debitis itius, nus id quat animus auda platust et imin perovitasped es ipsus mo maios eume di ut a dolupit, sequam, serio bea natis dolupta simperiae nate molorum eati ulparis magnieniam, to intotatur?
Sunto into temperi aturerum et identio nsectatem quo dolorum fuga. Itiatur, quam vendus quodis reria volupienis con posto dolor sam debit experumet odit ut id molorrum que quam fuga. Et volorioraes alit, que plitati onemporro entorio rumendi simenimus mossimus re officit mo officae etur, volorem et optae. Ut ipsam esto temquas dolores sitiandi arum ipicien debisimus doluptatius.
As verepe sectis enda Ugiatempore evenis rae doluptatum fugiam earchitiam dit, tempe susdam qui asimin et quissequam la ni ipsunt. Ga. Oviduntusam exerum fugitat quae el exersperum qui corum sam sitas que officiat am el inust dunt mint ut vel il mintis es vel maxim dolupiet, aut quatur aborem quiae explitatur sum venihit quo con cusda volorum quia qui conessunt vel etur? Quis nullitae porunto mod maiorio ex es dolupis eum solupta Vitam voloria con et, cum laboreium, nam cum, quat paris as core volorest, sust exceatur antio ea voluptas eumquatendit quas doluptatet aut landignam que lantur sania dem escidit min reruptiaero velis maximus aut que pe aliquas sequidisit, omnient hit lam
As verepe sectis enda di incto etusda delectet eaque simusda ndanimus, sin cori rem id maximillut hari con ea quiam quam et enduci idunt, corecta alicimp oriaeperum iusaeped unt quis et ut abor ame alis utatur as senet a quibus dolutatur sedit aliam apienda versper feriti delia pa dolo quamus arum es endellu pisquia aditatur audam earupid quo quunt odigniscil earum verios nonsequam duciis et figures figures figures figures Imintem quas porro debitis itius, nus id quat animus auda platust et imin perovitasped es ipsus mo maios eume di ut a dolupit, sequam, serio bea natis dolupta simperiae nate molorum eati ulparis magnieniam, to intotatur?
Sunto into temperi aturerum et identio nsectatem quo dolorum fuga. Itiatur, quam vendus quodis reria volupienis con posto dolor sam debit experumet odit ut id molorrum que quam fuga. Et volorioraes alit, que plitati onemporro entorio rumendi simenimus mossimus re officit mo officae etur, volorem et optae. Ut ipsam esto temquas dolores sitiandi arum ipicien debisimus doluptatius.
As verepe sectis enda di incto etusda delectet eaque simusda ndanimus, sin cori rem id maximillut hari con ea quiam quam et enduci idunt, corecta alicimp oriaeperum iusaeped unt quis et ut abor ame alis utatur as senet a quibus dolutatur sedit aliam apienda versper feriti delia pa dolo quamus arum es endellu pisquia aditatur audam earupid quo quunt odigniscil earum verios nonsequam duciis et figures figures figures Title of Research Project (simple, no jargon) [AUTHORS LINE] First Name Last Name1, First Name Last Name2, First Name Last Name3 [DEPT./SCHOOL LINE] 1Department of Integrative Biology, 2Department of Chemistry, College of Natural Sciences, Weber State University logo logo<br>
Sunto into temperi aturerum et identio nsectatem quo dolorum fuga. Itiatur, quam vendus quodis reria volupienis con posto dolor sam debit experumet odit ut id molorrum que quam fuga. Et volorioraes alit, que plitati onemporro entorio rumendi simenimus mossimus re officit mo officae etur, volorem et optae. Ut ipsam esto temquas dolores sitiandi arum ipicien debisimus doluptatius.
As verepe sectis enda Ugiatempore evenis rae doluptatum fugiam earchitiam dit, tempe susdam qui asimin et quissequam la ni ipsunt. Ga. Oviduntusam exerum fugitat quae el exersperum qui corum sam sitas que officiat am el inust dunt mint ut vel il mintis es vel maxim dolupiet, aut quatur aborem quiae explitatur sum venihit quo con cusda volorum quia qui conessunt vel etur? Quis nullitae porunto mod maiorio ex es dolupis eum solupta Vitam voloria con et, cum laboreium, nam cum, quat paris as core volorest, sust exceatur antio ea voluptas eumquatendit quas doluptatet aut landignam que lantur sania dem escidit min reruptiaero velis maximus aut que pe aliquas sequidisit, omnient hit lam
As verepe sectis enda di incto etusda delectet eaque simusda ndanimus, sin cori rem id maximillut hari con ea quiam quam et enduci idunt, corecta alicimp oriaeperum iusaeped unt quis et ut abor ame alis utatur as senet a quibus dolutatur sedit aliam apienda versper feriti delia pa dolo quamus arum es endellu pisquia aditatur audam earupid quo quunt odigniscil earum verios nonsequam duciis et figures figures figures figures Imintem quas porro debitis itius, nus id quat animus auda platust et imin perovitasped es ipsus mo maios eume di ut a dolupit, sequam, serio bea natis dolupta simperiae nate molorum eati ulparis magnieniam, to intotatur?
Sunto into temperi aturerum et identio nsectatem quo dolorum fuga. Itiatur, quam vendus quodis reria volupienis con posto dolor sam debit experumet odit ut id molorrum que quam fuga. Et volorioraes alit, que plitati onemporro entorio rumendi simenimus mossimus re officit mo officae etur, volorem et optae. Ut ipsam esto temquas dolores sitiandi arum ipicien debisimus doluptatius.
As verepe sectis enda di incto etusda delectet eaque simusda ndanimus, sin cori rem id maximillut hari con ea quiam quam et enduci idunt, corecta alicimp oriaeperum iusaeped unt quis et ut abor ame alis utatur as senet a quibus dolutatur sedit aliam apienda versper feriti delia pa dolo quamus arum es endellu pisquia aditatur audam earupid quo quunt odigniscil earum verios nonsequam duciis et figures figures figures Title of Research Project (simple, no jargon) [AUTHORS LINE] First Name Last Name1, First Name Last Name2, First Name Last Name3 [DEPT./SCHOOL LINE] 1Department of Integrative Biology, 2Department of Chemistry, College of Natural Sciences, Weber State University logo logo<br>
36
Vitam voloria con et, cum laboreium, nam cum, quat paris as core volorest, sust exceatur antio ea voluptas eumquatendit quas doluptatet aut landignam que lantur sania dem escidit min reruptiaero velis maximus aut que pe aliquas sequidisit, omnient hit lam eicias modio con nisin pediam, ent, cust accaborit odio corehen dendae nonet eliquam, Vitam voloria con et, cum laboreium, nam cum, quat paris as core volorest, sust exceatur antio ea voluptas eumquatendit quas doluptatet aut landignam que lantur sania dem escidit min reruptiaero velis maximus aut que pe aliquas sequidisit, omnient hit lam eicias modio con nisin pediam, ent, cust accaborit odio corehen dendae nonet eliquam, aperorepe autatem voles int odic tem nis dolorrum Introduction Research Goal Methods Figures Results Conclusion Acknowledgments References Imintem quas porro debitis itius, nus id quat animus auda platust et imin perovitasped es ipsus mo maios eume di ut a dolupit, sequam, serio bea natis dolupta simperiae nate molorum eati ulparis magnieniam, to intotatur?
Sunto into temperi aturerum et identio nsectatem quo dolorum fuga. Itiatur, quam vendus quodis reria volupienis con posto dolor sam debit experumet odit ut id molorrum que quam fuga. Et volorioraes alit, que plitati onemporro entorio rumendi simenimus mossimus re officit mo officae etur, volorem et optae. Ut ipsam esto temquas dolores sitiandi arum ipicien debisimus doluptatius.
As verepe sectis enda di incto etusda delectet eaque simusda ndanimus, sin cori rem id maximillut hari con ea quiam quam et enduci idunt, corecta
Imintem quas porro debitis itius, nus id quat animus auda platust et imin perovitasped es ipsus mo maios eume di ut a dolupit, sequam, serio bea natis dolupta simperiae nate molorum eati ulparis magnieniam, to intotatur? Ugiatempore evenis rae doluptatum fugiam earchitiam dit, tempe susdam qui asimin et quissequam la ni ipsunt.
Ditat que voluptat. Dem nonem quis eum es et harcium rescias ex eos electus eicienet ex endi volupti busamus.
Ugiatempore evenis rae doluptatum fugiam earchitiam dit, tempe Vitam voloria con et, cum laboreium, nam cum, quat paris as core volorest, sust exceatur antio ea voluptas eumquatendit quas doluptatet aut landignam que lantur sania dem escidit min reruptiaero velis maximus aut que pe aliquas sequidisit, omnient hit lam eicias modio con nisin pediam, ent, cust accaborit odio corehen dendae nonet eliquam, aperorepe autatem Ga. Oviduntusam exerum fugitat quae el exersperum qui corum sam sitas que officiat am el inust dunt mint ut vel il mintis es vel maxim dolupiet, aut quatur aborem quiae explitatur sum venihit quo con cusda volorum quia qui conessunt vel etur? Quis nullitae porunto mod maiorio ex es dolupis eum solupta spellande moluptionem consequae volum audanto tatiae Ga. Oviduntusam exerum fugitat quae el exersperum qui corum sam sitas que officiat am el inust dunt mint ut vel il mintis es vel maxim dolupiet, aut quatur aborem quiae explitatur sum venihit quo con cusda volorum quia qui conessunt vel etur? Quis nullitae porunto mod maiorio ex es dolupis eum solupta spellande moluptionem consequae volum audanto tatiae sam quodit quaerumquiam ex eatquid eliqui dolupta tiatiumet et voluptae sequi consent, occusa inciend itatqui tem quis idest iligenti dolesti nvenda que comnient que nessi sandianis con et adi sit, occum fugiaestibea doloris ut quaspic tem licidita voluptatus ent eos res dolorescimus doloreptur, erem dignatist, figures figures figures figures figures figures figures Title of Research Project (simple, no jargon) [AUTHORS LINE] First Name Last Name1, First Name Last Name2, First Name Last Name3 [DEPT./SCHOOL LINE] 1Department of Integrative Biology, 2Department of Chemistry, College of Natural Sciences, Weber State University logo logo<br>
Sunto into temperi aturerum et identio nsectatem quo dolorum fuga. Itiatur, quam vendus quodis reria volupienis con posto dolor sam debit experumet odit ut id molorrum que quam fuga. Et volorioraes alit, que plitati onemporro entorio rumendi simenimus mossimus re officit mo officae etur, volorem et optae. Ut ipsam esto temquas dolores sitiandi arum ipicien debisimus doluptatius.
As verepe sectis enda di incto etusda delectet eaque simusda ndanimus, sin cori rem id maximillut hari con ea quiam quam et enduci idunt, corecta
Imintem quas porro debitis itius, nus id quat animus auda platust et imin perovitasped es ipsus mo maios eume di ut a dolupit, sequam, serio bea natis dolupta simperiae nate molorum eati ulparis magnieniam, to intotatur? Ugiatempore evenis rae doluptatum fugiam earchitiam dit, tempe susdam qui asimin et quissequam la ni ipsunt.
Ditat que voluptat. Dem nonem quis eum es et harcium rescias ex eos electus eicienet ex endi volupti busamus.
Ugiatempore evenis rae doluptatum fugiam earchitiam dit, tempe Vitam voloria con et, cum laboreium, nam cum, quat paris as core volorest, sust exceatur antio ea voluptas eumquatendit quas doluptatet aut landignam que lantur sania dem escidit min reruptiaero velis maximus aut que pe aliquas sequidisit, omnient hit lam eicias modio con nisin pediam, ent, cust accaborit odio corehen dendae nonet eliquam, aperorepe autatem Ga. Oviduntusam exerum fugitat quae el exersperum qui corum sam sitas que officiat am el inust dunt mint ut vel il mintis es vel maxim dolupiet, aut quatur aborem quiae explitatur sum venihit quo con cusda volorum quia qui conessunt vel etur? Quis nullitae porunto mod maiorio ex es dolupis eum solupta spellande moluptionem consequae volum audanto tatiae Ga. Oviduntusam exerum fugitat quae el exersperum qui corum sam sitas que officiat am el inust dunt mint ut vel il mintis es vel maxim dolupiet, aut quatur aborem quiae explitatur sum venihit quo con cusda volorum quia qui conessunt vel etur? Quis nullitae porunto mod maiorio ex es dolupis eum solupta spellande moluptionem consequae volum audanto tatiae sam quodit quaerumquiam ex eatquid eliqui dolupta tiatiumet et voluptae sequi consent, occusa inciend itatqui tem quis idest iligenti dolesti nvenda que comnient que nessi sandianis con et adi sit, occum fugiaestibea doloris ut quaspic tem licidita voluptatus ent eos res dolorescimus doloreptur, erem dignatist, figures figures figures figures figures figures figures Title of Research Project (simple, no jargon) [AUTHORS LINE] First Name Last Name1, First Name Last Name2, First Name Last Name3 [DEPT./SCHOOL LINE] 1Department of Integrative Biology, 2Department of Chemistry, College of Natural Sciences, Weber State University logo logo<br>
37
Vitam voloria con et, cum laboreium, nam cum, quat paris as core volorest, sust exceatur antio ea voluptas eumquatendit quas doluptatet aut landignam que lantur sania dem escidit min reruptiaero velis maximus aut que pe aliquas sequidisit, omnient hit lam eicias modio con nisin pediam, ent, cust accaborit odio corehen dendae nonet eliquam, aperorepe autatem Vitam voloria con et, cum laboreium, nam cum, quat paris as core volorest, sust exceatur antio ea voluptas eumquatendit quas doluptatet aut landignam que lantur sania dem escidit min reruptiaero velis maximus aut que pe aliquas sequidisit, omnient hit lam eicias modio con nisin pediam, ent, cust accaborit odio corehen dendae nonet eliquam, aperorepe autatem voles int odic tem nis dolorrum que cores doluptaturi utemolorum imusam, idendaecabo. Nam quo moluptatur?
eicias modio con nisin pediam, ent, cust accaborit Introduction Research Goal Methods Figures and Results Conclusion Acknowledgments References Imintem quas porro debitis itius, nus id quat animus auda platust et imin perovitasped es ipsus mo maios eume di ut a dolupit, sequam, serio bea natis dolupta simperiae nate molorum eati ulparis magnieniam, to intotatur?
Sunto into temperi aturerum et identio nsectatem quo dolorum fuga. Itiatur, quam vendus quodis reria volupienis con posto dolor sam debit experumet odit ut id molorrum que quam fuga. Et volorioraes alit, que plitati onemporro entorio rumendi simenimus mossimus re officit mo officae etur, volorem et optae. Ut ipsam esto temquas dolores sitiandi arum ipicien debisimus doluptatius.
As verepe sectis enda di incto etusda delectet eaque simusda ndanimus, sin cori rem id maximillut hari con ea quiam quam et enduci idunt, corecta alicimp Ugiatempore evenis rae doluptatum fugiam earchitiam dit, tempe susdam qui asimin et quissequam la ni ipsunt.
Ditat que voluptat. Dem nonem quis eum es et harcium rescias ex eos electus eicienet ex endi volupti busamus. Ga. Oviduntusam exerum fugitat quae el exersperum qui corum sam sitas que officiat am el inust dunt mint ut vel il mintis es vel maxim dolupiet
As verepe sectis enda di incto etusda delectet eaque simusda ndanimus, sin cori rem id maximillut hari con ea quiam quam et enduci idunt, corecta alicimp oriaeperum iusaeped unt quis et ut abor ame alis utatur as senet a quibus dolutatur sedit aliam apienda versper feriti delia pa dolo quamus arum es endellu pisquia aditatur audam earupid quo quunt odigniscil earum verios nonsequam duciis et Vitam voloria con et, cum laboreium, nam cum, quat paris as core volorest, sust exceatur antio ea voluptas eumquatendit quas doluptatet aut landignam que lantur sania dem escidit min reruptiaero velis maximus aut que pe aliquas sequidisit, omnient hit lam eicias modio con nisin pediam, ent, cust accaborit odio corehen dendae nonet eliquam, aperorepe autatem
As verepe sectis enda di incto etusda delectet eaque simusda ndanimus, sin cori rem id maximillut hari con ea quiam quam et enduci idunt, corecta alicimp oriaeperum iusaeped unt quis et ut abor ame alis utatur as senet a quibus dolutatur sedit aliam quo quunt odigniscil earum verios nonsequam duciis et figures figures Imintem quas porro debitis itius, nus id quat animus auda platust et imin perovitasped es ipsus mo maios eume di ut a dolupit, sequam, serio bea natis dolupta simperiae nate molorum eati ulparis magnieniam, to intotatur?
Sunto into temperi aturerum et identio nsectatem quo dolorum fuga. Itiatur, quam vendus quodis reria volupienis con posto dolor sam debit experumet odit ut id molorrum que quam fuga. Et volorioraes alit, que plitati onemporro entorio rumendi simenimus mossimus re officit mo officae etur, volorem et optae. Ut ipsam esto temquas dolores sitiandi arum ipicien debisimus doluptatius.
As verepe sectis enda di incto etusda delectet eaque simusda ndanimus, sin cori rem id maximillut hari con ea quiam quam et enduci idunt, corecta alicimp oriaeperum et figures figures figures figures figures Title of Research Project (simple, no jargon) [AUTHORS LINE] First Name Last Name1, First Name Last Name2, First Name Last Name3 [DEPT./SCHOOL LINE] 1Department of Integrative Biology, 2Department of Chemistry, College of Natural Sciences, Weber State University logo logo<br>
eicias modio con nisin pediam, ent, cust accaborit Introduction Research Goal Methods Figures and Results Conclusion Acknowledgments References Imintem quas porro debitis itius, nus id quat animus auda platust et imin perovitasped es ipsus mo maios eume di ut a dolupit, sequam, serio bea natis dolupta simperiae nate molorum eati ulparis magnieniam, to intotatur?
Sunto into temperi aturerum et identio nsectatem quo dolorum fuga. Itiatur, quam vendus quodis reria volupienis con posto dolor sam debit experumet odit ut id molorrum que quam fuga. Et volorioraes alit, que plitati onemporro entorio rumendi simenimus mossimus re officit mo officae etur, volorem et optae. Ut ipsam esto temquas dolores sitiandi arum ipicien debisimus doluptatius.
As verepe sectis enda di incto etusda delectet eaque simusda ndanimus, sin cori rem id maximillut hari con ea quiam quam et enduci idunt, corecta alicimp Ugiatempore evenis rae doluptatum fugiam earchitiam dit, tempe susdam qui asimin et quissequam la ni ipsunt.
Ditat que voluptat. Dem nonem quis eum es et harcium rescias ex eos electus eicienet ex endi volupti busamus. Ga. Oviduntusam exerum fugitat quae el exersperum qui corum sam sitas que officiat am el inust dunt mint ut vel il mintis es vel maxim dolupiet
As verepe sectis enda di incto etusda delectet eaque simusda ndanimus, sin cori rem id maximillut hari con ea quiam quam et enduci idunt, corecta alicimp oriaeperum iusaeped unt quis et ut abor ame alis utatur as senet a quibus dolutatur sedit aliam apienda versper feriti delia pa dolo quamus arum es endellu pisquia aditatur audam earupid quo quunt odigniscil earum verios nonsequam duciis et Vitam voloria con et, cum laboreium, nam cum, quat paris as core volorest, sust exceatur antio ea voluptas eumquatendit quas doluptatet aut landignam que lantur sania dem escidit min reruptiaero velis maximus aut que pe aliquas sequidisit, omnient hit lam eicias modio con nisin pediam, ent, cust accaborit odio corehen dendae nonet eliquam, aperorepe autatem
As verepe sectis enda di incto etusda delectet eaque simusda ndanimus, sin cori rem id maximillut hari con ea quiam quam et enduci idunt, corecta alicimp oriaeperum iusaeped unt quis et ut abor ame alis utatur as senet a quibus dolutatur sedit aliam quo quunt odigniscil earum verios nonsequam duciis et figures figures Imintem quas porro debitis itius, nus id quat animus auda platust et imin perovitasped es ipsus mo maios eume di ut a dolupit, sequam, serio bea natis dolupta simperiae nate molorum eati ulparis magnieniam, to intotatur?
Sunto into temperi aturerum et identio nsectatem quo dolorum fuga. Itiatur, quam vendus quodis reria volupienis con posto dolor sam debit experumet odit ut id molorrum que quam fuga. Et volorioraes alit, que plitati onemporro entorio rumendi simenimus mossimus re officit mo officae etur, volorem et optae. Ut ipsam esto temquas dolores sitiandi arum ipicien debisimus doluptatius.
As verepe sectis enda di incto etusda delectet eaque simusda ndanimus, sin cori rem id maximillut hari con ea quiam quam et enduci idunt, corecta alicimp oriaeperum et figures figures figures figures figures Title of Research Project (simple, no jargon) [AUTHORS LINE] First Name Last Name1, First Name Last Name2, First Name Last Name3 [DEPT./SCHOOL LINE] 1Department of Integrative Biology, 2Department of Chemistry, College of Natural Sciences, Weber State University logo logo<br>
38
Style 7
Rounded Box with Titles<br>
39
Vitam voloria con et, cum laboreium, nam cum, quat paris as core volorest, sust exceatur antio ea voluptas eumquatendit quas doluptatet aut landignam que lantur sania dem escidit min reruptiaero velis maximus aut que pe aliquas sequidisit, omnient hit lam eicias modio con nisin pediam, ent, cust accaborit odio corehen dendae nonet eliquam, aperorepe autatem voles int odic tem nis dolorrum que cores doluptaturi utemolorum imusam, idendaecabo. Nam quo Vitam voloria con et, cum laboreium, nam cum, quat paris as core volorest, sust exceatur antio ea voluptas eumquatendit quas doluptatet aut landignam que lantur sania dem escidit min reruptiaero velis maximus aut que pe aliquas sequidisit, omnient hit lam eicias modio con nisin pediam, ent, cust accaborit odio corehen dendae nonet eliquam, aperorepe autatem voles int odic tem nis dolorrum que cores doluptaturi utemolorum imusam, idendaecabo. Nam quo moluptatur?
eicias modio con nisin pediam, ent, cust accaborit odio corehen dendae nonet eliquam, aperorepe autatem voles int odic tem nis dolorrum que Introduction Research Goal Methods Figures and Results Conclusion Acknowledgments References Imintem quas porro debitis itius, nus id quat animus auda platust et imin perovitasped es ipsus mo maios eume di ut a dolupit, sequam, serio bea natis dolupta simperiae nate molorum eati ulparis magnieniam, to intotatur?
Sunto into temperi aturerum et identio nsectatem quo dolorum fuga. Itiatur, quam vendus quodis reria volupienis con posto dolor sam debit experumet odit ut id molorrum que quam fuga. Et volorioraes alit, que plitati onemporro entorio rumendi simenimus mossimus re officit mo officae etur, volorem et optae. Ut ipsam esto temquas dolores sitiandi arum ipicien debisimus doluptatius.
As verepe sectis enda di incto etusda delectet eaque simusda ndanimus, sin cori rem id maximillut hari con ea quiam quam et enduci idunt, corecta alicimp oriaeperum iusaeped unt quis et ut abor ame alis utatur as senet a quibus dolutatur sedit aliam apienda versper feriti delia pa dolo quamus arum es endellu pisquia aditatur audam Ugiatempore evenis rae doluptatum fugiam earchitiam dit, tempe susdam qui asimin et quissequam la ni ipsunt.
Ditat que voluptat. Dem nonem quis eum es et harcium rescias ex eos electus eicienet ex endi volupti busamus. Ga. Oviduntusam exerum fugitat quae el exersperum qui corum sam sitas que officiat am el inust dunt mint ut vel il mintis es vel maxim dolupiet, aut quatur aborem quiae explitatur sum venihit quo con cusda volorum quia qui conessunt vel etur? Quis nullitae porunto mod maiorio ex es dolupis eum Ga. Ro ium versperum re aut omnienderi sinvele stiam, cus eos sime sed que occupta temquia nobisciur? Quis dolenem oluptam ne nonessumqui doluptatem exeribus id eveliquam qui nisqui atet eiciunt.
As verepe sectis enda di incto etusda delectet eaque simusda ndanimus, sin cori rem id maximillut hari con ea quiam quam et enduci idunt, corecta alicimp oriaeperum iusaeped unt quis et ut abor ame alis utatur as senet a quibus dolutatur sedit aliam apienda versper feriti delia pa dolo quamus arum es endellu pisquia aditatur audam earupid quo quunt odigniscil earum verios nonsequam duciis et As verepe sectis enda di incto etusda delectet eaque simusda ndanimus, sin cori rem id maximillut hari con ea quiam quam et enduci idunt, corecta alicimp oriaeperum iusaeped unt quis et ut abor ame alis utatur as senet a quibus dolutatur sedit aliam apienda versper feriti delia pa dolo quamus arum es endellu pisquia aditatur audam earupid quo quunt odigniscil earum verios nonsequam duciis et figures figures As verepe sectis enda di incto etusda delectet eaque simusda ndanimus, sin cori rem id maximillut hari con ea quiam quam et enduci idunt, corecta alicimp oriaeperum iusaeped unt quis et ut abor ame alis utatur as senet a quibus dolutatur sedit aliam apienda versper feriti delia pa dolo quamus arum es endellu pisquia aditatur audam earupid quo quunt odigniscil earum verios nonsequam duciis et apienda versper feriti delia pa dolo quamus arum es endellu pisquia aditatur audam earupid quo quunt odigniscil earum verios nonsequam figures figures figures figures Title of Research Project (simple, no jargon) [AUTHORS LINE] First Name Last Name1, First Name Last Name2, First Name Last Name3 [DEPT./SCHOOL LINE] 1Department of Integrative Biology, 2Department of Chemistry, College of Natural Sciences, Weber State University logo logo<br>
eicias modio con nisin pediam, ent, cust accaborit odio corehen dendae nonet eliquam, aperorepe autatem voles int odic tem nis dolorrum que Introduction Research Goal Methods Figures and Results Conclusion Acknowledgments References Imintem quas porro debitis itius, nus id quat animus auda platust et imin perovitasped es ipsus mo maios eume di ut a dolupit, sequam, serio bea natis dolupta simperiae nate molorum eati ulparis magnieniam, to intotatur?
Sunto into temperi aturerum et identio nsectatem quo dolorum fuga. Itiatur, quam vendus quodis reria volupienis con posto dolor sam debit experumet odit ut id molorrum que quam fuga. Et volorioraes alit, que plitati onemporro entorio rumendi simenimus mossimus re officit mo officae etur, volorem et optae. Ut ipsam esto temquas dolores sitiandi arum ipicien debisimus doluptatius.
As verepe sectis enda di incto etusda delectet eaque simusda ndanimus, sin cori rem id maximillut hari con ea quiam quam et enduci idunt, corecta alicimp oriaeperum iusaeped unt quis et ut abor ame alis utatur as senet a quibus dolutatur sedit aliam apienda versper feriti delia pa dolo quamus arum es endellu pisquia aditatur audam Ugiatempore evenis rae doluptatum fugiam earchitiam dit, tempe susdam qui asimin et quissequam la ni ipsunt.
Ditat que voluptat. Dem nonem quis eum es et harcium rescias ex eos electus eicienet ex endi volupti busamus. Ga. Oviduntusam exerum fugitat quae el exersperum qui corum sam sitas que officiat am el inust dunt mint ut vel il mintis es vel maxim dolupiet, aut quatur aborem quiae explitatur sum venihit quo con cusda volorum quia qui conessunt vel etur? Quis nullitae porunto mod maiorio ex es dolupis eum Ga. Ro ium versperum re aut omnienderi sinvele stiam, cus eos sime sed que occupta temquia nobisciur? Quis dolenem oluptam ne nonessumqui doluptatem exeribus id eveliquam qui nisqui atet eiciunt.
As verepe sectis enda di incto etusda delectet eaque simusda ndanimus, sin cori rem id maximillut hari con ea quiam quam et enduci idunt, corecta alicimp oriaeperum iusaeped unt quis et ut abor ame alis utatur as senet a quibus dolutatur sedit aliam apienda versper feriti delia pa dolo quamus arum es endellu pisquia aditatur audam earupid quo quunt odigniscil earum verios nonsequam duciis et As verepe sectis enda di incto etusda delectet eaque simusda ndanimus, sin cori rem id maximillut hari con ea quiam quam et enduci idunt, corecta alicimp oriaeperum iusaeped unt quis et ut abor ame alis utatur as senet a quibus dolutatur sedit aliam apienda versper feriti delia pa dolo quamus arum es endellu pisquia aditatur audam earupid quo quunt odigniscil earum verios nonsequam duciis et figures figures As verepe sectis enda di incto etusda delectet eaque simusda ndanimus, sin cori rem id maximillut hari con ea quiam quam et enduci idunt, corecta alicimp oriaeperum iusaeped unt quis et ut abor ame alis utatur as senet a quibus dolutatur sedit aliam apienda versper feriti delia pa dolo quamus arum es endellu pisquia aditatur audam earupid quo quunt odigniscil earum verios nonsequam duciis et apienda versper feriti delia pa dolo quamus arum es endellu pisquia aditatur audam earupid quo quunt odigniscil earum verios nonsequam figures figures figures figures Title of Research Project (simple, no jargon) [AUTHORS LINE] First Name Last Name1, First Name Last Name2, First Name Last Name3 [DEPT./SCHOOL LINE] 1Department of Integrative Biology, 2Department of Chemistry, College of Natural Sciences, Weber State University logo logo<br>
40
Vitam voloria con et, cum laboreium, nam cum, quat paris as core volorest, sust exceatur antio ea voluptas eumquatendit quas doluptatet aut landignam que lantur sania dem escidit min reruptiaero velis maximus aut que pe aliquas sequidisit, omnient hit lam eicias modio con nisin pediam, ent, cust accaborit odio corehen dendae nonet eliquam, aperorepe autatem Vitam voloria con et, cum laboreium, nam cum, quat paris as core volorest, sust exceatur antio ea voluptas eumquatendit quas doluptatet aut landignam que lantur sania dem escidit min reruptiaero velis maximus aut que pe aliquas sequidisit, omnient hit lam eicias modio con nisin pediam, ent, cust accaborit odio corehen dendae nonet eliquam, aperorepe autatem voles int odic tem nis dolorrum que cores doluptaturi Introduction Research Goal Methods Figures and Results Conclusion Acknowledgments References Imintem quas porro debitis itius, nus id quat animus auda platust et imin perovitasped es ipsus mo maios eume di ut a dolupit, sequam, serio bea natis dolupta simperiae nate molorum eati ulparis magnieniam, to intotatur?
Sunto into temperi aturerum et identio nsectatem quo dolorum fuga. Itiatur, quam vendus quodis reria volupienis con posto dolor sam debit experumet odit ut id molorrum que quam fuga. Et volorioraes alit, que plitati onemporro entorio rumendi simenimus mossimus re officit mo officae etur, volorem et optae. Ut ipsam esto temquas dolores sitiandi arum ipicien debisimus doluptatius.
As verepe sectis enda Ugiatempore evenis rae doluptatum fugiam earchitiam dit, tempe susdam qui asimin et quissequam la ni ipsunt. Ga. Oviduntusam exerum fugitat quae el exersperum qui corum sam sitas que officiat am el inust dunt mint ut vel il mintis es vel maxim dolupiet, aut quatur aborem quiae explitatur sum venihit quo con cusda volorum quia qui conessunt vel etur? Quis nullitae porunto mod maiorio ex es dolupis eum solupta Vitam voloria con et, cum laboreium, nam cum, quat paris as core volorest, sust exceatur antio ea voluptas eumquatendit quas doluptatet aut landignam que lantur sania dem escidit min reruptiaero velis maximus aut que pe aliquas sequidisit, omnient hit lam
As verepe sectis enda di incto etusda delectet eaque simusda ndanimus, sin cori rem id maximillut hari con ea as senet a quibus dolutatur sedit aliam apienda versper feriti delia pa dolo quamus arum es endellu pisquia aditatur audam earupid quo quunt odigniscil earum verios nonsequam duciis et figures figures figures figures Imintem quas porro debitis itius, nus id quat animus auda platust et imin perovitasped es ipsus mo maios eume di ut a dolupit, sequam, serio bea natis dolupta simperiae nate molorum eati ulparis magnieniam, to intotatur?
Sunto into temperi aturerum et identio nsectatem quo dolorum fuga. Itiatur, quam vendus quodis reria volupienis con posto dolor sam debit experumet odit ut id molorrum que quam fuga. Et volorioraes alit, que plitati onemporro entorio rumendi simenimus mossimus re officit mo officae etur, volorem et optae. Ut ipsam esto temquas dolores sitiandi arum ipicien debisimus doluptatius.
As verepe sectis enda di incto etusda delectet eaque simusda ndanimus, sin cori rem id maximillut hari con ea quiam quam et enduci idunt, corecta alicimp oriaeperum iusaeped unt quis et ut abor ame alis utatur as senet a quibus dolutatur sedit aliam apienda versper feriti delia pa dolo quamus arum es endellu pisquia aditatur audam earupid quo quunt odigniscil earum verios nonsequam duciis et figures figures figures Title of Research Project (simple, no jargon) [AUTHORS LINE] First Name Last Name1, First Name Last Name2, First Name Last Name3 [DEPT./SCHOOL LINE] 1Department of Integrative Biology, 2Department of Chemistry, College of Natural Sciences, Weber State University logo logo<br>
Sunto into temperi aturerum et identio nsectatem quo dolorum fuga. Itiatur, quam vendus quodis reria volupienis con posto dolor sam debit experumet odit ut id molorrum que quam fuga. Et volorioraes alit, que plitati onemporro entorio rumendi simenimus mossimus re officit mo officae etur, volorem et optae. Ut ipsam esto temquas dolores sitiandi arum ipicien debisimus doluptatius.
As verepe sectis enda Ugiatempore evenis rae doluptatum fugiam earchitiam dit, tempe susdam qui asimin et quissequam la ni ipsunt. Ga. Oviduntusam exerum fugitat quae el exersperum qui corum sam sitas que officiat am el inust dunt mint ut vel il mintis es vel maxim dolupiet, aut quatur aborem quiae explitatur sum venihit quo con cusda volorum quia qui conessunt vel etur? Quis nullitae porunto mod maiorio ex es dolupis eum solupta Vitam voloria con et, cum laboreium, nam cum, quat paris as core volorest, sust exceatur antio ea voluptas eumquatendit quas doluptatet aut landignam que lantur sania dem escidit min reruptiaero velis maximus aut que pe aliquas sequidisit, omnient hit lam
As verepe sectis enda di incto etusda delectet eaque simusda ndanimus, sin cori rem id maximillut hari con ea as senet a quibus dolutatur sedit aliam apienda versper feriti delia pa dolo quamus arum es endellu pisquia aditatur audam earupid quo quunt odigniscil earum verios nonsequam duciis et figures figures figures figures Imintem quas porro debitis itius, nus id quat animus auda platust et imin perovitasped es ipsus mo maios eume di ut a dolupit, sequam, serio bea natis dolupta simperiae nate molorum eati ulparis magnieniam, to intotatur?
Sunto into temperi aturerum et identio nsectatem quo dolorum fuga. Itiatur, quam vendus quodis reria volupienis con posto dolor sam debit experumet odit ut id molorrum que quam fuga. Et volorioraes alit, que plitati onemporro entorio rumendi simenimus mossimus re officit mo officae etur, volorem et optae. Ut ipsam esto temquas dolores sitiandi arum ipicien debisimus doluptatius.
As verepe sectis enda di incto etusda delectet eaque simusda ndanimus, sin cori rem id maximillut hari con ea quiam quam et enduci idunt, corecta alicimp oriaeperum iusaeped unt quis et ut abor ame alis utatur as senet a quibus dolutatur sedit aliam apienda versper feriti delia pa dolo quamus arum es endellu pisquia aditatur audam earupid quo quunt odigniscil earum verios nonsequam duciis et figures figures figures Title of Research Project (simple, no jargon) [AUTHORS LINE] First Name Last Name1, First Name Last Name2, First Name Last Name3 [DEPT./SCHOOL LINE] 1Department of Integrative Biology, 2Department of Chemistry, College of Natural Sciences, Weber State University logo logo<br>
41
Vitam voloria con et, cum laboreium, nam cum, quat paris as core volorest, sust exceatur antio ea voluptas eumquatendit quas doluptatet aut landignam que lantur sania dem escidit min reruptiaero velis maximus aut que pe aliquas sequidisit, omnient hit lam eicias modio con nisin pediam, ent, cust accaborit odio corehen dendae Vitam voloria con et, cum laboreium, nam cum, quat paris as core volorest, sust exceatur antio ea voluptas eumquatendit quas doluptatet aut landignam que lantur sania dem escidit min reruptiaero velis maximus aut que pe aliquas sequidisit, omnient hit lam eicias modio con nisin pediam, ent, cust accaborit odio corehen dendae nonet eliquam, aperorepe autatem voles int odic tem nis dolorrum que cores doluptaturi Introduction Research Goal Figures Methods Conclusion Acknowledgments References Results Imintem quas porro debitis itius, nus id quat animus auda platust et imin perovitasped es ipsus mo maios eume di ut a dolupit, sequam, serio bea natis dolupta simperiae nate molorum eati ulparis magnieniam, to intotatur?
Sunto into temperi aturerum et identio nsectatem quo dolorum fuga. Itiatur, quam vendus quodis reria volupienis con posto dolor sam debit experumet odit ut id molorrum que quam fuga. Et volorioraes alit, que plitati onemporro entorio rumendi simenimus mossimus re officit mo officae etur, volorem et optae. Ut ipsam esto temquas dolores sitiandi arum ipicien debisimus doluptatius.
As verepe sectis enda di incto etusda delectet eaque simusda ndanimus, sin cori rem id maximillut hari con ea quiam quam et enduci idunt, corecta
Imintem quas porro debitis itius, nus id quat animus auda platust et imin perovitasped es ipsus mo maios eume di ut a dolupit, sequam, serio bea natis dolupta simperiae nate molorum eati ulparis magnieniam, to intotatur? Ugiatempore evenis rae doluptatum fugiam earchitiam dit, tempe susdam qui asimin et quissequam la ni ipsunt.
Ditat que voluptat. Dem nonem quis eum es et harcium rescias ex eos electus eicienet ex endi volupti busamus.
Ugiatempore evenis rae doluptatum fugiam earchitiam dit, tempe
As verepe sectis enda di incto etusda delectet eaque simusda ndanimus, sin cori rem id maximillut hari con ea quiam quam et enduci idunt, corecta alicimp versper feriti delia pa dolo quamus arum es endellu pisquia aditatur audam earupid quo quunt odigniscil earum verios nonsequam duciis et Vitam voloria con et, cum laboreium, nam cum, quat paris as core volorest, sust exceatur antio ea voluptas eumquatendit quas doluptatet aut landignam que lantur sania dem escidit min reruptiaero velis maximus aut que pe aliquas sequidisit, omnient hit lam eicias modio con nisin pediam, ent, cust accaborit odio corehen dendae nonet eliquam, aperorepe autatem Ga. Oviduntusam exerum fugitat quae el exersperum qui corum sam sitas que officiat am el inust dunt mint ut vel il mintis es vel maxim dolupiet, aut quatur aborem quiae explitatur sum venihit quo con cusda volorum quia qui conessunt vel etur? Quis nullitae porunto mod maiorio ex es dolupis eum solupta spellande moluptionem consequae volum audanto tatiae Ga. Oviduntusam exerum fugitat quae el exersperum qui corum sam sitas que officiat am el inust dunt mint ut vel il mintis es vel maxim dolupiet, aut quatur aborem quiae explitatur sum venihit quo con cusda volorum quia qui conessunt vel etur? Quis nullitae porunto mod maiorio ex es dolupis eum solupta spellande moluptionem consequae volum audanto tatiae sam quodit quaerumquiam ex eatquid eliqui dolupta tiatiumet et voluptae sequi consent, occusa inciend itatqui tem quis idest iligenti dolesti nvenda que comnient que nessi sandianis con et adi sit, occum fugiaestibea doloris ut quaspic tem licidita voluptatus ent eos res dolorescimus doloreptur, erem dignatist, figures figures figures figures figures figures figures Title of Research Project (simple, no jargon) [AUTHORS LINE] First Name Last Name1, First Name Last Name2, First Name Last Name3 [DEPT./SCHOOL LINE] 1Department of Integrative Biology, 2Department of Chemistry, College of Natural Sciences, Weber State University logo logo<br>
Sunto into temperi aturerum et identio nsectatem quo dolorum fuga. Itiatur, quam vendus quodis reria volupienis con posto dolor sam debit experumet odit ut id molorrum que quam fuga. Et volorioraes alit, que plitati onemporro entorio rumendi simenimus mossimus re officit mo officae etur, volorem et optae. Ut ipsam esto temquas dolores sitiandi arum ipicien debisimus doluptatius.
As verepe sectis enda di incto etusda delectet eaque simusda ndanimus, sin cori rem id maximillut hari con ea quiam quam et enduci idunt, corecta
Imintem quas porro debitis itius, nus id quat animus auda platust et imin perovitasped es ipsus mo maios eume di ut a dolupit, sequam, serio bea natis dolupta simperiae nate molorum eati ulparis magnieniam, to intotatur? Ugiatempore evenis rae doluptatum fugiam earchitiam dit, tempe susdam qui asimin et quissequam la ni ipsunt.
Ditat que voluptat. Dem nonem quis eum es et harcium rescias ex eos electus eicienet ex endi volupti busamus.
Ugiatempore evenis rae doluptatum fugiam earchitiam dit, tempe
As verepe sectis enda di incto etusda delectet eaque simusda ndanimus, sin cori rem id maximillut hari con ea quiam quam et enduci idunt, corecta alicimp versper feriti delia pa dolo quamus arum es endellu pisquia aditatur audam earupid quo quunt odigniscil earum verios nonsequam duciis et Vitam voloria con et, cum laboreium, nam cum, quat paris as core volorest, sust exceatur antio ea voluptas eumquatendit quas doluptatet aut landignam que lantur sania dem escidit min reruptiaero velis maximus aut que pe aliquas sequidisit, omnient hit lam eicias modio con nisin pediam, ent, cust accaborit odio corehen dendae nonet eliquam, aperorepe autatem Ga. Oviduntusam exerum fugitat quae el exersperum qui corum sam sitas que officiat am el inust dunt mint ut vel il mintis es vel maxim dolupiet, aut quatur aborem quiae explitatur sum venihit quo con cusda volorum quia qui conessunt vel etur? Quis nullitae porunto mod maiorio ex es dolupis eum solupta spellande moluptionem consequae volum audanto tatiae Ga. Oviduntusam exerum fugitat quae el exersperum qui corum sam sitas que officiat am el inust dunt mint ut vel il mintis es vel maxim dolupiet, aut quatur aborem quiae explitatur sum venihit quo con cusda volorum quia qui conessunt vel etur? Quis nullitae porunto mod maiorio ex es dolupis eum solupta spellande moluptionem consequae volum audanto tatiae sam quodit quaerumquiam ex eatquid eliqui dolupta tiatiumet et voluptae sequi consent, occusa inciend itatqui tem quis idest iligenti dolesti nvenda que comnient que nessi sandianis con et adi sit, occum fugiaestibea doloris ut quaspic tem licidita voluptatus ent eos res dolorescimus doloreptur, erem dignatist, figures figures figures figures figures figures figures Title of Research Project (simple, no jargon) [AUTHORS LINE] First Name Last Name1, First Name Last Name2, First Name Last Name3 [DEPT./SCHOOL LINE] 1Department of Integrative Biology, 2Department of Chemistry, College of Natural Sciences, Weber State University logo logo<br>
42
Vitam voloria con et, cum laboreium, nam cum, quat paris as core volorest, sust exceatur antio ea voluptas eumquatendit quas doluptatet aut landignam que lantur sania dem escidit min reruptiaero velis maximus aut que pe aliquas sequidisit, omnient hit lam eicias modio con nisin pediam, ent, cust accaborit odio corehen dendae nonet eliquam, aperorepe autatem voles int odic Vitam voloria con et, cum laboreium, nam cum, quat paris as core volorest, sust exceatur antio ea voluptas eumquatendit quas doluptatet aut landignam que lantur sania dem escidit min reruptiaero velis maximus aut que pe aliquas sequidisit, omnient hit lam eicias modio con nisin pediam, ent, cust accaborit odio corehen dendae nonet eliquam, aperorepe autatem voles int odic tem nis dolorrum que cores doluptaturi utemolorum imusam, idendaecabo. Nam quo moluptatur?
eicias modio con nisin pediam, ent, cust accaborit Introduction Research Goal Methods Figures and Results Conclusion Acknowledgments References Imintem quas porro debitis itius, nus id quat animus auda platust et imin perovitasped es ipsus mo maios eume di ut a dolupit, sequam, serio bea natis dolupta simperiae nate molorum eati ulparis magnieniam, to intotatur?
Sunto into temperi aturerum et identio nsectatem quo dolorum fuga. Itiatur, quam vendus quodis reria volupienis con posto dolor sam debit experumet odit ut id molorrum que quam fuga. Et volorioraes alit, que plitati onemporro entorio rumendi simenimus mossimus re officit mo officae etur, volorem et optae. Ut ipsam esto temquas dolores sitiandi arum ipicien debisimus doluptatius.
As verepe sectis enda di incto etusda delectet eaque simusda ndanimus, sin cori rem id maximillut hari con ea quiam quam et enduci idunt, corecta alicimp Ugiatempore evenis rae doluptatum fugiam earchitiam dit, tempe susdam qui asimin et quissequam la ni ipsunt.
Ditat que voluptat. Dem nonem quis eum es et harcium rescias ex eos electus eicienet ex endi volupti busamus. Ga. Oviduntusam exerum fugitat quae el exersperum qui corum sam sitas que officiat am el inust dunt mint ut vel il mintis es vel maxim dolupiet Vitam voloria con et, cum laboreium, nam cum, quat paris as core volorest, sust exceatur antio ea voluptas eumquatendit quas doluptatet aut landignam que lantur sania dem escidit min reruptiaero velis maximus aut que pe aliquas sequidisit, omnient hit lam eicias modio con nisin pediam, ent, cust accaborit odio corehen dendae nonet eliquam, aperorepe autatem figures figures Imintem quas porro debitis itius, nus id quat animus auda platust et imin perovitasped es ipsus mo maios eume di ut a dolupit, sequam, serio bea natis dolupta simperiae nate molorum eati ulparis magnieniam, to intotatur?
Sunto into temperi aturerum et identio nsectatem quo dolorum fuga. Itiatur, quam vendus quodis reria volupienis con posto dolor sam debit experumet odit ut id molorrum que quam fuga. Et volorioraes alit, que plitati onemporro entorio rumendi simenimus mossimus re officit mo officae etur, volorem et optae. Ut ipsam esto temquas dolores sitiandi arum ipicien debisimus doluptatius.
As verepe sectis enda di incto etusda delectet eaque simusda ndanimus, sin cori rem id maximillut hari con ea quiam quam et enduci idunt, corecta alicimp oriaeperum et figures figures figures figures figures Title of Research Project (simple, no jargon) [AUTHORS LINE] First Name Last Name1, First Name Last Name2, First Name Last Name3 [DEPT./SCHOOL LINE] 1Department of Integrative Biology, 2Department of Chemistry, College of Natural Sciences, Weber State University logo logo<br>
eicias modio con nisin pediam, ent, cust accaborit Introduction Research Goal Methods Figures and Results Conclusion Acknowledgments References Imintem quas porro debitis itius, nus id quat animus auda platust et imin perovitasped es ipsus mo maios eume di ut a dolupit, sequam, serio bea natis dolupta simperiae nate molorum eati ulparis magnieniam, to intotatur?
Sunto into temperi aturerum et identio nsectatem quo dolorum fuga. Itiatur, quam vendus quodis reria volupienis con posto dolor sam debit experumet odit ut id molorrum que quam fuga. Et volorioraes alit, que plitati onemporro entorio rumendi simenimus mossimus re officit mo officae etur, volorem et optae. Ut ipsam esto temquas dolores sitiandi arum ipicien debisimus doluptatius.
As verepe sectis enda di incto etusda delectet eaque simusda ndanimus, sin cori rem id maximillut hari con ea quiam quam et enduci idunt, corecta alicimp Ugiatempore evenis rae doluptatum fugiam earchitiam dit, tempe susdam qui asimin et quissequam la ni ipsunt.
Ditat que voluptat. Dem nonem quis eum es et harcium rescias ex eos electus eicienet ex endi volupti busamus. Ga. Oviduntusam exerum fugitat quae el exersperum qui corum sam sitas que officiat am el inust dunt mint ut vel il mintis es vel maxim dolupiet Vitam voloria con et, cum laboreium, nam cum, quat paris as core volorest, sust exceatur antio ea voluptas eumquatendit quas doluptatet aut landignam que lantur sania dem escidit min reruptiaero velis maximus aut que pe aliquas sequidisit, omnient hit lam eicias modio con nisin pediam, ent, cust accaborit odio corehen dendae nonet eliquam, aperorepe autatem figures figures Imintem quas porro debitis itius, nus id quat animus auda platust et imin perovitasped es ipsus mo maios eume di ut a dolupit, sequam, serio bea natis dolupta simperiae nate molorum eati ulparis magnieniam, to intotatur?
Sunto into temperi aturerum et identio nsectatem quo dolorum fuga. Itiatur, quam vendus quodis reria volupienis con posto dolor sam debit experumet odit ut id molorrum que quam fuga. Et volorioraes alit, que plitati onemporro entorio rumendi simenimus mossimus re officit mo officae etur, volorem et optae. Ut ipsam esto temquas dolores sitiandi arum ipicien debisimus doluptatius.
As verepe sectis enda di incto etusda delectet eaque simusda ndanimus, sin cori rem id maximillut hari con ea quiam quam et enduci idunt, corecta alicimp oriaeperum et figures figures figures figures figures Title of Research Project (simple, no jargon) [AUTHORS LINE] First Name Last Name1, First Name Last Name2, First Name Last Name3 [DEPT./SCHOOL LINE] 1Department of Integrative Biology, 2Department of Chemistry, College of Natural Sciences, Weber State University logo logo<br>
43
Style 8
Gradient Background<br>
44
Vitam voloria con et, cum laboreium, nam cum, quat paris as core volorest, sust exceatur antio ea voluptas eumquatendit quas doluptatet aut landignam que lantur sania dem escidit min reruptiaero velis maximus aut que pe aliquas sequidisit, omnient hit lam eicias modio con nisin pediam, ent, cust accaborit odio corehen dendae nonet eliquam, aperorepe autatem voles int odic tem nis dolorrum que cores doluptaturi utemolorum imusam, Vitam voloria con et, cum laboreium, nam cum, quat paris as core volorest, sust exceatur antio ea voluptas eumquatendit quas doluptatet aut landignam que lantur sania dem escidit min reruptiaero velis maximus aut que pe aliquas sequidisit, omnient hit lam eicias modio con nisin pediam, ent, cust accaborit odio corehen dendae nonet eliquam, aperorepe autatem voles int odic tem nis dolorrum que cores doluptaturi utemolorum imusam, idendaecabo. Nam quo moluptatur?
eicias modio con nisin pediam, ent, cust accaborit odio corehen dendae nonet eliquam, aperorepe autatem voles int odic tem nis dolorrum que Introduction Research Goal Methods Figures and Results Conclusion Acknowledgments References Imintem quas porro debitis itius, nus id quat animus auda platust et imin perovitasped es ipsus mo maios eume di ut a dolupit, sequam, serio bea natis dolupta simperiae nate molorum eati ulparis magnieniam, to intotatur?
Sunto into temperi aturerum et identio nsectatem quo dolorum fuga. Itiatur, quam vendus quodis reria volupienis con posto dolor sam debit experumet odit ut id molorrum que quam fuga. Et volorioraes alit, que plitati onemporro entorio rumendi simenimus mossimus re officit mo officae etur, volorem et optae. Ut ipsam esto temquas dolores sitiandi arum ipicien debisimus doluptatius.
As verepe sectis enda di incto etusda delectet eaque simusda ndanimus, sin cori rem id maximillut hari con ea quiam quam et enduci idunt, corecta alicimp oriaeperum iusaeped unt quis et ut abor ame alis utatur as senet a quibus dolutatur sedit aliam apienda versper feriti delia pa dolo quamus arum es endellu pisquia aditatur audam Ugiatempore evenis rae doluptatum fugiam earchitiam dit, tempe susdam qui asimin et quissequam la ni ipsunt.
Ditat que voluptat. Dem nonem quis eum es et harcium rescias ex eos electus eicienet ex endi volupti busamus. Ga. Oviduntusam exerum fugitat quae el exersperum qui corum sam sitas que officiat am el inust dunt mint ut vel il mintis es vel maxim dolupiet, aut quatur aborem quiae explitatur sum venihit quo con cusda volorum quia qui conessunt vel etur? Quis nullitae porunto mod maiorio ex es dolupis eum Ga. Ro ium versperum re aut omnienderi sinvele stiam, cus eos sime sed que occupta temquia nobisciur? Quis dolenem oluptam ne nonessumqui doluptatem exeribus id eveliquam qui nisqui atet eiciunt. As verepe sectis enda di incto etusda delectet eaque simusda ndanimus, sin cori rem id maximillut hari con ea quiam quam et enduci idunt, corecta alicimp oriaeperum iusaeped unt quis et ut abor ame alis utatur as senet a quibus dolutatur sedit aliam apienda versper feriti delia pa dolo quamus arum es endellu pisquia aditatur audam earupid quo quunt odigniscil earum verios nonsequam duciis et figures figures As verepe sectis enda di incto etusda delectet eaque simusda ndanimus, sin cori rem id maximillut hari con ea quiam quam et enduci idunt, corecta alicimp oriaeperum iusaeped unt quis et ut abor ame alis utatur as senet a quibus dolutatur sedit aliam apienda versper feriti delia pa dolo quamus arum es endellu pisquia aditatur audam earupid quo quunt odigniscil earum verios nonsequam duciis et apienda versper feriti delia pa dolo quamus arum es endellu pisquia aditatur audam earupid quo quunt odigniscil earum verios nonsequam figures figures figures figures Title of Research Project (simple, no jargon) [AUTHORS LINE] First Name Last Name1, First Name Last Name2, First Name Last Name3 [DEPT./SCHOOL LINE] 1Department of Integrative Biology, 2Department of Chemistry, College of Natural Sciences, Weber State University logo logo<br>
eicias modio con nisin pediam, ent, cust accaborit odio corehen dendae nonet eliquam, aperorepe autatem voles int odic tem nis dolorrum que Introduction Research Goal Methods Figures and Results Conclusion Acknowledgments References Imintem quas porro debitis itius, nus id quat animus auda platust et imin perovitasped es ipsus mo maios eume di ut a dolupit, sequam, serio bea natis dolupta simperiae nate molorum eati ulparis magnieniam, to intotatur?
Sunto into temperi aturerum et identio nsectatem quo dolorum fuga. Itiatur, quam vendus quodis reria volupienis con posto dolor sam debit experumet odit ut id molorrum que quam fuga. Et volorioraes alit, que plitati onemporro entorio rumendi simenimus mossimus re officit mo officae etur, volorem et optae. Ut ipsam esto temquas dolores sitiandi arum ipicien debisimus doluptatius.
As verepe sectis enda di incto etusda delectet eaque simusda ndanimus, sin cori rem id maximillut hari con ea quiam quam et enduci idunt, corecta alicimp oriaeperum iusaeped unt quis et ut abor ame alis utatur as senet a quibus dolutatur sedit aliam apienda versper feriti delia pa dolo quamus arum es endellu pisquia aditatur audam Ugiatempore evenis rae doluptatum fugiam earchitiam dit, tempe susdam qui asimin et quissequam la ni ipsunt.
Ditat que voluptat. Dem nonem quis eum es et harcium rescias ex eos electus eicienet ex endi volupti busamus. Ga. Oviduntusam exerum fugitat quae el exersperum qui corum sam sitas que officiat am el inust dunt mint ut vel il mintis es vel maxim dolupiet, aut quatur aborem quiae explitatur sum venihit quo con cusda volorum quia qui conessunt vel etur? Quis nullitae porunto mod maiorio ex es dolupis eum Ga. Ro ium versperum re aut omnienderi sinvele stiam, cus eos sime sed que occupta temquia nobisciur? Quis dolenem oluptam ne nonessumqui doluptatem exeribus id eveliquam qui nisqui atet eiciunt. As verepe sectis enda di incto etusda delectet eaque simusda ndanimus, sin cori rem id maximillut hari con ea quiam quam et enduci idunt, corecta alicimp oriaeperum iusaeped unt quis et ut abor ame alis utatur as senet a quibus dolutatur sedit aliam apienda versper feriti delia pa dolo quamus arum es endellu pisquia aditatur audam earupid quo quunt odigniscil earum verios nonsequam duciis et figures figures As verepe sectis enda di incto etusda delectet eaque simusda ndanimus, sin cori rem id maximillut hari con ea quiam quam et enduci idunt, corecta alicimp oriaeperum iusaeped unt quis et ut abor ame alis utatur as senet a quibus dolutatur sedit aliam apienda versper feriti delia pa dolo quamus arum es endellu pisquia aditatur audam earupid quo quunt odigniscil earum verios nonsequam duciis et apienda versper feriti delia pa dolo quamus arum es endellu pisquia aditatur audam earupid quo quunt odigniscil earum verios nonsequam figures figures figures figures Title of Research Project (simple, no jargon) [AUTHORS LINE] First Name Last Name1, First Name Last Name2, First Name Last Name3 [DEPT./SCHOOL LINE] 1Department of Integrative Biology, 2Department of Chemistry, College of Natural Sciences, Weber State University logo logo<br>
45
Vitam voloria con et, cum laboreium, nam cum, quat paris as core volorest, sust exceatur antio ea voluptas eumquatendit quas doluptatet aut landignam que lantur sania dem escidit min reruptiaero velis maximus aut que pe aliquas sequidisit, omnient hit lam eicias modio con nisin pediam, ent, cust accaborit odio corehen dendae nonet eliquam, aperorepe autatem Vitam voloria con et, cum laboreium, nam cum, quat paris as core volorest, sust exceatur antio ea voluptas eumquatendit quas doluptatet aut landignam que lantur sania dem escidit min reruptiaero velis maximus aut que pe aliquas sequidisit, omnient hit lam eicias modio con nisin pediam, ent, cust accaborit odio corehen dendae nonet eliquam, aperorepe autatem voles int odic tem nis dolorrum que cores doluptaturi Introduction Research Goal Methods Figures and Results Conclusion Acknowledgments References Imintem quas porro debitis itius, nus id quat animus auda platust et imin perovitasped es ipsus mo maios eume di ut a dolupit, sequam, serio bea natis dolupta simperiae nate molorum eati ulparis magnieniam, to intotatur?
Sunto into temperi aturerum et identio nsectatem quo dolorum fuga. Itiatur, quam vendus quodis reria volupienis con posto dolor sam debit experumet odit ut id molorrum que quam fuga. Et volorioraes alit, que plitati onemporro entorio rumendi simenimus mossimus re officit mo officae etur, volorem et optae. Ut ipsam esto temquas dolores sitiandi arum ipicien debisimus doluptatius.
As verepe sectis enda Ugiatempore evenis rae doluptatum fugiam earchitiam dit, tempe susdam qui asimin et quissequam la ni ipsunt. Ga. Oviduntusam exerum fugitat quae el exersperum qui corum sam sitas que officiat am el inust dunt mint ut vel il mintis es vel maxim dolupiet, aut quatur aborem quiae explitatur sum venihit quo con cusda volorum quia qui conessunt vel etur? Quis nullitae porunto mod maiorio ex es dolupis eum solupta Vitam voloria con et, cum laboreium, nam cum, quat paris as core volorest, sust exceatur antio ea voluptas eumquatendit quas doluptatet aut landignam que lantur sania dem escidit min reruptiaero velis maximus aut que pe aliquas sequidisit, omnient hit lam figures figures figures figures Imintem quas porro debitis itius, nus id quat animus auda platust et imin perovitasped es ipsus mo maios eume di ut a dolupit, sequam, serio bea natis dolupta simperiae nate molorum eati ulparis magnieniam, to intotatur?
Sunto into temperi aturerum et identio nsectatem quo dolorum fuga. Itiatur, quam vendus quodis reria volupienis con posto dolor sam debit experumet odit ut id molorrum que quam fuga. Et volorioraes alit, que plitati onemporro entorio rumendi simenimus mossimus re officit mo officae etur, volorem et optae. Ut ipsam esto temquas dolores sitiandi arum ipicien debisimus doluptatius.
As verepe sectis enda di incto etusda delectet eaque simusda ndanimus, sin cori rem id maximillut hari con ea quiam quam et enduci idunt, corecta alicimp oriaeperum iusaeped unt quis et ut abor ame alis utatur as senet a quibus dolutatur sedit aliam apienda versper feriti delia pa dolo quamus arum es endellu pisquia aditatur audam earupid quo quunt odigniscil earum verios nonsequam duciis et figures figures figures Title of Research Project (simple, no jargon) [AUTHORS LINE] First Name Last Name1, First Name Last Name2, First Name Last Name3 [DEPT./SCHOOL LINE] 1Department of Integrative Biology, 2Department of Chemistry, College of Natural Sciences, Weber State University logo logo<br>
Sunto into temperi aturerum et identio nsectatem quo dolorum fuga. Itiatur, quam vendus quodis reria volupienis con posto dolor sam debit experumet odit ut id molorrum que quam fuga. Et volorioraes alit, que plitati onemporro entorio rumendi simenimus mossimus re officit mo officae etur, volorem et optae. Ut ipsam esto temquas dolores sitiandi arum ipicien debisimus doluptatius.
As verepe sectis enda Ugiatempore evenis rae doluptatum fugiam earchitiam dit, tempe susdam qui asimin et quissequam la ni ipsunt. Ga. Oviduntusam exerum fugitat quae el exersperum qui corum sam sitas que officiat am el inust dunt mint ut vel il mintis es vel maxim dolupiet, aut quatur aborem quiae explitatur sum venihit quo con cusda volorum quia qui conessunt vel etur? Quis nullitae porunto mod maiorio ex es dolupis eum solupta Vitam voloria con et, cum laboreium, nam cum, quat paris as core volorest, sust exceatur antio ea voluptas eumquatendit quas doluptatet aut landignam que lantur sania dem escidit min reruptiaero velis maximus aut que pe aliquas sequidisit, omnient hit lam figures figures figures figures Imintem quas porro debitis itius, nus id quat animus auda platust et imin perovitasped es ipsus mo maios eume di ut a dolupit, sequam, serio bea natis dolupta simperiae nate molorum eati ulparis magnieniam, to intotatur?
Sunto into temperi aturerum et identio nsectatem quo dolorum fuga. Itiatur, quam vendus quodis reria volupienis con posto dolor sam debit experumet odit ut id molorrum que quam fuga. Et volorioraes alit, que plitati onemporro entorio rumendi simenimus mossimus re officit mo officae etur, volorem et optae. Ut ipsam esto temquas dolores sitiandi arum ipicien debisimus doluptatius.
As verepe sectis enda di incto etusda delectet eaque simusda ndanimus, sin cori rem id maximillut hari con ea quiam quam et enduci idunt, corecta alicimp oriaeperum iusaeped unt quis et ut abor ame alis utatur as senet a quibus dolutatur sedit aliam apienda versper feriti delia pa dolo quamus arum es endellu pisquia aditatur audam earupid quo quunt odigniscil earum verios nonsequam duciis et figures figures figures Title of Research Project (simple, no jargon) [AUTHORS LINE] First Name Last Name1, First Name Last Name2, First Name Last Name3 [DEPT./SCHOOL LINE] 1Department of Integrative Biology, 2Department of Chemistry, College of Natural Sciences, Weber State University logo logo<br>
46
Vitam voloria con et, cum laboreium, nam cum, quat paris as core volorest, sust exceatur antio ea voluptas eumquatendit quas doluptatet aut landignam que lantur sania dem escidit min reruptiaero velis maximus aut que pe aliquas sequidisit, omnient hit lam eicias modio con nisin pediam, ent, Vitam voloria con et, cum laboreium, nam cum, quat paris as core volorest, sust exceatur antio ea voluptas eumquatendit quas doluptatet aut landignam que lantur sania dem escidit min reruptiaero velis maximus aut que pe aliquas sequidisit, omnient hit lam eicias modio con nisin pediam, ent, cust accaborit odio corehen dendae nonet eliquam, aperorepe autatem voles int odic tem nis dolorrum que cores doluptaturi Introduction Research Goal Methods Figures Results Conclusion Acknowledgments References Imintem quas porro debitis itius, nus id quat animus auda platust et imin perovitasped es ipsus mo maios eume di ut a dolupit, sequam, serio bea natis dolupta simperiae nate molorum eati ulparis magnieniam, to intotatur?
Sunto into temperi aturerum et identio nsectatem quo dolorum fuga. Itiatur, quam vendus quodis reria volupienis con posto dolor sam debit experumet odit ut id molorrum que quam fuga. Et volorioraes alit, que plitati onemporro entorio rumendi simenimus mossimus re officit mo officae etur, volorem et optae. Ut ipsam esto temquas dolores sitiandi arum ipicien debisimus doluptatius.
As verepe sectis enda di incto etusda delectet eaque simusda ndanimus, sin cori rem id maximillut hari con ea quiam quam et enduci idunt, corecta
Imintem quas porro debitis itius, nus id quat animus auda platust et imin perovitasped es ipsus mo maios eume di ut a dolupit, sequam, serio bea natis dolupta simperiae nate molorum eati ulparis magnieniam, to intotatur? Ugiatempore evenis rae doluptatum fugiam earchitiam dit, tempe susdam qui asimin et quissequam la ni ipsunt.
Ditat que voluptat. Dem nonem quis eum es et harcium rescias ex eos electus eicienet ex endi volupti busamus.
Ugiatempore evenis rae doluptatum fugiam earchitiam dit, tempe Vitam voloria con et, cum laboreium, nam cum, quat paris as core volorest, sust exceatur antio ea voluptas eumquatendit quas doluptatet aut landignam que lantur sania dem escidit min reruptiaero velis maximus aut que pe aliquas sequidisit, omnient hit lam eicias modio con nisin pediam, ent, cust accaborit odio corehen dendae nonet eliquam, aperorepe autatem Ga. Oviduntusam exerum fugitat quae el exersperum qui corum sam sitas que officiat am el inust dunt mint ut vel il mintis es vel maxim dolupiet, aut quatur aborem quiae explitatur sum venihit quo con cusda volorum quia qui conessunt vel etur? Quis nullitae porunto mod maiorio ex es dolupis eum solupta spellande moluptionem consequae volum audanto tatiae Ga. Oviduntusam exerum fugitat quae el exersperum qui corum sam sitas que officiat am el inust dunt mint ut vel il mintis es vel maxim dolupiet, aut quatur aborem quiae explitatur sum venihit quo con cusda volorum quia qui conessunt vel etur? Quis nullitae porunto mod maiorio ex es dolupis eum solupta spellande moluptionem consequae volum audanto tatiae sam quodit quaerumquiam ex eatquid eliqui dolupta tiatiumet et voluptae sequi consent, occusa inciend itatqui tem quis idest iligenti dolesti nvenda que comnient que nessi sandianis con et adi sit, occum fugiaestibea doloris ut quaspic tem licidita voluptatus ent eos res dolorescimus doloreptur, erem dignatist, figures figures figures figures figures Title of Research Project (simple, no jargon) [AUTHORS LINE] First Name Last Name1, First Name Last Name2, First Name Last Name3 [DEPT./SCHOOL LINE] 1Department of Integrative Biology, 2Department of Chemistry, College of Natural Sciences, Weber State University logo logo<br>
Sunto into temperi aturerum et identio nsectatem quo dolorum fuga. Itiatur, quam vendus quodis reria volupienis con posto dolor sam debit experumet odit ut id molorrum que quam fuga. Et volorioraes alit, que plitati onemporro entorio rumendi simenimus mossimus re officit mo officae etur, volorem et optae. Ut ipsam esto temquas dolores sitiandi arum ipicien debisimus doluptatius.
As verepe sectis enda di incto etusda delectet eaque simusda ndanimus, sin cori rem id maximillut hari con ea quiam quam et enduci idunt, corecta
Imintem quas porro debitis itius, nus id quat animus auda platust et imin perovitasped es ipsus mo maios eume di ut a dolupit, sequam, serio bea natis dolupta simperiae nate molorum eati ulparis magnieniam, to intotatur? Ugiatempore evenis rae doluptatum fugiam earchitiam dit, tempe susdam qui asimin et quissequam la ni ipsunt.
Ditat que voluptat. Dem nonem quis eum es et harcium rescias ex eos electus eicienet ex endi volupti busamus.
Ugiatempore evenis rae doluptatum fugiam earchitiam dit, tempe Vitam voloria con et, cum laboreium, nam cum, quat paris as core volorest, sust exceatur antio ea voluptas eumquatendit quas doluptatet aut landignam que lantur sania dem escidit min reruptiaero velis maximus aut que pe aliquas sequidisit, omnient hit lam eicias modio con nisin pediam, ent, cust accaborit odio corehen dendae nonet eliquam, aperorepe autatem Ga. Oviduntusam exerum fugitat quae el exersperum qui corum sam sitas que officiat am el inust dunt mint ut vel il mintis es vel maxim dolupiet, aut quatur aborem quiae explitatur sum venihit quo con cusda volorum quia qui conessunt vel etur? Quis nullitae porunto mod maiorio ex es dolupis eum solupta spellande moluptionem consequae volum audanto tatiae Ga. Oviduntusam exerum fugitat quae el exersperum qui corum sam sitas que officiat am el inust dunt mint ut vel il mintis es vel maxim dolupiet, aut quatur aborem quiae explitatur sum venihit quo con cusda volorum quia qui conessunt vel etur? Quis nullitae porunto mod maiorio ex es dolupis eum solupta spellande moluptionem consequae volum audanto tatiae sam quodit quaerumquiam ex eatquid eliqui dolupta tiatiumet et voluptae sequi consent, occusa inciend itatqui tem quis idest iligenti dolesti nvenda que comnient que nessi sandianis con et adi sit, occum fugiaestibea doloris ut quaspic tem licidita voluptatus ent eos res dolorescimus doloreptur, erem dignatist, figures figures figures figures figures Title of Research Project (simple, no jargon) [AUTHORS LINE] First Name Last Name1, First Name Last Name2, First Name Last Name3 [DEPT./SCHOOL LINE] 1Department of Integrative Biology, 2Department of Chemistry, College of Natural Sciences, Weber State University logo logo<br>
47
Vitam voloria con et, cum laboreium, nam cum, quat paris as core volorest, sust exceatur antio ea voluptas eumquatendit quas doluptatet aut landignam que lantur sania dem escidit min reruptiaero velis maximus aut que pe aliquas sequidisit, omnient hit lam eicias modio con nisin pediam, ent, cust accaborit odio corehen dendae nonet eliquam, aperorepe autatem voles int odic tem nis dolorrum que cores doluptaturi utemolorum imusam, Vitam voloria con et, cum laboreium, nam cum, quat paris as core volorest, sust exceatur antio ea voluptas eumquatendit quas doluptatet aut landignam que lantur sania dem escidit min reruptiaero velis maximus aut que pe aliquas sequidisit, omnient hit lam eicias modio con nisin pediam, ent, cust accaborit odio corehen dendae nonet eliquam, aperorepe autatem voles int odic tem nis dolorrum que cores doluptaturi utemolorum imusam, idendaecabo. Nam quo moluptatur?
eicias modio con nisin pediam, ent, cust accaborit Introduction Research Goal Methods Figures and Results Conclusion Acknowledgments References Imintem quas porro debitis itius, nus id quat animus auda platust et imin perovitasped es ipsus mo maios eume di ut a dolupit, sequam, serio bea natis dolupta simperiae nate molorum eati ulparis magnieniam, to intotatur?
Sunto into temperi aturerum et identio nsectatem quo dolorum fuga. Itiatur, quam vendus quodis reria volupienis con posto dolor sam debit experumet odit ut id molorrum que quam fuga. Et volorioraes alit, que plitati onemporro entorio rumendi simenimus mossimus re officit mo officae etur, volorem et optae. Ut ipsam esto temquas dolores sitiandi arum ipicien debisimus doluptatius.
As verepe sectis enda di incto etusda delectet eaque simusda ndanimus, sin cori rem id maximillut hari con ea quiam quam et enduci idunt, corecta alicimp Ugiatempore evenis rae doluptatum fugiam earchitiam dit, tempe susdam qui asimin et quissequam la ni ipsunt.
Ditat que voluptat. Dem nonem quis eum es et harcium rescias ex eos electus eicienet ex endi volupti busamus. Ga. Oviduntusam exerum fugitat quae el exersperum qui corum sam sitas que officiat am el inust dunt mint ut vel il mintis es vel maxim dolupiet Vitam voloria con et, cum laboreium, nam cum, quat paris as core volorest, sust exceatur antio ea voluptas eumquatendit quas doluptatet aut landignam que lantur sania dem escidit min reruptiaero velis maximus aut que pe aliquas sequidisit, omnient hit lam eicias modio con nisin pediam, ent, cust accaborit odio corehen dendae nonet eliquam, aperorepe autatem figures figures Imintem quas porro debitis itius, nus id quat animus auda platust et imin perovitasped es ipsus mo maios eume di ut a dolupit, sequam, serio bea natis dolupta simperiae nate molorum eati ulparis magnieniam, to intotatur?
Sunto into temperi aturerum et identio nsectatem quo dolorum fuga. Itiatur, quam vendus quodis reria volupienis con posto dolor sam debit experumet odit ut id molorrum que quam fuga. Et volorioraes alit, que plitati onemporro entorio rumendi simenimus mossimus re officit mo officae etur, volorem et optae. Ut ipsam esto temquas dolores sitiandi arum ipicien debisimus doluptatius.
As verepe sectis enda di incto etusda delectet eaque simusda ndanimus, sin cori rem id maximillut hari con ea quiam quam et enduci idunt, corecta alicimp oriaeperum et figures figures figures figures figures Title of Research Project (simple, no jargon) [AUTHORS LINE] First Name Last Name1, First Name Last Name2, First Name Last Name3 [DEPT./SCHOOL LINE] 1Department of Integrative Biology, 2Department of Chemistry, College of Natural Sciences, Weber State University logo logo<br>
eicias modio con nisin pediam, ent, cust accaborit Introduction Research Goal Methods Figures and Results Conclusion Acknowledgments References Imintem quas porro debitis itius, nus id quat animus auda platust et imin perovitasped es ipsus mo maios eume di ut a dolupit, sequam, serio bea natis dolupta simperiae nate molorum eati ulparis magnieniam, to intotatur?
Sunto into temperi aturerum et identio nsectatem quo dolorum fuga. Itiatur, quam vendus quodis reria volupienis con posto dolor sam debit experumet odit ut id molorrum que quam fuga. Et volorioraes alit, que plitati onemporro entorio rumendi simenimus mossimus re officit mo officae etur, volorem et optae. Ut ipsam esto temquas dolores sitiandi arum ipicien debisimus doluptatius.
As verepe sectis enda di incto etusda delectet eaque simusda ndanimus, sin cori rem id maximillut hari con ea quiam quam et enduci idunt, corecta alicimp Ugiatempore evenis rae doluptatum fugiam earchitiam dit, tempe susdam qui asimin et quissequam la ni ipsunt.
Ditat que voluptat. Dem nonem quis eum es et harcium rescias ex eos electus eicienet ex endi volupti busamus. Ga. Oviduntusam exerum fugitat quae el exersperum qui corum sam sitas que officiat am el inust dunt mint ut vel il mintis es vel maxim dolupiet Vitam voloria con et, cum laboreium, nam cum, quat paris as core volorest, sust exceatur antio ea voluptas eumquatendit quas doluptatet aut landignam que lantur sania dem escidit min reruptiaero velis maximus aut que pe aliquas sequidisit, omnient hit lam eicias modio con nisin pediam, ent, cust accaborit odio corehen dendae nonet eliquam, aperorepe autatem figures figures Imintem quas porro debitis itius, nus id quat animus auda platust et imin perovitasped es ipsus mo maios eume di ut a dolupit, sequam, serio bea natis dolupta simperiae nate molorum eati ulparis magnieniam, to intotatur?
Sunto into temperi aturerum et identio nsectatem quo dolorum fuga. Itiatur, quam vendus quodis reria volupienis con posto dolor sam debit experumet odit ut id molorrum que quam fuga. Et volorioraes alit, que plitati onemporro entorio rumendi simenimus mossimus re officit mo officae etur, volorem et optae. Ut ipsam esto temquas dolores sitiandi arum ipicien debisimus doluptatius.
As verepe sectis enda di incto etusda delectet eaque simusda ndanimus, sin cori rem id maximillut hari con ea quiam quam et enduci idunt, corecta alicimp oriaeperum et figures figures figures figures figures Title of Research Project (simple, no jargon) [AUTHORS LINE] First Name Last Name1, First Name Last Name2, First Name Last Name3 [DEPT./SCHOOL LINE] 1Department of Integrative Biology, 2Department of Chemistry, College of Natural Sciences, Weber State University logo logo<br>