
Introduction to C++: Part 2 Tutorial Outline:
MS
Published · 66 slides · 0 views
1 / 1

Description
Introduction to C: Part 2 Tutorial Outline: Parts 2 and 3 References and Pointers The formal concepts in OOP More about C classes Inheritance, Abstraction, and Encapsulation Virtual functions and Interfaces References and Pointers Part
Related Topics
Share
Embed code
Download this presentation From Below
"Introduction to C++: Part 2 Tutorial Outline:" is the property of its rightful owner. Permission is granted to download and print the materials on this website for personal, non-commercial use only, and to display it on your personal computer provided you do not modify the materials and that you retain all copyright notices contained in the materials. By downloading content from our website, you accept the terms of this agreement.
Presentation Transcript
01
Introduction to C++: Part 2<br>
02
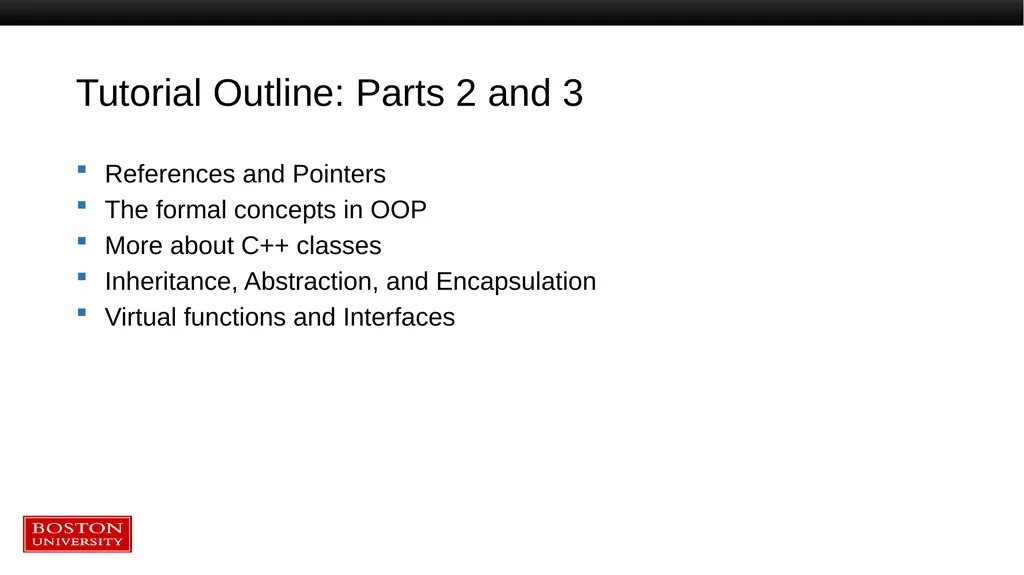
Tutorial Outline: Parts 2 and 3 References and Pointers
The formal concepts in OOP
More about C++ classes
Inheritance, Abstraction, and Encapsulation
Virtual functions and Interfaces<br>
The formal concepts in OOP
More about C++ classes
Inheritance, Abstraction, and Encapsulation
Virtual functions and Interfaces<br>
03
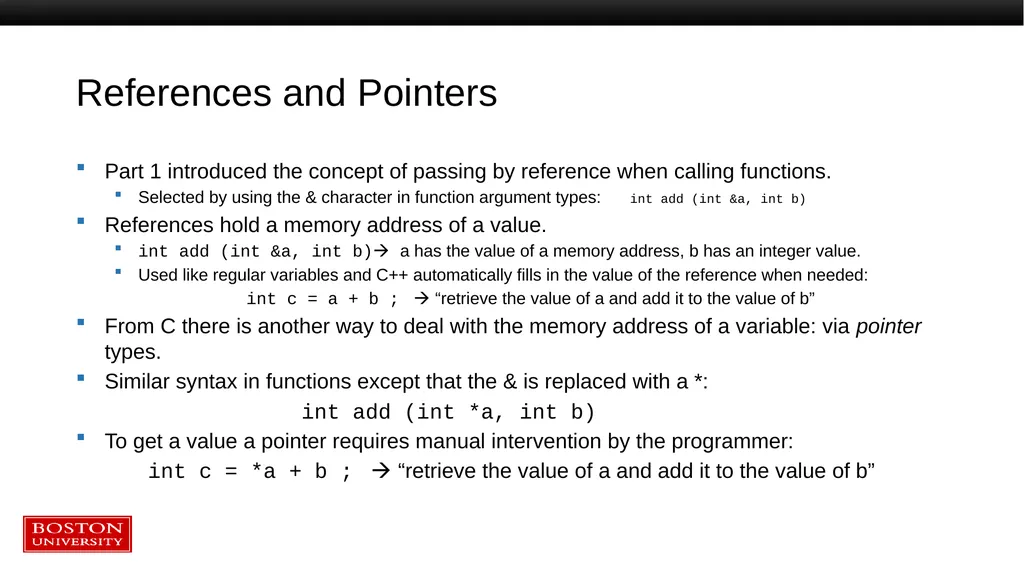
References and Pointers Part 1 introduced the concept of passing by reference when calling functions.
Selected by using the & character in function argument types: int add (int &a, int b)
References hold a memory address of a value.
int add (int &a, int b) a has the value of a memory address, b has an integer value.
Used like regular variables and C++ automatically fills in the value of the reference when needed:
int c = a + b ; “retrieve the value of a and add it to the value of b”
From C there is another way to deal with the memory address of a variable: via pointer types.
Similar syntax in functions except that the & is replaced with a *:
int add (int *a, int b)
To get a value a pointer requires manual intervention by the programmer:
int c = *a + b ; “retrieve the value of a and add it to the value of b”<br>
Selected by using the & character in function argument types: int add (int &a, int b)
References hold a memory address of a value.
int add (int &a, int b) a has the value of a memory address, b has an integer value.
Used like regular variables and C++ automatically fills in the value of the reference when needed:
int c = a + b ; “retrieve the value of a and add it to the value of b”
From C there is another way to deal with the memory address of a variable: via pointer types.
Similar syntax in functions except that the & is replaced with a *:
int add (int *a, int b)
To get a value a pointer requires manual intervention by the programmer:
int c = *a + b ; “retrieve the value of a and add it to the value of b”<br>
04
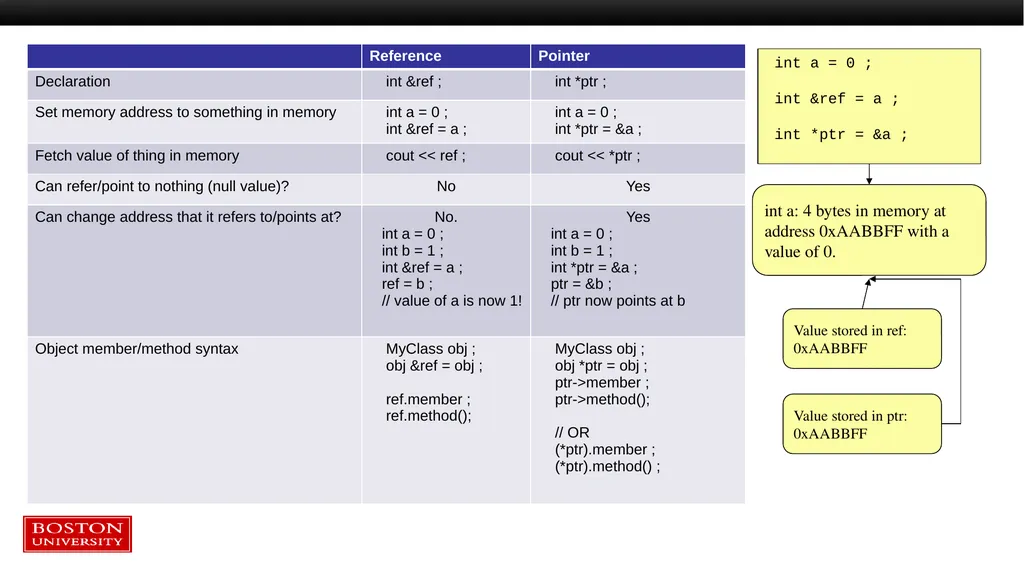
int a = 0 ;
int &ref = a ;
int *ptr = &a ; int a: 4 bytes in memory at address 0xAABBFF with a value of 0. Value stored in ref: 0xAABBFF Value stored in ptr: 0xAABBFF<br>
int &ref = a ;
int *ptr = &a ; int a: 4 bytes in memory at address 0xAABBFF with a value of 0. Value stored in ref: 0xAABBFF Value stored in ptr: 0xAABBFF<br>
05
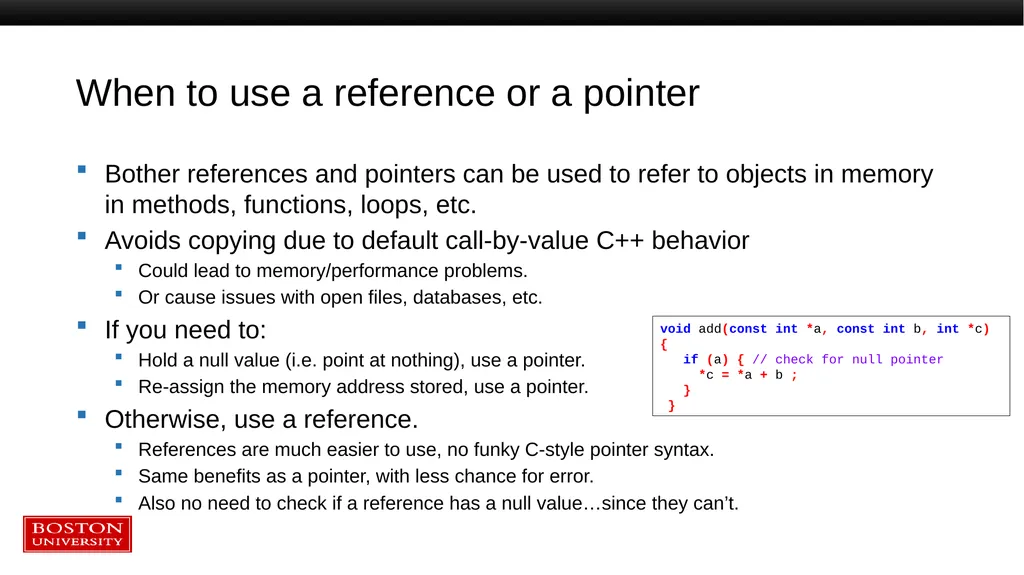
When to use a reference or a pointer Bother references and pointers can be used to refer to objects in memory in methods, functions, loops, etc.
Avoids copying due to default call-by-value C++ behavior
Could lead to memory/performance problems.
Or cause issues with open files, databases, etc.
If you need to:
Hold a null value (i.e. point at nothing), use a pointer.
Re-assign the memory address stored, use a pointer.
Otherwise, use a reference.
References are much easier to use, no funky C-style pointer syntax.
Same benefits as a pointer, with less chance for error.
Also no need to check if a reference has a null value…since they can’t. void add(const int *a, const int b, int *c)
{
if (a) { // check for null pointer
*c = *a + b ;
}
}<br>
Avoids copying due to default call-by-value C++ behavior
Could lead to memory/performance problems.
Or cause issues with open files, databases, etc.
If you need to:
Hold a null value (i.e. point at nothing), use a pointer.
Re-assign the memory address stored, use a pointer.
Otherwise, use a reference.
References are much easier to use, no funky C-style pointer syntax.
Same benefits as a pointer, with less chance for error.
Also no need to check if a reference has a null value…since they can’t. void add(const int *a, const int b, int *c)
{
if (a) { // check for null pointer
*c = *a + b ;
}
}<br>
06
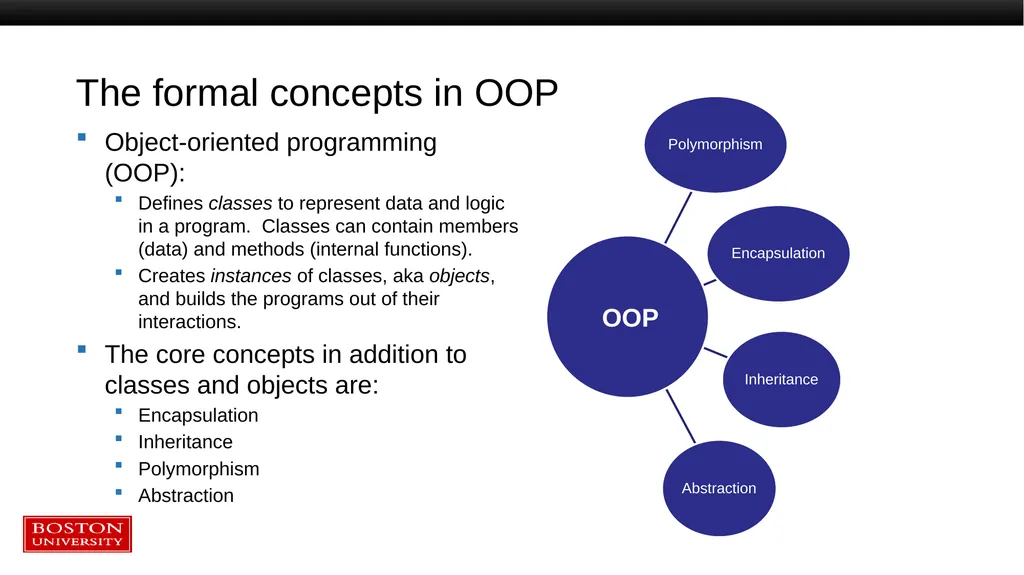
The formal concepts in OOP Object-oriented programming (OOP):
Defines classes to represent data and logic in a program. Classes can contain members (data) and methods (internal functions).
Creates instances of classes, aka objects, and builds the programs out of their interactions.
The core concepts in addition to classes and objects are:
Encapsulation
Inheritance
Polymorphism
Abstraction OOP<br>
Defines classes to represent data and logic in a program. Classes can contain members (data) and methods (internal functions).
Creates instances of classes, aka objects, and builds the programs out of their interactions.
The core concepts in addition to classes and objects are:
Encapsulation
Inheritance
Polymorphism
Abstraction OOP<br>
07
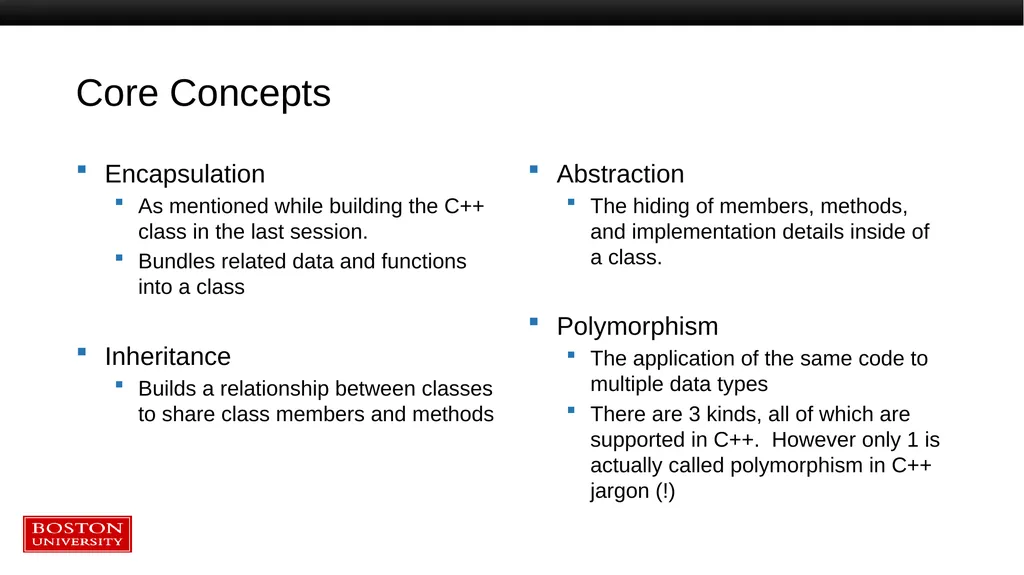
Core Concepts Encapsulation
As mentioned while building the C++ class in the last session.
Bundles related data and functions into a class
Inheritance
Builds a relationship between classes to share class members and methods Abstraction
The hiding of members, methods, and implementation details inside of a class.
Polymorphism
The application of the same code to multiple data types
There are 3 kinds, all of which are supported in C++. However only 1 is actually called polymorphism in C++ jargon (!)<br>
As mentioned while building the C++ class in the last session.
Bundles related data and functions into a class
Inheritance
Builds a relationship between classes to share class members and methods Abstraction
The hiding of members, methods, and implementation details inside of a class.
Polymorphism
The application of the same code to multiple data types
There are 3 kinds, all of which are supported in C++. However only 1 is actually called polymorphism in C++ jargon (!)<br>
08
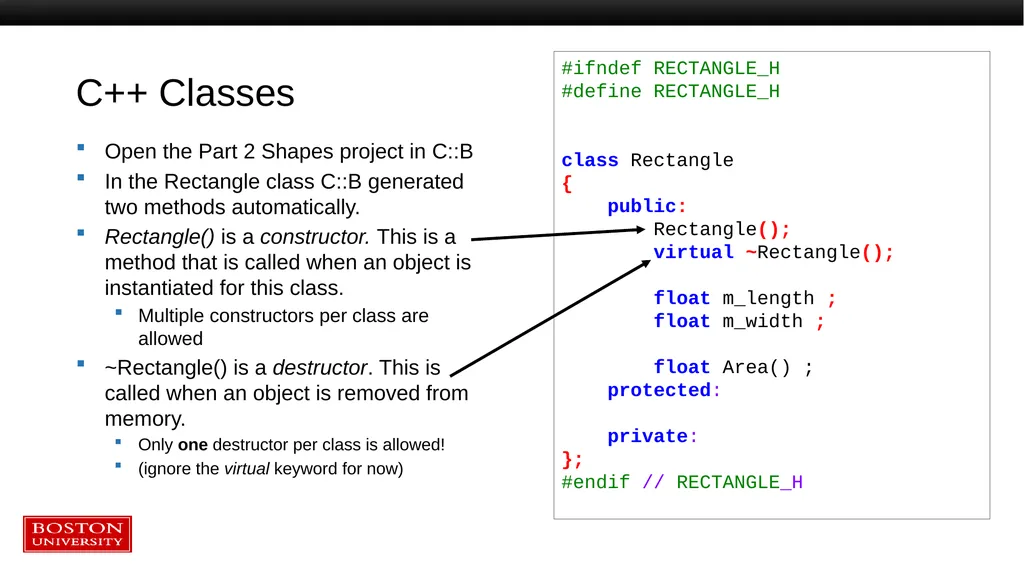
C++ Classes Open the Part 2 Shapes project in C::B
In the Rectangle class C::B generated two methods automatically.
Rectangle() is a constructor. This is a method that is called when an object is instantiated for this class.
Multiple constructors per class are allowed
~Rectangle() is a destructor. This is called when an object is removed from memory.
Only one destructor per class is allowed!
(ignore the virtual keyword for now) #ifndef RECTANGLE_H
#define RECTANGLE_H
class Rectangle
{
public:
Rectangle();
virtual ~Rectangle();
float m_length ;
float m_width ;
float Area() ;
protected:
private:
};
#endif // RECTANGLE_H<br>
In the Rectangle class C::B generated two methods automatically.
Rectangle() is a constructor. This is a method that is called when an object is instantiated for this class.
Multiple constructors per class are allowed
~Rectangle() is a destructor. This is called when an object is removed from memory.
Only one destructor per class is allowed!
(ignore the virtual keyword for now) #ifndef RECTANGLE_H
#define RECTANGLE_H
class Rectangle
{
public:
Rectangle();
virtual ~Rectangle();
float m_length ;
float m_width ;
float Area() ;
protected:
private:
};
#endif // RECTANGLE_H<br>
09
Encapsulation Bundling the data and area calculation for a rectangle into a single class is and example of the concept of encapsulation.<br>
10
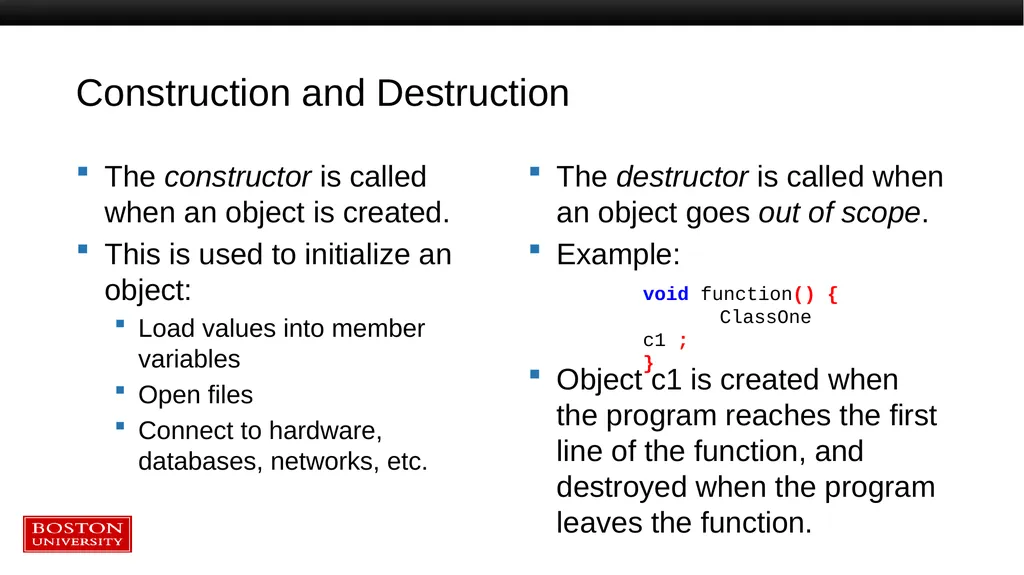
Construction and Destruction The constructor is called when an object is created.
This is used to initialize an object:
Load values into member variables
Open files
Connect to hardware, databases, networks, etc. The destructor is called when an object goes out of scope.
Example:
Object c1 is created when the program reaches the first line of the function, and destroyed when the program leaves the function. void function() {
ClassOne c1 ;
}<br>
This is used to initialize an object:
Load values into member variables
Open files
Connect to hardware, databases, networks, etc. The destructor is called when an object goes out of scope.
Example:
Object c1 is created when the program reaches the first line of the function, and destroyed when the program leaves the function. void function() {
ClassOne c1 ;
}<br>
11
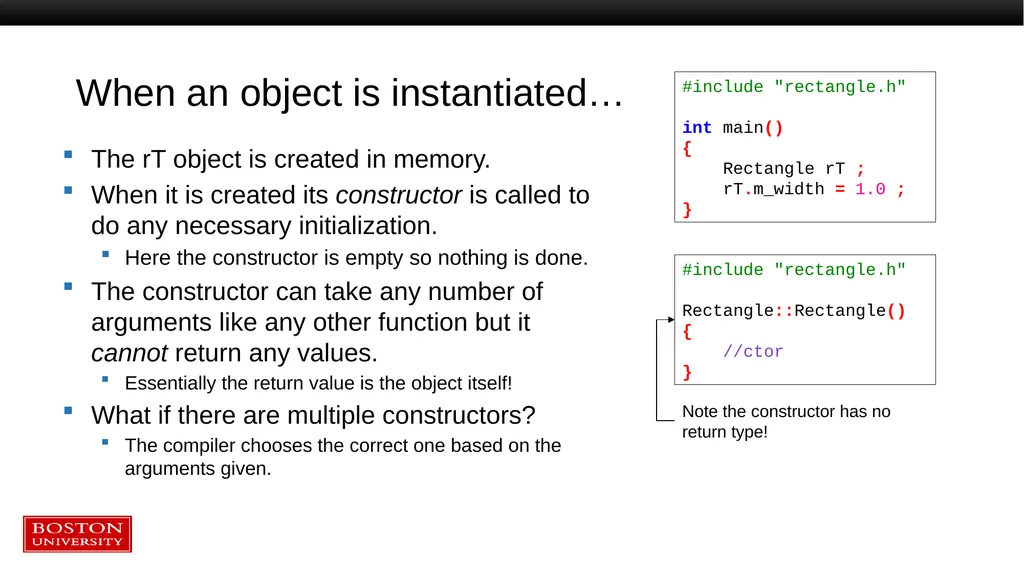
When an object is instantiated… The rT object is created in memory.
When it is created its constructor is called to do any necessary initialization.
Here the constructor is empty so nothing is done.
The constructor can take any number of arguments like any other function but it cannot return any values.
Essentially the return value is the object itself!
What if there are multiple constructors?
The compiler chooses the correct one based on the arguments given. #include "rectangle.h"
int main()
{
Rectangle rT ;
rT.m_width = 1.0 ;
} #include "rectangle.h"
Rectangle::Rectangle()
{
//ctor
} Note the constructor has no return type!<br>
When it is created its constructor is called to do any necessary initialization.
Here the constructor is empty so nothing is done.
The constructor can take any number of arguments like any other function but it cannot return any values.
Essentially the return value is the object itself!
What if there are multiple constructors?
The compiler chooses the correct one based on the arguments given. #include "rectangle.h"
int main()
{
Rectangle rT ;
rT.m_width = 1.0 ;
} #include "rectangle.h"
Rectangle::Rectangle()
{
//ctor
} Note the constructor has no return type!<br>
12
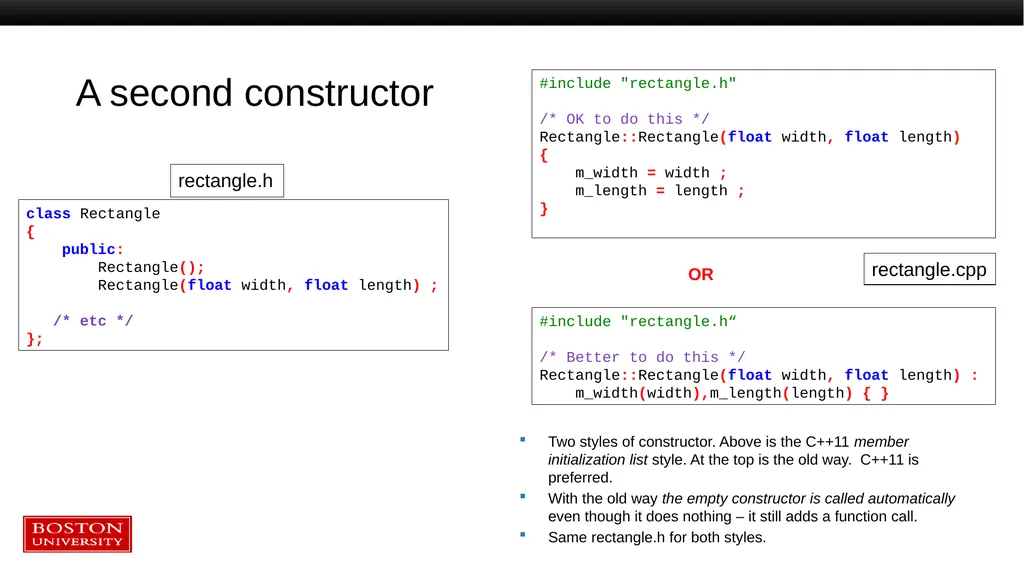
A second constructor rectangle.h class Rectangle
{
public:
Rectangle();
Rectangle(float width, float length) ;
/* etc */
}; rectangle.cpp #include "rectangle.h"
/* OK to do this */
Rectangle::Rectangle(float width, float length)
{
m_width = width ;
m_length = length ;
} Two styles of constructor. Above is the C++11 member initialization list style. At the top is the old way. C++11 is preferred.
With the old way the empty constructor is called automatically even though it does nothing – it still adds a function call.
Same rectangle.h for both styles. #include "rectangle.h“
/* Better to do this */
Rectangle::Rectangle(float width, float length) :
m_width(width),m_length(length) { } OR<br>
{
public:
Rectangle();
Rectangle(float width, float length) ;
/* etc */
}; rectangle.cpp #include "rectangle.h"
/* OK to do this */
Rectangle::Rectangle(float width, float length)
{
m_width = width ;
m_length = length ;
} Two styles of constructor. Above is the C++11 member initialization list style. At the top is the old way. C++11 is preferred.
With the old way the empty constructor is called automatically even though it does nothing – it still adds a function call.
Same rectangle.h for both styles. #include "rectangle.h“
/* Better to do this */
Rectangle::Rectangle(float width, float length) :
m_width(width),m_length(length) { } OR<br>
13
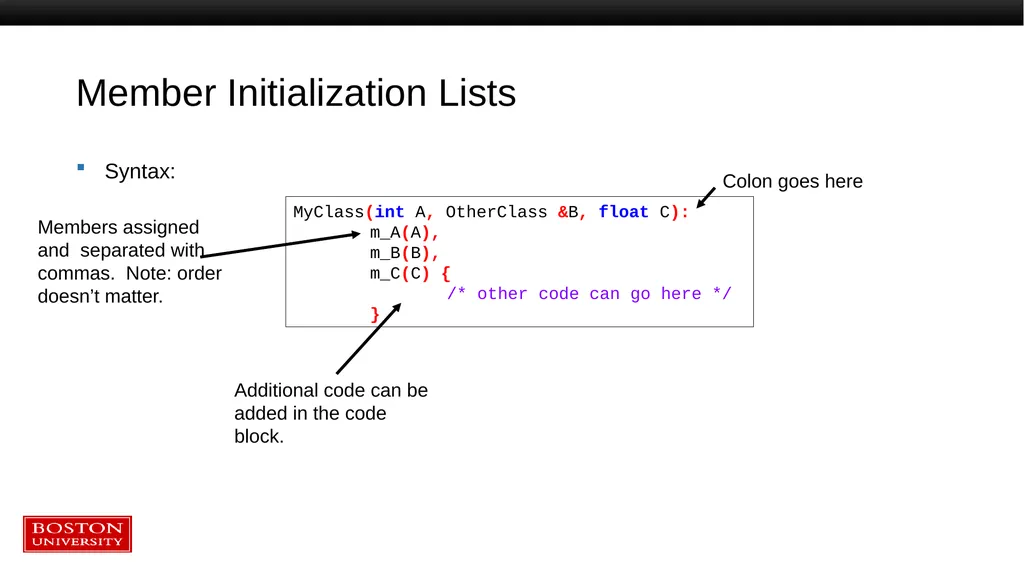
Member Initialization Lists Syntax: MyClass(int A, OtherClass &B, float C):
m_A(A),
m_B(B),
m_C(C) {
/* other code can go here */
} Colon goes here Members assigned and separated with commas. Note: order doesn’t matter. Additional code can be added in the code block.<br>
m_A(A),
m_B(B),
m_C(C) {
/* other code can go here */
} Colon goes here Members assigned and separated with commas. Note: order doesn’t matter. Additional code can be added in the code block.<br>
14
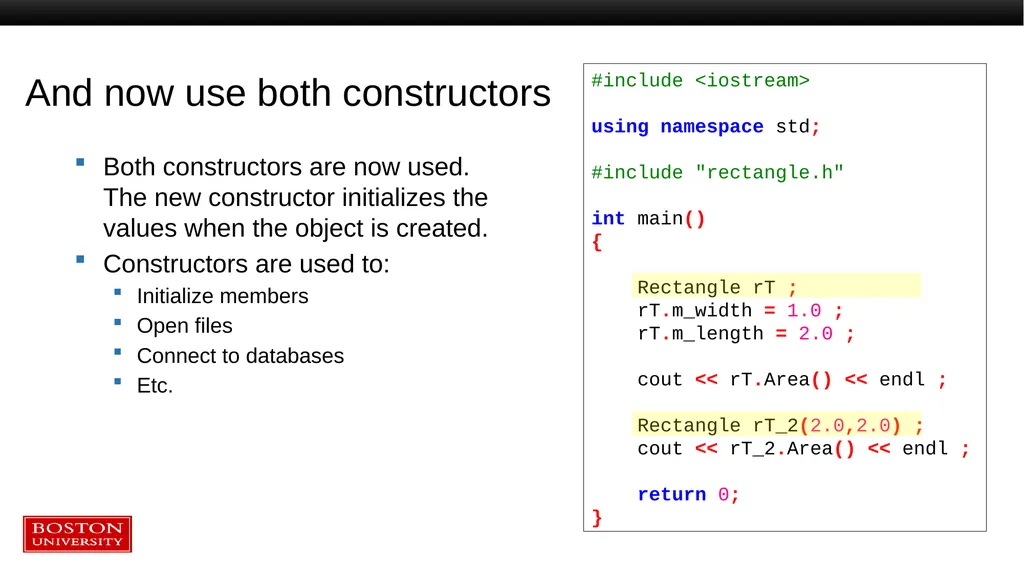
And now use both constructors Both constructors are now used. The new constructor initializes the values when the object is created.
Constructors are used to:
Initialize members
Open files
Connect to databases
Etc. #include <iostream>
using namespace std;
#include "rectangle.h"
int main()
{
Rectangle rT ;
rT.m_width = 1.0 ;
rT.m_length = 2.0 ;
cout << rT.Area() << endl ;
Rectangle rT_2(2.0,2.0) ;
cout << rT_2.Area() << endl ;
return 0;
}<br>
Constructors are used to:
Initialize members
Open files
Connect to databases
Etc. #include <iostream>
using namespace std;
#include "rectangle.h"
int main()
{
Rectangle rT ;
rT.m_width = 1.0 ;
rT.m_length = 2.0 ;
cout << rT.Area() << endl ;
Rectangle rT_2(2.0,2.0) ;
cout << rT_2.Area() << endl ;
return 0;
}<br>
15
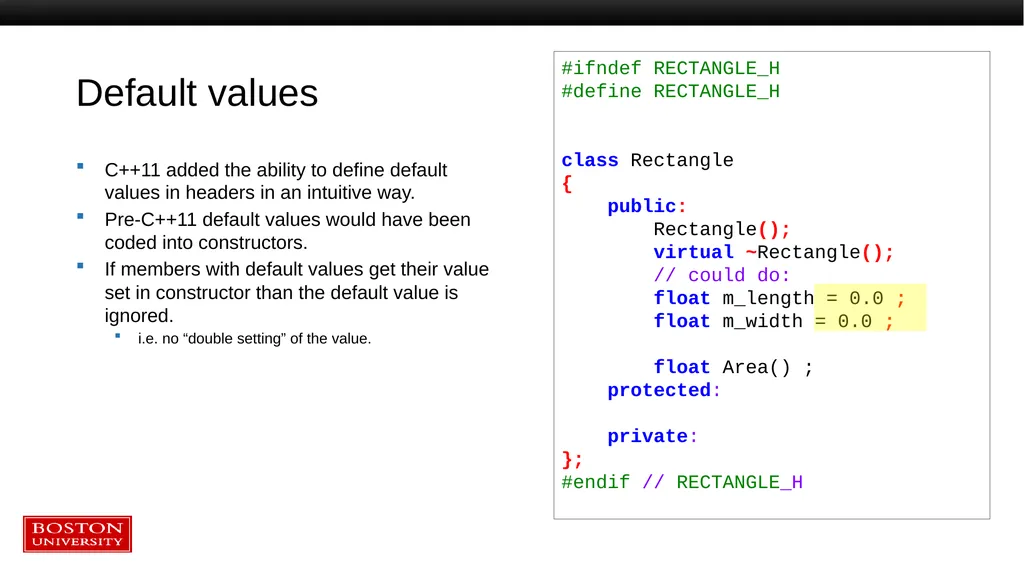
Default values C++11 added the ability to define default values in headers in an intuitive way.
Pre-C++11 default values would have been coded into constructors.
If members with default values get their value set in constructor than the default value is ignored.
i.e. no “double setting” of the value. #ifndef RECTANGLE_H
#define RECTANGLE_H
class Rectangle
{
public:
Rectangle();
virtual ~Rectangle();
// could do:
float m_length = 0.0 ;
float m_width = 0.0 ;
float Area() ;
protected:
private:
};
#endif // RECTANGLE_H<br>
Pre-C++11 default values would have been coded into constructors.
If members with default values get their value set in constructor than the default value is ignored.
i.e. no “double setting” of the value. #ifndef RECTANGLE_H
#define RECTANGLE_H
class Rectangle
{
public:
Rectangle();
virtual ~Rectangle();
// could do:
float m_length = 0.0 ;
float m_width = 0.0 ;
float Area() ;
protected:
private:
};
#endif // RECTANGLE_H<br>
16
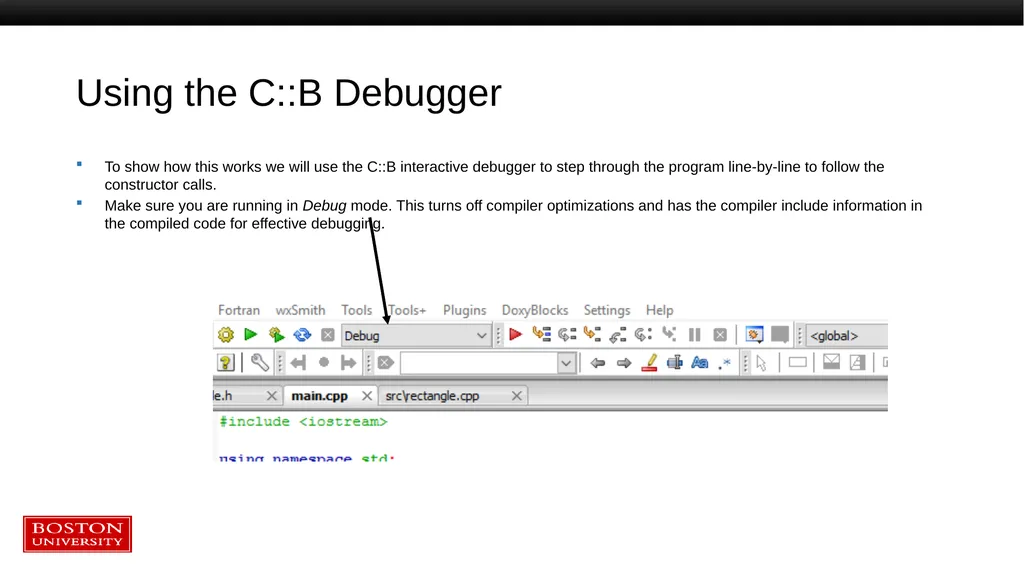
Using the C::B Debugger To show how this works we will use the C::B interactive debugger to step through the program line-by-line to follow the constructor calls.
Make sure you are running in Debug mode. This turns off compiler optimizations and has the compiler include information in the compiled code for effective debugging.<br>
Make sure you are running in Debug mode. This turns off compiler optimizations and has the compiler include information in the compiled code for effective debugging.<br>
17
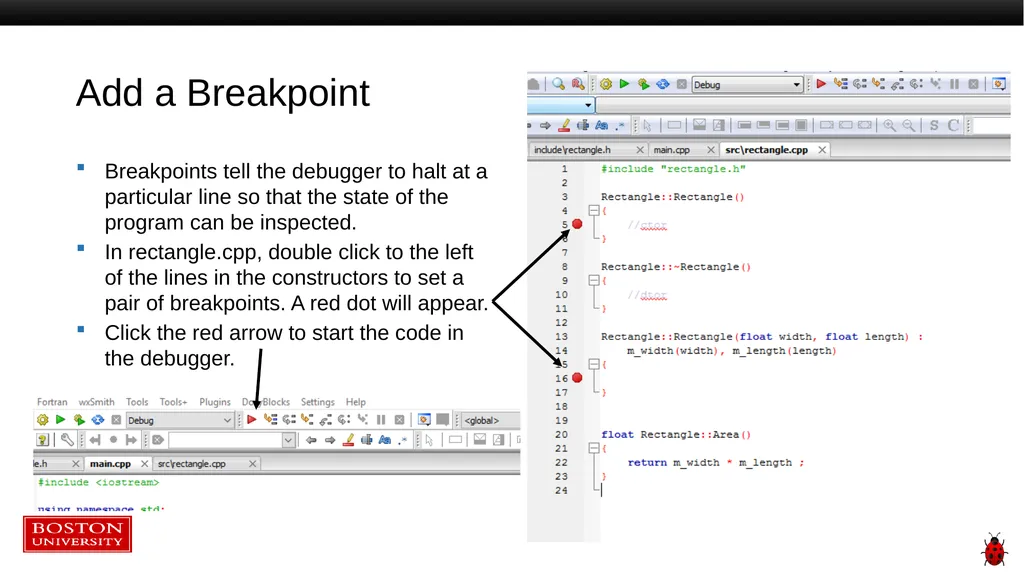
Add a Breakpoint Breakpoints tell the debugger to halt at a particular line so that the state of the program can be inspected.
In rectangle.cpp, double click to the left of the lines in the constructors to set a pair of breakpoints. A red dot will appear.
Click the red arrow to start the code in the debugger.<br>
In rectangle.cpp, double click to the left of the lines in the constructors to set a pair of breakpoints. A red dot will appear.
Click the red arrow to start the code in the debugger.<br>
18
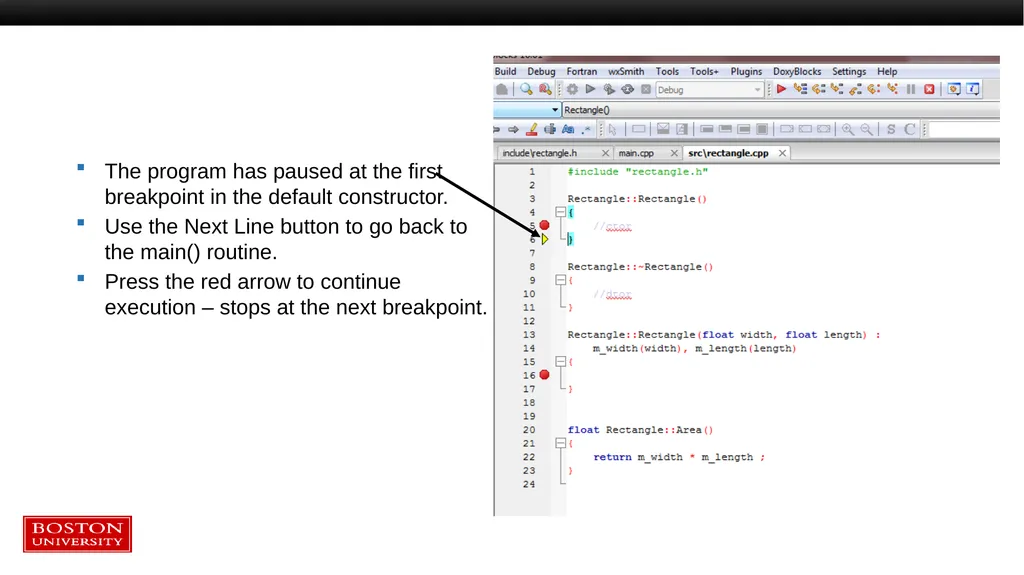
The program has paused at the first breakpoint in the default constructor.
Use the Next Line button to go back to the main() routine.
Press the red arrow to continue execution – stops at the next breakpoint.<br>
Use the Next Line button to go back to the main() routine.
Press the red arrow to continue execution – stops at the next breakpoint.<br>
19
Default constructors and destructors The two methods created by C::B automatically are explicit versions of the default C++ constructors and destructors.
Every class has them – if you don’t define them then empty ones that do nothing will be created for you by the compiler.
If you really don’t want the default constructor you can delete it with the delete keyword. Also in the header file you can use the default keyword if you like to be clear. You must define your own constructor when you want to initialize an object with arguments (as done here)
A custom destructor is always needed when internal members in the class need special handling.
Examples: manually allocated memory, open files, hardware drivers, database or network connections, custom data structures, etc.<br>
Every class has them – if you don’t define them then empty ones that do nothing will be created for you by the compiler.
If you really don’t want the default constructor you can delete it with the delete keyword. Also in the header file you can use the default keyword if you like to be clear. You must define your own constructor when you want to initialize an object with arguments (as done here)
A custom destructor is always needed when internal members in the class need special handling.
Examples: manually allocated memory, open files, hardware drivers, database or network connections, custom data structures, etc.<br>
20
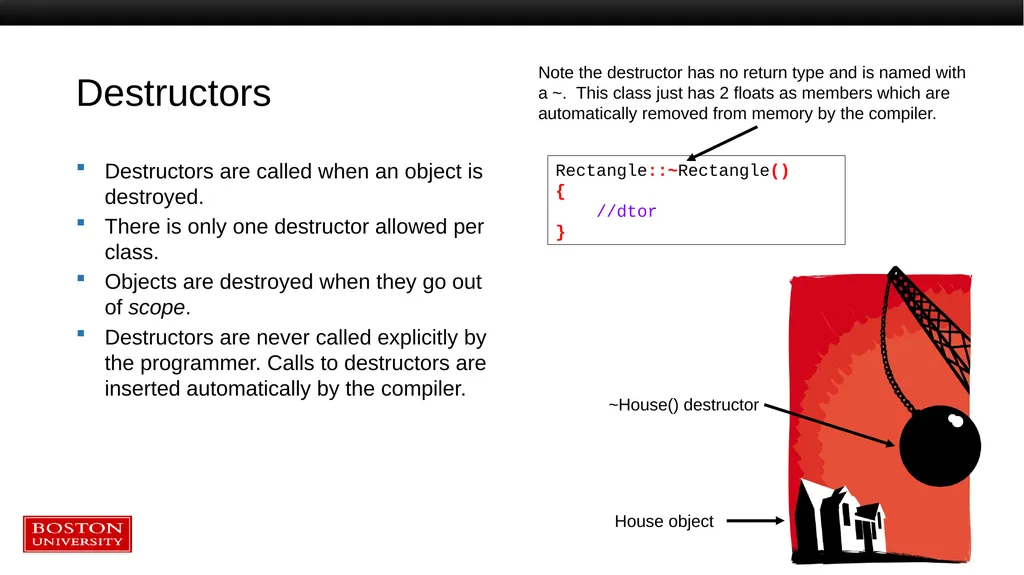
Destructors Destructors are called when an object is destroyed.
There is only one destructor allowed per class.
Objects are destroyed when they go out of scope.
Destructors are never called explicitly by the programmer. Calls to destructors are inserted automatically by the compiler. Rectangle::~Rectangle()
{
//dtor
} Note the destructor has no return type and is named with a ~. This class just has 2 floats as members which are automatically removed from memory by the compiler. House object ~House() destructor<br>
There is only one destructor allowed per class.
Objects are destroyed when they go out of scope.
Destructors are never called explicitly by the programmer. Calls to destructors are inserted automatically by the compiler. Rectangle::~Rectangle()
{
//dtor
} Note the destructor has no return type and is named with a ~. This class just has 2 floats as members which are automatically removed from memory by the compiler. House object ~House() destructor<br>
21
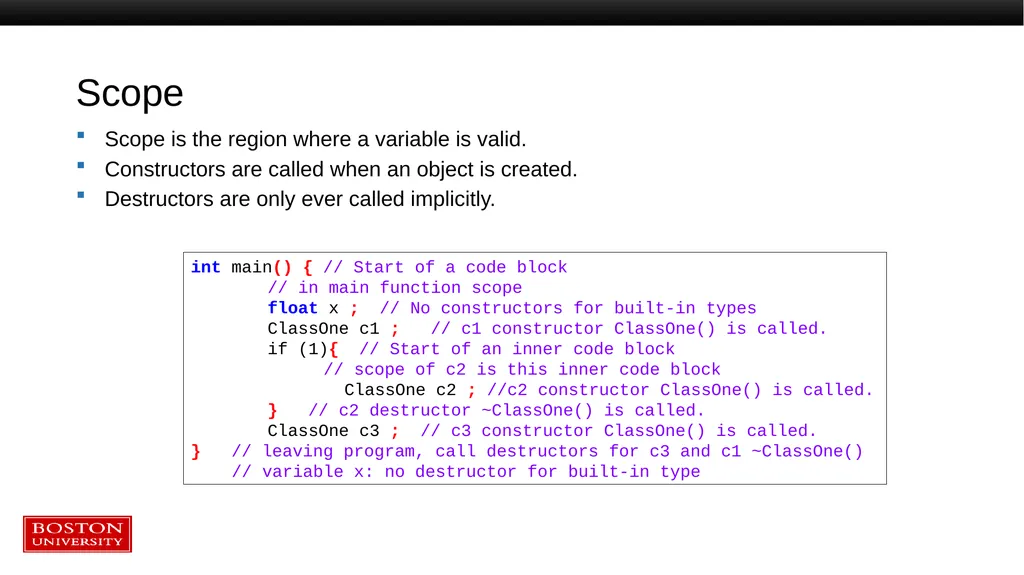
Scope Scope is the region where a variable is valid.
Constructors are called when an object is created.
Destructors are only ever called implicitly. int main() { // Start of a code block
// in main function scope
float x ; // No constructors for built-in types
ClassOne c1 ; // c1 constructor ClassOne() is called.
if (1){ // Start of an inner code block
// scope of c2 is this inner code block
ClassOne c2 ; //c2 constructor ClassOne() is called.
} // c2 destructor ~ClassOne() is called.
ClassOne c3 ; // c3 constructor ClassOne() is called.
} // leaving program, call destructors for c3 and c1 ~ClassOne()
// variable x: no destructor for built-in type<br>
Constructors are called when an object is created.
Destructors are only ever called implicitly. int main() { // Start of a code block
// in main function scope
float x ; // No constructors for built-in types
ClassOne c1 ; // c1 constructor ClassOne() is called.
if (1){ // Start of an inner code block
// scope of c2 is this inner code block
ClassOne c2 ; //c2 constructor ClassOne() is called.
} // c2 destructor ~ClassOne() is called.
ClassOne c3 ; // c3 constructor ClassOne() is called.
} // leaving program, call destructors for c3 and c1 ~ClassOne()
// variable x: no destructor for built-in type<br>
22
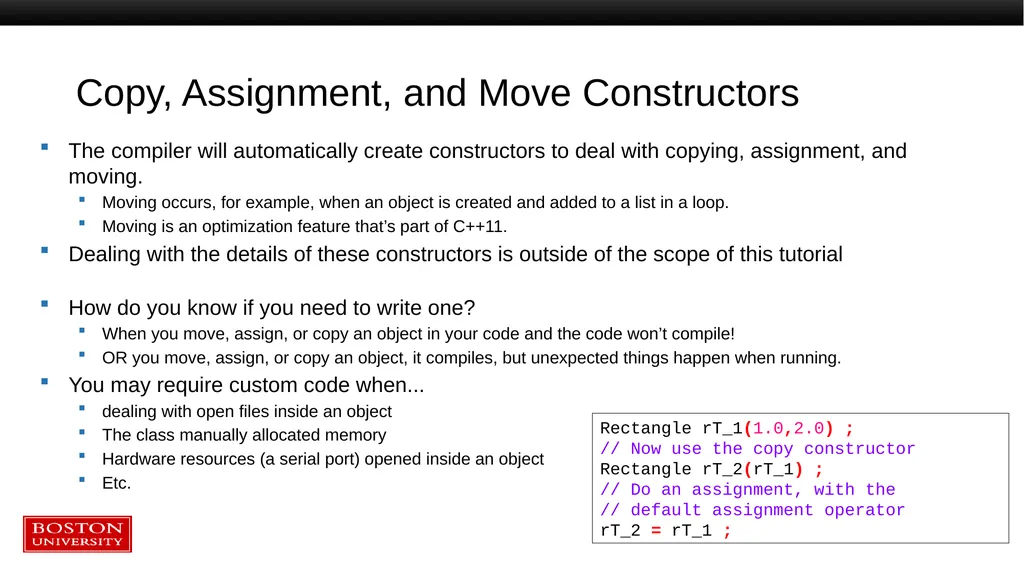
Copy, Assignment, and Move Constructors The compiler will automatically create constructors to deal with copying, assignment, and moving.
Moving occurs, for example, when an object is created and added to a list in a loop.
Moving is an optimization feature that’s part of C++11.
Dealing with the details of these constructors is outside of the scope of this tutorial
How do you know if you need to write one?
When you move, assign, or copy an object in your code and the code won’t compile!
OR you move, assign, or copy an object, it compiles, but unexpected things happen when running.
You may require custom code when...
dealing with open files inside an object
The class manually allocated memory
Hardware resources (a serial port) opened inside an object
Etc. Rectangle rT_1(1.0,2.0) ;
// Now use the copy constructor
Rectangle rT_2(rT_1) ;
// Do an assignment, with the
// default assignment operator
rT_2 = rT_1 ;<br>
Moving occurs, for example, when an object is created and added to a list in a loop.
Moving is an optimization feature that’s part of C++11.
Dealing with the details of these constructors is outside of the scope of this tutorial
How do you know if you need to write one?
When you move, assign, or copy an object in your code and the code won’t compile!
OR you move, assign, or copy an object, it compiles, but unexpected things happen when running.
You may require custom code when...
dealing with open files inside an object
The class manually allocated memory
Hardware resources (a serial port) opened inside an object
Etc. Rectangle rT_1(1.0,2.0) ;
// Now use the copy constructor
Rectangle rT_2(rT_1) ;
// Do an assignment, with the
// default assignment operator
rT_2 = rT_1 ;<br>
23
So Far… Define a C++ class
Adding members and methods
Use separate header and source files for a C++ class.
Class constructors & destructors
OOP concept: Encapsulation<br>
Adding members and methods
Use separate header and source files for a C++ class.
Class constructors & destructors
OOP concept: Encapsulation<br>
24
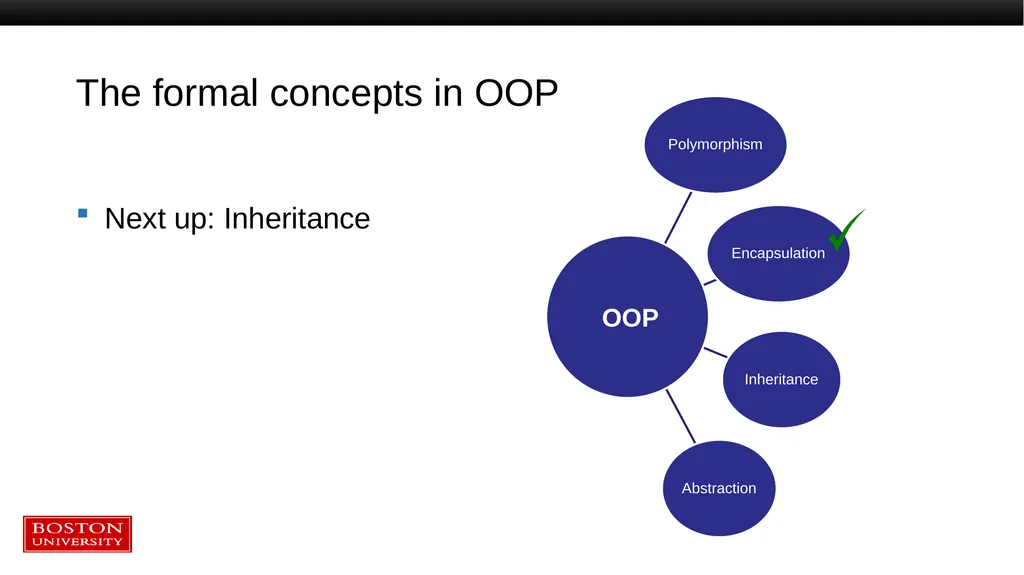
The formal concepts in OOP OOP Next up: Inheritance<br>
25
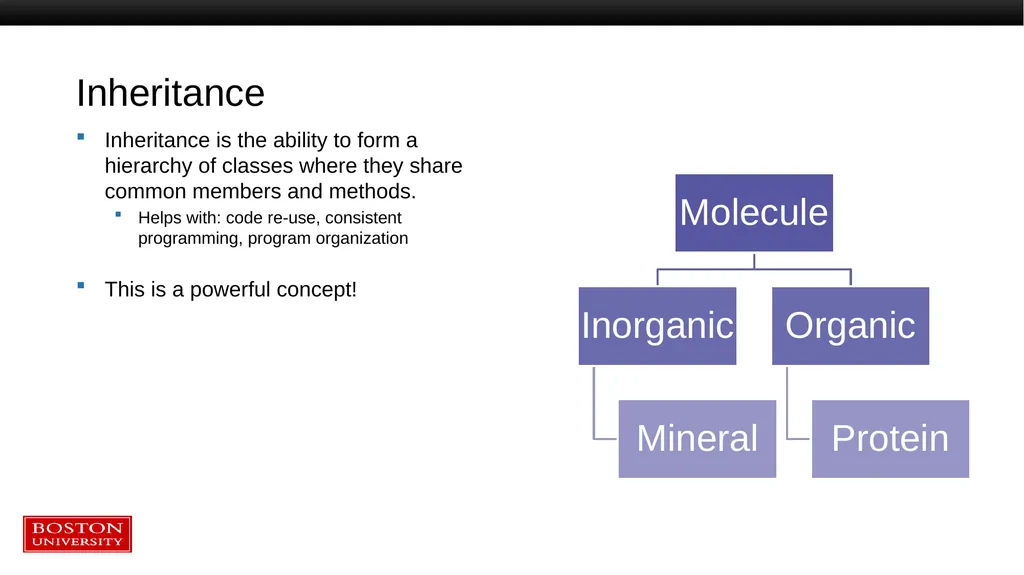
Inheritance Inheritance is the ability to form a hierarchy of classes where they share common members and methods.
Helps with: code re-use, consistent programming, program organization
This is a powerful concept!<br>
Helps with: code re-use, consistent programming, program organization
This is a powerful concept!<br>
26
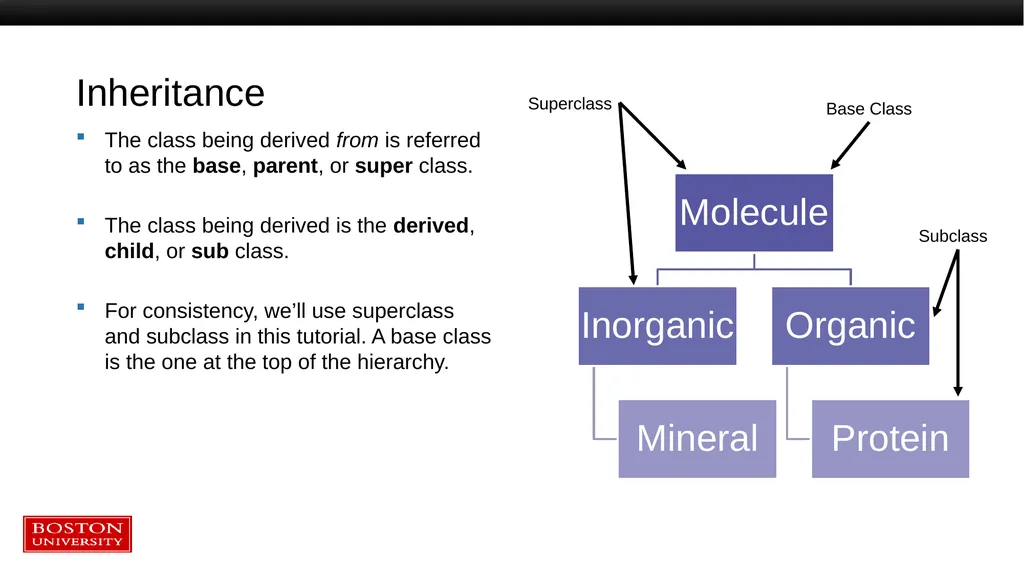
Inheritance The class being derived from is referred to as the base, parent, or super class.
The class being derived is the derived, child, or sub class.
For consistency, we’ll use superclass and subclass in this tutorial. A base class is the one at the top of the hierarchy. Superclass Subclass Base Class<br>
The class being derived is the derived, child, or sub class.
For consistency, we’ll use superclass and subclass in this tutorial. A base class is the one at the top of the hierarchy. Superclass Subclass Base Class<br>
27
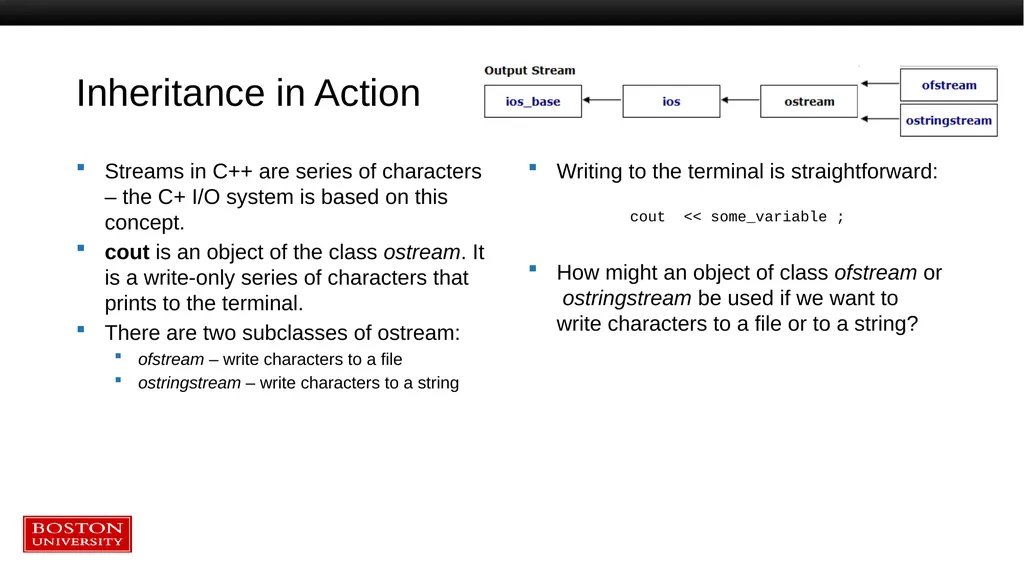
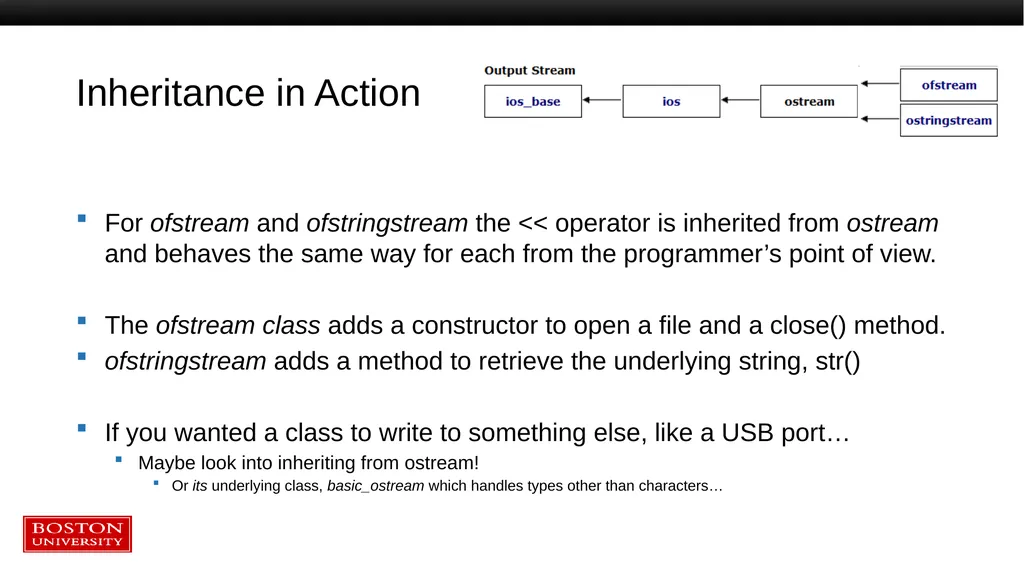
Inheritance in Action Streams in C++ are series of characters – the C+ I/O system is based on this concept.
cout is an object of the class ostream. It is a write-only series of characters that prints to the terminal.
There are two subclasses of ostream:
ofstream – write characters to a file
ostringstream – write characters to a string Writing to the terminal is straightforward:
cout << some_variable ;
How might an object of class ofstream or ostringstream be used if we want to write characters to a file or to a string?<br>
cout is an object of the class ostream. It is a write-only series of characters that prints to the terminal.
There are two subclasses of ostream:
ofstream – write characters to a file
ostringstream – write characters to a string Writing to the terminal is straightforward:
cout << some_variable ;
How might an object of class ofstream or ostringstream be used if we want to write characters to a file or to a string?<br>
28
Inheritance in Action For ofstream and ofstringstream the << operator is inherited from ostream and behaves the same way for each from the programmer’s point of view.
The ofstream class adds a constructor to open a file and a close() method.
ofstringstream adds a method to retrieve the underlying string, str()
If you wanted a class to write to something else, like a USB port…
Maybe look into inheriting from ostream!
Or its underlying class, basic_ostream which handles types other than characters…<br>
The ofstream class adds a constructor to open a file and a close() method.
ofstringstream adds a method to retrieve the underlying string, str()
If you wanted a class to write to something else, like a USB port…
Maybe look into inheriting from ostream!
Or its underlying class, basic_ostream which handles types other than characters…<br>
29
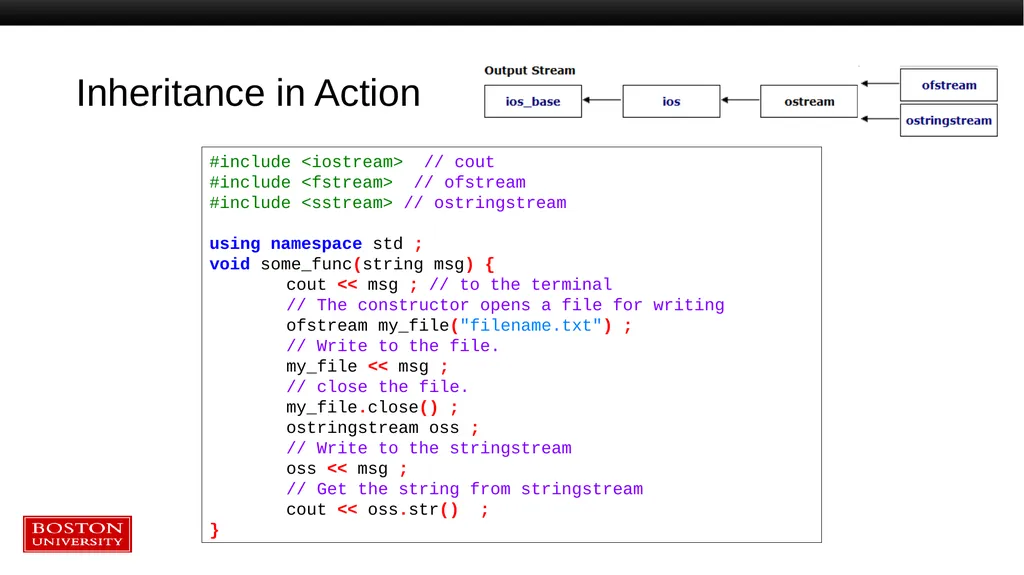
Inheritance in Action #include <iostream> // cout
#include <fstream> // ofstream
#include <sstream> // ostringstream
using namespace std ;
void some_func(string msg) {
cout << msg ; // to the terminal
// The constructor opens a file for writing
ofstream my_file("filename.txt") ;
// Write to the file.
my_file << msg ;
// close the file.
my_file.close() ;
ostringstream oss ;
// Write to the stringstream
oss << msg ;
// Get the string from stringstream
cout << oss.str() ;
}<br>
#include <fstream> // ofstream
#include <sstream> // ostringstream
using namespace std ;
void some_func(string msg) {
cout << msg ; // to the terminal
// The constructor opens a file for writing
ofstream my_file("filename.txt") ;
// Write to the file.
my_file << msg ;
// close the file.
my_file.close() ;
ostringstream oss ;
// Write to the stringstream
oss << msg ;
// Get the string from stringstream
cout << oss.str() ;
}<br>
30
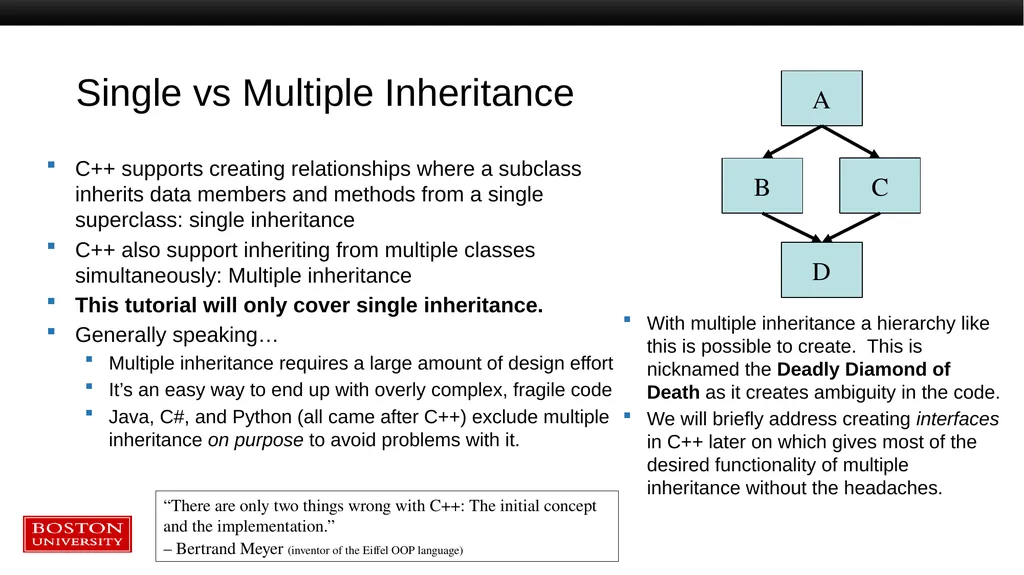
Single vs Multiple Inheritance C++ supports creating relationships where a subclass inherits data members and methods from a single superclass: single inheritance
C++ also support inheriting from multiple classes simultaneously: Multiple inheritance
This tutorial will only cover single inheritance.
Generally speaking…
Multiple inheritance requires a large amount of design effort
It’s an easy way to end up with overly complex, fragile code
Java, C#, and Python (all came after C++) exclude multiple inheritance on purpose to avoid problems with it. With multiple inheritance a hierarchy like this is possible to create. This is nicknamed the Deadly Diamond of Death as it creates ambiguity in the code.
We will briefly address creating interfaces in C++ later on which gives most of the desired functionality of multiple inheritance without the headaches. D B C A “There are only two things wrong with C++: The initial concept and the implementation.”
– Bertrand Meyer (inventor of the Eiffel OOP language)<br>
C++ also support inheriting from multiple classes simultaneously: Multiple inheritance
This tutorial will only cover single inheritance.
Generally speaking…
Multiple inheritance requires a large amount of design effort
It’s an easy way to end up with overly complex, fragile code
Java, C#, and Python (all came after C++) exclude multiple inheritance on purpose to avoid problems with it. With multiple inheritance a hierarchy like this is possible to create. This is nicknamed the Deadly Diamond of Death as it creates ambiguity in the code.
We will briefly address creating interfaces in C++ later on which gives most of the desired functionality of multiple inheritance without the headaches. D B C A “There are only two things wrong with C++: The initial concept and the implementation.”
– Bertrand Meyer (inventor of the Eiffel OOP language)<br>
31
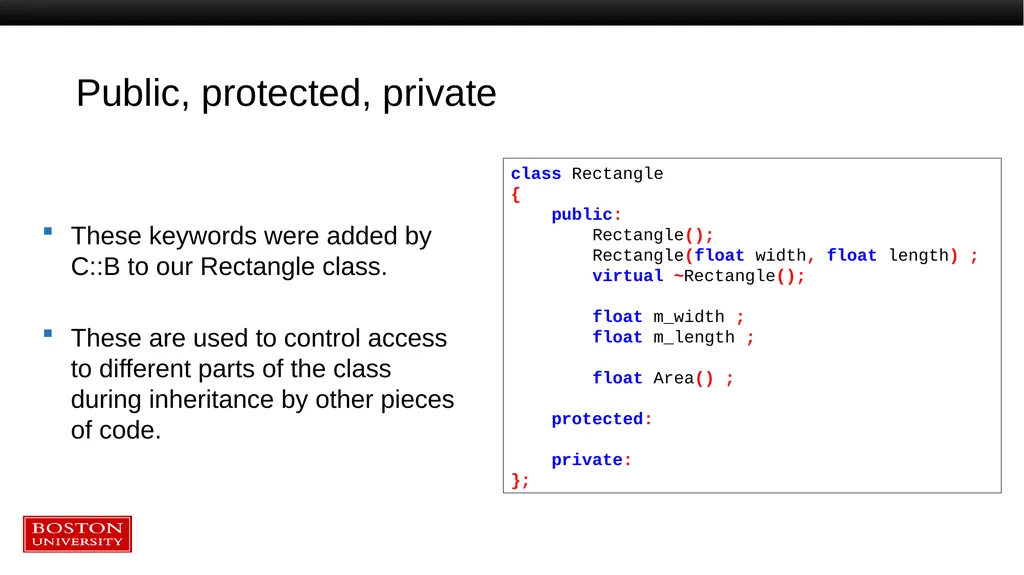
Public, protected, private These keywords were added by C::B to our Rectangle class.
These are used to control access to different parts of the class during inheritance by other pieces of code. class Rectangle
{
public:
Rectangle();
Rectangle(float width, float length) ;
virtual ~Rectangle();
float m_width ;
float m_length ;
float Area() ;
protected:
private:
};<br>
These are used to control access to different parts of the class during inheritance by other pieces of code. class Rectangle
{
public:
Rectangle();
Rectangle(float width, float length) ;
virtual ~Rectangle();
float m_width ;
float m_length ;
float Area() ;
protected:
private:
};<br>
32
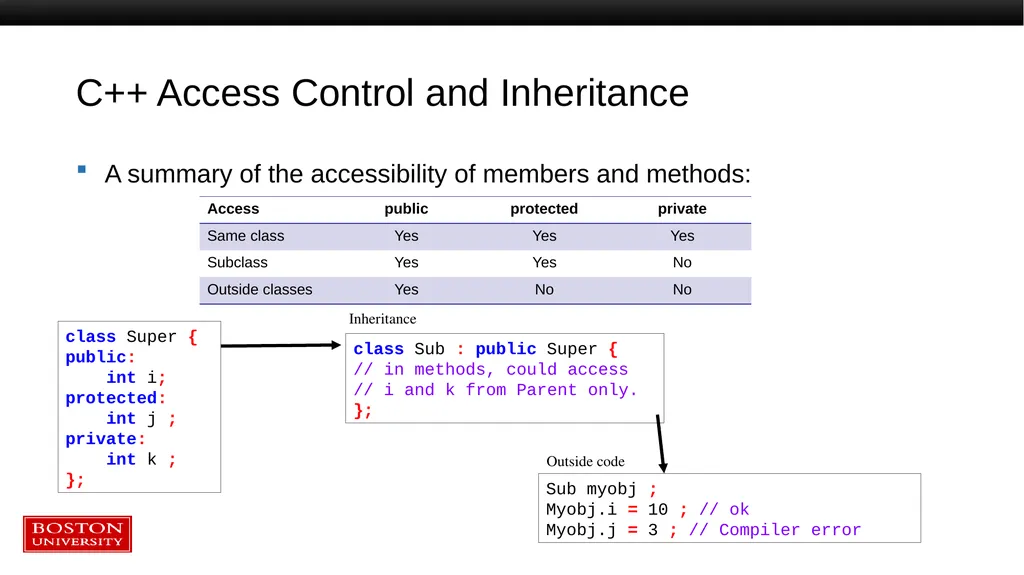
C++ Access Control and Inheritance A summary of the accessibility of members and methods: Sub myobj ;
Myobj.i = 10 ; // ok
Myobj.j = 3 ; // Compiler error class Super {
public:
int i;
protected:
int j ;
private:
int k ;
}; class Sub : public Super {
// in methods, could access
// i and k from Parent only.
}; Inheritance Outside code<br>
Myobj.i = 10 ; // ok
Myobj.j = 3 ; // Compiler error class Super {
public:
int i;
protected:
int j ;
private:
int k ;
}; class Sub : public Super {
// in methods, could access
// i and k from Parent only.
}; Inheritance Outside code<br>
33
Abstraction Having private (internal) data and methods separated from public ones is the OOP concept of abstraction.<br>
34
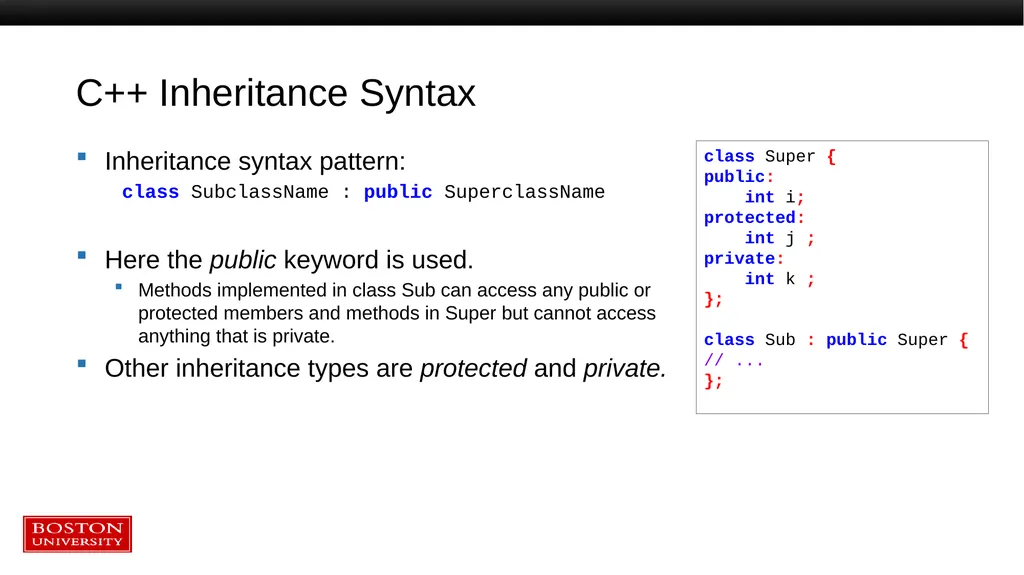
C++ Inheritance Syntax Inheritance syntax pattern:
class SubclassName : public SuperclassName
Here the public keyword is used.
Methods implemented in class Sub can access any public or protected members and methods in Super but cannot access anything that is private.
Other inheritance types are protected and private. class Super {
public:
int i;
protected:
int j ;
private:
int k ;
};
class Sub : public Super {
// ...
};<br>
class SubclassName : public SuperclassName
Here the public keyword is used.
Methods implemented in class Sub can access any public or protected members and methods in Super but cannot access anything that is private.
Other inheritance types are protected and private. class Super {
public:
int i;
protected:
int j ;
private:
int k ;
};
class Sub : public Super {
// ...
};<br>
35
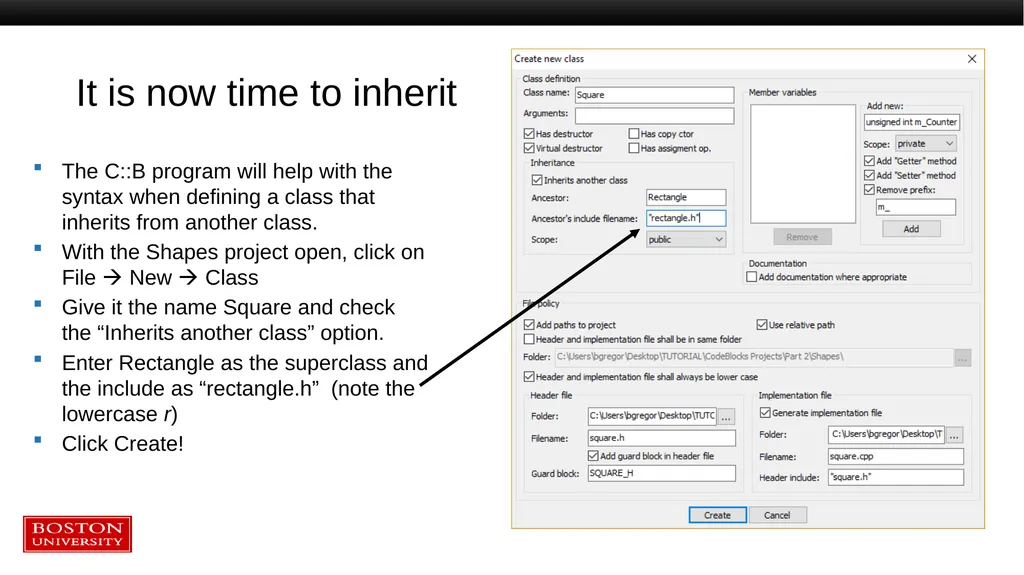
It is now time to inherit The C::B program will help with the syntax when defining a class that inherits from another class.
With the Shapes project open, click on File New Class
Give it the name Square and check the “Inherits another class” option.
Enter Rectangle as the superclass and the include as “rectangle.h” (note the lowercase r)
Click Create!<br>
With the Shapes project open, click on File New Class
Give it the name Square and check the “Inherits another class” option.
Enter Rectangle as the superclass and the include as “rectangle.h” (note the lowercase r)
Click Create!<br>
36
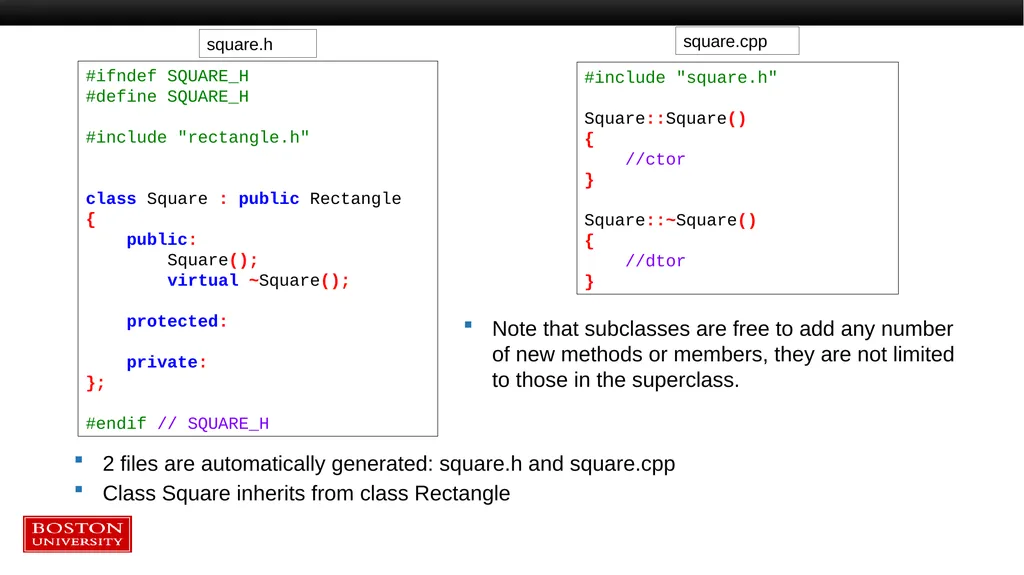
2 files are automatically generated: square.h and square.cpp
Class Square inherits from class Rectangle square.h square.cpp #ifndef SQUARE_H
#define SQUARE_H
#include "rectangle.h"
class Square : public Rectangle
{
public:
Square();
virtual ~Square();
protected:
private:
};
#endif // SQUARE_H #include "square.h"
Square::Square()
{
//ctor
}
Square::~Square()
{
//dtor
} Note that subclasses are free to add any number of new methods or members, they are not limited to those in the superclass.<br>
Class Square inherits from class Rectangle square.h square.cpp #ifndef SQUARE_H
#define SQUARE_H
#include "rectangle.h"
class Square : public Rectangle
{
public:
Square();
virtual ~Square();
protected:
private:
};
#endif // SQUARE_H #include "square.h"
Square::Square()
{
//ctor
}
Square::~Square()
{
//dtor
} Note that subclasses are free to add any number of new methods or members, they are not limited to those in the superclass.<br>
37
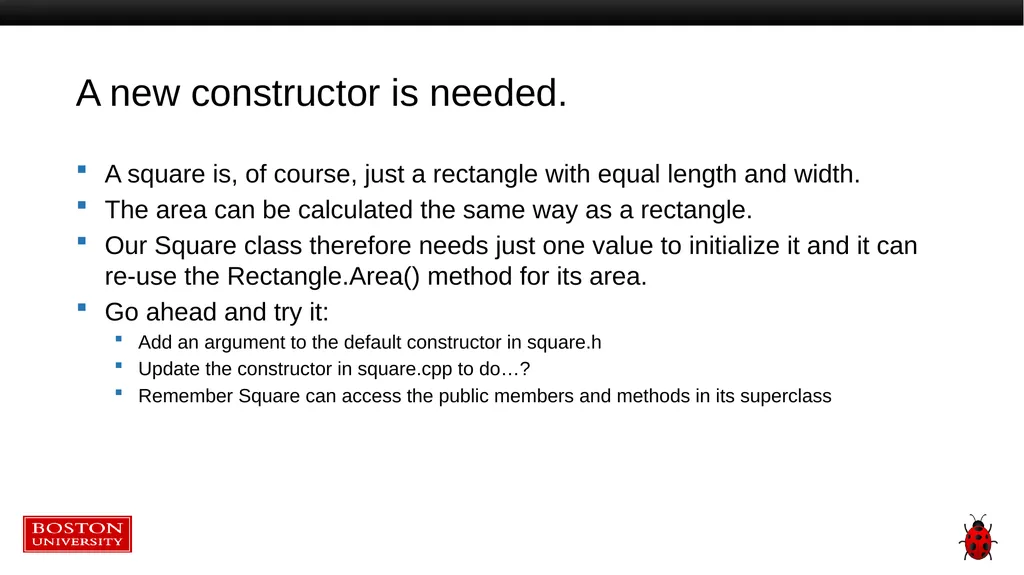
A new constructor is needed. A square is, of course, just a rectangle with equal length and width.
The area can be calculated the same way as a rectangle.
Our Square class therefore needs just one value to initialize it and it can re-use the Rectangle.Area() method for its area.
Go ahead and try it:
Add an argument to the default constructor in square.h
Update the constructor in square.cpp to do…?
Remember Square can access the public members and methods in its superclass<br>
The area can be calculated the same way as a rectangle.
Our Square class therefore needs just one value to initialize it and it can re-use the Rectangle.Area() method for its area.
Go ahead and try it:
Add an argument to the default constructor in square.h
Update the constructor in square.cpp to do…?
Remember Square can access the public members and methods in its superclass<br>
38
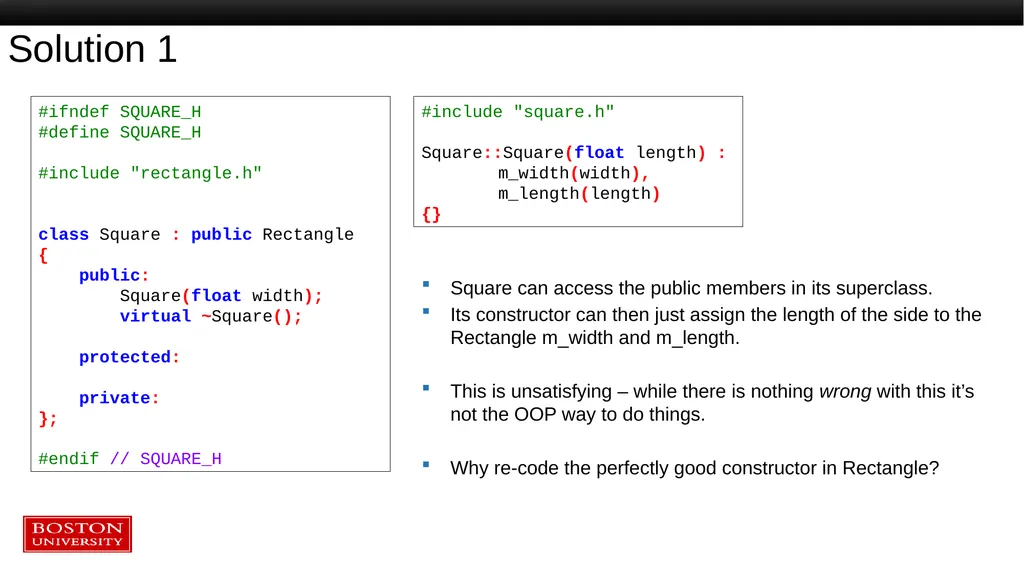
Solution 1 Square can access the public members in its superclass.
Its constructor can then just assign the length of the side to the Rectangle m_width and m_length.
This is unsatisfying – while there is nothing wrong with this it’s not the OOP way to do things.
Why re-code the perfectly good constructor in Rectangle? #ifndef SQUARE_H
#define SQUARE_H
#include "rectangle.h"
class Square : public Rectangle
{
public:
Square(float width);
virtual ~Square();
protected:
private:
};
#endif // SQUARE_H #include "square.h"
Square::Square(float length) :
m_width(width),
m_length(length)
{}<br>
Its constructor can then just assign the length of the side to the Rectangle m_width and m_length.
This is unsatisfying – while there is nothing wrong with this it’s not the OOP way to do things.
Why re-code the perfectly good constructor in Rectangle? #ifndef SQUARE_H
#define SQUARE_H
#include "rectangle.h"
class Square : public Rectangle
{
public:
Square(float width);
virtual ~Square();
protected:
private:
};
#endif // SQUARE_H #include "square.h"
Square::Square(float length) :
m_width(width),
m_length(length)
{}<br>
39
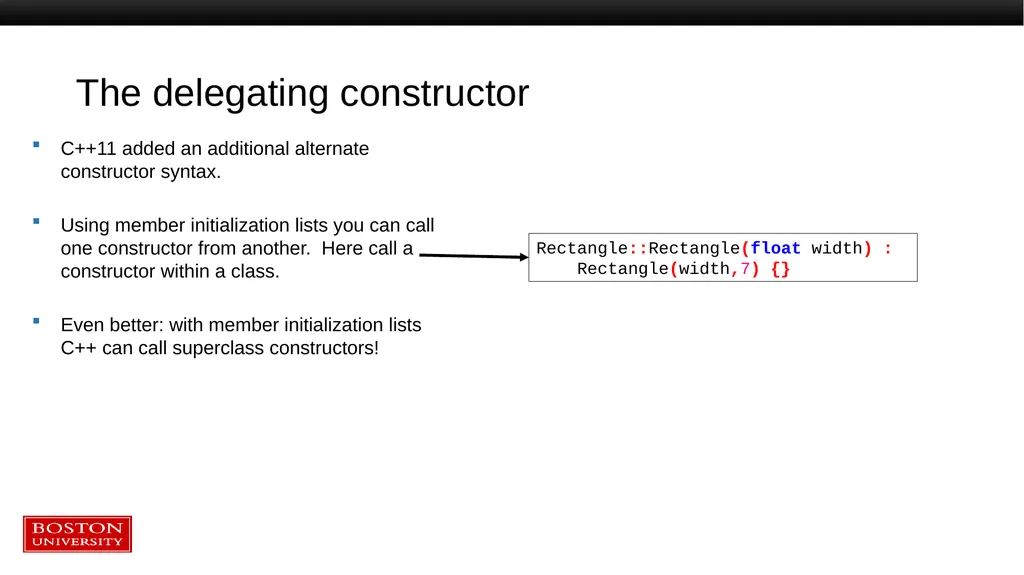
The delegating constructor C++11 added an additional alternate constructor syntax.
Using member initialization lists you can call one constructor from another. Here call a constructor within a class.
Even better: with member initialization lists C++ can call superclass constructors! Rectangle::Rectangle(float width) :
Rectangle(width,7) {}<br>
Using member initialization lists you can call one constructor from another. Here call a constructor within a class.
Even better: with member initialization lists C++ can call superclass constructors! Rectangle::Rectangle(float width) :
Rectangle(width,7) {}<br>
40
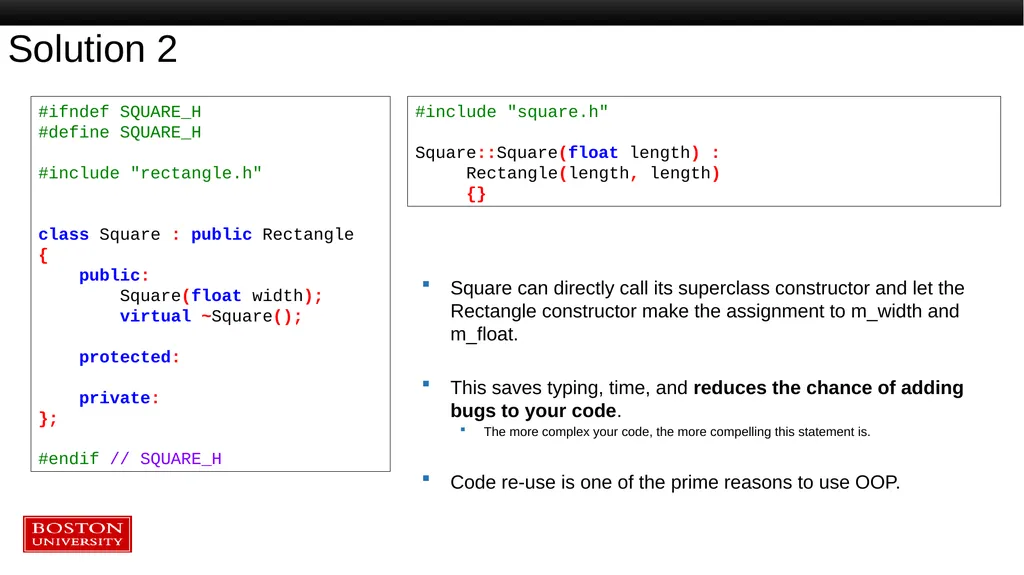
Solution 2 Square can directly call its superclass constructor and let the Rectangle constructor make the assignment to m_width and m_float.
This saves typing, time, and reduces the chance of adding bugs to your code.
The more complex your code, the more compelling this statement is.
Code re-use is one of the prime reasons to use OOP. #ifndef SQUARE_H
#define SQUARE_H
#include "rectangle.h"
class Square : public Rectangle
{
public:
Square(float width);
virtual ~Square();
protected:
private:
};
#endif // SQUARE_H #include "square.h"
Square::Square(float length) :
Rectangle(length, length)
{}<br>
This saves typing, time, and reduces the chance of adding bugs to your code.
The more complex your code, the more compelling this statement is.
Code re-use is one of the prime reasons to use OOP. #ifndef SQUARE_H
#define SQUARE_H
#include "rectangle.h"
class Square : public Rectangle
{
public:
Square(float width);
virtual ~Square();
protected:
private:
};
#endif // SQUARE_H #include "square.h"
Square::Square(float length) :
Rectangle(length, length)
{}<br>
41
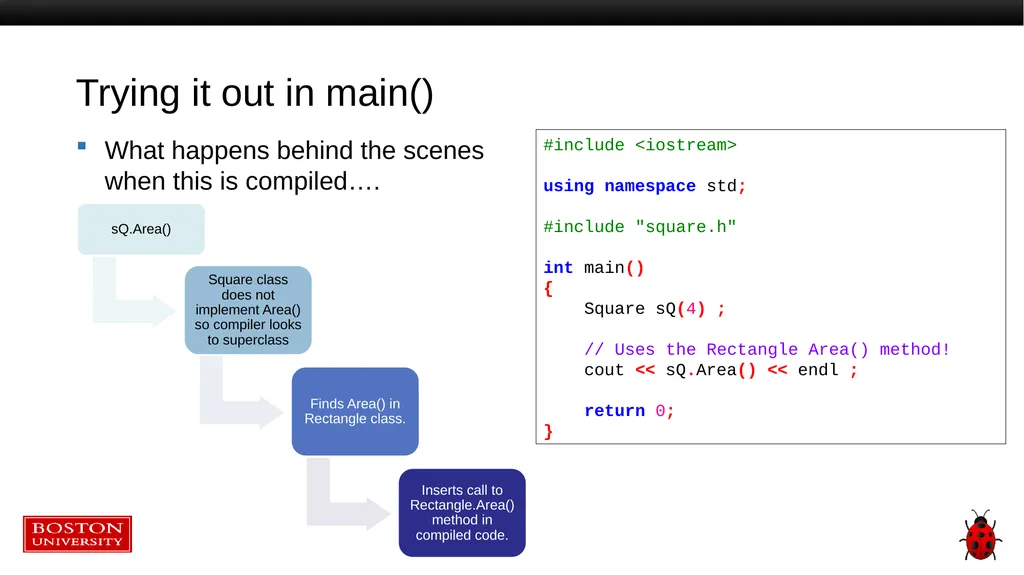
Trying it out in main() What happens behind the scenes when this is compiled…. #include <iostream>
using namespace std;
#include "square.h"
int main()
{
Square sQ(4) ;
// Uses the Rectangle Area() method!
cout << sQ.Area() << endl ;
return 0;
}<br>
using namespace std;
#include "square.h"
int main()
{
Square sQ(4) ;
// Uses the Rectangle Area() method!
cout << sQ.Area() << endl ;
return 0;
}<br>
42
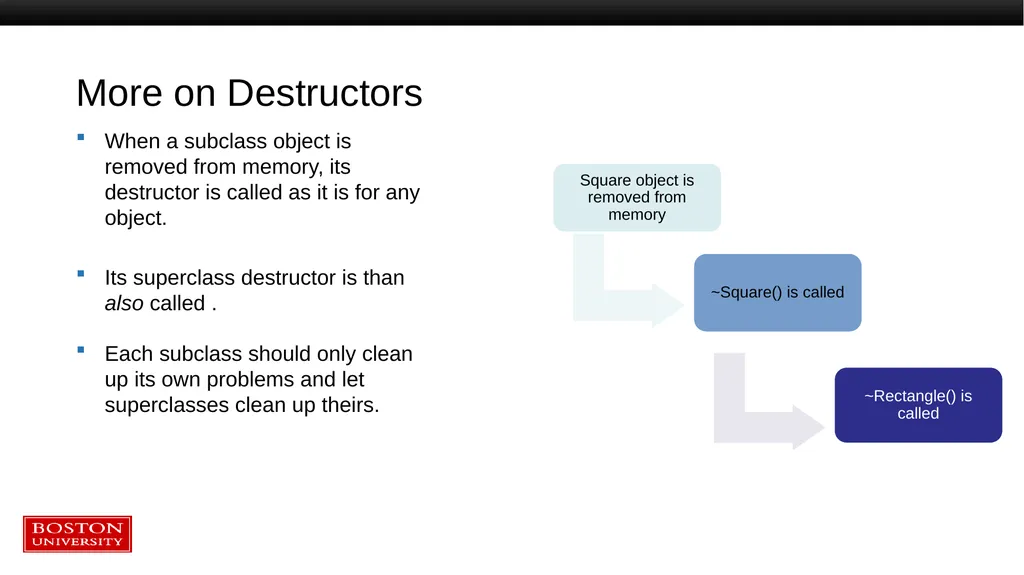
More on Destructors When a subclass object is removed from memory, its destructor is called as it is for any object.
Its superclass destructor is than also called .
Each subclass should only clean up its own problems and let superclasses clean up theirs.<br>
Its superclass destructor is than also called .
Each subclass should only clean up its own problems and let superclasses clean up theirs.<br>
43
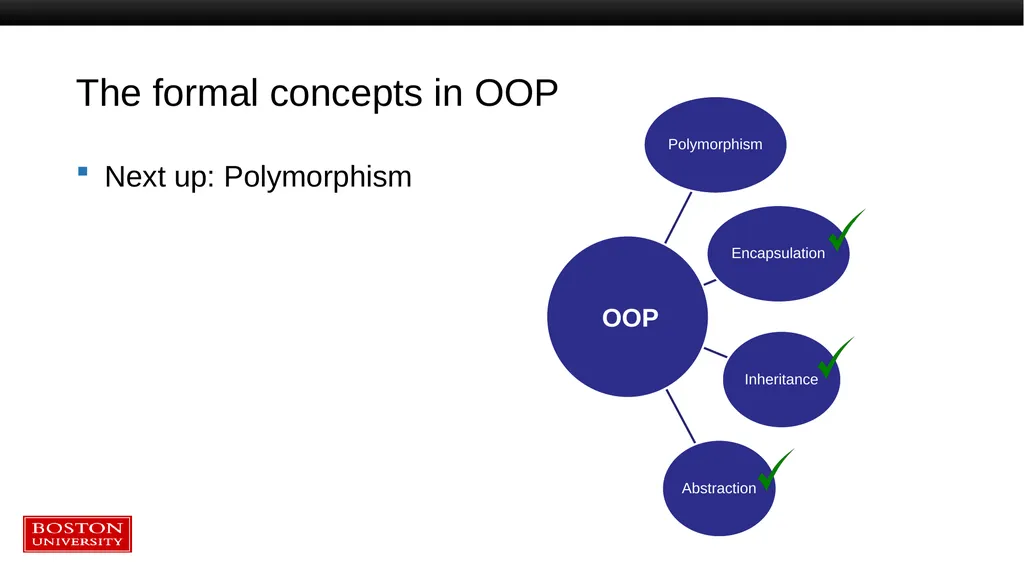
The formal concepts in OOP OOP Next up: Polymorphism<br>
44
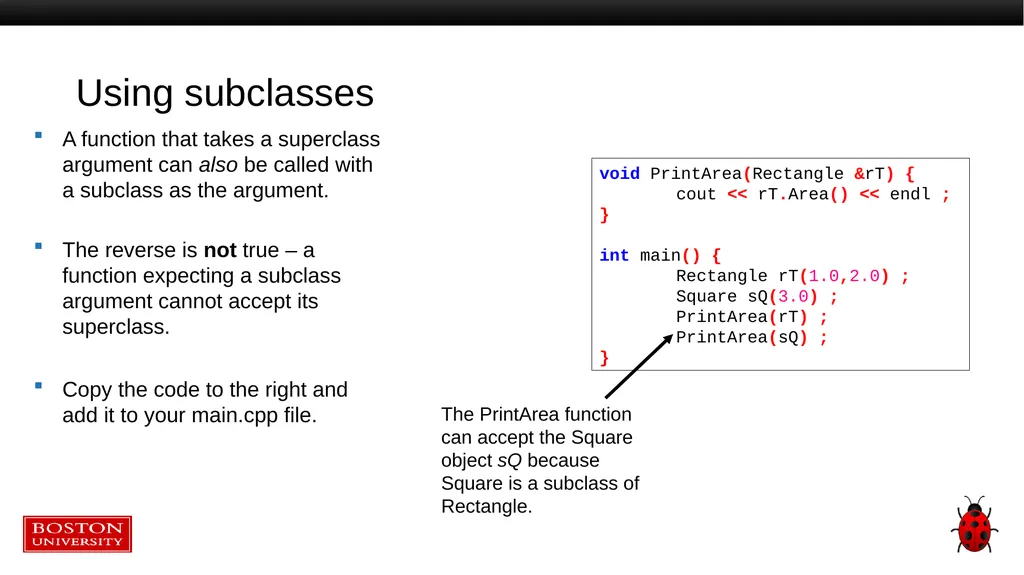
Using subclasses A function that takes a superclass argument can also be called with a subclass as the argument.
The reverse is not true – a function expecting a subclass argument cannot accept its superclass.
Copy the code to the right and add it to your main.cpp file. void PrintArea(Rectangle &rT) {
cout << rT.Area() << endl ;
}
int main() {
Rectangle rT(1.0,2.0) ;
Square sQ(3.0) ;
PrintArea(rT) ;
PrintArea(sQ) ;
} The PrintArea function can accept the Square object sQ because Square is a subclass of Rectangle.<br>
The reverse is not true – a function expecting a subclass argument cannot accept its superclass.
Copy the code to the right and add it to your main.cpp file. void PrintArea(Rectangle &rT) {
cout << rT.Area() << endl ;
}
int main() {
Rectangle rT(1.0,2.0) ;
Square sQ(3.0) ;
PrintArea(rT) ;
PrintArea(sQ) ;
} The PrintArea function can accept the Square object sQ because Square is a subclass of Rectangle.<br>
45
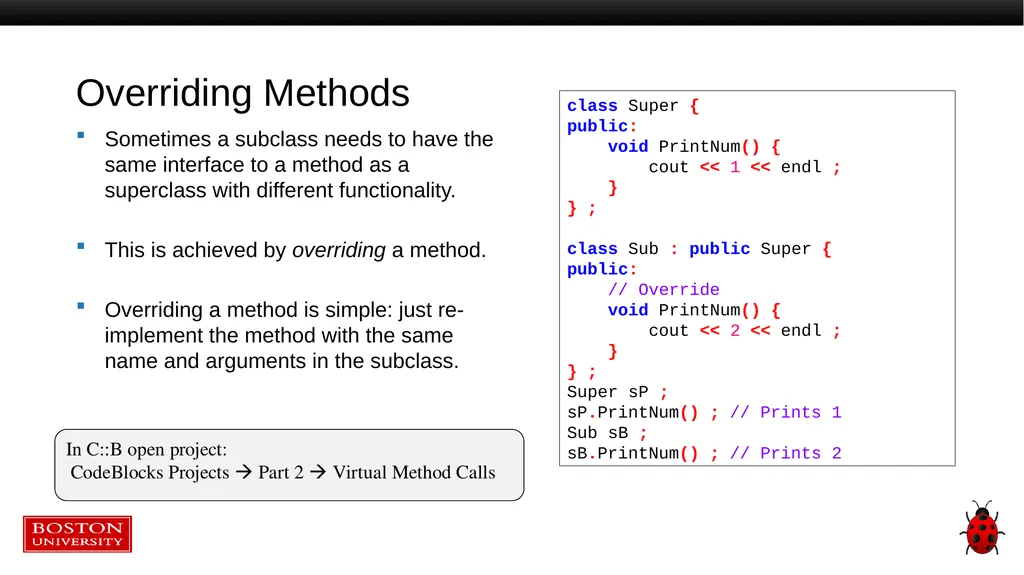
Overriding Methods Sometimes a subclass needs to have the same interface to a method as a superclass with different functionality.
This is achieved by overriding a method.
Overriding a method is simple: just re-implement the method with the same name and arguments in the subclass. In C::B open project:
CodeBlocks Projects Part 2 Virtual Method Calls class Super {
public:
void PrintNum() {
cout << 1 << endl ;
}
} ;
class Sub : public Super {
public:
// Override
void PrintNum() {
cout << 2 << endl ;
}
} ;
Super sP ;
sP.PrintNum() ; // Prints 1
Sub sB ;
sB.PrintNum() ; // Prints 2<br>
This is achieved by overriding a method.
Overriding a method is simple: just re-implement the method with the same name and arguments in the subclass. In C::B open project:
CodeBlocks Projects Part 2 Virtual Method Calls class Super {
public:
void PrintNum() {
cout << 1 << endl ;
}
} ;
class Sub : public Super {
public:
// Override
void PrintNum() {
cout << 2 << endl ;
}
} ;
Super sP ;
sP.PrintNum() ; // Prints 1
Sub sB ;
sB.PrintNum() ; // Prints 2<br>
46
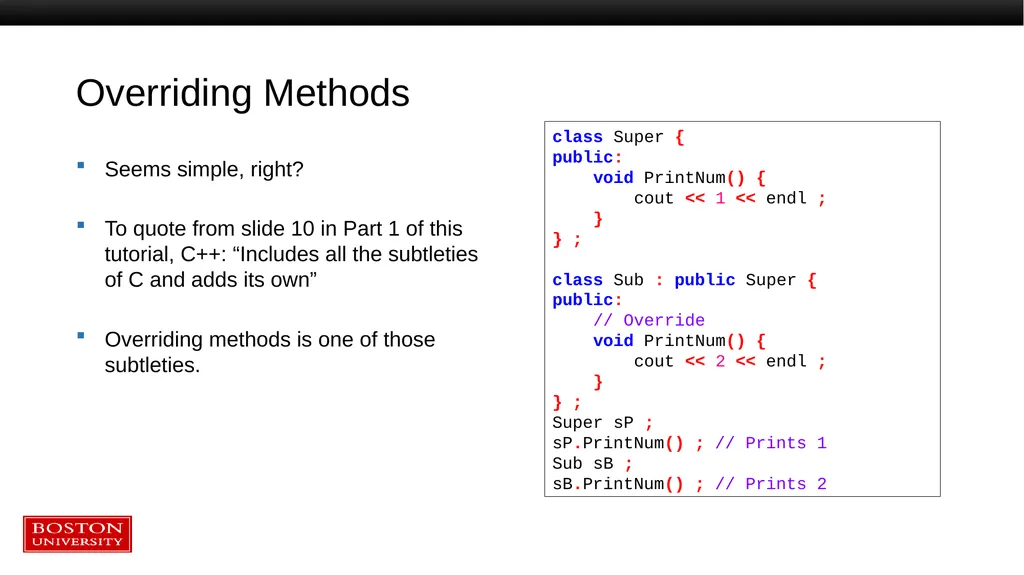
Overriding Methods Seems simple, right?
To quote from slide 10 in Part 1 of this tutorial, C++: “Includes all the subtleties of C and adds its own”
Overriding methods is one of those subtleties. class Super {
public:
void PrintNum() {
cout << 1 << endl ;
}
} ;
class Sub : public Super {
public:
// Override
void PrintNum() {
cout << 2 << endl ;
}
} ;
Super sP ;
sP.PrintNum() ; // Prints 1
Sub sB ;
sB.PrintNum() ; // Prints 2<br>
To quote from slide 10 in Part 1 of this tutorial, C++: “Includes all the subtleties of C and adds its own”
Overriding methods is one of those subtleties. class Super {
public:
void PrintNum() {
cout << 1 << endl ;
}
} ;
class Sub : public Super {
public:
// Override
void PrintNum() {
cout << 2 << endl ;
}
} ;
Super sP ;
sP.PrintNum() ; // Prints 1
Sub sB ;
sB.PrintNum() ; // Prints 2<br>
47
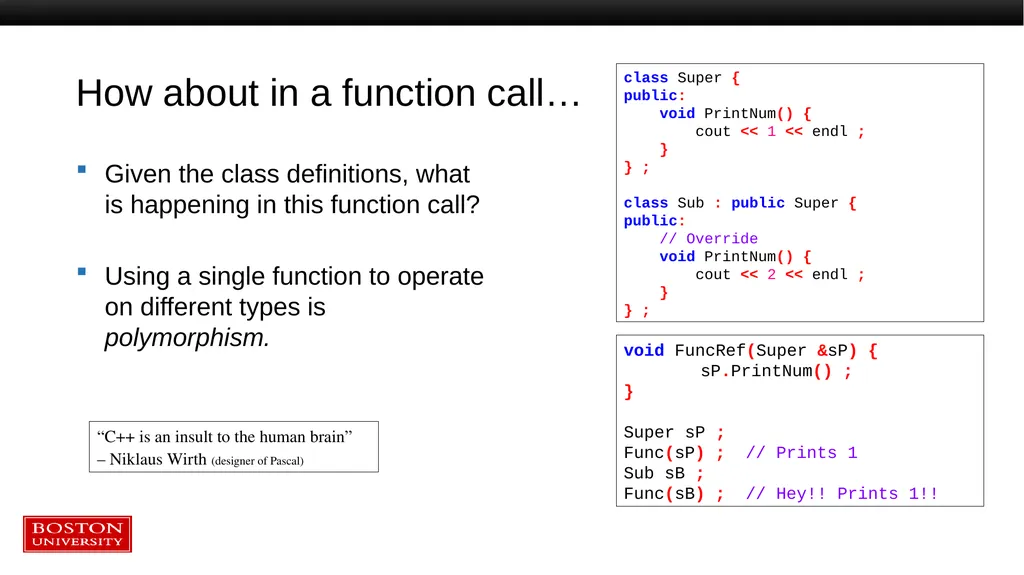
How about in a function call… Given the class definitions, what is happening in this function call?
Using a single function to operate on different types is polymorphism. class Super {
public:
void PrintNum() {
cout << 1 << endl ;
}
} ;
class Sub : public Super {
public:
// Override
void PrintNum() {
cout << 2 << endl ;
}
} ; void FuncRef(Super &sP) {
sP.PrintNum() ;
}
Super sP ;
Func(sP) ; // Prints 1
Sub sB ;
Func(sB) ; // Hey!! Prints 1!! “C++ is an insult to the human brain”
– Niklaus Wirth (designer of Pascal)<br>
Using a single function to operate on different types is polymorphism. class Super {
public:
void PrintNum() {
cout << 1 << endl ;
}
} ;
class Sub : public Super {
public:
// Override
void PrintNum() {
cout << 2 << endl ;
}
} ; void FuncRef(Super &sP) {
sP.PrintNum() ;
}
Super sP ;
Func(sP) ; // Prints 1
Sub sB ;
Func(sB) ; // Hey!! Prints 1!! “C++ is an insult to the human brain”
– Niklaus Wirth (designer of Pascal)<br>
48
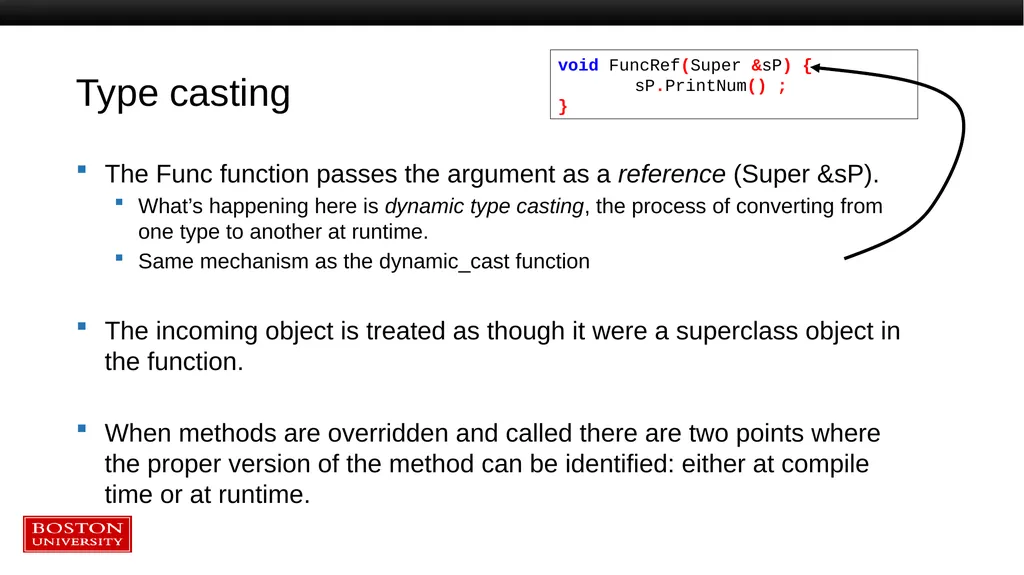
Type casting The Func function passes the argument as a reference (Super &sP).
What’s happening here is dynamic type casting, the process of converting from one type to another at runtime.
Same mechanism as the dynamic_cast function
The incoming object is treated as though it were a superclass object in the function.
When methods are overridden and called there are two points where the proper version of the method can be identified: either at compile time or at runtime. void FuncRef(Super &sP) {
sP.PrintNum() ;
}<br>
What’s happening here is dynamic type casting, the process of converting from one type to another at runtime.
Same mechanism as the dynamic_cast function
The incoming object is treated as though it were a superclass object in the function.
When methods are overridden and called there are two points where the proper version of the method can be identified: either at compile time or at runtime. void FuncRef(Super &sP) {
sP.PrintNum() ;
}<br>
49
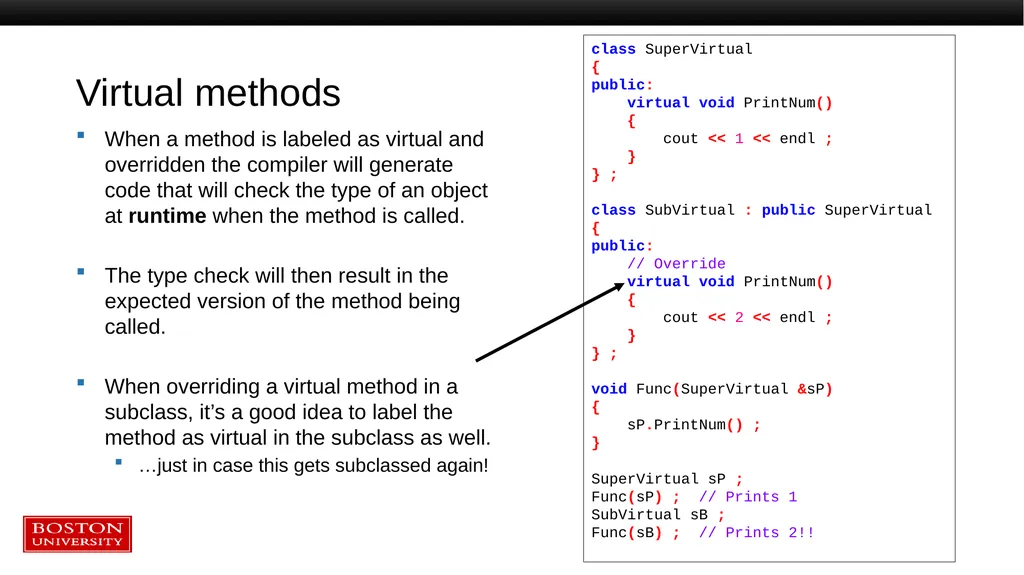
Virtual methods When a method is labeled as virtual and overridden the compiler will generate code that will check the type of an object at runtime when the method is called.
The type check will then result in the expected version of the method being called.
When overriding a virtual method in a subclass, it’s a good idea to label the method as virtual in the subclass as well.
…just in case this gets subclassed again! class SuperVirtual
{
public:
virtual void PrintNum()
{
cout << 1 << endl ;
}
} ;
class SubVirtual : public SuperVirtual
{
public:
// Override
virtual void PrintNum()
{
cout << 2 << endl ;
}
} ;
void Func(SuperVirtual &sP)
{
sP.PrintNum() ;
}
SuperVirtual sP ;
Func(sP) ; // Prints 1
SubVirtual sB ;
Func(sB) ; // Prints 2!!<br>
The type check will then result in the expected version of the method being called.
When overriding a virtual method in a subclass, it’s a good idea to label the method as virtual in the subclass as well.
…just in case this gets subclassed again! class SuperVirtual
{
public:
virtual void PrintNum()
{
cout << 1 << endl ;
}
} ;
class SubVirtual : public SuperVirtual
{
public:
// Override
virtual void PrintNum()
{
cout << 2 << endl ;
}
} ;
void Func(SuperVirtual &sP)
{
sP.PrintNum() ;
}
SuperVirtual sP ;
Func(sP) ; // Prints 1
SubVirtual sB ;
Func(sB) ; // Prints 2!!<br>
50
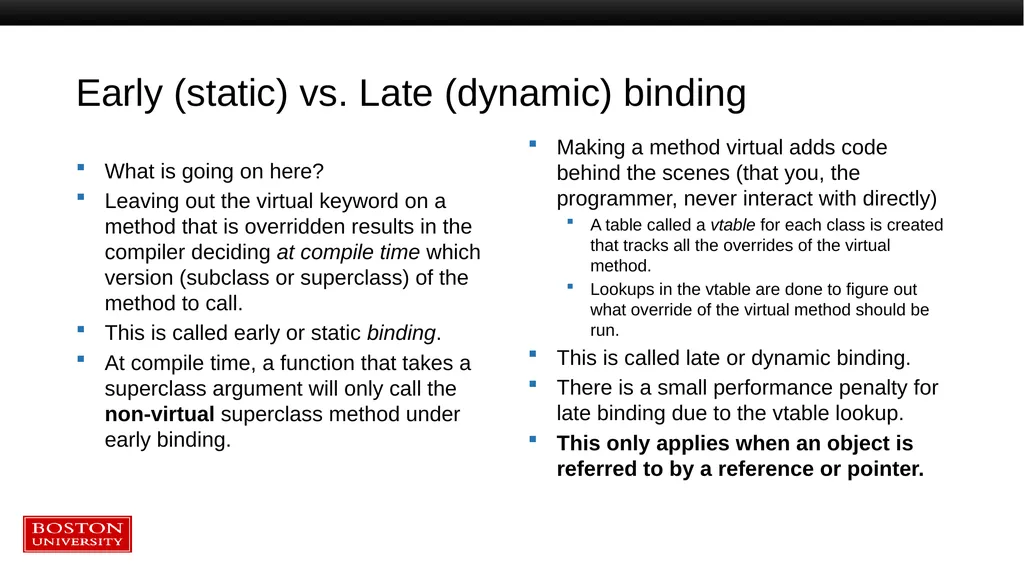
Early (static) vs. Late (dynamic) binding What is going on here?
Leaving out the virtual keyword on a method that is overridden results in the compiler deciding at compile time which version (subclass or superclass) of the method to call.
This is called early or static binding.
At compile time, a function that takes a superclass argument will only call the non-virtual superclass method under early binding. Making a method virtual adds code behind the scenes (that you, the programmer, never interact with directly)
A table called a vtable for each class is created that tracks all the overrides of the virtual method.
Lookups in the vtable are done to figure out what override of the virtual method should be run.
This is called late or dynamic binding.
There is a small performance penalty for late binding due to the vtable lookup.
This only applies when an object is referred to by a reference or pointer.<br>
Leaving out the virtual keyword on a method that is overridden results in the compiler deciding at compile time which version (subclass or superclass) of the method to call.
This is called early or static binding.
At compile time, a function that takes a superclass argument will only call the non-virtual superclass method under early binding. Making a method virtual adds code behind the scenes (that you, the programmer, never interact with directly)
A table called a vtable for each class is created that tracks all the overrides of the virtual method.
Lookups in the vtable are done to figure out what override of the virtual method should be run.
This is called late or dynamic binding.
There is a small performance penalty for late binding due to the vtable lookup.
This only applies when an object is referred to by a reference or pointer.<br>
51
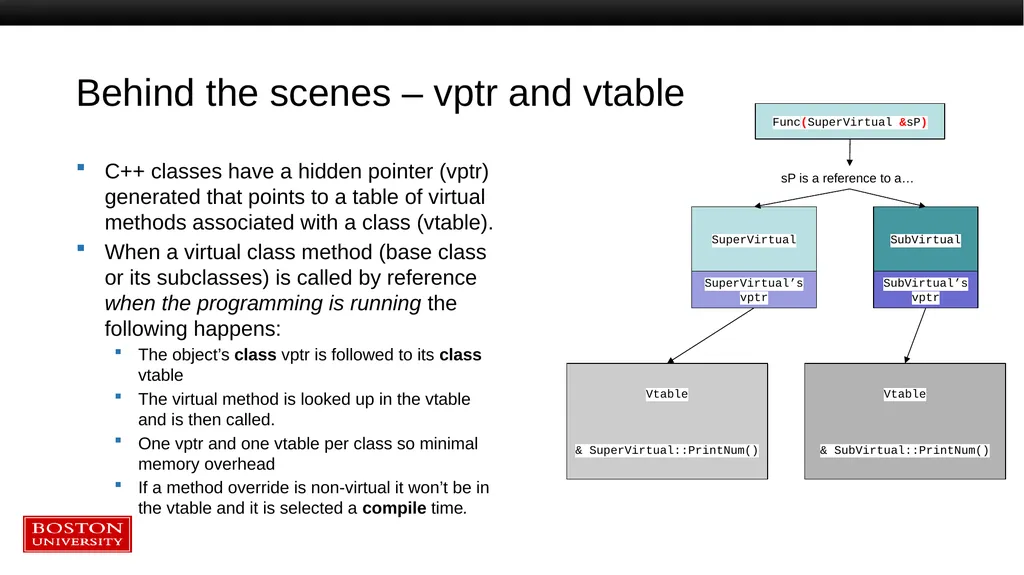
Behind the scenes – vptr and vtable C++ classes have a hidden pointer (vptr) generated that points to a table of virtual methods associated with a class (vtable).
When a virtual class method (base class or its subclasses) is called by reference when the programming is running the following happens:
The object’s class vptr is followed to its class vtable
The virtual method is looked up in the vtable and is then called.
One vptr and one vtable per class so minimal memory overhead
If a method override is non-virtual it won’t be in the vtable and it is selected a compile time. Func(SuperVirtual &sP) sP is a reference to a… SuperVirtual SubVirtual SuperVirtual’s vptr SubVirtual’s vptr Vtable
& SuperVirtual::PrintNum() Vtable
& SubVirtual::PrintNum()<br>
When a virtual class method (base class or its subclasses) is called by reference when the programming is running the following happens:
The object’s class vptr is followed to its class vtable
The virtual method is looked up in the vtable and is then called.
One vptr and one vtable per class so minimal memory overhead
If a method override is non-virtual it won’t be in the vtable and it is selected a compile time. Func(SuperVirtual &sP) sP is a reference to a… SuperVirtual SubVirtual SuperVirtual’s vptr SubVirtual’s vptr Vtable
& SuperVirtual::PrintNum() Vtable
& SubVirtual::PrintNum()<br>
52
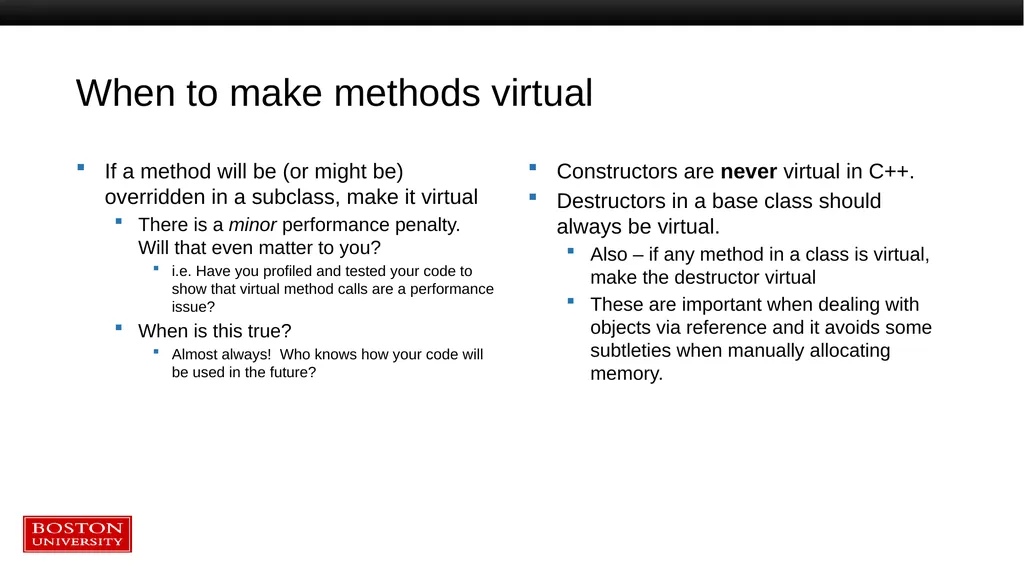
When to make methods virtual If a method will be (or might be) overridden in a subclass, make it virtual
There is a minor performance penalty. Will that even matter to you?
i.e. Have you profiled and tested your code to show that virtual method calls are a performance issue?
When is this true?
Almost always! Who knows how your code will be used in the future? Constructors are never virtual in C++.
Destructors in a base class should always be virtual.
Also – if any method in a class is virtual, make the destructor virtual
These are important when dealing with objects via reference and it avoids some subtleties when manually allocating memory.<br>
There is a minor performance penalty. Will that even matter to you?
i.e. Have you profiled and tested your code to show that virtual method calls are a performance issue?
When is this true?
Almost always! Who knows how your code will be used in the future? Constructors are never virtual in C++.
Destructors in a base class should always be virtual.
Also – if any method in a class is virtual, make the destructor virtual
These are important when dealing with objects via reference and it avoids some subtleties when manually allocating memory.<br>
53
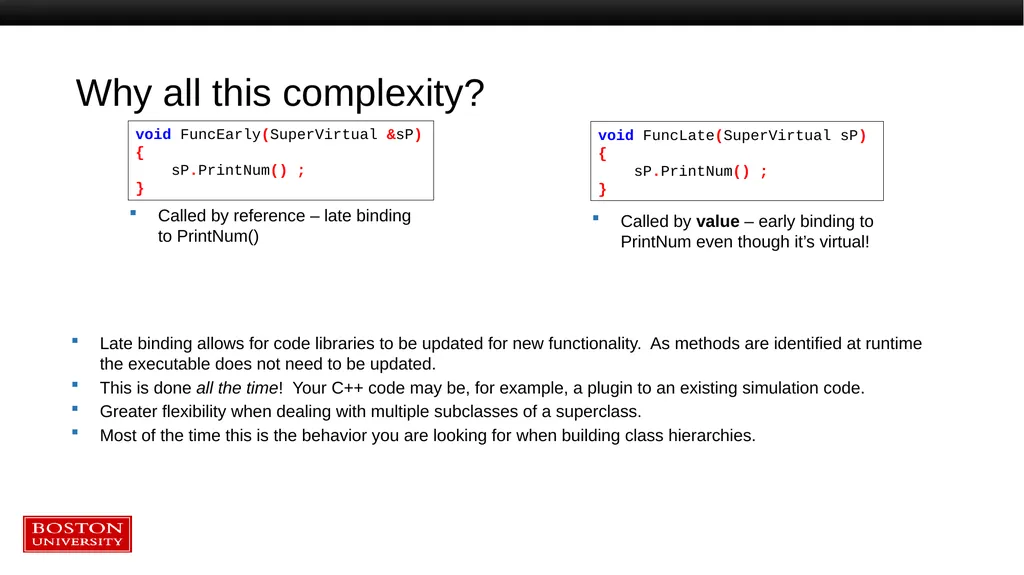
Why all this complexity? Late binding allows for code libraries to be updated for new functionality. As methods are identified at runtime the executable does not need to be updated.
This is done all the time! Your C++ code may be, for example, a plugin to an existing simulation code.
Greater flexibility when dealing with multiple subclasses of a superclass.
Most of the time this is the behavior you are looking for when building class hierarchies. void FuncLate(SuperVirtual sP)
{
sP.PrintNum() ;
} void FuncEarly(SuperVirtual &sP)
{
sP.PrintNum() ;
} Called by reference – late binding to PrintNum() Called by value – early binding to PrintNum even though it’s virtual!<br>
This is done all the time! Your C++ code may be, for example, a plugin to an existing simulation code.
Greater flexibility when dealing with multiple subclasses of a superclass.
Most of the time this is the behavior you are looking for when building class hierarchies. void FuncLate(SuperVirtual sP)
{
sP.PrintNum() ;
} void FuncEarly(SuperVirtual &sP)
{
sP.PrintNum() ;
} Called by reference – late binding to PrintNum() Called by value – early binding to PrintNum even though it’s virtual!<br>
54
Remember the Deadly Diamond of Death? Let’s explain.
Look at the class hierarchy on the right.
Square and Circle inherit from Shape
Squircle inherits from both Square and Circle
Syntax:
class Squircle : public Square, public Circle
The Shape class implements an empty Area() method. The Square and Circle classes override it. Squircle does not.
Under late binding, which version of Area is accessed from Squircle? Square.Area() or Circle.Area()? Shape
virtual float Area() {} Square
virtual float Area() {…} Circle
virtual float Area() {…} Squircle<br>
Look at the class hierarchy on the right.
Square and Circle inherit from Shape
Squircle inherits from both Square and Circle
Syntax:
class Squircle : public Square, public Circle
The Shape class implements an empty Area() method. The Square and Circle classes override it. Squircle does not.
Under late binding, which version of Area is accessed from Squircle? Square.Area() or Circle.Area()? Shape
virtual float Area() {} Square
virtual float Area() {…} Circle
virtual float Area() {…} Squircle<br>
55
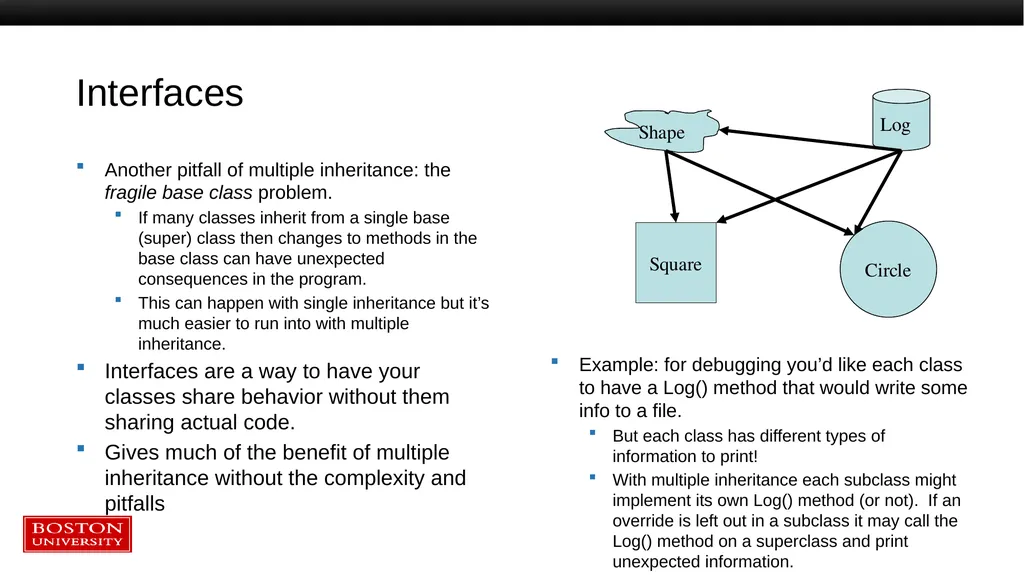
Interfaces Another pitfall of multiple inheritance: the fragile base class problem.
If many classes inherit from a single base (super) class then changes to methods in the base class can have unexpected consequences in the program.
This can happen with single inheritance but it’s much easier to run into with multiple inheritance.
Interfaces are a way to have your classes share behavior without them sharing actual code.
Gives much of the benefit of multiple inheritance without the complexity and pitfalls Shape Square Circle Example: for debugging you’d like each class to have a Log() method that would write some info to a file.
But each class has different types of information to print!
With multiple inheritance each subclass might implement its own Log() method (or not). If an override is left out in a subclass it may call the Log() method on a superclass and print unexpected information. Log<br>
If many classes inherit from a single base (super) class then changes to methods in the base class can have unexpected consequences in the program.
This can happen with single inheritance but it’s much easier to run into with multiple inheritance.
Interfaces are a way to have your classes share behavior without them sharing actual code.
Gives much of the benefit of multiple inheritance without the complexity and pitfalls Shape Square Circle Example: for debugging you’d like each class to have a Log() method that would write some info to a file.
But each class has different types of information to print!
With multiple inheritance each subclass might implement its own Log() method (or not). If an override is left out in a subclass it may call the Log() method on a superclass and print unexpected information. Log<br>
56
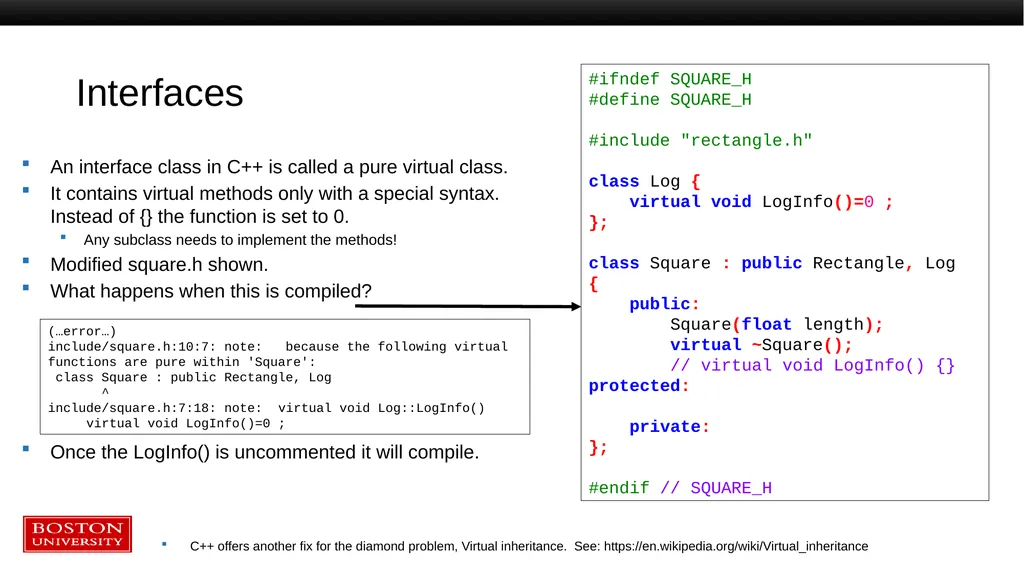
Interfaces An interface class in C++ is called a pure virtual class.
It contains virtual methods only with a special syntax. Instead of {} the function is set to 0.
Any subclass needs to implement the methods!
Modified square.h shown.
What happens when this is compiled?
Once the LogInfo() is uncommented it will compile. #ifndef SQUARE_H
#define SQUARE_H
#include "rectangle.h"
class Log {
virtual void LogInfo()=0 ;
};
class Square : public Rectangle, Log
{
public:
Square(float length);
virtual ~Square();
// virtual void LogInfo() {}
protected:
private:
};
#endif // SQUARE_H (…error…)
include/square.h:10:7: note: because the following virtual functions are pure within 'Square':
class Square : public Rectangle, Log
^
include/square.h:7:18: note: virtual void Log::LogInfo()
virtual void LogInfo()=0 ; C++ offers another fix for the diamond problem, Virtual inheritance. See: https://en.wikipedia.org/wiki/Virtual_inheritance<br>
It contains virtual methods only with a special syntax. Instead of {} the function is set to 0.
Any subclass needs to implement the methods!
Modified square.h shown.
What happens when this is compiled?
Once the LogInfo() is uncommented it will compile. #ifndef SQUARE_H
#define SQUARE_H
#include "rectangle.h"
class Log {
virtual void LogInfo()=0 ;
};
class Square : public Rectangle, Log
{
public:
Square(float length);
virtual ~Square();
// virtual void LogInfo() {}
protected:
private:
};
#endif // SQUARE_H (…error…)
include/square.h:10:7: note: because the following virtual functions are pure within 'Square':
class Square : public Rectangle, Log
^
include/square.h:7:18: note: virtual void Log::LogInfo()
virtual void LogInfo()=0 ; C++ offers another fix for the diamond problem, Virtual inheritance. See: https://en.wikipedia.org/wiki/Virtual_inheritance<br>
57
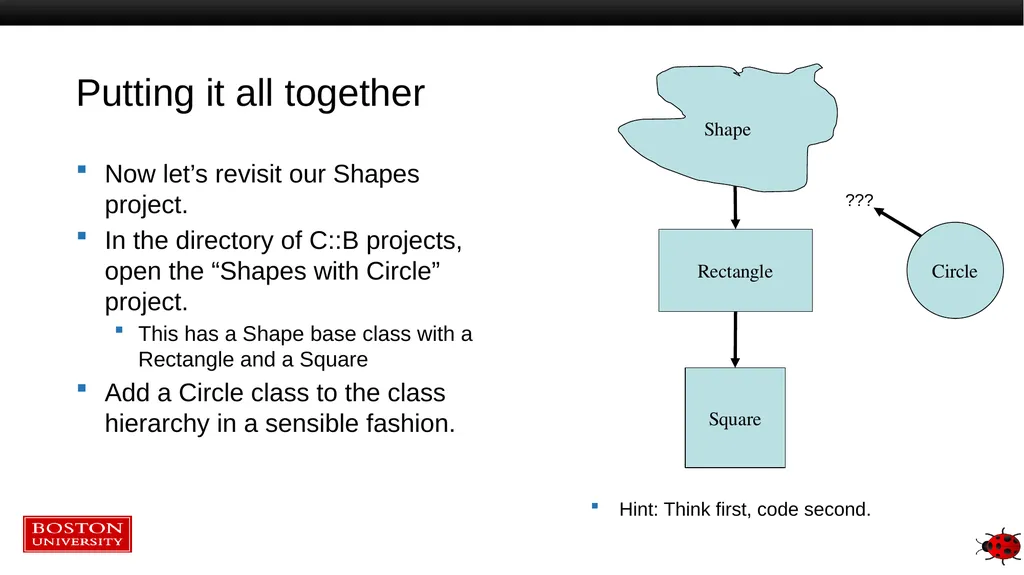
Putting it all together Now let’s revisit our Shapes project.
In the directory of C::B projects, open the “Shapes with Circle” project.
This has a Shape base class with a Rectangle and a Square
Add a Circle class to the class hierarchy in a sensible fashion. Shape Rectangle Square Hint: Think first, code second. Circle ???<br>
In the directory of C::B projects, open the “Shapes with Circle” project.
This has a Shape base class with a Rectangle and a Square
Add a Circle class to the class hierarchy in a sensible fashion. Shape Rectangle Square Hint: Think first, code second. Circle ???<br>
58
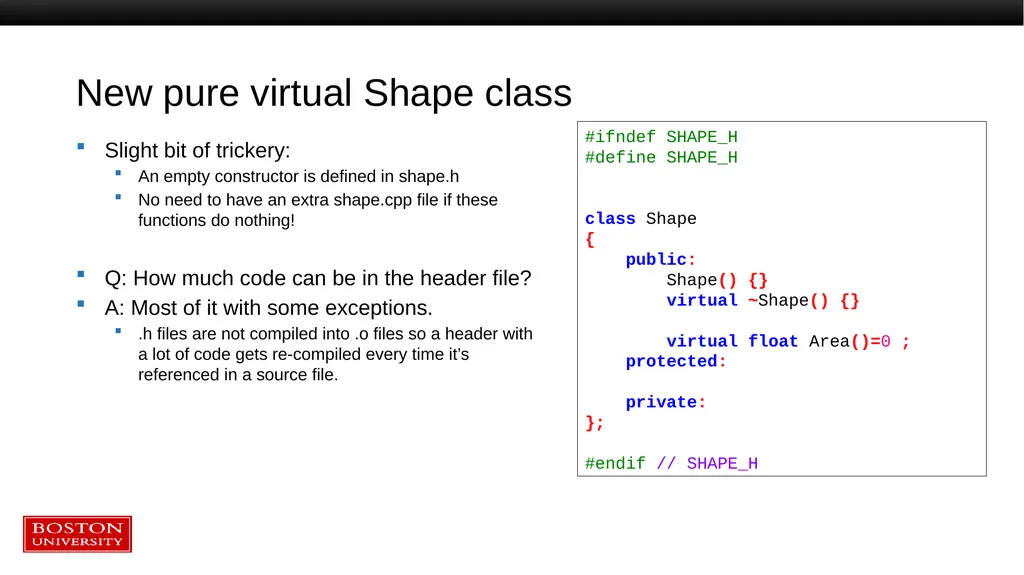
New pure virtual Shape class Slight bit of trickery:
An empty constructor is defined in shape.h
No need to have an extra shape.cpp file if these functions do nothing!
Q: How much code can be in the header file?
A: Most of it with some exceptions.
.h files are not compiled into .o files so a header with a lot of code gets re-compiled every time it’s referenced in a source file. #ifndef SHAPE_H
#define SHAPE_H
class Shape
{
public:
Shape() {}
virtual ~Shape() {}
virtual float Area()=0 ;
protected:
private:
};
#endif // SHAPE_H<br>
An empty constructor is defined in shape.h
No need to have an extra shape.cpp file if these functions do nothing!
Q: How much code can be in the header file?
A: Most of it with some exceptions.
.h files are not compiled into .o files so a header with a lot of code gets re-compiled every time it’s referenced in a source file. #ifndef SHAPE_H
#define SHAPE_H
class Shape
{
public:
Shape() {}
virtual ~Shape() {}
virtual float Area()=0 ;
protected:
private:
};
#endif // SHAPE_H<br>
59
Give it a try Add inheritance from Shape to the Rectangle class
Add a Circle class, inheriting from wherever you like.
Implement Area() for the Circle If you just want to see a solution, open the project “Shapes with Circle solved”<br>
Add a Circle class, inheriting from wherever you like.
Implement Area() for the Circle If you just want to see a solution, open the project “Shapes with Circle solved”<br>
60
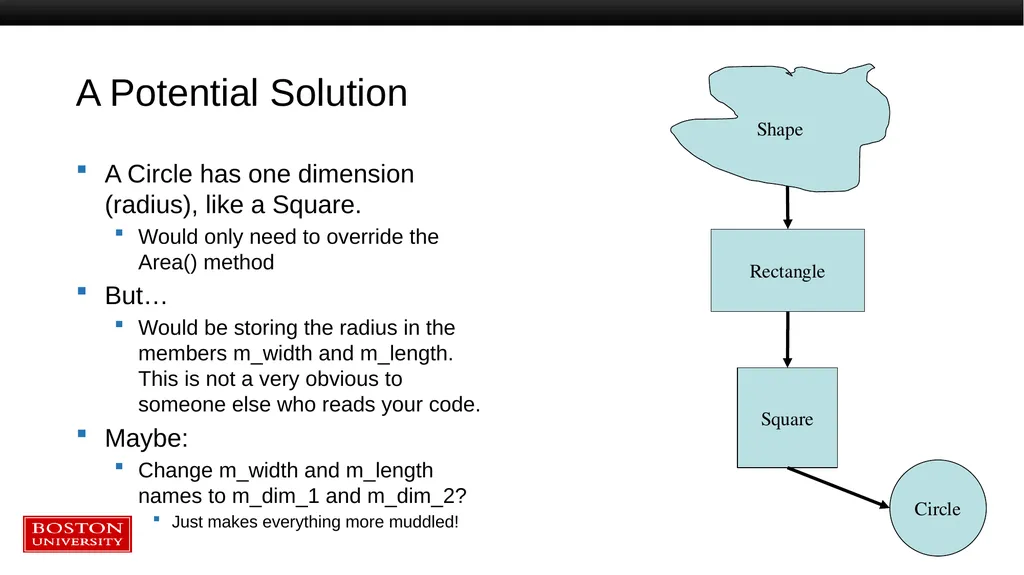
A Potential Solution A Circle has one dimension (radius), like a Square.
Would only need to override the Area() method
But…
Would be storing the radius in the members m_width and m_length. This is not a very obvious to someone else who reads your code.
Maybe:
Change m_width and m_length names to m_dim_1 and m_dim_2?
Just makes everything more muddled! Shape Rectangle Square Circle<br>
Would only need to override the Area() method
But…
Would be storing the radius in the members m_width and m_length. This is not a very obvious to someone else who reads your code.
Maybe:
Change m_width and m_length names to m_dim_1 and m_dim_2?
Just makes everything more muddled! Shape Rectangle Square Circle<br>
61
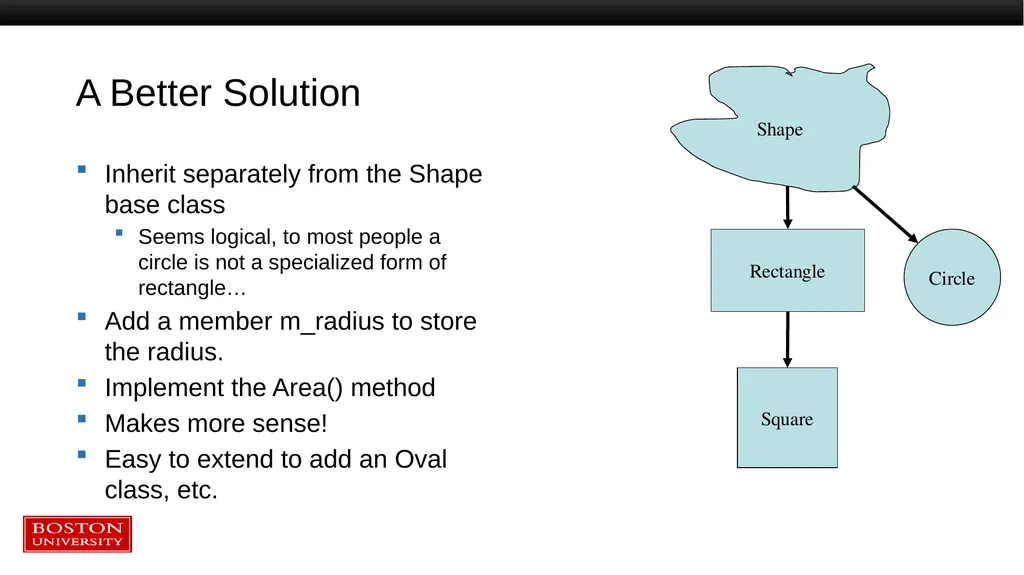
A Better Solution Inherit separately from the Shape base class
Seems logical, to most people a circle is not a specialized form of rectangle…
Add a member m_radius to store the radius.
Implement the Area() method
Makes more sense!
Easy to extend to add an Oval class, etc. Shape Rectangle Square Circle<br>
Seems logical, to most people a circle is not a specialized form of rectangle…
Add a member m_radius to store the radius.
Implement the Area() method
Makes more sense!
Easy to extend to add an Oval class, etc. Shape Rectangle Square Circle<br>
62
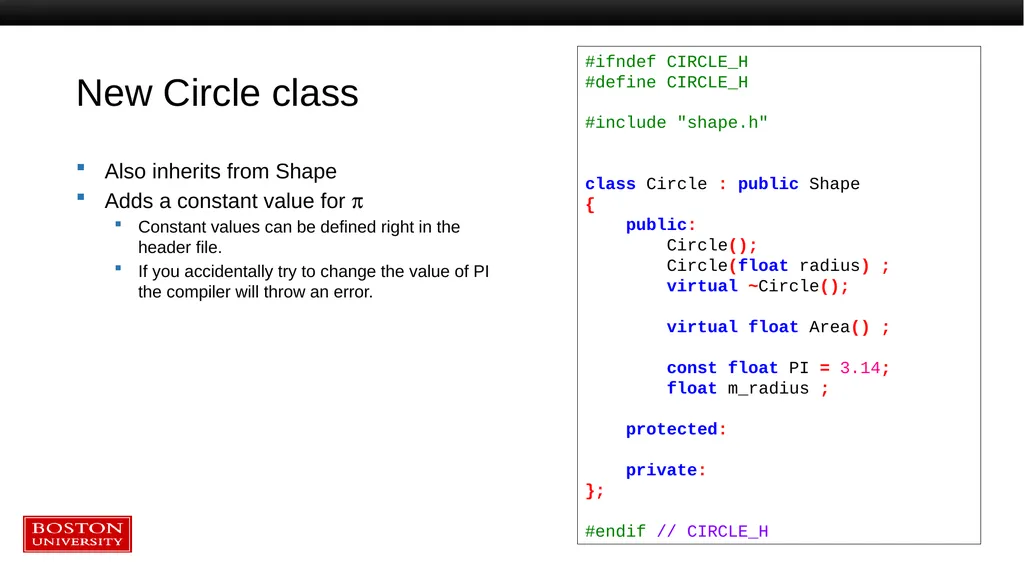
New Circle class Also inherits from Shape
Adds a constant value for p
Constant values can be defined right in the header file.
If you accidentally try to change the value of PI the compiler will throw an error. #ifndef CIRCLE_H
#define CIRCLE_H
#include "shape.h"
class Circle : public Shape
{
public:
Circle();
Circle(float radius) ;
virtual ~Circle();
virtual float Area() ;
const float PI = 3.14;
float m_radius ;
protected:
private:
};
#endif // CIRCLE_H<br>
Adds a constant value for p
Constant values can be defined right in the header file.
If you accidentally try to change the value of PI the compiler will throw an error. #ifndef CIRCLE_H
#define CIRCLE_H
#include "shape.h"
class Circle : public Shape
{
public:
Circle();
Circle(float radius) ;
virtual ~Circle();
virtual float Area() ;
const float PI = 3.14;
float m_radius ;
protected:
private:
};
#endif // CIRCLE_H<br>
63
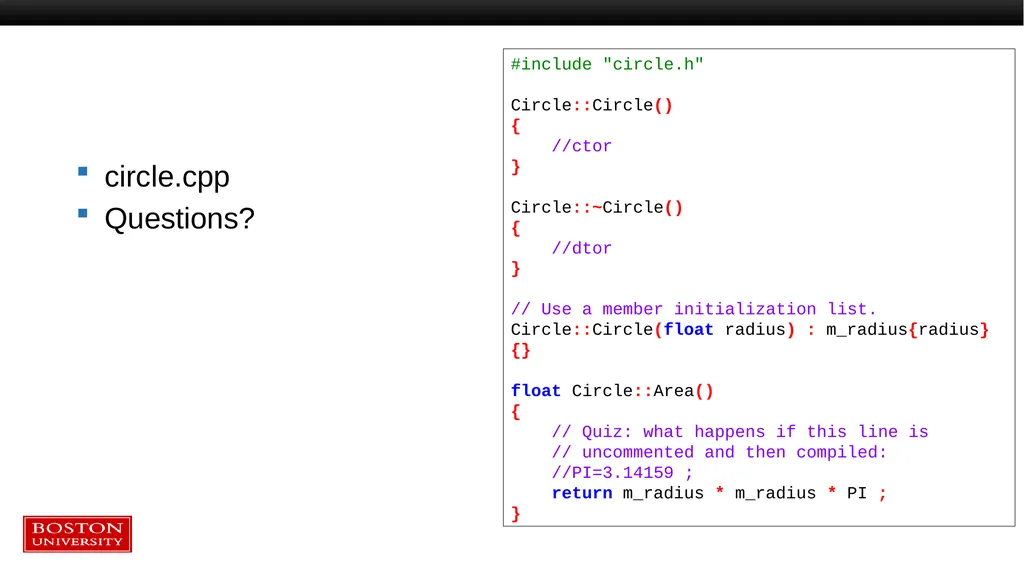
circle.cpp
Questions? #include "circle.h"
Circle::Circle()
{
//ctor
}
Circle::~Circle()
{
//dtor
}
// Use a member initialization list.
Circle::Circle(float radius) : m_radius{radius} {}
float Circle::Area()
{
// Quiz: what happens if this line is
// uncommented and then compiled:
//PI=3.14159 ;
return m_radius * m_radius * PI ;
}<br>
Questions? #include "circle.h"
Circle::Circle()
{
//ctor
}
Circle::~Circle()
{
//dtor
}
// Use a member initialization list.
Circle::Circle(float radius) : m_radius{radius} {}
float Circle::Area()
{
// Quiz: what happens if this line is
// uncommented and then compiled:
//PI=3.14159 ;
return m_radius * m_radius * PI ;
}<br>
64
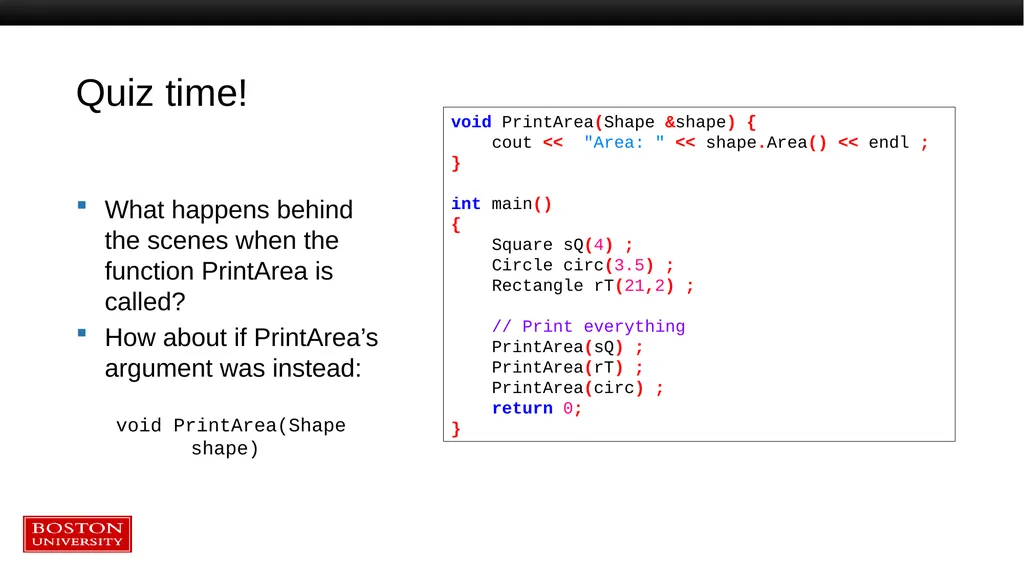
Quiz time! What happens behind the scenes when the function PrintArea is called?
How about if PrintArea’s argument was instead:
void PrintArea(Shape shape) void PrintArea(Shape &shape) {
cout << "Area: " << shape.Area() << endl ;
}
int main()
{
Square sQ(4) ;
Circle circ(3.5) ;
Rectangle rT(21,2) ;
// Print everything
PrintArea(sQ) ;
PrintArea(rT) ;
PrintArea(circ) ;
return 0;
}<br>
How about if PrintArea’s argument was instead:
void PrintArea(Shape shape) void PrintArea(Shape &shape) {
cout << "Area: " << shape.Area() << endl ;
}
int main()
{
Square sQ(4) ;
Circle circ(3.5) ;
Rectangle rT(21,2) ;
// Print everything
PrintArea(sQ) ;
PrintArea(rT) ;
PrintArea(circ) ;
return 0;
}<br>
65
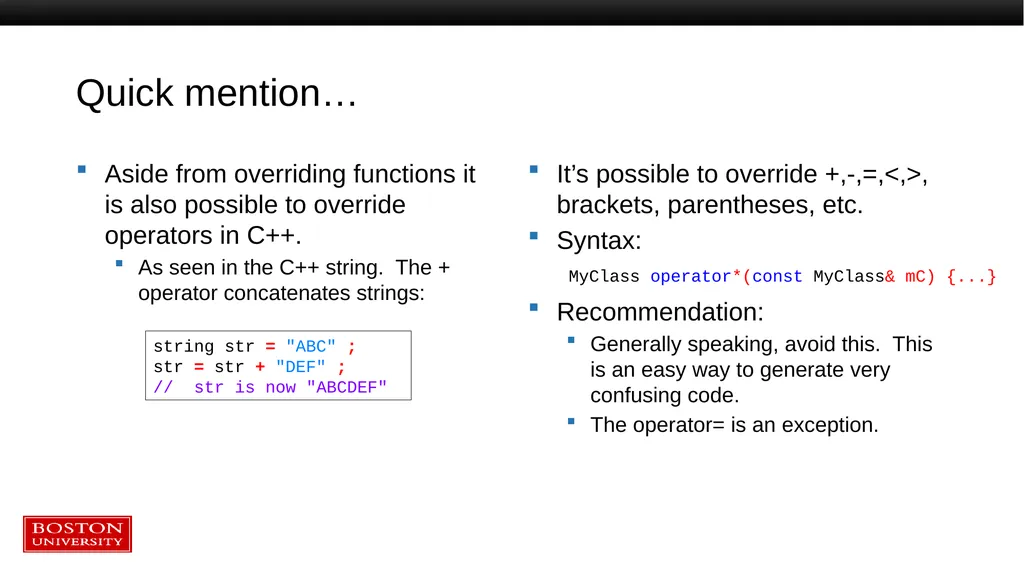
Quick mention… Aside from overriding functions it is also possible to override operators in C++.
As seen in the C++ string. The + operator concatenates strings: It’s possible to override +,-,=,<,>, brackets, parentheses, etc.
Syntax:
Recommendation:
Generally speaking, avoid this. This is an easy way to generate very confusing code.
The operator= is an exception. string str = "ABC" ;
str = str + "DEF" ;
// str is now "ABCDEF" MyClass operator*(const MyClass& mC) {...}<br>
As seen in the C++ string. The + operator concatenates strings: It’s possible to override +,-,=,<,>, brackets, parentheses, etc.
Syntax:
Recommendation:
Generally speaking, avoid this. This is an easy way to generate very confusing code.
The operator= is an exception. string str = "ABC" ;
str = str + "DEF" ;
// str is now "ABCDEF" MyClass operator*(const MyClass& mC) {...}<br>
66
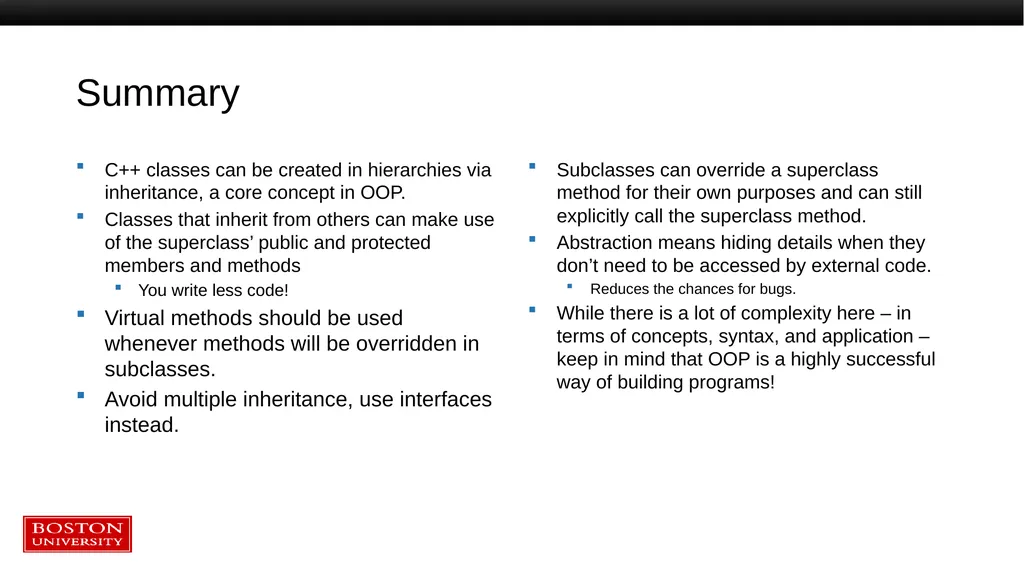
Summary C++ classes can be created in hierarchies via inheritance, a core concept in OOP.
Classes that inherit from others can make use of the superclass’ public and protected members and methods
You write less code!
Virtual methods should be used whenever methods will be overridden in subclasses.
Avoid multiple inheritance, use interfaces instead. Subclasses can override a superclass method for their own purposes and can still explicitly call the superclass method.
Abstraction means hiding details when they don’t need to be accessed by external code.
Reduces the chances for bugs.
While there is a lot of complexity here – in terms of concepts, syntax, and application – keep in mind that OOP is a highly successful way of building programs!<br>
Classes that inherit from others can make use of the superclass’ public and protected members and methods
You write less code!
Virtual methods should be used whenever methods will be overridden in subclasses.
Avoid multiple inheritance, use interfaces instead. Subclasses can override a superclass method for their own purposes and can still explicitly call the superclass method.
Abstraction means hiding details when they don’t need to be accessed by external code.
Reduces the chances for bugs.
While there is a lot of complexity here – in terms of concepts, syntax, and application – keep in mind that OOP is a highly successful way of building programs!<br>