
Medication Administration CHAPTER 14 Introduction
MJ
Published · 185 slides · 0 views

1 / 1













Description
Medication Administration CHAPTER 14 Introduction Vascular access may be needed for patients in hemodynamically unstable condition. Many techniques are used. Patients survival depends on your abilities. Medical Direction (1 of 2) Online
Related Topics
Share
Embed code
Download this presentation From Below
"Medication Administration CHAPTER 14 Introduction" is the property of its rightful owner. Permission is granted to download and print the materials on this website for personal, non-commercial use only, and to display it on your personal computer provided you do not modify the materials and that you retain all copyright notices contained in the materials. By downloading content from our website, you accept the terms of this agreement.
Presentation Transcript
01
Medication Administration CHAPTER 14<br>
02
Introduction Vascular access may be needed for patients in hemodynamically unstable condition.
Many techniques are used.
Patient’s survival depends on your abilities.<br>
Many techniques are used.
Patient’s survival depends on your abilities.<br>
03
Medical Direction (1 of 2) Online (direct) medical control
If you are not confident with medication administration:
Use your protocols, a drug formulary, a flip guide, a smartphone app, or other resource.
Consider medical control.<br>
If you are not confident with medication administration:
Use your protocols, a drug formulary, a flip guide, a smartphone app, or other resource.
Consider medical control.<br>
04
Medical Direction (2 of 2) Online medical control
Approval of medications
General consultation of treatment modalities
When in doubt, contact medical control.<br>
Approval of medications
General consultation of treatment modalities
When in doubt, contact medical control.<br>
05
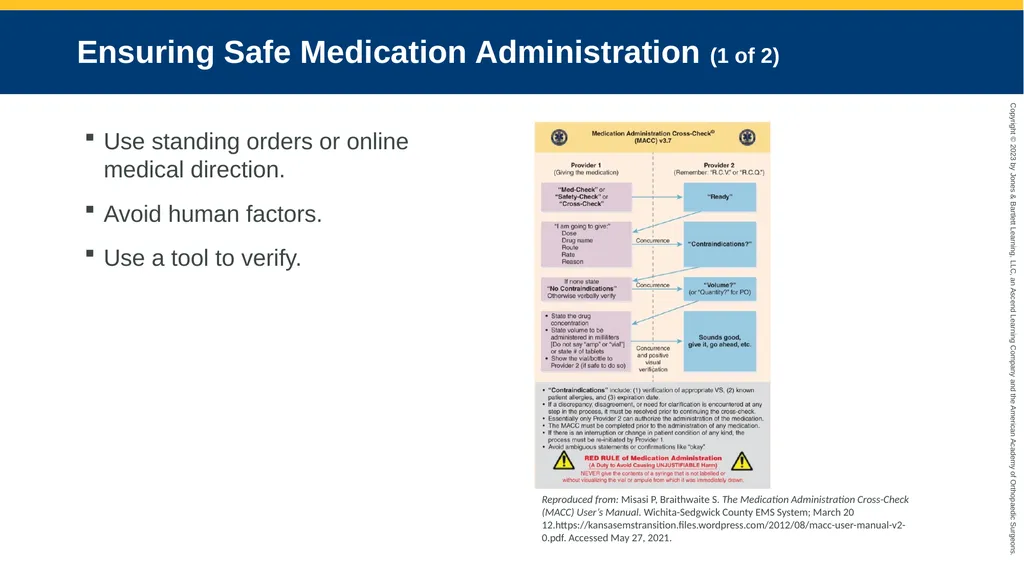
Ensuring Safe Medication Administration (1 of 2) Use standing orders or online medical direction.
Avoid human factors.
Use a tool to verify. Reproduced from: Misasi P, Braithwaite S. The Medication Administration Cross-Check (MACC) User’s Manual. Wichita-Sedgwick County EMS System; March 20 12.https://kansasemstransition.files.wordpress.com/2012/08/macc-user-manual-v2-0.pdf. Accessed May 27, 2021.<br>
Avoid human factors.
Use a tool to verify. Reproduced from: Misasi P, Braithwaite S. The Medication Administration Cross-Check (MACC) User’s Manual. Wichita-Sedgwick County EMS System; March 20 12.https://kansasemstransition.files.wordpress.com/2012/08/macc-user-manual-v2-0.pdf. Accessed May 27, 2021.<br>
06
Ensuring Safe Medication Administration (2 of 2) Document
Dose administered
Name of medication
Route
Rate
Time of administration
Who administered the drug
Who helped perform the medication check
Patient’s response<br>
Dose administered
Name of medication
Route
Rate
Time of administration
Who administered the drug
Who helped perform the medication check
Patient’s response<br>
07
Local Drug Distribution System Ensure functionality of all equipment at the beginning of your shift.
Check that medications are:
Not expired
Not damaged
Readily available in right quantity
You are responsible for documentation and security of all controlled substances.<br>
Check that medications are:
Not expired
Not damaged
Readily available in right quantity
You are responsible for documentation and security of all controlled substances.<br>
08
Medical Asepsis (1 of 4) Practice of preventing contamination of the patient using aseptic technique
Accomplished through:
Sterilization of equipment
Antiseptics
Disinfectants<br>
Accomplished through:
Sterilization of equipment
Antiseptics
Disinfectants<br>
09
Medical Asepsis (2 of 4) Clean technique versus sterile technique
Sterile technique
Deconstruction of all living organisms using heat, gas, or chemicals
Sterile field:
Wear mask and sterile sleeves/gown
Wear sterile gloves.
Place sterile drapes around procedural area.<br>
Sterile technique
Deconstruction of all living organisms using heat, gas, or chemicals
Sterile field:
Wear mask and sterile sleeves/gown
Wear sterile gloves.
Place sterile drapes around procedural area.<br>
10
Medical Asepsis (3 of 4) May not be possible to maintain a sterile environment in the field
Practice medical asepsis to reduce risk of contamination and infection.
Handwashing, wearing gloves, keeping equipment as clean as possible<br>
Practice medical asepsis to reduce risk of contamination and infection.
Handwashing, wearing gloves, keeping equipment as clean as possible<br>
11
Medical Asepsis (4 of 4) Antiseptics are used before invasive procedure.
Disinfectants are toxic to living tissue.<br>
Disinfectants are toxic to living tissue.<br>
12
Standard Precautions and Contaminated Equipment Disposal<br>
13
Standard Precautions Treat any bodily fluid as being potentially infectious.<br>
14
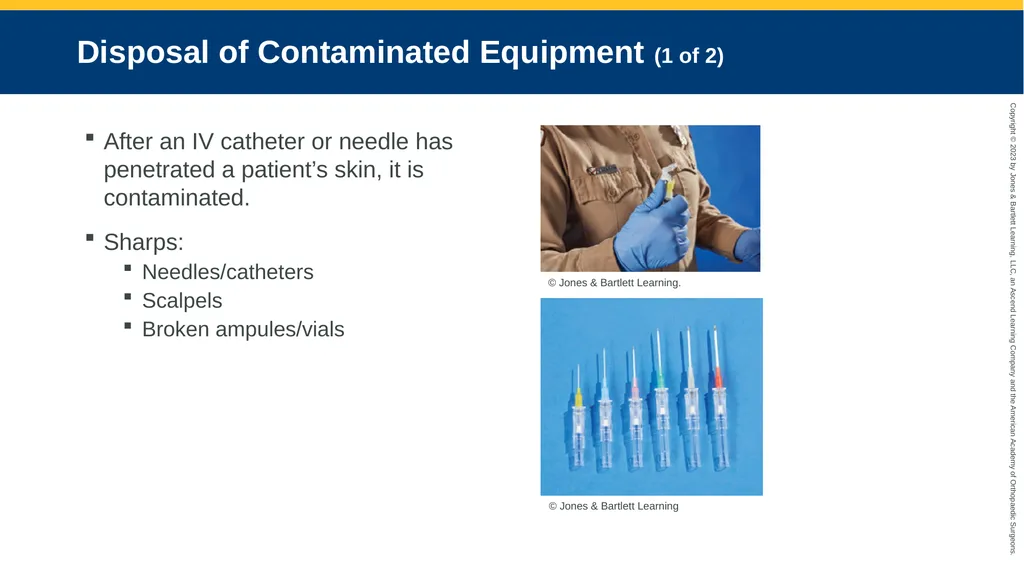
Disposal of Contaminated Equipment (1 of 2) After an IV catheter or needle has penetrated a patient’s skin, it is contaminated.
Sharps:
Needles/catheters
Scalpels
Broken ampules/vials © Jones & Bartlett Learning. © Jones & Bartlett Learning<br>
Sharps:
Needles/catheters
Scalpels
Broken ampules/vials © Jones & Bartlett Learning. © Jones & Bartlett Learning<br>
15
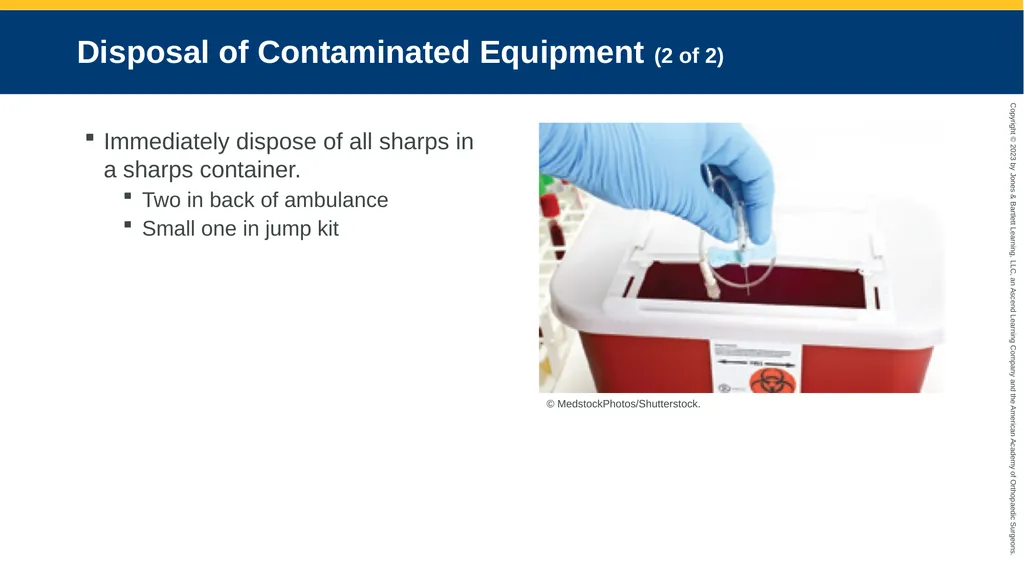
Disposal of Contaminated Equipment (2 of 2) Immediately dispose of all sharps in a sharps container.
Two in back of ambulance
Small one in jump kit © MedstockPhotos/Shutterstock.<br>
Two in back of ambulance
Small one in jump kit © MedstockPhotos/Shutterstock.<br>
16
Cellular Fluid Composition and Status<br>
17
Body Fluid Composition The human body is composed mostly of water.
Provides environment needed for life
Body maintains balance between intake and output of fluids and electrolytes.
Injured or ill body may be unable to maintain homeostasis.
Healthy person looses 2–2.5 of fluid daily
Urine output, lungs (exhalation), and skin<br>
Provides environment needed for life
Body maintains balance between intake and output of fluids and electrolytes.
Injured or ill body may be unable to maintain homeostasis.
Healthy person looses 2–2.5 of fluid daily
Urine output, lungs (exhalation), and skin<br>
18
Dehydration (1 of 2) Inadequate total systemic fluid volume
Signs and symptoms:
Decreased level of consciousness
Postural hypotension
Tachypnea
Dry mucous membranes
Decreased urine output
Tachycardia
Poor skin turgor
Flushed, dry skin<br>
Signs and symptoms:
Decreased level of consciousness
Postural hypotension
Tachypnea
Dry mucous membranes
Decreased urine output
Tachycardia
Poor skin turgor
Flushed, dry skin<br>
19
Dehydration (2 of 2) Causes:
Diarrhea
Vomiting
Gastrointestinal drainage
Infections
Metabolic disorders
Hemorrhage
Environmental emergencies
High-caffeine diet
Insufficient fluid intake<br>
Diarrhea
Vomiting
Gastrointestinal drainage
Infections
Metabolic disorders
Hemorrhage
Environmental emergencies
High-caffeine diet
Insufficient fluid intake<br>
20
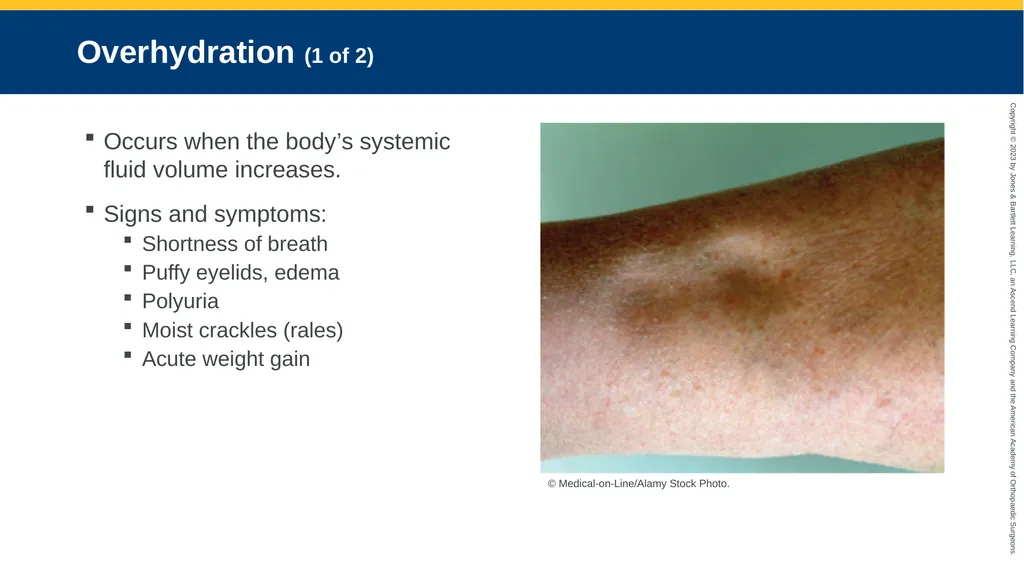
Overhydration (1 of 2) Occurs when the body’s systemic fluid volume increases.
Signs and symptoms:
Shortness of breath
Puffy eyelids, edema
Polyuria
Moist crackles (rales)
Acute weight gain © Medical-on-Line/Alamy Stock Photo.<br>
Signs and symptoms:
Shortness of breath
Puffy eyelids, edema
Polyuria
Moist crackles (rales)
Acute weight gain © Medical-on-Line/Alamy Stock Photo.<br>
21
Overhydration (2 of 2) Causes:
Unmonitored IVs (pediatrics)
Kidney failure
Water intoxication in endurance sports
Prolonged hypoventilation<br>
Unmonitored IVs (pediatrics)
Kidney failure
Water intoxication in endurance sports
Prolonged hypoventilation<br>
22
IV Fluid Composition<br>
23
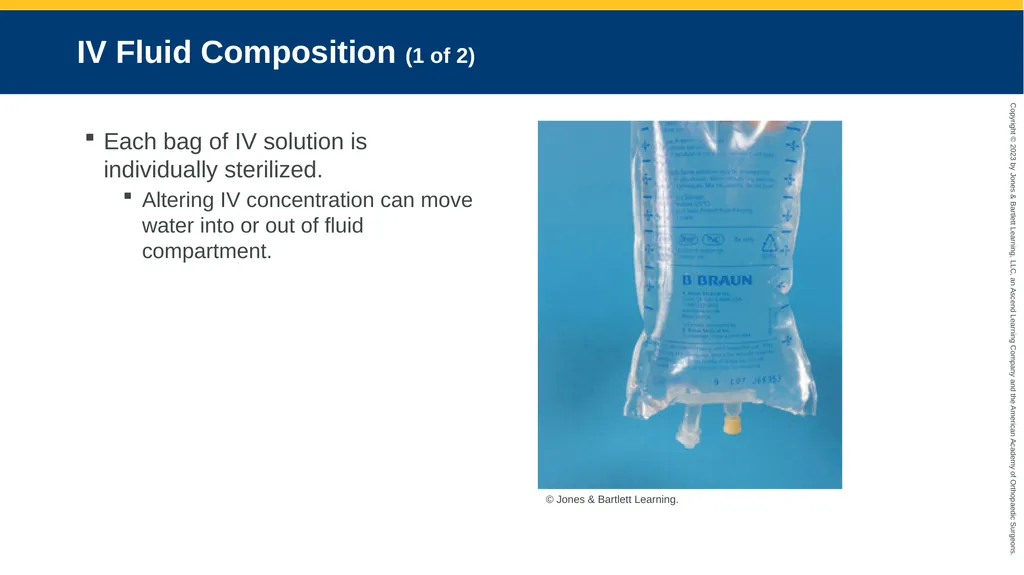
IV Fluid Composition (1 of 2) Each bag of IV solution is individually sterilized.
Altering IV concentration can move water into or out of fluid compartment. © Jones & Bartlett Learning.<br>
Altering IV concentration can move water into or out of fluid compartment. © Jones & Bartlett Learning.<br>
24
IV Fluid Composition (2 of 2) Electrolytes can become altered from:
Excessive vomiting
Diarrhea
Dietary issues
Medications
Blood loss, or a variety of other injuries<br>
Excessive vomiting
Diarrhea
Dietary issues
Medications
Blood loss, or a variety of other injuries<br>
25
Types of IV Solutions (1 of 8) Crystalloid solutions
Dissolved crystals in water
Cross membranes and alter fluid levels
Optimal replacement fluid is as near to whole as possible
Cannot carry oxygen
Boluses maintain perfusion<br>
Dissolved crystals in water
Cross membranes and alter fluid levels
Optimal replacement fluid is as near to whole as possible
Cannot carry oxygen
Boluses maintain perfusion<br>
26
Types of IV Solutions (2 of 8) Colloid solutions
Molecules too large to pass out of capillary membranes
Molecules remain in vascular system
High osmolarity
Reduce edema
Dramatic fluid shifts
Short duration of action
Low cost-to-benefit ratio<br>
Molecules too large to pass out of capillary membranes
Molecules remain in vascular system
High osmolarity
Reduce edema
Dramatic fluid shifts
Short duration of action
Low cost-to-benefit ratio<br>
27
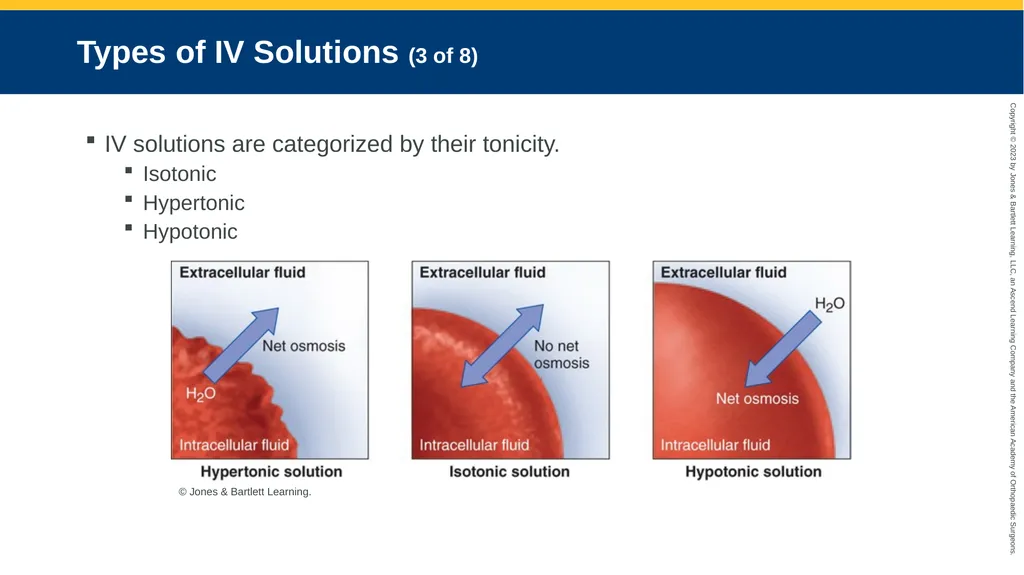
Types of IV Solutions (3 of 8) IV solutions are categorized by their tonicity.
Isotonic
Hypertonic
Hypotonic © Jones & Bartlett Learning.<br>
Isotonic
Hypertonic
Hypotonic © Jones & Bartlett Learning.<br>
28
Types of IV Solutions (4 of 8) Isotonic solutions
Same concentration of sodium as cell
Water does not shift
No change in cell shape
Examples:
Lactated Ringer’s (LR) solution
D5W, 5% dextrose in water<br>
Same concentration of sodium as cell
Water does not shift
No change in cell shape
Examples:
Lactated Ringer’s (LR) solution
D5W, 5% dextrose in water<br>
29
Types of IV Solutions (5 of 8) Hypotonic solutions
Lower concentration of sodium than cell
Hydrate the cells while depleting the vascular compartment
Sudden fluid shift from intravascular space to the cells
Example:
0.45% sodium chloride<br>
Lower concentration of sodium than cell
Hydrate the cells while depleting the vascular compartment
Sudden fluid shift from intravascular space to the cells
Example:
0.45% sodium chloride<br>
30
Types of IV Solutions (6 of 8) Hypertonic solution
Greater concentration of sodium than cell
High osmolarity and ionic concentration
Pulls fluid from intracellular and intestinal compartments to intravascular compartment<br>
Greater concentration of sodium than cell
High osmolarity and ionic concentration
Pulls fluid from intracellular and intestinal compartments to intravascular compartment<br>
31
Types of IV Solutions (7 of 8) Hypertonic solution (cont’d)
Stabilize blood pressure, increases urine output, and reduces edema
Careful monitoring to avoid fluid overloading
Example:
3% sodium chloride<br>
Stabilize blood pressure, increases urine output, and reduces edema
Careful monitoring to avoid fluid overloading
Example:
3% sodium chloride<br>
32
Types of IV Solutions (8 of 8) Oxygen-carrying solutions
Whole blood is the best replacement for lost blood.
Synthetic blood substitutes<br>
Whole blood is the best replacement for lost blood.
Synthetic blood substitutes<br>
33
Techniques and Administration<br>
34
Techniques and Administration IV therapy involves cannulation of a vein with a catheter.
Peripheral vein cannulation involves cannulating veins of the periphery.
Keep IV equipment sterile!<br>
Peripheral vein cannulation involves cannulating veins of the periphery.
Keep IV equipment sterile!<br>
35
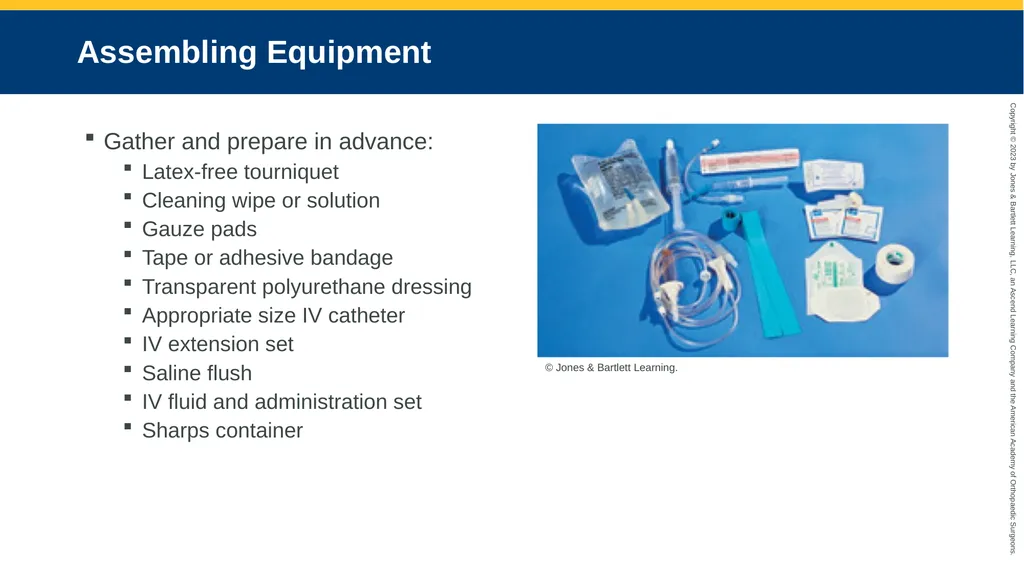
Assembling Equipment Gather and prepare in advance:
Latex-free tourniquet
Cleaning wipe or solution
Gauze pads
Tape or adhesive bandage
Transparent polyurethane dressing
Appropriate size IV catheter
IV extension set
Saline flush
IV fluid and administration set
Sharps container © Jones & Bartlett Learning.<br>
Latex-free tourniquet
Cleaning wipe or solution
Gauze pads
Tape or adhesive bandage
Transparent polyurethane dressing
Appropriate size IV catheter
IV extension set
Saline flush
IV fluid and administration set
Sharps container © Jones & Bartlett Learning.<br>
36
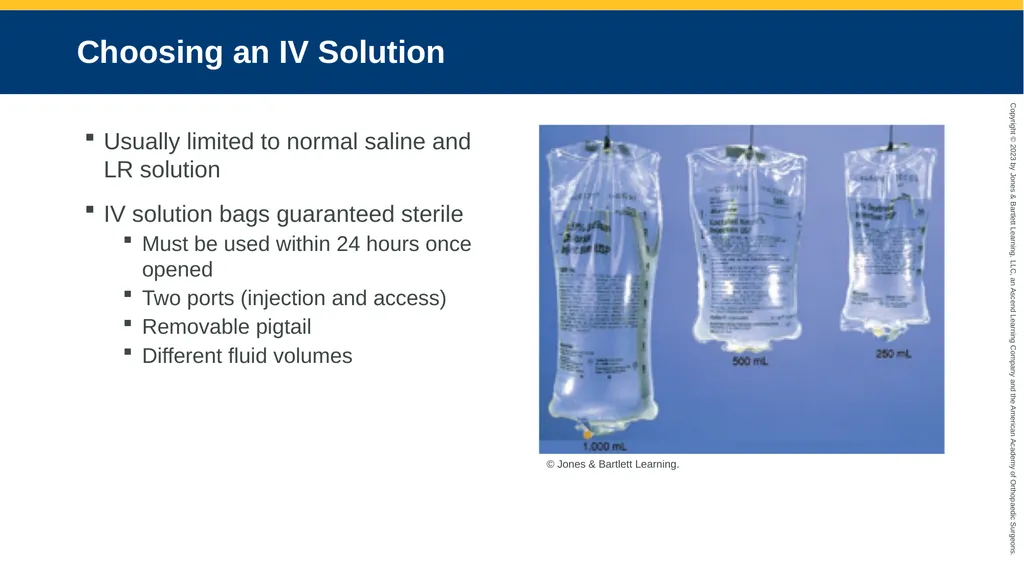
Choosing an IV Solution Usually limited to normal saline and LR solution
IV solution bags guaranteed sterile
Must be used within 24 hours once opened
Two ports (injection and access)
Removable pigtail
Different fluid volumes © Jones & Bartlett Learning.<br>
IV solution bags guaranteed sterile
Must be used within 24 hours once opened
Two ports (injection and access)
Removable pigtail
Different fluid volumes © Jones & Bartlett Learning.<br>
37
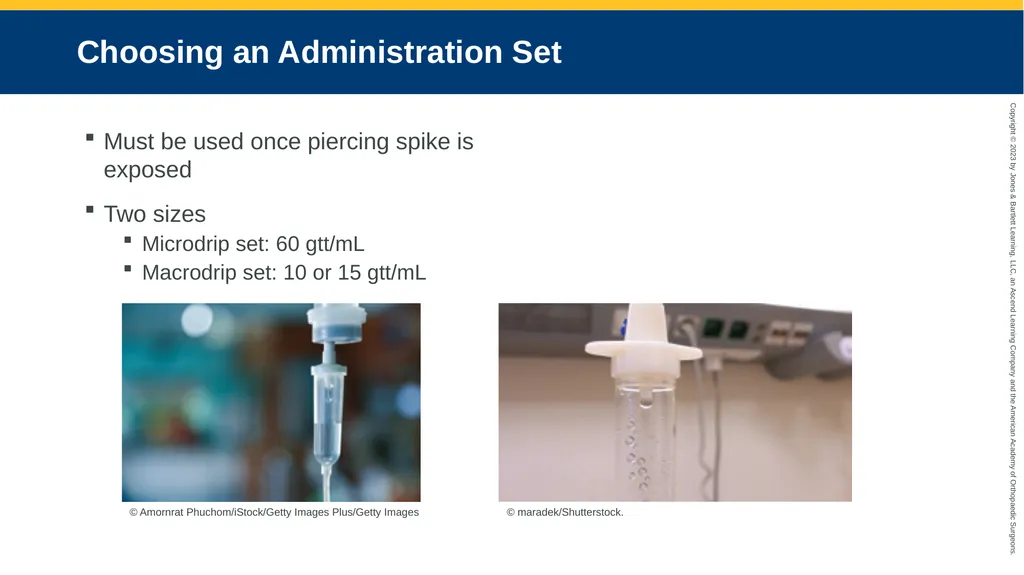
Choosing an Administration Set Must be used once piercing spike is exposed
Two sizes
Microdrip set: 60 gtt/mL
Macrodrip set: 10 or 15 gtt/mL © Amornrat Phuchom/iStock/Getty Images Plus/Getty Images © maradek/Shutterstock.<br>
Two sizes
Microdrip set: 60 gtt/mL
Macrodrip set: 10 or 15 gtt/mL © Amornrat Phuchom/iStock/Getty Images Plus/Getty Images © maradek/Shutterstock.<br>
38
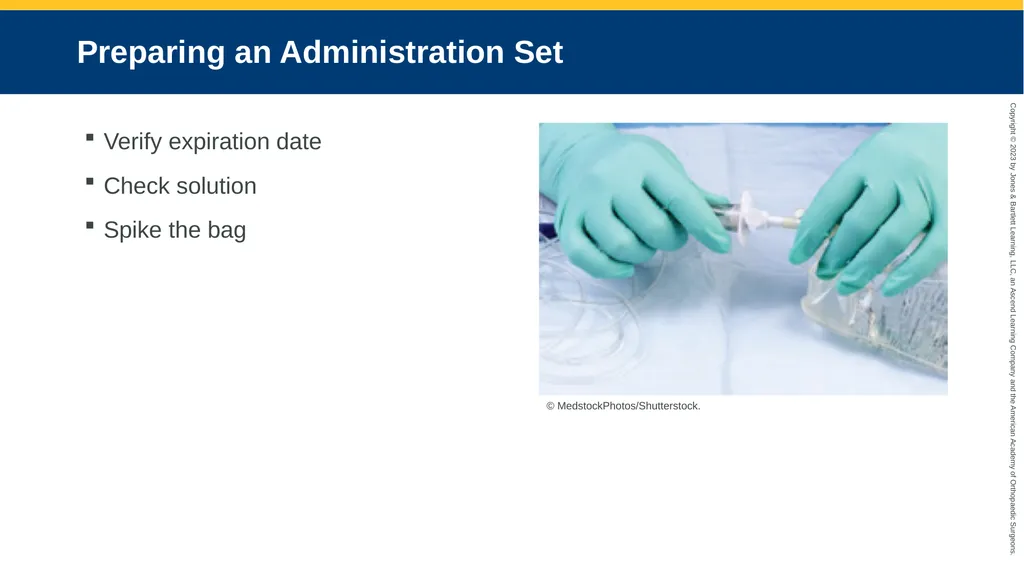
Preparing an Administration Set Verify expiration date
Check solution
Spike the bag © MedstockPhotos/Shutterstock.<br>
Check solution
Spike the bag © MedstockPhotos/Shutterstock.<br>
39
Spiking the Bag (1 of 2) Ensure:
Solution is clear and not expired
Correct administrative drip rating
Tubing not tangled
Protective covers are present
Flow clamp is closed/up to drip chamber
Remove protective covering
Slide spike into IV bag port
Squeeze drip chamber to fill line
Run fluid into line to flush out air<br>
Solution is clear and not expired
Correct administrative drip rating
Tubing not tangled
Protective covers are present
Flow clamp is closed/up to drip chamber
Remove protective covering
Slide spike into IV bag port
Squeeze drip chamber to fill line
Run fluid into line to flush out air<br>
40
Spiking the Bag (2 of 2) Twist protective cover to remove air bubbles
Either turn roller clamp wheel to stop flow or set drip rate per required dose
Check drip chamber fluid level
Half-filled
Too low: squeeze chamber
Too full: invert bag and chamber and squeeze chamber to empty fluid back into bag
Hang bag in appropriate location<br>
Either turn roller clamp wheel to stop flow or set drip rate per required dose
Check drip chamber fluid level
Half-filled
Too low: squeeze chamber
Too full: invert bag and chamber and squeeze chamber to empty fluid back into bag
Hang bag in appropriate location<br>
41
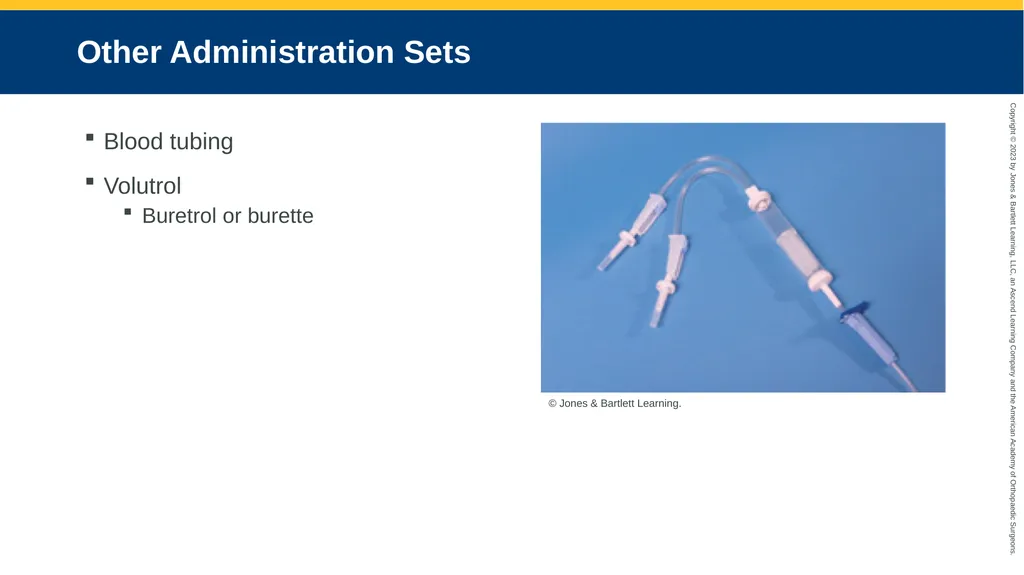
Other Administration Sets Blood tubing
Volutrol
Buretrol or burette © Jones & Bartlett Learning.<br>
Volutrol
Buretrol or burette © Jones & Bartlett Learning.<br>
42
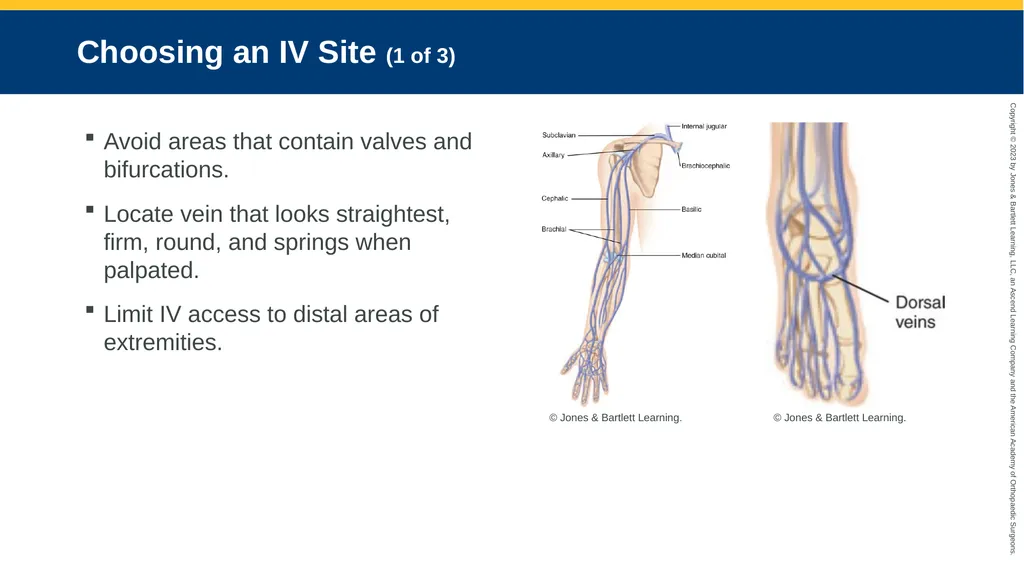
Choosing an IV Site (1 of 3) Avoid areas that contain valves and bifurcations.
Locate vein that looks straightest, firm, round, and springs when palpated.
Limit IV access to distal areas of extremities. © Jones & Bartlett Learning. © Jones & Bartlett Learning.<br>
Locate vein that looks straightest, firm, round, and springs when palpated.
Limit IV access to distal areas of extremities. © Jones & Bartlett Learning. © Jones & Bartlett Learning.<br>
43
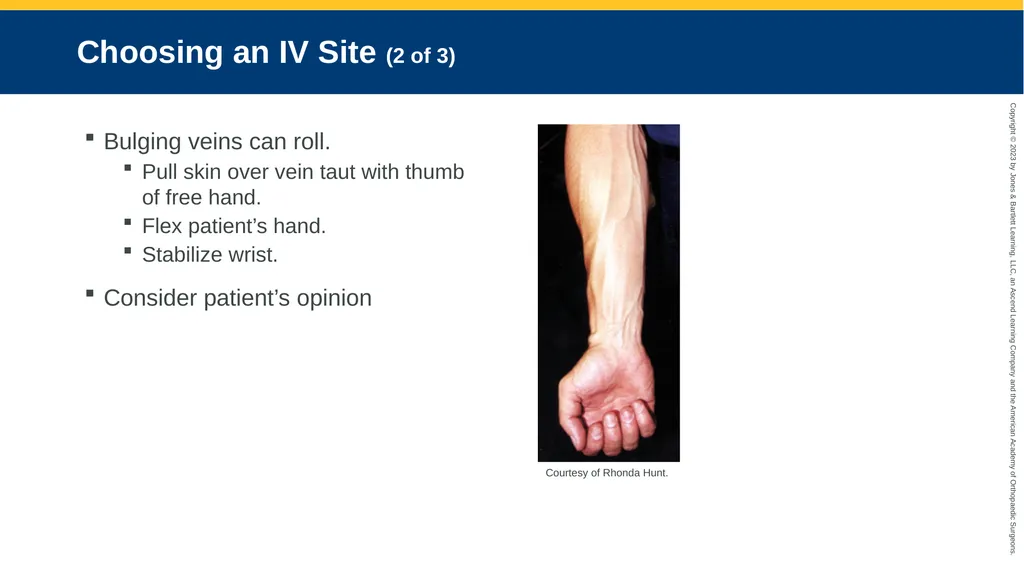
Choosing an IV Site (2 of 3) Bulging veins can roll.
Pull skin over vein taut with thumb of free hand.
Flex patient’s hand.
Stabilize wrist.
Consider patient’s opinion Courtesy of Rhonda Hunt.<br>
Pull skin over vein taut with thumb of free hand.
Flex patient’s hand.
Stabilize wrist.
Consider patient’s opinion Courtesy of Rhonda Hunt.<br>
44
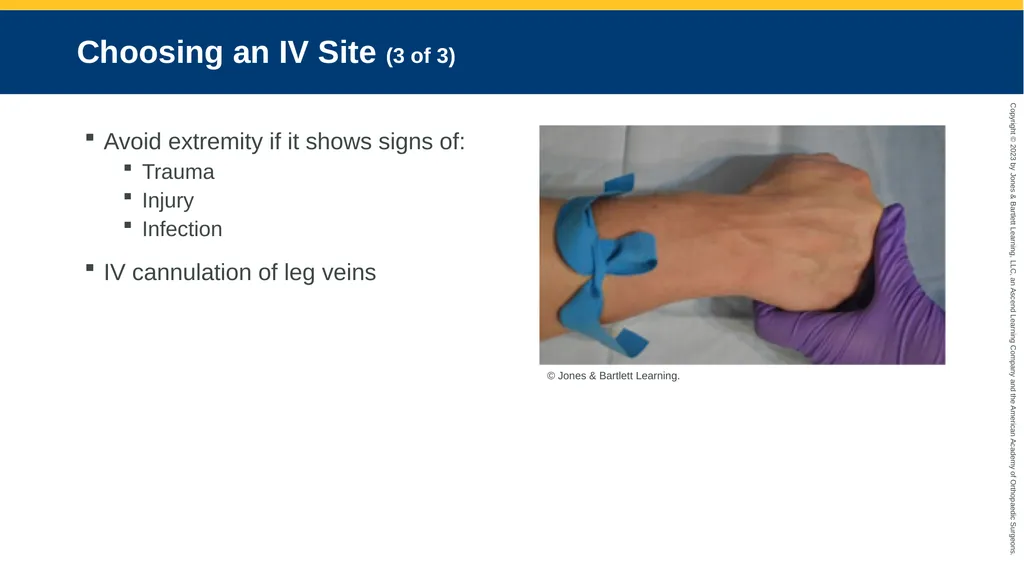
Choosing an IV Site (3 of 3) Avoid extremity if it shows signs of:
Trauma
Injury
Infection
IV cannulation of leg veins © Jones & Bartlett Learning.<br>
Trauma
Injury
Infection
IV cannulation of leg veins © Jones & Bartlett Learning.<br>
45
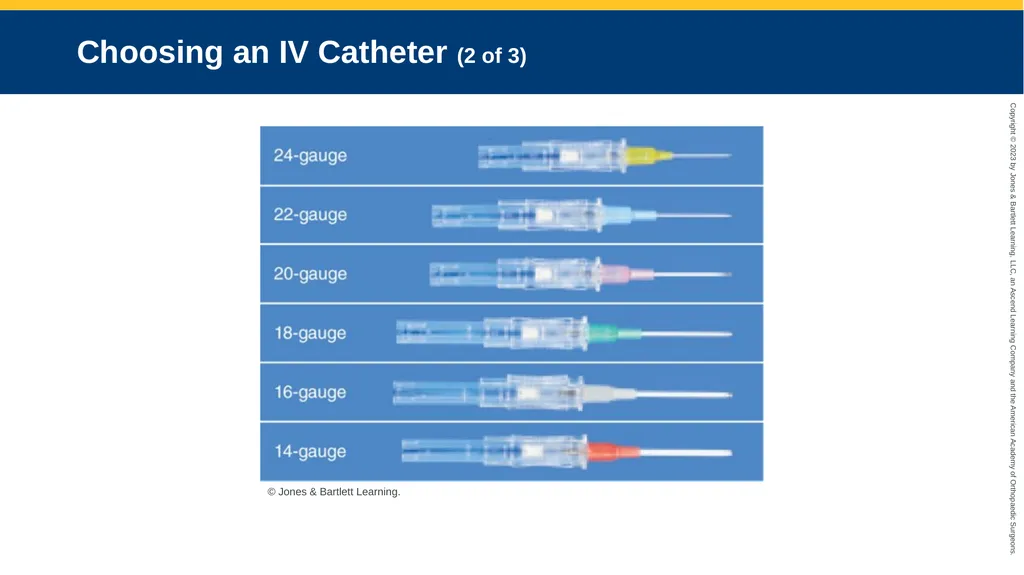
Choosing an IV Catheter (1 of 3) Over-the-needle
Automatic needle retraction
Smaller the gauge, the larger the diameter
Choose the largest-diameter catheter for vein © Jones & Bartlett Learning.<br>
Automatic needle retraction
Smaller the gauge, the larger the diameter
Choose the largest-diameter catheter for vein © Jones & Bartlett Learning.<br>
46
Choosing an IV Catheter (2 of 3) © Jones & Bartlett Learning.<br>
47
Choosing an IV Catheter (3 of 3) Butterfly catheter
Intracatheter
Rarely used in prehospital setting © felipe caparros/Shutterstock.<br>
Intracatheter
Rarely used in prehospital setting © felipe caparros/Shutterstock.<br>
48
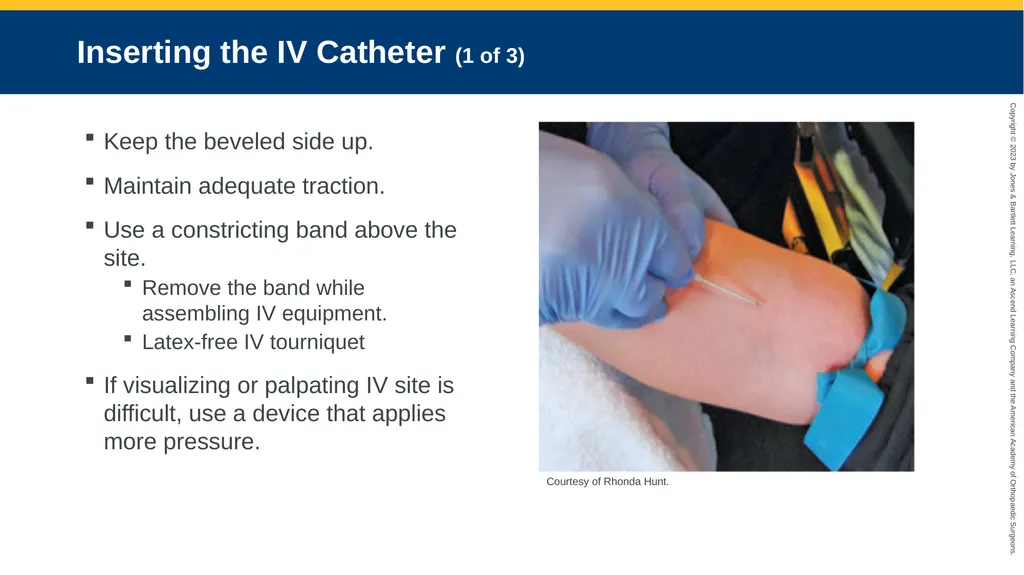
Inserting the IV Catheter (1 of 3) Keep the beveled side up.
Maintain adequate traction.
Use a constricting band above the site.
Remove the band while assembling IV equipment.
Latex-free IV tourniquet
If visualizing or palpating IV site is difficult, use a device that applies more pressure. Courtesy of Rhonda Hunt.<br>
Maintain adequate traction.
Use a constricting band above the site.
Remove the band while assembling IV equipment.
Latex-free IV tourniquet
If visualizing or palpating IV site is difficult, use a device that applies more pressure. Courtesy of Rhonda Hunt.<br>
49
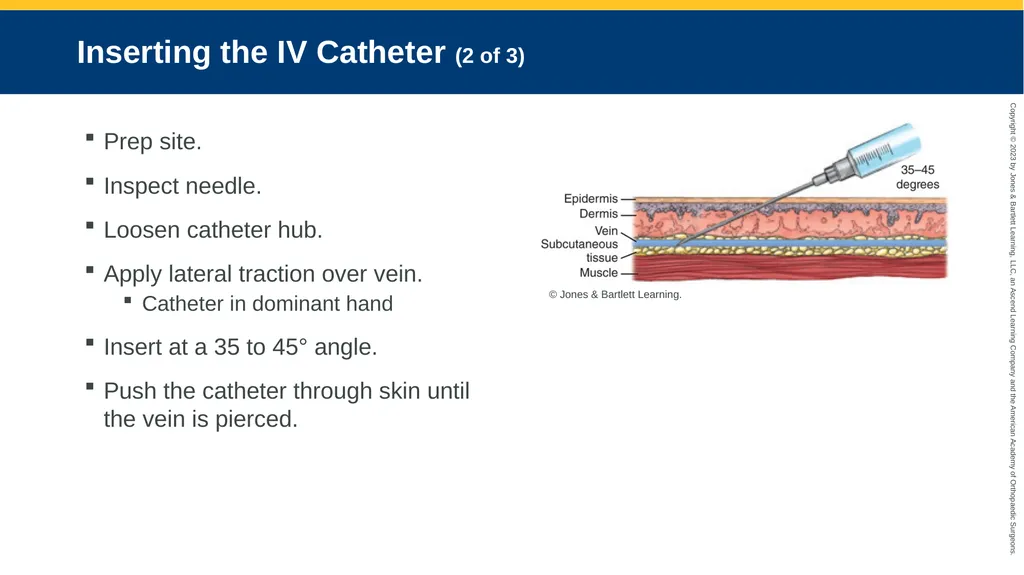
Inserting the IV Catheter (2 of 3) Prep site.
Inspect needle.
Loosen catheter hub.
Apply lateral traction over vein.
Catheter in dominant hand
Insert at a 35 to 45° angle.
Push the catheter through skin until the vein is pierced. © Jones & Bartlett Learning.<br>
Inspect needle.
Loosen catheter hub.
Apply lateral traction over vein.
Catheter in dominant hand
Insert at a 35 to 45° angle.
Push the catheter through skin until the vein is pierced. © Jones & Bartlett Learning.<br>
50
Inserting the IV Catheter (3 of 3) Drop angle to 15° and advance the catheter a few centimeters
Slide sheath off needle into vein
Hub touching skin
Apply pressure to the vein proximal to the end of the indwelling catheter
Remove needle
Activate shielding device
Dispose of needle<br>
Slide sheath off needle into vein
Hub touching skin
Apply pressure to the vein proximal to the end of the indwelling catheter
Remove needle
Activate shielding device
Dispose of needle<br>
51
Vein Identification Assistive Devices Helps to visualize a patient’s vasculature in the event of a challenging IV start
Portable vein transilluminators
Most economically feasible in prehospital setting<br>
Portable vein transilluminators
Most economically feasible in prehospital setting<br>
52
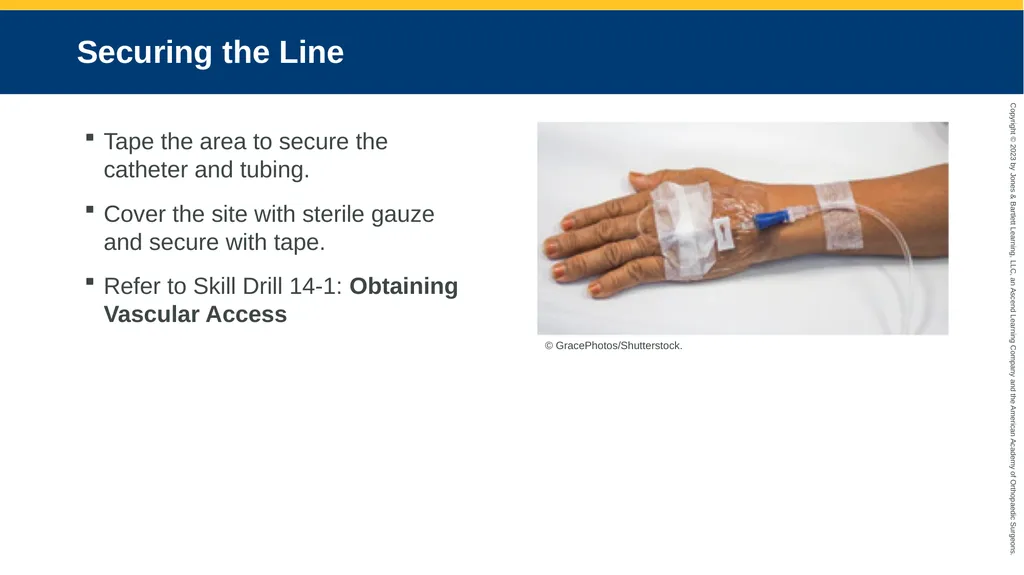
Securing the Line Tape the area to secure the catheter and tubing.
Cover the site with sterile gauze and secure with tape.
Refer to Skill Drill 14-1: Obtaining Vascular Access © GracePhotos/Shutterstock.<br>
Cover the site with sterile gauze and secure with tape.
Refer to Skill Drill 14-1: Obtaining Vascular Access © GracePhotos/Shutterstock.<br>
53
Changing an IV Bag Stop the flow by closing the roller clamp.
Prepare the new IV bag.
Remove the piercing spike and insert it into the port on the new bag.
Ensure the drip chamber is filled and open the roller clamp.<br>
Prepare the new IV bag.
Remove the piercing spike and insert it into the port on the new bag.
Ensure the drip chamber is filled and open the roller clamp.<br>
54
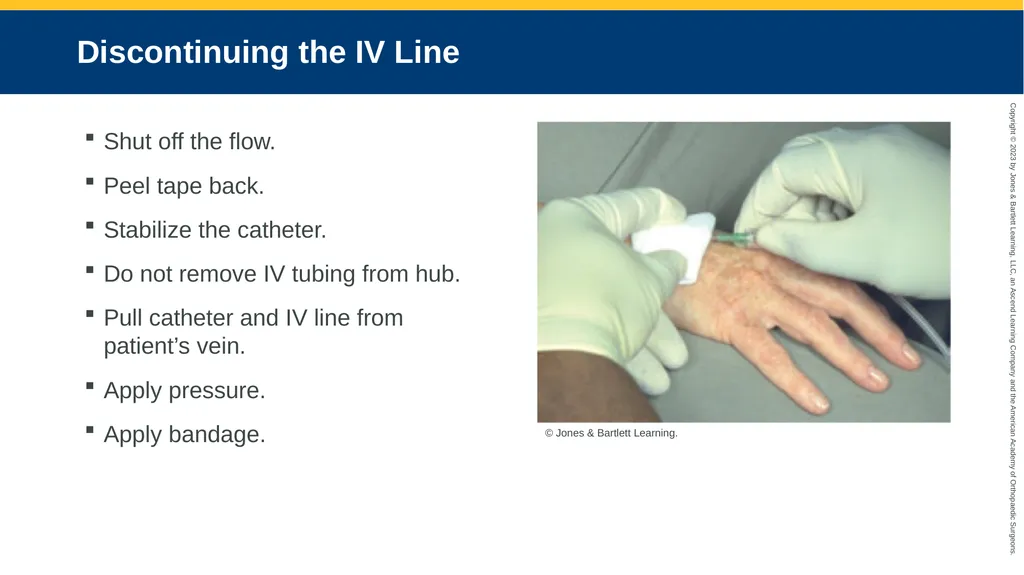
Discontinuing the IV Line Shut off the flow.
Peel tape back.
Stabilize the catheter.
Do not remove IV tubing from hub.
Pull catheter and IV line from patient’s vein.
Apply pressure.
Apply bandage. © Jones & Bartlett Learning.<br>
Peel tape back.
Stabilize the catheter.
Do not remove IV tubing from hub.
Pull catheter and IV line from patient’s vein.
Apply pressure.
Apply bandage. © Jones & Bartlett Learning.<br>
55
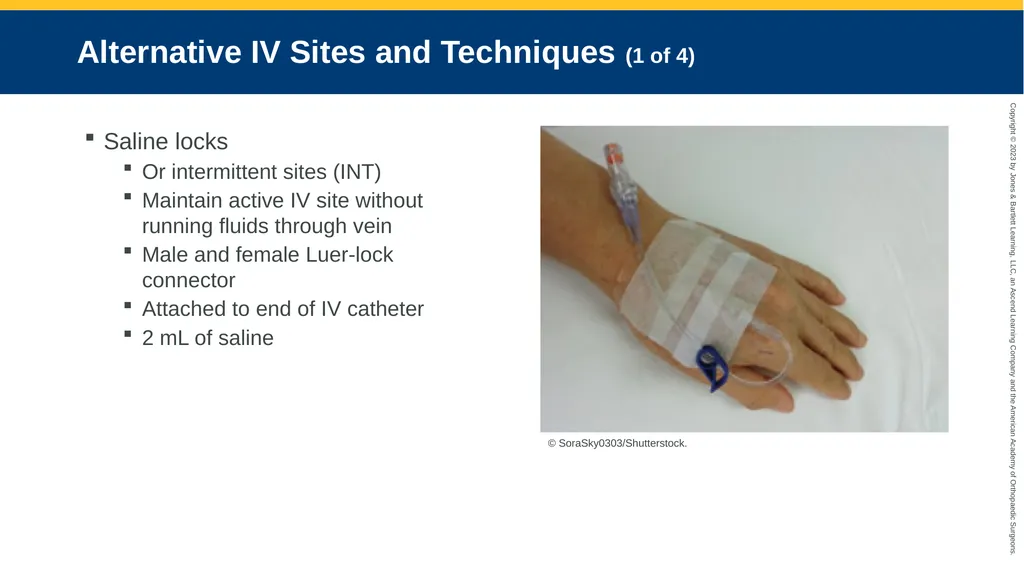
Alternative IV Sites and Techniques (1 of 4) Saline locks
Or intermittent sites (INT)
Maintain active IV site without running fluids through vein
Male and female Luer-lock connector
Attached to end of IV catheter
2 mL of saline © SoraSky0303/Shutterstock.<br>
Or intermittent sites (INT)
Maintain active IV site without running fluids through vein
Male and female Luer-lock connector
Attached to end of IV catheter
2 mL of saline © SoraSky0303/Shutterstock.<br>
56
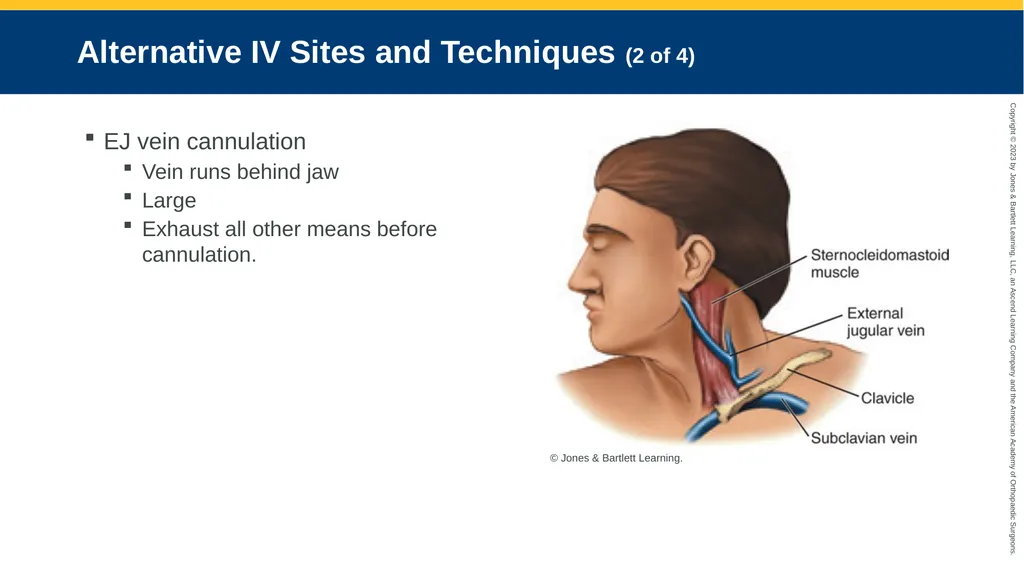
Alternative IV Sites and Techniques (2 of 4) EJ vein cannulation
Vein runs behind jaw
Large
Exhaust all other means before cannulation. © Jones & Bartlett Learning.<br>
Vein runs behind jaw
Large
Exhaust all other means before cannulation. © Jones & Bartlett Learning.<br>
57
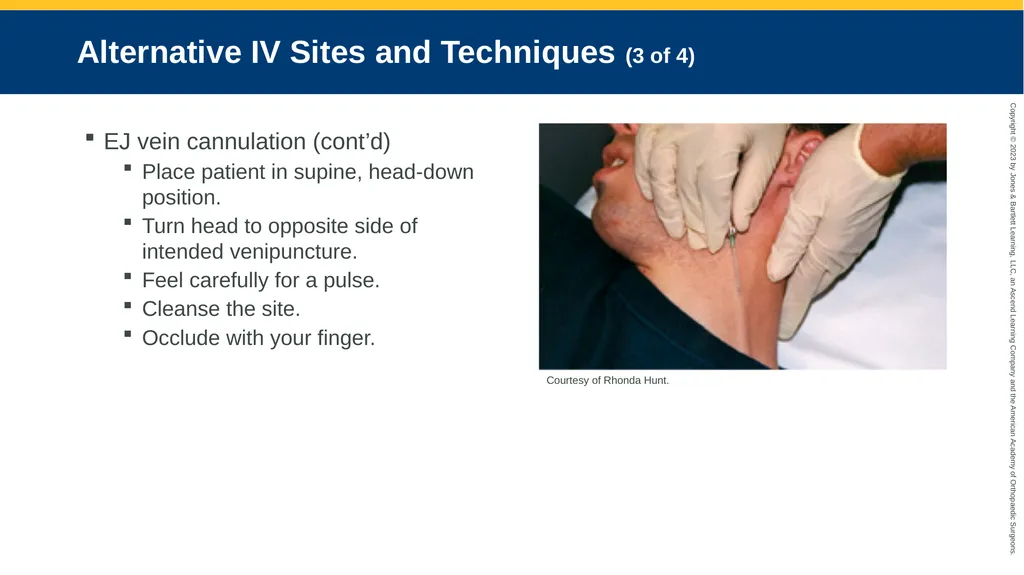
Alternative IV Sites and Techniques (3 of 4) EJ vein cannulation (cont’d)
Place patient in supine, head-down position.
Turn head to opposite side of intended venipuncture.
Feel carefully for a pulse.
Cleanse the site.
Occlude with your finger. Courtesy of Rhonda Hunt.<br>
Place patient in supine, head-down position.
Turn head to opposite side of intended venipuncture.
Feel carefully for a pulse.
Cleanse the site.
Occlude with your finger. Courtesy of Rhonda Hunt.<br>
58
Alternative IV Sites and Techniques (4 of 4) EJ vein cannulation (cont’d)
Align catheter in the direction of the vein.
Puncture midway between jaw and midclavicular line.
Stabilize vein.
Proceed cannulation as if for a peripheral vein.
Tape line securely.<br>
Align catheter in the direction of the vein.
Puncture midway between jaw and midclavicular line.
Stabilize vein.
Proceed cannulation as if for a peripheral vein.
Tape line securely.<br>
59
Pediatric IV Therapy Considerations (1 of 2) Catheters
Best gauges for over-the-needle catheters are:
20, 22, 24, 26
Butterfly catheters are ideal.<br>
Best gauges for over-the-needle catheters are:
20, 22, 24, 26
Butterfly catheters are ideal.<br>
60
Pediatric IV Therapy Considerations (2 of 2) IV locations
Explain your actions to child and parent.
Hand veins remain the location of choice.
Technique for starting pediatric IV line:
Use penlight to illuminate veins through back of hand.
Scalp vein cannulation can be difficult.<br>
Explain your actions to child and parent.
Hand veins remain the location of choice.
Technique for starting pediatric IV line:
Use penlight to illuminate veins through back of hand.
Scalp vein cannulation can be difficult.<br>
61
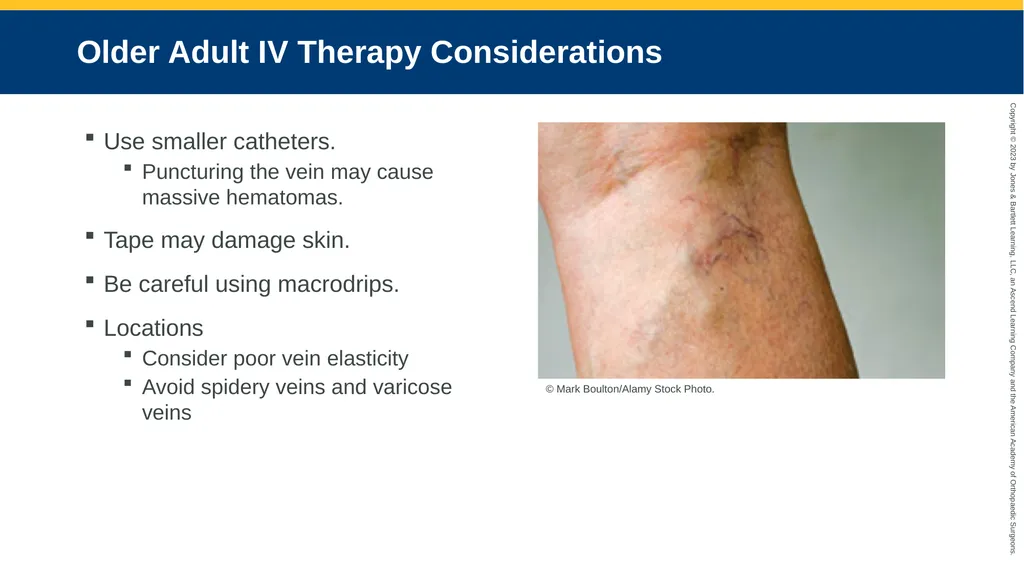
Older Adult IV Therapy Considerations Use smaller catheters.
Puncturing the vein may cause massive hematomas.
Tape may damage skin.
Be careful using macrodrips.
Locations
Consider poor vein elasticity
Avoid spidery veins and varicose veins © Mark Boulton/Alamy Stock Photo.<br>
Puncturing the vein may cause massive hematomas.
Tape may damage skin.
Be careful using macrodrips.
Locations
Consider poor vein elasticity
Avoid spidery veins and varicose veins © Mark Boulton/Alamy Stock Photo.<br>
62
Factors Affecting IV Flow Rates Checks to perform after IV administration:
Fluid
Administration set
Height of bag
Catheter type
Constricting band
No clamping of line
Positioning of line<br>
Fluid
Administration set
Height of bag
Catheter type
Constricting band
No clamping of line
Positioning of line<br>
63
Potential Complications of IV Therapy<br>
64
Local Complications (1 of 15) Infiltration
Localized area of edema
Causes:
Dislodgement of catheter
Puncture of distal vein wall
Solution leakages
Poorly secured line
Poor vein/site selection
Irritating solution/medication
Improver cannula size
High delivery rate/pressure<br>
Localized area of edema
Causes:
Dislodgement of catheter
Puncture of distal vein wall
Solution leakages
Poorly secured line
Poor vein/site selection
Irritating solution/medication
Improver cannula size
High delivery rate/pressure<br>
65
Local Complications (2 of 15) Infiltration (cont’d)
If it occurs:
Discontinue IV line.
Reestablish line in another site with new equipment.
Document and report condition.<br>
If it occurs:
Discontinue IV line.
Reestablish line in another site with new equipment.
Document and report condition.<br>
66
Local Complications (3 of 15) Catheter occlusion
Physical blockage of vein or catheter
First sign is a decreasing drip rate or blood in IV tubing.
Causes:
Position of catheter within the vein
Blood pressure overcoming the flow<br>
Physical blockage of vein or catheter
First sign is a decreasing drip rate or blood in IV tubing.
Causes:
Position of catheter within the vein
Blood pressure overcoming the flow<br>
67
Local Complications (4 of 15) Catheter occlusion (cont’d)
Do not flush a catheter.
If suspected:
Remove the catheter.
Assess catheter integrity.
Apply dry, sterile dressing to the site.<br>
Do not flush a catheter.
If suspected:
Remove the catheter.
Assess catheter integrity.
Apply dry, sterile dressing to the site.<br>
68
Local Complications (5 of 15) Vein spasm
Patients report the solution is bothering them.
Signs and symptoms:
Sluggish/stopped infusion rate
Severe pain radiating up extremity
Blanching or redness over and around the site<br>
Patients report the solution is bothering them.
Signs and symptoms:
Sluggish/stopped infusion rate
Severe pain radiating up extremity
Blanching or redness over and around the site<br>
69
Local Complications (6 of 15) Vein spasm (cont’d)
If it occurs:
Slow the infusion rate until the spasm subsides.
Remove the catheter if the spasm persists.<br>
If it occurs:
Slow the infusion rate until the spasm subsides.
Remove the catheter if the spasm persists.<br>
70
Local Complications (7 of 15) Phlebitis
Chemical
Mechanical
Bacterial<br>
Chemical
Mechanical
Bacterial<br>
71
Local Complications (8 of 15) Phlebitis (cont’d)
If it develops:
Discontinue IV line.
Save equipment for analysis.
Reestablish line in another site with new equipment.<br>
If it develops:
Discontinue IV line.
Save equipment for analysis.
Reestablish line in another site with new equipment.<br>
72
Local Complications (9 of 15) Thrombophlebitis
May occur in:
Association with venous cannulation
Patients who misuse drugs
Patients who receive long-term IV therapy
Conjunction with vein-irritating solutions<br>
May occur in:
Association with venous cannulation
Patients who misuse drugs
Patients who receive long-term IV therapy
Conjunction with vein-irritating solutions<br>
73
Local Complications (10 of 15) Thrombophlebitis (cont’d)
If suspected:
Stop the infusion.
Discontinue the IV line.
Warm compress<br>
If suspected:
Stop the infusion.
Discontinue the IV line.
Warm compress<br>
74
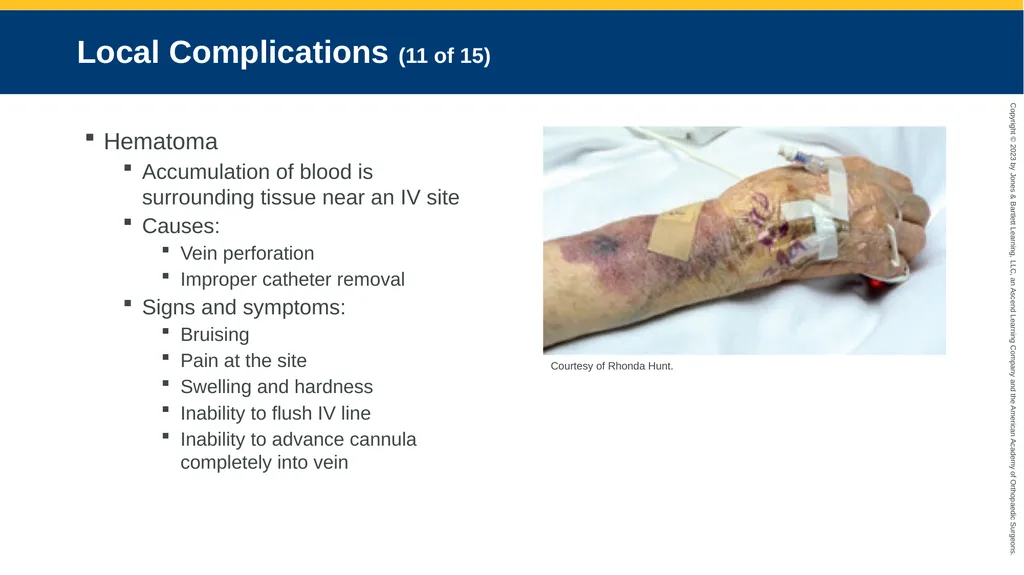
Local Complications (11 of 15) Hematoma
Accumulation of blood is surrounding tissue near an IV site
Causes:
Vein perforation
Improper catheter removal
Signs and symptoms:
Bruising
Pain at the site
Swelling and hardness
Inability to flush IV line
Inability to advance cannula completely into vein Courtesy of Rhonda Hunt.<br>
Accumulation of blood is surrounding tissue near an IV site
Causes:
Vein perforation
Improper catheter removal
Signs and symptoms:
Bruising
Pain at the site
Swelling and hardness
Inability to flush IV line
Inability to advance cannula completely into vein Courtesy of Rhonda Hunt.<br>
75
Local Complications (12 of 15) Hematoma (cont’d)
Common in patients:
With a history of vascular diseases
Taking certain medications
Drinking alcohol
If it occurs:
While inserting a catheter
Stop and apply direct pressure
After insertion
Evaluate the IV flow
Monitor leave the line in place
After discontinuing
Apply pressure<br>
Common in patients:
With a history of vascular diseases
Taking certain medications
Drinking alcohol
If it occurs:
While inserting a catheter
Stop and apply direct pressure
After insertion
Evaluate the IV flow
Monitor leave the line in place
After discontinuing
Apply pressure<br>
76
Local Complications (13 of 15) Nerve, tendon, or ligament damage
Causes:
Improper venipuncture technique
Improper identification of anatomic structures around IV site
Improper securing/stabilization of cannula and line after insertion
Extravasation of the solution<br>
Causes:
Improper venipuncture technique
Improper identification of anatomic structures around IV site
Improper securing/stabilization of cannula and line after insertion
Extravasation of the solution<br>
77
Local Complications (14 of 15) Nerve, tendon, or ligament damage (cont’d)
Injuring results in sudden and severe shooting pain
Increased risk near joints
If it occurs:
Remove the catheter.
Select another IV site.<br>
Injuring results in sudden and severe shooting pain
Increased risk near joints
If it occurs:
Remove the catheter.
Select another IV site.<br>
78
Local Complications (15 of 15) Arterial puncture
High risk near an EJ vein
Bright red blood spurts back through the catheter.
If it occurs:
Withdraw the catheter.
Apply direct pressure for at least 5 minutes or until bleeding stops.<br>
High risk near an EJ vein
Bright red blood spurts back through the catheter.
If it occurs:
Withdraw the catheter.
Apply direct pressure for at least 5 minutes or until bleeding stops.<br>
79
Systemic Complications (1 of 8) Allergic reactions
Response to IV solution, preservatives, or medication
Wide range of signs and symptoms
If it occurs:
Stop the infusion.
Discontinue the IV.
Select a new IV site.<br>
Response to IV solution, preservatives, or medication
Wide range of signs and symptoms
If it occurs:
Stop the infusion.
Discontinue the IV.
Select a new IV site.<br>
80
Systemic Complications (2 of 8) Pyrogenic reactions
Foreign proteins capable of producing fever
Reaction begins within 30 seconds
If it occurs:
Stop the infusion.
Start a new IV line in the other arm with fresh solution.
Remove the first IV.
Always inspect IV bags before use.<br>
Foreign proteins capable of producing fever
Reaction begins within 30 seconds
If it occurs:
Stop the infusion.
Start a new IV line in the other arm with fresh solution.
Remove the first IV.
Always inspect IV bags before use.<br>
81
Systemic Complications (3 of 8) Circulatory overload
Excessive fluid administration can lead to pulmonary edema.
Commonly caused by failure to readjust drip rate after flushing an IV line after insertion.<br>
Excessive fluid administration can lead to pulmonary edema.
Commonly caused by failure to readjust drip rate after flushing an IV line after insertion.<br>
82
Systemic Complications (4 of 8) Circulatory overload (cont’d)
If it occurs:
Slow the IV rate to keep the vein open.
Place patient in a semi-Fowler position.
Administer high-flow oxygen.
Monitor vital signs and breathing adequacy.
Consider CPAP use.<br>
If it occurs:
Slow the IV rate to keep the vein open.
Place patient in a semi-Fowler position.
Administer high-flow oxygen.
Monitor vital signs and breathing adequacy.
Consider CPAP use.<br>
83
Systemic Complications (5 of 8) Speed shock
Rapid introduction of medication or solution into the circulation
If it occurs:
Halt infusion or medication.
Ensure IV line is patent and monitor.<br>
Rapid introduction of medication or solution into the circulation
If it occurs:
Halt infusion or medication.
Ensure IV line is patent and monitor.<br>
84
Systemic Complications (6 of 8) Air embolus
Air enters the bloodstream
Properly flush IV lines
Replace empty IV bags
If it occurs:
Place patient on the left side with head down.
Administer 100% oxygen.
Transport to closest facility.
Assist ventilations if needed.<br>
Air enters the bloodstream
Properly flush IV lines
Replace empty IV bags
If it occurs:
Place patient on the left side with head down.
Administer 100% oxygen.
Transport to closest facility.
Assist ventilations if needed.<br>
85
Systemic Complications (7 of 8) Vasovagal reactions
Anxiety concerning needles or sight of blood
Drop in blood pressure and collapse
If it occurs:
Place patient in supine position.
Apply high-flow oxygen.
Monitor vital signs.
Establish an IV line.<br>
Anxiety concerning needles or sight of blood
Drop in blood pressure and collapse
If it occurs:
Place patient in supine position.
Apply high-flow oxygen.
Monitor vital signs.
Establish an IV line.<br>
86
Systemic Complications (8 of 8) Catheter shear
Needle slices through pinched catheter
Free-floating fragment
If suspected:
Put patient in left lateral recumbent position.
Obtain an IV site in the other extremity.
Transport.<br>
Needle slices through pinched catheter
Free-floating fragment
If suspected:
Put patient in left lateral recumbent position.
Obtain an IV site in the other extremity.
Transport.<br>
87
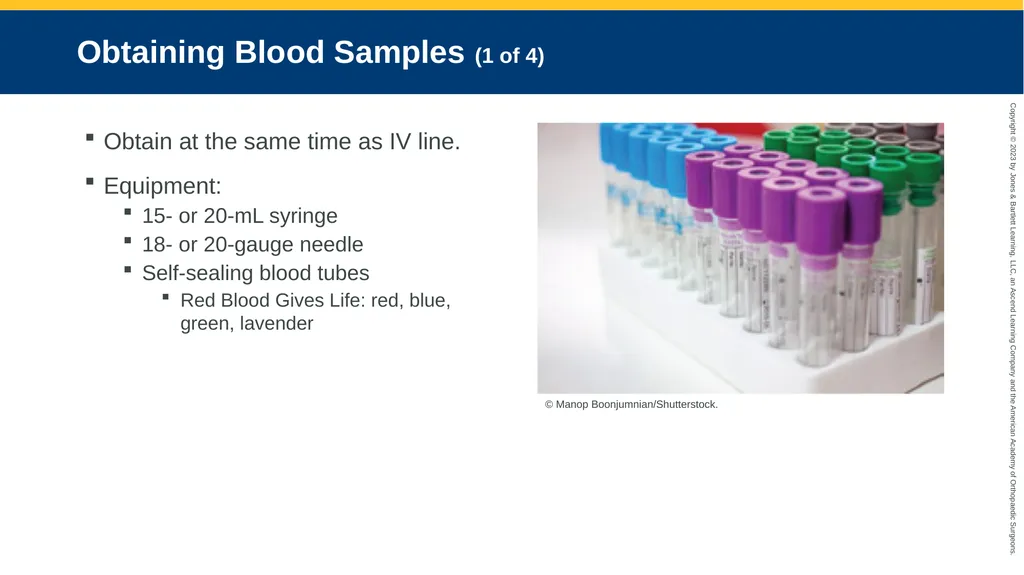
Obtaining Blood Samples (1 of 4) Obtain at the same time as IV line.
Equipment:
15- or 20-mL syringe
18- or 20-gauge needle
Self-sealing blood tubes
Red Blood Gives Life: red, blue, green, lavender © Manop Boonjumnian/Shutterstock.<br>
Equipment:
15- or 20-mL syringe
18- or 20-gauge needle
Self-sealing blood tubes
Red Blood Gives Life: red, blue, green, lavender © Manop Boonjumnian/Shutterstock.<br>
88
Obtaining Blood Samples (2 of 4) After catheter is in place, occlude and remove constricting band.
Attach a 15- or 20-mL syringe to the hub of the IV and draw necessary blood.
Remove constricting band while drawing blood.
Remove syringe after blood has been obtained.
Attach IV tubing and begin infusion.<br>
Attach a 15- or 20-mL syringe to the hub of the IV and draw necessary blood.
Remove constricting band while drawing blood.
Remove syringe after blood has been obtained.
Attach IV tubing and begin infusion.<br>
89
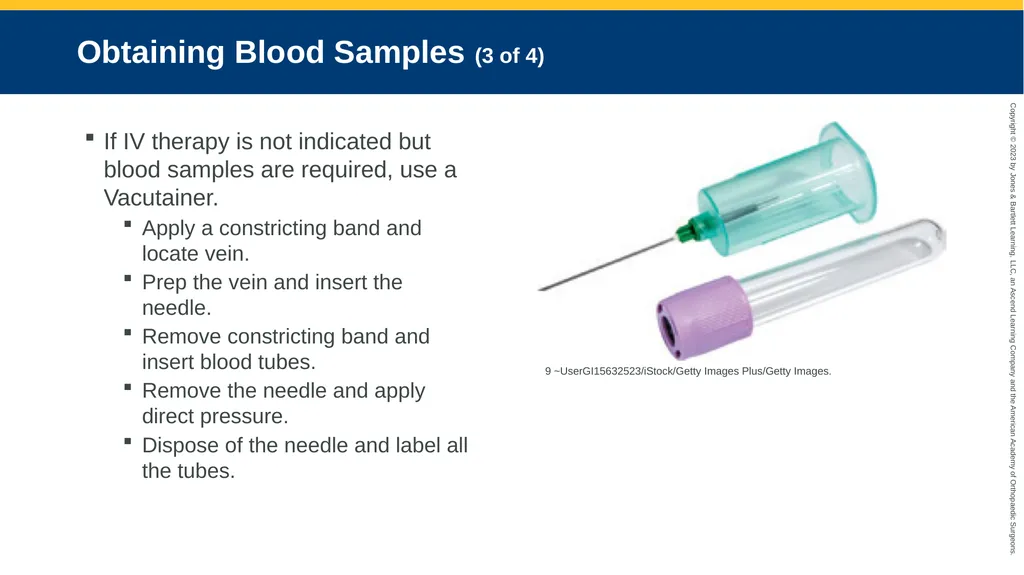
Obtaining Blood Samples (3 of 4) If IV therapy is not indicated but blood samples are required, use a Vacutainer.
Apply a constricting band and locate vein.
Prep the vein and insert the needle.
Remove constricting band and insert blood tubes.
Remove the needle and apply direct pressure.
Dispose of the needle and label all the tubes. 9 ~UserGI15632523/iStock/Getty Images Plus/Getty Images.<br>
Apply a constricting band and locate vein.
Prep the vein and insert the needle.
Remove constricting band and insert blood tubes.
Remove the needle and apply direct pressure.
Dispose of the needle and label all the tubes. 9 ~UserGI15632523/iStock/Getty Images Plus/Getty Images.<br>
90
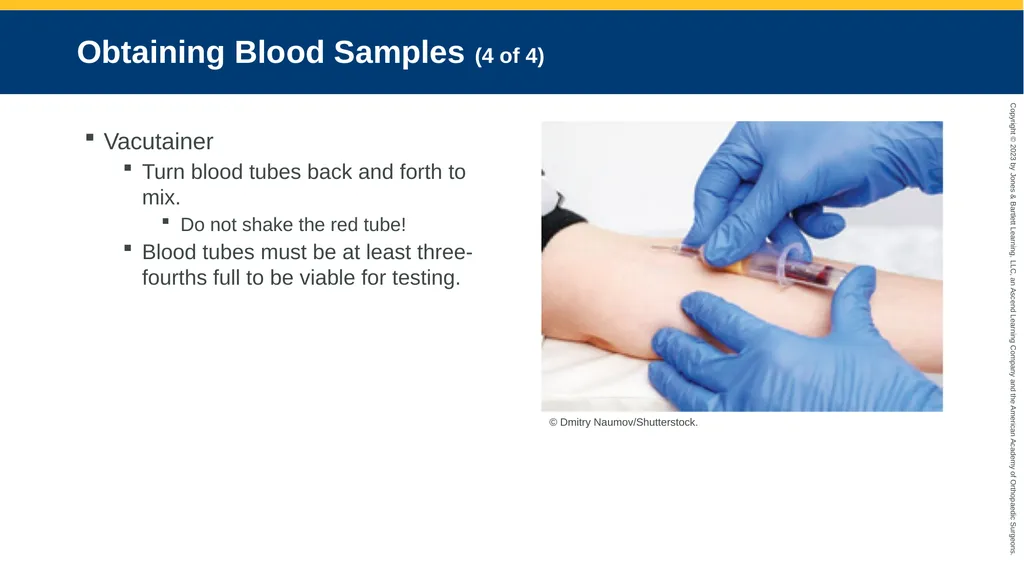
Obtaining Blood Samples (4 of 4) Vacutainer
Turn blood tubes back and forth to mix.
Do not shake the red tube!
Blood tubes must be at least three-fourths full to be viable for testing. © Dmitry Naumov/Shutterstock.<br>
Turn blood tubes back and forth to mix.
Do not shake the red tube!
Blood tubes must be at least three-fourths full to be viable for testing. © Dmitry Naumov/Shutterstock.<br>
91
Blood Transfusions (1 of 3) Type and cross-match
Bracelet identifies blood type
Verification:
Name
Medical record number
Transfused product
Product unit number
ABO and Rh type of the product
Expiration date<br>
Bracelet identifies blood type
Verification:
Name
Medical record number
Transfused product
Product unit number
ABO and Rh type of the product
Expiration date<br>
92
Blood Transfusions (2 of 3) Type O blood available for transfusion
Accepted blood must be used within 4 hours or returned
For transports:
Verify ABO type and Rh factor before leaving.
Ensure at least one available vascular site with no blood running<br>
Accepted blood must be used within 4 hours or returned
For transports:
Verify ABO type and Rh factor before leaving.
Ensure at least one available vascular site with no blood running<br>
93
Blood Transfusions (3 of 3) If transfusion reaction occurs, discontinue IV lines.
Blood is administered through specific tubing.
Assess vital signs every 5 minutes.
Monitor for reactions.<br>
Blood is administered through specific tubing.
Assess vital signs every 5 minutes.
Monitor for reactions.<br>
94
Intraosseous Infusion<br>
95
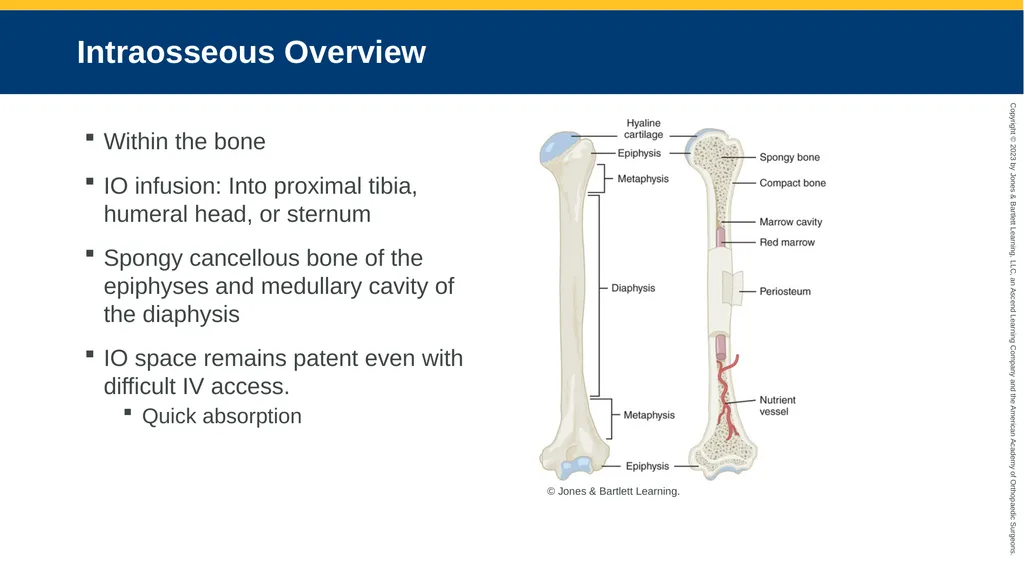
Intraosseous Overview Within the bone
IO infusion: Into proximal tibia, humeral head, or sternum
Spongy cancellous bone of the epiphyses and medullary cavity of the diaphysis
IO space remains patent even with difficult IV access.
Quick absorption © Jones & Bartlett Learning.<br>
IO infusion: Into proximal tibia, humeral head, or sternum
Spongy cancellous bone of the epiphyses and medullary cavity of the diaphysis
IO space remains patent even with difficult IV access.
Quick absorption © Jones & Bartlett Learning.<br>
96
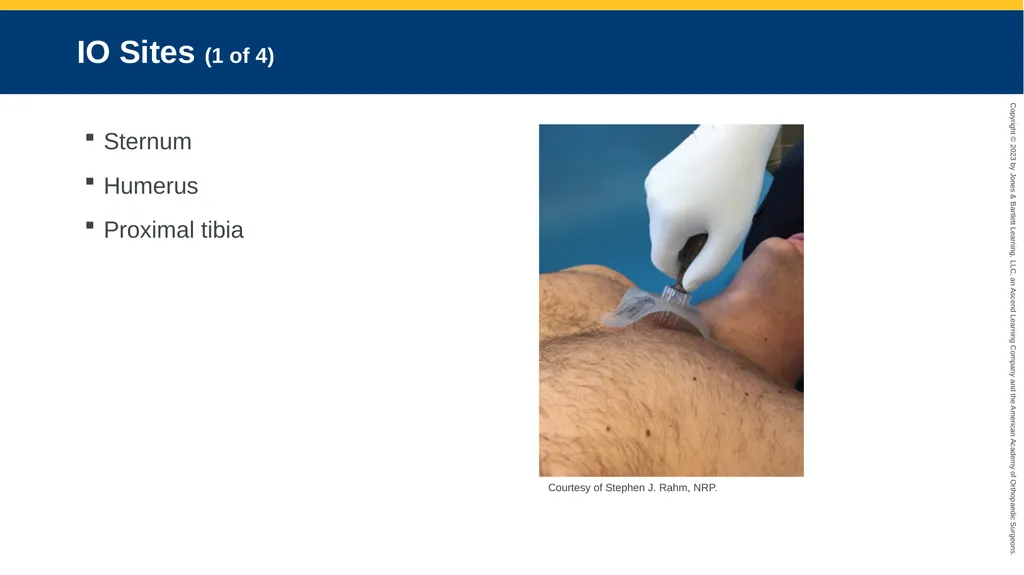
IO Sites (1 of 4) Sternum
Humerus
Proximal tibia Courtesy of Stephen J. Rahm, NRP.<br>
Humerus
Proximal tibia Courtesy of Stephen J. Rahm, NRP.<br>
97
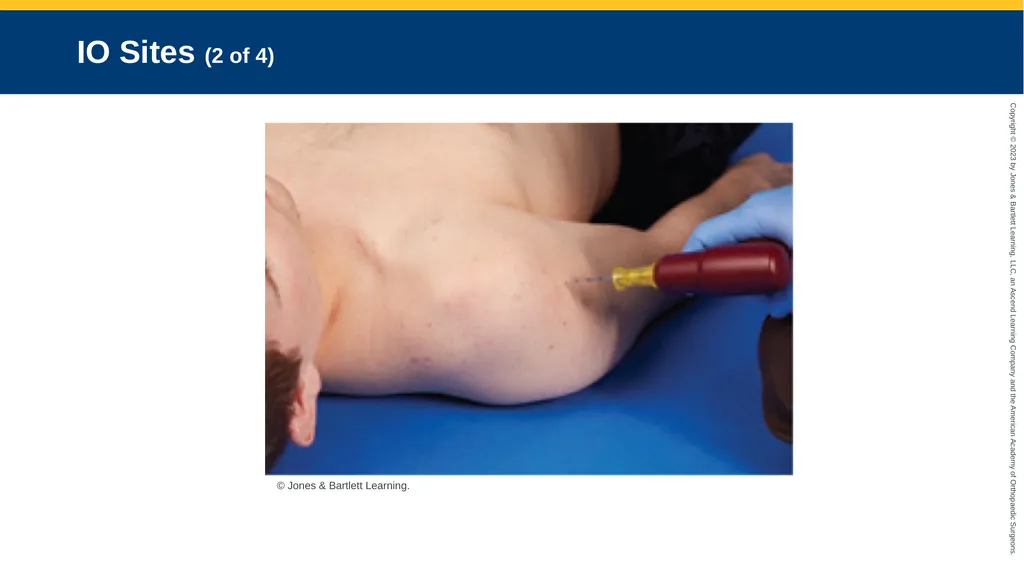
IO Sites (2 of 4) © Jones & Bartlett Learning.<br>
98
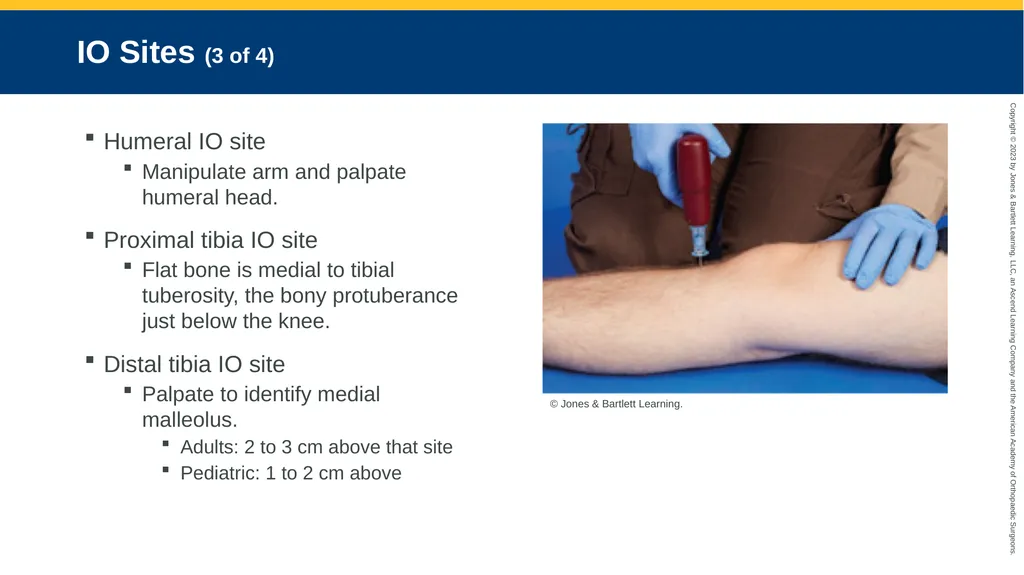
IO Sites (3 of 4) Humeral IO site
Manipulate arm and palpate humeral head.
Proximal tibia IO site
Flat bone is medial to tibial tuberosity, the bony protuberance just below the knee.
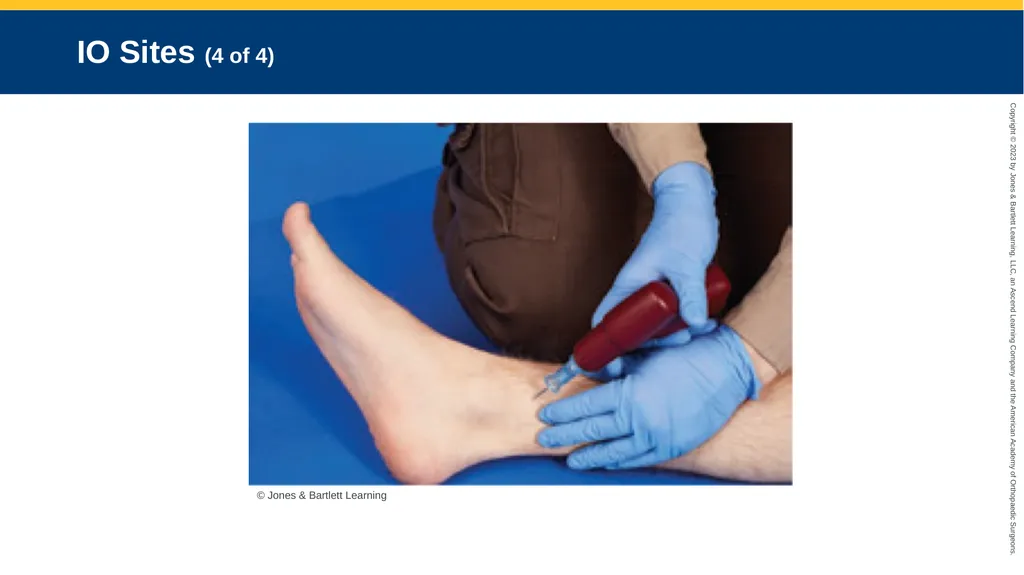
Distal tibia IO site
Palpate to identify medial malleolus.
Adults: 2 to 3 cm above that site
Pediatric: 1 to 2 cm above © Jones & Bartlett Learning.<br>
Manipulate arm and palpate humeral head.
Proximal tibia IO site
Flat bone is medial to tibial tuberosity, the bony protuberance just below the knee.
Distal tibia IO site
Palpate to identify medial malleolus.
Adults: 2 to 3 cm above that site
Pediatric: 1 to 2 cm above © Jones & Bartlett Learning.<br>
99
IO Sites (4 of 4) © Jones & Bartlett Learning<br>
100
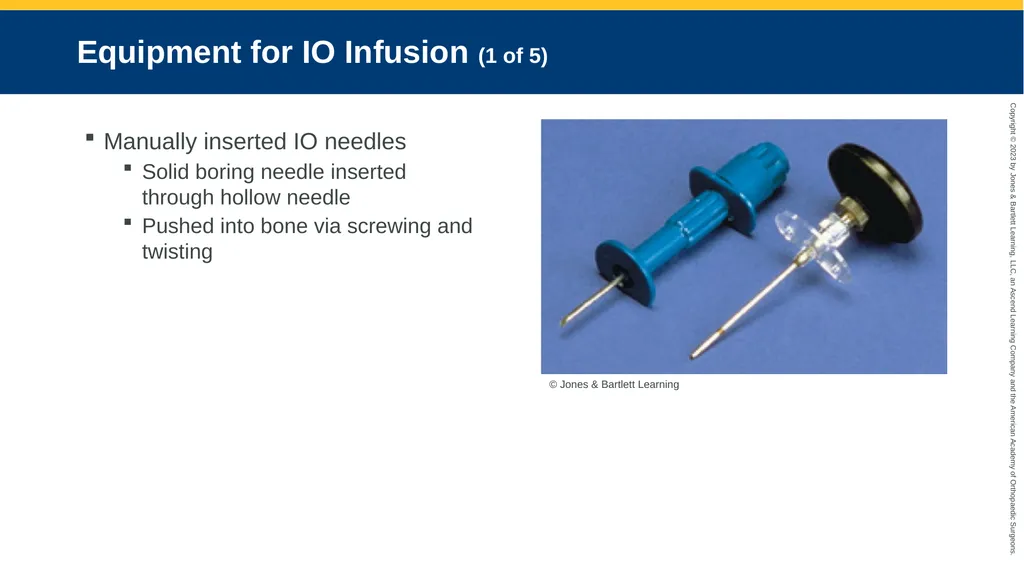
Equipment for IO Infusion (1 of 5) Manually inserted IO needles
Solid boring needle inserted through hollow needle
Pushed into bone via screwing and twisting © Jones & Bartlett Learning<br>
Solid boring needle inserted through hollow needle
Pushed into bone via screwing and twisting © Jones & Bartlett Learning<br>
101
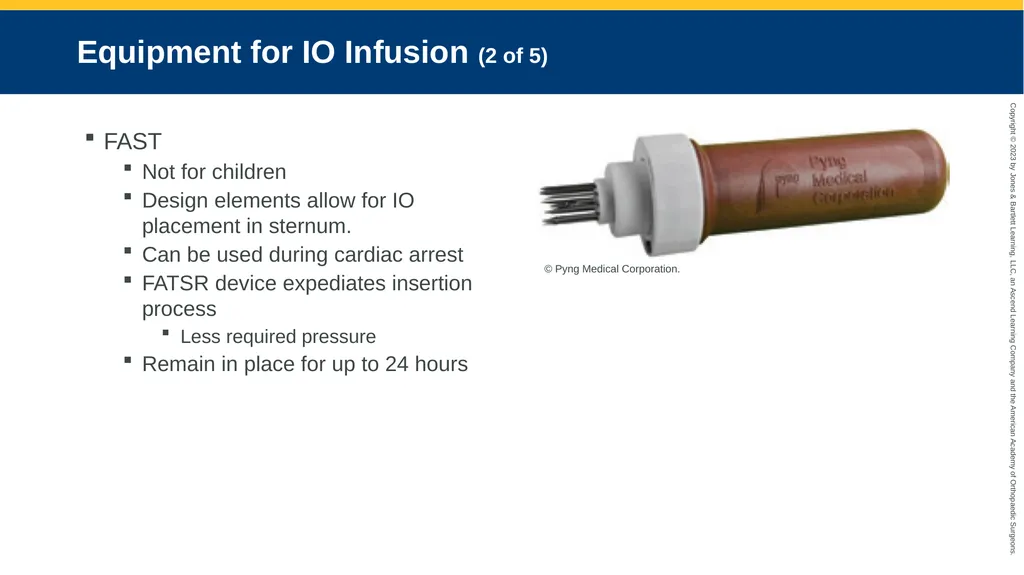
Equipment for IO Infusion (2 of 5) FAST
Not for children
Design elements allow for IO placement in sternum.
Can be used during cardiac arrest
FATSR device expediates insertion process
Less required pressure
Remain in place for up to 24 hours © Pyng Medical Corporation.<br>
Not for children
Design elements allow for IO placement in sternum.
Can be used during cardiac arrest
FATSR device expediates insertion process
Less required pressure
Remain in place for up to 24 hours © Pyng Medical Corporation.<br>
102
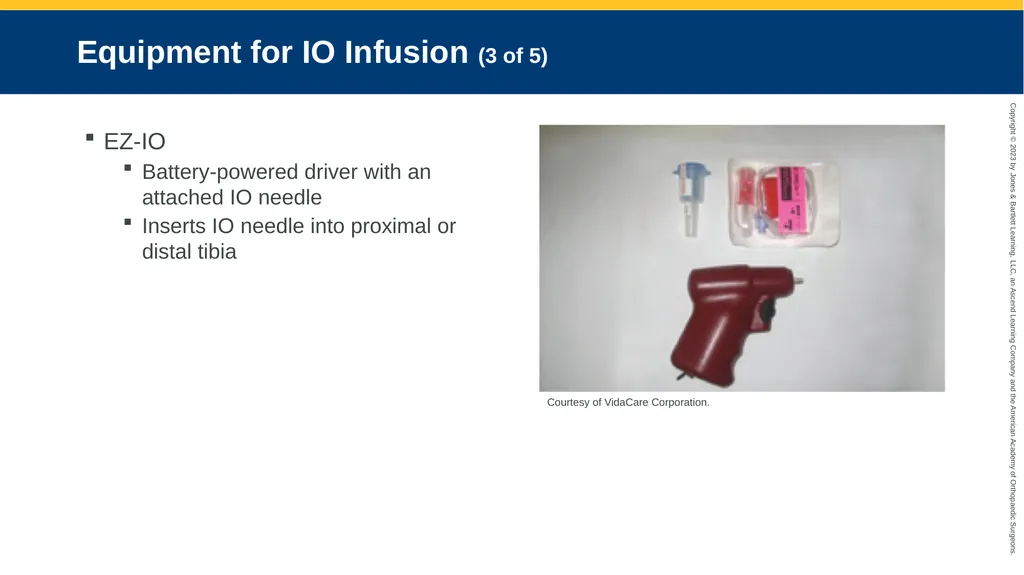
Equipment for IO Infusion (3 of 5) EZ-IO
Battery-powered driver with an attached IO needle
Inserts IO needle into proximal or distal tibia Courtesy of VidaCare Corporation.<br>
Battery-powered driver with an attached IO needle
Inserts IO needle into proximal or distal tibia Courtesy of VidaCare Corporation.<br>
103
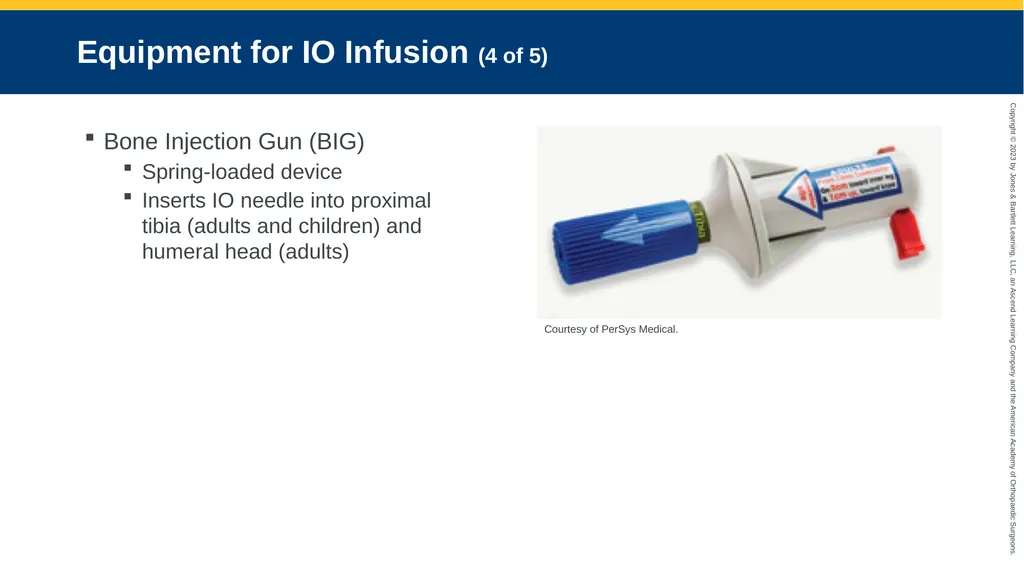
Equipment for IO Infusion (4 of 5) Bone Injection Gun (BIG)
Spring-loaded device
Inserts IO needle into proximal tibia (adults and children) and humeral head (adults) Courtesy of PerSys Medical.<br>
Spring-loaded device
Inserts IO needle into proximal tibia (adults and children) and humeral head (adults) Courtesy of PerSys Medical.<br>
104
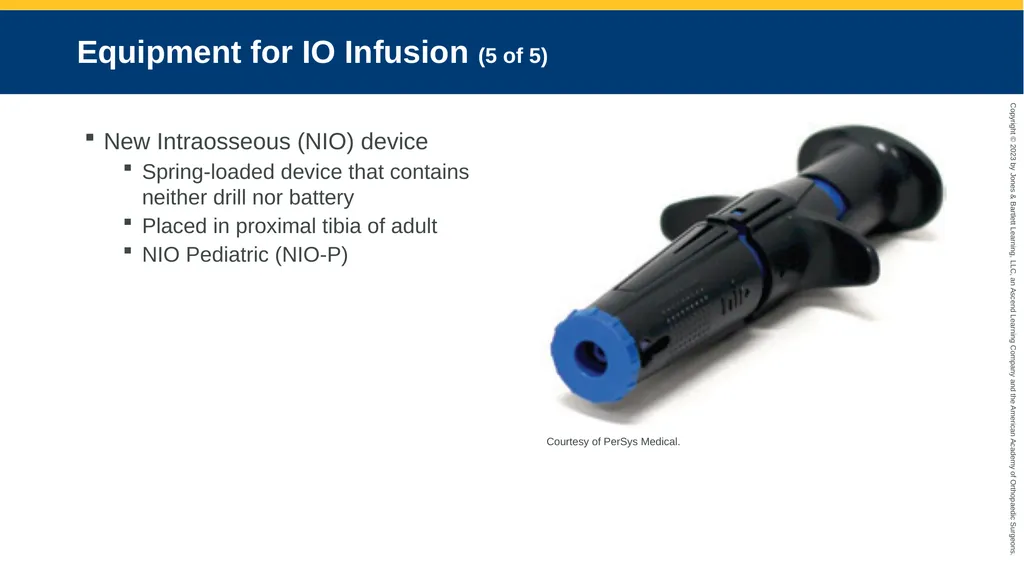
Equipment for IO Infusion (5 of 5) New Intraosseous (NIO) device
Spring-loaded device that contains neither drill nor battery
Placed in proximal tibia of adult
NIO Pediatric (NIO-P) Courtesy of PerSys Medical.<br>
Spring-loaded device that contains neither drill nor battery
Placed in proximal tibia of adult
NIO Pediatric (NIO-P) Courtesy of PerSys Medical.<br>
105
Performing IO Infusion Refer to Skill Drill 14-2: Gaining IO Access With an EZ-IO Device<br>
106
Potential Complications of IO Infusion (1 of 2) Infiltration
Osteomyelitis
Failure to identify the proper anatomic landmark can damage the growth plate.<br>
Osteomyelitis
Failure to identify the proper anatomic landmark can damage the growth plate.<br>
107
Potential Complications of IO Infusion (2 of 2) Improper technique can cause fracture.
Through-and-through insertion
Pulmonary embolism (PE)<br>
Through-and-through insertion
Pulmonary embolism (PE)<br>
108
Contraindications to IO Infusion Functional IV line is available.
Fracture of the bone intended for IO cannulation
Osteoporosis
Osteogenesis imperfecta
Bilateral knee replacements
Prosthetic limb<br>
Fracture of the bone intended for IO cannulation
Osteoporosis
Osteogenesis imperfecta
Bilateral knee replacements
Prosthetic limb<br>
109
Medication Administration<br>
110
Medication Administration Understand how medications affect the human body before administering them.
Become familiar with:
Mechanism of action
Indications
Contraindications
Adverse effects
Routes of administration
Pediatric and adult doses
Antidotes<br>
Become familiar with:
Mechanism of action
Indications
Contraindications
Adverse effects
Routes of administration
Pediatric and adult doses
Antidotes<br>
111
Mathematical Principles Used in Pharmacology (1 of 7) Mathematics review
Fractions represent a portion of a whole number.
Decimals distinguish numbers that are greater and smaller than zero.
Dividing or multiplying by 10:
When dividing, move decimal point to the left.
When multiplying, move decimal point to the right.
Percentages are part of 100 and use the % symbol.<br>
Fractions represent a portion of a whole number.
Decimals distinguish numbers that are greater and smaller than zero.
Dividing or multiplying by 10:
When dividing, move decimal point to the left.
When multiplying, move decimal point to the right.
Percentages are part of 100 and use the % symbol.<br>
112
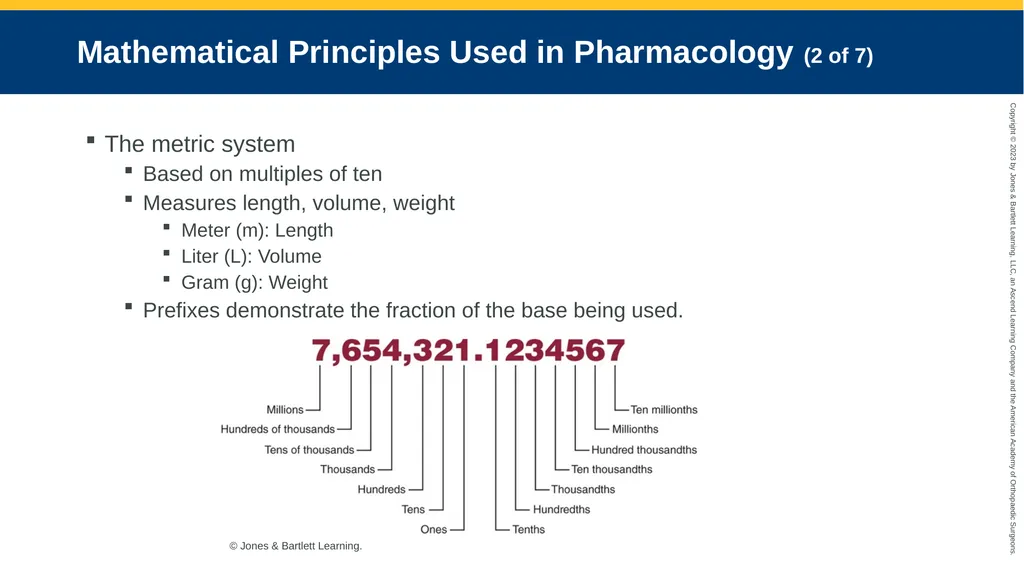
Mathematical Principles Used in Pharmacology (2 of 7) The metric system
Based on multiples of ten
Measures length, volume, weight
Meter (m): Length
Liter (L): Volume
Gram (g): Weight
Prefixes demonstrate the fraction of the base being used. © Jones & Bartlett Learning.<br>
Based on multiples of ten
Measures length, volume, weight
Meter (m): Length
Liter (L): Volume
Gram (g): Weight
Prefixes demonstrate the fraction of the base being used. © Jones & Bartlett Learning.<br>
113
Mathematical Principles Used in Pharmacology (3 of 7) Drugs are supplied and packaged in a variety of weights and volumes.
Weight and volume conversion<br>
Weight and volume conversion<br>
114
Mathematical Principles Used in Pharmacology (4 of 7) Volume conversion
Prehospital setting uses two measurements of volume: Milliliters and liters.
mL to L: Divide smaller volume by 1,000
L to mL: Multiply L by 1,000<br>
Prehospital setting uses two measurements of volume: Milliliters and liters.
mL to L: Divide smaller volume by 1,000
L to mL: Multiply L by 1,000<br>
115
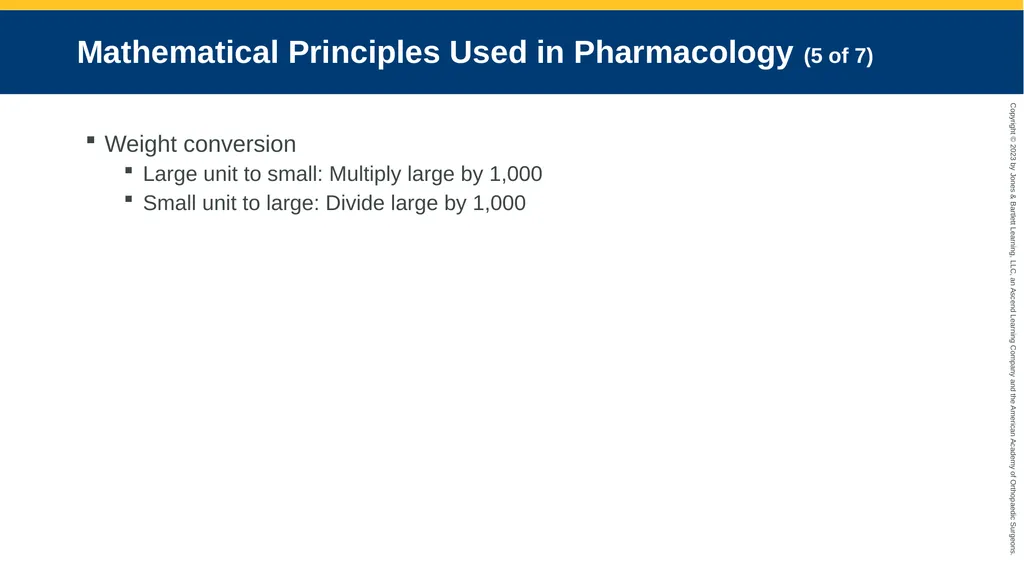
Mathematical Principles Used in Pharmacology (5 of 7) Weight conversion
Large unit to small: Multiply large by 1,000
Small unit to large: Divide large by 1,000<br>
Large unit to small: Multiply large by 1,000
Small unit to large: Divide large by 1,000<br>
116
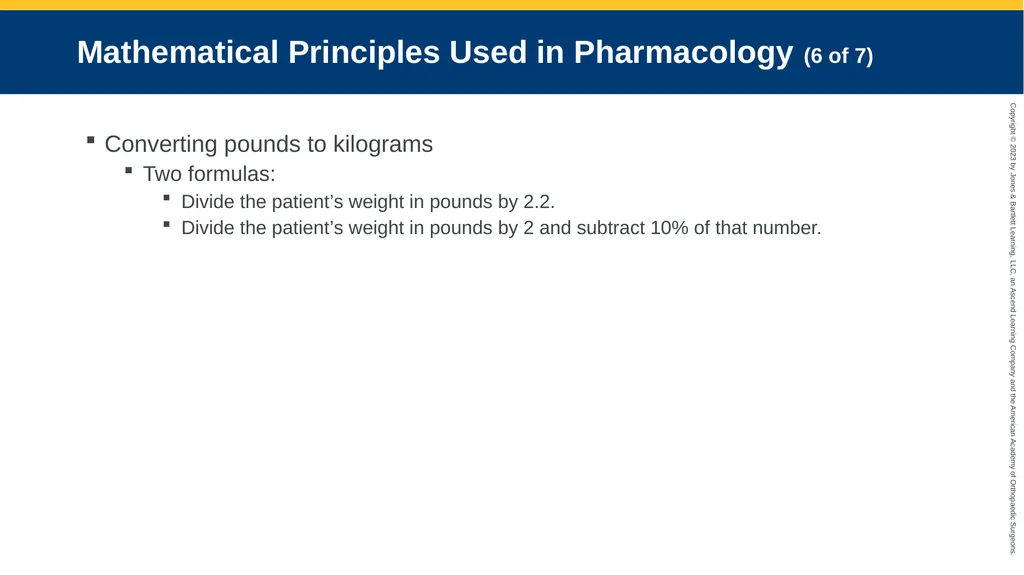
Mathematical Principles Used in Pharmacology (6 of 7) Converting pounds to kilograms
Two formulas:
Divide the patient’s weight in pounds by 2.2.
Divide the patient’s weight in pounds by 2 and subtract 10% of that number.<br>
Two formulas:
Divide the patient’s weight in pounds by 2.2.
Divide the patient’s weight in pounds by 2 and subtract 10% of that number.<br>
117
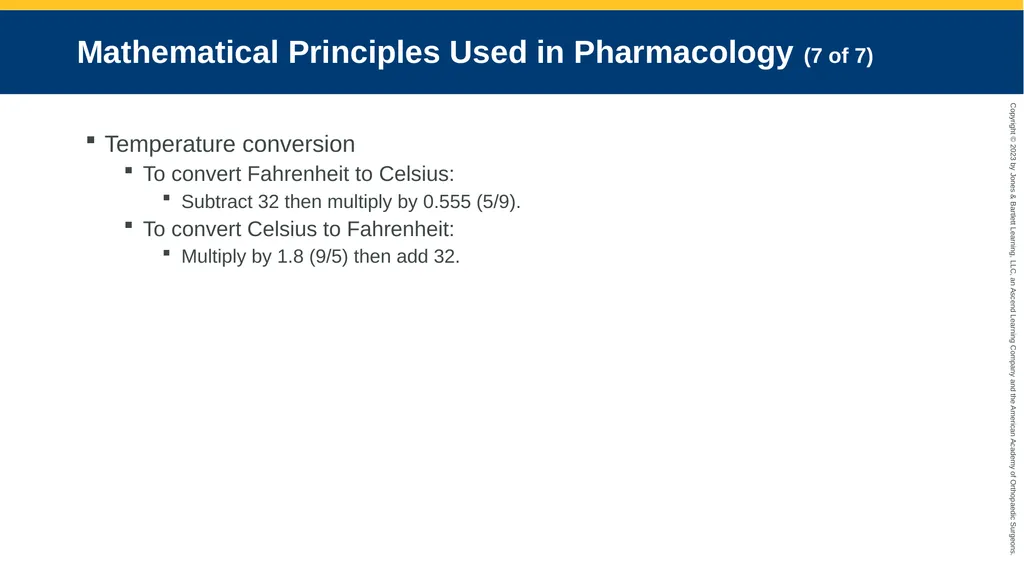
Mathematical Principles Used in Pharmacology (7 of 7) Temperature conversion
To convert Fahrenheit to Celsius:
Subtract 32 then multiply by 0.555 (5/9).
To convert Celsius to Fahrenheit:
Multiply by 1.8 (9/5) then add 32.<br>
To convert Fahrenheit to Celsius:
Subtract 32 then multiply by 0.555 (5/9).
To convert Celsius to Fahrenheit:
Multiply by 1.8 (9/5) then add 32.<br>
118
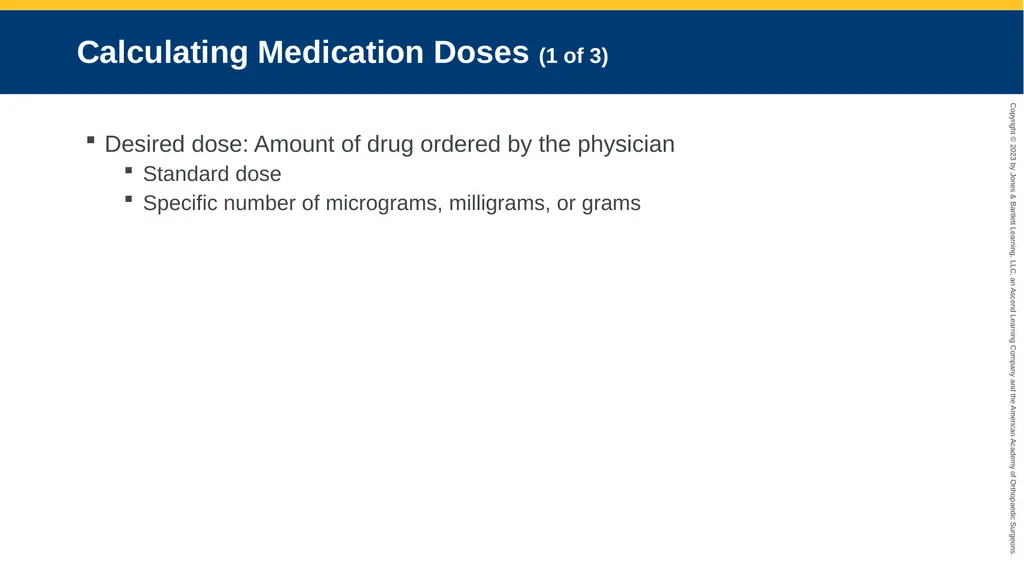
Calculating Medication Doses (1 of 3) Desired dose: Amount of drug ordered by the physician
Standard dose
Specific number of micrograms, milligrams, or grams<br>
Standard dose
Specific number of micrograms, milligrams, or grams<br>
119
Calculating Medication Doses (2 of 3) Drug concentrations: Total weight of the drug contained in a specific amount of volume
Volume on hand: Volume of solution that the drug is contained in
Weight of drug present in 1 mL = concentration<br>
Volume on hand: Volume of solution that the drug is contained in
Weight of drug present in 1 mL = concentration<br>
120
Calculating Medication Doses (3 of 3) Volume to be administered
Desired dose (mg)/Concentration of drug on hand (mg/mL) = Volume to be administered<br>
Desired dose (mg)/Concentration of drug on hand (mg/mL) = Volume to be administered<br>
121
Weight-Based Drugs Medication doses are based on patient’s weight in kilograms.
Convert the weight<br>
Convert the weight<br>
122
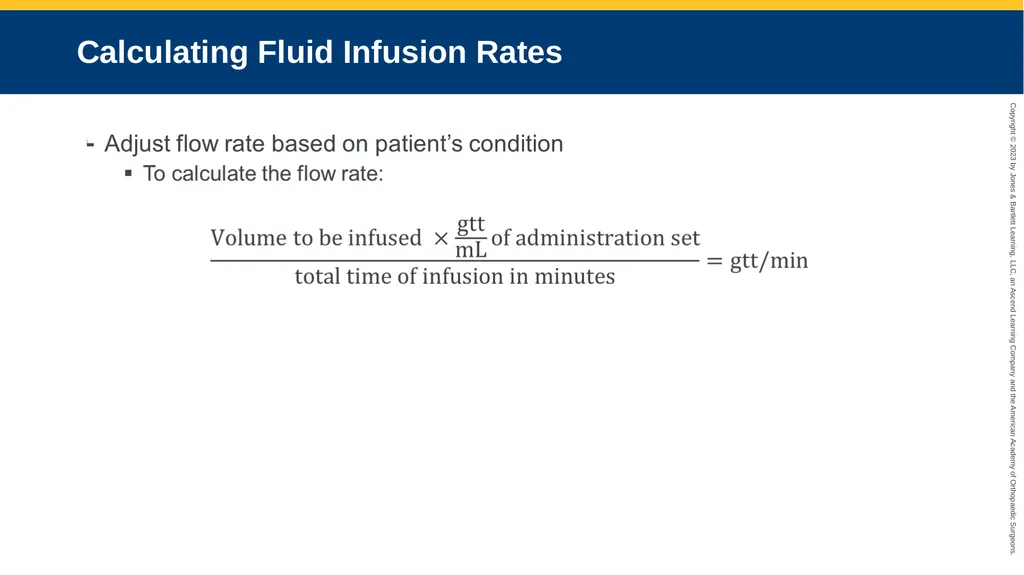
Calculating Fluid Infusion Rates<br>
123
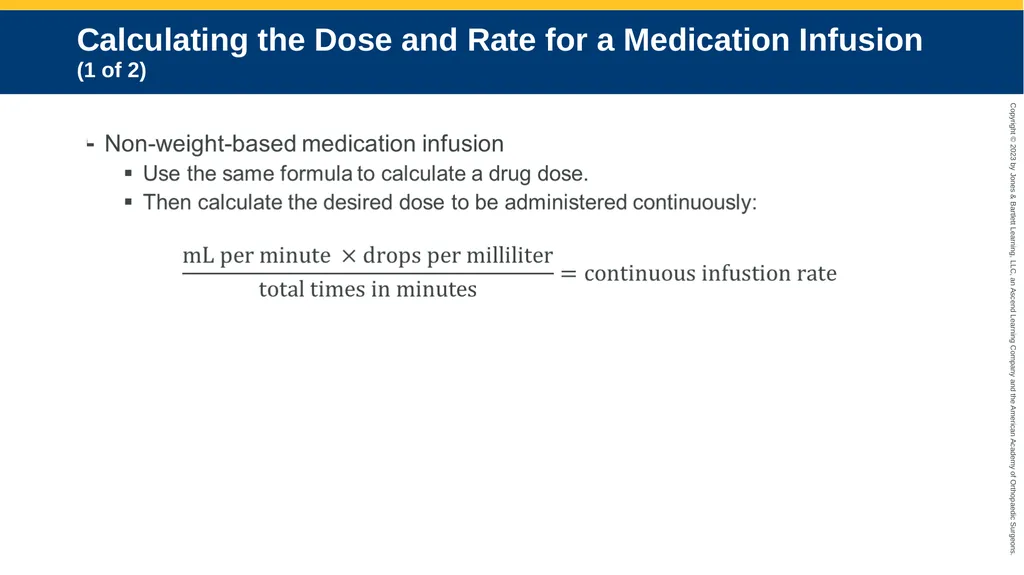
Calculating the Dose and Rate for a Medication Infusion (1 of 2)<br>
124
Calculating the Dose and Rate for a Medication Infusion (2 of 2) Weight-based medication infusions
Use the previously discussed formula.
Factor in the patient’s weight in kilograms<br>
Use the previously discussed formula.
Factor in the patient’s weight in kilograms<br>
125
Pediatric Drug Doses Length-based resuscitation tape measures
Pediatric wheel charts
EMS field guide with tables or charts
Most drugs are based on child’s weight in kg.<br>
Pediatric wheel charts
EMS field guide with tables or charts
Most drugs are based on child’s weight in kg.<br>
126
Enteral Medication Administration<br>
127
Overview Medications given through the digestive or intestinal tracts
Forms include:
Capsules, time-released capsules, lozenges, pills, tablets, elixirs, emulsions, suspensions, syrups<br>
Forms include:
Capsules, time-released capsules, lozenges, pills, tablets, elixirs, emulsions, suspensions, syrups<br>
128
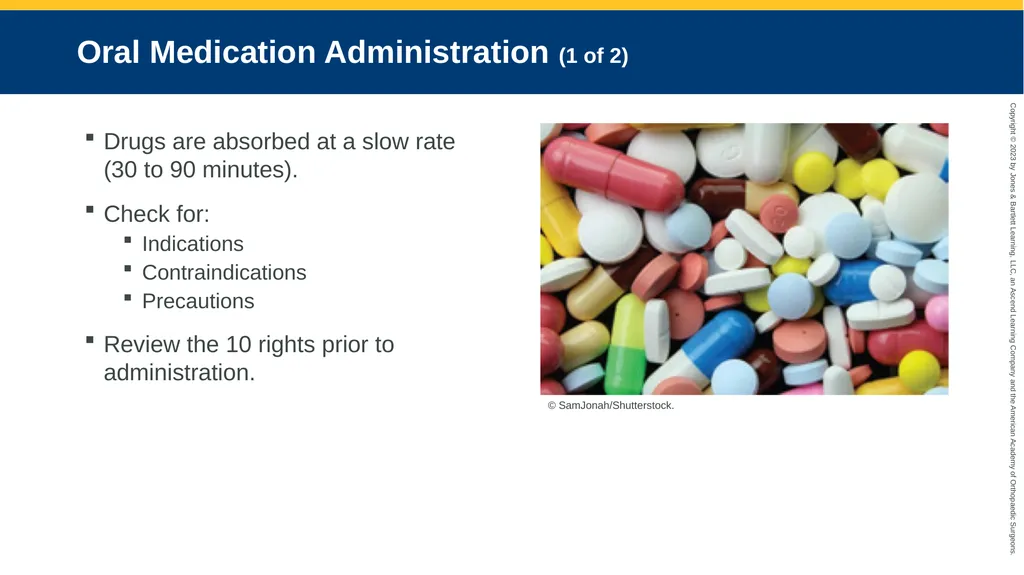
Oral Medication Administration (1 of 2) Drugs are absorbed at a slow rate (30 to 90 minutes).
Check for:
Indications
Contraindications
Precautions
Review the 10 rights prior to administration. © SamJonah/Shutterstock.<br>
Check for:
Indications
Contraindications
Precautions
Review the 10 rights prior to administration. © SamJonah/Shutterstock.<br>
129
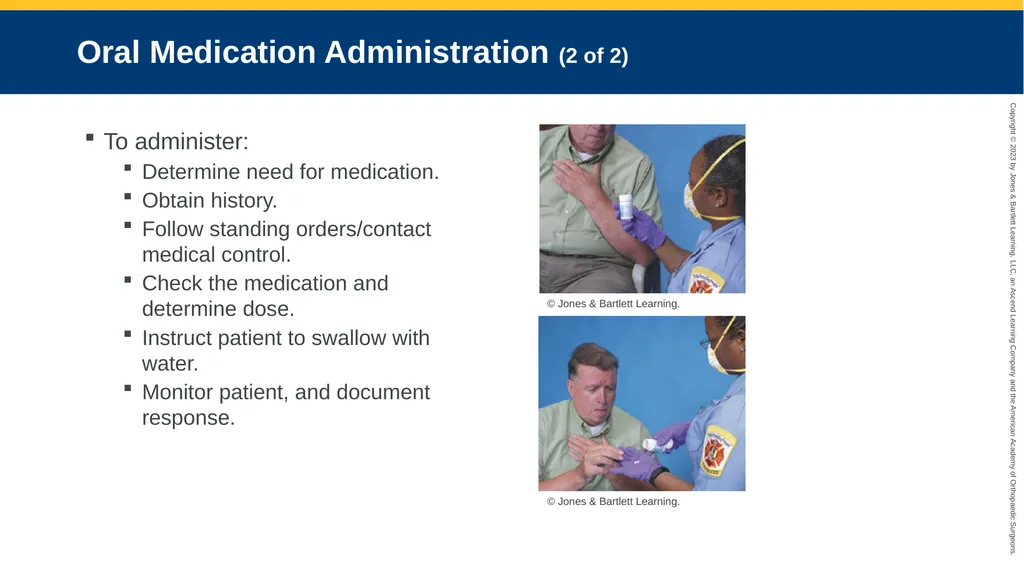
Oral Medication Administration (2 of 2) To administer:
Determine need for medication.
Obtain history.
Follow standing orders/contact medical control.
Check the medication and determine dose.
Instruct patient to swallow with water.
Monitor patient, and document response. © Jones & Bartlett Learning. © Jones & Bartlett Learning.<br>
Determine need for medication.
Obtain history.
Follow standing orders/contact medical control.
Check the medication and determine dose.
Instruct patient to swallow with water.
Monitor patient, and document response. © Jones & Bartlett Learning. © Jones & Bartlett Learning.<br>
130
Orogastric and Nasogastric Tube Medication Administration Gastric tubes are occasionally inserted to:
Decompress stomach
Perform gastric lavage
Establish a route for administration
Tube feeding<br>
Decompress stomach
Perform gastric lavage
Establish a route for administration
Tube feeding<br>
131
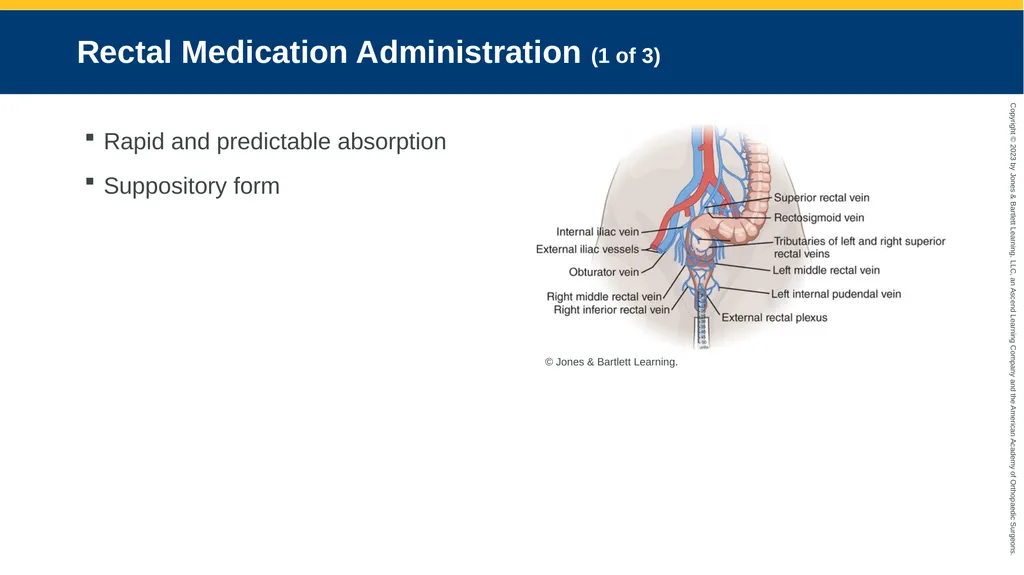
Rectal Medication Administration (1 of 3) Rapid and predictable absorption
Suppository form © Jones & Bartlett Learning.<br>
Suppository form © Jones & Bartlett Learning.<br>
132
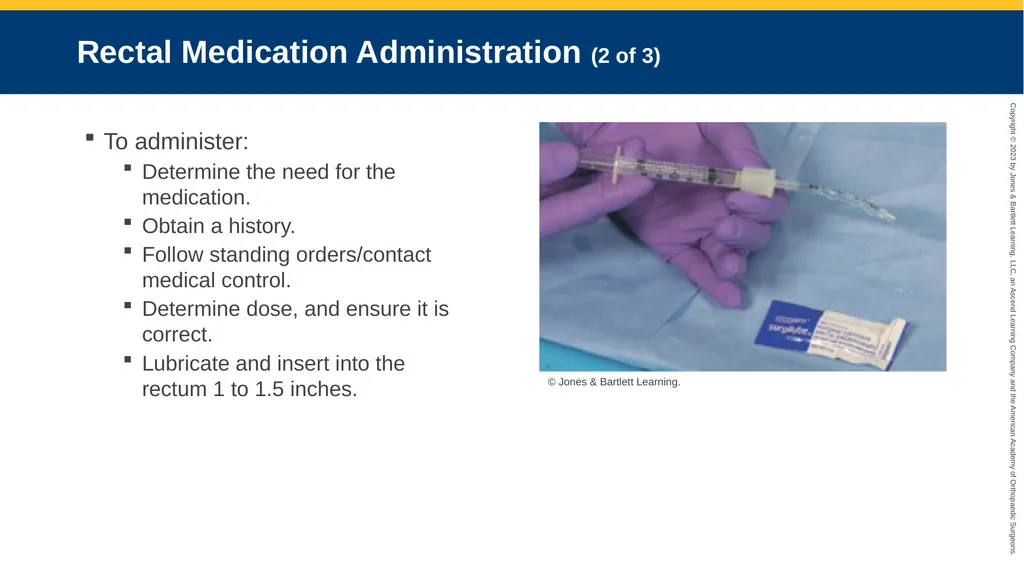
Rectal Medication Administration (2 of 3) To administer:
Determine the need for the medication.
Obtain a history.
Follow standing orders/contact medical control.
Determine dose, and ensure it is correct.
Lubricate and insert into the rectum 1 to 1.5 inches. © Jones & Bartlett Learning.<br>
Determine the need for the medication.
Obtain a history.
Follow standing orders/contact medical control.
Determine dose, and ensure it is correct.
Lubricate and insert into the rectum 1 to 1.5 inches. © Jones & Bartlett Learning.<br>
133
Rectal Medication Administration (3 of 3) To administer (cont’d):
Modifications may be needed for liquid form:
Lubricate device and insert 1 to 1.5 inches into rectum.
Tell patient not to bear down.
Push medication through tube with needleless syringe.
Remove and dispose of tube.
Monitor patient, and document response.<br>
Modifications may be needed for liquid form:
Lubricate device and insert 1 to 1.5 inches into rectum.
Tell patient not to bear down.
Push medication through tube with needleless syringe.
Remove and dispose of tube.
Monitor patient, and document response.<br>
134
Parenteral Medication Administration<br>
135
Overview Any route other than the gastrointestinal tract
Fast and predictable absorption into the central circulation<br>
Fast and predictable absorption into the central circulation<br>
136
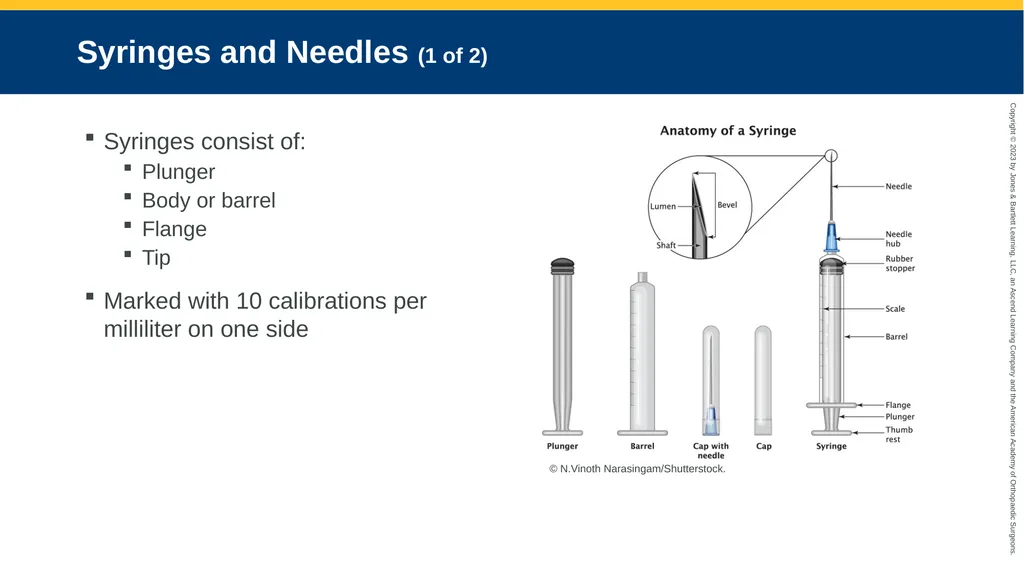
Syringes and Needles (1 of 2) Syringes consist of:
Plunger
Body or barrel
Flange
Tip
Marked with 10 calibrations per milliliter on one side © N.Vinoth Narasingam/Shutterstock.<br>
Plunger
Body or barrel
Flange
Tip
Marked with 10 calibrations per milliliter on one side © N.Vinoth Narasingam/Shutterstock.<br>
137
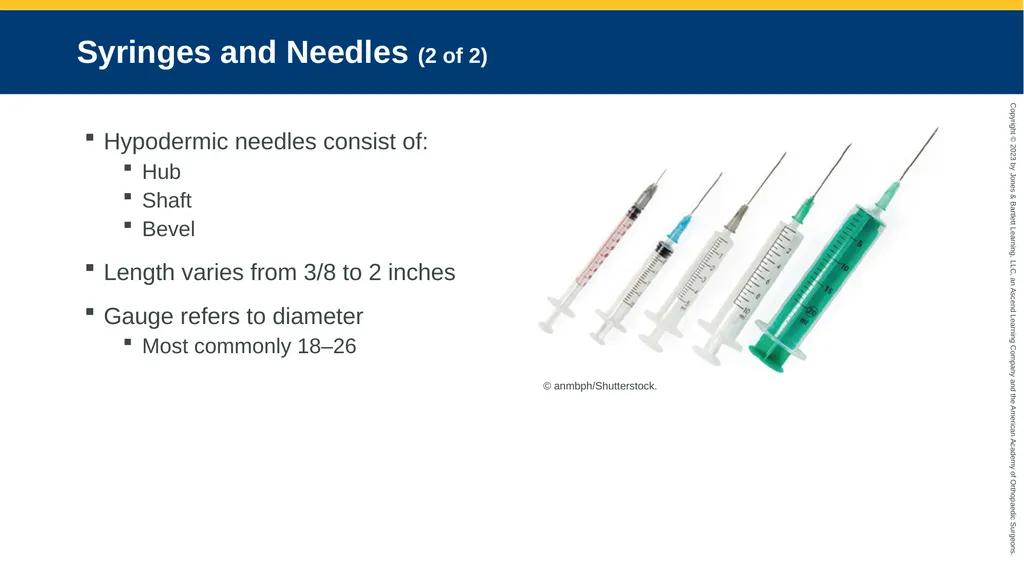
Syringes and Needles (2 of 2) Hypodermic needles consist of:
Hub
Shaft
Bevel
Length varies from 3/8 to 2 inches
Gauge refers to diameter
Most commonly 18–26 © anmbph/Shutterstock.<br>
Hub
Shaft
Bevel
Length varies from 3/8 to 2 inches
Gauge refers to diameter
Most commonly 18–26 © anmbph/Shutterstock.<br>
138
Packaging of Parenteral Medication (1 of 7) Ampules
Breakable sterile glass containers
Carry single dose of medication
Refer to Skill Drill 14-3: Drawing Medication From an Ampule © Jones & Bartlett Learning.<br>
Breakable sterile glass containers
Carry single dose of medication
Refer to Skill Drill 14-3: Drawing Medication From an Ampule © Jones & Bartlett Learning.<br>
139
Packaging of Parenteral Medication (2 of 7) Vials
Glass or plastic bottles with rubber stopper top
Contain single or multiple doses
Removing the cover makes it no longer sterile. © Jones & Bartlett Learning.<br>
Glass or plastic bottles with rubber stopper top
Contain single or multiple doses
Removing the cover makes it no longer sterile. © Jones & Bartlett Learning.<br>
140
Packaging of Parenteral Medication (3 of 7) Vials (cont’d)
Medications may need to be reconstituted.
Mix-o-Vial: Two compartments
Squeeze vials together and then shake.
Refer to Skill Drill 14-4: Drawing Medication From a Vial © Jones & Bartlett Learning.<br>
Medications may need to be reconstituted.
Mix-o-Vial: Two compartments
Squeeze vials together and then shake.
Refer to Skill Drill 14-4: Drawing Medication From a Vial © Jones & Bartlett Learning.<br>
141
Packaging of Parenteral Medication (4 of 7) Prefilled syringes
Packaged in tamper-proof boxes
Two types:
Separated into a glass cartridge and syringe
Preassembled prefilled syringes © Jones & Bartlett Learning.<br>
Packaged in tamper-proof boxes
Two types:
Separated into a glass cartridge and syringe
Preassembled prefilled syringes © Jones & Bartlett Learning.<br>
142
Packaging of Parenteral Medication (5 of 7) © American Academy of Orthopaedic Surgeons.<br>
143
Packaging of Parenteral Medication (6 of 7) Single-dose medication cartridges inserted into a reusable syringe are available. © Jones & Bartlett Learning.<br>
144
Packaging of Parenteral Medication (7 of 7) Push-dose pressors
Vasopressors
Small bolus format
Push-dose epinephrine
Mix appropriate concentration<br>
Vasopressors
Small bolus format
Push-dose epinephrine
Mix appropriate concentration<br>
145
Intradermal Medication Administration (1 of 3) Medication administered into the dermal layer
Avoid superficial blood vessels
Slow absorption rate<br>
Avoid superficial blood vessels
Slow absorption rate<br>
146
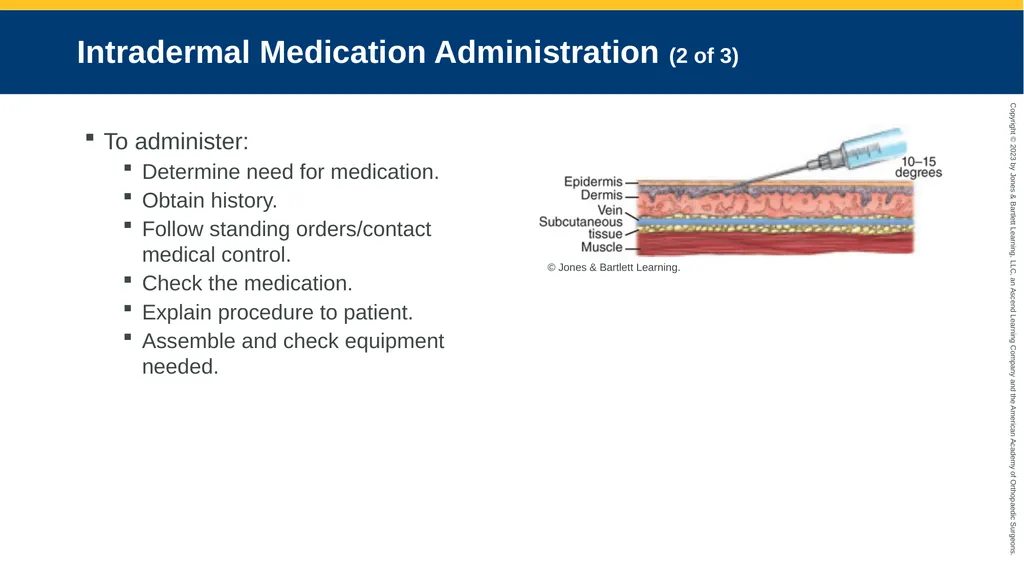
Intradermal Medication Administration (2 of 3) To administer:
Determine need for medication.
Obtain history.
Follow standing orders/contact medical control.
Check the medication.
Explain procedure to patient.
Assemble and check equipment needed. © Jones & Bartlett Learning.<br>
Determine need for medication.
Obtain history.
Follow standing orders/contact medical control.
Check the medication.
Explain procedure to patient.
Assemble and check equipment needed. © Jones & Bartlett Learning.<br>
147
Intradermal Medication Administration (3 of 3) To administer (cont’d):
Cleanse the area for injection.
Pull skin taut.
Insert the needle and slowly inject medication.
Remove the needle and dispose of it.
Monitor the patient and document response.<br>
Cleanse the area for injection.
Pull skin taut.
Insert the needle and slowly inject medication.
Remove the needle and dispose of it.
Monitor the patient and document response.<br>
148
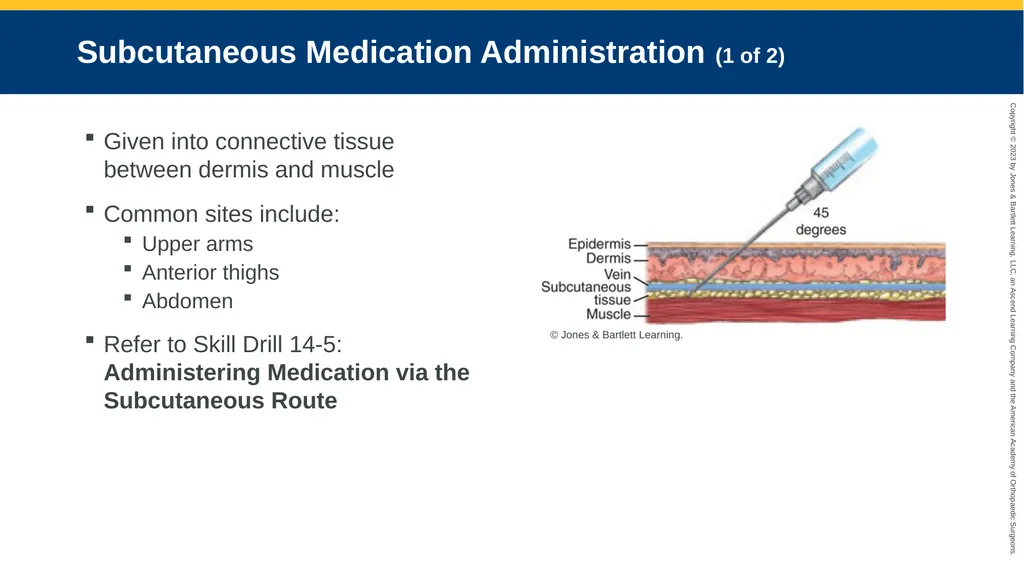
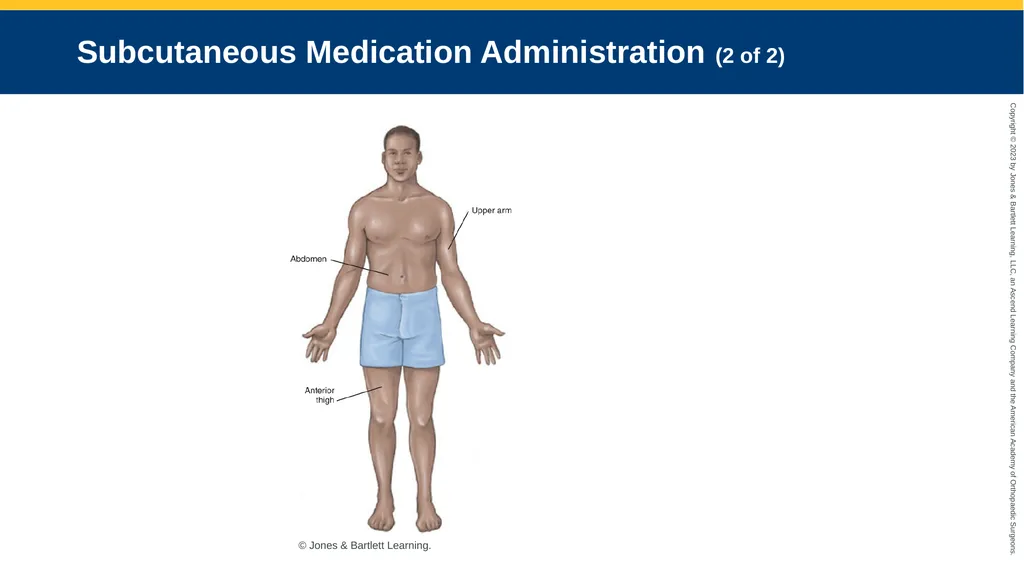
Subcutaneous Medication Administration (1 of 2) Given into connective tissue between dermis and muscle
Common sites include:
Upper arms
Anterior thighs
Abdomen
Refer to Skill Drill 14-5: Administering Medication via the Subcutaneous Route © Jones & Bartlett Learning.<br>
Common sites include:
Upper arms
Anterior thighs
Abdomen
Refer to Skill Drill 14-5: Administering Medication via the Subcutaneous Route © Jones & Bartlett Learning.<br>
149
Subcutaneous Medication Administration (2 of 2) © Jones & Bartlett Learning.<br>
150
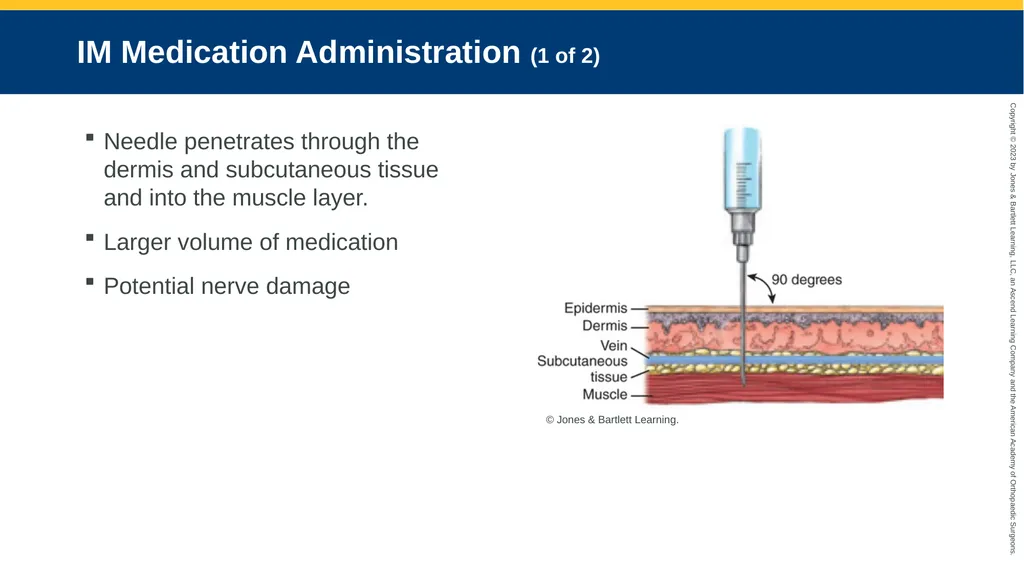
IM Medication Administration (1 of 2) Needle penetrates through the dermis and subcutaneous tissue and into the muscle layer.
Larger volume of medication
Potential nerve damage © Jones & Bartlett Learning.<br>
Larger volume of medication
Potential nerve damage © Jones & Bartlett Learning.<br>
151
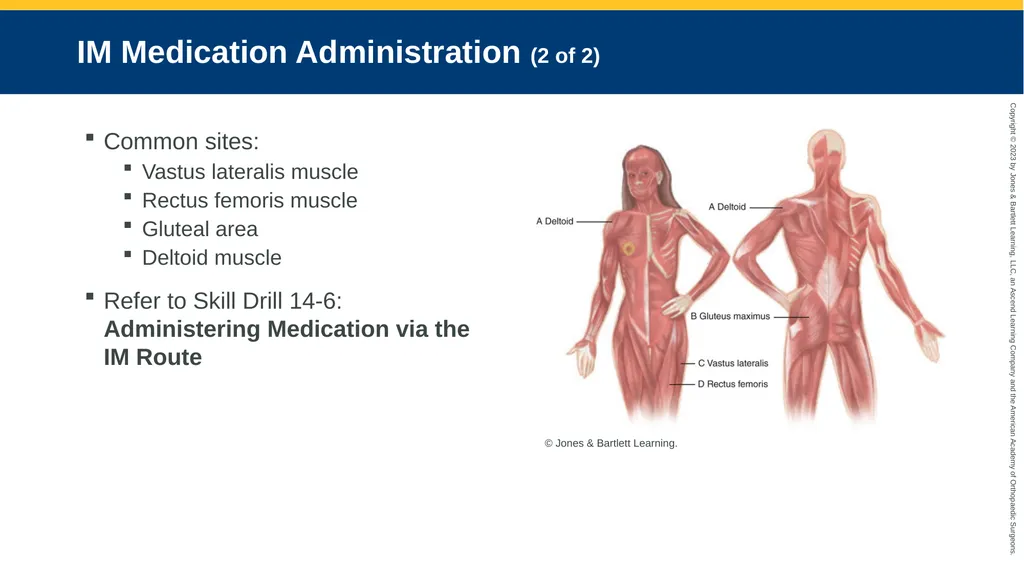
IM Medication Administration (2 of 2) Common sites:
Vastus lateralis muscle
Rectus femoris muscle
Gluteal area
Deltoid muscle
Refer to Skill Drill 14-6: Administering Medication via the IM Route © Jones & Bartlett Learning.<br>
Vastus lateralis muscle
Rectus femoris muscle
Gluteal area
Deltoid muscle
Refer to Skill Drill 14-6: Administering Medication via the IM Route © Jones & Bartlett Learning.<br>
152
IV Bolus Medication Administration (1 of 4) Drugs go directly into the circulatory system.
Direct injection of drugs with a needle and syringe into IV line
Needleless systems now available
A bolus is a single dose given by the IV route.
Small or large quantity of a drug
Delivered rapidly or slowly
Refer to Skill Drill 14-7: Administering Medication via the IV Bolus Route<br>
Direct injection of drugs with a needle and syringe into IV line
Needleless systems now available
A bolus is a single dose given by the IV route.
Small or large quantity of a drug
Delivered rapidly or slowly
Refer to Skill Drill 14-7: Administering Medication via the IV Bolus Route<br>
153
IV Bolus Medication Administration (2 of 4) Saline lock:
Determine the need for the medication.
Obtain a history.
Follow standing orders/contact medical control.
Check the medication.
Explain the procedure to the patient.<br>
Determine the need for the medication.
Obtain a history.
Follow standing orders/contact medical control.
Check the medication.
Explain the procedure to the patient.<br>
154
IV Bolus Medication Administration (3 of 4) Saline lock (cont’d):
Assemble equipment and draw up medication.
Cleanse the injection port or remove the cap.
Insert the needle into the port or screw the syringe onto the port.
Pull back on the plunger and observe for blood.
Place needle and syringe into a sharps container.<br>
Assemble equipment and draw up medication.
Cleanse the injection port or remove the cap.
Insert the needle into the port or screw the syringe onto the port.
Pull back on the plunger and observe for blood.
Place needle and syringe into a sharps container.<br>
155
IV Bolus Medication Administration (4 of 4) To administer medication through a saline lock (cont’d):
Clean the port; insert the needle with the flush.
Flush and place needle in sharps container.
Store any unused medication properly.
Monitor the patient and document findings.<br>
Clean the port; insert the needle with the flush.
Flush and place needle in sharps container.
Store any unused medication properly.
Monitor the patient and document findings.<br>
156
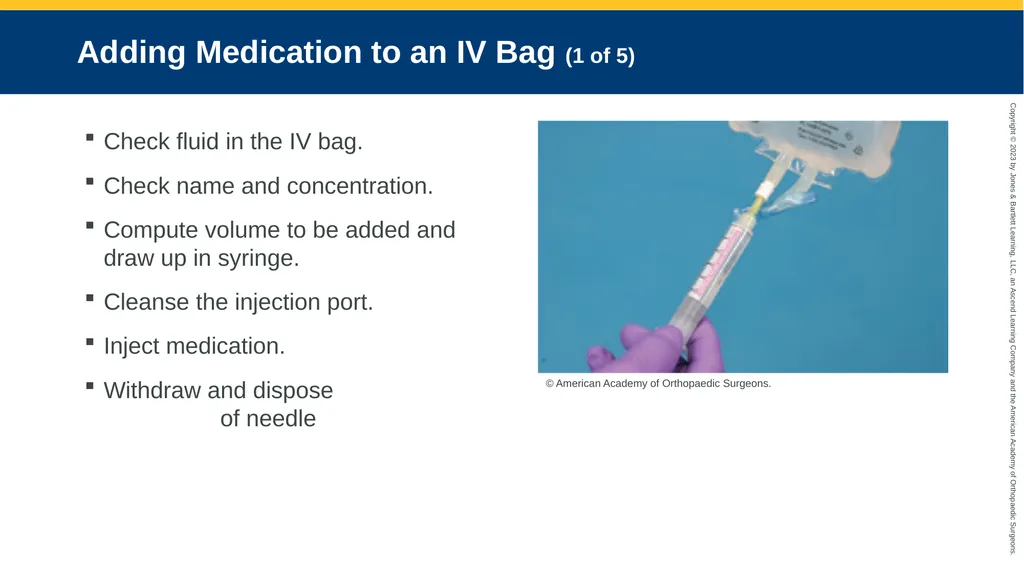
Adding Medication to an IV Bag (1 of 5) Check fluid in the IV bag.
Check name and concentration.
Compute volume to be added and draw up in syringe.
Cleanse the injection port.
Inject medication.
Withdraw and dispose of needle © American Academy of Orthopaedic Surgeons.<br>
Check name and concentration.
Compute volume to be added and draw up in syringe.
Cleanse the injection port.
Inject medication.
Withdraw and dispose of needle © American Academy of Orthopaedic Surgeons.<br>
157
Adding Medication to an IV Bag (2 of 5) Agitate bag.
Label the IV bag with the:
Name
Amount added
Concentration
Date and time
Your name
Attach IV administration set and prepare bag.<br>
Label the IV bag with the:
Name
Amount added
Concentration
Date and time
Your name
Attach IV administration set and prepare bag.<br>
158
Adding Medication to an IV Bag (3 of 5) IV piggyback
Administration set directly connected to hub of IV catheter is primary line
Distal end of drip set is connected to primary line.
Multiple lines
Refer to Skill Drill 14-8: Administering Medication via IV Piggyback Infusion<br>
Administration set directly connected to hub of IV catheter is primary line
Distal end of drip set is connected to primary line.
Multiple lines
Refer to Skill Drill 14-8: Administering Medication via IV Piggyback Infusion<br>
159
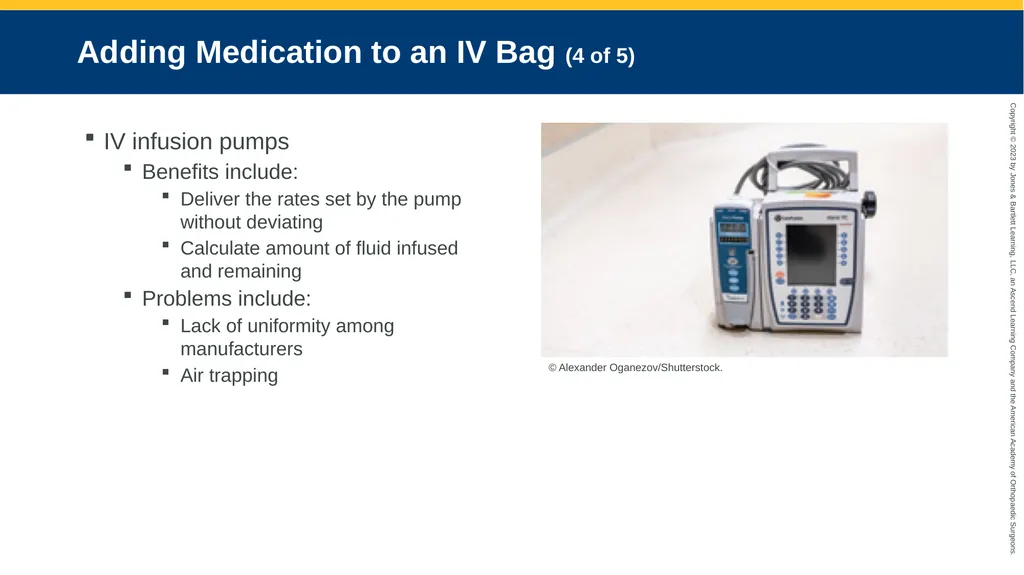
Adding Medication to an IV Bag (4 of 5) IV infusion pumps
Benefits include:
Deliver the rates set by the pump without deviating
Calculate amount of fluid infused and remaining
Problems include:
Lack of uniformity among manufacturers
Air trapping © Alexander Oganezov/Shutterstock.<br>
Benefits include:
Deliver the rates set by the pump without deviating
Calculate amount of fluid infused and remaining
Problems include:
Lack of uniformity among manufacturers
Air trapping © Alexander Oganezov/Shutterstock.<br>
160
Adding Medication to an IV Bag (5 of 5) IV infusion pumps (cont’d)
Deliver fluids via positive pressure.
May be designed to accommodate:
IV tubing to regulate the flow of fluids
Needleless syringe
Multiple chambers for multiple medications
Databases calculate rate by desired dose and patient’s weight
Wide variety<br>
Deliver fluids via positive pressure.
May be designed to accommodate:
IV tubing to regulate the flow of fluids
Needleless syringe
Multiple chambers for multiple medications
Databases calculate rate by desired dose and patient’s weight
Wide variety<br>
161
IO Medication Administration Fluid does not flow well into the bone.
Use a large syringe.
A pressure infuser device forces fluid from the IV bag.
Potential for compartment syndrome
Refer to Skill Drill 14-9: Administering Medication via the IO Route<br>
Use a large syringe.
A pressure infuser device forces fluid from the IV bag.
Potential for compartment syndrome
Refer to Skill Drill 14-9: Administering Medication via the IO Route<br>
162
Percutaneous Medication Administration (1 of 8) Medications are applied to and absorbed through the skin and mucous membranes.
Transdermal medication administration
Applied topically
Useful for sustained release of medication<br>
Transdermal medication administration
Applied topically
Useful for sustained release of medication<br>
163
Percutaneous Medication Administration (2 of 8) Transdermal medication administration (cont’d)
To apply:
Determine need for medication; obtain history.
Follow standing orders/contact medical control.
Check the medication.
Explain the procedure to patient.
Clean area and apply the medication.
Monitor patient and document response.<br>
To apply:
Determine need for medication; obtain history.
Follow standing orders/contact medical control.
Check the medication.
Explain the procedure to patient.
Clean area and apply the medication.
Monitor patient and document response.<br>
164
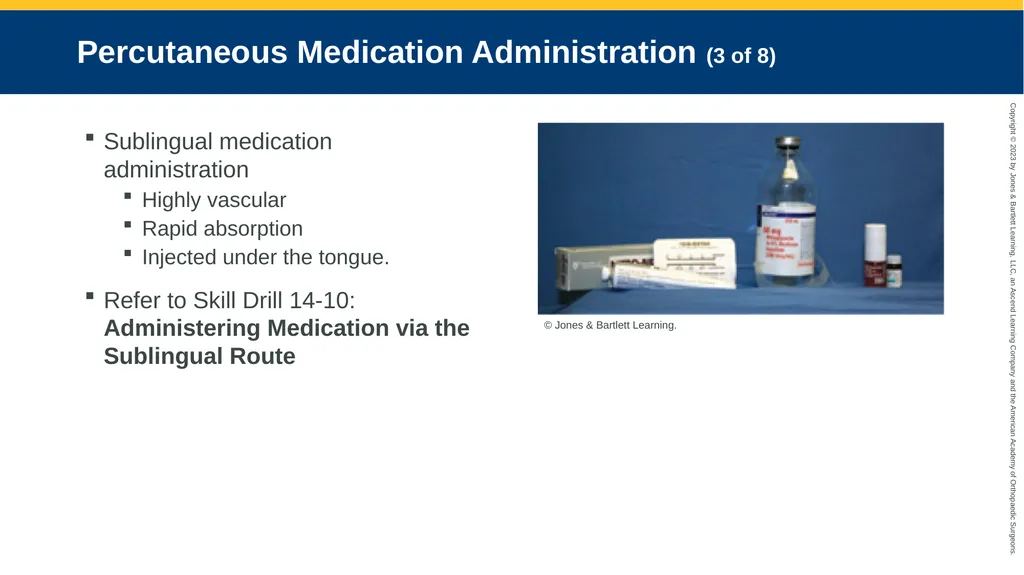
Percutaneous Medication Administration (3 of 8) Sublingual medication administration
Highly vascular
Rapid absorption
Injected under the tongue.
Refer to Skill Drill 14-10: Administering Medication via the Sublingual Route © Jones & Bartlett Learning.<br>
Highly vascular
Rapid absorption
Injected under the tongue.
Refer to Skill Drill 14-10: Administering Medication via the Sublingual Route © Jones & Bartlett Learning.<br>
165
Percutaneous Medication Administration (4 of 8) Buccal medication administration
Between the cheek and gums
Tablets or gel
To administer medication:
Determine the need and obtain history.
Follow standing orders/contact medical control.
Check medication and explain procedure to patient.
Place medication between cheek and gum.
Advise patient to allow the tablet to dissolve slowly.
Monitor patient and document response.<br>
Between the cheek and gums
Tablets or gel
To administer medication:
Determine the need and obtain history.
Follow standing orders/contact medical control.
Check medication and explain procedure to patient.
Place medication between cheek and gum.
Advise patient to allow the tablet to dissolve slowly.
Monitor patient and document response.<br>
166
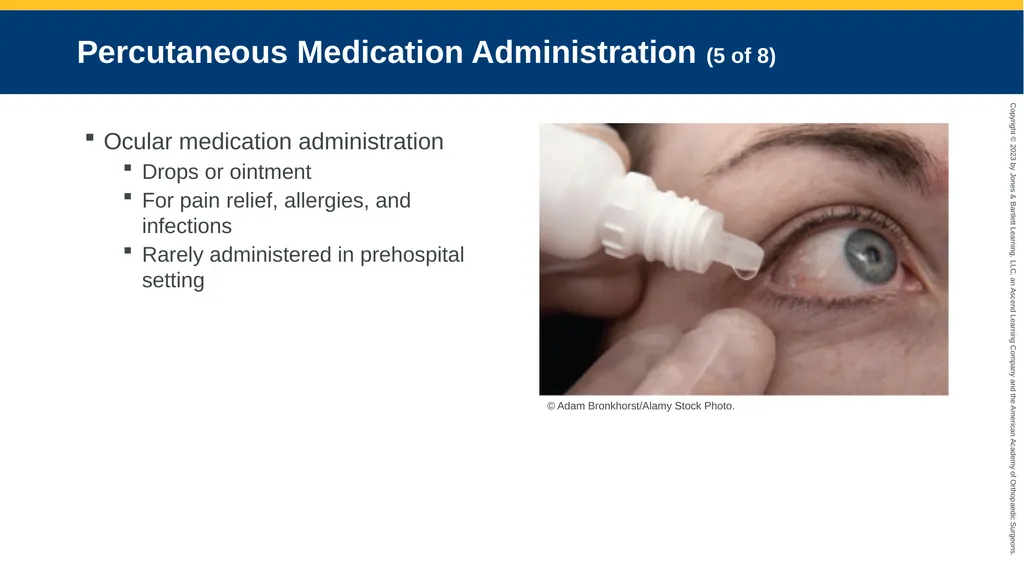
Percutaneous Medication Administration (5 of 8) Ocular medication administration
Drops or ointment
For pain relief, allergies, and infections
Rarely administered in prehospital setting © Adam Bronkhorst/Alamy Stock Photo.<br>
Drops or ointment
For pain relief, allergies, and infections
Rarely administered in prehospital setting © Adam Bronkhorst/Alamy Stock Photo.<br>
167
Percutaneous Medication Administration (6 of 8) Ocular medication administration (cont’d)
To assist a patient:
Confirm prescription.
Have patient tilt head and look up.
Expose conjunctiva and administer medication.
Advise patient to close eye for 1 to 2 minutes.
Document medication name, dose, and time.<br>
To assist a patient:
Confirm prescription.
Have patient tilt head and look up.
Expose conjunctiva and administer medication.
Advise patient to close eye for 1 to 2 minutes.
Document medication name, dose, and time.<br>
168
Percutaneous Medication Administration (7 of 8) Aural medication administration
Via ear canal
To assist a patient:
Confirm prescription.
Place patient on side with affected ear facing up.
Expose the ear canal.
Administer medication with a medicine dropper.
Document medication name, dose, and time.<br>
Via ear canal
To assist a patient:
Confirm prescription.
Place patient on side with affected ear facing up.
Expose the ear canal.
Administer medication with a medicine dropper.
Document medication name, dose, and time.<br>
169
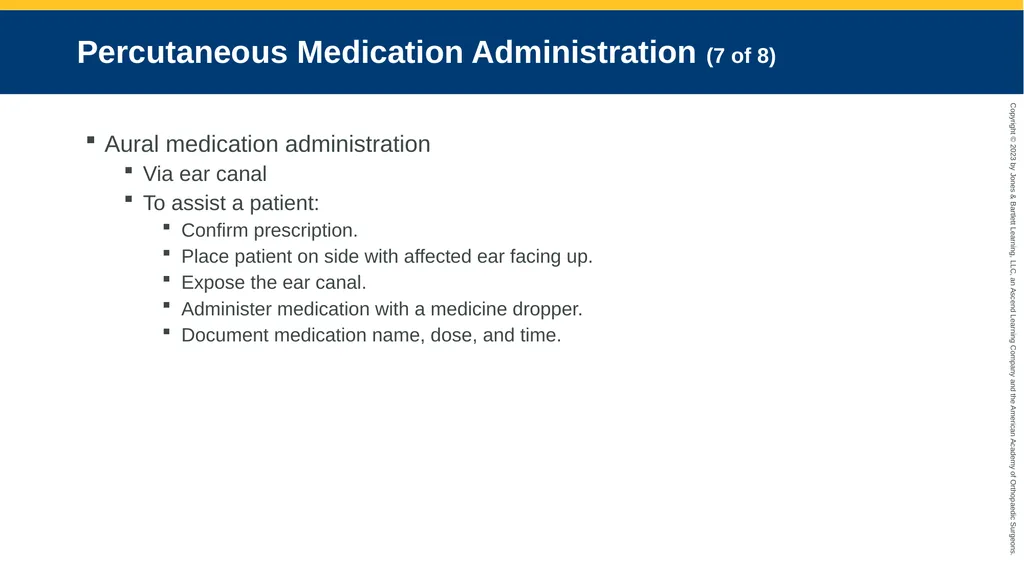
Percutaneous Medication Administration (8 of 8) Intranasal medication administration
Nasal spray or solutions
Rapidly absorbed
Performed with a mucosal atomizer device (MAD)
Requires 2 to 2.5 times the dose of IV medications
Refer to Skill Drill 14-11: Administering Medication via the Intranasal Route Courtesy of LMA North America.<br>
Nasal spray or solutions
Rapidly absorbed
Performed with a mucosal atomizer device (MAD)
Requires 2 to 2.5 times the dose of IV medications
Refer to Skill Drill 14-11: Administering Medication via the Intranasal Route Courtesy of LMA North America.<br>
170
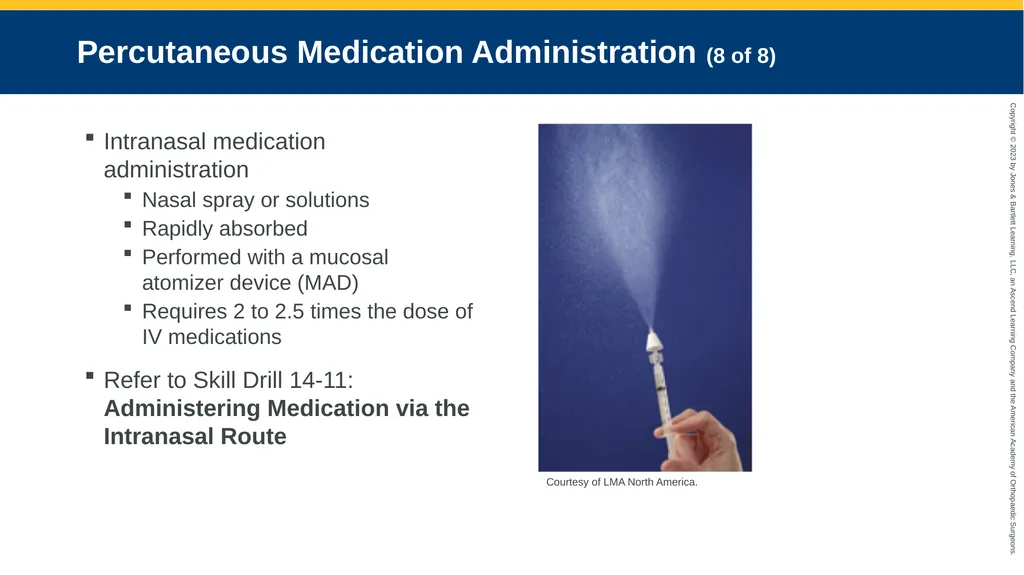
Medications Administered by the Inhalation Route (1 of 5) Metered-dose inhaler
For patients with a history of respiratory problems
Delivered through mouthpiece or mask © Jones & Bartlett Learning.<br>
For patients with a history of respiratory problems
Delivered through mouthpiece or mask © Jones & Bartlett Learning.<br>
171
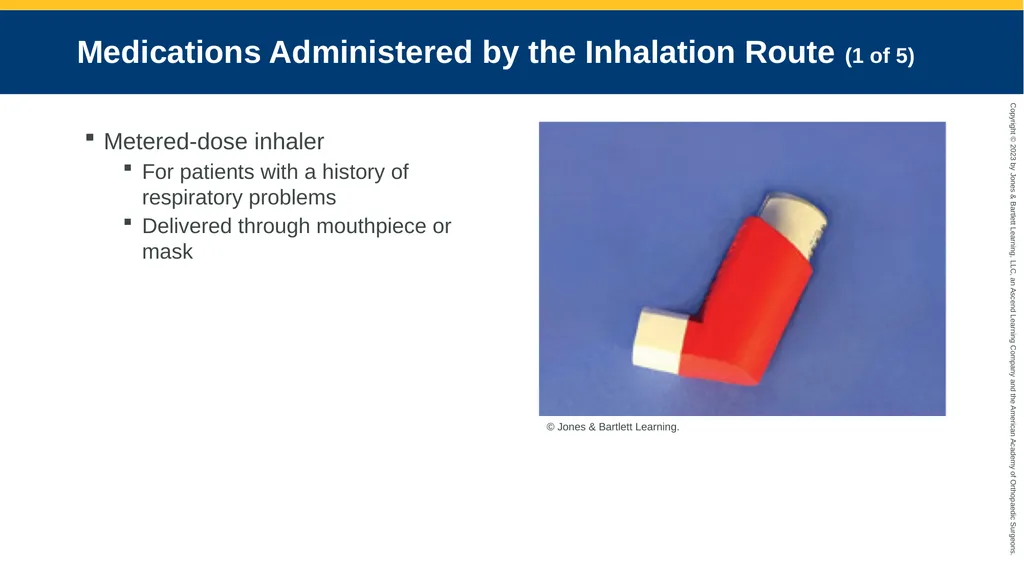
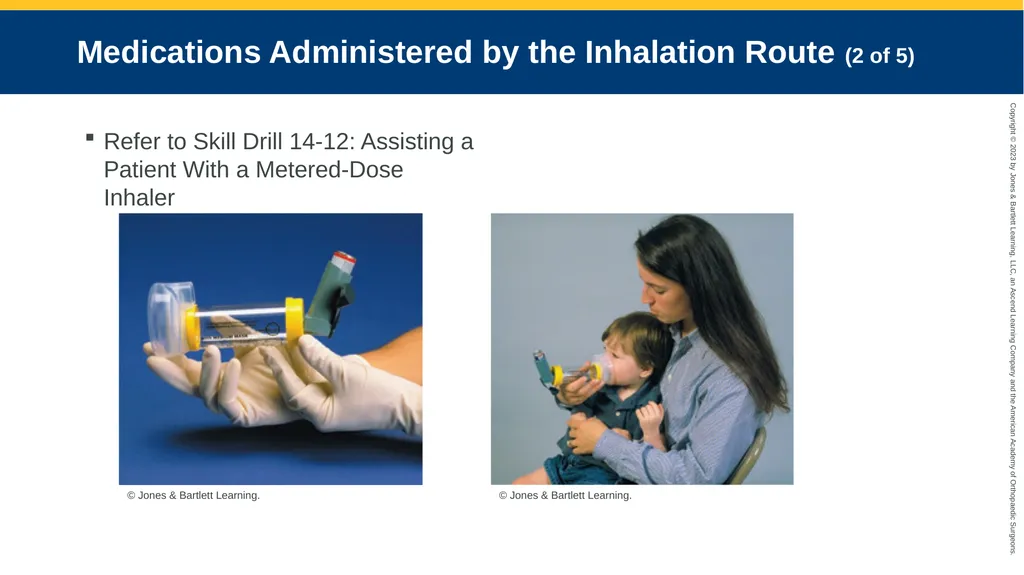
Medications Administered by the Inhalation Route (2 of 5) Refer to Skill Drill 14-12: Assisting a Patient With a Metered-Dose Inhaler © Jones & Bartlett Learning. © Jones & Bartlett Learning.<br>
172
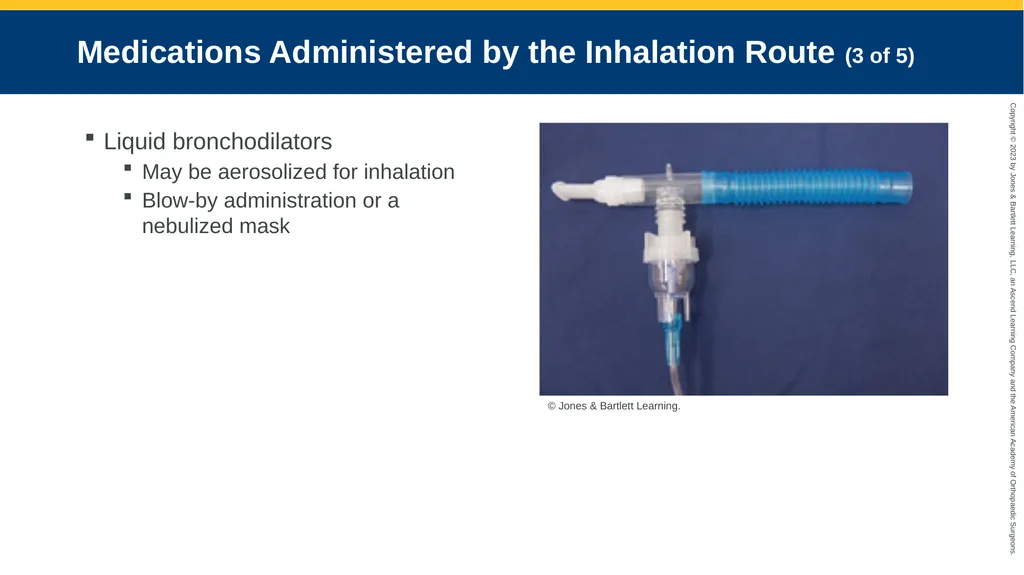
Medications Administered by the Inhalation Route (3 of 5) Liquid bronchodilators
May be aerosolized for inhalation
Blow-by administration or a nebulized mask © Jones & Bartlett Learning.<br>
May be aerosolized for inhalation
Blow-by administration or a nebulized mask © Jones & Bartlett Learning.<br>
173
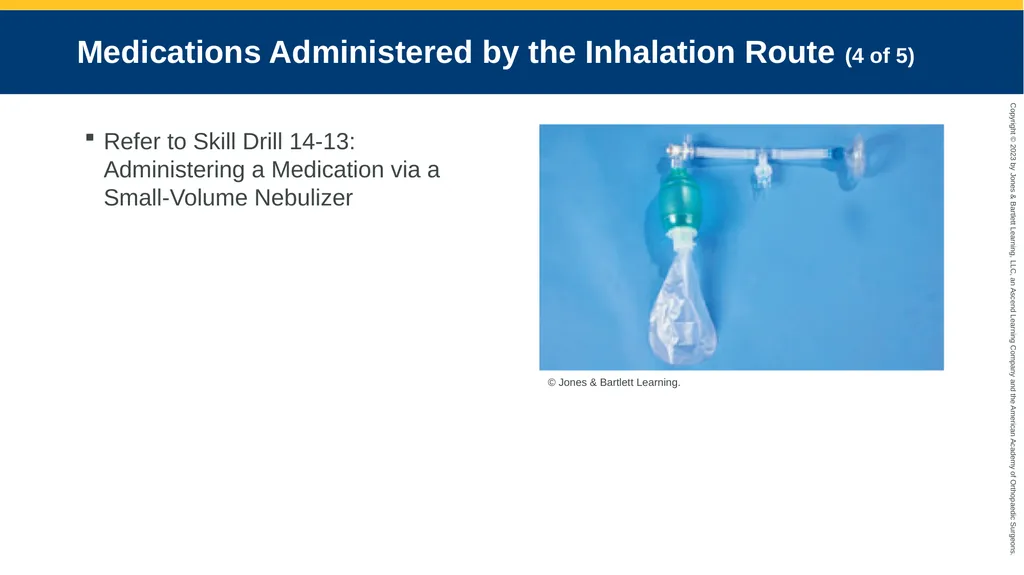
Medications Administered by the Inhalation Route (4 of 5) Refer to Skill Drill 14-13: Administering a Medication via a Small-Volume Nebulizer © Jones & Bartlett Learning.<br>
174
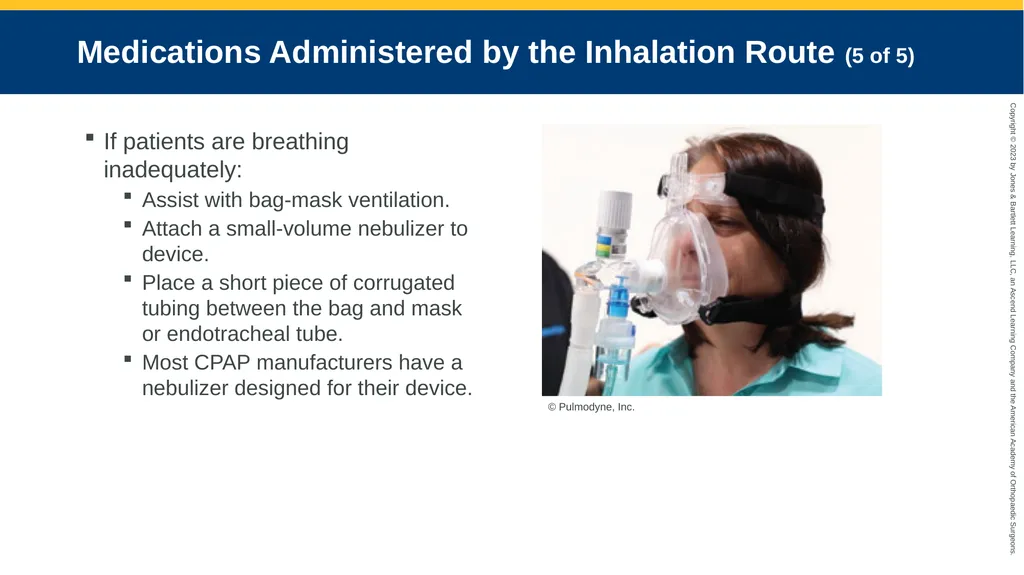
Medications Administered by the Inhalation Route (5 of 5) If patients are breathing inadequately:
Assist with bag-mask ventilation.
Attach a small-volume nebulizer to device.
Place a short piece of corrugated tubing between the bag and mask or endotracheal tube.
Most CPAP manufacturers have a nebulizer designed for their device. © Pulmodyne, Inc.<br>
Assist with bag-mask ventilation.
Attach a small-volume nebulizer to device.
Place a short piece of corrugated tubing between the bag and mask or endotracheal tube.
Most CPAP manufacturers have a nebulizer designed for their device. © Pulmodyne, Inc.<br>
175
Long-Term Vascular Access Devices<br>
176
Long-Term Vascular Access Devices For patients receiving:
Antibiotic regimen
Chemotherapy
Blood draws for chronic disorders
Hemodialysis
Treatment for acute/chronic illnesses
Two types:
Non-tunneling
Implanted
Preserved with heparin<br>
Antibiotic regimen
Chemotherapy
Blood draws for chronic disorders
Hemodialysis
Treatment for acute/chronic illnesses
Two types:
Non-tunneling
Implanted
Preserved with heparin<br>
177
Non-Tunneling VAD (1 of 4) Inserted by direct venipuncture
Peripheral inserted central catheters (PICC)
Midlines at the antecubital vein © Jones & Bartlett Learning.<br>
Peripheral inserted central catheters (PICC)
Midlines at the antecubital vein © Jones & Bartlett Learning.<br>
178
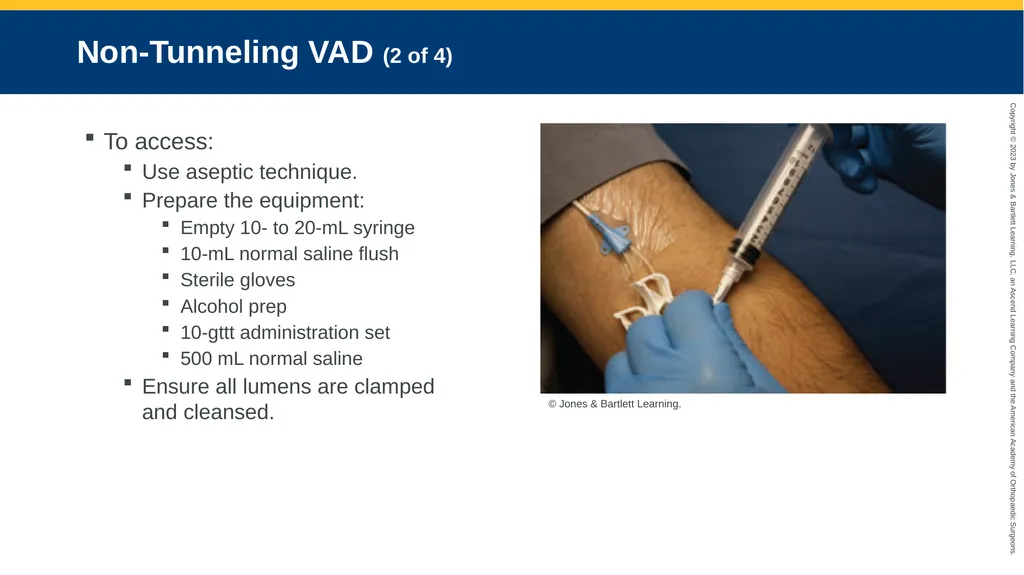
Non-Tunneling VAD (2 of 4) To access:
Use aseptic technique.
Prepare the equipment:
Empty 10- to 20-mL syringe
10-mL normal saline flush
Sterile gloves
Alcohol prep
10-gttt administration set
500 mL normal saline
Ensure all lumens are clamped and cleansed. © Jones & Bartlett Learning.<br>
Use aseptic technique.
Prepare the equipment:
Empty 10- to 20-mL syringe
10-mL normal saline flush
Sterile gloves
Alcohol prep
10-gttt administration set
500 mL normal saline
Ensure all lumens are clamped and cleansed. © Jones & Bartlett Learning.<br>
179
Non-Tunneling VAD (3 of 4) To access (cont’d):
Attach the empty syringe and withdraw blood from lumen.
Minimum of 10 mL
Discard syringe.
Administer the 10mL syringe of normal saline.
Attach the IV drip set.
Rate of at least 10 mL/h
Monitor the patient’s position and document response. © Jones & Bartlett Learning.<br>
Attach the empty syringe and withdraw blood from lumen.
Minimum of 10 mL
Discard syringe.
Administer the 10mL syringe of normal saline.
Attach the IV drip set.
Rate of at least 10 mL/h
Monitor the patient’s position and document response. © Jones & Bartlett Learning.<br>
180
Non-Tunneling VAD (4 of 4) © Jones & Bartlett Learning.<br>
181
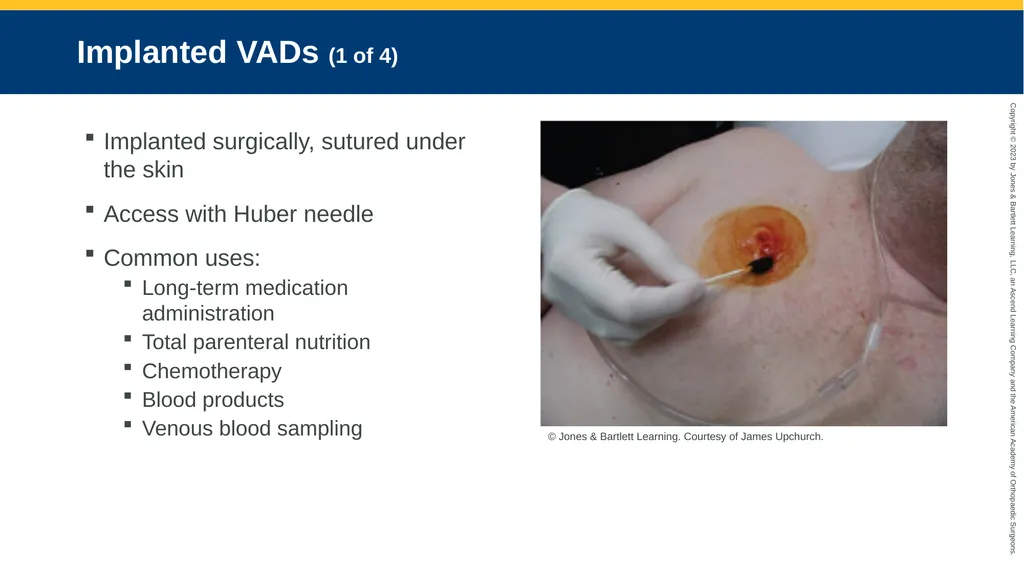
Implanted VADs (1 of 4) Implanted surgically, sutured under the skin
Access with Huber needle
Common uses:
Long-term medication administration
Total parenteral nutrition
Chemotherapy
Blood products
Venous blood sampling © Jones & Bartlett Learning. Courtesy of James Upchurch.<br>
Access with Huber needle
Common uses:
Long-term medication administration
Total parenteral nutrition
Chemotherapy
Blood products
Venous blood sampling © Jones & Bartlett Learning. Courtesy of James Upchurch.<br>
182
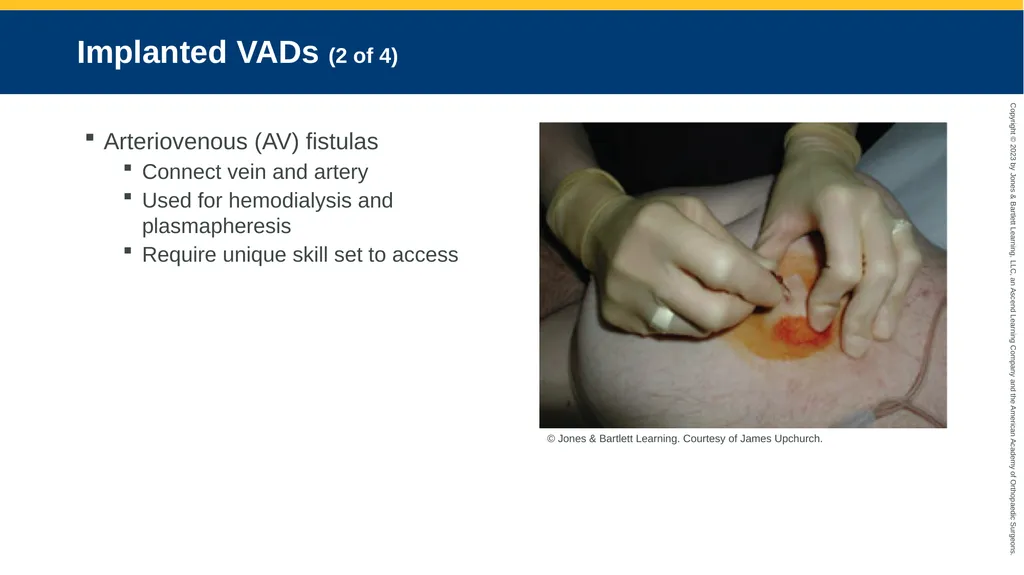
Implanted VADs (2 of 4) Arteriovenous (AV) fistulas
Connect vein and artery
Used for hemodialysis and plasmapheresis
Require unique skill set to access © Jones & Bartlett Learning. Courtesy of James Upchurch.<br>
Connect vein and artery
Used for hemodialysis and plasmapheresis
Require unique skill set to access © Jones & Bartlett Learning. Courtesy of James Upchurch.<br>
183
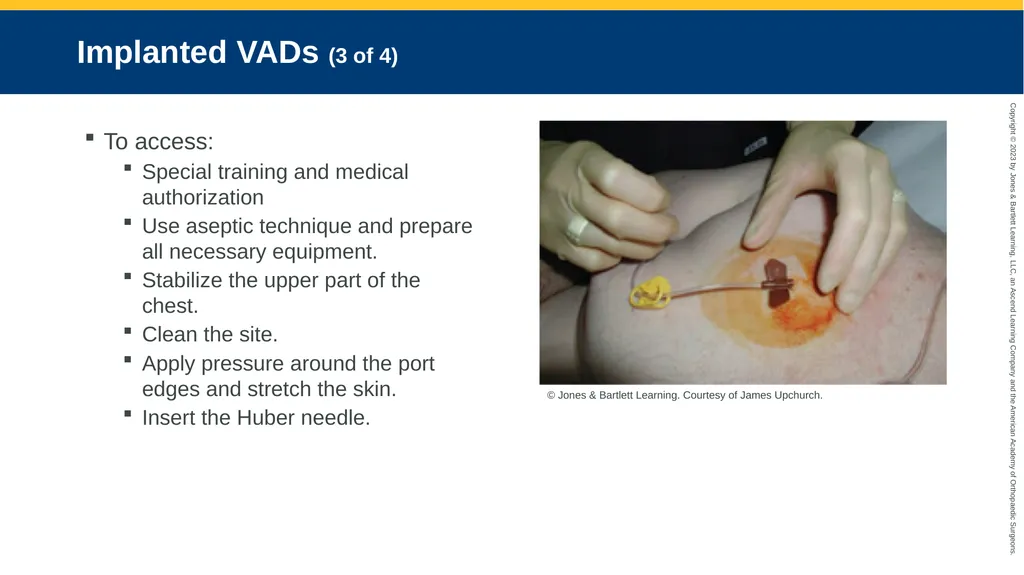
Implanted VADs (3 of 4) To access:
Special training and medical authorization
Use aseptic technique and prepare all necessary equipment.
Stabilize the upper part of the chest.
Clean the site.
Apply pressure around the port edges and stretch the skin.
Insert the Huber needle. © Jones & Bartlett Learning. Courtesy of James Upchurch.<br>
Special training and medical authorization
Use aseptic technique and prepare all necessary equipment.
Stabilize the upper part of the chest.
Clean the site.
Apply pressure around the port edges and stretch the skin.
Insert the Huber needle. © Jones & Bartlett Learning. Courtesy of James Upchurch.<br>
184
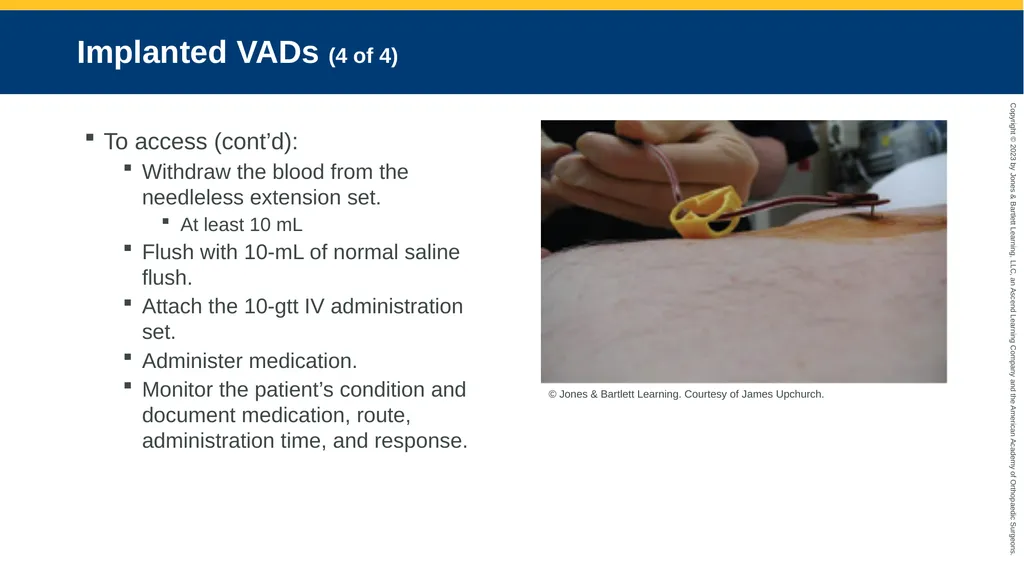
Implanted VADs (4 of 4) To access (cont’d):
Withdraw the blood from the needleless extension set.
At least 10 mL
Flush with 10-mL of normal saline flush.
Attach the 10-gtt IV administration set.
Administer medication.
Monitor the patient’s condition and document medication, route, administration time, and response. © Jones & Bartlett Learning. Courtesy of James Upchurch.<br>
Withdraw the blood from the needleless extension set.
At least 10 mL
Flush with 10-mL of normal saline flush.
Attach the 10-gtt IV administration set.
Administer medication.
Monitor the patient’s condition and document medication, route, administration time, and response. © Jones & Bartlett Learning. Courtesy of James Upchurch.<br>
185
Rates of Medication Absorption Drugs are absorbed at a speed directly related to the route of delivery.
Injections into the bloodstream are fastest.
Oral medications take longer.<br>
Injections into the bloodstream are fastest.
Oral medications take longer.<br>