
Soft-Tissue Trauma CHAPTER 32 Introduction The





Description: Soft-Tissue Trauma CHAPTER 32 Introduction The skin is the largest organ of the body. Injuries are common. Always search for other injuries or conditions before treating soft-tissue trauma. Do not let dramatic soft-tissue injuries distract
Related Topics
Download Presentation
"Soft-Tissue Trauma CHAPTER 32 Introduction The" is the property of its rightful owner. Permission is granted to download and print the materials on this website for personal, non-commercial use only, and to display it on your personal computer provided you do not modify the materials and that you retain all copyright notices contained in the materials. By downloading content from our website, you accept the terms of this agreement.
Presentation Transcript
slide1. Soft-Tissue Trauma CHAPTER 32<br>
slide2. Introduction The skin is the largest organ of the body.
Injuries are common.
Always search for other injuries or conditions before treating soft-tissue trauma.
Do not let dramatic soft-tissue injuries distract you from conducting a thorough primary survey.<br>
slide3. Incidence, Mortality, and Morbidity (1 of 2) Soft tissue can be injured by:
Blunt injury
Penetrating injury
Burns
Soft-tissue trauma is the leading form of injury.<br>
slide4. Incidence, Mortality, and Morbidity (2 of 2) Death from soft-tissue injury is uncommon.
Uncontrolled bleeding
Local or systemic infections
Prevention involves simple actions.<br>
slide5. Anatomy and Physiology Review (1 of 2) Skin: Complex organ with crucial role in homeostasis
Protects underlying tissue from injury
Aids in temperature regulation
Prevents excessive water loss
Acts as sense organ
Responds to injuries with inflammation<br>
slide6. Anatomy and Physiology Review (2 of 2) Significant damage may make the patient vulnerable to:
Bacterial invasion
Temperature instability
Fluid balance disturbances<br>
slide7. Epidermis (1 of 2) Outer, visible layer of skin
Consists of five layers
Stratum corneum (outermost layer)
Cells are constantly shed and replaced by new cells.
Four inner layers of living cells<br>
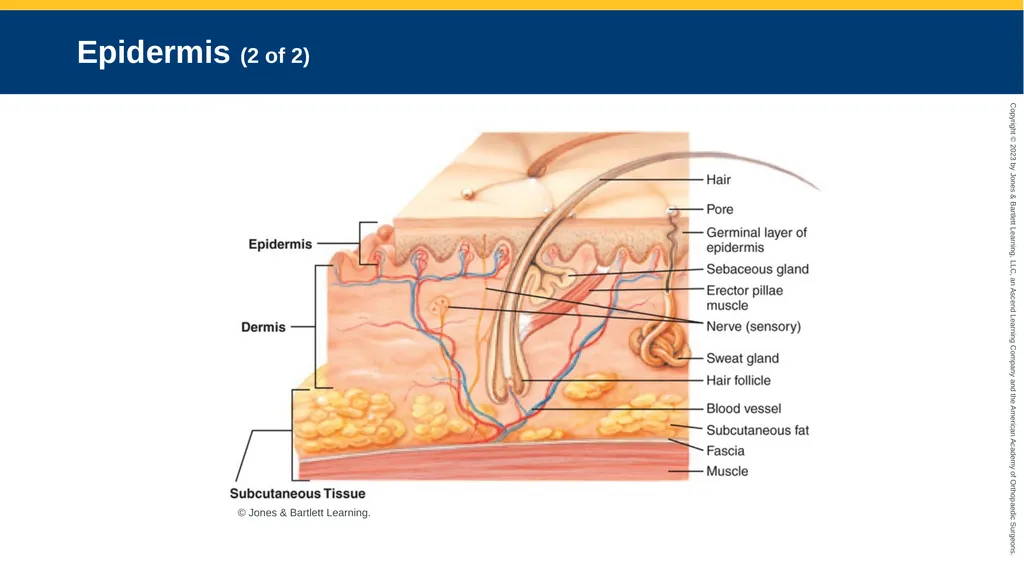
slide8. Epidermis (2 of 2) © Jones & Bartlett Learning.<br>
slide9. Dermis Tough, highly elastic connective tissue
Specialized structures include:
Nerve endings
Blood vessels
Sweat glands
Hair follicles
Sebaceous glands<br>
slide10. Subcutaneous Tissues Layer between the dermis and the underlying muscle and bone
Insulates
Protects
Stores energy (as fat)<br>
slide11. Deep Fascia Thick, dense layer of fibrous tissue below subcutaneous tissue
Tendons, muscles, and bones are located below this layer.<br>
slide12. Skin Tension Lines (1 of 2) Skin is arranged over body structures in a way that creates tension.
Static tension develops over areas with limited movement.
Lacerations parallel to lines may remain closed.
Larger wounds may be pulled open.
Smaller lacerations perpendicular to tension lines will remain open.<br>
slide13. Skin Tension Lines (2 of 2) Dynamic tension is found over muscle.
Open injuries interfere with healing
An abnormal scar may prompt scar revision surgery.<br>
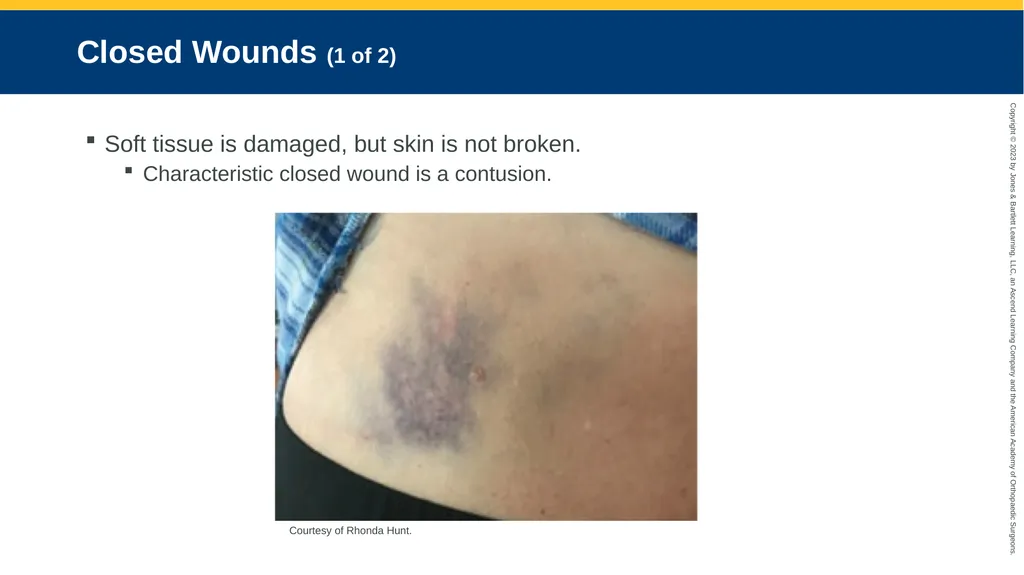
slide14. Closed Wounds (1 of 2) Soft tissue is damaged, but skin is not broken.
Characteristic closed wound is a contusion. Courtesy of Rhonda Hunt.<br>
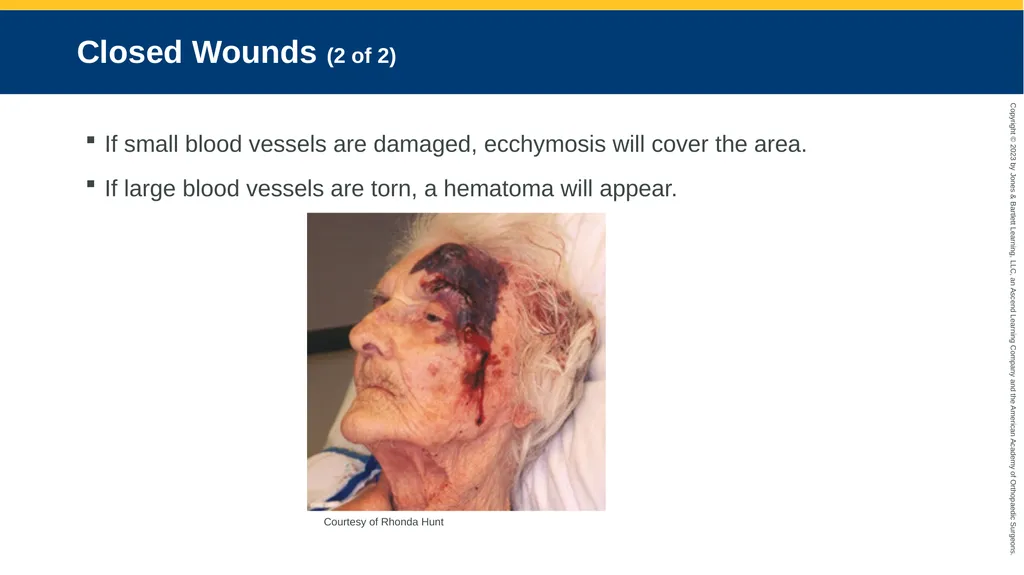
slide15. Closed Wounds (2 of 2) If small blood vessels are damaged, ecchymosis will cover the area.
If large blood vessels are torn, a hematoma will appear. Courtesy of Rhonda Hunt<br>
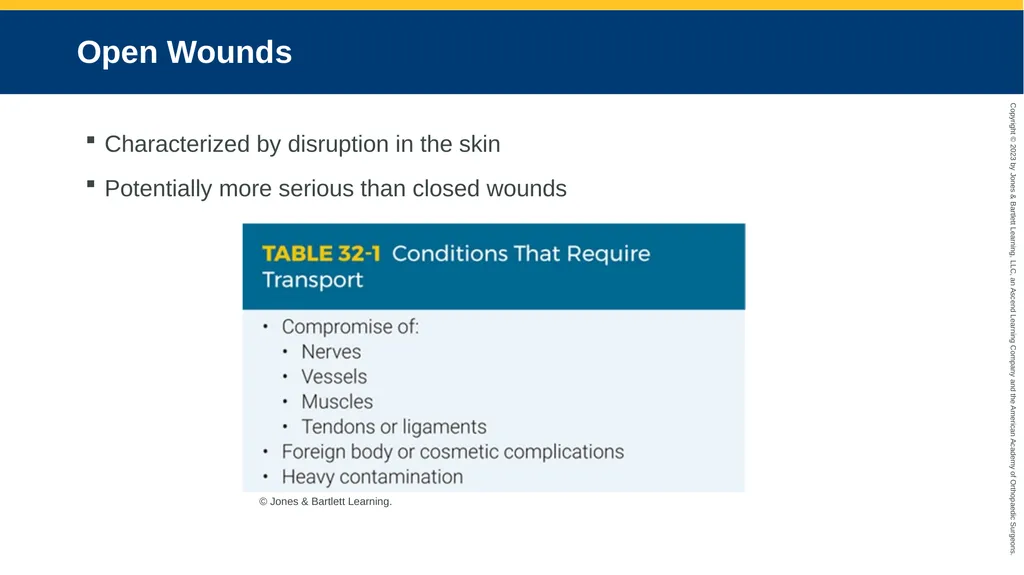
slide16. Open Wounds Characterized by disruption in the skin
Potentially more serious than closed wounds © Jones & Bartlett Learning.<br>
slide17. Crush Injuries Presents following extrication or release of an entrapped limb
External appearance may not represent level of internal damage.
Soft-tissue injuries are almost always less important than the injuries beneath the skin.<br>
slide18. Compartment Syndrome Caused by external or internal factors
External: Includes mechanisms that are applied too tightly and restrict circulation
Bandage, splint, or cast
Internal: Includes mechanisms that increase the amount of material within a compartment
Fracture, dislocation, crush, vascular, or soft-tissue injury<br>
slide19. Blast Injury Explosions can result in:
Soft-tissue trauma
Abdominal trauma
Skeletal trauma
Blast lung
Assess the scene for hazards.<br>
slide20. The Process of Wound Healing (1 of 5) Hemostasis
Vessels, platelets, and clotting cascade must work together to stop bleeding.
The release of chemical mediators:
Constricts the blood vessels
Activates platelets<br>
slide21. The Process of Wound Healing (2 of 5) Inflammation
Additional cells enter area for repair.
White blood cells combat pathogens.
Chemotactic factors are released.
Lymphocytes destroy bacteria and pathogens.
Mast cells release histamine.<br>
slide22. The Process of Wound Healing (3 of 5) Inflammation (cont’d)
Leads to the removal of:
Foreign material
Damaged cellular parts
Invading microorganisms<br>
slide23. The Process of Wound Healing (4 of 5) Epithelialization
New epithelial cells move to outer layer of skin to replace those lost in injury.
Neovascularization
New blood vessels form to bring oxygen and nutrients to injured tissue.<br>
slide24. The Process of Wound Healing (5 of 5) Collagen synthesis
Collagen: Tough, fibrous protein in scar tissue, hair, bones, connective tissue
Repair unit is synthesized by fibroblasts.
Cannot restore damaged tissue to original strength<br>
slide25. Alterations of Wound Healing (1 of 6) Healing does not always follow pattern because there may be:
Infection or abnormal scarring
Excessive bleeding
Slow healing<br>
slide26. Alterations of Wound Healing (2 of 6) Anatomic factors
Body areas with repeated motion
Relationship of open wound to skin tension lines
High-risk wounds
Human and animal bites
Injuries from foreign bodies or organic matter
Do not remove an impaled object in the field.<br>
slide27. Alterations of Wound Healing (3 of 6) Abnormal scar formation
Excessive collagen formation can occur if healing phases are not balanced, leading to:
Hypertrophic scar
Keloid scar<br>
slide28. Alterations of Wound Healing (4 of 6) Pressure injuries
Occur from:
Being bedridden
Pressure applied for prolonged periods
Involved tissues are deprived of oxygen.<br>
slide29. Alterations of Wound Healing (5 of 6) Wounds requiring closure
Open injuries affecting cosmetic areas
Gaping wounds and wounds over tension lines
Degloving injuries
Ring injuries and skin tears<br>
slide30. Alterations of Wound Healing (6 of 6) Wounds requiring closure (cont’d)
Open injuries should be closed within 24 hours.
Three types of wound closure:
Primary closure
Secondary intention
Delayed primary closure<br>
slide31. Infection (1 of 3) Any break in the skin can lead to infection.
Larger and deeper penetrations = higher risk for infection
Pathogens grow and multiply once they reach body tissues.
Clinical signs may not appear for days.<br>
slide32. Infection (2 of 3) Infection (cont’d)
Visible signs
Erythema
Pus
Warmth
Edema
Local discomfort
Red streaks<br>
slide33. Infection (3 of 3) Infection (cont’d)
Systemic signs
Fever
Shaking
Chills
Joint pain
Hypotension<br>
slide34. Patient Assessment Skin trauma is rarely life threatening.
Stay focused on assessment process.
Identify threats to EMS crew.
Identify threats to patient.<br>
slide35. Scene Size-Up Address safety first.
Evaluate MOI.
If significant, keep a high index of suspicion.
Protect yourself and patient from bodily fluid.<br>
slide36. General Impression Determine any life threats.
Altered LOC
Airway protection/patency
Inadequate breathing
Uncontrolled bleeding
Significant MOI<br>
slide37. XABCDEs (1 of 3) Note external bleeding.
Determine the patient’s mental status using AVPU.
Assess airway.
Assess breathing.
Assess circulation.<br>
slide38. XABCDEs (2 of 3) Ensure patient is adequately exposed.
Preserve clothing as evidence.
Control severe hemorrhage with a tourniquet.
Takes precedence<br>
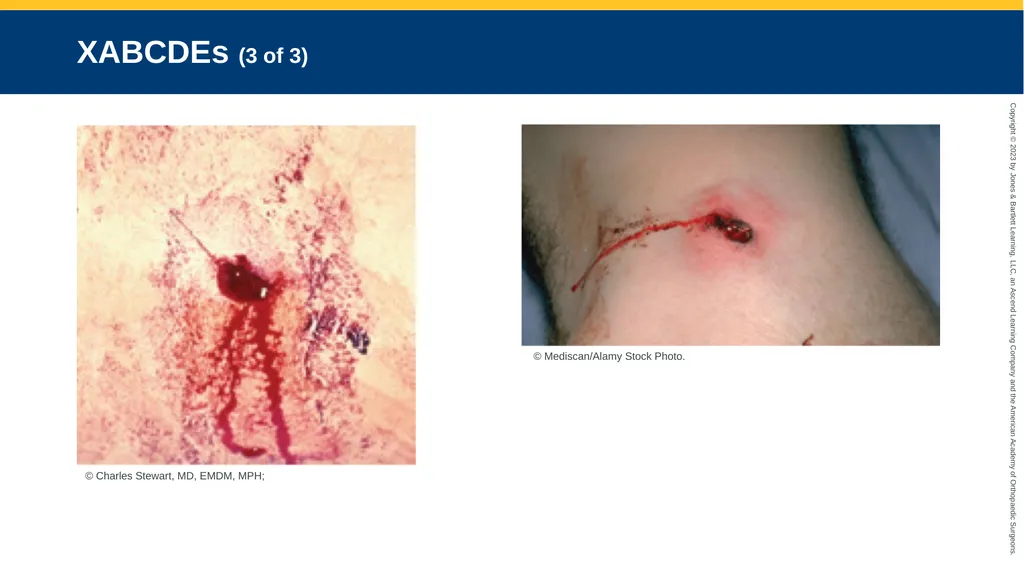
slide39. XABCDEs (3 of 3) © Charles Stewart, MD, EMDM, MPH; © Mediscan/Alamy Stock Photo.<br>
slide40. Transport Decision Transport patients.
Obtain:
Complete set of baseline vital signs
SAMPLE history<br>
slide41. History Taking Ask about:
Events leading to injury
Last tetanus booster
Prescribed and over-the-counter medicines<br>
slide42. Secondary Assessment Conduct a more thorough examination en route if there is:
A significant MOI
Adequate time
Patient in stable condition<br>
slide43. Reassessment (1 of 2) Do frequent reassessments en route.
Obtain and evaluate vital signs.
Check interventions and monitor patient.
Complete written documentation, include:
Relevant scene findings
All patient findings
Patient’s presentation
Body position (prone or supine)<br>
slide44. Reassessment (2 of 2) Complete written documentation.
Note specific injuries, describing wounds.
Record any interventions performed, documenting:
Patient’s response
Patient’s understanding
Which provider attended the patient<br>
slide45. Treatment of Closed Wounds (1 of 2) Minimize bleeding and swelling (RICES):
Help the patients Rest.
Apply Ice or cold packs.
Apply firm Compression.
Elevate the injured part higher than the heart.
Apply a Splint.<br>
slide46. Treatment of Closed Wounds (2 of 2) Swelling
Using ice as early as possible may speed up healing time.<br>
slide47. Treatment of Open Wounds General principles:
Control bleeding by most effective method.
Keep wound as clean as possible.<br>
slide48. Bandaging and Dressing Wounds Used to:
Cover wound
Control bleeding
Limit motion
Variety of materials used<br>
slide49. Complications of Improperly Applied Dressings (1 of 3) Always use as sterile a technique as possible.
Irrigate open wounds with normal saline or sterile water.
Apply a dressing over the site.
Wrap bandage neatly over dressing.<br>
slide50. Complications of Improperly Applied Dressings (2 of 3) Hemodynamic complications may include continued bleeding.
Do not remove an in-place dressing.
Consider the use of a hemostatic dressing or tourniquet.
Perform frequent assessments.<br>
slide51. Complications of Improperly Applied Dressings (3 of 3) Structural elements can be damaged if dressings are too tight.
Assess and readjust if necessary.
When extremity dressings are in place, assess:
Distal pulses
Motor function
Sensation<br>
slide52. Control of External Bleeding (1 of 5) Bleeding can be characterized by type of blood vessel damaged.
Capillary bleeding—slow flow, bright or dark red
Venous bleeding—slow, steady, darker color
Arterial bleeding—spurts, bright red color<br>
slide53. Control of External Bleeding (2 of 5) Direct pressure
Allows platelets to seal vascular walls
Use a sterile dressing, then a gloved hand over the bleeding to apply pressure.<br>
slide54. Control of External Bleeding (3 of 5) Splints
Motion disrupts clotting process.
Limit injured extremity movement.
If necessary, apply a splint.<br>
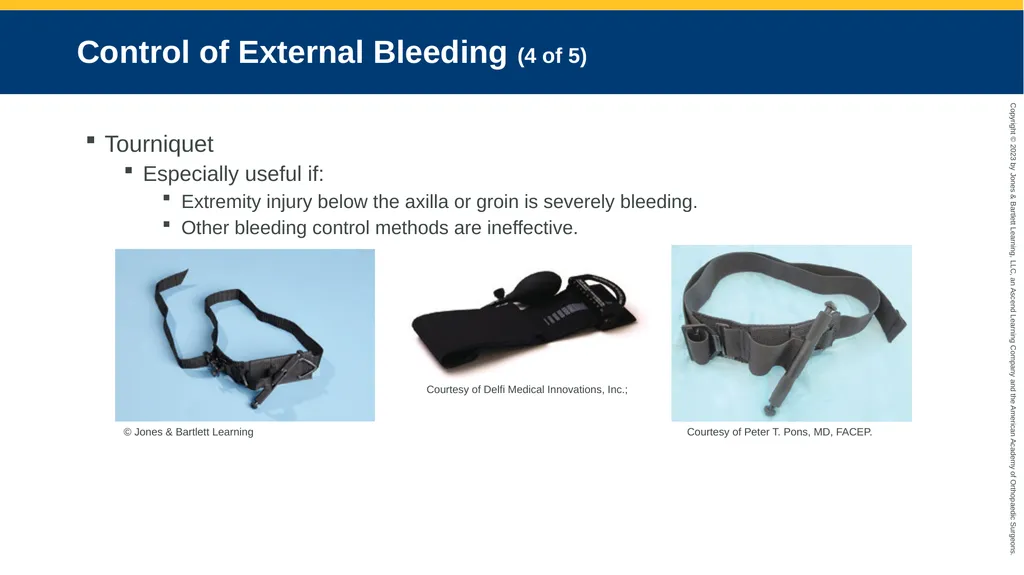
slide55. Control of External Bleeding (4 of 5) Tourniquet
Especially useful if:
Extremity injury below the axilla or groin is severely bleeding.
Other bleeding control methods are ineffective. © Jones & Bartlett Learning Courtesy of Delfi Medical Innovations, Inc.; Courtesy of Peter T. Pons, MD, FACEP.<br>
slide56. Control of External Bleeding (5 of 5) Hemostatic agents
Can be used with direct pressure
Assist with clot formation
Remove all other dressings before applying.
Consult local protocols.<br>
slide57. Managing Wound Healing and Infection Basic measures should be used in the prehospital setting.
Wounds that look infected or are not healing properly should be dressed and bandaged.
Pain control measures may be indicated.<br>
slide58. Scalp Dressing Direct pressure is usually effective.
Determine the extent of injury.
Balance bleeding control needs against the possibility of causing further damage.
If skull has been damaged, apply pressure to areas around the break.<br>
slide59. Facial Dressing Reassure patient.
Direct pressure is effective to control bleeding.
If avulsed tissue is present, attempt to place it as close to its previous position as possible.
Assess for airway compromise.<br>
slide60. Ear or Mastoid Dressing Do not place a dressing in the ear canal.
Use gauze sponges to aid in stopping blood loss.
Do not try to directly stop blood flow from the ear canal.
Place a bulky dressing over the external ear.<br>
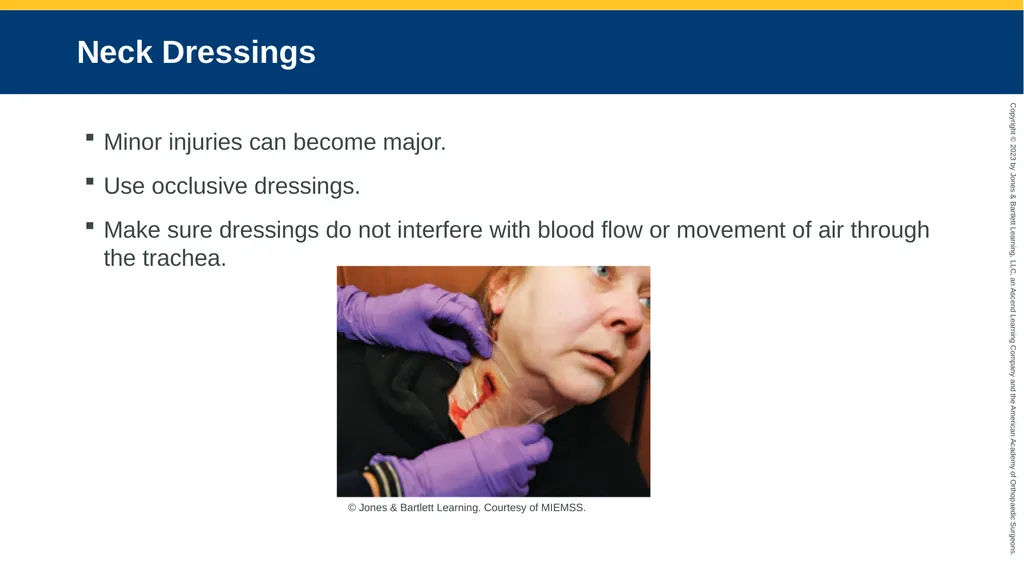
slide61. Neck Dressings Minor injuries can become major.
Use occlusive dressings.
Make sure dressings do not interfere with blood flow or movement of air through the trachea. © Jones & Bartlett Learning. Courtesy of MIEMSS.<br>
slide62. Shoulder Dressings Apply direct pressure to control bleeding.
Use a sling and swathe.<br>
slide63. Truncal Dressings Cover open wounds with occlusive dressing, taping only three sides.
Assess breath sounds.
Use medical tape to secure dressing.<br>
slide64. Groin and Hip Dressings Combined with direct pressure
Genitalia injuries should be managed by someone of the same gender.
Remain professional and protect the patient’s privacy.<br>
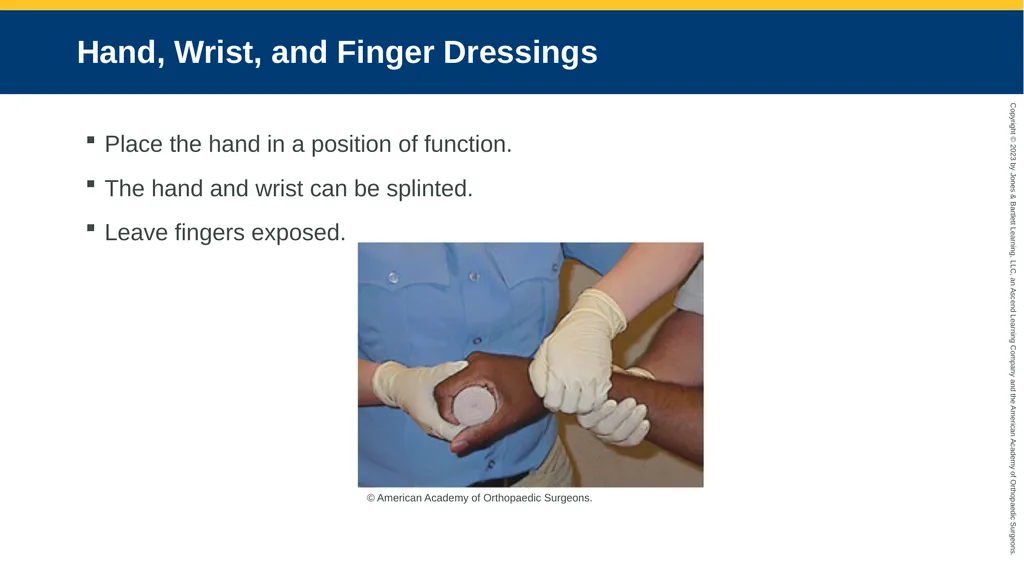
slide65. Hand, Wrist, and Finger Dressings Place the hand in a position of function.
The hand and wrist can be splinted.
Leave fingers exposed. © American Academy of Orthopaedic Surgeons.<br>
slide66. Elbow and Knee Dressings Movement may cause dressings to shift.
For larger wounds, immobilize joint.
Assess distal neurovascular status.<br>
slide67. Ankle and Foot Dressings Control bleeding with direct pressure.
If bleeding is arterial and not controlled, consider a tourniquet proximal to injury.
Always assess distal neurovascular function before and after caring for a wound.<br>
slide68. Pain Control May include:
Cold compress
Analgesics<br>
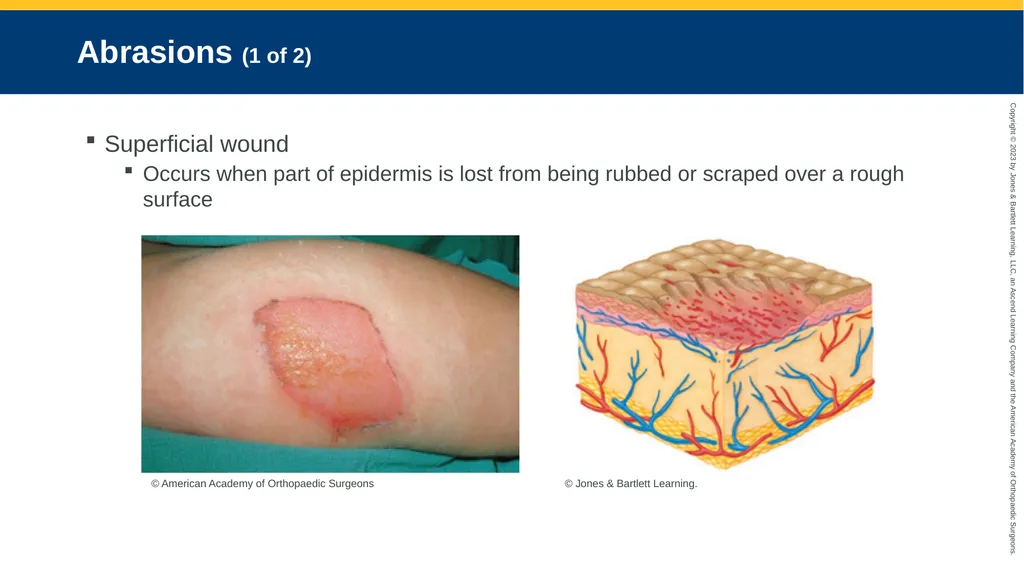
slide69. Abrasions (1 of 2) Superficial wound
Occurs when part of epidermis is lost from being rubbed or scraped over a rough surface © American Academy of Orthopaedic Surgeons © Jones & Bartlett Learning.<br>
slide70. Abrasions (2 of 2) Assessment and management
Oozes small amounts of blood and plasma
May be painful and prone to infection
Do not clean in the field.
Cover lightly with sterile dressing.<br>
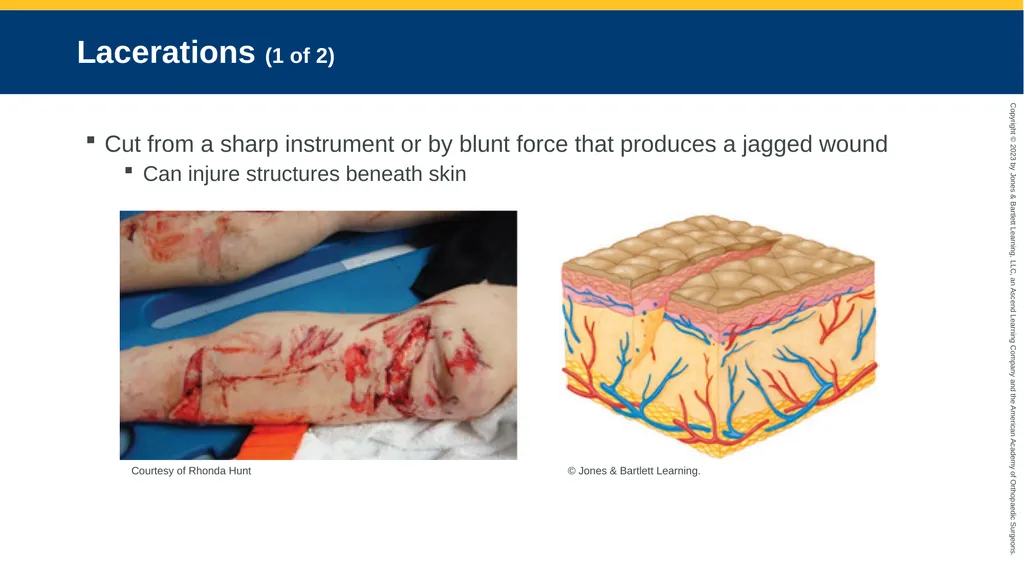
slide71. Lacerations (1 of 2) Cut from a sharp instrument or by blunt force that produces a jagged wound
Can injure structures beneath skin Courtesy of Rhonda Hunt © Jones & Bartlett Learning.<br>
slide72. Lacerations (2 of 2) Assessment and management
Seriousness depends on:
Depth
Structures damaged
First priority is to control bleeding.<br>
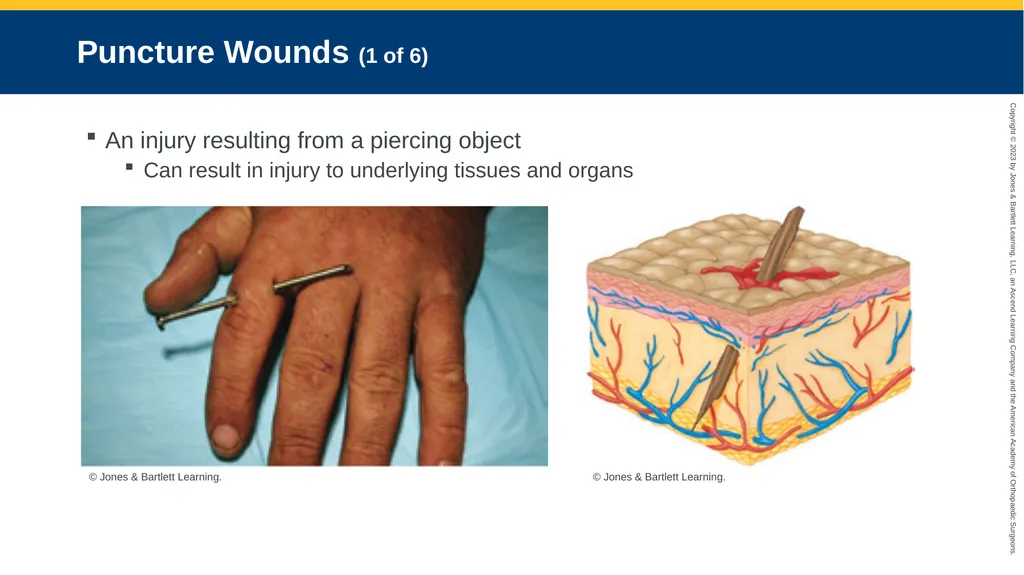
slide73. Puncture Wounds (1 of 6) An injury resulting from a piercing object
Can result in injury to underlying tissues and organs © Jones & Bartlett Learning. © Jones & Bartlett Learning.<br>
slide74. Puncture Wounds (2 of 6) Assessment and management
Consider potential depth of wound.
Treatment is similar to other wounds:
Air may be injected under the skin with certain puncture wounds.
Monitor for edema.
Treat swelling with ice.<br>
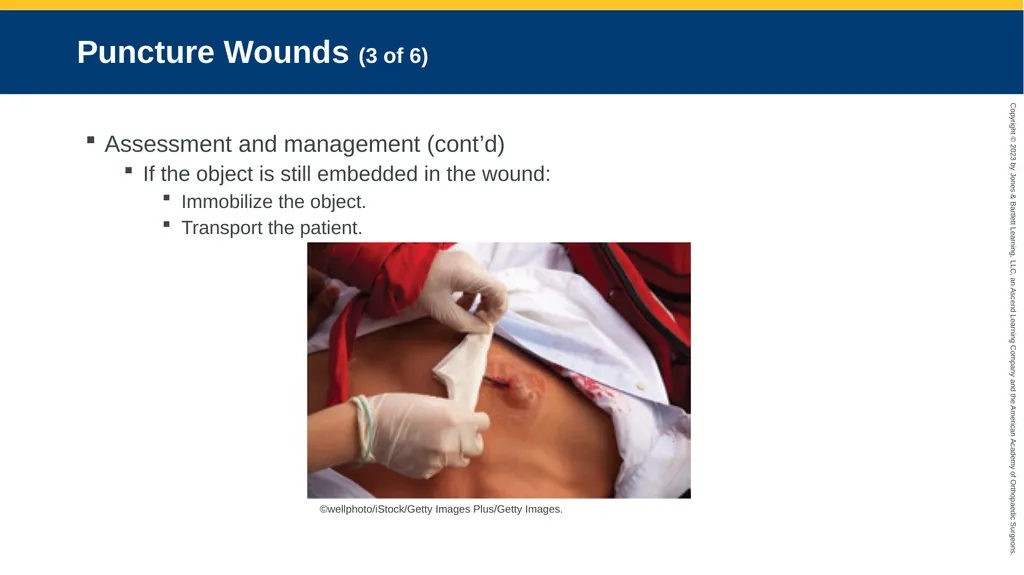
slide75. Puncture Wounds (3 of 6) Assessment and management (cont’d)
If the object is still embedded in the wound:
Immobilize the object.
Transport the patient. ©wellphoto/iStock/Getty Images Plus/Getty Images.<br>
slide76. Puncture Wounds (4 of 6) Assessment and management (cont’d)
Basic management points for impaled objects:
Do not try to remove an impaled object.
Use direct compression, but not on the impaled object or adjacent tissues.
Do not try to shorten the object.
Stabilize the object with bulky dressing and immobilize the extremity.<br>
slide77. Puncture Wounds (5 of 6) Assessment and management (cont’d)
Limit motion as soon as possible.
Secure the object as best as possible.<br>
slide78. Puncture Wounds (6 of 6) Removal of impaled object may be necessary if the:
Object directly interferes with airway control
Object interferes with chest compression
Patient is impaled on an immovable object<br>
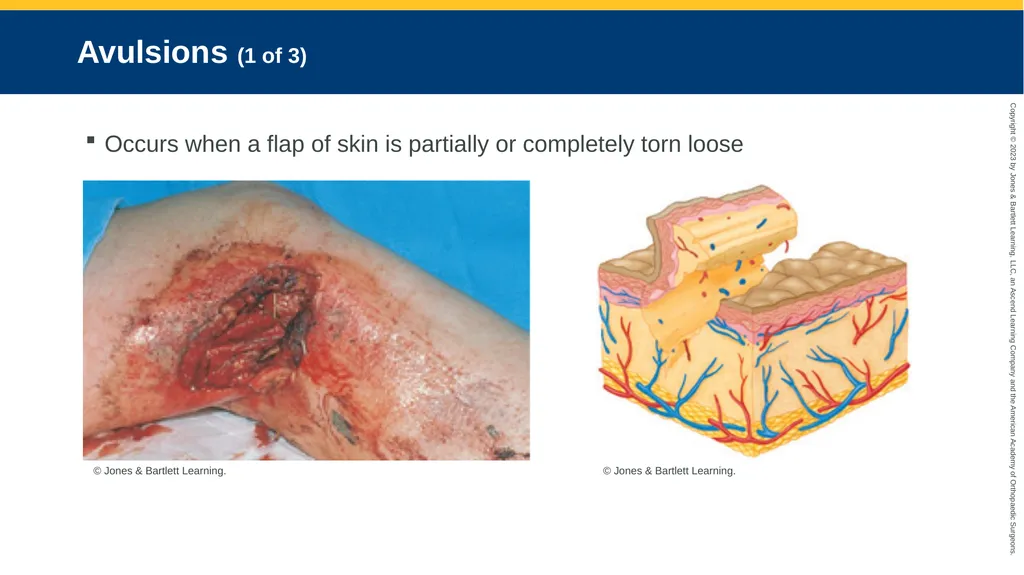
slide79. Avulsions (1 of 3) Occurs when a flap of skin is partially or completely torn loose © Jones & Bartlett Learning. © Jones & Bartlett Learning.<br>
slide80. Avulsions (2 of 3) Assessment and management
Principal danger is loss of blood supply to the avulsed skin flap.
If wound is contaminated, provide irrigation.
Gently fold and align the skin flap back as close to its normal position as possible.
Cover it with a dry, sterile compression dressing.<br>
slide81. Avulsions (3 of 3) Assessment and management (cont’d)
Ice packs on the surrounding area may:
Decrease pain and swelling
Increase the length of time the underlying tissue remains viable
If patient is unstable, do not delay transport.<br>
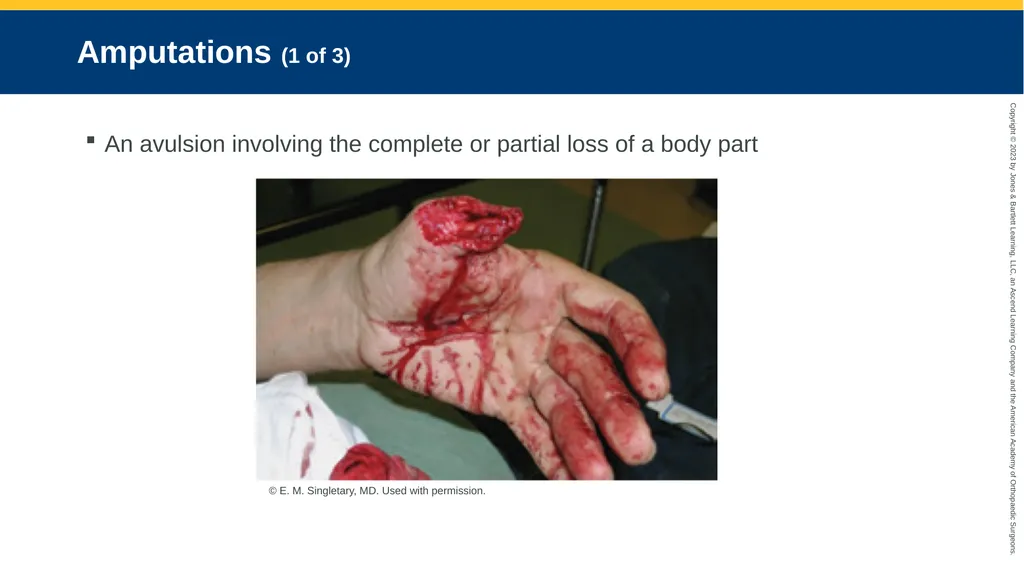
slide82. Amputations (1 of 3) An avulsion involving the complete or partial loss of a body part © E. M. Singletary, MD. Used with permission.<br>
slide83. Amputations (2 of 3) Assessment and management
Be aware of sharp bone protrusions.
If a body part is completely amputated, try to preserve it in optimal condition.
Rinse off any debris.
Wrap it loosely in saline-moistened sterile gauze.
Seal it in a plastic bag; place it in a cool container.
Never warm it or place it in water.
Never place it directly on ice or use dry ice.<br>
slide84. Amputations (3 of 3) Assessment and management (cont’d)
Transport as soon as possible.
If the amputated part is a limb or part of one, notify ED staff of:
Type of amputation
Estimated arrival time<br>
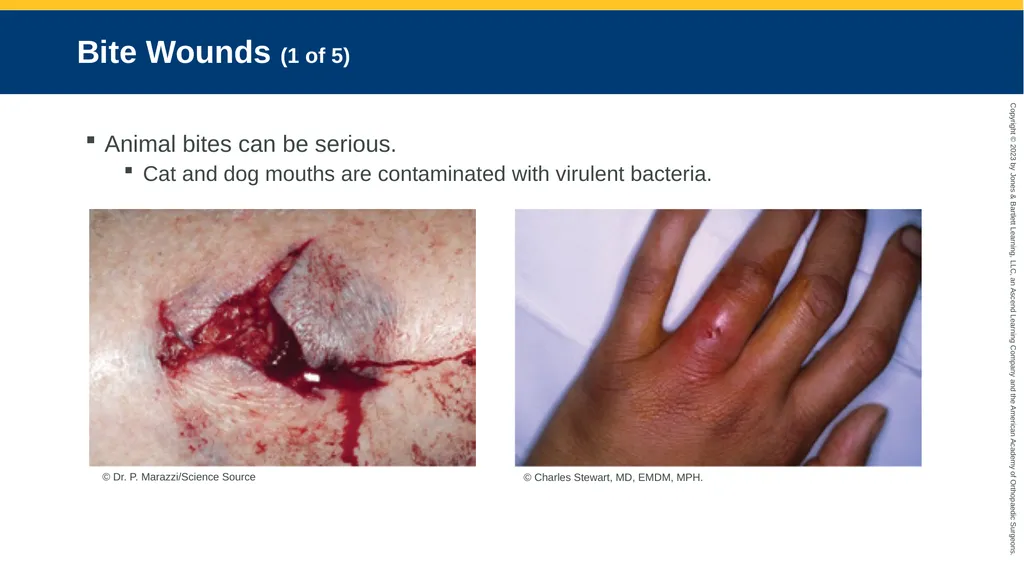
slide85. Bite Wounds (1 of 5) Animal bites can be serious.
Cat and dog mouths are contaminated with virulent bacteria. © Dr. P. Marazzi/Science Source © Charles Stewart, MD, EMDM, MPH.<br>
slide86. Bite Wounds (2 of 5) Human bites usually occur on the hand.
Human mouths contain a wide variety of virulent pathogens.<br>
slide87. Bite Wounds (3 of 5) Assessment and management
Place a sterile dressing and transport promptly.
Splint an arm or leg if it is injured.
Determine and document:
When the bite occurred
Type of animal
What led to the biting incident<br>
slide88. Bite Wounds (4 of 5) Assessment and management (cont’d)
Rabies is a major concern with dog bites.
Do not enter until the scene is secured.<br>
slide89. Bite Wounds (5 of 5) Assessment and management (cont’d)
Emergency treatment for human bites includes:
Control all bleeding and apply a sterile dressing.
Immobilize the area with splint or bandage.
Provide transport.<br>
slide90. High-Pressure Injection Injuries (1 of 3) Occurs when a foreign material is forcefully injected into soft tissue, causing:
Acute and chronic inflammation
Damage from:
Direct insult
Chemical inflammation
Ischemia from compressed blood vessels
Secondary infection<br>
slide91. High-Pressure Injection Injuries (2 of 3) Assessment and management
Question patient about nature of injury.
Inspect injury for extent of visibly damaged tissue.
Palpate affected area for signs of edema.
Check for crepitus at injury site.<br>
slide92. High-Pressure Injection Injuries (3 of 3) Assessment and management (cont’d)
Gently irrigate open wounds with normal saline or sterile water.
Dress and bandage open injuries.
Manage pain if necessary.
Injury may require emergent surgery.<br>
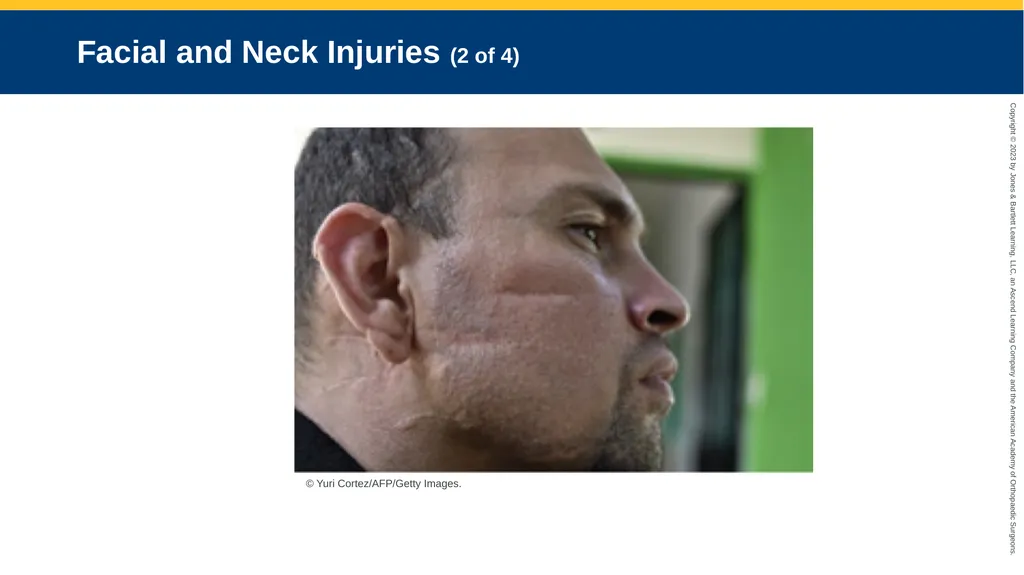
slide93. Facial and Neck Injuries (1 of 4) May involve airway or large blood vessels
Airway compromise may arise.
Open injuries to the jugular or carotid vessels can result in exsanguination.<br>
slide94. Facial and Neck Injuries (2 of 4) © Yuri Cortez/AFP/Getty Images.<br>
slide95. Facial and Neck Injuries (3 of 4) Assessment and management
Assess airway patency, protection, and oxygen.
May require more invasive management:
ET tube
Combitube
King-LT<br>
slide96. Facial and Neck Injuries (4 of 4) Assessment and management (cont’d)
If bleeding is life threatening, switch to the XABCDE approach.
Manage significant bleeding by applying bulky dressings and direct pressure.
Open wounds on the neck need occlusive dressings to prevent air emboli.<br>
slide97. Thoracic Injuries May have underlying chest trauma
Assessment and management
Four steps to assessment:
Inspection
Palpation
Auscultation
Percussion<br>
slide98. Abdominal Injuries (1 of 2) Range from minor abrasions to evisceration
Inspect abdomen and palpate area.
During inspiration, the size of thoracic and abdominal cavities change.
Increases risk of drawing air into pleural space<br>
slide99. Abdominal Injuries (2 of 2) Assessment and management
Focus on injury to underlying organs and blood vessels.
Could quickly lead to serious complications<br>
slide100. Infection (1 of 6) Myositis
Inflammation of the muscle
Can be caused by injury, infection, or overuse of a muscle
Treatment is based on patient presentation.<br>
slide101. Infection (2 of 6) Gangrene
Caused by Clostridium perfringens
Causes foul-smelling gas
If untreated:
Skin will become necrotic.
Infection may lead to sepsis.<br>
slide102. Infection (3 of 6) Tetanus
Caused by infection from Clostridium tetani
Causes a potent toxin, resulting in:
Painful muscle contractions
Muscle stiffness
Rare because of vaccine
Early recognition is important.<br>
slide103. Infection (4 of 6) Necrotizing fasciitis
Involves tissue death from bacterial infection
Recognition by EMS personnel is difficult but critical.
Early intervention is crucial.
Treatment includes:
Antibiotic therapy
Surgical debridement<br>
slide104. Infection (5 of 6) Paronychia
Most common infection of the hand in the United States
Can spread through the hand and into the circulatory and lymphatic system if not treated
Transport the patient for antibiotic therapy or lancing of the abscess.<br>
slide105. Infection (6 of 6) Flexor tenosynovitis of the hand
Caused by infection, usually the result of penetrating trauma
Presentation may be:
Swelling
Redness
Limited mobility of the hand
Transport the patient for definitive care.<br>
slide2. Introduction The skin is the largest organ of the body.
Injuries are common.
Always search for other injuries or conditions before treating soft-tissue trauma.
Do not let dramatic soft-tissue injuries distract you from conducting a thorough primary survey.<br>
slide3. Incidence, Mortality, and Morbidity (1 of 2) Soft tissue can be injured by:
Blunt injury
Penetrating injury
Burns
Soft-tissue trauma is the leading form of injury.<br>
slide4. Incidence, Mortality, and Morbidity (2 of 2) Death from soft-tissue injury is uncommon.
Uncontrolled bleeding
Local or systemic infections
Prevention involves simple actions.<br>
slide5. Anatomy and Physiology Review (1 of 2) Skin: Complex organ with crucial role in homeostasis
Protects underlying tissue from injury
Aids in temperature regulation
Prevents excessive water loss
Acts as sense organ
Responds to injuries with inflammation<br>
slide6. Anatomy and Physiology Review (2 of 2) Significant damage may make the patient vulnerable to:
Bacterial invasion
Temperature instability
Fluid balance disturbances<br>
slide7. Epidermis (1 of 2) Outer, visible layer of skin
Consists of five layers
Stratum corneum (outermost layer)
Cells are constantly shed and replaced by new cells.
Four inner layers of living cells<br>
slide8. Epidermis (2 of 2) © Jones & Bartlett Learning.<br>
slide9. Dermis Tough, highly elastic connective tissue
Specialized structures include:
Nerve endings
Blood vessels
Sweat glands
Hair follicles
Sebaceous glands<br>
slide10. Subcutaneous Tissues Layer between the dermis and the underlying muscle and bone
Insulates
Protects
Stores energy (as fat)<br>
slide11. Deep Fascia Thick, dense layer of fibrous tissue below subcutaneous tissue
Tendons, muscles, and bones are located below this layer.<br>
slide12. Skin Tension Lines (1 of 2) Skin is arranged over body structures in a way that creates tension.
Static tension develops over areas with limited movement.
Lacerations parallel to lines may remain closed.
Larger wounds may be pulled open.
Smaller lacerations perpendicular to tension lines will remain open.<br>
slide13. Skin Tension Lines (2 of 2) Dynamic tension is found over muscle.
Open injuries interfere with healing
An abnormal scar may prompt scar revision surgery.<br>
slide14. Closed Wounds (1 of 2) Soft tissue is damaged, but skin is not broken.
Characteristic closed wound is a contusion. Courtesy of Rhonda Hunt.<br>
slide15. Closed Wounds (2 of 2) If small blood vessels are damaged, ecchymosis will cover the area.
If large blood vessels are torn, a hematoma will appear. Courtesy of Rhonda Hunt<br>
slide16. Open Wounds Characterized by disruption in the skin
Potentially more serious than closed wounds © Jones & Bartlett Learning.<br>
slide17. Crush Injuries Presents following extrication or release of an entrapped limb
External appearance may not represent level of internal damage.
Soft-tissue injuries are almost always less important than the injuries beneath the skin.<br>
slide18. Compartment Syndrome Caused by external or internal factors
External: Includes mechanisms that are applied too tightly and restrict circulation
Bandage, splint, or cast
Internal: Includes mechanisms that increase the amount of material within a compartment
Fracture, dislocation, crush, vascular, or soft-tissue injury<br>
slide19. Blast Injury Explosions can result in:
Soft-tissue trauma
Abdominal trauma
Skeletal trauma
Blast lung
Assess the scene for hazards.<br>
slide20. The Process of Wound Healing (1 of 5) Hemostasis
Vessels, platelets, and clotting cascade must work together to stop bleeding.
The release of chemical mediators:
Constricts the blood vessels
Activates platelets<br>
slide21. The Process of Wound Healing (2 of 5) Inflammation
Additional cells enter area for repair.
White blood cells combat pathogens.
Chemotactic factors are released.
Lymphocytes destroy bacteria and pathogens.
Mast cells release histamine.<br>
slide22. The Process of Wound Healing (3 of 5) Inflammation (cont’d)
Leads to the removal of:
Foreign material
Damaged cellular parts
Invading microorganisms<br>
slide23. The Process of Wound Healing (4 of 5) Epithelialization
New epithelial cells move to outer layer of skin to replace those lost in injury.
Neovascularization
New blood vessels form to bring oxygen and nutrients to injured tissue.<br>
slide24. The Process of Wound Healing (5 of 5) Collagen synthesis
Collagen: Tough, fibrous protein in scar tissue, hair, bones, connective tissue
Repair unit is synthesized by fibroblasts.
Cannot restore damaged tissue to original strength<br>
slide25. Alterations of Wound Healing (1 of 6) Healing does not always follow pattern because there may be:
Infection or abnormal scarring
Excessive bleeding
Slow healing<br>
slide26. Alterations of Wound Healing (2 of 6) Anatomic factors
Body areas with repeated motion
Relationship of open wound to skin tension lines
High-risk wounds
Human and animal bites
Injuries from foreign bodies or organic matter
Do not remove an impaled object in the field.<br>
slide27. Alterations of Wound Healing (3 of 6) Abnormal scar formation
Excessive collagen formation can occur if healing phases are not balanced, leading to:
Hypertrophic scar
Keloid scar<br>
slide28. Alterations of Wound Healing (4 of 6) Pressure injuries
Occur from:
Being bedridden
Pressure applied for prolonged periods
Involved tissues are deprived of oxygen.<br>
slide29. Alterations of Wound Healing (5 of 6) Wounds requiring closure
Open injuries affecting cosmetic areas
Gaping wounds and wounds over tension lines
Degloving injuries
Ring injuries and skin tears<br>
slide30. Alterations of Wound Healing (6 of 6) Wounds requiring closure (cont’d)
Open injuries should be closed within 24 hours.
Three types of wound closure:
Primary closure
Secondary intention
Delayed primary closure<br>
slide31. Infection (1 of 3) Any break in the skin can lead to infection.
Larger and deeper penetrations = higher risk for infection
Pathogens grow and multiply once they reach body tissues.
Clinical signs may not appear for days.<br>
slide32. Infection (2 of 3) Infection (cont’d)
Visible signs
Erythema
Pus
Warmth
Edema
Local discomfort
Red streaks<br>
slide33. Infection (3 of 3) Infection (cont’d)
Systemic signs
Fever
Shaking
Chills
Joint pain
Hypotension<br>
slide34. Patient Assessment Skin trauma is rarely life threatening.
Stay focused on assessment process.
Identify threats to EMS crew.
Identify threats to patient.<br>
slide35. Scene Size-Up Address safety first.
Evaluate MOI.
If significant, keep a high index of suspicion.
Protect yourself and patient from bodily fluid.<br>
slide36. General Impression Determine any life threats.
Altered LOC
Airway protection/patency
Inadequate breathing
Uncontrolled bleeding
Significant MOI<br>
slide37. XABCDEs (1 of 3) Note external bleeding.
Determine the patient’s mental status using AVPU.
Assess airway.
Assess breathing.
Assess circulation.<br>
slide38. XABCDEs (2 of 3) Ensure patient is adequately exposed.
Preserve clothing as evidence.
Control severe hemorrhage with a tourniquet.
Takes precedence<br>
slide39. XABCDEs (3 of 3) © Charles Stewart, MD, EMDM, MPH; © Mediscan/Alamy Stock Photo.<br>
slide40. Transport Decision Transport patients.
Obtain:
Complete set of baseline vital signs
SAMPLE history<br>
slide41. History Taking Ask about:
Events leading to injury
Last tetanus booster
Prescribed and over-the-counter medicines<br>
slide42. Secondary Assessment Conduct a more thorough examination en route if there is:
A significant MOI
Adequate time
Patient in stable condition<br>
slide43. Reassessment (1 of 2) Do frequent reassessments en route.
Obtain and evaluate vital signs.
Check interventions and monitor patient.
Complete written documentation, include:
Relevant scene findings
All patient findings
Patient’s presentation
Body position (prone or supine)<br>
slide44. Reassessment (2 of 2) Complete written documentation.
Note specific injuries, describing wounds.
Record any interventions performed, documenting:
Patient’s response
Patient’s understanding
Which provider attended the patient<br>
slide45. Treatment of Closed Wounds (1 of 2) Minimize bleeding and swelling (RICES):
Help the patients Rest.
Apply Ice or cold packs.
Apply firm Compression.
Elevate the injured part higher than the heart.
Apply a Splint.<br>
slide46. Treatment of Closed Wounds (2 of 2) Swelling
Using ice as early as possible may speed up healing time.<br>
slide47. Treatment of Open Wounds General principles:
Control bleeding by most effective method.
Keep wound as clean as possible.<br>
slide48. Bandaging and Dressing Wounds Used to:
Cover wound
Control bleeding
Limit motion
Variety of materials used<br>
slide49. Complications of Improperly Applied Dressings (1 of 3) Always use as sterile a technique as possible.
Irrigate open wounds with normal saline or sterile water.
Apply a dressing over the site.
Wrap bandage neatly over dressing.<br>
slide50. Complications of Improperly Applied Dressings (2 of 3) Hemodynamic complications may include continued bleeding.
Do not remove an in-place dressing.
Consider the use of a hemostatic dressing or tourniquet.
Perform frequent assessments.<br>
slide51. Complications of Improperly Applied Dressings (3 of 3) Structural elements can be damaged if dressings are too tight.
Assess and readjust if necessary.
When extremity dressings are in place, assess:
Distal pulses
Motor function
Sensation<br>
slide52. Control of External Bleeding (1 of 5) Bleeding can be characterized by type of blood vessel damaged.
Capillary bleeding—slow flow, bright or dark red
Venous bleeding—slow, steady, darker color
Arterial bleeding—spurts, bright red color<br>
slide53. Control of External Bleeding (2 of 5) Direct pressure
Allows platelets to seal vascular walls
Use a sterile dressing, then a gloved hand over the bleeding to apply pressure.<br>
slide54. Control of External Bleeding (3 of 5) Splints
Motion disrupts clotting process.
Limit injured extremity movement.
If necessary, apply a splint.<br>
slide55. Control of External Bleeding (4 of 5) Tourniquet
Especially useful if:
Extremity injury below the axilla or groin is severely bleeding.
Other bleeding control methods are ineffective. © Jones & Bartlett Learning Courtesy of Delfi Medical Innovations, Inc.; Courtesy of Peter T. Pons, MD, FACEP.<br>
slide56. Control of External Bleeding (5 of 5) Hemostatic agents
Can be used with direct pressure
Assist with clot formation
Remove all other dressings before applying.
Consult local protocols.<br>
slide57. Managing Wound Healing and Infection Basic measures should be used in the prehospital setting.
Wounds that look infected or are not healing properly should be dressed and bandaged.
Pain control measures may be indicated.<br>
slide58. Scalp Dressing Direct pressure is usually effective.
Determine the extent of injury.
Balance bleeding control needs against the possibility of causing further damage.
If skull has been damaged, apply pressure to areas around the break.<br>
slide59. Facial Dressing Reassure patient.
Direct pressure is effective to control bleeding.
If avulsed tissue is present, attempt to place it as close to its previous position as possible.
Assess for airway compromise.<br>
slide60. Ear or Mastoid Dressing Do not place a dressing in the ear canal.
Use gauze sponges to aid in stopping blood loss.
Do not try to directly stop blood flow from the ear canal.
Place a bulky dressing over the external ear.<br>
slide61. Neck Dressings Minor injuries can become major.
Use occlusive dressings.
Make sure dressings do not interfere with blood flow or movement of air through the trachea. © Jones & Bartlett Learning. Courtesy of MIEMSS.<br>
slide62. Shoulder Dressings Apply direct pressure to control bleeding.
Use a sling and swathe.<br>
slide63. Truncal Dressings Cover open wounds with occlusive dressing, taping only three sides.
Assess breath sounds.
Use medical tape to secure dressing.<br>
slide64. Groin and Hip Dressings Combined with direct pressure
Genitalia injuries should be managed by someone of the same gender.
Remain professional and protect the patient’s privacy.<br>
slide65. Hand, Wrist, and Finger Dressings Place the hand in a position of function.
The hand and wrist can be splinted.
Leave fingers exposed. © American Academy of Orthopaedic Surgeons.<br>
slide66. Elbow and Knee Dressings Movement may cause dressings to shift.
For larger wounds, immobilize joint.
Assess distal neurovascular status.<br>
slide67. Ankle and Foot Dressings Control bleeding with direct pressure.
If bleeding is arterial and not controlled, consider a tourniquet proximal to injury.
Always assess distal neurovascular function before and after caring for a wound.<br>
slide68. Pain Control May include:
Cold compress
Analgesics<br>
slide69. Abrasions (1 of 2) Superficial wound
Occurs when part of epidermis is lost from being rubbed or scraped over a rough surface © American Academy of Orthopaedic Surgeons © Jones & Bartlett Learning.<br>
slide70. Abrasions (2 of 2) Assessment and management
Oozes small amounts of blood and plasma
May be painful and prone to infection
Do not clean in the field.
Cover lightly with sterile dressing.<br>
slide71. Lacerations (1 of 2) Cut from a sharp instrument or by blunt force that produces a jagged wound
Can injure structures beneath skin Courtesy of Rhonda Hunt © Jones & Bartlett Learning.<br>
slide72. Lacerations (2 of 2) Assessment and management
Seriousness depends on:
Depth
Structures damaged
First priority is to control bleeding.<br>
slide73. Puncture Wounds (1 of 6) An injury resulting from a piercing object
Can result in injury to underlying tissues and organs © Jones & Bartlett Learning. © Jones & Bartlett Learning.<br>
slide74. Puncture Wounds (2 of 6) Assessment and management
Consider potential depth of wound.
Treatment is similar to other wounds:
Air may be injected under the skin with certain puncture wounds.
Monitor for edema.
Treat swelling with ice.<br>
slide75. Puncture Wounds (3 of 6) Assessment and management (cont’d)
If the object is still embedded in the wound:
Immobilize the object.
Transport the patient. ©wellphoto/iStock/Getty Images Plus/Getty Images.<br>
slide76. Puncture Wounds (4 of 6) Assessment and management (cont’d)
Basic management points for impaled objects:
Do not try to remove an impaled object.
Use direct compression, but not on the impaled object or adjacent tissues.
Do not try to shorten the object.
Stabilize the object with bulky dressing and immobilize the extremity.<br>
slide77. Puncture Wounds (5 of 6) Assessment and management (cont’d)
Limit motion as soon as possible.
Secure the object as best as possible.<br>
slide78. Puncture Wounds (6 of 6) Removal of impaled object may be necessary if the:
Object directly interferes with airway control
Object interferes with chest compression
Patient is impaled on an immovable object<br>
slide79. Avulsions (1 of 3) Occurs when a flap of skin is partially or completely torn loose © Jones & Bartlett Learning. © Jones & Bartlett Learning.<br>
slide80. Avulsions (2 of 3) Assessment and management
Principal danger is loss of blood supply to the avulsed skin flap.
If wound is contaminated, provide irrigation.
Gently fold and align the skin flap back as close to its normal position as possible.
Cover it with a dry, sterile compression dressing.<br>
slide81. Avulsions (3 of 3) Assessment and management (cont’d)
Ice packs on the surrounding area may:
Decrease pain and swelling
Increase the length of time the underlying tissue remains viable
If patient is unstable, do not delay transport.<br>
slide82. Amputations (1 of 3) An avulsion involving the complete or partial loss of a body part © E. M. Singletary, MD. Used with permission.<br>
slide83. Amputations (2 of 3) Assessment and management
Be aware of sharp bone protrusions.
If a body part is completely amputated, try to preserve it in optimal condition.
Rinse off any debris.
Wrap it loosely in saline-moistened sterile gauze.
Seal it in a plastic bag; place it in a cool container.
Never warm it or place it in water.
Never place it directly on ice or use dry ice.<br>
slide84. Amputations (3 of 3) Assessment and management (cont’d)
Transport as soon as possible.
If the amputated part is a limb or part of one, notify ED staff of:
Type of amputation
Estimated arrival time<br>
slide85. Bite Wounds (1 of 5) Animal bites can be serious.
Cat and dog mouths are contaminated with virulent bacteria. © Dr. P. Marazzi/Science Source © Charles Stewart, MD, EMDM, MPH.<br>
slide86. Bite Wounds (2 of 5) Human bites usually occur on the hand.
Human mouths contain a wide variety of virulent pathogens.<br>
slide87. Bite Wounds (3 of 5) Assessment and management
Place a sterile dressing and transport promptly.
Splint an arm or leg if it is injured.
Determine and document:
When the bite occurred
Type of animal
What led to the biting incident<br>
slide88. Bite Wounds (4 of 5) Assessment and management (cont’d)
Rabies is a major concern with dog bites.
Do not enter until the scene is secured.<br>
slide89. Bite Wounds (5 of 5) Assessment and management (cont’d)
Emergency treatment for human bites includes:
Control all bleeding and apply a sterile dressing.
Immobilize the area with splint or bandage.
Provide transport.<br>
slide90. High-Pressure Injection Injuries (1 of 3) Occurs when a foreign material is forcefully injected into soft tissue, causing:
Acute and chronic inflammation
Damage from:
Direct insult
Chemical inflammation
Ischemia from compressed blood vessels
Secondary infection<br>
slide91. High-Pressure Injection Injuries (2 of 3) Assessment and management
Question patient about nature of injury.
Inspect injury for extent of visibly damaged tissue.
Palpate affected area for signs of edema.
Check for crepitus at injury site.<br>
slide92. High-Pressure Injection Injuries (3 of 3) Assessment and management (cont’d)
Gently irrigate open wounds with normal saline or sterile water.
Dress and bandage open injuries.
Manage pain if necessary.
Injury may require emergent surgery.<br>
slide93. Facial and Neck Injuries (1 of 4) May involve airway or large blood vessels
Airway compromise may arise.
Open injuries to the jugular or carotid vessels can result in exsanguination.<br>
slide94. Facial and Neck Injuries (2 of 4) © Yuri Cortez/AFP/Getty Images.<br>
slide95. Facial and Neck Injuries (3 of 4) Assessment and management
Assess airway patency, protection, and oxygen.
May require more invasive management:
ET tube
Combitube
King-LT<br>
slide96. Facial and Neck Injuries (4 of 4) Assessment and management (cont’d)
If bleeding is life threatening, switch to the XABCDE approach.
Manage significant bleeding by applying bulky dressings and direct pressure.
Open wounds on the neck need occlusive dressings to prevent air emboli.<br>
slide97. Thoracic Injuries May have underlying chest trauma
Assessment and management
Four steps to assessment:
Inspection
Palpation
Auscultation
Percussion<br>
slide98. Abdominal Injuries (1 of 2) Range from minor abrasions to evisceration
Inspect abdomen and palpate area.
During inspiration, the size of thoracic and abdominal cavities change.
Increases risk of drawing air into pleural space<br>
slide99. Abdominal Injuries (2 of 2) Assessment and management
Focus on injury to underlying organs and blood vessels.
Could quickly lead to serious complications<br>
slide100. Infection (1 of 6) Myositis
Inflammation of the muscle
Can be caused by injury, infection, or overuse of a muscle
Treatment is based on patient presentation.<br>
slide101. Infection (2 of 6) Gangrene
Caused by Clostridium perfringens
Causes foul-smelling gas
If untreated:
Skin will become necrotic.
Infection may lead to sepsis.<br>
slide102. Infection (3 of 6) Tetanus
Caused by infection from Clostridium tetani
Causes a potent toxin, resulting in:
Painful muscle contractions
Muscle stiffness
Rare because of vaccine
Early recognition is important.<br>
slide103. Infection (4 of 6) Necrotizing fasciitis
Involves tissue death from bacterial infection
Recognition by EMS personnel is difficult but critical.
Early intervention is crucial.
Treatment includes:
Antibiotic therapy
Surgical debridement<br>
slide104. Infection (5 of 6) Paronychia
Most common infection of the hand in the United States
Can spread through the hand and into the circulatory and lymphatic system if not treated
Transport the patient for antibiotic therapy or lancing of the abscess.<br>
slide105. Infection (6 of 6) Flexor tenosynovitis of the hand
Caused by infection, usually the result of penetrating trauma
Presentation may be:
Swelling
Redness
Limited mobility of the hand
Transport the patient for definitive care.<br>