
Tuesday 19th May 2020 WALT: use development tools

Description: Tuesday 19th May 2020 WALT: use development tools to create an app WILF: I can follow instructions to download an app development tool (MIT app inventor). I can identify the main features of the two app examples given. I can recreate at
Related Topics
Download Presentation
"Tuesday 19th May 2020 WALT: use development tools" is the property of its rightful owner. Permission is granted to download and print the materials on this website for personal, non-commercial use only, and to display it on your personal computer provided you do not modify the materials and that you retain all copyright notices contained in the materials. By downloading content from our website, you accept the terms of this agreement.
Presentation Transcript
slide1. Tuesday 19th May 2020 WALT: use development tools to create an app WILF:
I can follow instructions to download an app development tool (MIT app inventor).
I can identify the main features of the two app examples given.
I can recreate at least one of the given apps by select the right components and coding.
I can test the app/s on an emulator or smart phone.<br>
slide2. Apps are small programs that sit on mobile phones to help us do all sorts of things:
Play games
Check the weather
Look at Instagram or Facebook
Read the latest news
and much more .... What is an app? Why do we need apps? The word "app" is an abbreviation for "application." It's a piece of software which comes pre-installed on your device or its software that you install yourself.<br>
slide3. The first thing you need to do is download an app development tool.
We will be using the ‘MIT app inventor’ https://appinventor.mit.edu/ Once you go onto this website, follow the steps that can be found on the next few slides.<br>
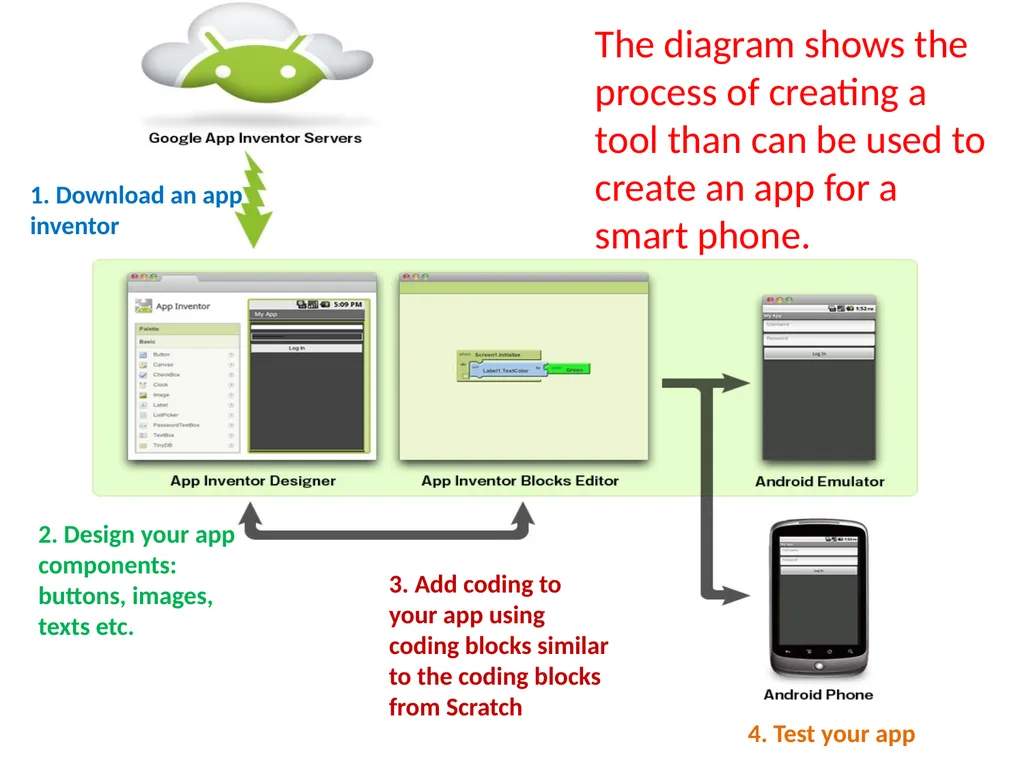
slide4. The diagram shows the process of creating a tool than can be used to create an app for a smart phone. 1. Download an app inventor 2. Design your app components: buttons, images, texts etc. 3. Add coding to your app using coding blocks similar to the coding blocks from Scratch 4. Test your app<br>
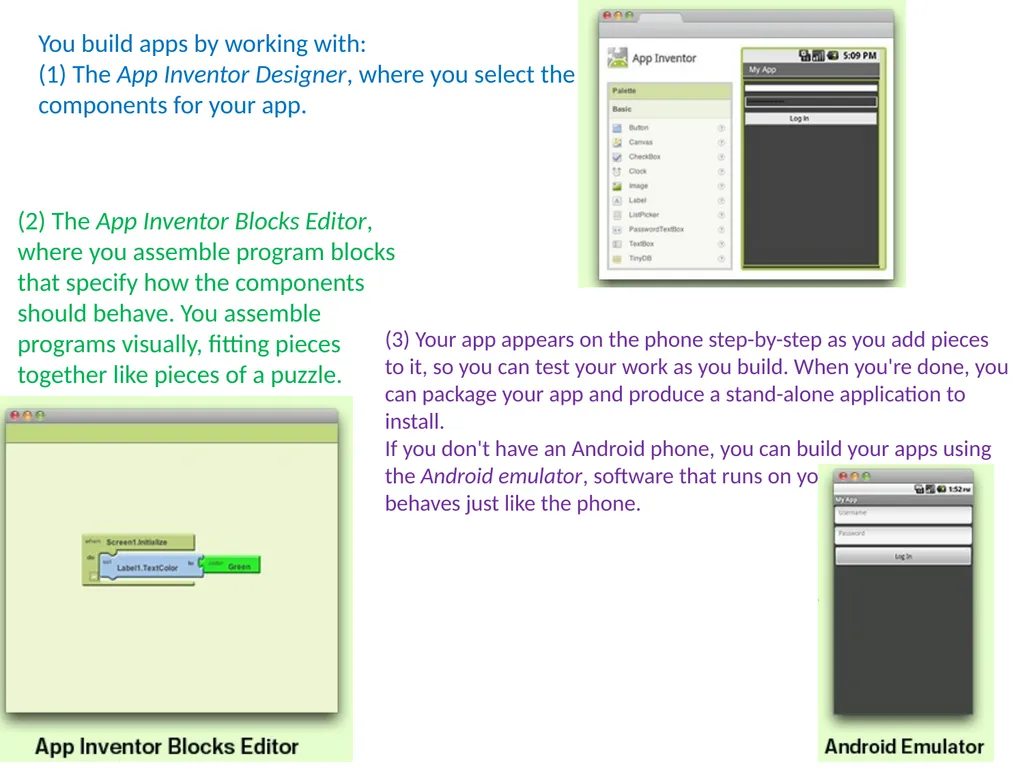
slide5. You build apps by working with:
(1) The App Inventor Designer, where you select the components for your app. (2) The App Inventor Blocks Editor, where you assemble program blocks that specify how the components should behave. You assemble programs visually, fitting pieces together like pieces of a puzzle. (3) Your app appears on the phone step-by-step as you add pieces to it, so you can test your work as you build. When you're done, you can package your app and produce a stand-alone application to install.
If you don't have an Android phone, you can build your apps using the Android emulator, software that runs on your computer and behaves just like the phone.<br>
slide6. We are going to now go through how to set up an App Inventor.
Google MIT App inventor https://appinventor.mit.edu/
Click on get started
Click on setup instructions
Scroll down to Option 2 Instructions – Click
(Or you can go straight to that page using the link below)
Choose Instruction for Windows or Mac (depending on your device)
Download the installer Task 1 https://appinventor.mit.edu/explore/ai2/setup-emulator For detailed instructions, check the PPT on the post (Google classroom)saying ‘Instructions for setting up ‘MIT app inventor’<br>
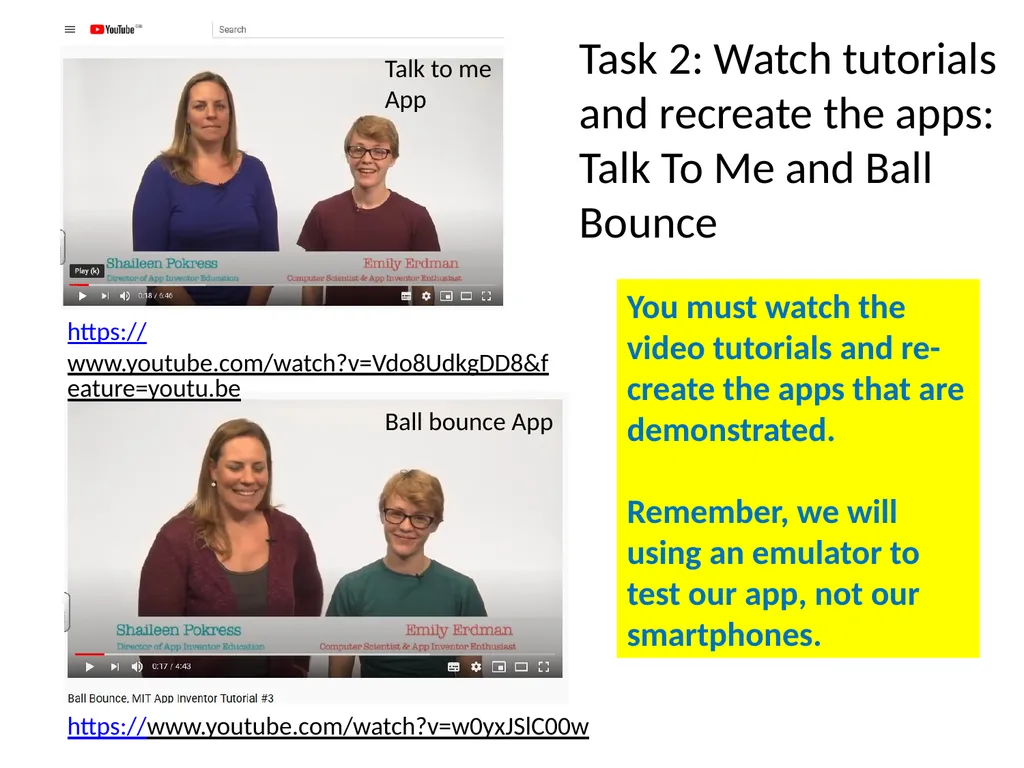
slide7. https://www.youtube.com/watch?v=Vdo8UdkgDD8&feature=youtu.be Talk to me App You must watch the video tutorials and re-create the apps that are demonstrated.
Remember, we will using an emulator to test our app, not our smartphones. https://www.youtube.com/watch?v=w0yxJSlC00w Ball bounce App Task 2: Watch tutorials and recreate the apps: Talk To Me and Ball Bounce<br>
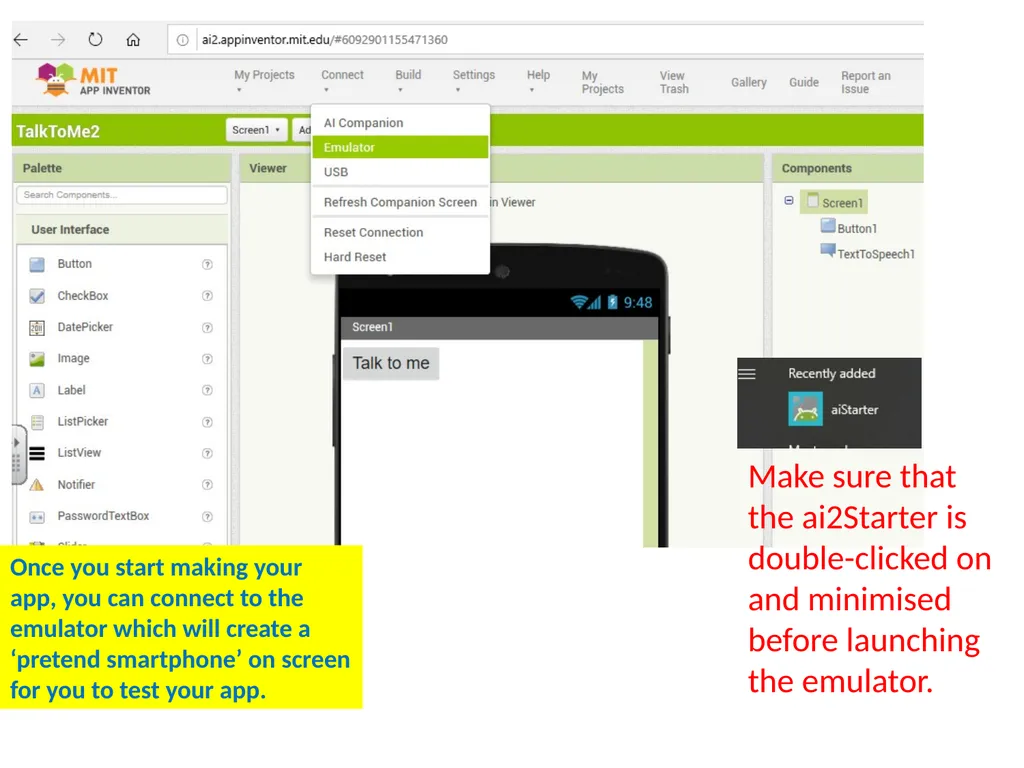
slide8. Once you start making your app, you can connect to the emulator which will create a ‘pretend smartphone’ on screen for you to test your app. Make sure that the ai2Starter is double-clicked on and minimised before launching the emulator.<br>
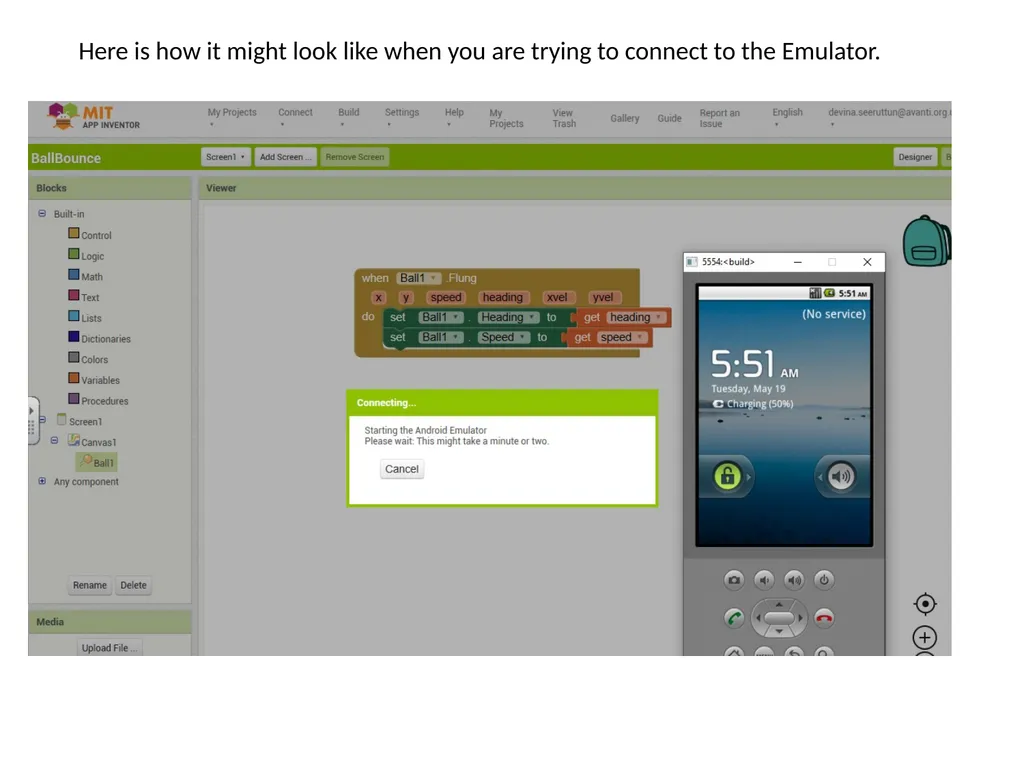
slide9. Here is how it might look like when you are trying to connect to the Emulator.<br>
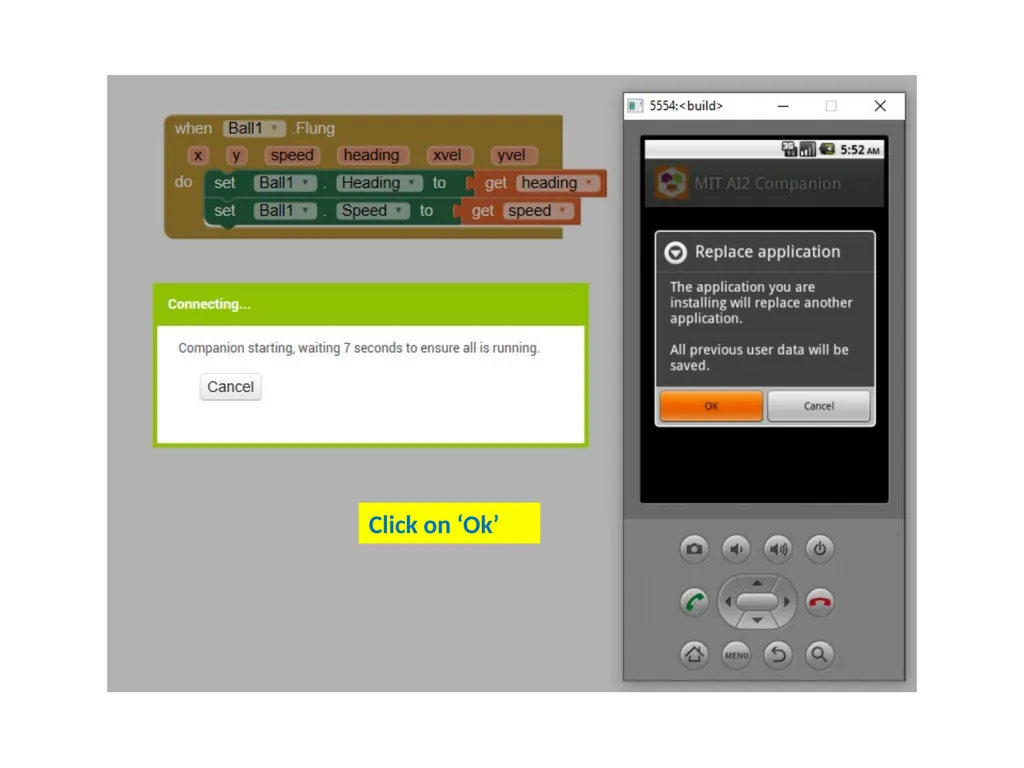
slide10. Click on ‘Ok’<br>
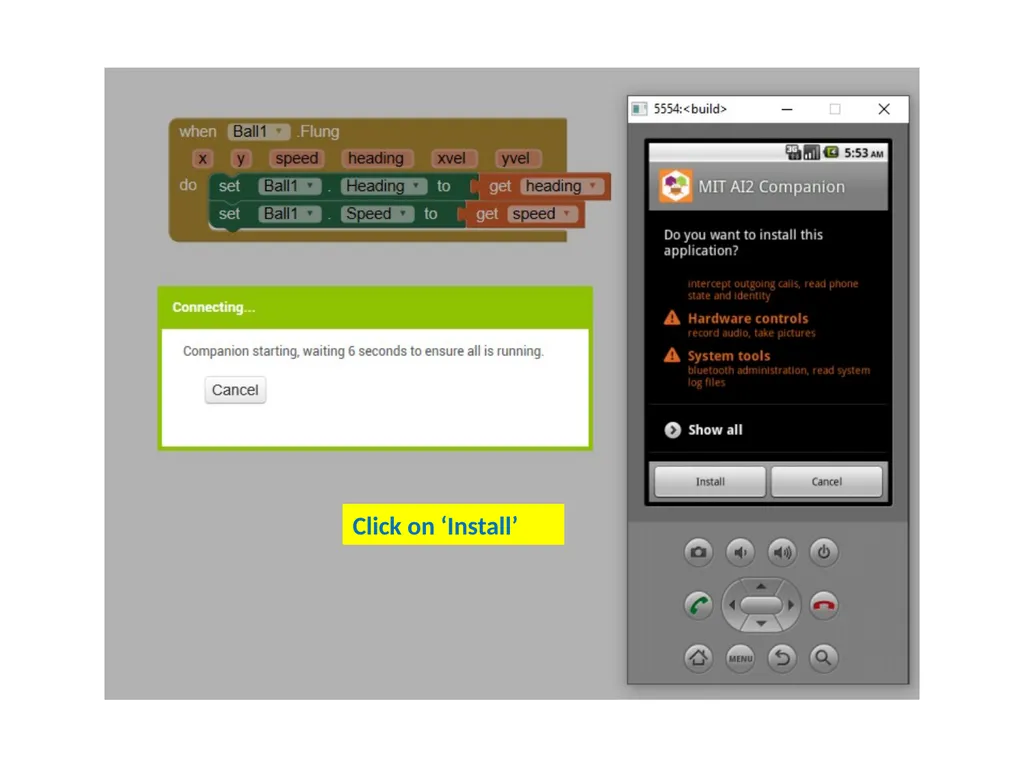
slide11. Click on ‘Install’<br>
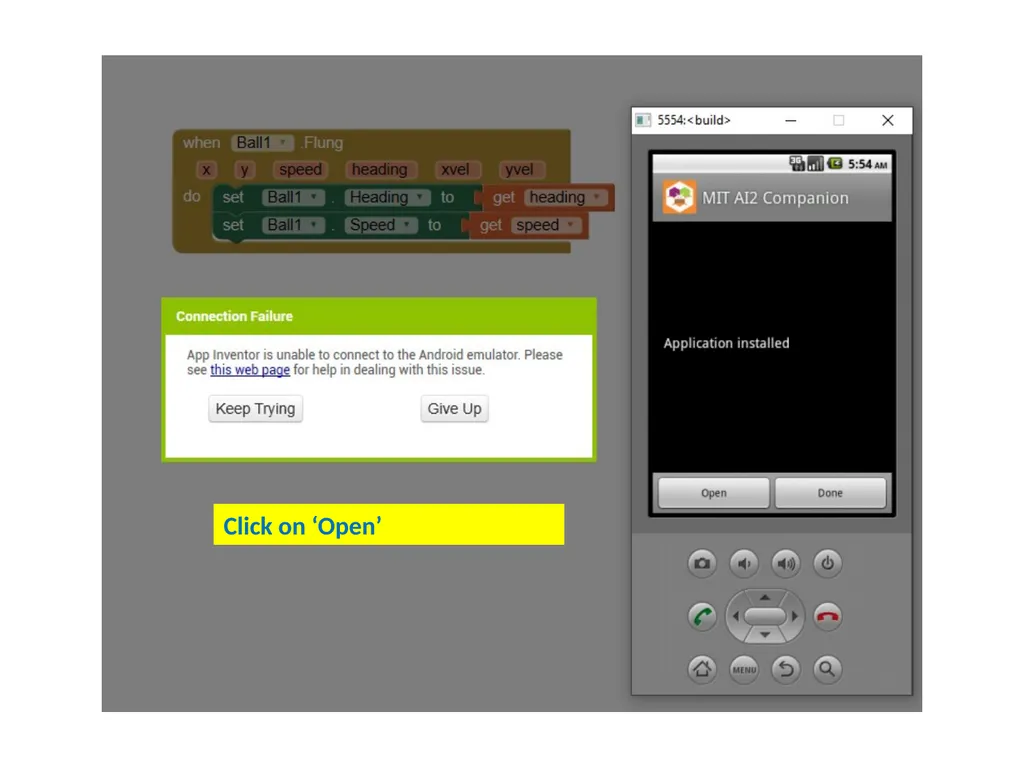
slide13. Click on ‘Open’<br>
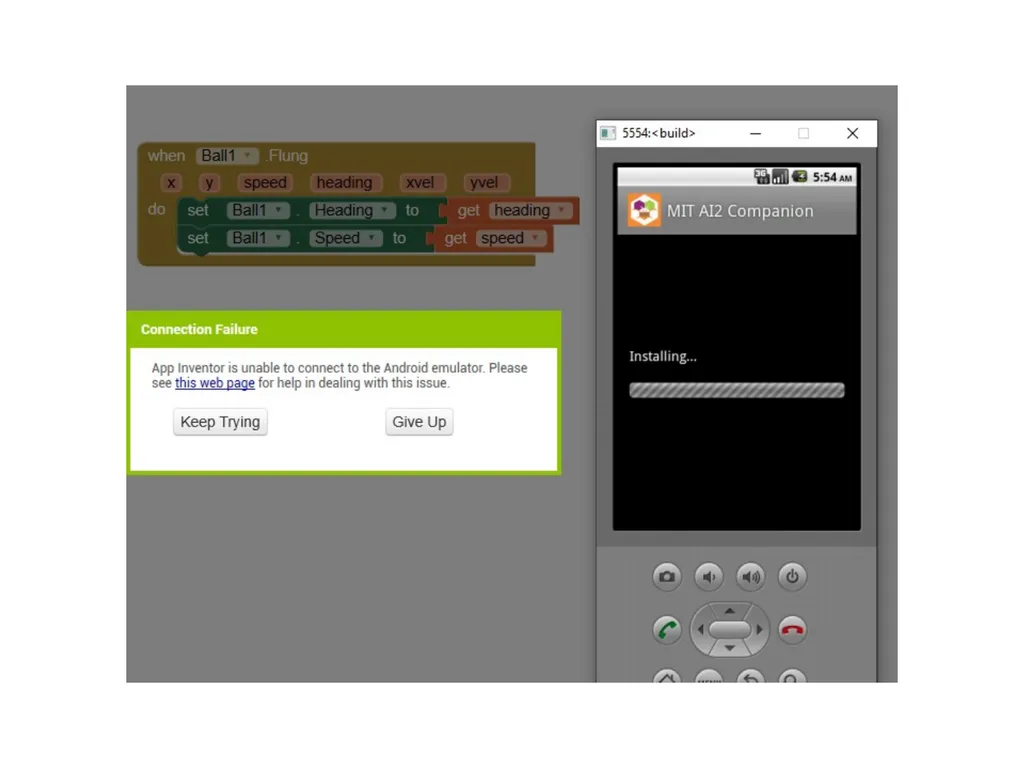
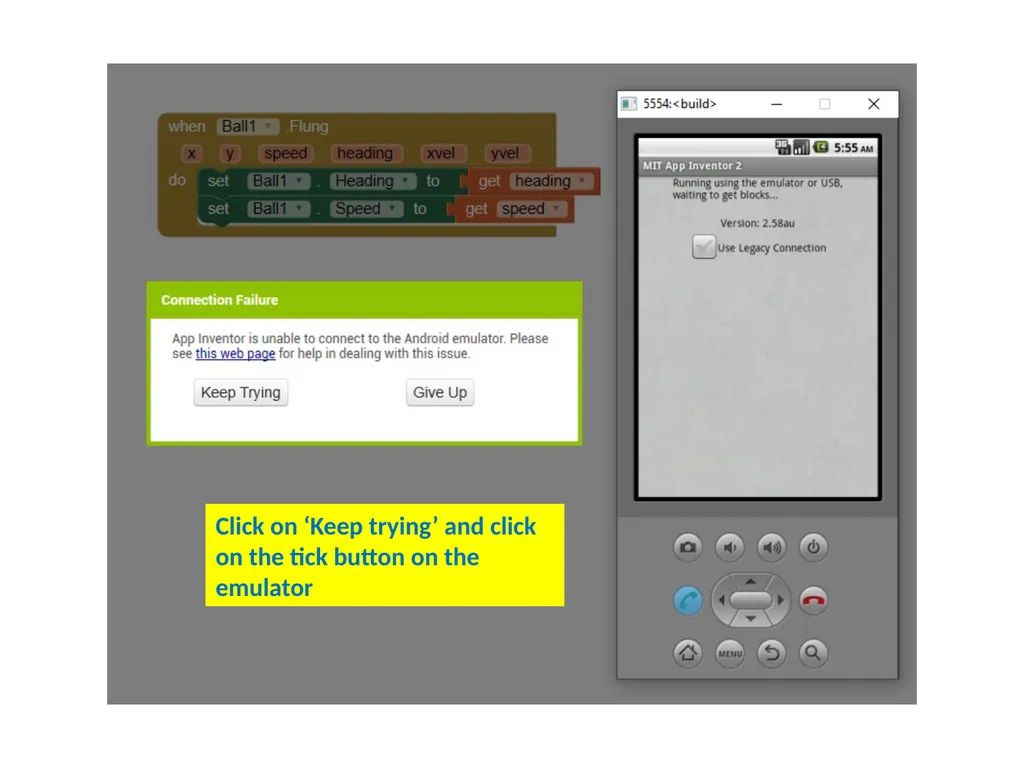
slide14. Click on ‘Keep trying’ and click on the tick button on the emulator<br>
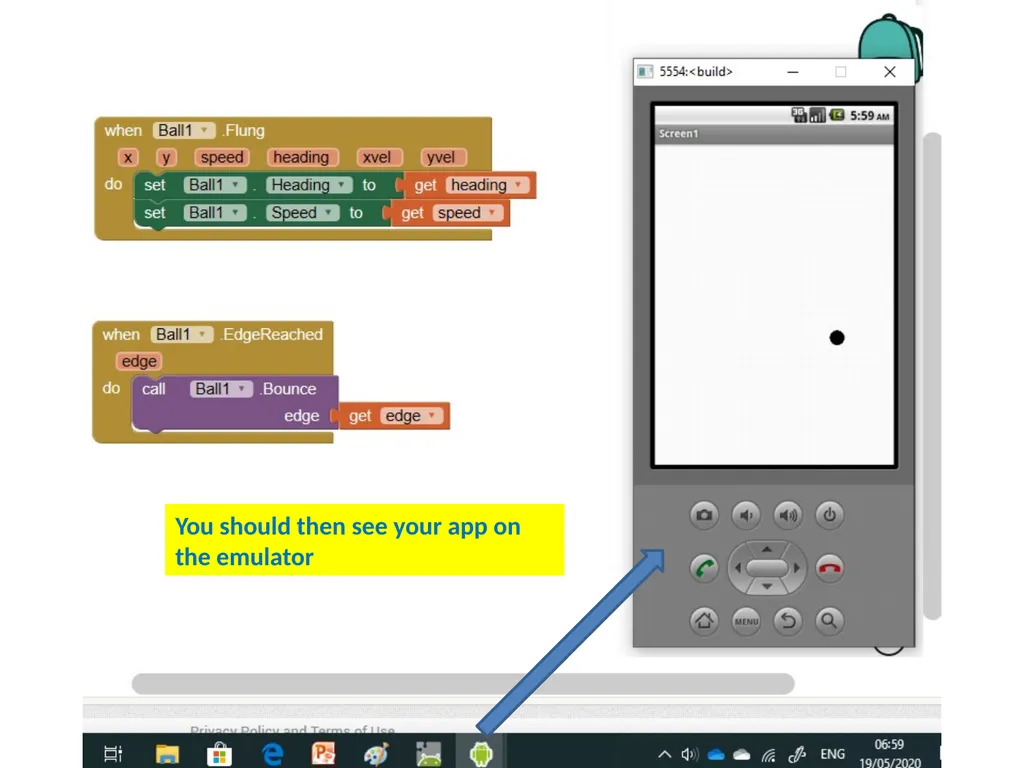
slide15. You should then see your app on the emulator<br>
I can follow instructions to download an app development tool (MIT app inventor).
I can identify the main features of the two app examples given.
I can recreate at least one of the given apps by select the right components and coding.
I can test the app/s on an emulator or smart phone.<br>
slide2. Apps are small programs that sit on mobile phones to help us do all sorts of things:
Play games
Check the weather
Look at Instagram or Facebook
Read the latest news
and much more .... What is an app? Why do we need apps? The word "app" is an abbreviation for "application." It's a piece of software which comes pre-installed on your device or its software that you install yourself.<br>
slide3. The first thing you need to do is download an app development tool.
We will be using the ‘MIT app inventor’ https://appinventor.mit.edu/ Once you go onto this website, follow the steps that can be found on the next few slides.<br>
slide4. The diagram shows the process of creating a tool than can be used to create an app for a smart phone. 1. Download an app inventor 2. Design your app components: buttons, images, texts etc. 3. Add coding to your app using coding blocks similar to the coding blocks from Scratch 4. Test your app<br>
slide5. You build apps by working with:
(1) The App Inventor Designer, where you select the components for your app. (2) The App Inventor Blocks Editor, where you assemble program blocks that specify how the components should behave. You assemble programs visually, fitting pieces together like pieces of a puzzle. (3) Your app appears on the phone step-by-step as you add pieces to it, so you can test your work as you build. When you're done, you can package your app and produce a stand-alone application to install.
If you don't have an Android phone, you can build your apps using the Android emulator, software that runs on your computer and behaves just like the phone.<br>
slide6. We are going to now go through how to set up an App Inventor.
Google MIT App inventor https://appinventor.mit.edu/
Click on get started
Click on setup instructions
Scroll down to Option 2 Instructions – Click
(Or you can go straight to that page using the link below)
Choose Instruction for Windows or Mac (depending on your device)
Download the installer Task 1 https://appinventor.mit.edu/explore/ai2/setup-emulator For detailed instructions, check the PPT on the post (Google classroom)saying ‘Instructions for setting up ‘MIT app inventor’<br>
slide7. https://www.youtube.com/watch?v=Vdo8UdkgDD8&feature=youtu.be Talk to me App You must watch the video tutorials and re-create the apps that are demonstrated.
Remember, we will using an emulator to test our app, not our smartphones. https://www.youtube.com/watch?v=w0yxJSlC00w Ball bounce App Task 2: Watch tutorials and recreate the apps: Talk To Me and Ball Bounce<br>
slide8. Once you start making your app, you can connect to the emulator which will create a ‘pretend smartphone’ on screen for you to test your app. Make sure that the ai2Starter is double-clicked on and minimised before launching the emulator.<br>
slide9. Here is how it might look like when you are trying to connect to the Emulator.<br>
slide10. Click on ‘Ok’<br>
slide11. Click on ‘Install’<br>
slide13. Click on ‘Open’<br>
slide14. Click on ‘Keep trying’ and click on the tick button on the emulator<br>
slide15. You should then see your app on the emulator<br>