
Where Do I Start?! A Step by Step Guide to
DJ
Published · 40 slides · 0 views
1 / 1







Description
Where Do I Start?! A Step by Step Guide to Adjusting your Workstation For computer users ? What to expect from this training General information: What you should know Basic Instructions: What you should do Supplemental information: Why you
Related Topics
Share
Embed code
Download this presentation From Below
"Where Do I Start?! A Step by Step Guide to" is the property of its rightful owner. Permission is granted to download and print the materials on this website for personal, non-commercial use only, and to display it on your personal computer provided you do not modify the materials and that you retain all copyright notices contained in the materials. By downloading content from our website, you accept the terms of this agreement.
Presentation Transcript
01
Where Do I Start?!
A Step by Step Guide to Adjusting your Workstation For computer users ?<br>
02
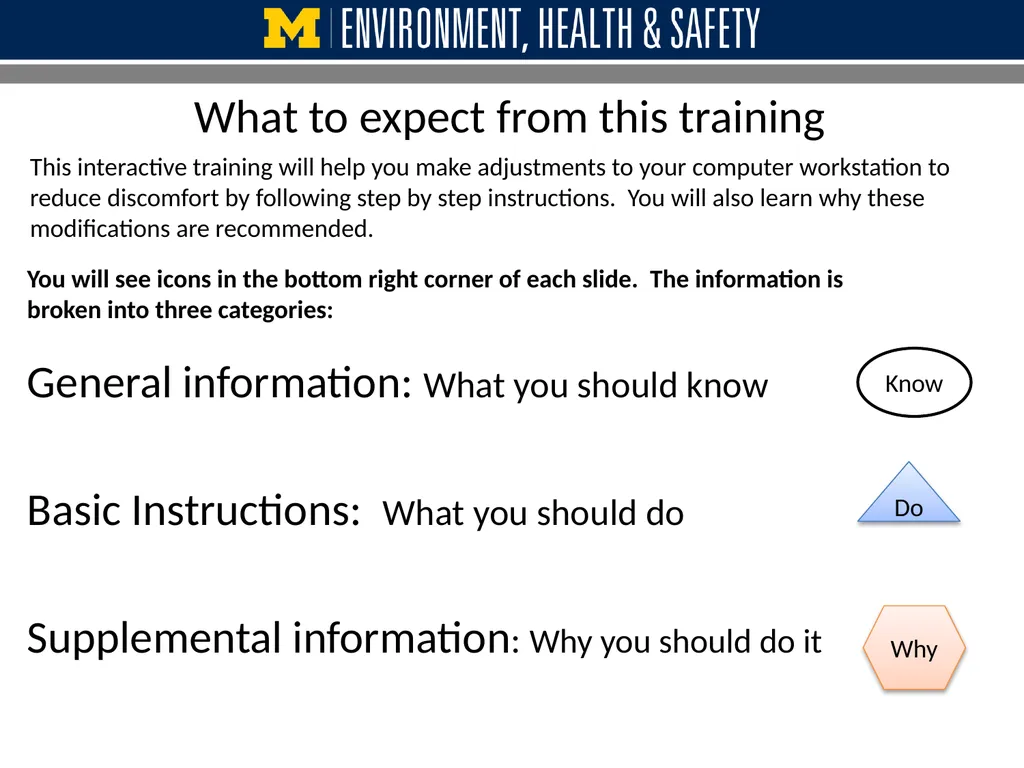
What to expect from this training General information: What you should know
Basic Instructions: What you should do
Supplemental information: Why you should do it Know Do Why You will see icons in the bottom right corner of each slide. The information is broken into three categories: This interactive training will help you make adjustments to your computer workstation to reduce discomfort by following step by step instructions. You will also learn why these modifications are recommended.<br>
Basic Instructions: What you should do
Supplemental information: Why you should do it Know Do Why You will see icons in the bottom right corner of each slide. The information is broken into three categories: This interactive training will help you make adjustments to your computer workstation to reduce discomfort by following step by step instructions. You will also learn why these modifications are recommended.<br>
03
Ergonomics is fitting the work to the worker
in order to reduce risk of injury/discomfort Know Exposure to more than one risk factor increases the chances of experiencing discomfort. Ergonomics is about “fit”. The fit between a person and what they do, the objects they use and the environments in which they work. If good fit is achieved, the stresses on people are reduced. They become comfortable, can do things efficiently and productively without discomfort.
An ergonomic evaluator will look for specific risk factors that may indicate a “poor” fit, and then make recommendations to reduce these risks<br>
An ergonomic evaluator will look for specific risk factors that may indicate a “poor” fit, and then make recommendations to reduce these risks<br>
04
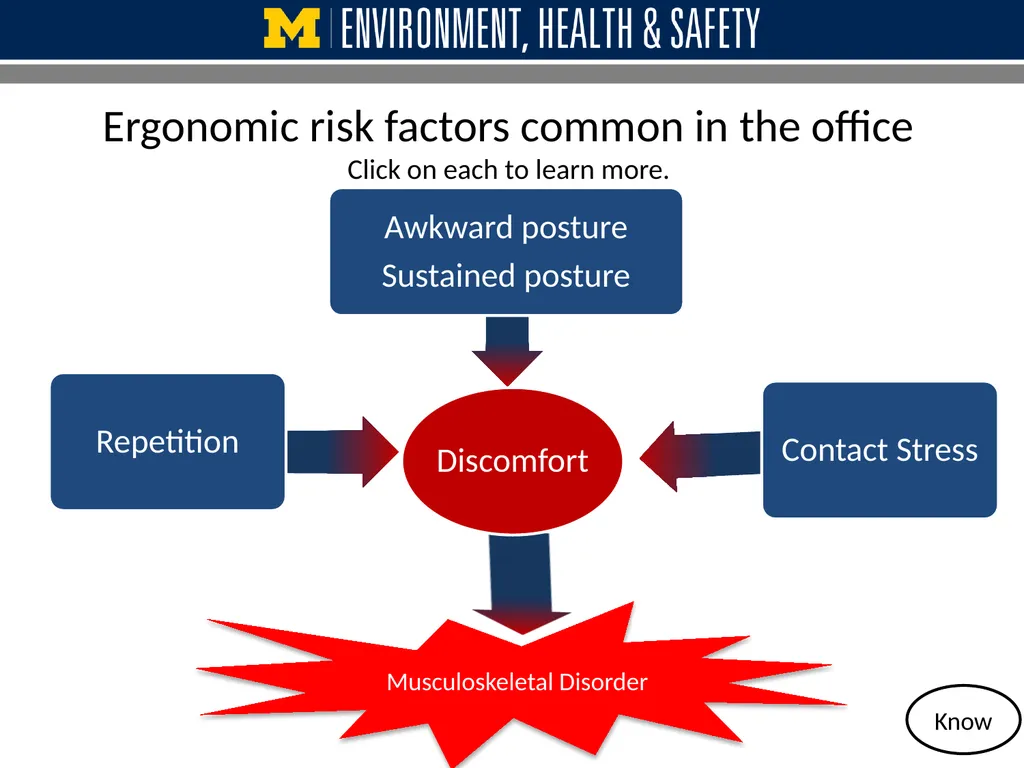
Ergonomic risk factors common in the office
Click on each to learn more. Musculoskeletal Disorder Know<br>
05
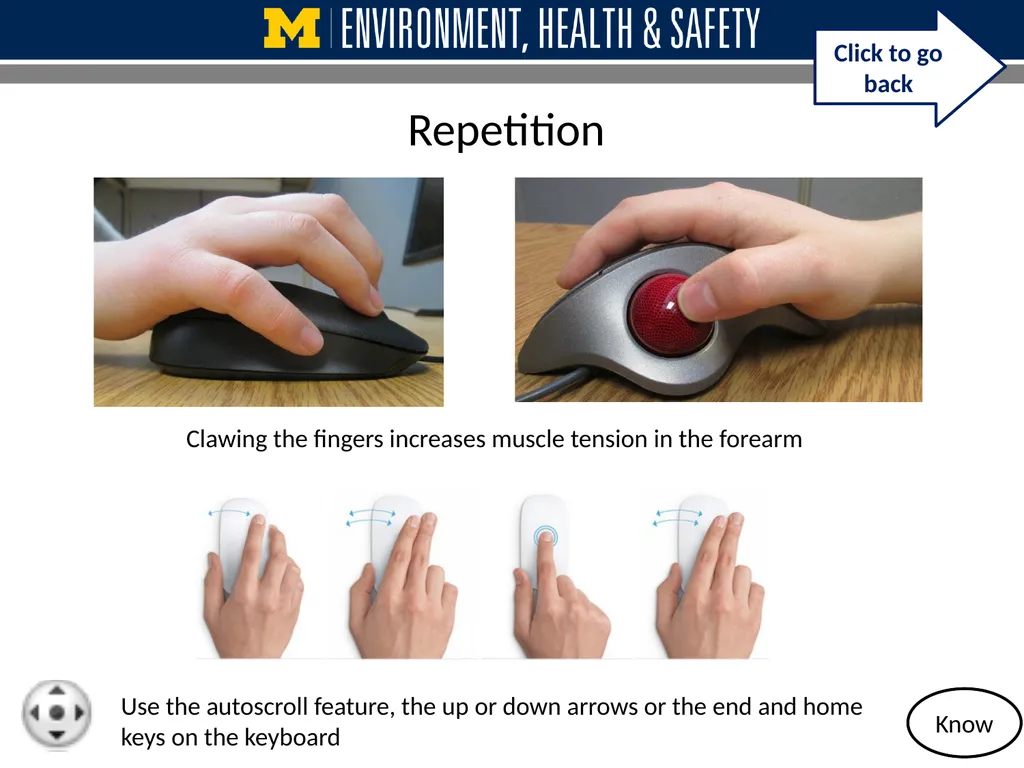
Repetition Clawing the fingers increases muscle tension in the forearm Click to go back Know Use the autoscroll feature, the up or down arrows or the end and home keys on the keyboard<br>
06
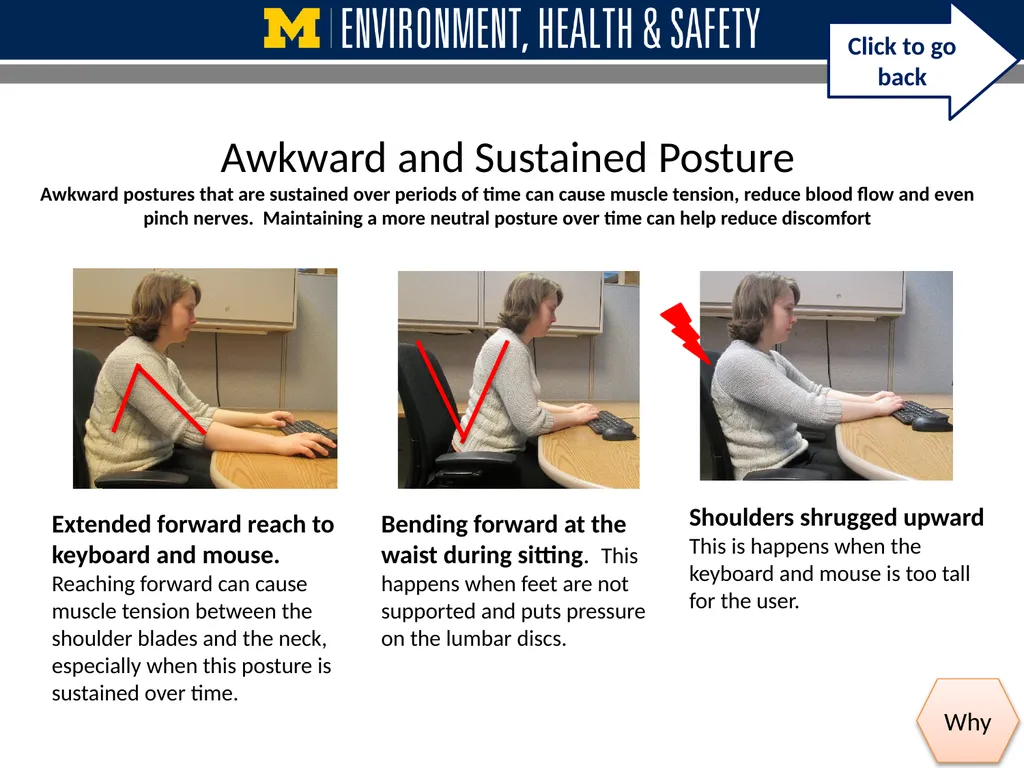
Awkward and Sustained Posture
Awkward postures that are sustained over periods of time can cause muscle tension, reduce blood flow and even pinch nerves. Maintaining a more neutral posture over time can help reduce discomfort Extended forward reach to keyboard and mouse. Reaching forward can cause muscle tension between the shoulder blades and the neck, especially when this posture is sustained over time. Bending forward at the waist during sitting. This happens when feet are not supported and puts pressure on the lumbar discs. Shoulders shrugged upward This is happens when the keyboard and mouse is too tall for the user. Click to go back Why<br>
07
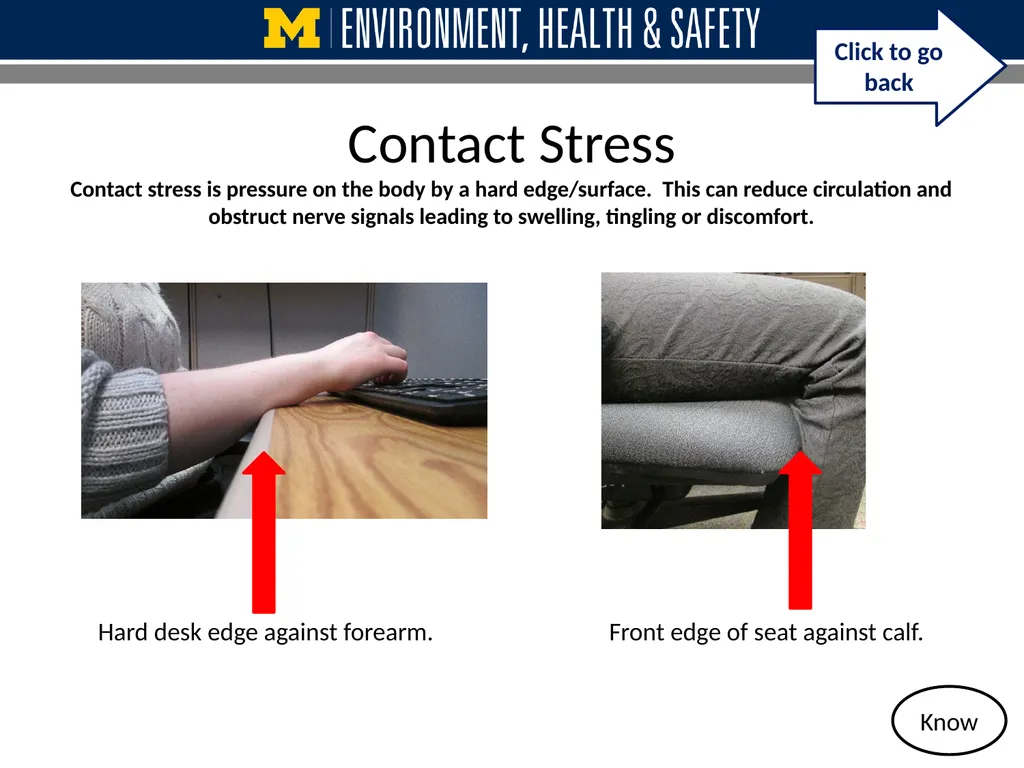
Contact Stress
Contact stress is pressure on the body by a hard edge/surface. This can reduce circulation and obstruct nerve signals leading to swelling, tingling or discomfort. Hard desk edge against forearm. Front edge of seat against calf. Click to go back Know<br>
08
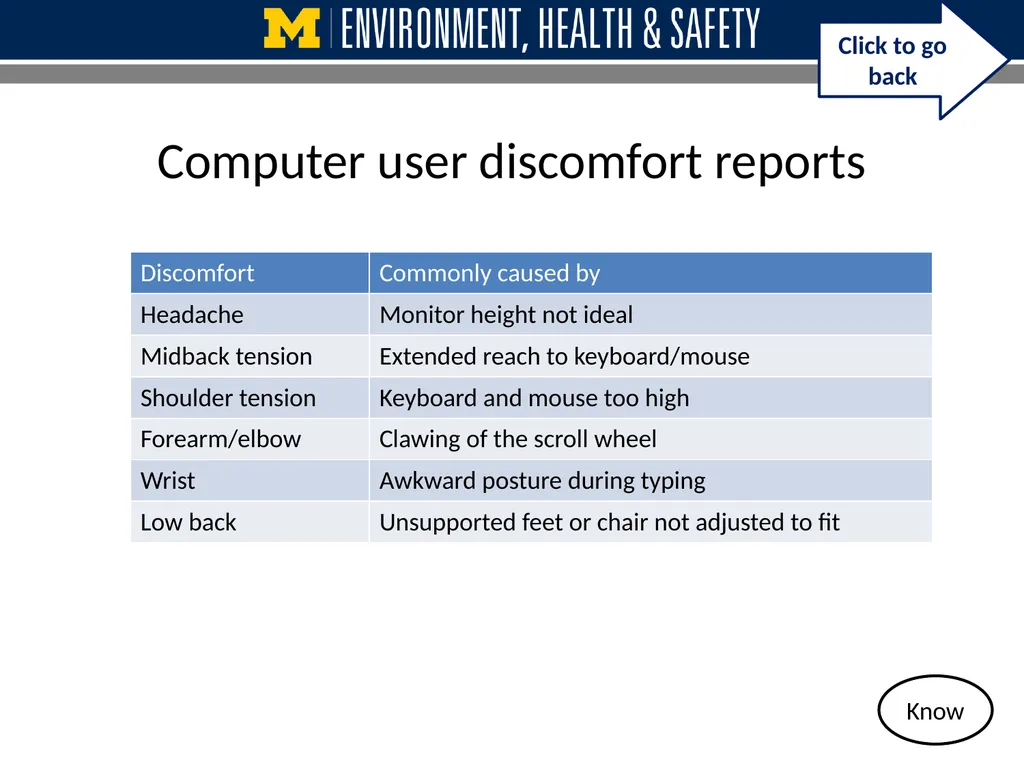
Computer user discomfort reports Click to go back Know<br>
09
What is a musculoskeletal disorder? A musculoskeletal disorder is discomfort that accumulates over time in the muscles, ligaments, tendons, joints or nerves which could include strain, sprain, or inflammation. Continue to next slide Musculoskeletal discomfort can occur anywhere in the body and typically are not caused by a single traumatic event, but is due to micro trauma to tissues that does not heal during rest. Know<br>
10
Musculoskeletal disorders can be controlled through ergonomics Why is ergonomics important?
Exposure to an ergonomic risk factor increases the likelihood that you will experience discomfort. Know<br>
Exposure to an ergonomic risk factor increases the likelihood that you will experience discomfort. Know<br>
11
There are many ways people position themselves to use their computer
So let’s learn the ideal way…. Know<br>
12
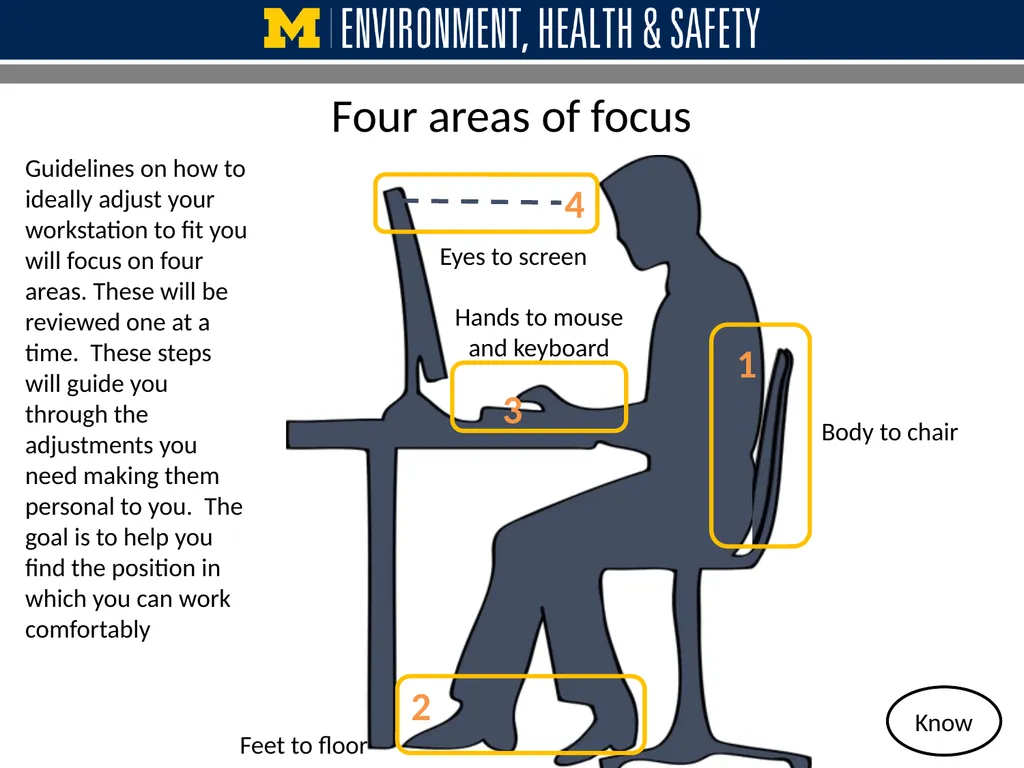
Four areas of focus Body to chair Feet to floor Hands to mouse and keyboard Eyes to screen 1 2 3 4 Guidelines on how to ideally adjust your workstation to fit you will focus on four areas. These will be reviewed one at a time. These steps will guide you through the adjustments you need making them personal to you. The goal is to help you find the position in which you can work comfortably Know<br>
13
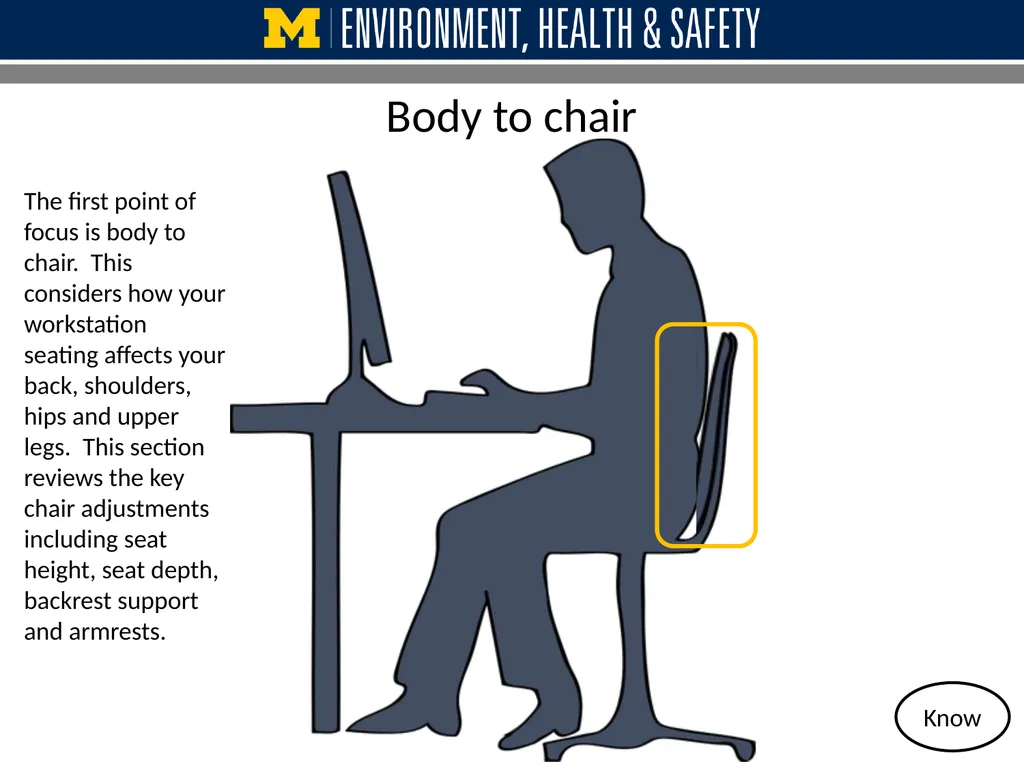
Body to chair Know The first point of focus is body to chair. This considers how your workstation seating affects your back, shoulders, hips and upper legs. This section reviews the key chair adjustments including seat height, seat depth, backrest support and armrests.<br>
14
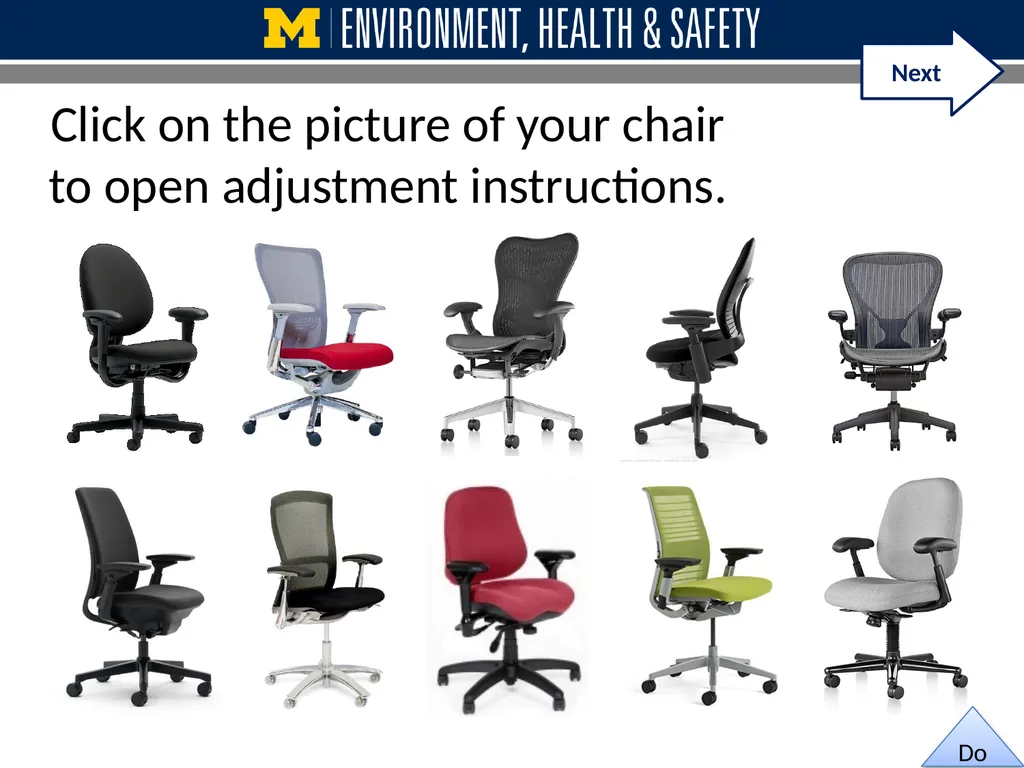
Click on the picture of your chair to open adjustment instructions. Next Do<br>
15
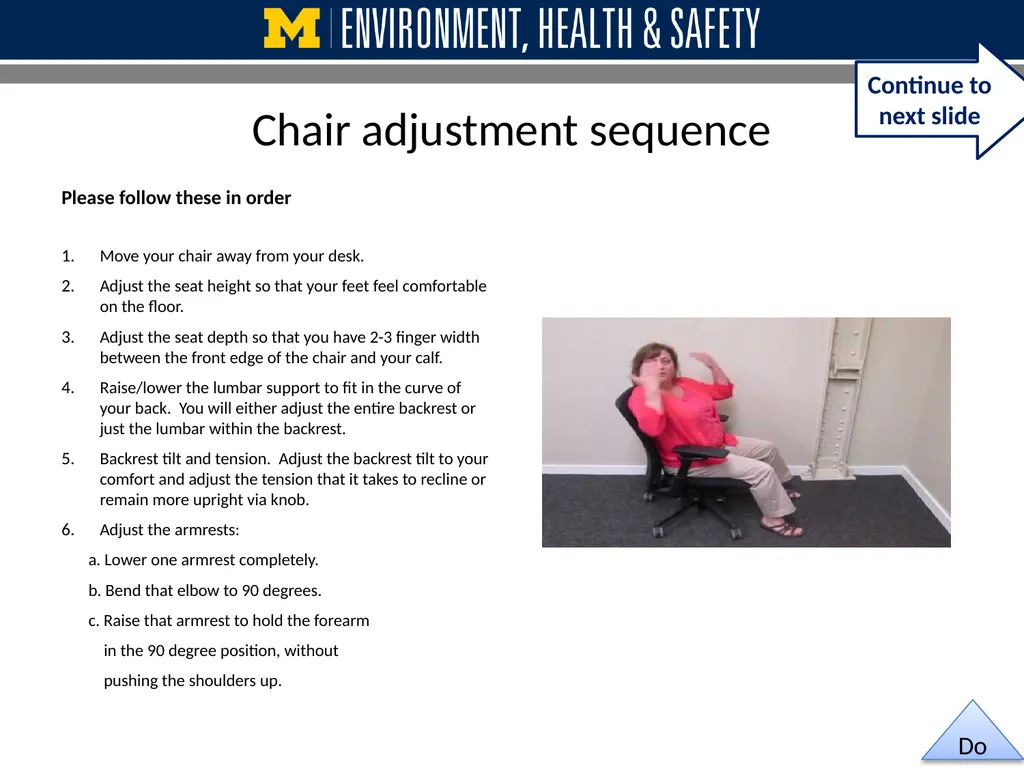
Chair adjustment sequence Please follow these in order
Move your chair away from your desk.
Adjust the seat height so that your feet feel comfortable on the floor.
Adjust the seat depth so that you have 2-3 finger width between the front edge of the chair and your calf.
Raise/lower the lumbar support to fit in the curve of your back. You will either adjust the entire backrest or just the lumbar within the backrest.
Backrest tilt and tension. Adjust the backrest tilt to your comfort and adjust the tension that it takes to recline or remain more upright via knob.
Adjust the armrests:
a. Lower one armrest completely.
b. Bend that elbow to 90 degrees.
c. Raise that armrest to hold the forearm
in the 90 degree position, without
pushing the shoulders up. Do Continue to next slide<br>
Move your chair away from your desk.
Adjust the seat height so that your feet feel comfortable on the floor.
Adjust the seat depth so that you have 2-3 finger width between the front edge of the chair and your calf.
Raise/lower the lumbar support to fit in the curve of your back. You will either adjust the entire backrest or just the lumbar within the backrest.
Backrest tilt and tension. Adjust the backrest tilt to your comfort and adjust the tension that it takes to recline or remain more upright via knob.
Adjust the armrests:
a. Lower one armrest completely.
b. Bend that elbow to 90 degrees.
c. Raise that armrest to hold the forearm
in the 90 degree position, without
pushing the shoulders up. Do Continue to next slide<br>
16
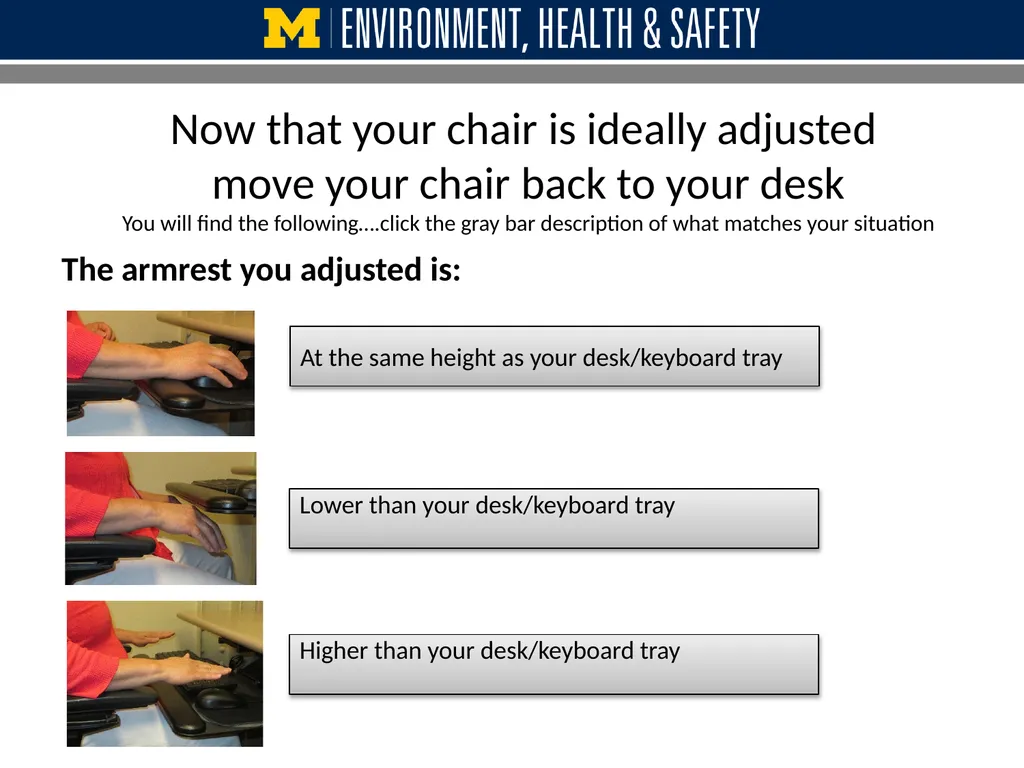
Now that your chair is ideally adjusted
move your chair back to your desk
You will find the following….click the gray bar description of what matches your situation The armrest you adjusted is: At the same height as your desk/keyboard tray Lower than your desk/keyboard tray Higher than your desk/keyboard tray<br>
17
The armrest you adjusted is:
At the same height as your desk or keyboard tray Congratulations, your chair and input devices(keyboard and mouse) are at your ideal sitting worksurface height. Do Continue to next slide<br>
18
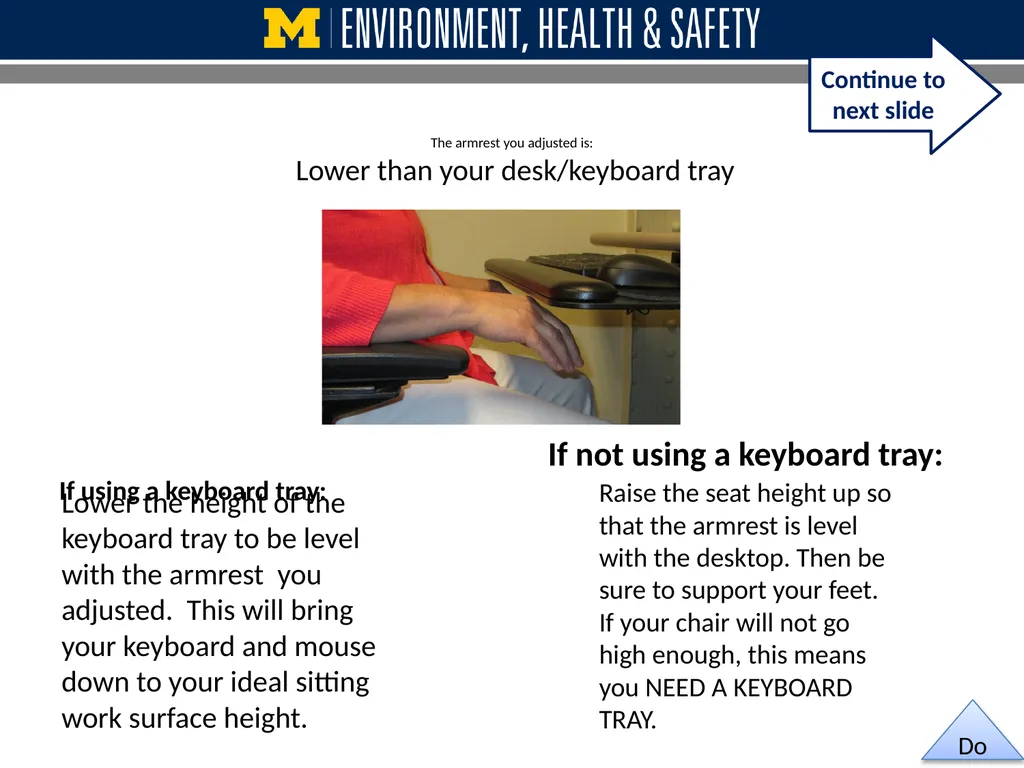
The armrest you adjusted is:
Lower than your desk/keyboard tray If using a keyboard tray: Lower the height of the keyboard tray to be level with the armrest you adjusted. This will bring your keyboard and mouse down to your ideal sitting work surface height. If not using a keyboard tray: Raise the seat height up so that the armrest is level with the desktop. Then be sure to support your feet. If your chair will not go high enough, this means you NEED A KEYBOARD TRAY. Do Continue to next slide<br>
19
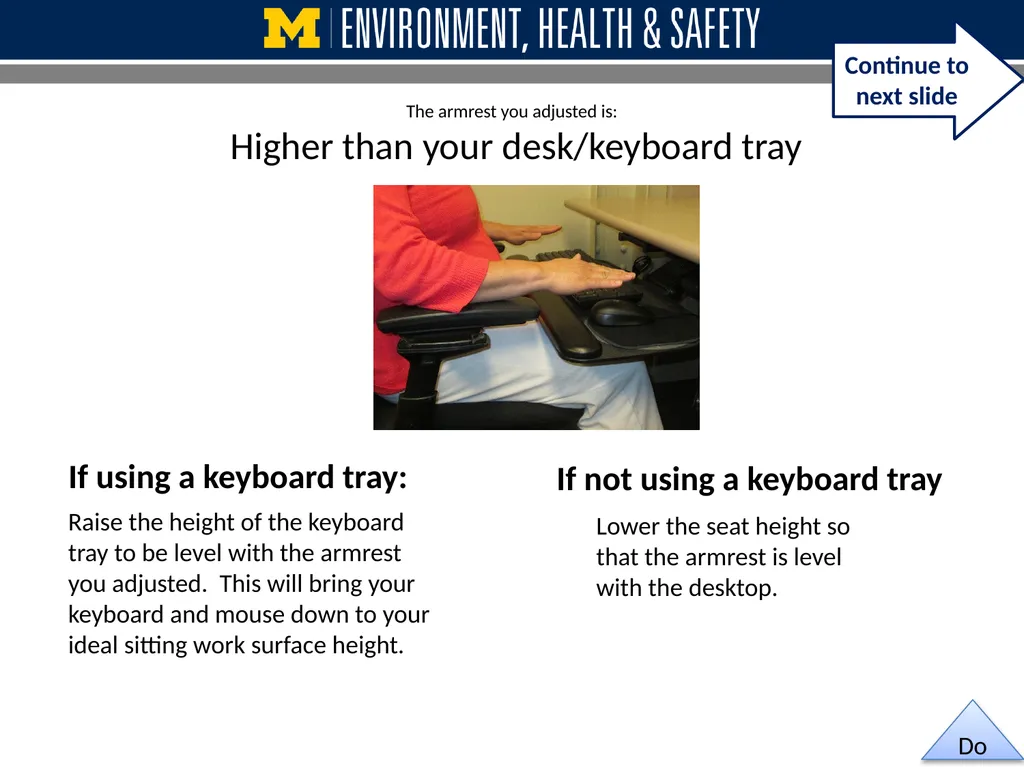
The armrest you adjusted is:
Higher than your desk/keyboard tray If using a keyboard tray: If not using a keyboard tray Lower the seat height so that the armrest is level with the desktop. Do Raise the height of the keyboard tray to be level with the armrest you adjusted. This will bring your keyboard and mouse down to your ideal sitting work surface height. Continue to next slide<br>
20
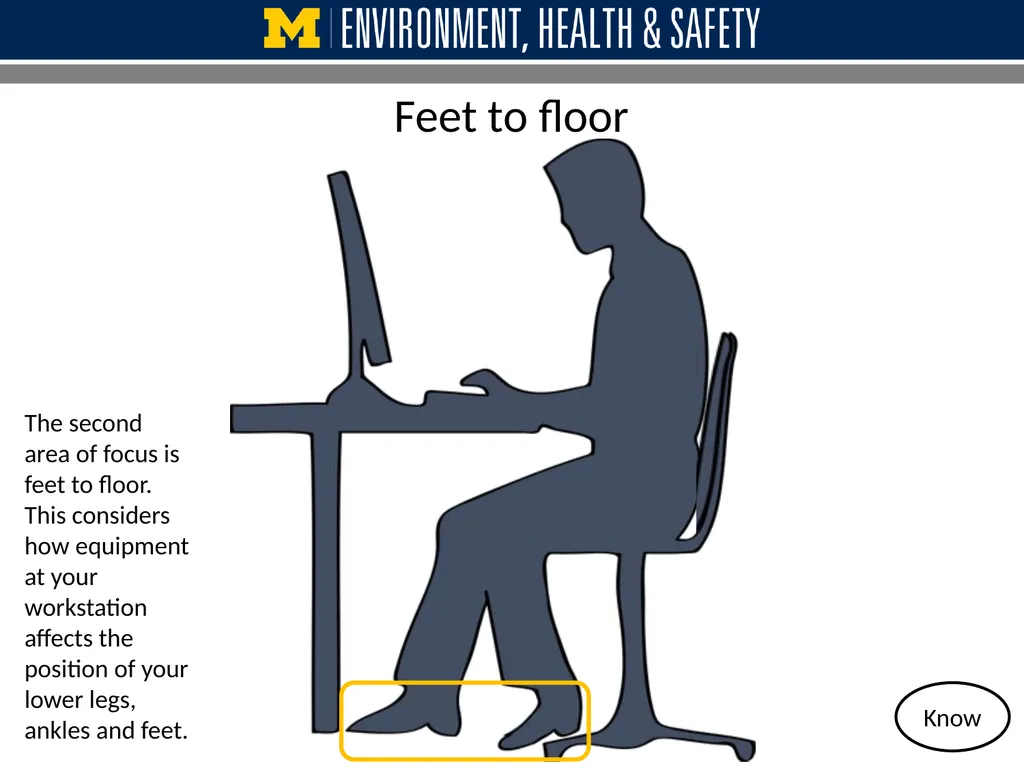
Feet to floor The second area of focus is feet to floor. This considers how equipment at your workstation affects the position of your lower legs, ankles and feet. Know<br>
21
If your feet are unsupported… 1. Lower your chair seat height
then
2. Lower your keyboard/mouse height Use a footrest. Many are styles are available Do OR<br>
then
2. Lower your keyboard/mouse height Use a footrest. Many are styles are available Do OR<br>
22
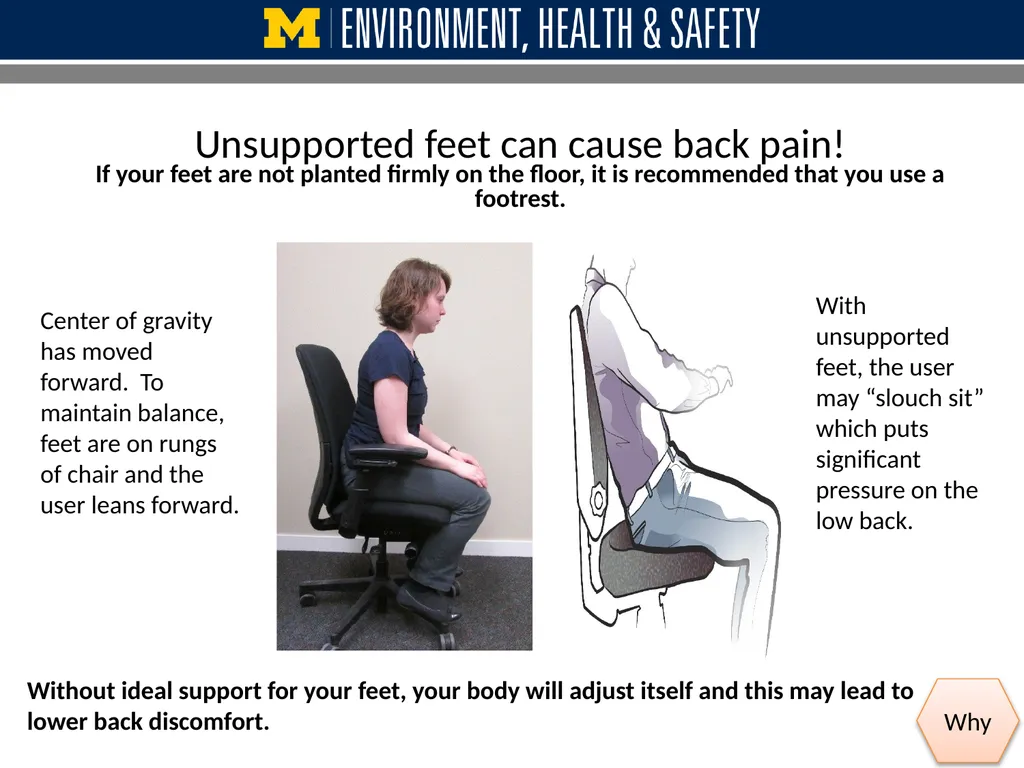
Unsupported feet can cause back pain!
If your feet are not planted firmly on the floor, it is recommended that you use a footrest. Center of gravity has moved forward. To maintain balance, feet are on rungs of chair and the user leans forward. With unsupported feet, the user may “slouch sit” which puts significant pressure on the low back. Without ideal support for your feet, your body will adjust itself and this may lead to lower back discomfort. Why<br>
23
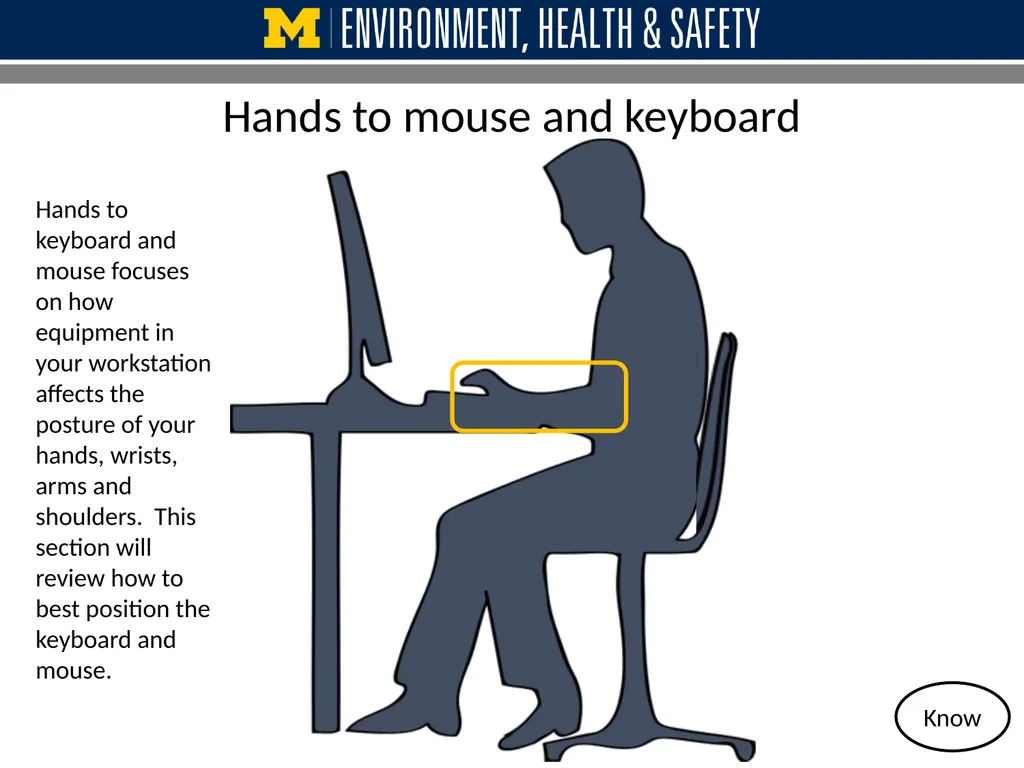
Hands to mouse and keyboard Hands to keyboard and mouse focuses on how equipment in your workstation affects the posture of your hands, wrists, arms and shoulders. This section will review how to best position the keyboard and mouse. Know<br>
24
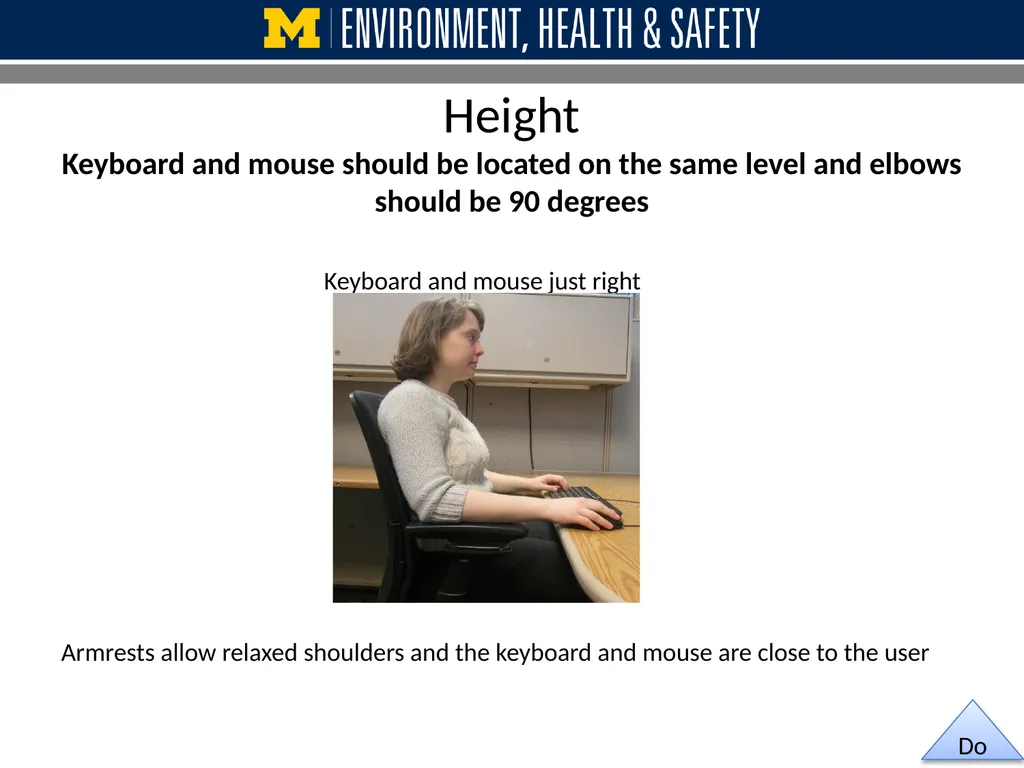
Height
Keyboard and mouse should be located on the same level and elbows should be 90 degrees Keyboard and mouse just right Armrests allow relaxed shoulders and the keyboard and mouse are close to the user Do<br>
25
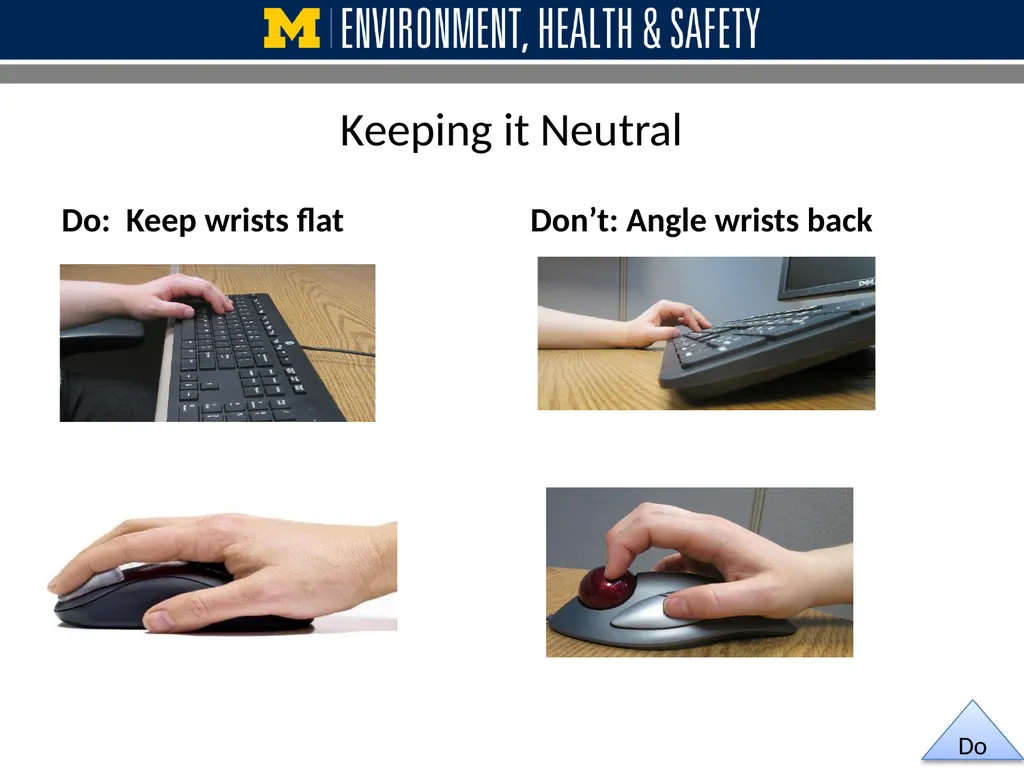
Keeping it Neutral Do: Keep wrists flat Don’t: Angle wrists back Do<br>
26
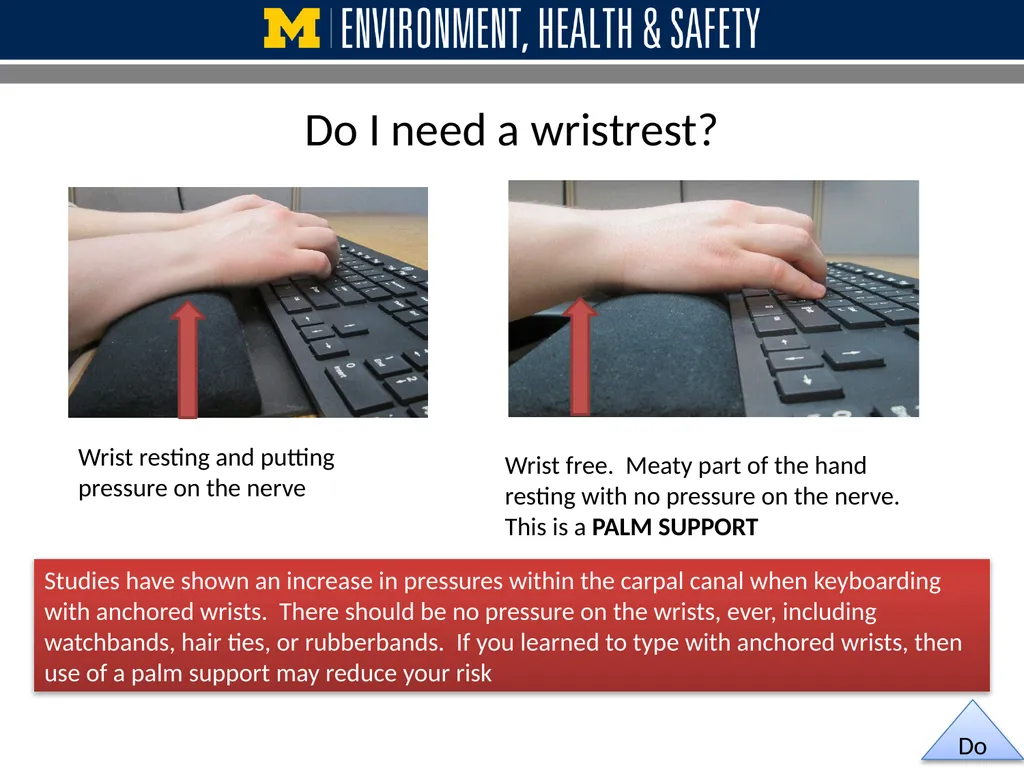
Do I need a wristrest? Wrist resting and putting pressure on the nerve Wrist free. Meaty part of the hand resting with no pressure on the nerve.
This is a PALM SUPPORT Studies have shown an increase in pressures within the carpal canal when keyboarding with anchored wrists. There should be no pressure on the wrists, ever, including watchbands, hair ties, or rubberbands. If you learned to type with anchored wrists, then use of a palm support may reduce your risk Do<br>
This is a PALM SUPPORT Studies have shown an increase in pressures within the carpal canal when keyboarding with anchored wrists. There should be no pressure on the wrists, ever, including watchbands, hair ties, or rubberbands. If you learned to type with anchored wrists, then use of a palm support may reduce your risk Do<br>
27
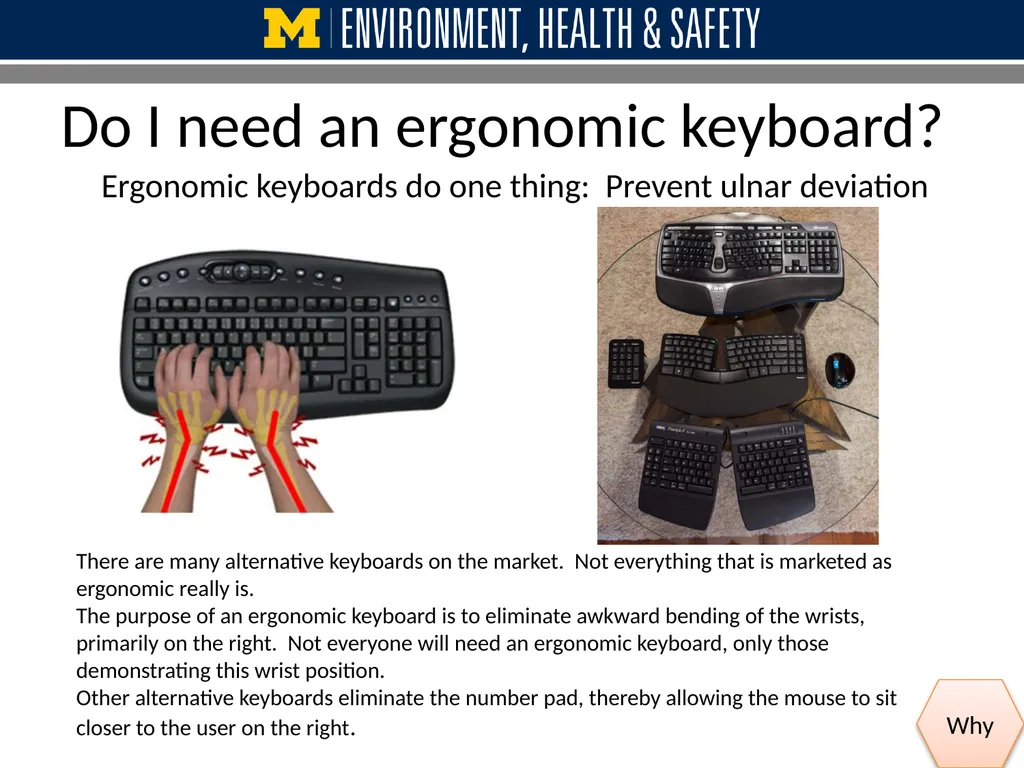
Do I need an ergonomic keyboard? Ergonomic keyboards do one thing: Prevent ulnar deviation There are many alternative keyboards on the market. Not everything that is marketed as ergonomic really is.
The purpose of an ergonomic keyboard is to eliminate awkward bending of the wrists, primarily on the right. Not everyone will need an ergonomic keyboard, only those demonstrating this wrist position.
Other alternative keyboards eliminate the number pad, thereby allowing the mouse to sit closer to the user on the right. Why<br>
The purpose of an ergonomic keyboard is to eliminate awkward bending of the wrists, primarily on the right. Not everyone will need an ergonomic keyboard, only those demonstrating this wrist position.
Other alternative keyboards eliminate the number pad, thereby allowing the mouse to sit closer to the user on the right. Why<br>
28
Do I need an “ergonomic” mouse There are even more alternative mice on the market than there are alternative keyboards.
Manufacturers have a monetary interest in telling you how bad your current mouse is and how much better their expensive mouse will make you feel.
Buyer beware. Know A trained professional is the best person to help determine if an “alternative” mouse is right for you.<br>
Manufacturers have a monetary interest in telling you how bad your current mouse is and how much better their expensive mouse will make you feel.
Buyer beware. Know A trained professional is the best person to help determine if an “alternative” mouse is right for you.<br>
29
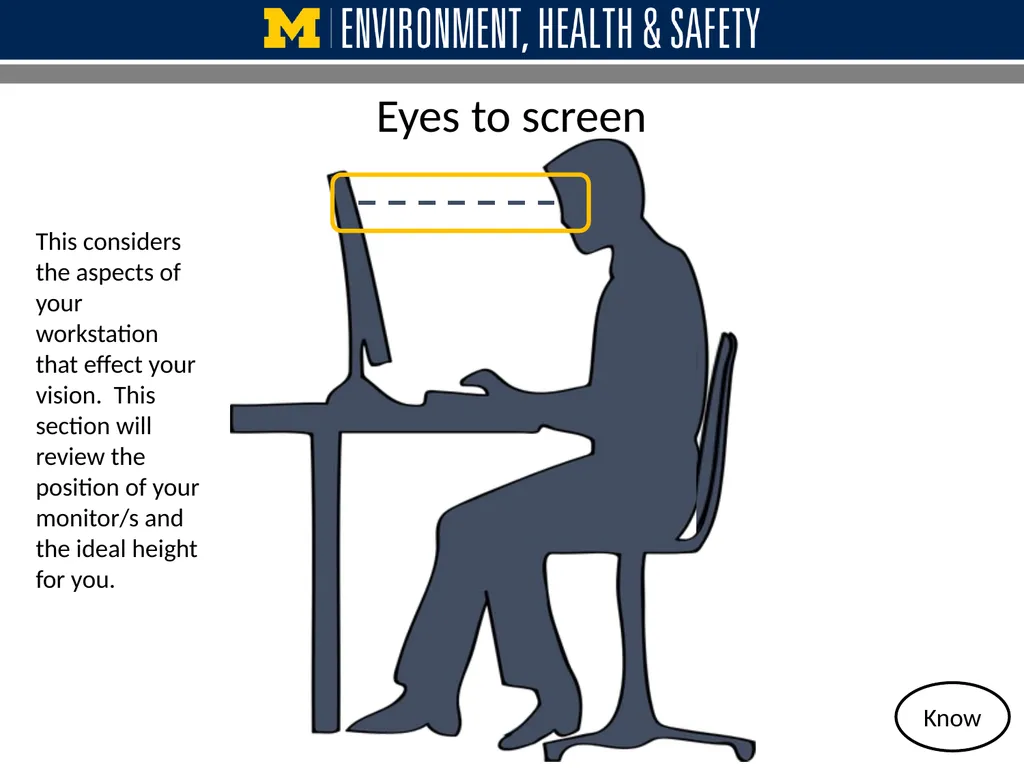
Eyes to screen This considers the aspects of your workstation that effect your vision. This section will review the position of your monitor/s and the ideal height for you. Know<br>
30
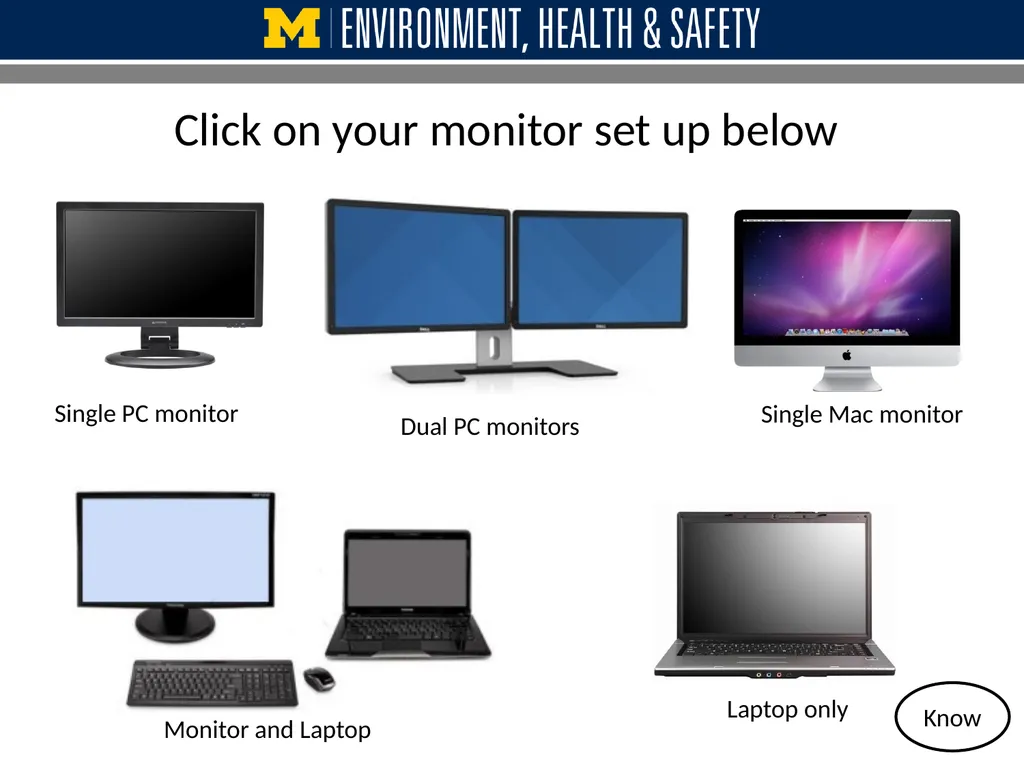
Click on your monitor set up below Single PC monitor Dual PC monitors Single Mac monitor Monitor and Laptop Laptop only Know<br>
31
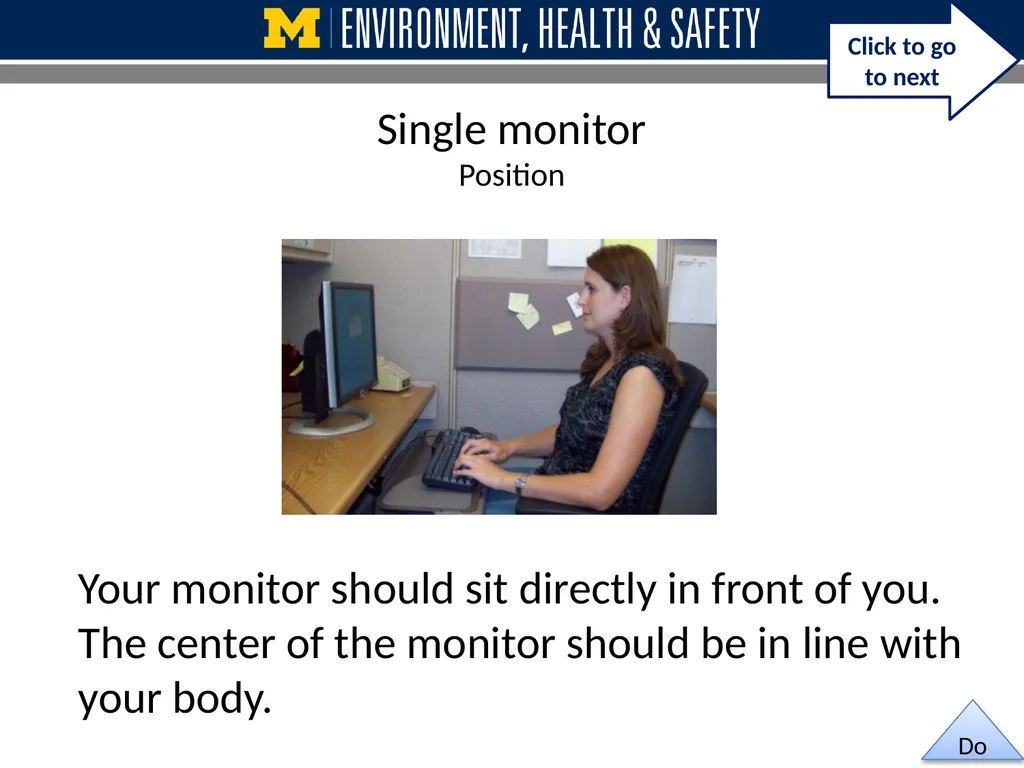
Single monitor
Position Your monitor should sit directly in front of you. The center of the monitor should be in line with your body. Do Click to go to next<br>
32
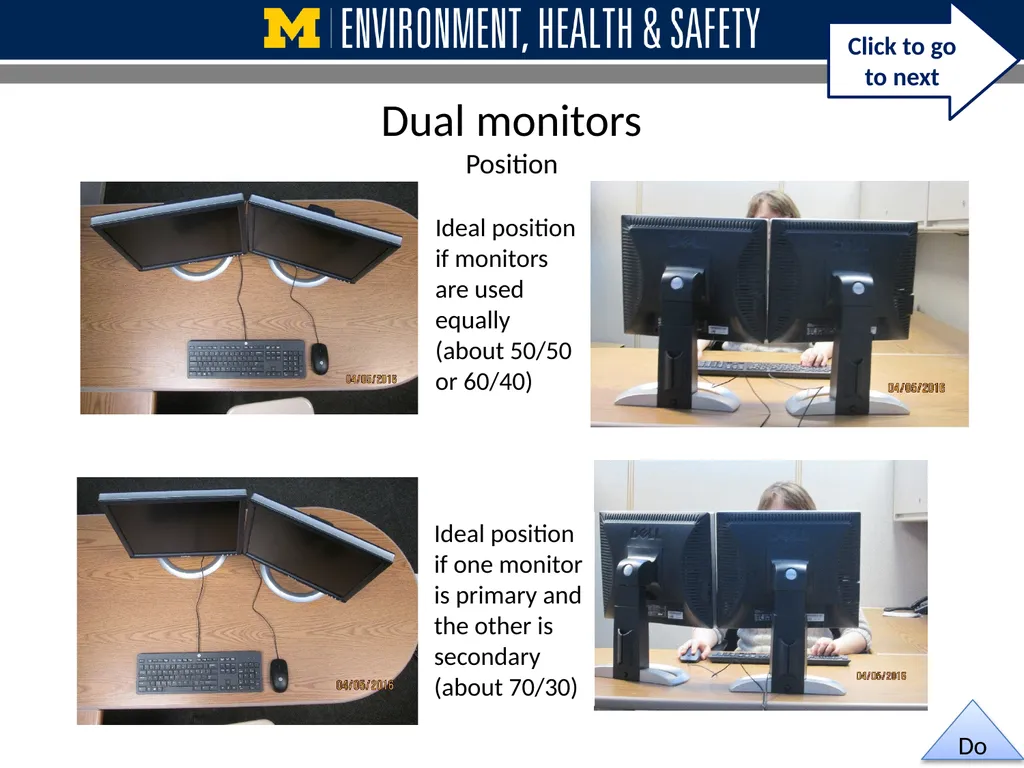
Dual monitors
Position Ideal position if monitors are used equally (about 50/50 or 60/40) Ideal position if one monitor is primary and the other is secondary (about 70/30) Do Click to go to next<br>
33
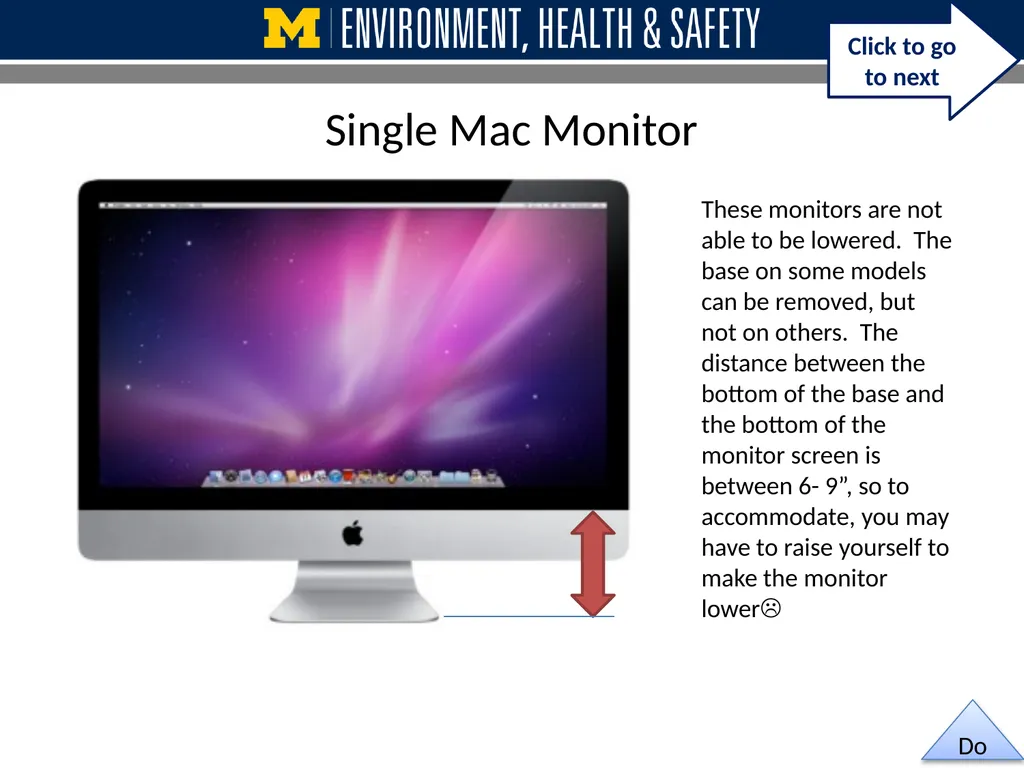
Single Mac Monitor These monitors are not able to be lowered. The base on some models can be removed, but not on others. The distance between the bottom of the base and the bottom of the monitor screen is between 6- 9”, so to accommodate, you may have to raise yourself to make the monitor lower Do Click to go to next<br>
34
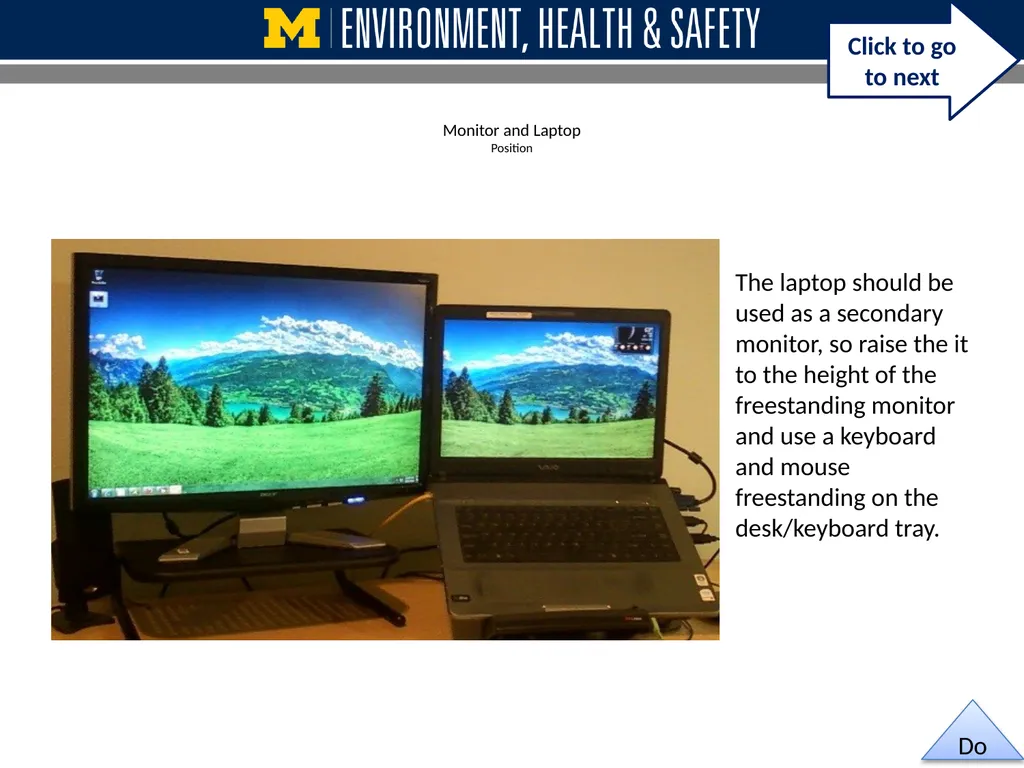
Monitor and Laptop
Position The laptop should be used as a secondary monitor, so raise the it to the height of the freestanding monitor and use a keyboard and mouse freestanding on the desk/keyboard tray. Do Click to go to next<br>
35
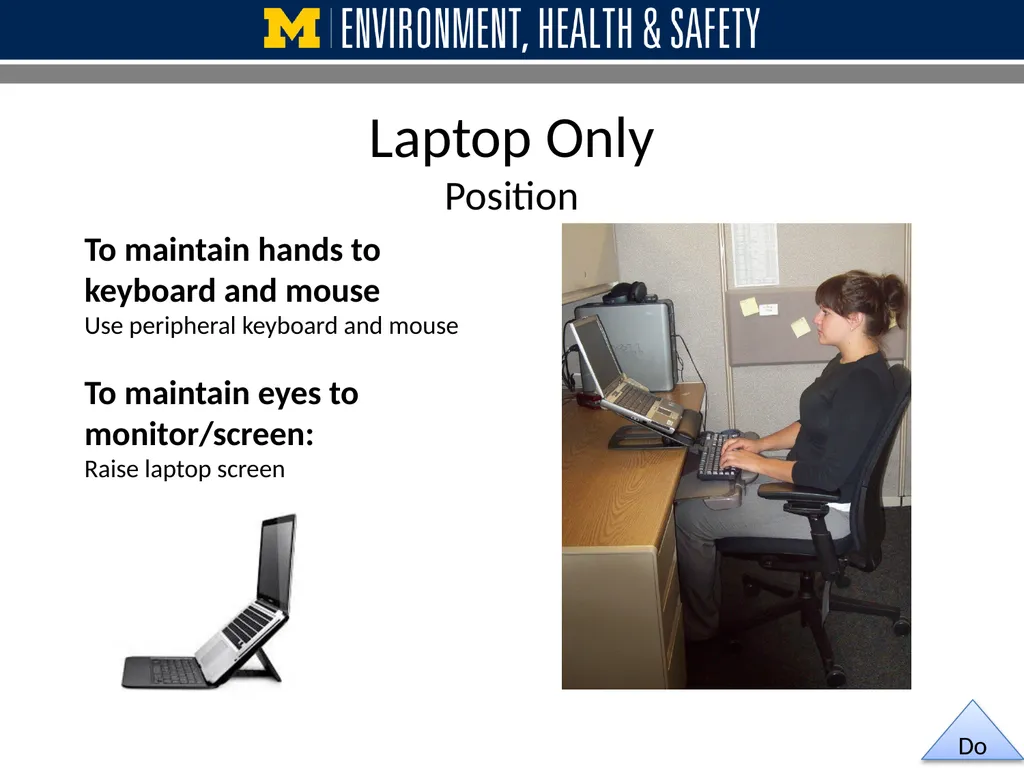
Laptop Only
Position To maintain hands to keyboard and mouse
Use peripheral keyboard and mouse
To maintain eyes to monitor/screen:
Raise laptop screen Do<br>
Use peripheral keyboard and mouse
To maintain eyes to monitor/screen:
Raise laptop screen Do<br>
36
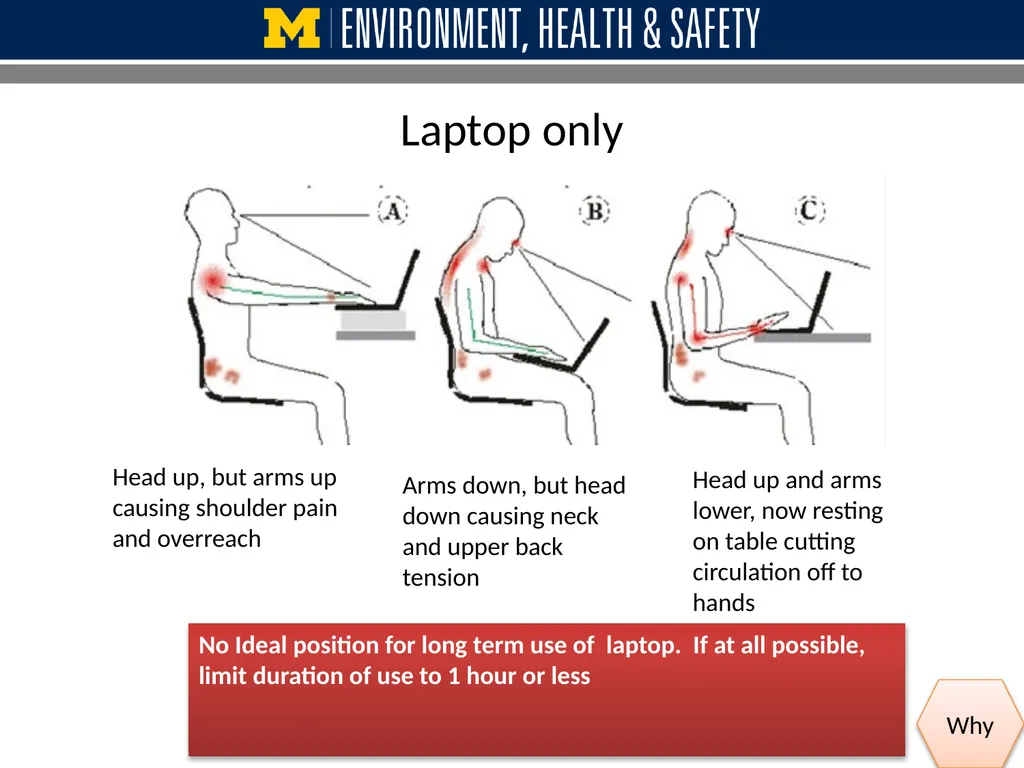
Laptop only No Ideal position for long term use of laptop. If at all possible, limit duration of use to 1 hour or less Head up, but arms up causing shoulder pain and overreach Arms down, but head down causing neck and upper back tension Head up and arms lower, now resting on table cutting circulation off to hands Why<br>
37
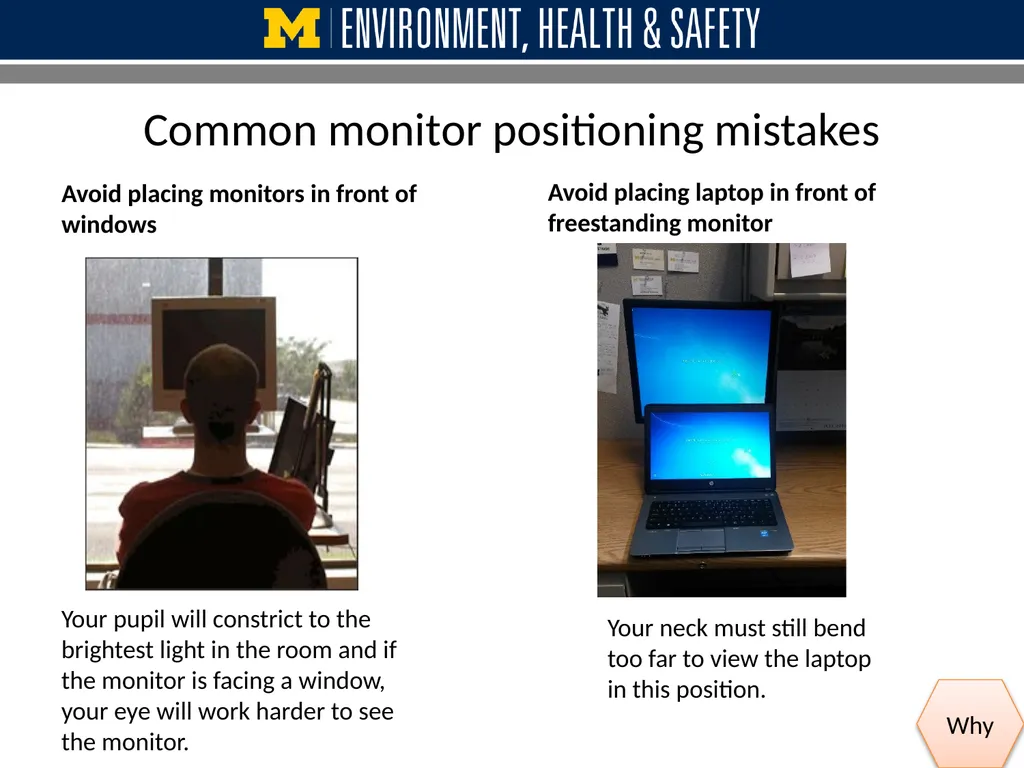
Common monitor positioning mistakes Avoid placing monitors in front of windows Avoid placing laptop in front of freestanding monitor Why Your pupil will constrict to the brightest light in the room and if the monitor is facing a window, your eye will work harder to see the monitor. Your neck must still bend too far to view the laptop in this position.<br>
38
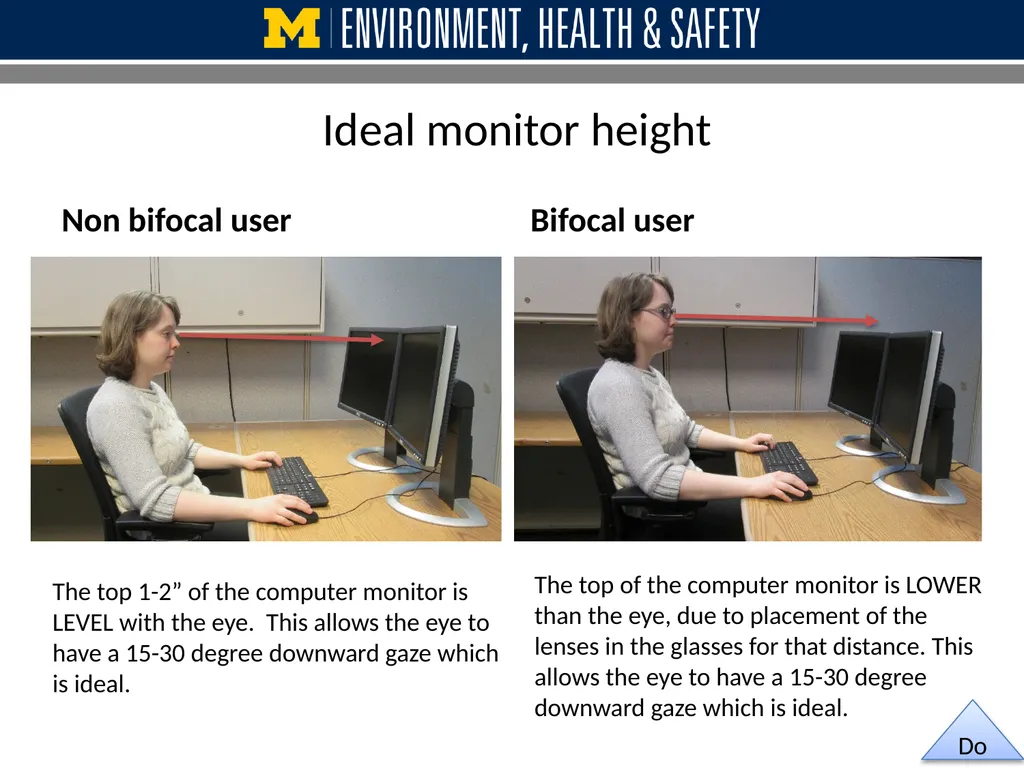
Ideal monitor height Non bifocal user Bifocal user Do The top 1-2” of the computer monitor is LEVEL with the eye. This allows the eye to have a 15-30 degree downward gaze which is ideal. The top of the computer monitor is LOWER than the eye, due to placement of the lenses in the glasses for that distance. This allows the eye to have a 15-30 degree downward gaze which is ideal.<br>
39
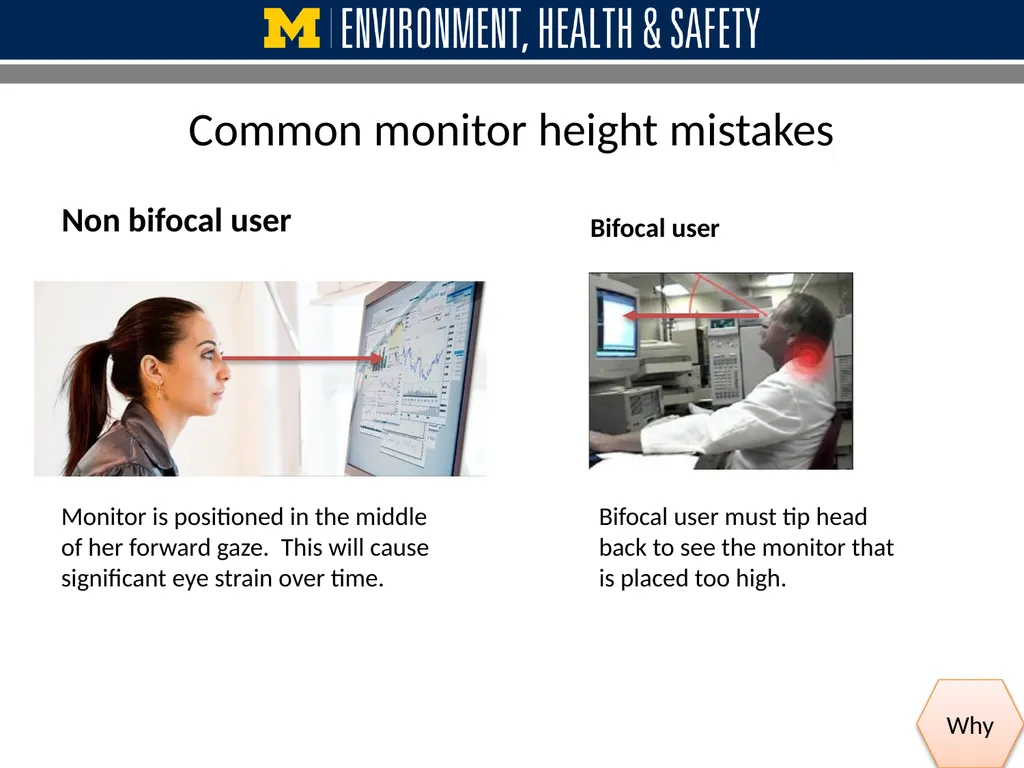
Common monitor height mistakes Non bifocal user Bifocal user Monitor is positioned in the middle of her forward gaze. This will cause significant eye strain over time. Bifocal user must tip head back to see the monitor that is placed too high. Why<br>
40
Summary Adjust the chair to fit you
Assure you have adequate foot support
Use your keyboard and mouse at the same level and avoid reaching
Position your monitors to avoid neck pain Do You will now be asked to demonstrate your knowledge via Qualtrics survey. Click Begin below. Once this is completed, the Ergonomic Specialist will be contacted and will be in touch with you. Begin Quiz<br>
Assure you have adequate foot support
Use your keyboard and mouse at the same level and avoid reaching
Position your monitors to avoid neck pain Do You will now be asked to demonstrate your knowledge via Qualtrics survey. Click Begin below. Once this is completed, the Ergonomic Specialist will be contacted and will be in touch with you. Begin Quiz<br>