/
Sun Hydraulics Technical Tips Sun Hydraulics Technical Tips

Sun Hydraulics Technical Tips - PDF document

alexa-scheidler
alexa-scheidler . @alexa-scheidler
Follow
815 views
Uploaded On 2016-03-05

Sun Hydraulics Technical Tips - PPT Presentation

1 ID: 243248

Share:

Link:

Embed:

Download Presentation from below link

Download Pdf The PPT/PDF document "Sun Hydraulics Technical Tips" is the property of its rightful owner. Permission is granted to download and print the materials on this web site for personal, non-commercial use only, and to display it on your personal computer provided you do not modify the materials and that you retain all copyright notices contained in the materials. By downloading content from our website, you accept the terms of this agreement.


Presentation Transcript

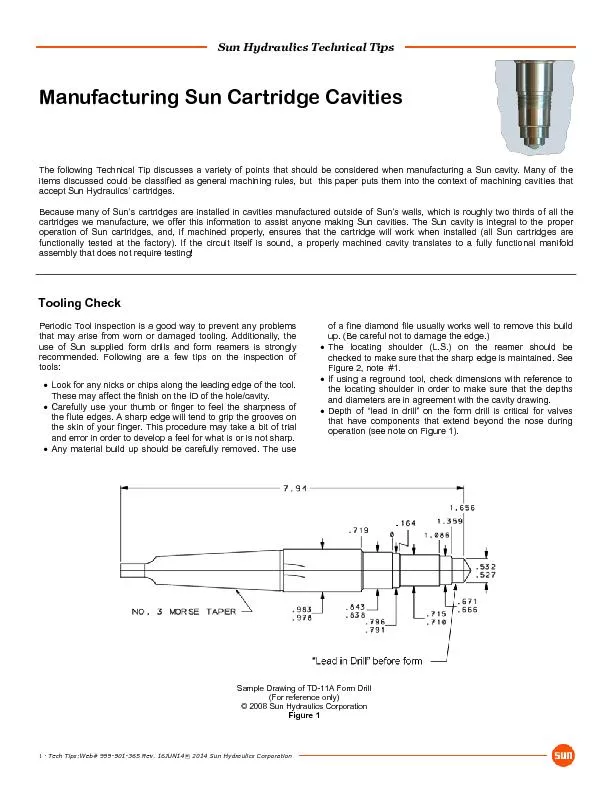
Sun Hydraulics Technical Tips 1 · Tech Tips:Web# 999 - 901 - 365 Rev. 16JUN14© 2014 Sun Hydraulics Corporation Manufacturing Sun Cartridge Cavities The following Technical Tip discusses a variety of points that should be considered when manufacturing a Sun cavity. Many of the items discussed could be classified as general machining rules, but this paper puts them into the context of machining cavit ies that accept Sun Hydraulics’ cartridges. Because many of Sun’s cartridges are installed in cavities manufactured outside of Sun’s walls, which is roughly two thirds o f a ll the cartridges we manufacture, we offer this information to assist anyone making Sun cavities. The Sun cavity is integral to the pro per operation of Sun cartridges, and, if machined properly, ensures that the cartridge will work when installed (all Sun cartridg es are functionally tested at the factory). If the circuit itself is sound, a properly machined cavity translates to a fully functio nal manifold assembly that does not require testing! Tooling Check Periodic Tool inspection is a good way to prevent any problems that may arise from worn or damaged tooling. Additionally, the use of Sun supplied form drills and form reamers is strongly recommended. Following are a few tips on the inspection of tools:  Look for any nicks or chips along the leading edge of the tool. These may affect the finish on the ID of the hole/cavity.  Carefully use your thumb or finger to feel the sharpness of the flute edges. A sharp edge will tend to grip the grooves on the skin of your finger. This procedure may take a bit of trial and error in order to develop a feel for what is or is not sharp.  Any material build up should be carefully removed. The use of a fine diamond file usually works well to remove this build up. (Be careful not to damage the edge.)  The locating shoulder (L.S.) on the reamer should be checked to make sure that the sharp edge is maintained. See Figure 2, note #1.  If using a reground tool, check dimensions with reference to the locating shoulder in order to make sure that the depths and diameters are in agreement with the cavity drawing.  Depth of “lead in drill” on the form drill is critical for valves that have components that extend beyond the nose during operation (see note on Figure 1). Sample Drawing of TD - 11A Form Drill (For reference only) © 2008 Sun Hydraulics Corporation Figure 1 Sun Hydraulics Technical Tips 2 · Tech Tips:Web# 999 - 901 - 365 Rev. 16JUN14© 2014 Sun Hydraulics Corporation Sample Drawing of TR - 11A Form Reamer (For reference only) © 2008 Sun Hydraulics Corporation Figure 2 The finished cavity should be checked for dimensional accuracy against a Sun detailed cavity drawing, available online at www.sunhydraulics.com under Accessories: Cavity Infor- mation . Sun recommends the use of Go / NoGo cylindrical plug and thread gages for final inspection of cavity dimensions. One of the more critical points on the cartridge cavity that needs to be checked is the nose of the cavity. This section is critical because this area is where the reamer performs the most work. If a worn form reamer is used, there is the potential for inaccurate finished geometry . The following points describe what may happen when a worn tool is used and what to look out for during inspection (see Figure 3):  A worn form reamer can create a taper at the nose that may not be easily detectable if it is not measured with care. The problem with a taper at the cavity nose is that it can create a situation where the nose of the cartridge gets wedged into the cavity upon installation. Consequently, when the car- tridge is unscrewed for servicing the body can come out while the cartridge nose remains wedged in the cavity. Therefore, when checking the nose dimensions, the diameter needs to be checked from the beginning of the nose all the way down to the nose support, to ensure that the nose is not tapered.  A visual inspection should be performed to determine if the machined cavity has a smooth surface, free from voids. Voids (incomplete seal diameter clean up) may result from excessive drill “walk” yielding a local oversized diameter.  A worn tool can leave a rough finish on the sealing areas, possibly creating a leak path and a reduction in seal life. Surface roughness in excess of 63 Ra can result in reduced seal life.  Using an improperly reground form reamer, where the distance from the locating shoulder to the nose has not been maintained (e.g. it was ground shorter than specified), will yield a situation where the cartridge nose will get com- pressed into the cartridge body at installation. (When the valve is torqued in place, movement of the working parts in the floating nose can be inhibited.)  Another critical area is the locating shoulder. This small area is where the valve is seated when it is torqued at installation. If a worn tool has been used, and the geometry is not created accurately, the locating shoulder on the cartridge valve will not rest on the locating shoulder of the cavity. Referring to Figure 2, the locating shoulder should be created with a sharp edge on the reamer. If that edge is worn to the degree that it becomes a radius, an equivalent radius will be created in the cavity. This condition will allow the valve to rest on this radius, rather than a flat edge. Cavity Check Sun Hydraulics Technical Tips 3 · Tech Tips:Web# 999 - 901 - 365 Rev. 16JUN14© 2014 Sun Hydraulics Corporation Cavity nose area Sample Drawing of T - 11A Cavity (For reference only) © 2008 Sun Hydraulics Corporation Figure 3 Sun Hydraulics Technical Tips 4 · Tech Tips:Web# 999 - 901 - 365 Rev. 16JUN14© 2014 Sun Hydraulics Corporation  All Sun cavity drawings specify a “Drill/Reamer Relationship ” of 1/32 (0,8 mm) of an inch. (See Figure 3.) Specifically, the form reamer should be inserted 1/32 of an inch deeper than the form drill, using the locating shoulder (L.S.) as the base line. If the reamer is inserted deeper, more material will be removed, causing unnecessary wear on the form tool. Conversely, if the reamer is not inserted to the required depth, the o - ring leads will not be created, resulting in seal damage and/or improper valve function due to incorrect cavity geometry.  Tapping of the thread is also critical, as alignment and concentricity can affect cartridge function. Sun’s floating style cartridge design allows for some misalignment, but severe eccentricity or a thread centerline not parallel with the cavity can lead to cartridge binding and malfunction.  Use of thru - tool coolant drills and reamers help to flush out chips and provide cooling and lubrication to the tool and cutting surface.  Oil based cutting fluids tend to work better when machining ductile iron, and water - based coolants tend to work better when machining aluminum.  When using water - based coolants, it is important to follow the manufacturer’s specifications for mixture ratios. (Too much water will provide adequate cooling but not enough lubrica- tion, causing the finish to suffer. In contrast, not enough water can cause inadequate cooling.)  Synthetic lubricants can work well, but their superior perfor- mance may not be realized if not enough heat is generated to activate the lubricating qualities of the fluid.  The temperature of the work piece and tool is important; a work piece that is very hot when final operations are per- formed, will cool off and can have a tendency to bind, become undersized, or warped. Remember that heat can be the enemy; that’s why it is important to maintain adequate coolant through out all machining operations.  Using dull and worn tools, not only affects the finished cavity, but also affects the amount of heat created while performing an operation. (Dull tools have a tendency to create more heat when cutting, compared to a sharp cutting tool.)  Rigidity of tool and work piece is very important. When either, or both, are not rigidly mounted, problems, such as, but not limited to, cavity run out, poor or incorrect finish, incorrect final dimensions, tool or work piece damage, and machine damage can occur.  When machining large and/or deep cavities in ductile iron, pre - drilling with an undersize drill is highly recommended.  “Voiding” can occur when machining a cavity and the drill intersects with a previously drilled passage. This situation can cause the drill to walk and create a slightly oval hole. In this example, rigidity is very important in order to minimize possible run out. (Typically, evidence of this scenario will be a hole where one side is smooth and shiny, while at 180°, there are grooves reminiscent of an old 45.)  Run out on long drills can pose a problem. As the drill goes deeper, the drill may have a tendency to wander away from its intended axis. (Once this happens, the reamer cannot be expected to correct the damage; the reamer will just follow the “slewed” drill hole.)  Feeds and speeds are very important and vary for different machines, tools, and materials. When machining aluminum, a feed rate that is too fast may not allow all of the chips to exit the hole, causing a build up of aluminum at the tip and leading edge of the drill. This metal build up tends to cause a poor surface finish. Cavity Coating Consideration: When using Sun tooling, a maximum coating thickness of .0002” (0,005 mm) may be applied to the final machined cavity. A thickness greater than this can result in material interference between the cavity and the cartridge. Machining Notes Sun Hydraulics Technical Tips 5 · Tech Tips:Web# 999 - 901 - 365 Rev. 16JUN14© 2014 Sun Hydraulics Corporation Cavity Features The following illustration (Figure 4) details some of the characteristics of the Sun cavity and how they interact with the un iqu e Sun floating design cartridge.  O - RING LEAD: The inclined step of a cavity located at the top of a seal area that gradually compresses or squeezes the o - ring as the cartridge is screwed into the cavity. It must be smooth and free of scratches and nicks.  O - RING SEAL AREAS: The area on a cavity that o - rings seat or squeeze against to create a seal. This seal pre- vents oil in one port area from leaking into another port area. Must be smooth and free of scratches and nicks. A surface finish of 63 Ra or lower is acceptable.  L.S. LOCATING SHOULDER: This is the shoulder that the cartridge is torqued or tightened against. This ledge helps the cartridge align itself with the centerline and diameters of the cavity. It must be completely formed and free of scratches and nicks.  PORT AREAS: Port areas are the open- ings on a cavity that expose fluid flow and pressure to the cartridge that the cavity holds. Each cavity has defined port areas. Drillings into these areas cannot exceed the maximum defined port area on the cavity drawing. Otherwise, they could run into o - ring leads, seal areas, locating shoulders, or remove threads. Openings into cavities must be free of all burrs and sharp edges.  FIRST THREAD: The first thread on all Sun cavities is important as it is needed to help support the backup ring above it (square o - ring that protects and supports the round o - ring). Although the starting thread is in this area, which usually is sharp, a complete thread should be main- tained. Threads should not be crossing or missing. For further information on the advantages of Sun’s floating style cartridge and unique cavity and to obtain a printable copy, click here . This printable pdf is also accessible from every cartridge product page on the Sun website under Additional Resources . O - ring leads Locating Shoulder O - ring lead Port 1 (NOSE) Max. port areas are Defined in the individual cavity drawings O - ring sealing areas First thread Port 3 Port 2 Typical Sun 3 - Port Cavity © 2008 Sun Hydraulics Corporation Figure 4