/
CAST APPLICATION To prepare plaster of Paris bandage u CAST APPLICATION To prepare plaster of Paris bandage u

CAST APPLICATION To prepare plaster of Paris bandage u - PDF document

alida-meadow
alida-meadow . @alida-meadow
Follow
424 views
Uploaded On 2015-05-12

CAST APPLICATION To prepare plaster of Paris bandage u - PPT Presentation

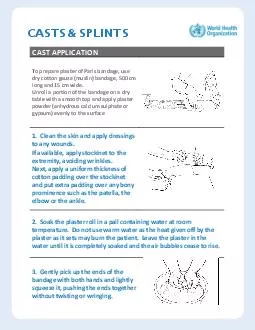
Unroll a portion of the bandage on a dry table with a smooth top and apply plaster powder anhydrous calcium sulphate or gypsum evenly to the surface 1 Clean the skin and apply dressings to any wounds If available apply stockinet to the extremity avo ID: 65771

Unroll portion

Share:

Link:

Embed:

Download Presentation from below link

Download Pdf The PPT/PDF document "CAST APPLICATION To prepare plaster of P..." is the property of its rightful owner. Permission is granted to download and print the materials on this web site for personal, non-commercial use only, and to display it on your personal computer provided you do not modify the materials and that you retain all copyright notices contained in the materials. By downloading content from our website, you accept the terms of this agreement.


Presentation Transcript

CAST S & SPLINTS CAST APPLICATION To prepare plaster of Paris bandage, use dry cotton gauze (muslin) bandage, 500 cm long and 15 cm wide. Unroll a portion of the bandage on a dry table with a smooth top and apply plaster powder (anhydrous calcium sulphate or gypsum) evenly to the surface 1. Clean the skin and apply dressings to any wounds. If available, apply stockinet to the extremity, avoiding wrinkles. Next, apply a uniform thickness of cotton padding over the stockinet and put extra padding over any bony prominence such as the patella, the elbow or the ankle. 2. Soak the plaster roll in a pail containing water at room temperature. Do not use warm water as the heat given off by the plaster as it sets may burn the patient. Leave the plaster in the water until it is completely soaked and the air bubbles cease to rise. 3. Gently pick up the ends of the bandage wit h both hands and lightly squeeze it, pushing the ends together without twisting or wringing. 4. While applying the plaster, hold the relevant part of the body steady in the correct position. Movement will cause ridges to form on the inside of the plaster. Work rapidly and without interruption, rubbing each layer firmly with the palm so that the plaster forms a homogenous mass rather than a discrete layer. 5. Apply the plaster by unrolling the bandage as it rests on the limb. Do not lift it up from the patient or apply tension to the roll. Overlap the previous layer of plaster by about half the width of the roll. 6. Mould the plaster evenly around the bony prominences and contours. Leave 3 cm of padding at the upper and lower margins of the cast to protect the skin from irritation by the edge of the cast. This can be folded back over the edge and incorporated in the last layer of plaster to provide a smooth edge. 7. Mould the cast until the plaster sets and becomes firm. Complete drying takes 24 hours, so advise the patient to take care not to dent the cast or apply weight to it during this time. The technique for application of a fibreglass cast is similar, but the fibreglass is slightly elastic and will contour to the body more easily. It sets firmly in about 30 minutes and will not be affected by water after that time. CASTS & SPLINTS SPLINT APPLICATION Measure the length of material needed to secure the limb. Place 3 - 5 layers of the measured padding on a flat surface and unroll 5 - 10 layers of plaster on to the padding. Grasp the plaster layer at each end, dip into the water and gently squeeze together without twisting. Place the wet plaster on the padding and smooth with the palm into a homogeneous layer Place the splint on the extremity, with the padding side toward the pa tient, mould it to the limb contours and secure with an elastic bandage or gauze wrap And alternative method is to split a circular cast lengthwise, remove the anterior half and secure it similarly with an elastic bandage CARING FOR A CAST OR SPLINT  Keep the cast or splint dry at all times  Encourage patients to try not to scratch their skin under the cast or splint with a sharp or blunt object  Allow the cast to dry for 24 hours before putting weight on it or resting it on a hard surface  For acute injuries, elevate the injured part for 24 - 48 hours and have the patient wiggle their fingers or toes frequently Return to the hea lth clinic immediately if…  Your cast or splint gets wet or becomes soft or broken  You have increasing pain  You experience numbness or tingling, or have difficulty moving your fingers or toes  You see a change in skin colour of the extremity  Your cast or spl int has a foul odour