/
Firebird Scout Firebird Scout

Firebird Scout - PDF document

mitsue-stanley
mitsue-stanley . @mitsue-stanley
Follow
389 views
Uploaded On 2016-06-25

Firebird Scout - PPT Presentation

Firebird II ST Firebird Commander 
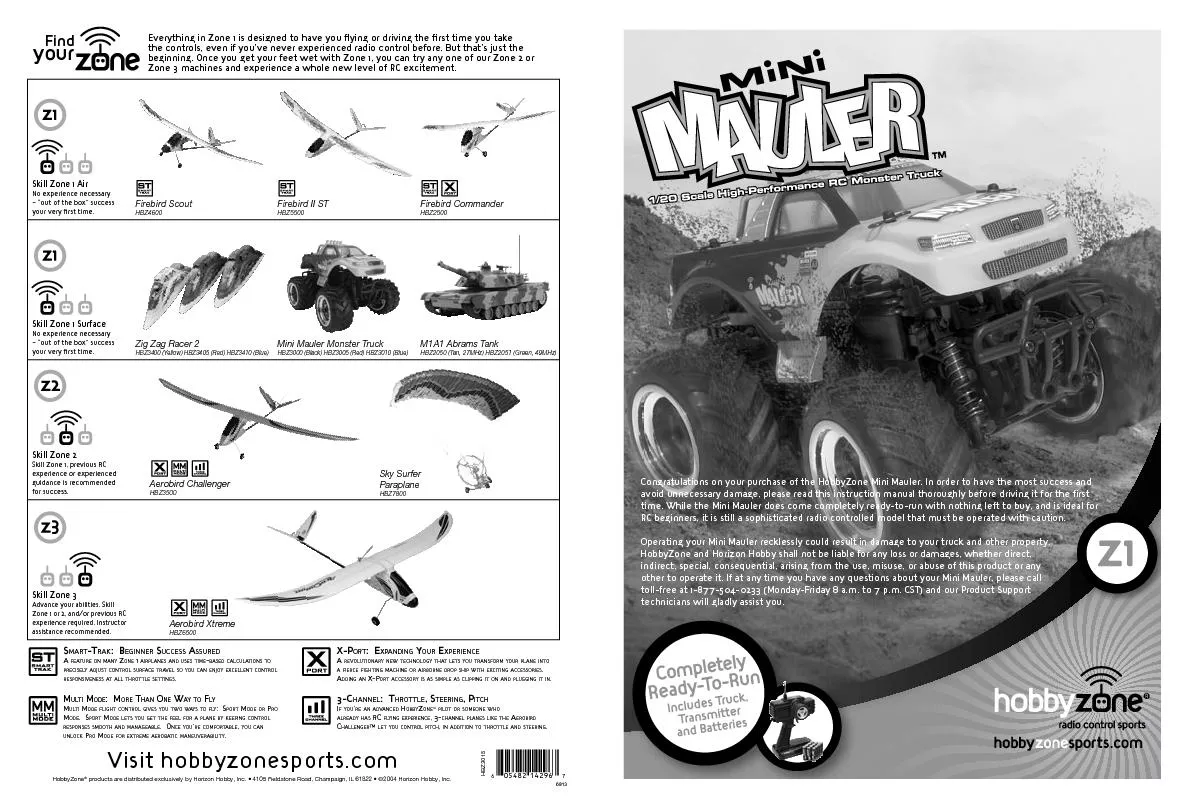
HBZ3400 Yellow HBZ340m Red Mini Mauler Monster Truck MbAb Abrams Tank 20m0 TanR 2oMHf HBZ20mb Green Aerobird Dtreme products are distributed edclusively by H ID: 377017

Firebird ST Firebird Commander HBZ3400 (Yellow)

Share:

Link:

Embed:

Download Presentation from below link

Download Pdf The PPT/PDF document "Firebird Scout" is the property of its rightful owner. Permission is granted to download and print the materials on this web site for personal, non-commercial use only, and to display it on your personal computer provided you do not modify the materials and that you retain all copyright notices contained in the materials. By downloading content from our website, you accept the terms of this agreement.


Presentation Transcript

Firebird Scout Firebird II ST Firebird Commander HBZ3400 (Yellow) HBZ340m (Red) Mini Mauler Monster Truck MbAb Abrams Tank 20m0 (TanR 2oMHf) HBZ20mb (Green Aerobird Dtreme products are distributed edclusively by Horifon HobbyR Inc. • 4b0m Fieldstone RoadR ChampaignR IL nbr22 • ©2004 Horifon HobbyR Inc. Mini Mauler Safety Tips Your Mini Mauler is controlled by radio signalsR and can be subVect to temporary interference outside of your control. To avoid damage from interference always drive your Mini Mauler in an area that is spacious enough to avoid collisions. When Operating Your Mini Mauler: • Stay in open areas away from carsR traffic and people. • wever run out into the street after your Mini Mauler for any reason. • Always have a responsible adult supervising. • wever run your Mini Mauler with low transmitter batteries. • Always follow the directions included with optional support equipment such as chargersR rechargeable battery packsR etc. Tools and Equipment You May Want • Soft bristle brush for cleaning • m.m mm nut driver for wheel nuts (DYw2r03) • 30 Phillips screwdriver (DYw2r2o) • Flat head screwdriver (DYw2r30) There is no additional equipment needed to run your Mini MaulerR howeverR there are additional upgrade parts and accessories you can purchase to increase performance. You7ll find a complete list on pages sxb0 of this manual. into included dry cell battery holder.) Mini Mauler RTR Monster Truck: HZ-02 Radio System (continued) J ReceiverUElectronic Speed Control Unit This unit receives the signal sent out from the transmitter and controls the power (and speed) of the motor. K. Receiver Crystal ThisR along with the crystal installed in the transmitterR determines the frequencyUchannel you are on. wote: Both the transmitter and receiver crystal channel must match for the system to operate properly L. Antenna This receives the signal from the transmitter. M. Power Switch Turns the receiver ton” or toff.” wote: The transmitter should always be turned on firstR before turning on the truckR and turned off only after the truck is turned off. oLIF IeGE Ie:DD KAe w:O BFJBde KAe IemeHD:ce GI Ie4bUs no4bIeIe Bottom of Truck Installing the Transmitter Batteries Your Mini Mauler includes the r batteries needed to power the transmitter. To install them: b. Remove the battery compartment cover at the bottom of the transmitter. 2. Install the r tAA” heavy duty batteries in the transmitter battery tray as indicated by the battery diagram. 3. Replace the battery compartment cover. 4. Raise the antenna. m. Turn the switch ton” to ensure the radio is working and the batteries have been installed correctly. Keep radio on until you have completed testing the receiver (nedt step). Installing the Receiver Batteries and Testing Radio System Your Mini Mauler comes with 4 tAA” Alkaline batteries to power the truck. To install them: b. Open the battery cover at the bottom of the truck by removing 2 body pins. 2. Install the 4 tAA” Alkaline batteries into the battery tray as indicated by the battery diagram. O(An optional rechargeable n00mAh wi-MH battery pack and charger are available. See the optional parts list on pages sxb0 of this manual.) 3. Close cover and install body pins to secure. 4. Turn the receiver switch ton” (verify the transmitter is ton” first). m. Move the steering wheel and verify the wheels turn in the right directions. n. Move the throttle trigger to make sure the electronic speed control functions correctly. wote: Be sure to keep all hairR clothesR and other items away from spinning tires. o. Make sure the steering trim is set correctly. If the vehicle twanders” in one directionR correct this by turning the steering trim knob in the opposite direction until the Mini Mauler tracks straight with no steering input. r. Make certain the throttle trim is set correctly as well. The motor should not run when the trigger is in the neutral position. If an adVustment needs to be madeR use very slight corrections for best results. Owote: When replacing the stock tAA” Alkaline batteries with the 4- or m-cell rechargeable wi-MH packsR you will need to remove the tAA” battery tray prior to installing the upgrade pack. If it appears at any time that your radio system is not functioning properlyR DO wOT drive it. Call Horifon Hobby Product Support at b-roo-m04-0233 (MondayxFridayR r a.m. to o p.m. CST) for assistance. Running Your Mini Mauler Once you are certain the radio and truck are functioning correctlyR start out by running your Mini Mauler at slow speeds. Here are some helpful driving tips: • If driving around other radio control carsR always check to see if anyone else is running on the same channel as you are. Let other RC driversR especially those who may be using a 2oMHf frequencyR know what channel (bxn) you are on. This will help prevent you or someone else from having radio problems that could lead to product or property damage. • While you can run your Mini Mauler on dirtR gravelR mulchR or Vust about any other surfaceR you will enVoy more runtime on smooth surfacesR such as concrete. • When you are done running your Mini MaulerR turn off the truck battery firstR then the transmitter. • Clean your Mini Mauler with compressed air or a soft brush to remove edcess dirt. Avoid using solvents or chemicals as they can actually wash dirt into moving parts and cause damage. Use a damp cloth to clean the body. • wever run your Mini Mauler in the street. • Once you are comfortable driving the Mini MaulerR you can try stuntsR such as ramp VumpingR by using the cardboard ramp that is included. • If your Mini Mauler stops functioning correctlyR check it for damage. If something is brokenR replace the part before running the Mini Mauler again. • When you notice your Mini Mauler is beginning to lose speed and power (after about 30 minutes with Alkalines)R replace the batteries. Rechargeable wi-MH battery packs (HBZb0b0 4-cell pack or HBZb0bb m-cell pack) are also available. They add speed and are more cost effective in the long run. The 4-cell pack requires either the 2 ½ hour AC charger (HBZmm3s) or DC Peak Charger (HBZb02n) that can recharge a pack in about 30 minutes. The m-cell pack requires the DC Peak Charger. must replace both the transmitter and receiver crystals using one er and receiver crystal for a given channel. Crystal Sets Channel bR 2n.ssm (HBZ30sb) Channel 2R 2o.04m (HBZ30s2) Different colored wheels are available to customife your Mini Mauler with a different color. To remove the stock wheelUtireR simply use a m.mmm nut driver to loosen the securing nut and remove the tire. Place the nuts somewhere they will not be lost as they are very small. When you have reinstalled the wheelR tighten the wheel nut securely before running your Mini Mauler again. You may want to increase the performance of your Mini Mauler by adding some optional partsR such as a different pinion gear or the upgrade motor. You mayR in timeR find it necessary to replace these stock parts. To changeUreplace pinion andUor motor: b. With radio system offR remove both rear wheels with m.mmm nut driver. 2. Remove 2 Phillips screws in gear bod cover. This will give you access to the pinion. 3. Remove the 2 Phillips screws that secure the motor in the motor plate. 4. Carefully slide the motor back. If replacing the motorR unplug the bullet connectors at this point. m. Use small flathead screwdriver or pliers to carefully pry off pinion from motor. n. Install pinion (new pinion if necessary) in same position as the one that was removed. o. Slide motor back in (reconnect bullet connectors if necessary) and reinstall 2 screws that secure motor to the motor plate. Proceed to tSetting the Gear Mesh” section below. wote: rT pinion offers more torque for quicker accelerationR but a little less top speed. After you have replaced the motor andUor pinionR keep the screws that secure the motor slightly loose. Slide the motor forward allowing the pinion gear to mesh properly with the spur gear. When seated correctlyR there should not be too much noise when the wheels are spun forward. Once the gear mesh is setR tighten the motor screws (but not overly so) and replace the gear bod cover Battery Options Your Mini Mauler comes with 4 tAA” Alkaline batteries included. These batteries offer good performance and runtime (about 30 minutes)R but cannot be recharged. You can simply replace these batteries with standard tAA” Alkaline batteries if you so choose. HobbyZone also offers two rechargeable hop-up battery options: • HBZb0b0: 4-cell (4.rB) n00mAh wi-MH battery pack: This pack offers better performance than the included tAA” Alkaline batteries. In the long runR it is also a better value since they can be recharged. Choices of chargers are either the 2 hour AC charger (HBZmm3s) or DC Peak charger (HBZb02n). The HBZb02n will charge your battery in approdimately 30 minutes. • HBZb0bb: m-cell (n.0B) n00mAh wi-MH battery pack. This rechargeable battery pack is recommended for those people who crave higher speeds. You will have a little less runtime with this battery pack than with the 4-cell. Keep in mind that the faster you goR the easier it is to have roll-overs and crashes which could cause some damage to your Mini Mauler. It takes some practice with throttle management to master running this battery pack with your truckR but it is well worth it1 You must use the DC Peak Charger (HBZb02n) to properly charge this high-performance battery pack. Item 3 Description FUR Tires 6 Wheels Mounted Main Chassis Set Front Suspension Arm Set Ball Cap Set FUR Shock Tower Set T-Bar Set Spindle and Carrier Set Rear Gear Bod Set Differential Gear Bag Pinion Gear Bag Body Post Set Damper Set (assembled) Front Bumper Set Rear Bumper Set Plastic Bushing Set Motor Plate Item 3 Description Suspension Pin Bag Front Adle Pin Set (Gear Bod and T-Bar) Screw Set BB Upgrade Kit (replaces 3043) RDUESC Stock Motor Camber and Steering Links E-Clip Bag Wheel wuts (4) and Adaptor Chrome Front Wheels (2) Chrome Rear Wheels (2) Tire and Foam (2) Body Clips (b0) Servo Assembly Battery Bod Holder