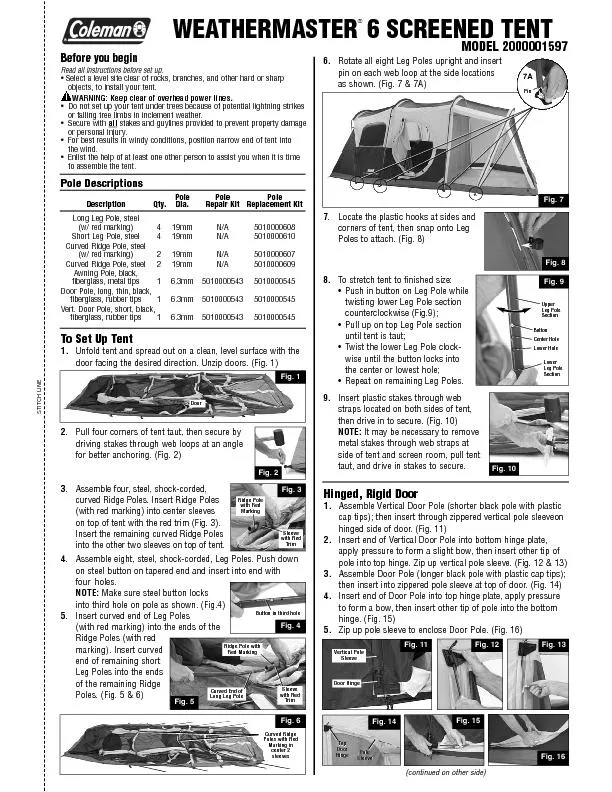
PDF-6.Rotate all eight Leg Poles upright and insertpin on each web loop at
Author : tatiana-dople | Published Date : 2016-08-12
STITCH LINE Fig 6 Fig 7 7A Locate the plastic hooks at sides and It may be necessary to remove Fig 10 To stretch tent to finished size
Presentation Embed Code
Download Presentation
Download Presentation The PPT/PDF document "6.Rotate all eight Leg Poles upright and..." is the property of its rightful owner. Permission is granted to download and print the materials on this website for personal, non-commercial use only, and to display it on your personal computer provided you do not modify the materials and that you retain all copyright notices contained in the materials. By downloading content from our website, you accept the terms of this agreement.
6.Rotate all eight Leg Poles upright and insertpin on each web loop at: Transcript
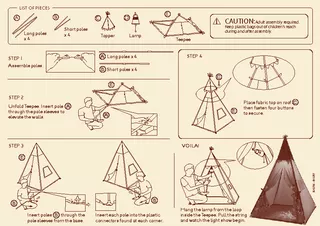
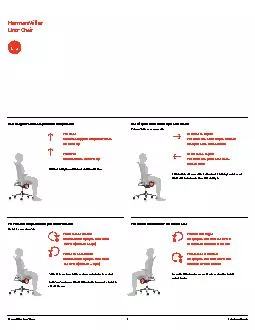
STITCH LINE Fig 6 Fig 7 7A Locate the plastic hooks at sides and It may be necessary to remove Fig 10 To stretch tent to finished size. Simonis Standard Cloth Cutting Guide for best yield use 66 wide cloth for 7 and 8 Std tables All rail cuts are 6 width No rails off the ends A u t h e n t i c A c c u r a t e A l w a y s Iwan Simonis Inc wwwsimonisclothcom 1514 St Paul Avenue Gurne One s tudent kneels down to hold one end of the rope on the ground while the second student stands holding the other end of the rope at hisher waist 2 he third student jumps with hisher feet together back and forth upward along the rope NA EY 1 wo s When in Loop Bypass mode the SendReturn effects loop is bypassed when the pedal is off In Loop On mode the SendReturn effects loop is active while the pedal is off This can be accessed by removing the back plate of the pedal Up Loop On factory sett Leg Forward Body Rotate Grab Drop Left Right Invent new commands and write them here Write your code here and give it to your robot to complete. Separate each command with a comma. Jump Squat fuz B D C E Assemble poles. Long poles TopperShort poles LampTeepee B Short poles x 4A Long poles x 4 Unfold Teepee. Insert pole A through the pole sleeves toelevate the walls.Hang the lamp from Period 8 . Computers. What are you going to do?. In this . project . you will interview your family members about your family's history, find symbols that represent different parts of your family history, and build a totem pole . Arturo Romero, Jessica Herrera, Beatriz Cantua, Alex Escobedo. Objective. The goal of this project is to build a roller coaster for marbles using foam pipe insulation and to investigate how much height is needed in order for the marble to run through a loop of fixed size.. Katherine Rankin, D.O., Brian Do, D.O.. Department of Diagnostic Radiology at Oklahoma State University Medical Center, Tulsa, Oklahoma. OBJECTIVE:. The objective of this study is to determine. if upright magnetic resonance imaging accentuates degenerative disc disease identified on supine imaging.. Megan Ardovini. April 25, 2014. 5 Major Questions to be answered. :. What is the purpose of totem poles? . How are totem poles created? . What tribes are known to have totem poles?. What are the meanings of the different symbols on a totem pole? . Dr. Mohamed . Bingabr. University of Central . Oklahoma. Transfer Function. Block Diagrams. Cascade Connection. Parallel Connection. Feedback Interconnections. System Realization. Realization is a synthesis problem, so there is no unique way of realizing a system.. Analyzing . utility pole . relationships . with soil hydrography and terrain. Timothy Tabor GEOG . 596A. , Summer . 2016. Advisor: Seth . Blumsack. Table of Contents. Background. Study Area. Data. Process. STEREOTYPES ABOUT THE POLES 1. THE POLES STEAL In Germany, Po lish people are often perceived as thieves. Mainly because of: car theft exporting cars abroad The o pinion that the Poles are thieves came after Polish accession to the Schengen zone. HermanMillerLino ChairTo raise:While taking your weight o chair, li lever up. To lower:While seated, li lever up.At the proper height, your feet should rest flat on the floor.Seat Heig Katherine Rankin, D.O., Brian Do, D.O.. Department of Diagnostic Radiology at Oklahoma State University Medical Center, Tulsa, Oklahoma. OBJECTIVE:. The objective of this study is to determine. if upright magnetic resonance imaging accentuates degenerative disc disease identified on supine imaging..
Download Document
Here is the link to download the presentation.
"6.Rotate all eight Leg Poles upright and insertpin on each web loop at"The content belongs to its owner. You may download and print it for personal use, without modification, and keep all copyright notices. By downloading, you agree to these terms.
Related Documents