
CALYPSO RDS-CAA Probe Qualification ZEISS
AM
Published · 32 slides · 0 views

1 / 1


Description
CALYPSO RDS-CAA Probe Qualification ZEISS Industrial Metrology 2 Agenda 1 2 3 How to Create a Stylus System Using RDS-CAA Qualification Create a new Stylus System activating RDS-CAA What is RDS-CAA? Carl Zeiss Industrial Metrology, LLC
Related Topics
Share
Embed code
Download this presentation From Below
"CALYPSO RDS-CAA Probe Qualification ZEISS" is the property of its rightful owner. Permission is granted to download and print the materials on this website for personal, non-commercial use only, and to display it on your personal computer provided you do not modify the materials and that you retain all copyright notices contained in the materials. By downloading content from our website, you accept the terms of this agreement.
Presentation Transcript
01
CALYPSO RDS-CAA Probe Qualification ZEISS Industrial Metrology<br>
02
2 Agenda 1 2 3 How to Create a Stylus System Using RDS-CAA Qualification Create a new Stylus System activating RDS-CAA What is RDS-CAA? Carl Zeiss Industrial Metrology, LLC 9/29/2015 4 Create a new multi-probe Stylus System activating RDS-CAA Conclusion 5<br>
03
3 Agenda 1 2 3 How to Create a Stylus System Using RDS-CAA Qualification Create a new Stylus System activating RDS-CAA What is RDS-CAA? Carl Zeiss Industrial Metrology, LLC 9/29/2015 4 Create a new multi-probe Stylus System activating RDS-CAA Conclusion 5<br>
04
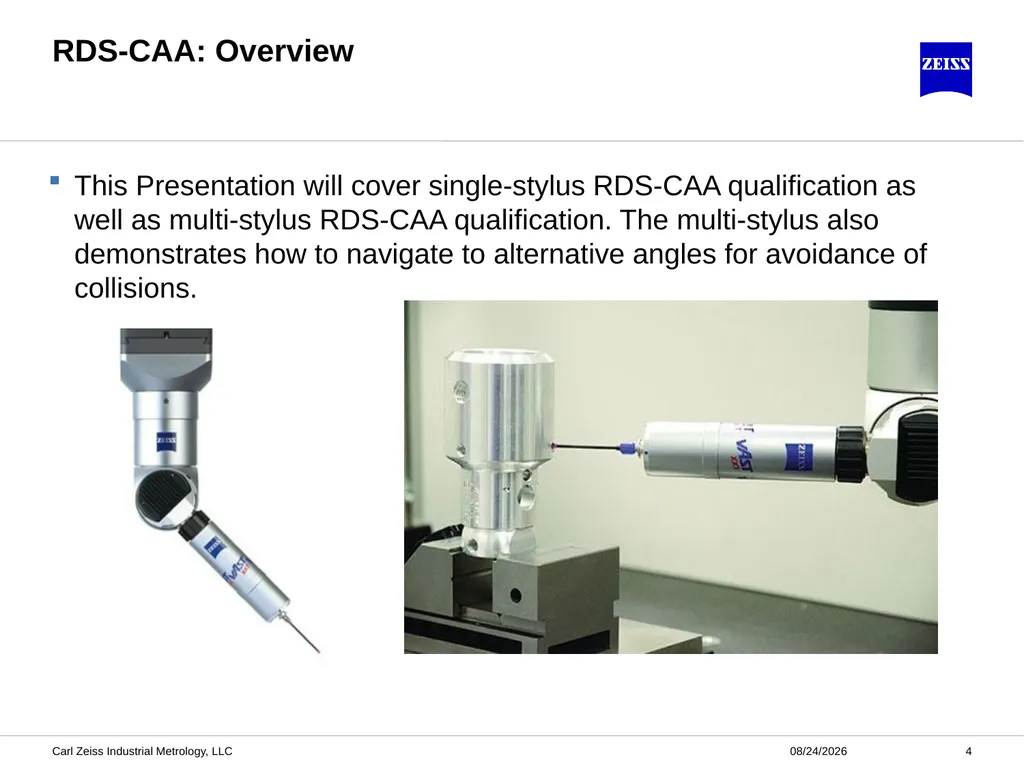
RDS-CAA: Overview 9/29/2015 4 Carl Zeiss Industrial Metrology, LLC This Presentation will cover single-stylus RDS-CAA qualification as well as multi-stylus RDS-CAA qualification. The multi-stylus also demonstrates how to navigate to alternative angles for avoidance of collisions.<br>
05
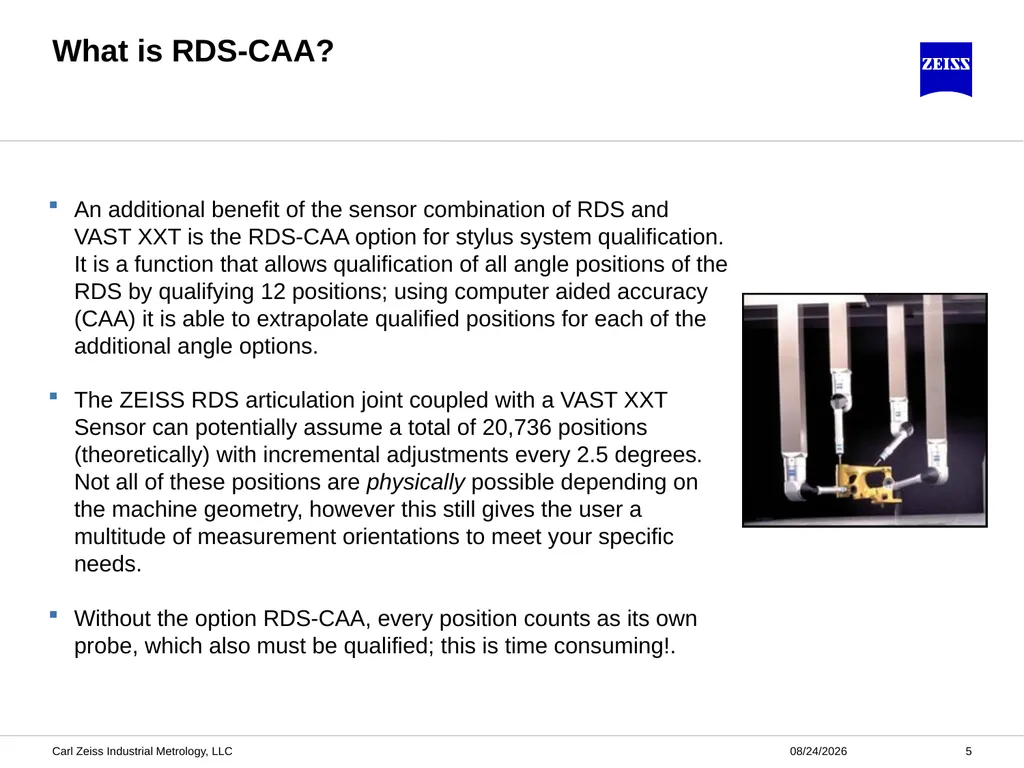
What is RDS-CAA? 9/29/2015 Carl Zeiss Industrial Metrology, LLC 5 An additional benefit of the sensor combination of RDS and VAST XXT is the RDS-CAA option for stylus system qualification. It is a function that allows qualification of all angle positions of the RDS by qualifying 12 positions; using computer aided accuracy (CAA) it is able to extrapolate qualified positions for each of the additional angle options.
The ZEISS RDS articulation joint coupled with a VAST XXT Sensor can potentially assume a total of 20,736 positions (theoretically) with incremental adjustments every 2.5 degrees. Not all of these positions are physically possible depending on the machine geometry, however this still gives the user a multitude of measurement orientations to meet your specific needs.
Without the option RDS-CAA, every position counts as its own probe, which also must be qualified; this is time consuming!.<br>
The ZEISS RDS articulation joint coupled with a VAST XXT Sensor can potentially assume a total of 20,736 positions (theoretically) with incremental adjustments every 2.5 degrees. Not all of these positions are physically possible depending on the machine geometry, however this still gives the user a multitude of measurement orientations to meet your specific needs.
Without the option RDS-CAA, every position counts as its own probe, which also must be qualified; this is time consuming!.<br>
06
6 Agenda 1 2 3 How to Create a Stylus System Using RDS-CAA Qualification Create a new Stylus System activating RDS-CAA What is RDS-CAA? Carl Zeiss Industrial Metrology, LLC 9/29/2015 4 Create a new multi-probe Stylus System activating RDS-CAA Conclusion 5<br>
07
How to Create a Stylus System Using RDS-CAA Qualification 9/29/2015 Carl Zeiss Industrial Metrology, LLC 7 In order to create a stylus system using RDS-CAA:
The MasterProbe must be configured for RDS-CAA
Then, if not previously qualified, qualify the MasterProbe
Lastly, the MasterProbe must be qualified in fitting positions<br>
The MasterProbe must be configured for RDS-CAA
Then, if not previously qualified, qualify the MasterProbe
Lastly, the MasterProbe must be qualified in fitting positions<br>
08
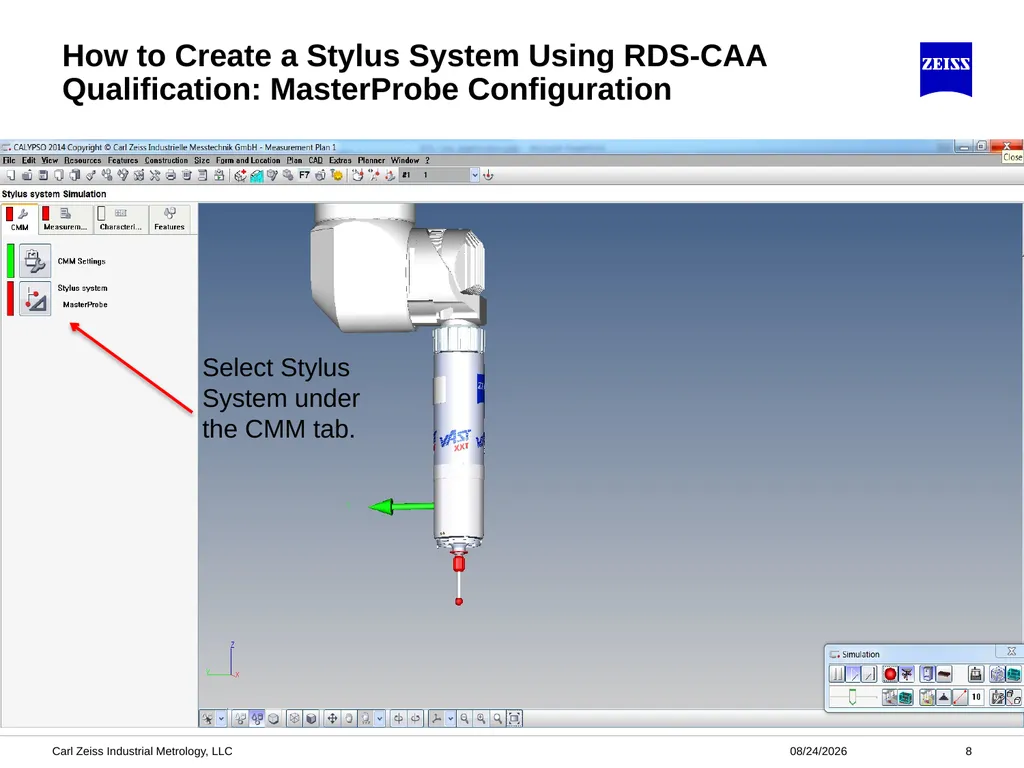
9/29/2015 Carl Zeiss Industrial Metrology, LLC 8 How to Create a Stylus System Using RDS-CAA Qualification: MasterProbe Configuration Select Stylus System under the CMM tab.<br>
09
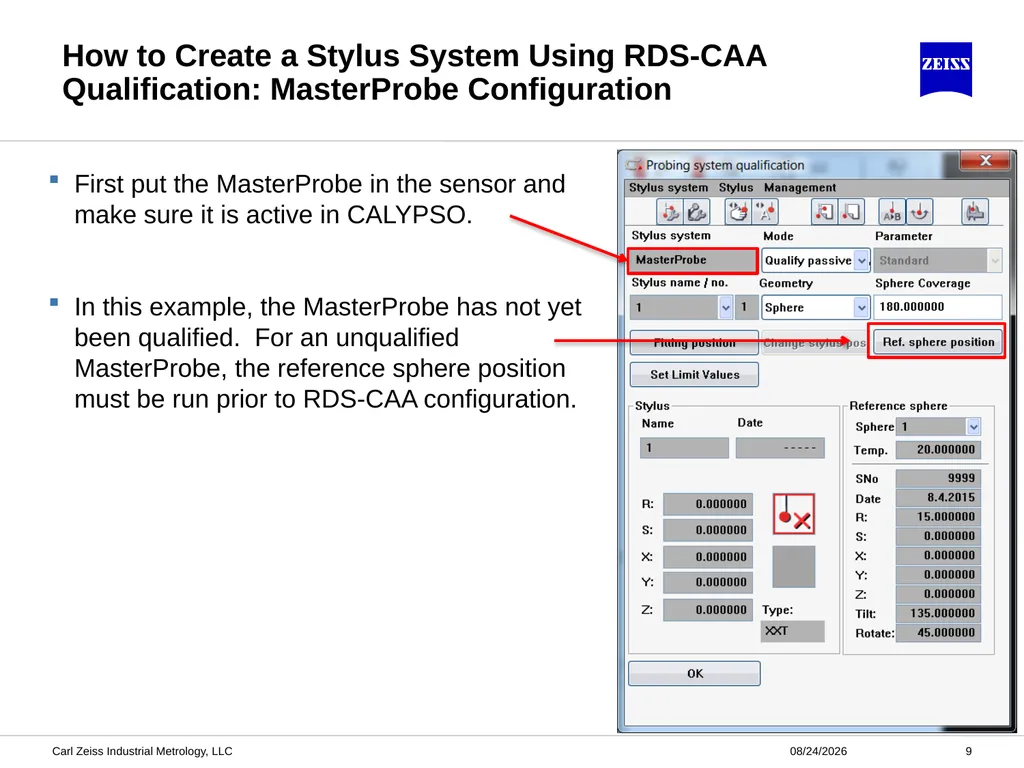
First put the MasterProbe in the sensor and make sure it is active in CALYPSO.
In this example, the MasterProbe has not yet been qualified. For an unqualified MasterProbe, the reference sphere position must be run prior to RDS-CAA configuration. 9/29/2015 Carl Zeiss Industrial Metrology, LLC 9 How to Create a Stylus System Using RDS-CAA Qualification: MasterProbe Configuration<br>
In this example, the MasterProbe has not yet been qualified. For an unqualified MasterProbe, the reference sphere position must be run prior to RDS-CAA configuration. 9/29/2015 Carl Zeiss Industrial Metrology, LLC 9 How to Create a Stylus System Using RDS-CAA Qualification: MasterProbe Configuration<br>
10
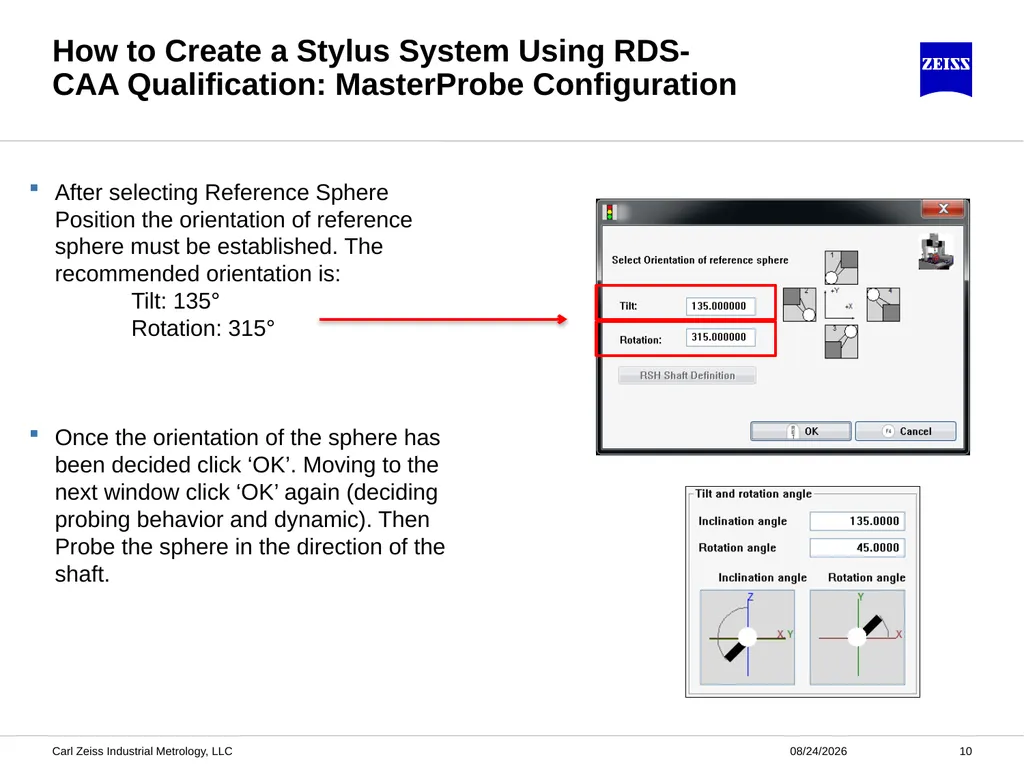
How to Create a Stylus System Using RDS-CAA Qualification: MasterProbe Configuration After selecting Reference Sphere Position the orientation of reference sphere must be established. The recommended orientation is:
Tilt: 135°
Rotation: 315°
Once the orientation of the sphere has been decided click ‘OK’. Moving to the next window click ‘OK’ again (deciding probing behavior and dynamic). Then Probe the sphere in the direction of the shaft. 9/29/2015 10 Carl Zeiss Industrial Metrology, LLC<br>
Tilt: 135°
Rotation: 315°
Once the orientation of the sphere has been decided click ‘OK’. Moving to the next window click ‘OK’ again (deciding probing behavior and dynamic). Then Probe the sphere in the direction of the shaft. 9/29/2015 10 Carl Zeiss Industrial Metrology, LLC<br>
11
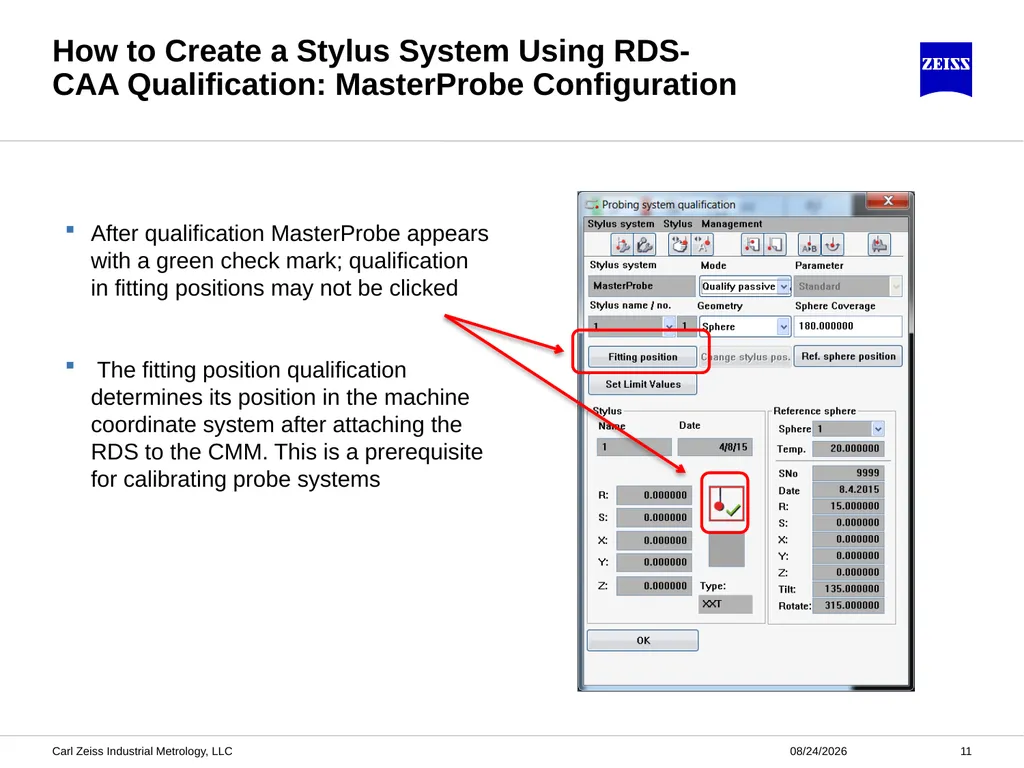
How to Create a Stylus System Using RDS-CAA Qualification: MasterProbe Configuration After qualification MasterProbe appears with a green check mark; qualification in fitting positions may not be clicked
The fitting position qualification determines its position in the machine coordinate system after attaching the RDS to the CMM. This is a prerequisite for calibrating probe systems 9/29/2015 11 Carl Zeiss Industrial Metrology, LLC<br>
The fitting position qualification determines its position in the machine coordinate system after attaching the RDS to the CMM. This is a prerequisite for calibrating probe systems 9/29/2015 11 Carl Zeiss Industrial Metrology, LLC<br>
12
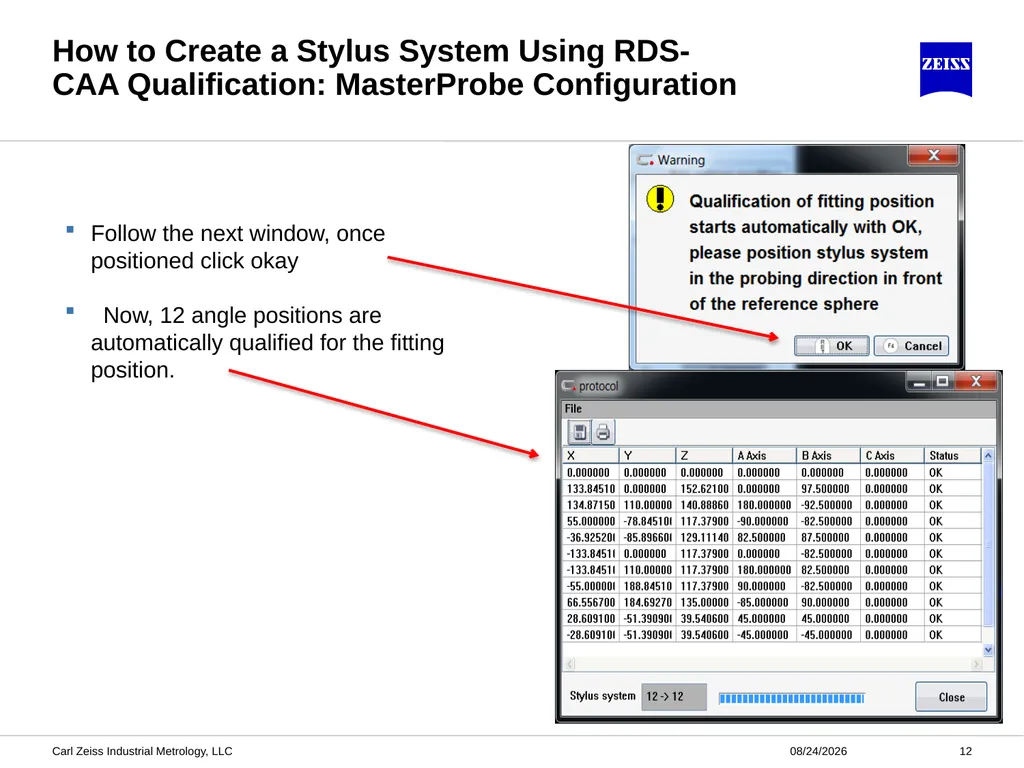
How to Create a Stylus System Using RDS-CAA Qualification: MasterProbe Configuration Follow the next window, once positioned click okay
Now, 12 angle positions are automatically qualified for the fitting position. 9/29/2015 12 Carl Zeiss Industrial Metrology, LLC<br>
Now, 12 angle positions are automatically qualified for the fitting position. 9/29/2015 12 Carl Zeiss Industrial Metrology, LLC<br>
13
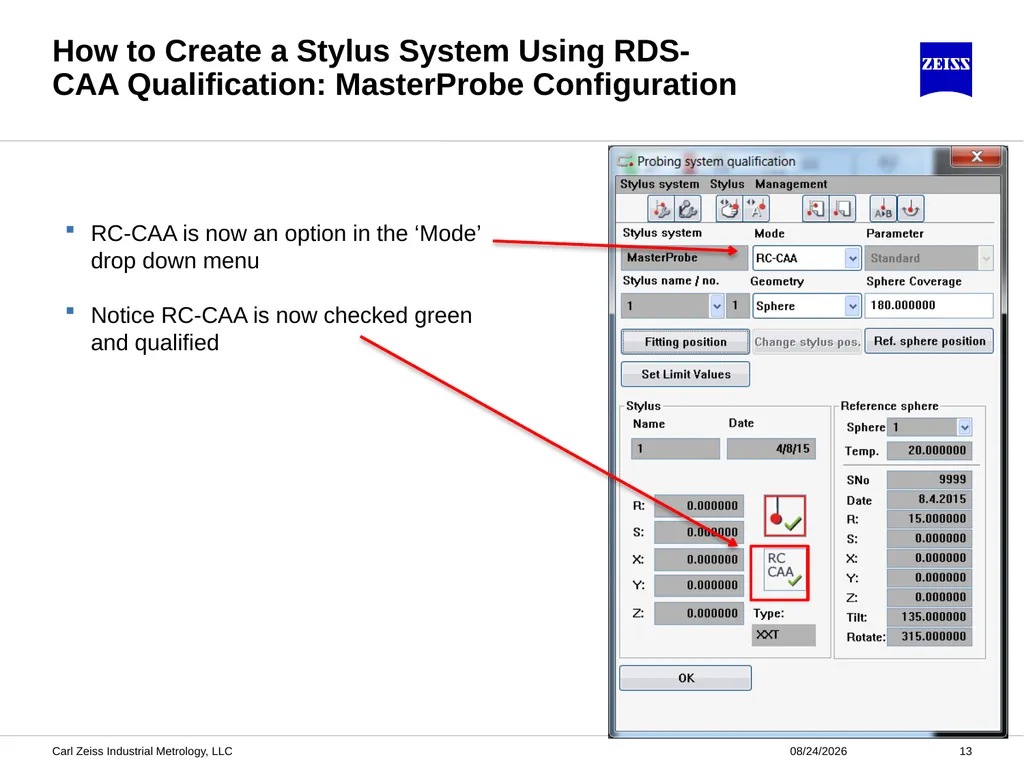
How to Create a Stylus System Using RDS-CAA Qualification: MasterProbe Configuration RC-CAA is now an option in the ‘Mode’ drop down menu
Notice RC-CAA is now checked green and qualified 9/29/2015 13 Carl Zeiss Industrial Metrology, LLC<br>
Notice RC-CAA is now checked green and qualified 9/29/2015 13 Carl Zeiss Industrial Metrology, LLC<br>
14
14 Agenda 1 2 3 How to Create a Stylus System Using RDS-CAA Qualification Create a new Stylus System activating RDS-CAA What is RDS-CAA? Carl Zeiss Industrial Metrology, LLC 9/29/2015 4 Create a new multi-probe Stylus System activating RDS-CAA Conclusion 5<br>
15
Create a new Stylus System activating RDS-CAA 9/29/2015 Carl Zeiss Industrial Metrology, LLC 15 Now that the MasterProbe has been qualified in Fitting Positions we must qualify a new stylus system
This new stylus system will have RDS-CAA activated
The new stylus system will then be qualified in RC-CAA mode<br>
This new stylus system will have RDS-CAA activated
The new stylus system will then be qualified in RC-CAA mode<br>
16
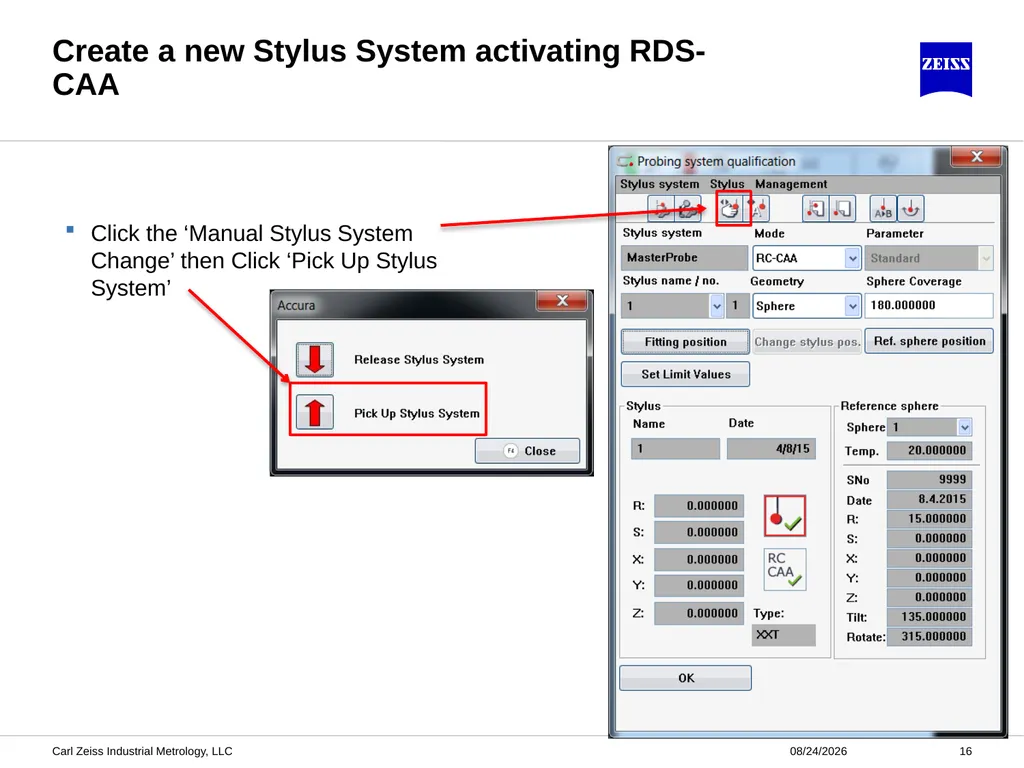
Create a new Stylus System activating RDS-CAA Click the ‘Manual Stylus System Change’ then Click ‘Pick Up Stylus System’ 9/29/2015 16 Carl Zeiss Industrial Metrology, LLC<br>
17
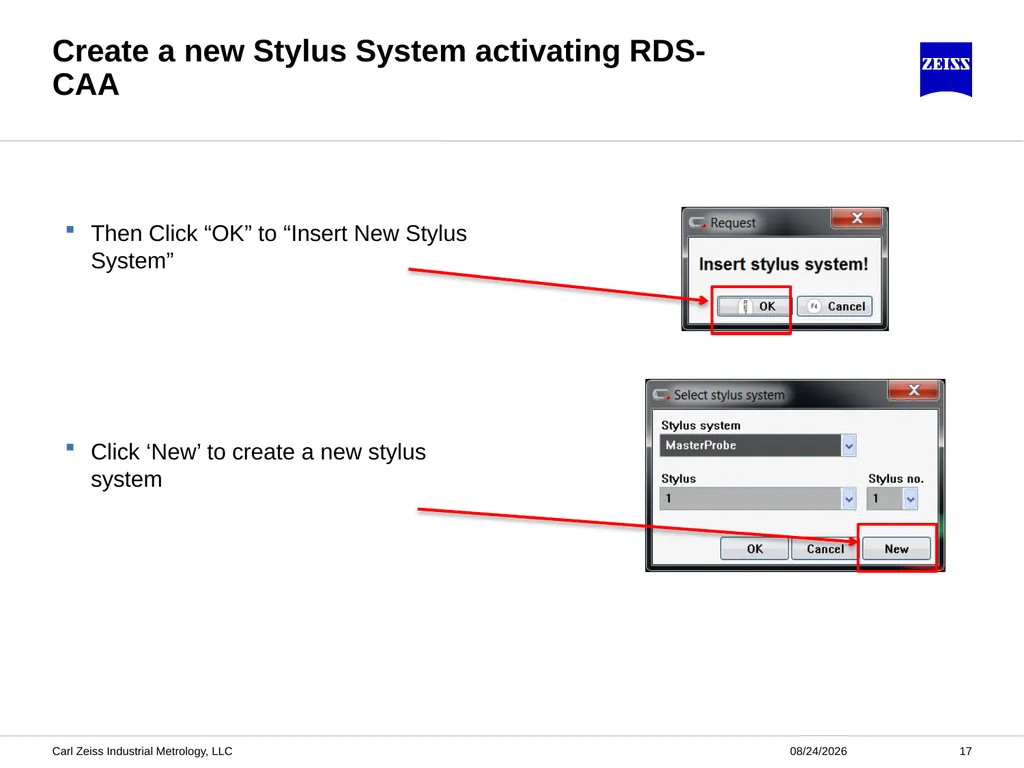
Create a new Stylus System activating RDS-CAA Then Click “OK” to “Insert New Stylus System”
Click ‘New’ to create a new stylus system 9/29/2015 17 Carl Zeiss Industrial Metrology, LLC<br>
Click ‘New’ to create a new stylus system 9/29/2015 17 Carl Zeiss Industrial Metrology, LLC<br>
18
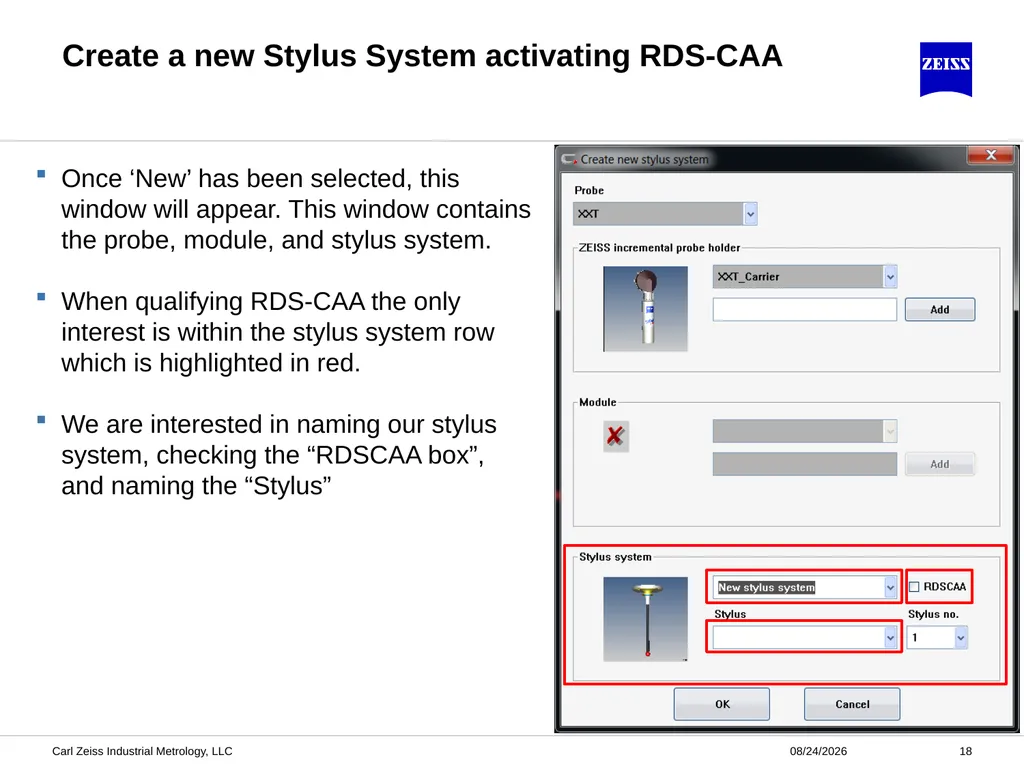
9/29/2015 Carl Zeiss Industrial Metrology, LLC 18 Once ‘New’ has been selected, this window will appear. This window contains the probe, module, and stylus system.
When qualifying RDS-CAA the only interest is within the stylus system row which is highlighted in red.
We are interested in naming our stylus system, checking the “RDSCAA box”, and naming the “Stylus” Create a new Stylus System activating RDS-CAA<br>
When qualifying RDS-CAA the only interest is within the stylus system row which is highlighted in red.
We are interested in naming our stylus system, checking the “RDSCAA box”, and naming the “Stylus” Create a new Stylus System activating RDS-CAA<br>
19
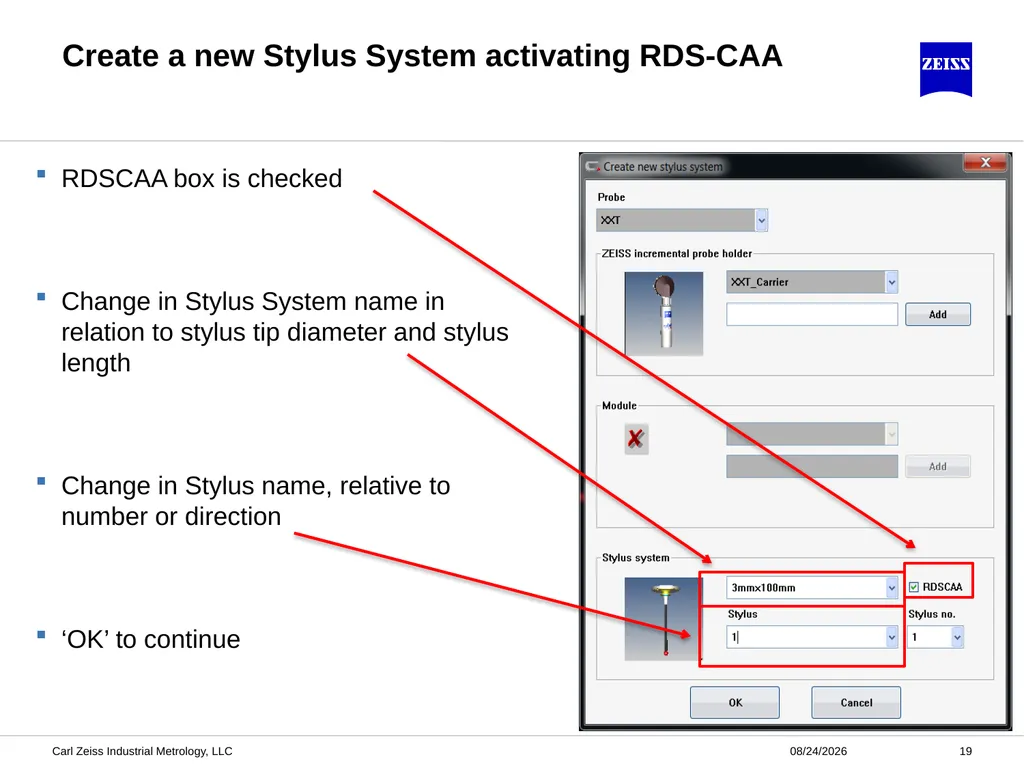
9/29/2015 Carl Zeiss Industrial Metrology, LLC 19 RDSCAA box is checked
Change in Stylus System name in relation to stylus tip diameter and stylus length
Change in Stylus name, relative to number or direction
‘OK’ to continue Create a new Stylus System activating RDS-CAA<br>
Change in Stylus System name in relation to stylus tip diameter and stylus length
Change in Stylus name, relative to number or direction
‘OK’ to continue Create a new Stylus System activating RDS-CAA<br>
20
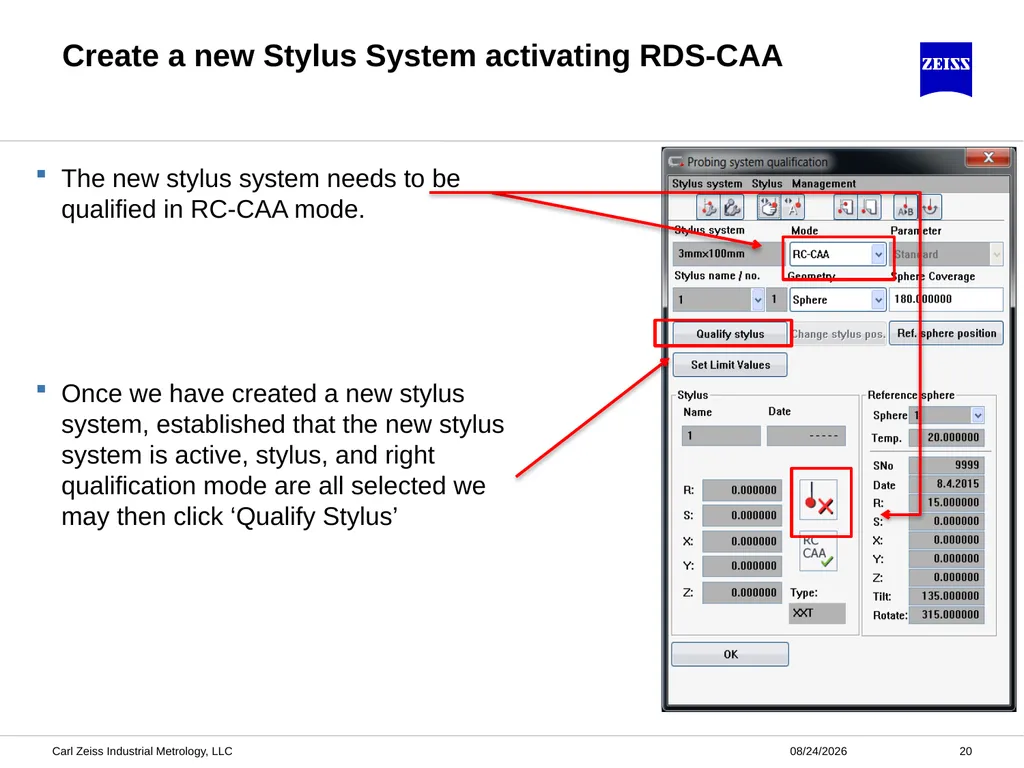
9/29/2015 Carl Zeiss Industrial Metrology, LLC 20 The new stylus system needs to be qualified in RC-CAA mode.
Once we have created a new stylus system, established that the new stylus system is active, stylus, and right qualification mode are all selected we may then click ‘Qualify Stylus’ Create a new Stylus System activating RDS-CAA<br>
Once we have created a new stylus system, established that the new stylus system is active, stylus, and right qualification mode are all selected we may then click ‘Qualify Stylus’ Create a new Stylus System activating RDS-CAA<br>
21
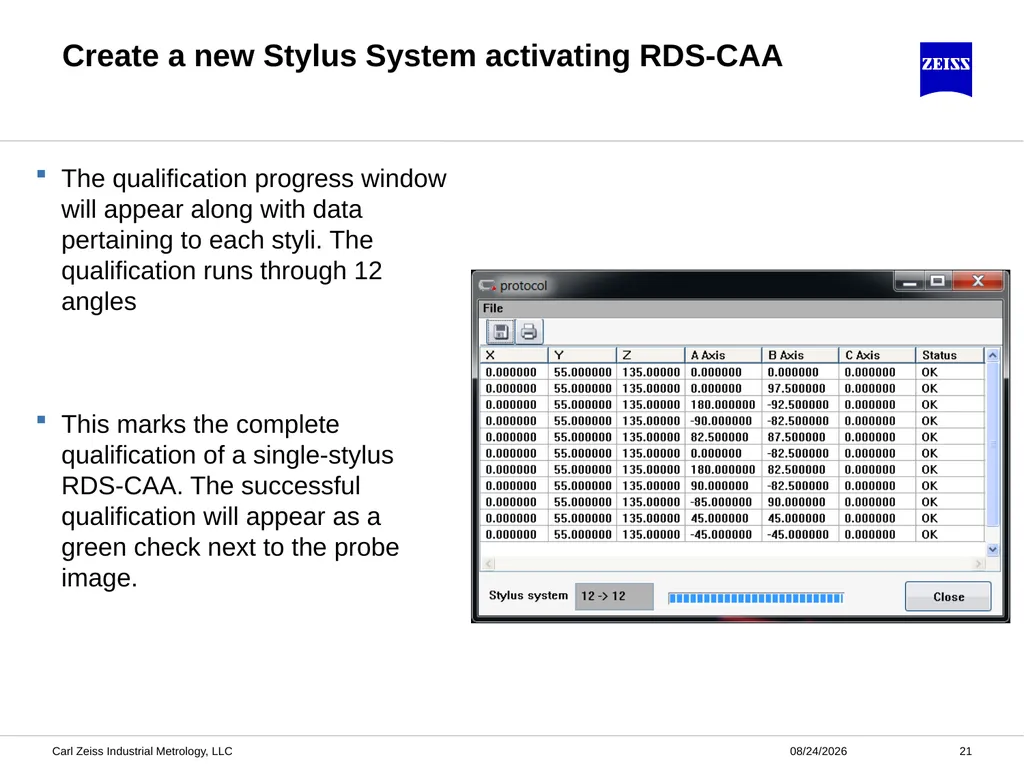
9/29/2015 Carl Zeiss Industrial Metrology, LLC 21 The qualification progress window will appear along with data pertaining to each styli. The qualification runs through 12 angles
This marks the complete qualification of a single-stylus RDS-CAA. The successful qualification will appear as a green check next to the probe image. Create a new Stylus System activating RDS-CAA<br>
This marks the complete qualification of a single-stylus RDS-CAA. The successful qualification will appear as a green check next to the probe image. Create a new Stylus System activating RDS-CAA<br>
22
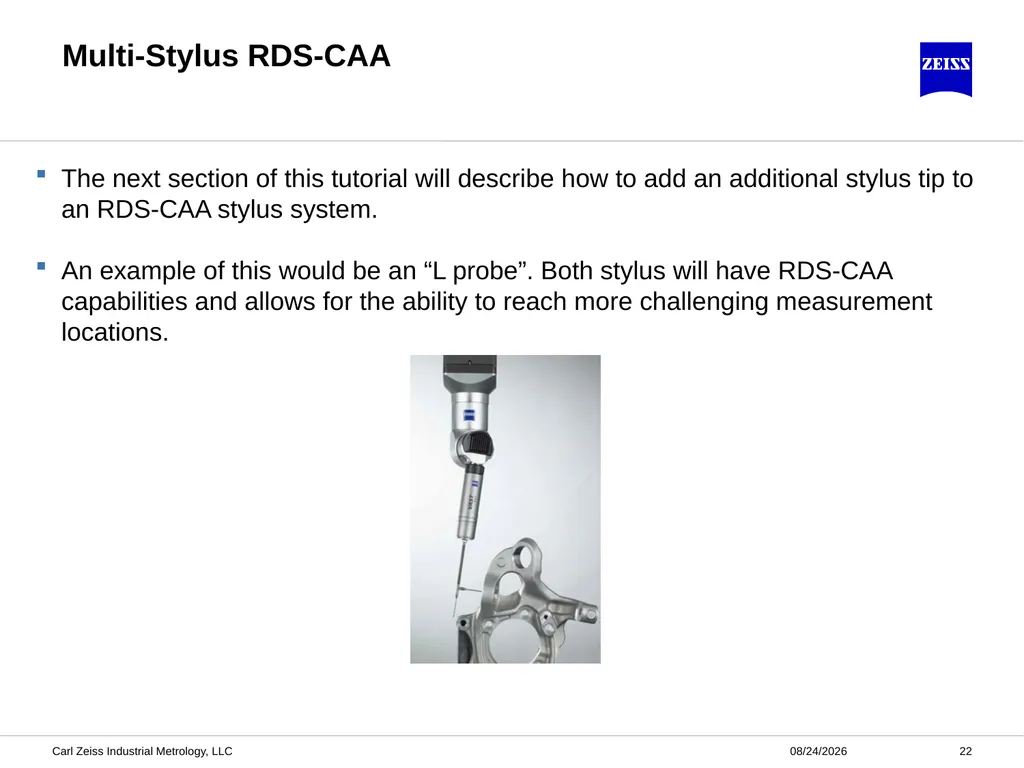
9/29/2015 22 Carl Zeiss Industrial Metrology, LLC Multi-Stylus RDS-CAA The next section of this tutorial will describe how to add an additional stylus tip to an RDS-CAA stylus system.
An example of this would be an “L probe”. Both stylus will have RDS-CAA capabilities and allows for the ability to reach more challenging measurement locations.<br>
An example of this would be an “L probe”. Both stylus will have RDS-CAA capabilities and allows for the ability to reach more challenging measurement locations.<br>
23
23 Agenda 1 2 3 How to Create a Stylus System Using RDS-CAA Qualification Create a new Stylus System activating RDS-CAA What is RDS-CAA? Carl Zeiss Industrial Metrology, LLC 9/29/2015 4 Create a new multi-probe Stylus System activating RDS-CAA Conclusion 5 3 Conclusion 5 How to Create a Stylus System Using RDS-CAA Qualification Create a new Stylus System activating RDS-CAA Conclusion<br>
24
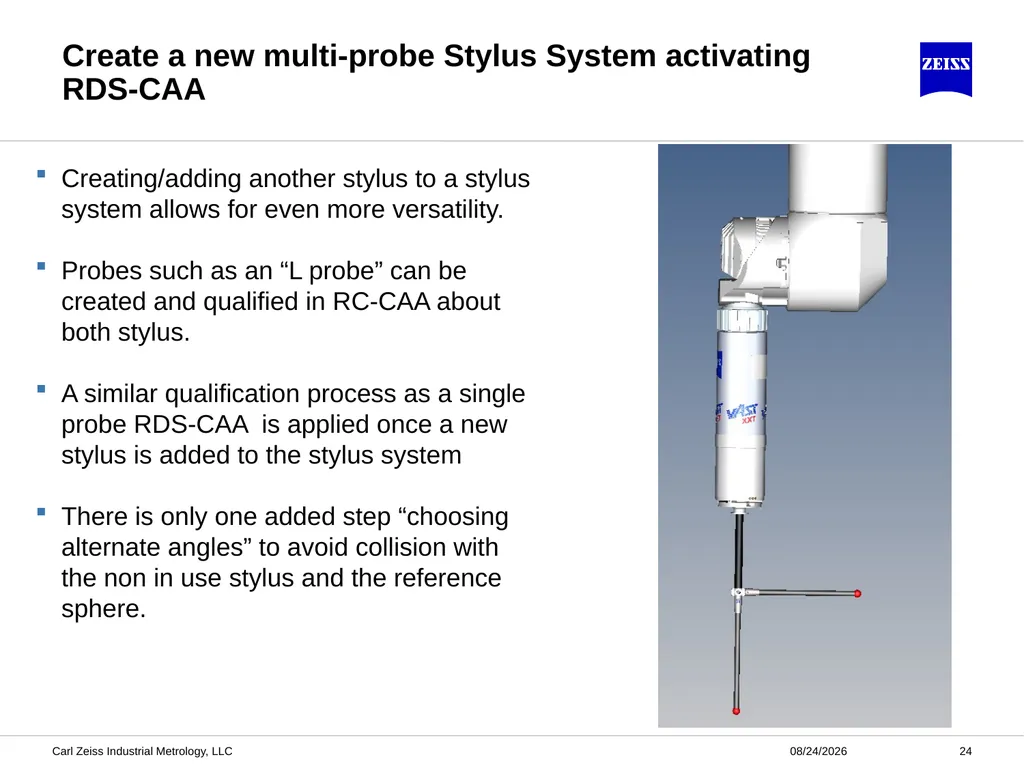
9/29/2015 Carl Zeiss Industrial Metrology, LLC 24 Creating/adding another stylus to a stylus system allows for even more versatility.
Probes such as an “L probe” can be created and qualified in RC-CAA about both stylus.
A similar qualification process as a single probe RDS-CAA is applied once a new stylus is added to the stylus system
There is only one added step “choosing alternate angles” to avoid collision with the non in use stylus and the reference sphere. Create a new multi-probe Stylus System activating RDS-CAA<br>
Probes such as an “L probe” can be created and qualified in RC-CAA about both stylus.
A similar qualification process as a single probe RDS-CAA is applied once a new stylus is added to the stylus system
There is only one added step “choosing alternate angles” to avoid collision with the non in use stylus and the reference sphere. Create a new multi-probe Stylus System activating RDS-CAA<br>
25
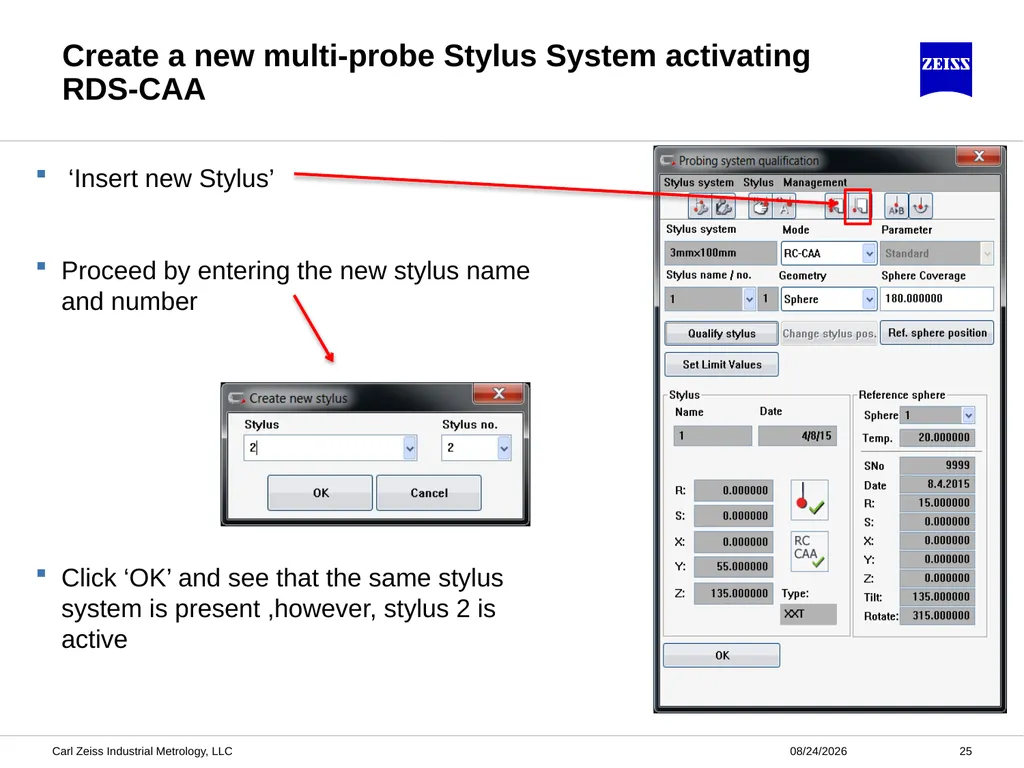
9/29/2015 Carl Zeiss Industrial Metrology, LLC 25 ‘Insert new Stylus’
Proceed by entering the new stylus name and number
Click ‘OK’ and see that the same stylus system is present ,however, stylus 2 is active Create a new multi-probe Stylus System activating RDS-CAA<br>
Proceed by entering the new stylus name and number
Click ‘OK’ and see that the same stylus system is present ,however, stylus 2 is active Create a new multi-probe Stylus System activating RDS-CAA<br>
26
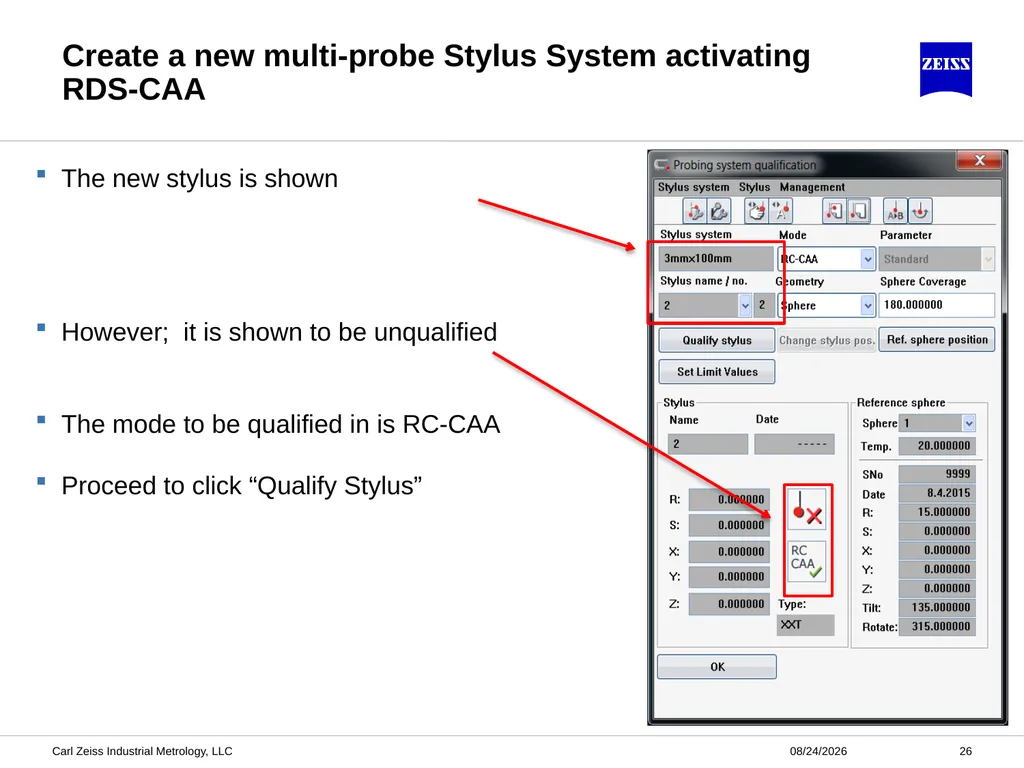
9/29/2015 Carl Zeiss Industrial Metrology, LLC 26 The new stylus is shown
However; it is shown to be unqualified
The mode to be qualified in is RC-CAA
Proceed to click “Qualify Stylus” Create a new multi-probe Stylus System activating RDS-CAA<br>
However; it is shown to be unqualified
The mode to be qualified in is RC-CAA
Proceed to click “Qualify Stylus” Create a new multi-probe Stylus System activating RDS-CAA<br>
27
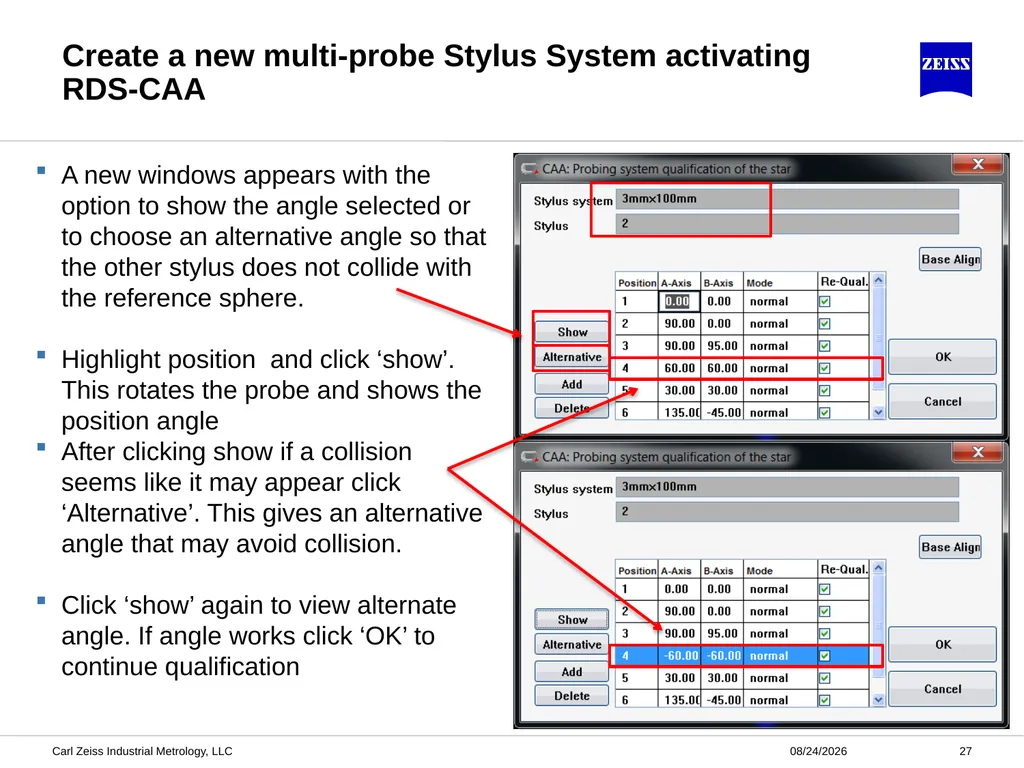
9/29/2015 Carl Zeiss Industrial Metrology, LLC 27 A new windows appears with the option to show the angle selected or to choose an alternative angle so that the other stylus does not collide with the reference sphere.
Highlight position and click ‘show’. This rotates the probe and shows the position angle
After clicking show if a collision seems like it may appear click ‘Alternative’. This gives an alternative angle that may avoid collision.
Click ‘show’ again to view alternate angle. If angle works click ‘OK’ to continue qualification Create a new multi-probe Stylus System activating RDS-CAA<br>
Highlight position and click ‘show’. This rotates the probe and shows the position angle
After clicking show if a collision seems like it may appear click ‘Alternative’. This gives an alternative angle that may avoid collision.
Click ‘show’ again to view alternate angle. If angle works click ‘OK’ to continue qualification Create a new multi-probe Stylus System activating RDS-CAA<br>
28
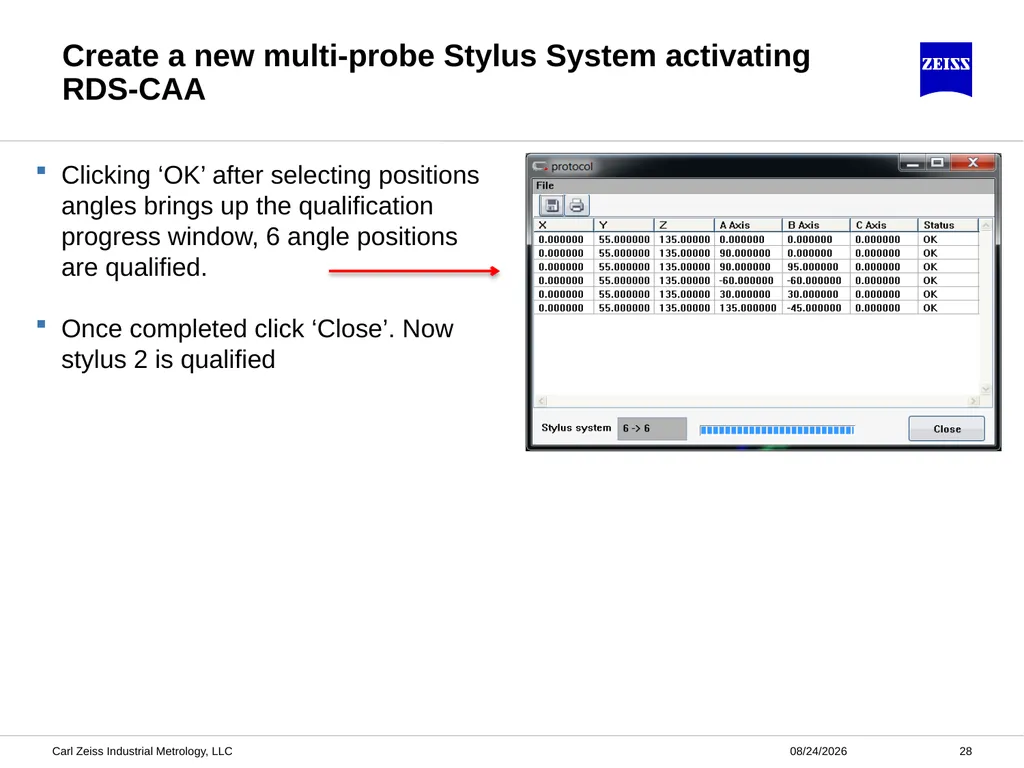
9/29/2015 Carl Zeiss Industrial Metrology, LLC 28 Clicking ‘OK’ after selecting positions angles brings up the qualification progress window, 6 angle positions are qualified.
Once completed click ‘Close’. Now stylus 2 is qualified Create a new multi-probe Stylus System activating RDS-CAA<br>
Once completed click ‘Close’. Now stylus 2 is qualified Create a new multi-probe Stylus System activating RDS-CAA<br>
29
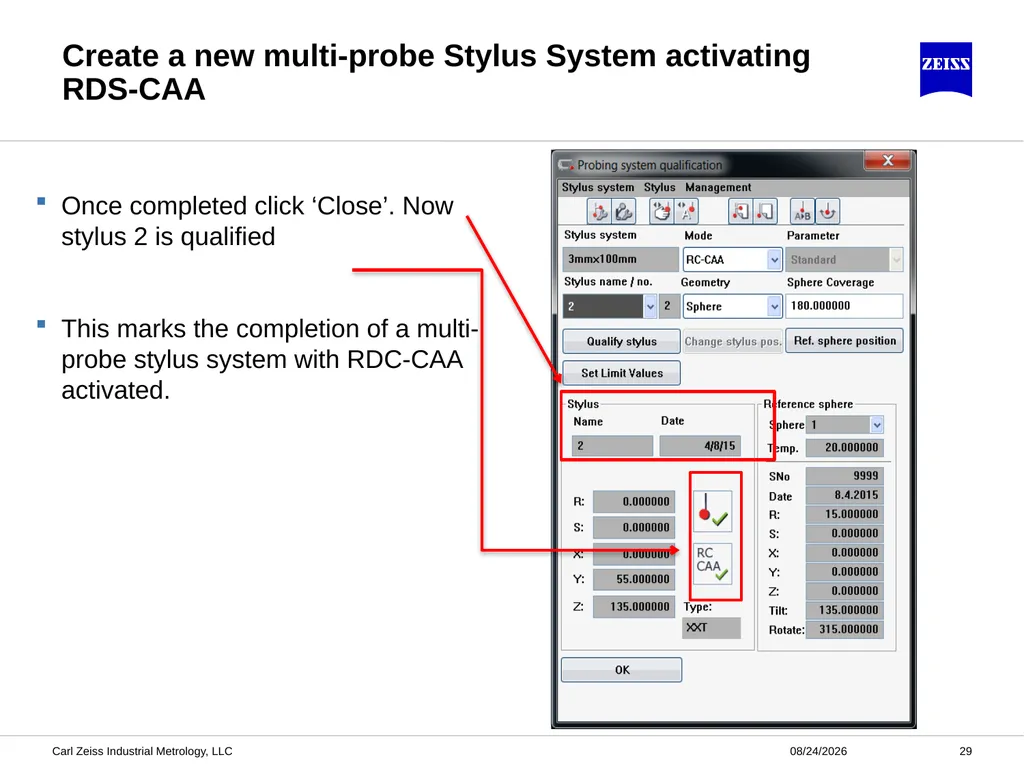
9/29/2015 Carl Zeiss Industrial Metrology, LLC 29 Once completed click ‘Close’. Now stylus 2 is qualified
This marks the completion of a multi-probe stylus system with RDC-CAA activated. Create a new multi-probe Stylus System activating RDS-CAA<br>
This marks the completion of a multi-probe stylus system with RDC-CAA activated. Create a new multi-probe Stylus System activating RDS-CAA<br>
30
30 Agenda 1 2 3 How to Create a Stylus System Using RDS-CAA Qualification Create a new Stylus System activating RDS-CAA What is RDS-CAA? Carl Zeiss Industrial Metrology, LLC 9/29/2015 4 Create a new multi-probe Stylus System activating RDS-CAA Conclusion 5<br>
31
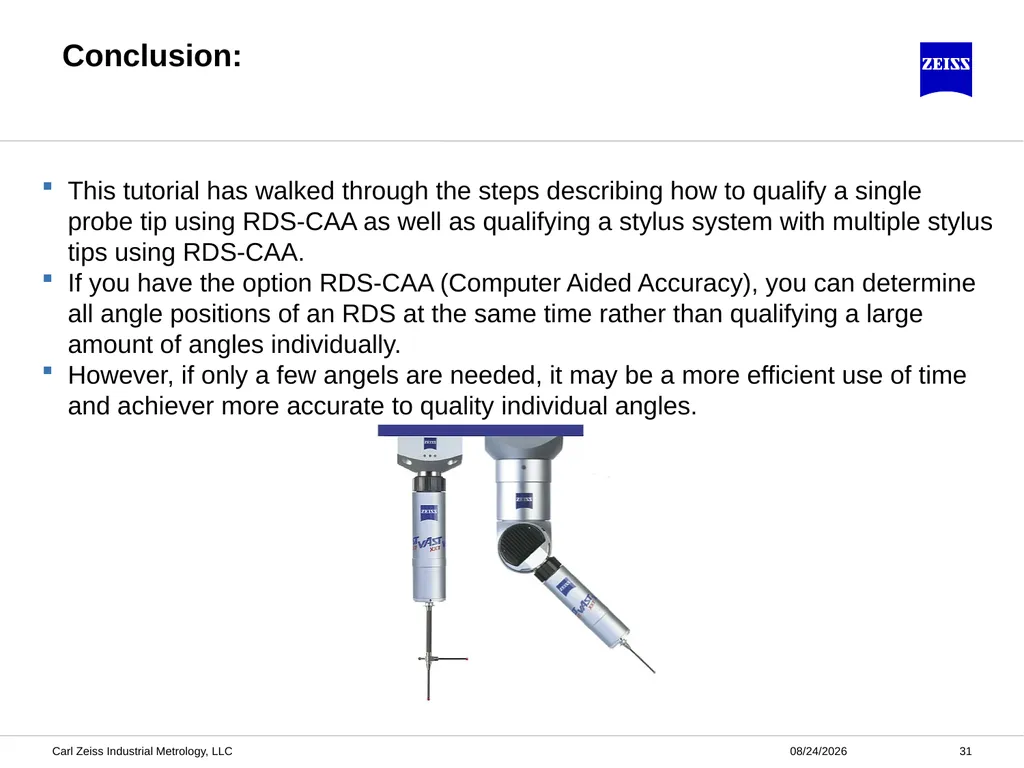
9/29/2015 31 Carl Zeiss Industrial Metrology, LLC This tutorial has walked through the steps describing how to qualify a single probe tip using RDS-CAA as well as qualifying a stylus system with multiple stylus tips using RDS-CAA.
If you have the option RDS-CAA (Computer Aided Accuracy), you can determine all angle positions of an RDS at the same time rather than qualifying a large amount of angles individually.
However, if only a few angels are needed, it may be a more efficient use of time and achiever more accurate to quality individual angles. Conclusion:<br>
If you have the option RDS-CAA (Computer Aided Accuracy), you can determine all angle positions of an RDS at the same time rather than qualifying a large amount of angles individually.
However, if only a few angels are needed, it may be a more efficient use of time and achiever more accurate to quality individual angles. Conclusion:<br>
32
9/29/2015 32 Carl Zeiss Industrial Metrology, LLC<br>