
Chapter 10 Airway Management National EMS






Description: Chapter 10 Airway Management National EMS Education Standard Competencies (1 of 6) Airway Management, Respiration, and Artificial Ventilation Applies knowledge of general anatomy and physiology to patient assessment and management in order
Related Topics
Download Presentation
"Chapter 10 Airway Management National EMS" is the property of its rightful owner. Permission is granted to download and print the materials on this website for personal, non-commercial use only, and to display it on your personal computer provided you do not modify the materials and that you retain all copyright notices contained in the materials. By downloading content from our website, you accept the terms of this agreement.
Presentation Transcript
slide1. Chapter 10
Airway Management<br>
slide2. National EMS Education Standard Competencies (1 of 6) Airway Management, Respiration, and Artificial Ventilation
Applies knowledge of general anatomy and physiology to patient assessment and management in order to assure a patent airway, adequate mechanical ventilation, and respiration for patients of all ages.<br>
slide3. National EMS Education Standard Competencies (2 of 6) Airway Management
Airway anatomy
Airway assessment
Techniques of assuring a patent airway<br>
slide4. National EMS Education Standard Competencies (3 of 6) Respiration
Anatomy of the respiratory system
Physiology and pathophysiology of respiration
Pulmonary ventilation
Oxygenation
Respiration (external, internal, cellular)<br>
slide5. National EMS Education Standard Competencies (4 of 6) Respiration (cont’d)
Assessment and management of adequate and inadequate ventilation
Supplemental oxygen therapy
Assessment and management of adequate and inadequate ventilation
Artificial ventilation<br>
slide6. National EMS Education Standard Competencies (5 of 6) Artificial Ventilation (cont’d)
Minute ventilation
Alveolar ventilation
Effect of artificial ventilation on cardiac output<br>
slide7. National EMS Education Standard Competencies (6 of 6) Pathophysiology
Applies fundamental knowledge of the pathophysiology of respiration and perfusion to patient assessment and management.<br>
slide8. Introduction (1 of 2) The primary component of caring for patients is ensuring that they can breathe adequately.
When the ability to breathe is disrupted:
Oxygen delivery to tissues and cells is compromised.
Vital organs may not function normally.
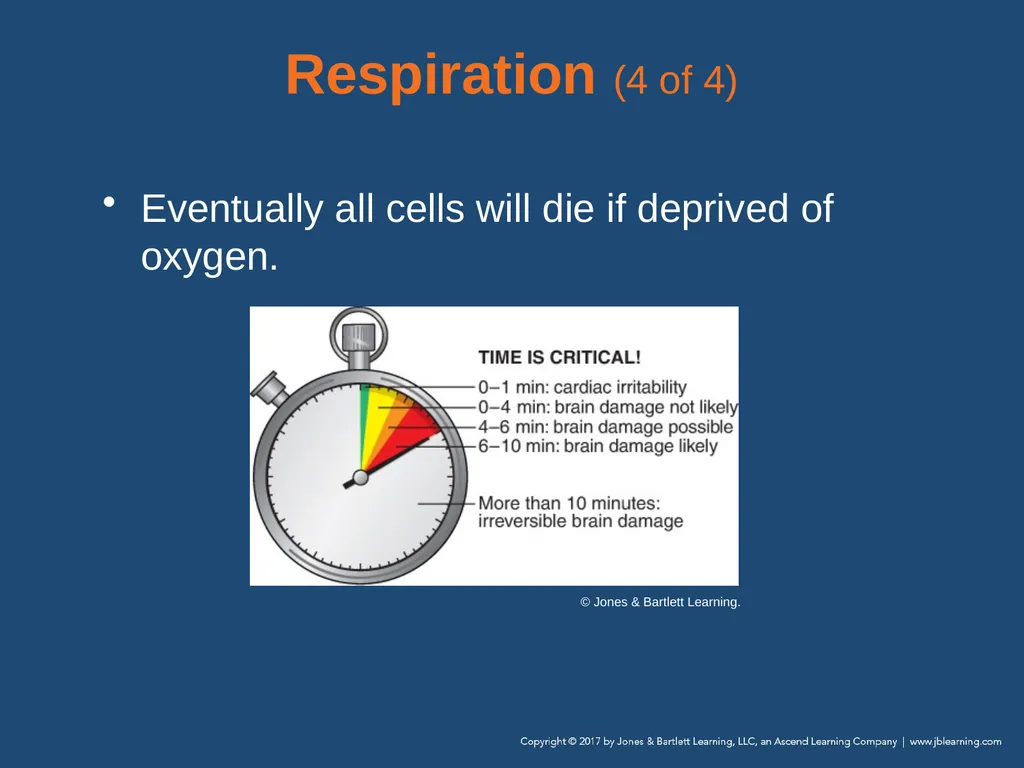
Brain tissue will begin to die within 4 to 6 minutes.<br>
slide9. Introduction (2 of 2) Oxygen reaches body tissues and cells through breathing and circulation.
During inhalation, oxygen moves from the atmosphere into the lungs.
Oxygen-enriched blood is pumped through the body by the heart.
You must be able to locate the parts of the respiratory system and understand how the system works.<br>
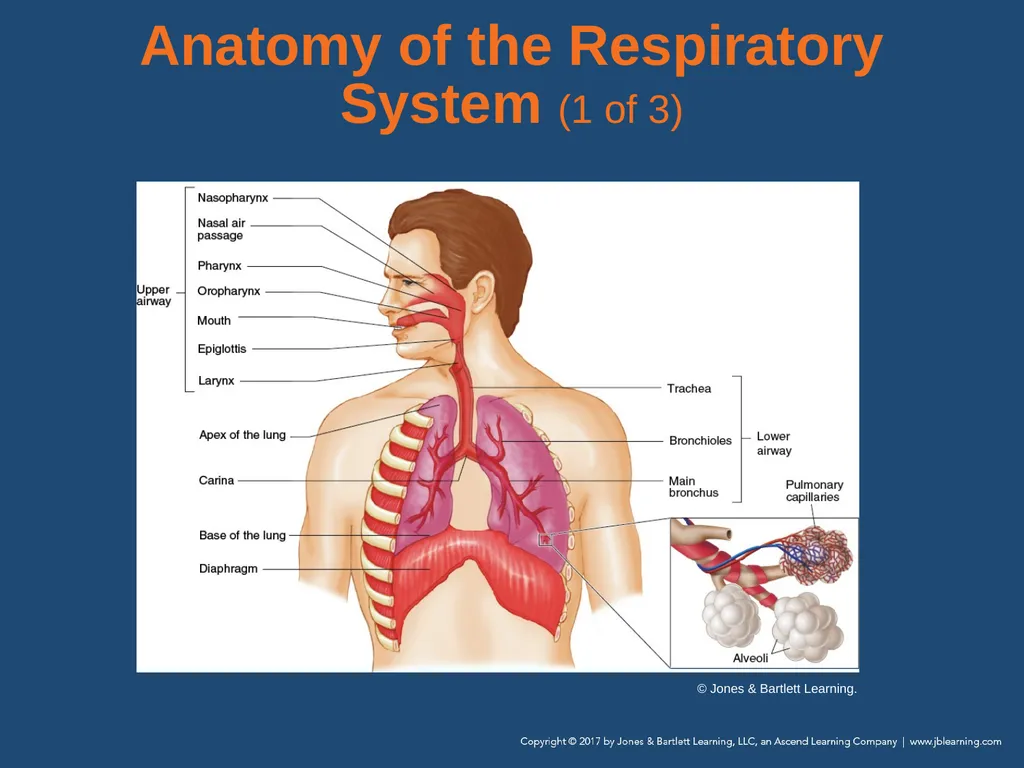
slide10. Anatomy of the Respiratory System (1 of 3) © Jones & Bartlett Learning.<br>
slide11. Anatomy of the Respiratory System (2 of 3) The respiratory system consists of all the structures that make up the airway and help us breathe, or ventilate.
The airway is divided into the upper and lower airways.<br>
slide12. Anatomy of the Respiratory System (3 of 3) Structures that help us breathe
Diaphragm
Chest wall muscles
Accessory muscles of breathing
Nerves from the brain and spinal cord to those muscles<br>
slide13. Anatomy of the Upper Airway (1 of 7) Upper airway consists of:
Nose
Mouth
Jaw
Oral cavity
Pharynx
Larynx<br>
slide14. Anatomy of the Upper Airway (2 of 7) The upper airway’s main function is to warm, filter, and humidify air as it enters the body.
Pharynx
Muscular tube extending from nose and mouth to level of esophagus and trachea
Composed, from top to bottom, of the nasopharynx, oropharynx, and laryngopharynx<br>
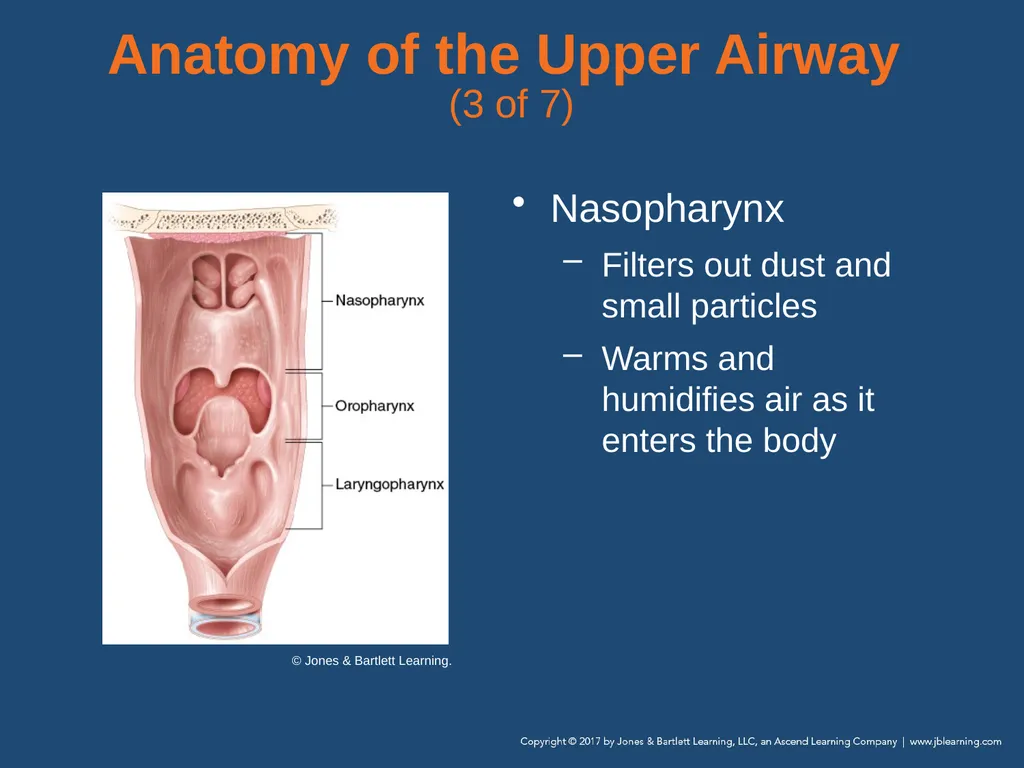
slide15. Anatomy of the Upper Airway (3 of 7) Nasopharynx
Filters out dust and small particles
Warms and humidifies air as it enters the body © Jones & Bartlett Learning.<br>
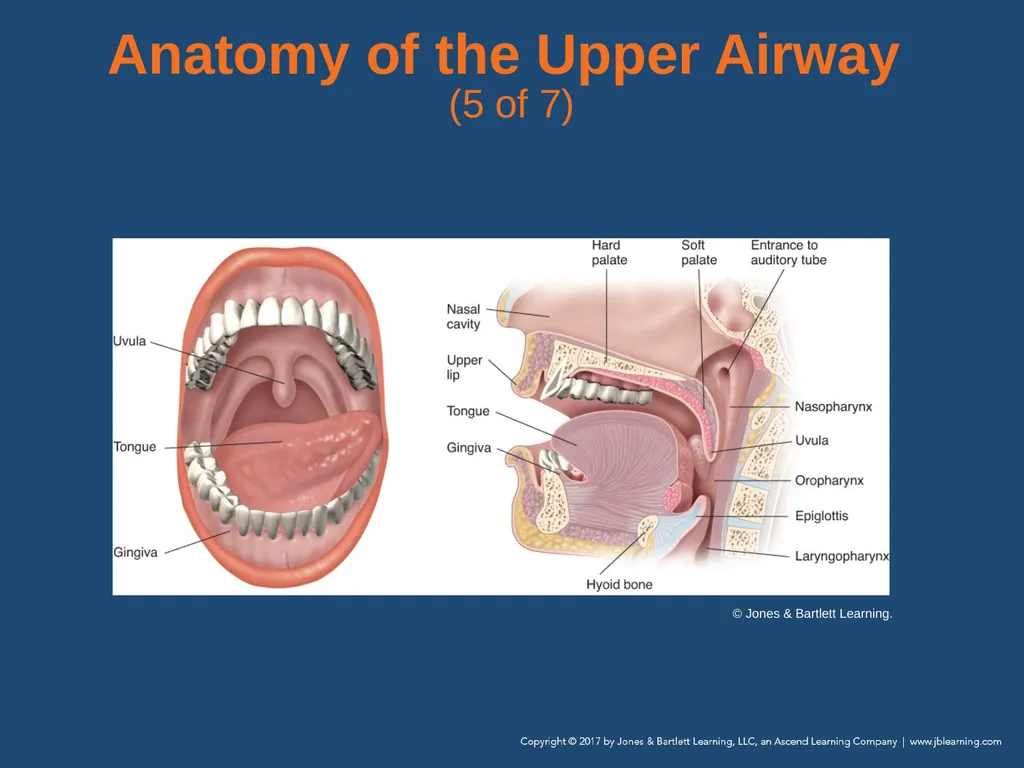
slide16. Anatomy of the Upper Airway (4 of 7) Oropharynx
Posterior portion of the oral cavity
Entrance for respiratory and digestive system
The epiglottis is superior to the larynx.<br>
slide17. Anatomy of the Upper Airway (5 of 7) © Jones & Bartlett Learning.<br>
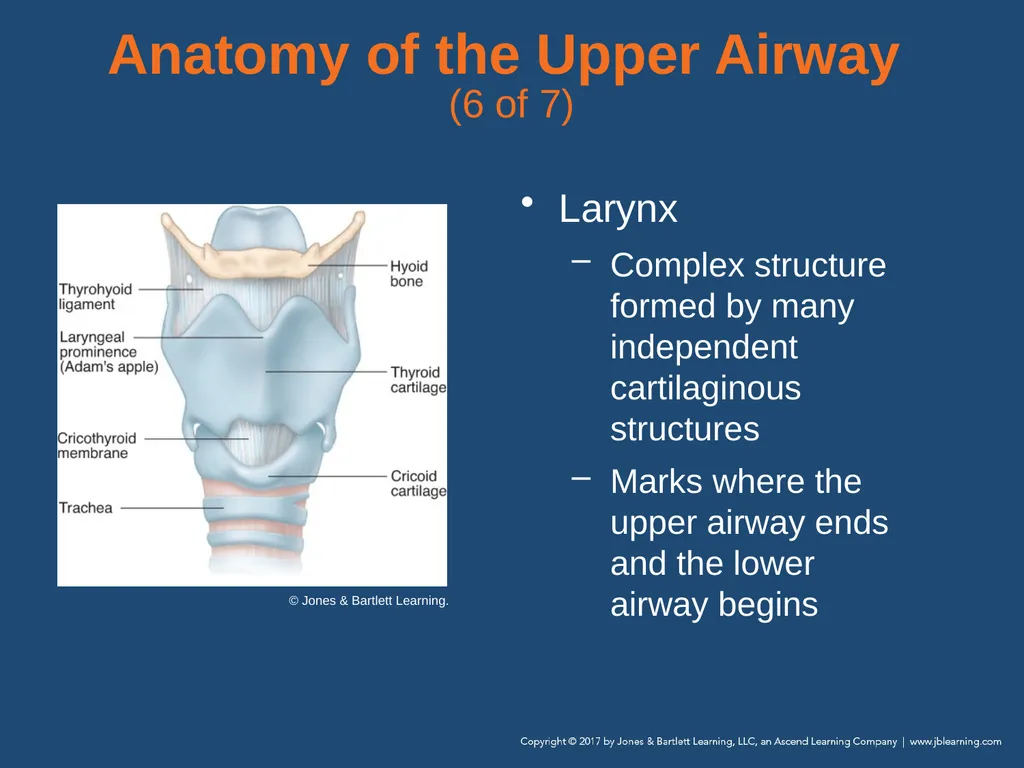
slide18. Anatomy of the Upper Airway (6 of 7) Larynx
Complex structure formed by many independent cartilaginous structures
Marks where the upper airway ends and the lower airway begins © Jones & Bartlett Learning.<br>
slide19. Anatomy of the Upper Airway (7 of 7) Larynx (cont’d)
Thyroid cartilage forms a “V” shape anteriorly
Cricoid cartilage forms the lowest portion of the larynx
Glottis is the area between the vocal cords<br>
slide20. Anatomy of the Lower Airway (1 of 6) The lower airway’s function is to deliver oxygen to the alveoli.
Lower airway includes:
Trachea
Bronchi
Lungs<br>
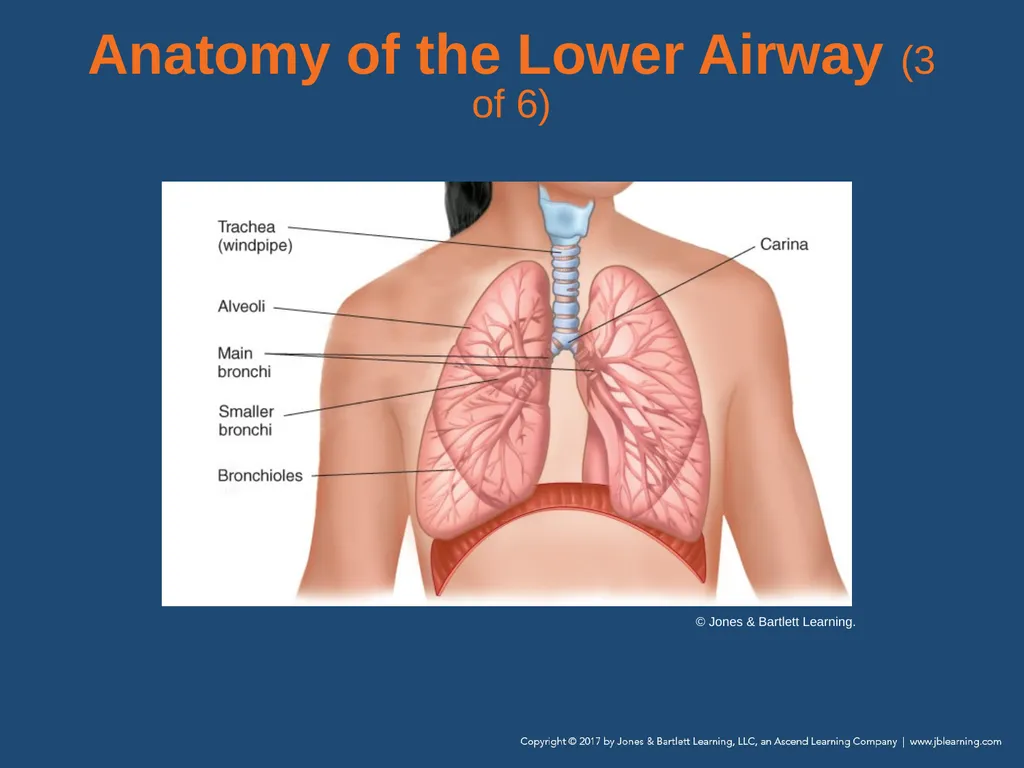
slide21. Anatomy of the Lower Airway (2 of 6) Trachea
Conduit for air entry into the lungs
Divides at the carina into two main stem bronchi, right and left
Bronchi are supported by cartilage.
Bronchi distribute oxygen to the lungs.<br>
slide22. Anatomy of the Lower Airway (3 of 6) © Jones & Bartlett Learning.<br>
slide23. Anatomy of the Lower Airway (4 of 6) Trachea (cont’d)
Bronchioles are made of smooth muscle; they dilate and constrict as oxygen passes through them.
Smaller bronchioles connect to alveoli.
Oxygen is transported back to the heart and distributed to the rest of the body.<br>
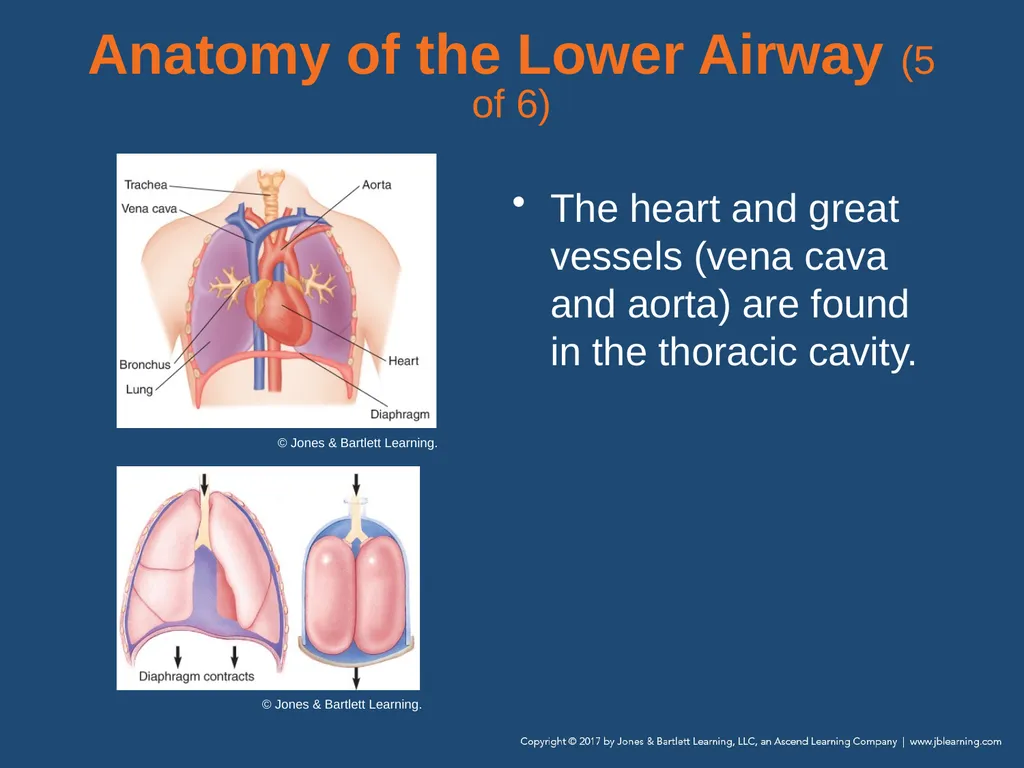
slide24. Anatomy of the Lower Airway (5 of 6) The heart and great vessels (vena cava and aorta) are found in the thoracic cavity. © Jones & Bartlett Learning. © Jones & Bartlett Learning.<br>
slide25. Anatomy of the Lower Airway (6 of 6) The mediastinum—the space between the lungs—contains:
Heart
Great vessels
Esophagus
Trachea
Major bronchi
Many nerves<br>
slide26. Physiology of Breathing (1 of 2) The respiratory and cardiovascular systems work together.
Ensure a constant supply of oxygen and nutrients is delivered to cells
Remove carbon dioxide and waste products<br>
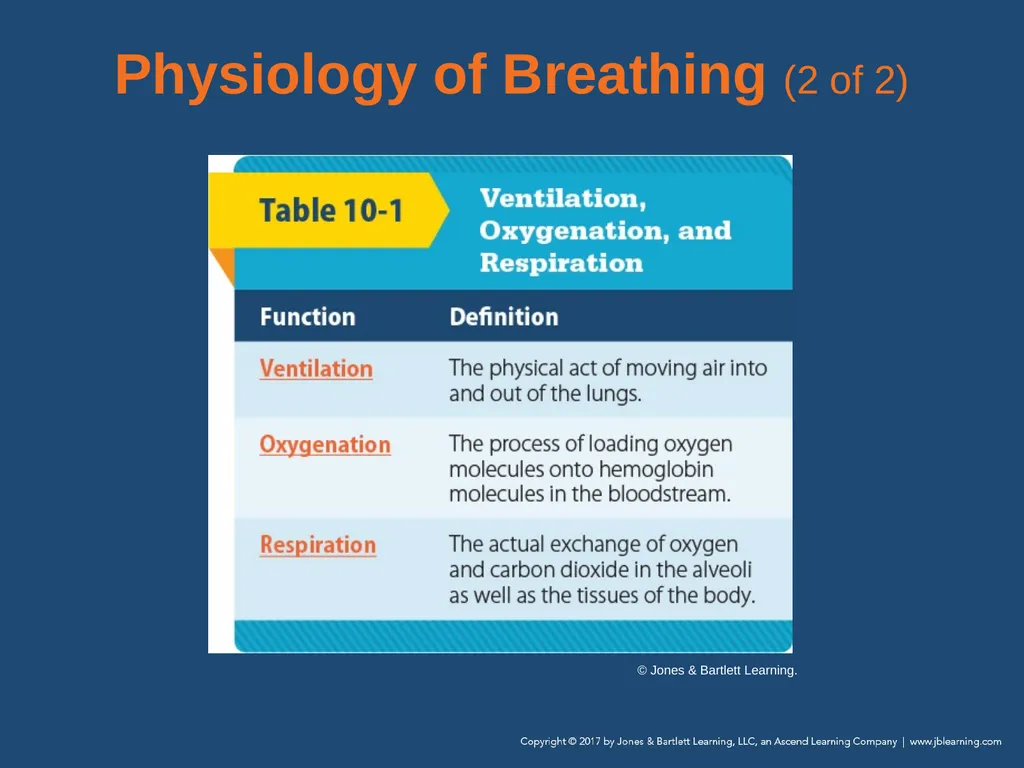
slide27. Physiology of Breathing (2 of 2) © Jones & Bartlett Learning.<br>
slide28. Ventilation (1 of 7) Physical act of moving air into and out of the lungs
Inhalation
Active, muscular part of breathing
The diaphragm and intercostal muscles contract.<br>
slide29. Ventilation (2 of 7) Inhalation (cont’d)
The lungs require the movement of the chest and supporting structures to expand.
Partial pressure: the amount of gas in the air or dissolved in fluid (blood)
Oxygen and carbon dioxide both diffuse until the partial pressures in the air and the blood are equal.<br>
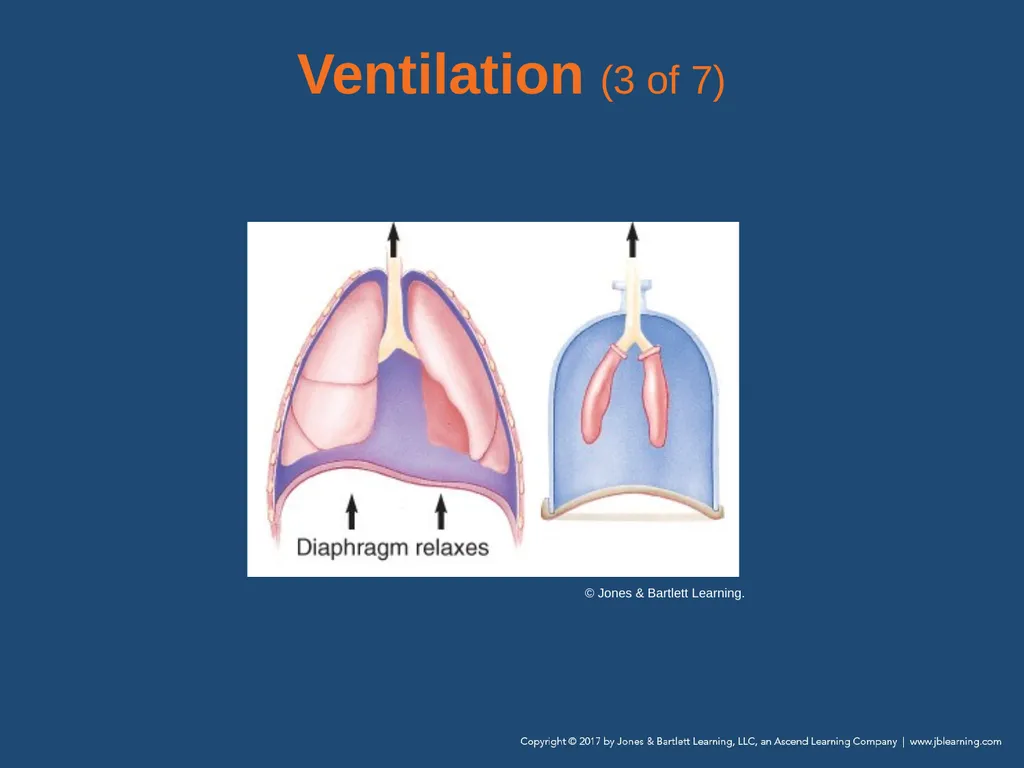
slide30. Ventilation (3 of 7) © Jones & Bartlett Learning.<br>
slide31. Ventilation (4 of 7) Inhalation (cont’d)
Inspiration focuses on delivering oxygen to the alveoli.
Tidal volume
Dead space<br>
slide32. Ventilation (5 of 7) Exhalation
Does not normally require muscular effort
Passive process
Diaphragm and intercostal muscles relax
Smaller thorax compresses air into the lungs<br>
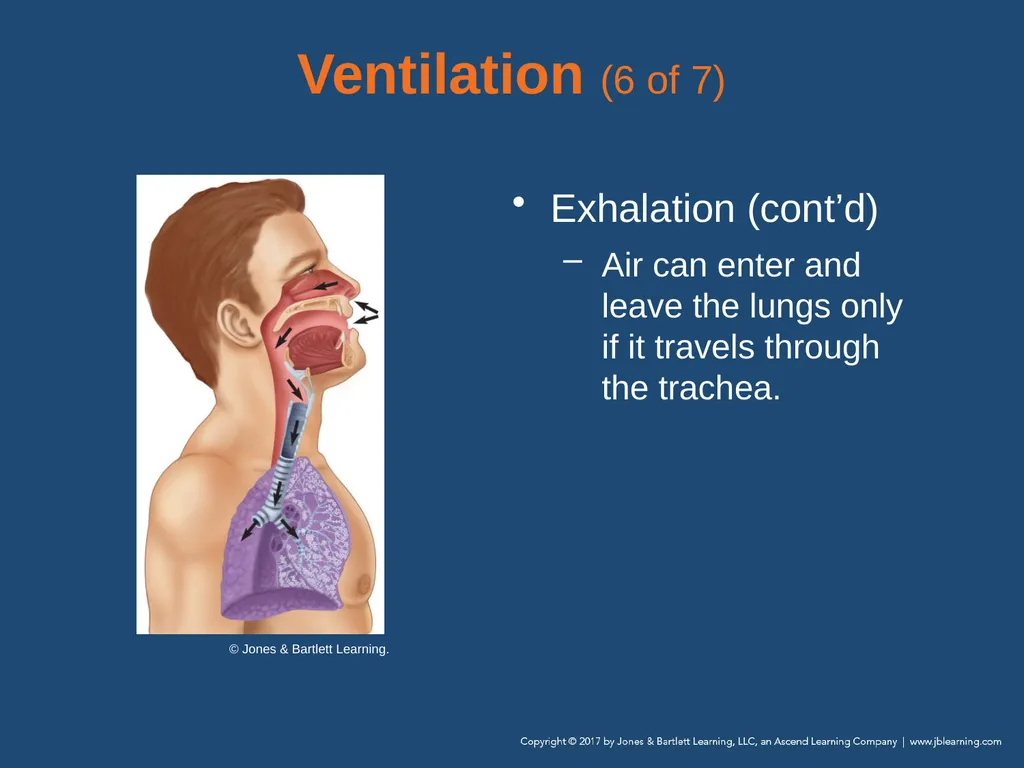
slide33. Ventilation (6 of 7) Exhalation (cont’d)
Air can enter and leave the lungs only if it travels through the trachea. © Jones & Bartlett Learning.<br>
slide34. Ventilation (7 of 7) Regulation of ventilation involves a complex series of receptors and feedback loops.
Failure to meet the body’s need for oxygen may result in hypoxia.
Based on pH changes in the blood and cerebrospinal fluid
Patients with COPD have difficulty eliminating carbon dioxide through exhalation.<br>
slide35. Oxygenation Process of loading oxygen molecules onto hemoglobin molecules in bloodstream
Required for internal respiration to take place
Does not guarantee that internal respiration is taking place
Ventilation without oxygenation can occur where oxygen levels have been depleted (eg, mines, confined spaces).<br>
slide36. Respiration (1 of 4) Actual exchange of oxygen and carbon dioxide in the alveoli and tissues of the body
Cells take energy from nutrients through metabolism.<br>
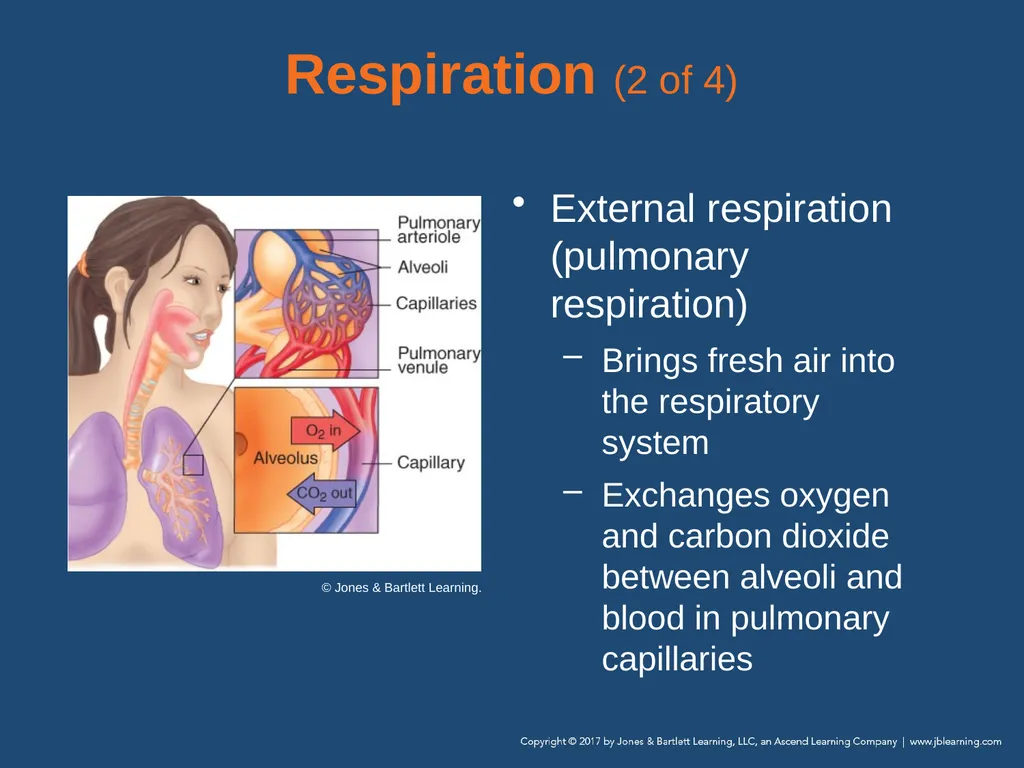
slide37. Respiration (2 of 4) External respiration (pulmonary respiration)
Brings fresh air into the respiratory system
Exchanges oxygen and carbon dioxide between alveoli and blood in pulmonary capillaries © Jones & Bartlett Learning.<br>
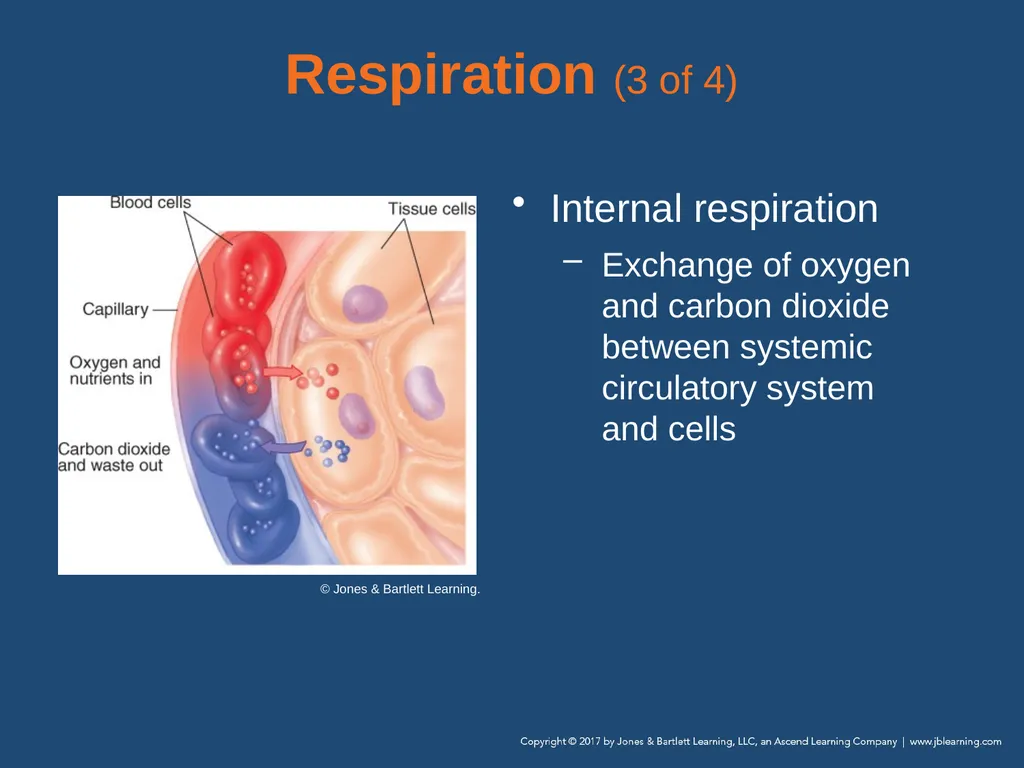
slide38. Respiration (3 of 4) Internal respiration
Exchange of oxygen and carbon dioxide between systemic circulatory system and cells © Jones & Bartlett Learning.<br>
slide39. Respiration (4 of 4) Eventually all cells will die if deprived of oxygen. © Jones & Bartlett Learning.<br>
slide40. Pathophysiology of Respiration (1 of 7) Factors in the nervous system
Chemoreceptors monitor levels of:
Oxygen
Carbon dioxide
Hydrogen ions
pH of cerebrospinal fluid
Provide feedback to the respiratory centers<br>
slide41. Pathophysiology of Respiration (2 of 7) Ventilation/perfusion ratio and mismatch
Air and blood flow must be directed to the same place at the same time.
Ventilation and perfusion must be matched.
Failure to match is the cause of most abnormalities of oxygen and carbon dioxide exchange.<br>
slide42. Pathophysiology of Respiration (3 of 7) Ventilation/perfusion ratio and mismatch (cont’d)
Gas exchange does not take place.
Lack of O2 in bloodstream
CO2 is recirculated within bloodstream
Severe hypoxemia can occur<br>
slide43. Pathophysiology of Respiration (4 of 7) Factors affecting pulmonary ventilation
Maintaining a patent airway is critical.
Intrinsic factors:
Infections
Allergic reactions
Unresponsiveness (tongue obstruction)
Extrinsic factors:
Trauma
Foreign body airway obstruction<br>
slide44. Pathophysiology of Respiration (5 of 7) Factors affecting respiration
External factors:
Atmospheric pressure
Partial pressure of O2
Internal factors:
Pneumonia
Pulmonary edema
COPD/emphysema<br>
slide45. Pathophysiology of Respiration (6 of 7) Circulatory compromise
Trauma emergencies typically obstruct blood flow to individual cells and tissue:
Pulmonary embolism
Simple or tension pneumothorax
Open pneumothorax
Hemothorax
Hemopneumothorax<br>
slide46. Pathophysiology of Respiration (7 of 7) Circulatory compromise (cont’d)
Other causes:
Blood loss
Anemia
Hypovolemic shock
Vasodilatory shock<br>
slide47. Patient Assessment (1 of 7) Recognizing adequate breathing
Between 12 and 20 breaths/min
Regular pattern of inhalation and exhalation
Bilateral clear and equal lung sounds
Regular, equal chest rise and fall
Adequate depth (tidal volume)<br>
slide48. Patient Assessment (2 of 7) Recognizing abnormal breathing
Fewer than 12 breaths/min
More than 20 breaths/min
Irregular rhythm
Diminished, absent, or noisy auscultated breath sounds
Reduced flow of expired air at nose and mouth<br>
slide49. Patient Assessment (3 of 7) Recognizing abnormal breathing (cont’d)
Unequal or inadequate chest expansion
Increased effort of breathing
Shallow depth
Skin that is pale, cyanotic, cool, or moist
Skin pulling in around ribs or above clavicles during inspiration<br>
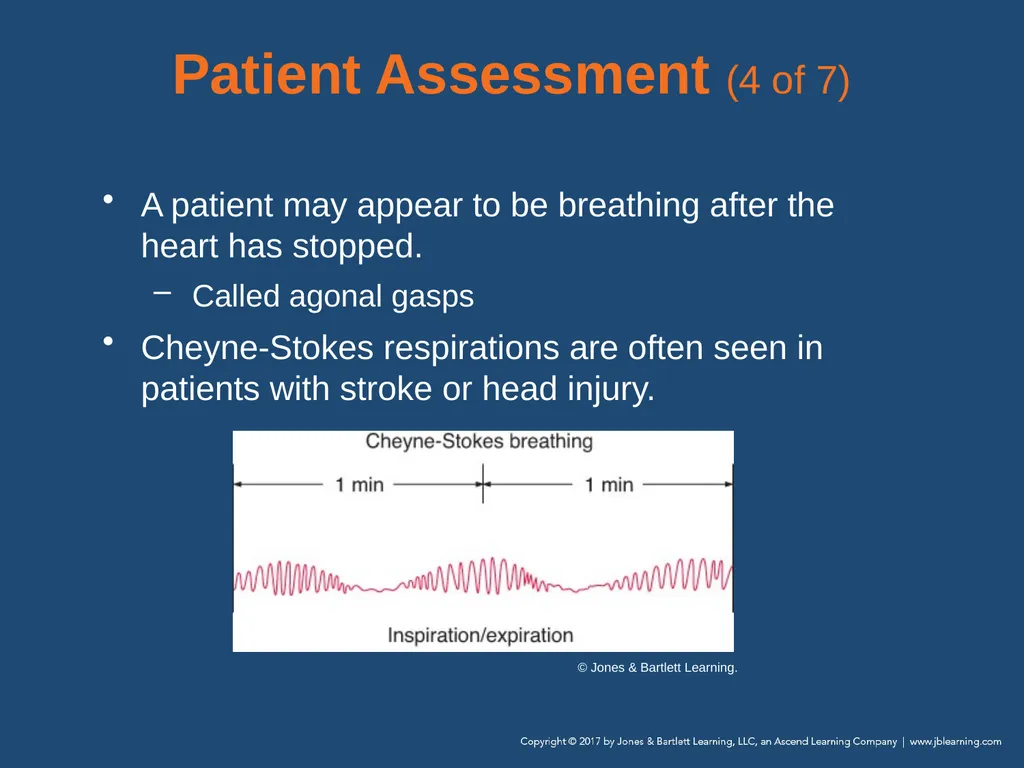
slide50. Patient Assessment (4 of 7) A patient may appear to be breathing after the heart has stopped.
Called agonal gasps
Cheyne-Stokes respirations are often seen in patients with stroke or head injury. © Jones & Bartlett Learning.<br>
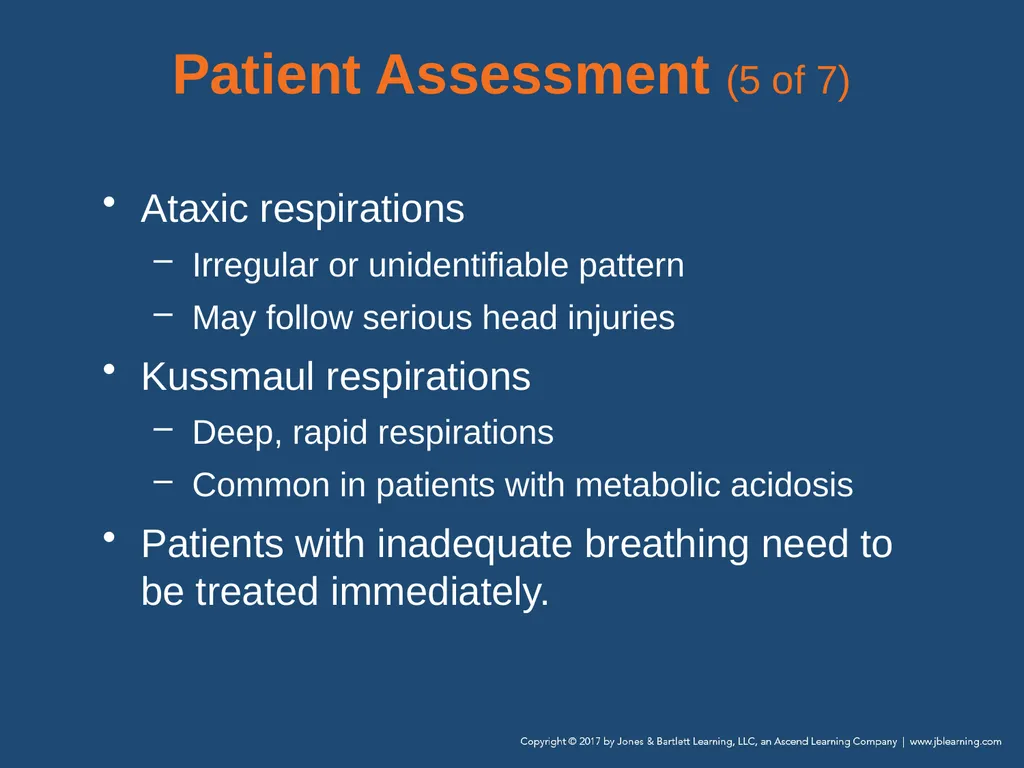
slide51. Patient Assessment (5 of 7) Ataxic respirations
Irregular or unidentifiable pattern
May follow serious head injuries
Kussmaul respirations
Deep, rapid respirations
Common in patients with metabolic acidosis
Patients with inadequate breathing need to be treated immediately.<br>
slide52. Patient Assessment (6 of 7) Assessment of respiration
Even though the patient may be ventilating appropriately, respiration may be compromised.
Level of consciousness and skin color are excellent indicators of respiration.<br>
slide53. Patient Assessment (7 of 7) Assessment of respiration (cont’d)
Also consider oxygenation
Pulse oximetry is considered a routine vital sign
Can be used as part of any patient assessment<br>
slide54. Opening the Airway (1 of 3) Emergency medical care begins with ensuring an open airway.
Rapidly assess whether an unconscious patient has an open airway and is breathing adequately.
Position the patient correctly.
Supine position is most effective.<br>
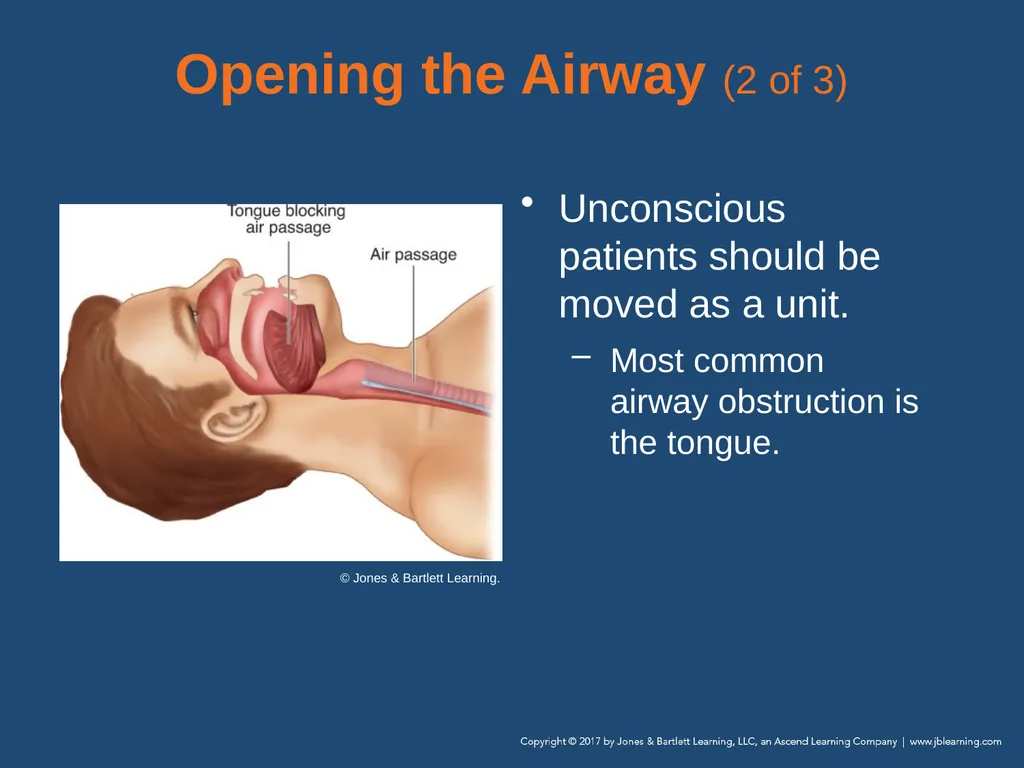
slide55. Opening the Airway (2 of 3) Unconscious patients should be moved as a unit.
Most common airway obstruction is the tongue. © Jones & Bartlett Learning.<br>
slide56. Opening the Airway (3 of 3) Other causes of airway obstruction:
Dentures (false teeth)
Blood
Vomitus
Mucus
Food
Other foreign objects<br>
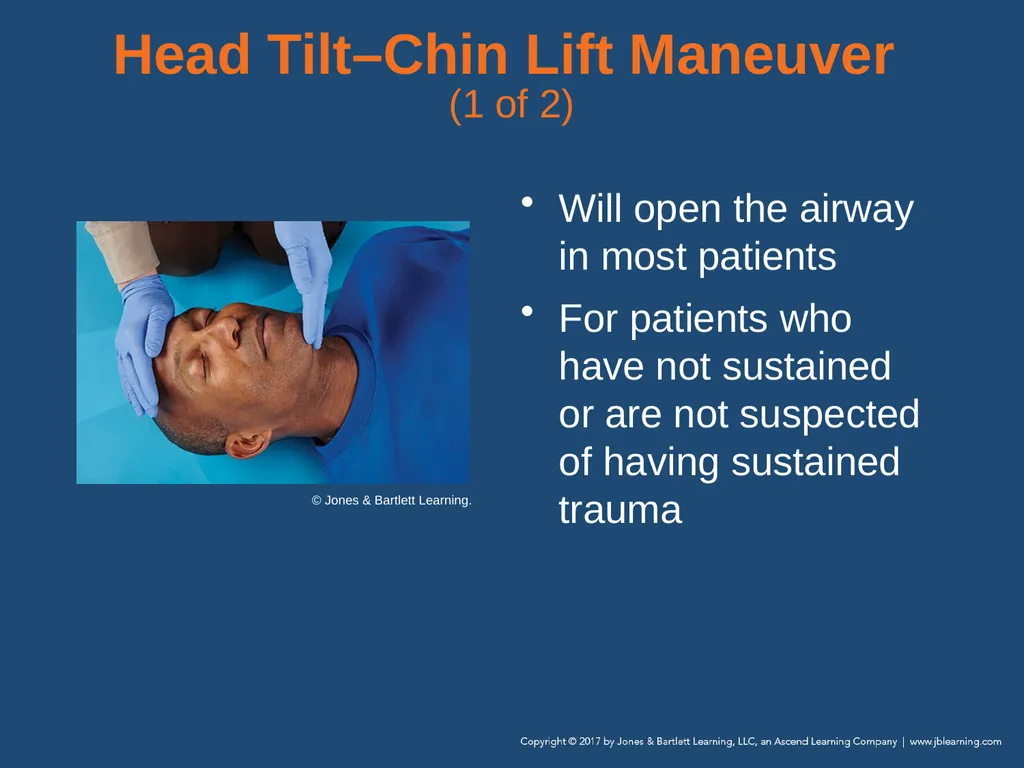
slide57. Head Tilt–Chin Lift Maneuver (1 of 2) Will open the airway in most patients
For patients who have not sustained or are not suspected of having sustained trauma © Jones & Bartlett Learning.<br>
slide58. Head Tilt–Chin Lift Maneuver (2 of 2) Follow these steps:
With the patient supine, position yourself beside the patient’s head.
Place the heel of one hand on the forehead, and apply firm backward pressure with the palm.
Place the fingertips of the other hand under the lower jaw.
Lift the chin upward, with the entire lower jaw.<br>
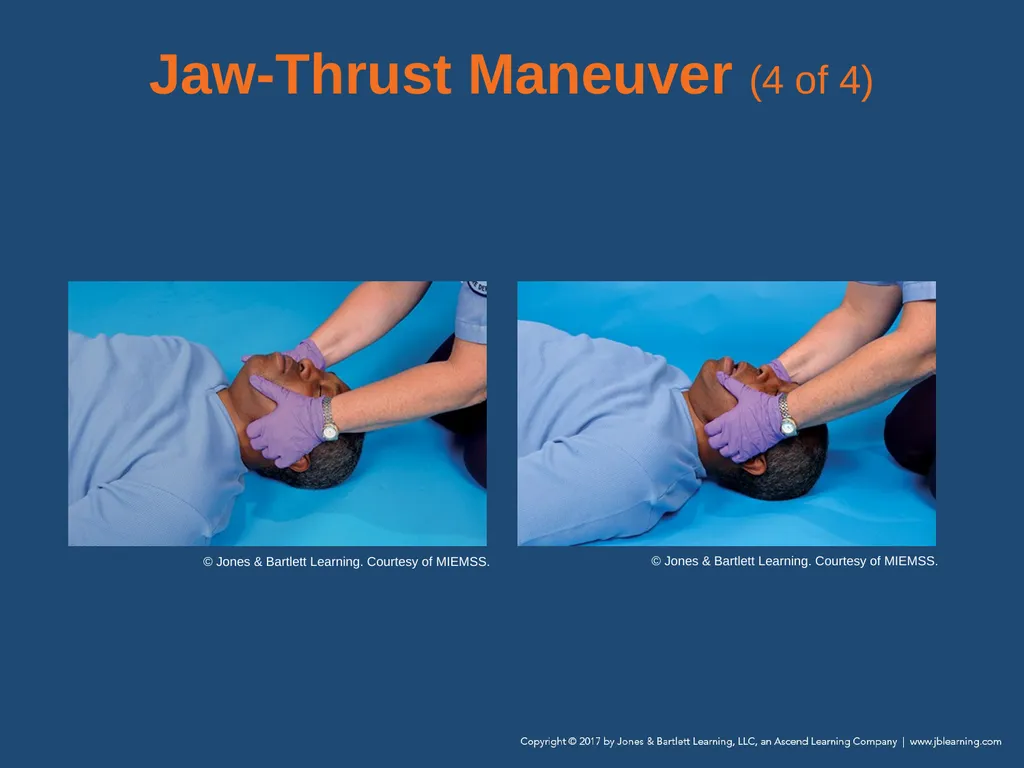
slide59. Jaw-Thrust Maneuver (1 of 4) If you suspect a cervical spine injury, use this maneuver.
Follow these steps:
Kneel above the patient’s head.
Place your fingers behind the angles of the lower jaw.
Move the jaw upward.
Use your thumbs to help position the jaw.<br>
slide60. Jaw-Thrust Maneuver (2 of 4) Once the airway has been opened, look at the chest and observe for movement.
With complete airway obstruction, there will be no movement of air.
Chest wall movement alone does not indicate that breathing is adequate.<br>
slide61. Jaw-Thrust Maneuver (3 of 4) Even if the airway is opened, the mouth may be closed.
For the cross-finger technique:
Place the tips of your index finger and thumb on the patient’s teeth.
Push your thumb on the lower teeth.
Push index finger on the upper teeth.
The index finger and the thumb cross over each other.<br>
slide62. Jaw-Thrust Maneuver (4 of 4) © Jones & Bartlett Learning. Courtesy of MIEMSS. © Jones & Bartlett Learning. Courtesy of MIEMSS.<br>
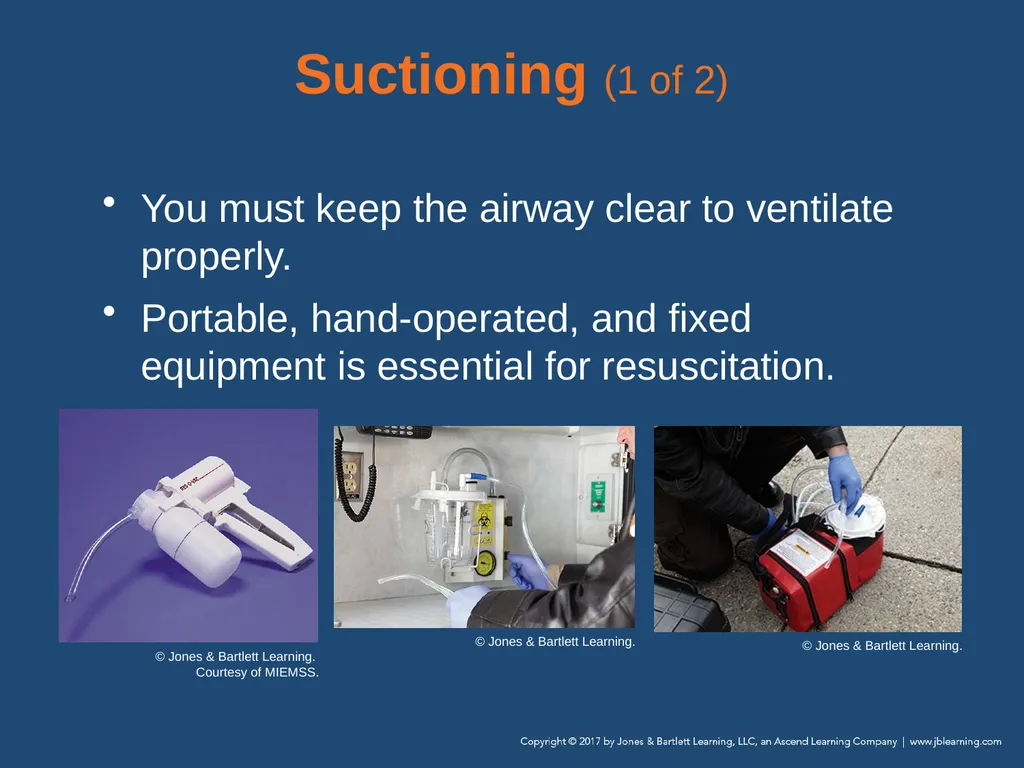
slide63. Suctioning (1 of 2) You must keep the airway clear to ventilate properly.
Portable, hand-operated, and fixed equipment is essential for resuscitation. © Jones & Bartlett Learning. Courtesy of MIEMSS. © Jones & Bartlett Learning. © Jones & Bartlett Learning.<br>
slide64. Suctioning (2 of 2) A portable or fixed unit should have:
Wide-bore, thick-walled, nonkinking tubing
Plastic, rigid pharyngeal suction tips
Nonrigid plastic catheters
A nonbreakable, disposable collection bottle
Water supply for rinsing the tips<br>
slide65. Techniques of Suctioning (1 of 4) Inspect the equipment regularly.
To operate the suction unit:
Check the unit for proper assembly of its parts.
Test the suctioning unit to ensure vacuum pressure of more than 300 mm Hg.
Select and attach the appropriate suction catheter to the tubing.<br>
slide66. Techniques of Suctioning (2 of 4) Never suction the mouth or nose for more than 15 seconds at one time for adult patients, 10 seconds for children, and 5 seconds for infants.
Suctioning can result in hypoxia.<br>
slide67. Techniques of Suctioning (3 of 4) When patients have secretions or vomitus that cannot be suctioned easily:
Remove the catheter from the patient’s mouth.
Log roll the patient to the side.
Clear the mouth carefully with a gloved finger.<br>
slide68. Techniques of Suctioning (4 of 4) If the patient produces frothy secretions as quickly as you can suction them:
Suction the airway for 15 seconds (less in infants and children).
Ventilate for 2 minutes.
Continue this alternating pattern until all secretions have been cleared.<br>
slide69. Basic Airway Adjuncts (1 of 4) Prevent obstruction by the tongue and allow for passage of air and oxygen to the lungs
Oropharyngeal airways
Keep the tongue from blocking the upper airway
Make it easier to suction the oropharynx if necessary<br>
slide70. Basic Airway Adjuncts (2 of 4) Oropharyngeal airways (cont’d)
Indications:
Unresponsive patients without a gag reflex
Apneic patients being ventilated with a bag-valve mask (BVM)
Contraindications:
Conscious patients
Any patient who has an intact gag reflex<br>
slide71. Basic Airway Adjuncts (3 of 4) Nasopharyngeal airways
Indications:
Patient who is unresponsive or has an altered LOC
Patient who has an intact gag reflex
Patient who is unable to maintain his or her own airway spontaneously<br>
slide72. Basic Airway Adjuncts (4 of 4) Nasopharyngeal airways (cont’d)
Indications:
Semiconscious or unconscious patients with an intact gag reflex
Patients who will not tolerate an oropharyngeal airway
Contraindications:
Severe head injury with blood in the nose
History of fractured nasal bone<br>
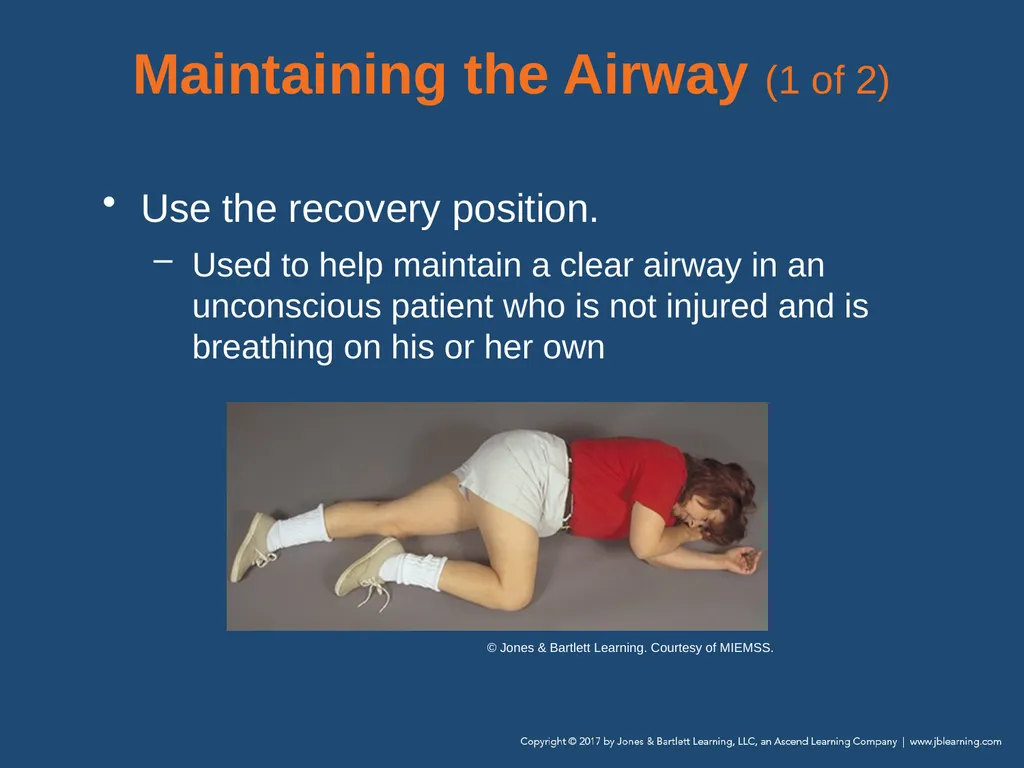
slide73. Maintaining the Airway (1 of 2) Use the recovery position.
Used to help maintain a clear airway in an unconscious patient who is not injured and is breathing on his or her own © Jones & Bartlett Learning. Courtesy of MIEMSS.<br>
slide74. Maintaining the Airway (2 of 2) Take the following steps:
Roll the patient onto either side so that the head, shoulder, and torso move at the same time without twisting.
Extend the patient’s lower arm and place the upper hand under his or her cheek.
Not appropriate for patients with suspected spinal injuries<br>
slide75. Supplemental Oxygen (1 of 9) Always give oxygen to patients who are hypoxic/
Some tissues and organs need a constant supply of oxygen to function normally.
Never withhold oxygen from any patient who might benefit from it.<br>
slide76. Supplemental Oxygen (2 of 9) Supplemental oxygen equipment
Become familiar with how oxygen is stored.
Oxygen cylinders contain compressed gas.
Liquid oxygen is becoming a more commonly used alternative.<br>
slide77. Supplemental Oxygen (3 of 9) Safety considerations
Handle gas cylinders carefully.
Make sure the correct pressure regulator is firmly attached before transport.
A puncture hole in a tank can turn it into a deadly missile.
Secure cylinders when stored on ambulance and when in use during transport.<br>
slide78. Supplemental Oxygen (4 of 9) Pin-indexing system
Prevents such mistakes as an oxygen regulator being accidentally connected to a carbon dioxide cylinder
Every cylinder of a specific gas type has a given pattern and a given number of pins.<br>
slide79. Supplemental Oxygen (5 of 9) Pressure regulators
Reduce the cylinder’s pressure to a useful therapeutic range
Usually 40 to 70 psi
Final attachment for delivering the gas is either a quick-connect female fitting or a flowmeter.<br>
slide80. Supplemental Oxygen (6 of 9) Flowmeters
Usually permanently attached to pressure regulators on emergency medical equipment
Pressure-compensated flowmeter
Bourdon-gauge flowmeter<br>
slide81. Supplemental Oxygen (7 of 9) Hazards of supplemental oxygen:
Combustion
Oxygen toxicity<br>
slide82. Supplemental Oxygen (8 of 9) Combustion
Oxygen does not burn or explode, but does speed up the combustion process.
Keep any sources of fire away.
Make sure the area is adequately ventilated.
Never leave an oxygen cylinder standing unattended.<br>
slide83. Supplemental Oxygen (9 of 9) Oxygen toxicity
Not all patients need high concentrations of oxygen.
Oxygen can have detrimental effects in patients with certain illnesses (COPD).
When pulse oximetry available, tailor oxygen therapy; administer the minimum amount necessary to maintain oxygen saturation at or above 94%.<br>
slide84. Oxygen-Delivery Equipment Nonrebreathing masks
Bag-valve masks
Nasal cannulas<br>
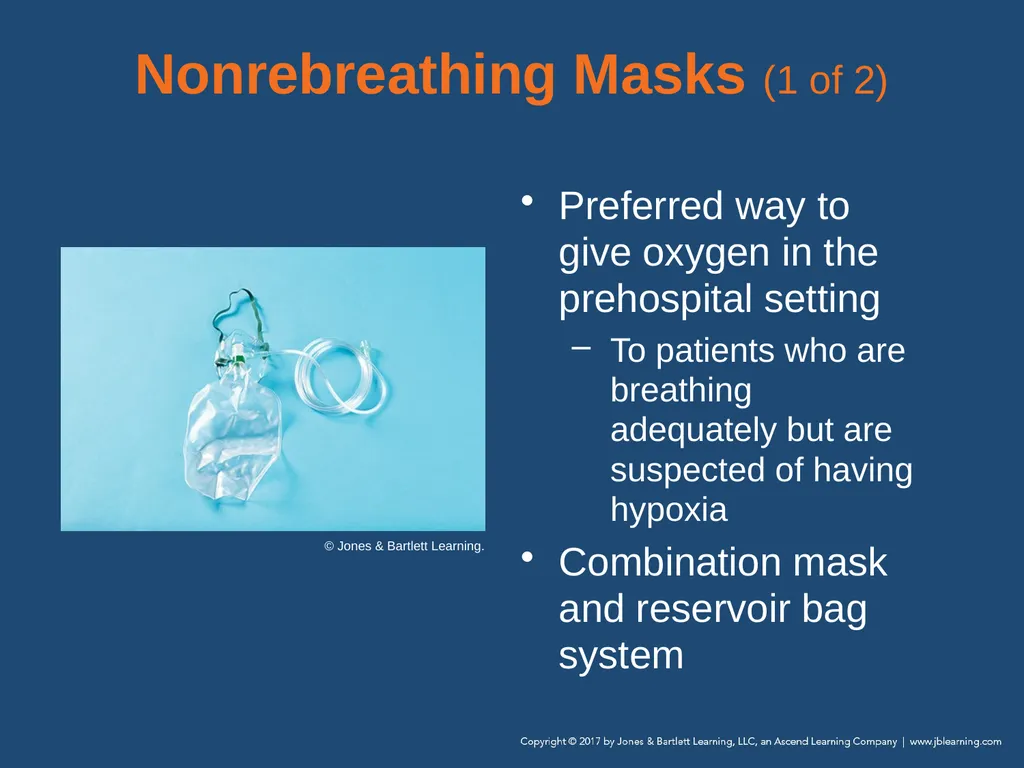
slide85. Nonrebreathing Masks (1 of 2) Preferred way to give oxygen in the prehospital setting
To patients who are breathing adequately but are suspected of having hypoxia
Combination mask and reservoir bag system © Jones & Bartlett Learning.<br>
slide86. Nonrebreathing Masks (2 of 2) Make sure the reservoir bag is full before placing the mask on the patient.
Adjust the flow rate so the bag does not collapse when the patient inhales.
Usually 10 to 15 L/min
When oxygen therapy is discontinued, remove the mask.<br>
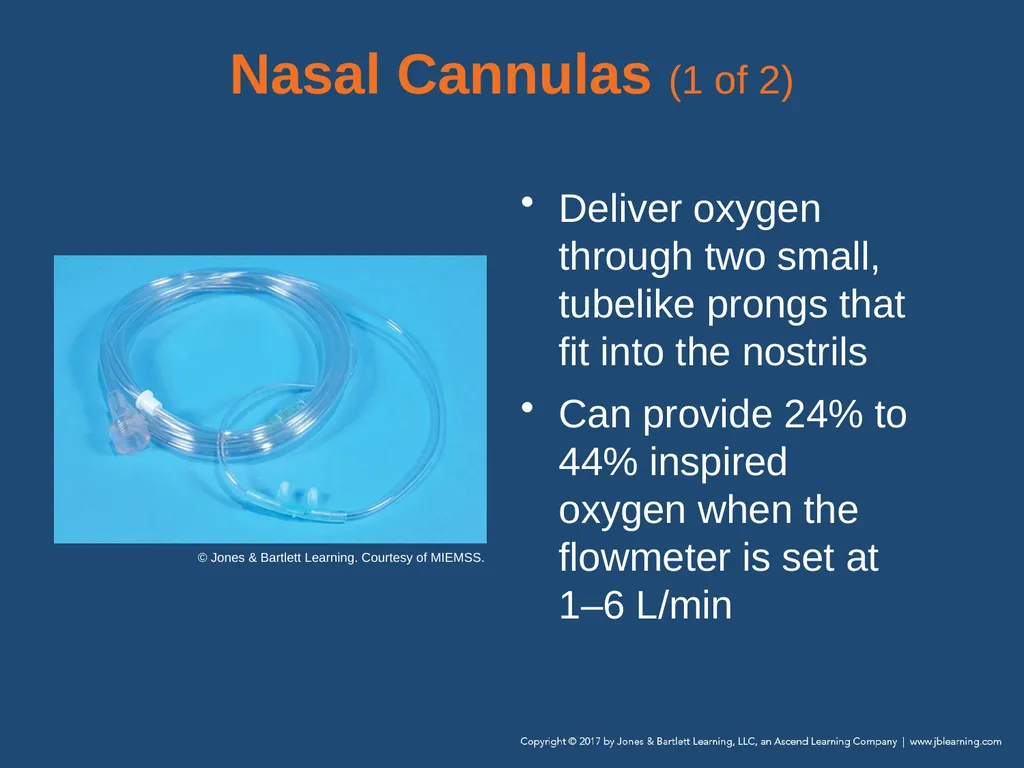
slide87. Nasal Cannulas (1 of 2) Deliver oxygen through two small, tubelike prongs that fit into the nostrils
Can provide 24% to 44% inspired oxygen when the flowmeter is set at 1–6 L/min © Jones & Bartlett Learning. Courtesy of MIEMSS.<br>
slide88. Nasal Cannulas (2 of 2) When you anticipate a long transport time, consider using humidification.
Limited use in the prehospital setting
A patient who breathes through the mouth, or has a nasal obstruction, will not benefit.
Always try to give high-flow oxygen through a nonrebreathing mask.<br>
slide89. Partial Rebreathing Masks Similar to nonrebreathing masks
There is no one-way valve between the mask and the reservoir.
Patients rebreathe a small amount of exhaled air.
Advantageous if patient is hyperventilating<br>
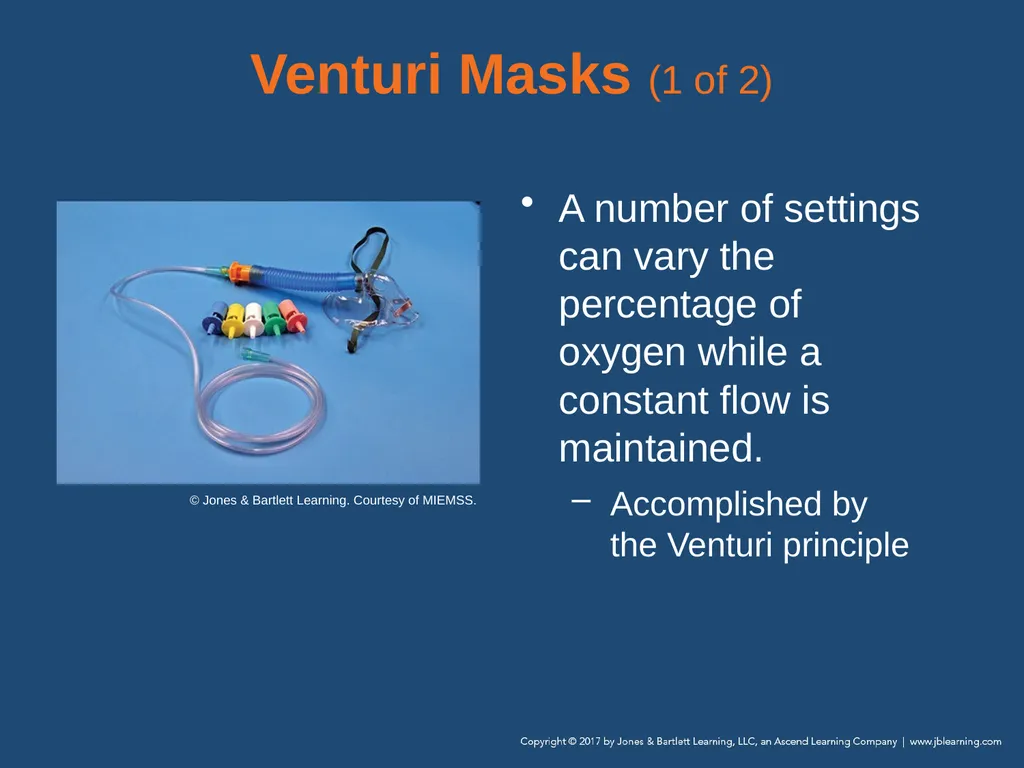
slide90. Venturi Masks (1 of 2) A number of settings can vary the percentage of oxygen while a constant flow is maintained.
Accomplished by the Venturi principle © Jones & Bartlett Learning. Courtesy of MIEMSS.<br>
slide91. Venturi Masks (2 of 2) Medium-flow devices that deliver 24% to 40% oxygen
Useful in long-term management of physiologically stable patients<br>
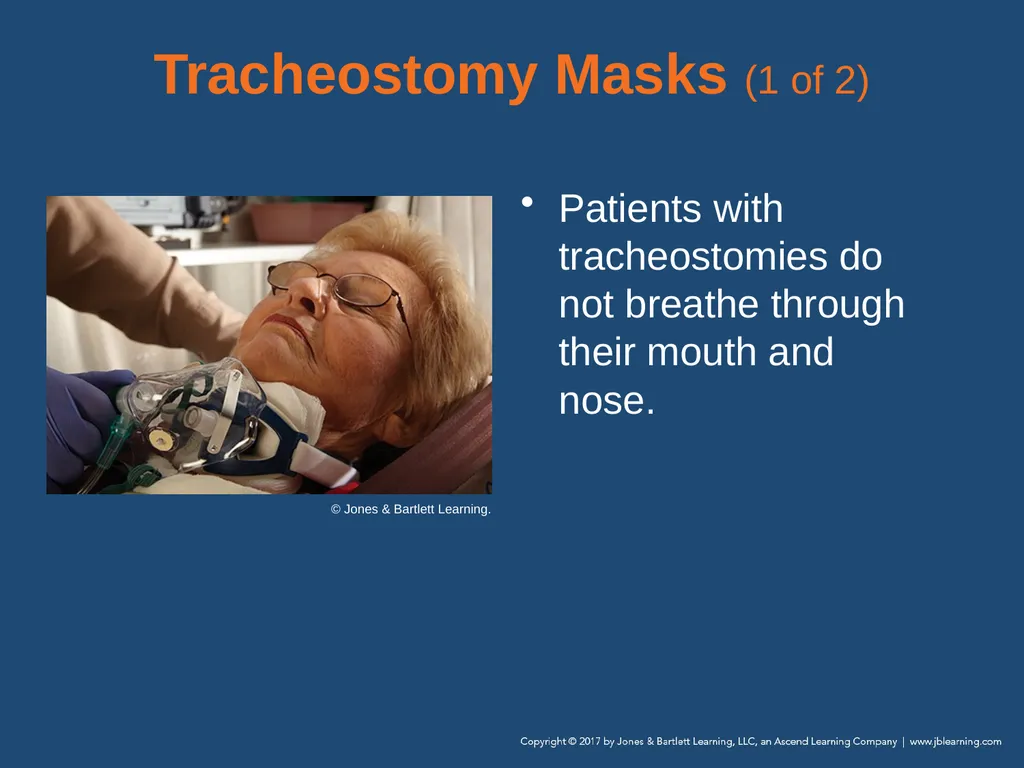
slide92. Tracheostomy Masks (1 of 2) Patients with tracheostomies do not breathe through their mouth and nose. © Jones & Bartlett Learning.<br>
slide93. Tracheostomy Masks (2 of 2) Tracheostomy masks cover the tracheostomy hole and have a strap that goes around the neck.
May not be available in an emergency setting
Improvise by using a face mask instead, placed at the tracheostomy opening.<br>
slide94. Humidification Some EMS systems provide humidified oxygen.
During extended transport
Many EMS systems do not use humidified oxygen in the prehospital setting.
For certain conditions such as croup
Dry oxygen is not considered harmful for short-term use.<br>
slide95. Assisted and Artificial Ventilation (1 of 17) Probably the most important skills in EMS at any level
Basic airway and ventilation techniques are extremely effective.
Follow standard precautions as needed when managing a patient’s airway.<br>
slide96. Assisted and Artificial Ventilation (2 of 17) Assisting ventilation in respiratory distress/failure
Intervene quickly to prevent further deterioration.
Two treatment options: assisted ventilation and CPAP<br>
slide97. Assisted and Artificial Ventilation (3 of 17) Signs and symptoms of inadequate ventilation:
Altered mental status
Inadequate minute volume
Excessive accessory muscle use and fatigue<br>
slide98. Assisted and Artificial Ventilation (4 of 17) When assisting with a BVM:
Explain the procedure to the patient.
Place the mask over the nose and mouth.
Squeeze the bag each time the patient breathes.
After the initial 5 to 10 breaths, deliver an appropriate tidal volume.
Maintain an adequate minute volume.<br>
slide99. Assisted and Artificial Ventilation (5 of 17) Artificial ventilation
Patients in respiratory arrest need immediate treatment to live.
Once a patient is not breathing, begin artificial ventilation immediately via:
Mouth-to-mask technique
One- or two-person BVM
Manually triggered ventilation device<br>
slide100. Assisted and Artificial Ventilation (6 of 17) Normal ventilation versus positive-pressure ventilation
In normal breathing, the diaphragm contracts and negative pressure is generated in the chest cavity.
Positive-pressure ventilation generated by a device (such as a BVM) that forces air into the chest cavity.<br>
slide101. Assisted and Artificial Ventilation (7 of 17) With positive-pressure ventilation:
Increased intrathoracic pressure reduces the blood pumped by the heart.
More volume is required to have the same effects as normal breathing.
Air is forced into the stomach, causing gastric distention.<br>
slide102. Assisted and Artificial Ventilation (8 of 17) Mouth-to-mouth and mouth-to-mask ventilation
Barrier device is routinely used in mouth-to-mouth ventilations
Mask with an oxygen inlet provides oxygen during mouth-to-mask ventilation<br>
slide103. Assisted and Artificial Ventilation (9 of 17) Signs of adequate ventilations:
Patient’s color improves
Chest rises adequately
No resistance when ventilating
You hear and feel air escape as the patient exhales<br>
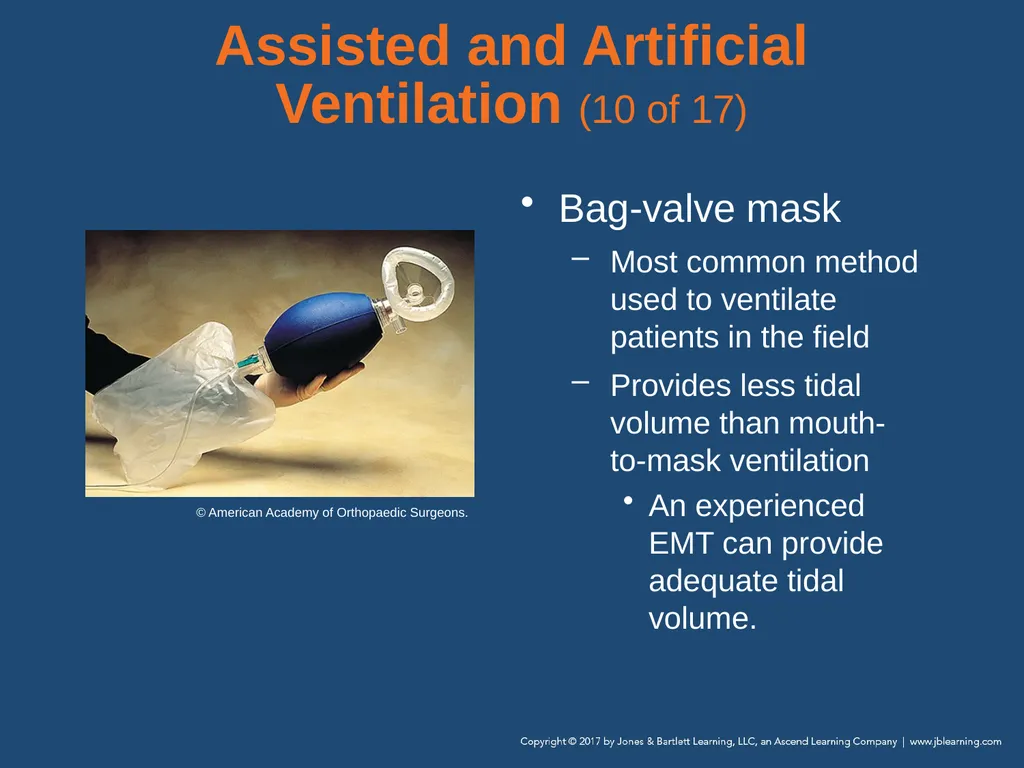
slide104. Assisted and Artificial Ventilation (10 of 17) Bag-valve mask
Most common method used to ventilate patients in the field
Provides less tidal volume than mouth-to-mask ventilation
An experienced EMT can provide adequate tidal volume. © American Academy of Orthopaedic Surgeons.<br>
slide105. Bag-valve mask (cont’d)
If you have difficulty ventilating with a BVM, switch to another method.
The volume of oxygen is based on observing chest rise and fall.
Whenever possible, work with your partner to provide BVM ventilation. Assisted and Artificial Ventilation (11 of 17)<br>
slide106. Gastric distention
Occurs when artificial ventilation fills the stomach with air
Most commonly affects children
Most likely to occur when you ventilate the patient too forcefully or too rapidly
May also occur when the airway is obstructed Assisted and Artificial Ventilation (12 of 17)<br>
slide107. Assisted and Artificial Ventilation (13 of 17) Gastric distention (cont’d)
To prevent or alleviate distention:
Ensure the patient’s airway is appropriately positioned
Ventilate at the appropriate rate
Ventilate with the appropriate volume
If the stomach appears distended, recheck and reposition the head and perform rescue breathing.<br>
slide108. Assisted and Artificial Ventilation (14 of 17) Passive ventilation
Expansion and contraction create a “pump” for air movement.
Benefits patients who are receiving chest compressions
Can be enhanced using oropharyngeal airway and supplemental oxygen<br>
slide109. Assisted and Artificial Ventilation (15 of 17) Manually triggered ventilation devices
Also known as flow-restricted, oxygen-powered ventilation devices
Allow a single rescuer to use both hands to maintain the mask-to-face seal while providing positive-pressure ventilation
Reduces rescuer fatigue<br>
slide110. Assisted and Artificial Ventilation (16 of 17) Manually triggered ventilation devices (cont’d)
May be difficult to maintain adequate ventilation without assistance
Should not be used routinely
Should not be used in patients with COPD or suspected cervical spine or chest injuries<br>
slide111. Assisted and Artificial Ventilation (17 of 17) Automatic transport ventilator (ATV)/resuscitator
Manually triggered device attached to a control box
Allows the variables of ventilation to be set
Lacks the sophisticated control of a hospital ventilator
Frees the EMT to perform other tasks<br>
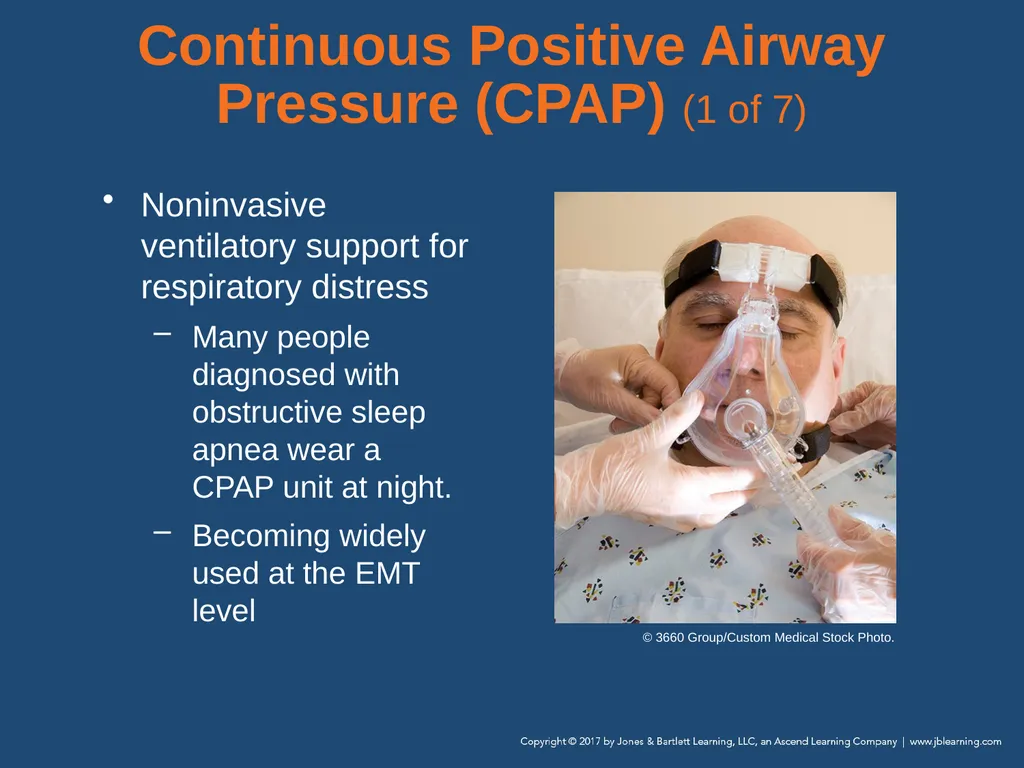
slide112. Continuous Positive Airway Pressure (CPAP) (1 of 7) Noninvasive ventilatory support for respiratory distress
Many people diagnosed with obstructive sleep apnea wear a CPAP unit at night.
Becoming widely used at the EMT level © 3660 Group/Custom Medical Stock Photo.<br>
slide113. Continuous Positive Airway Pressure (CPAP) (2 of 7) Mechanism
Increases pressure in the lungs
Opens collapsed alveoli
Pushes more oxygen across the alveolar membrane
Forces interstitial fluid back into the pulmonary circulation<br>
slide114. Continuous Positive Airway Pressure (CPAP) (3 of 7) Mechanism (cont’d)
Therapy is delivered through a face mask held to the head with a strapping system.
Use caution with patients with potentially low blood pressure.<br>
slide115. Continuous Positive Airway Pressure (CPAP) (4 of 7) Indications
Patient is alert and able to follow commands
Patient displays obvious signs of moderate to severe respiratory distress
Patient is breathing rapidly
Pulse oximetry reading is less than 90%<br>
slide116. Continuous Positive Airway Pressure (CPAP) (5 of 7) Contraindications
Patient in respiratory arrest
Signs and symptoms of pneumothorax or chest trauma
Patient who has a tracheostomy
Active gastrointestinal bleeding or vomiting
Patient who is unable to follow verbal commands.<br>
slide117. Continuous Positive Airway Pressure (CPAP) (6 of 7) Application
Resistance creates back pressure that pushes open smaller airway structures as the patient exhales
7.0 to 10.0 cm H2O is acceptable.<br>
slide118. Continuous Positive Airway Pressure (CPAP) (7 of 7) Complications
Some patients may find CPAP claustrophobic.
Risk of pneumothorax
Can lower the patient’s blood pressure
If the patient shows signs of deterioration, remove CPAP and begin positive-pressure ventilation using a BVM.<br>
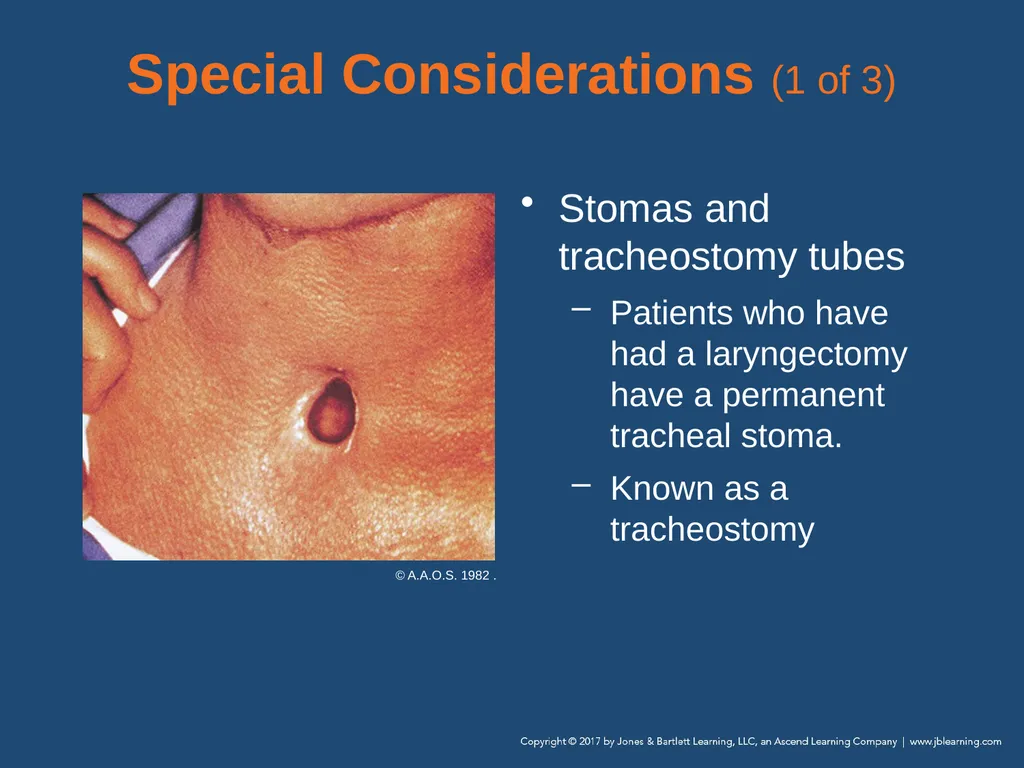
slide119. Special Considerations (1 of 3) Stomas and tracheostomy tubes
Patients who have had a laryngectomy have a permanent tracheal stoma.
Known as a tracheostomy © A.A.O.S. 1982 .<br>
slide120. Special Considerations (2 of 3) Stomas and tracheostomy tubes (cont’d)
Neither the head tilt–chin lift maneuver nor the jaw-thrust maneuver is required.
If the patient has a tracheostomy tube, ventilate through the tube with a BVM.<br>
slide121. Special Considerations (3 of 3) Stomas and tracheostomy tubes (cont’d)
If the patient has a stoma but no tube is in place, use an infant or child mask with your BVM to make a seal over the stoma.<br>
slide122. Foreign Body Airway Obstruction (1 of 7) If a foreign body completely blocks the airway, it is a true emergency.
Will result in death if not treated immediately
In an adult, usually occurs during a meal
In a child, can occur while eating, playing with small toys, or crawling<br>
slide123. Foreign Body Airway Obstruction (2 of 7) The tongue is the most common airway obstruction in an unconscious patient.
Causes of airway obstruction that do not involve foreign bodies:
Swelling, from infection or acute allergic reaction
Trauma (tissue damage from injury)<br>
slide124. Foreign Body Airway Obstruction (3 of 7) Early recognition is crucial.
Mild airway obstruction
Patients can still exchange air, but will have respiratory distress.
Noisy breathing, wheezing, coughing
With good air exchange, do not interfere with the patient’s efforts to expel the object on his or her own.<br>
slide125. Foreign Body Airway Obstruction (4 of 7) Mild airway obstruction (cont’d)
With poor air exchange, the patient may have increased difficulty breathing, stridor, and cyanosis.
Treat immediately.<br>
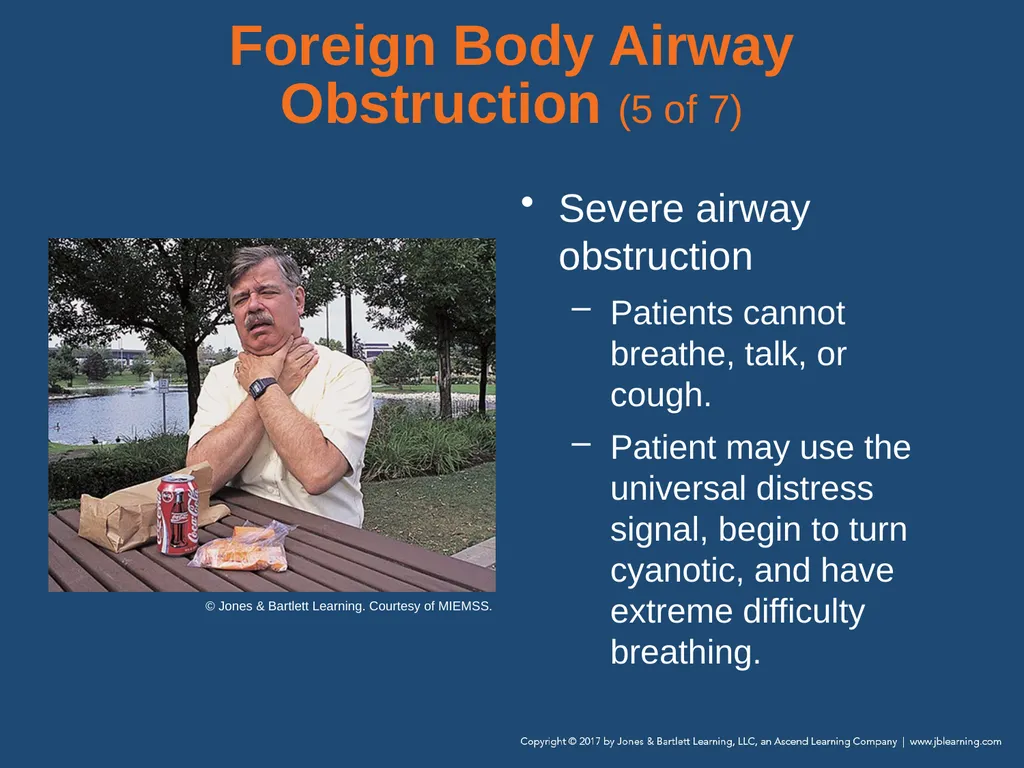
slide126. Foreign Body Airway Obstruction (5 of 7) Severe airway obstruction
Patients cannot breathe, talk, or cough.
Patient may use the universal distress signal, begin to turn cyanotic, and have extreme difficulty breathing. © Jones & Bartlett Learning. Courtesy of MIEMSS.<br>
slide127. Foreign Body Airway Obstruction (6 of 7) Severe airway obstruction (cont’d)
Provide immediate treatment to the conscious patient.
If not treated, the patient will become unconscious and die.
If the patient is unresponsive, not breathing, and has no pulse, begin CPR with chest compressions.<br>
slide128. Emergency Medical Care for Foreign Body Airway Obstruction Perform a head tilt–chin lift maneuver to clear a tongue obstruction.
Large obstructions should be swept forward out of the mouth with your gloved index finger.
Abdominal thrusts are the most effective method of dislodging and forcing out an object.<br>
slide129. Dental Appliances Can cause an airway obstruction
Examples: crown, bridge, dentures, piece of braces
Manually remove the appliance before providing ventilations.
Leave well-fitting dentures in place.
Loose dentures interfere with the process and should be removed.<br>
slide130. Facial Bleeding Airway problems can be particularly challenging in patients with serious facial bleeding.
The blood supply to the face is very rich.
Injuries can result in severe tissue swelling and bleeding into the airway.
Control bleeding with direct pressure, and suction as necessary.<br>
slide131. Review Breathing is controlled by an area in the:
lungs.
brain stem.
spinal cord.
diaphragm.<br>
slide132. Review Answer: B
Rationale: The pons and the medulla are the respiratory centers in the brain stem that control breathing.<br>
slide133. Review (1 of 2) Breathing is controlled by an area in the:
lungs. Rationale: The lungs contain small pockets called alveoli where the exchange of oxygen and carbon dioxide takes place.
brain stem. Rationale: Correct answer<br>
slide134. Review (2 of 2) Breathing is controlled by an area in the:
spinal cord. Rationale: Impulses are sent down the spinal cord from the brain stem.
diaphragm. Rationale: The diaphragm receives the impulses that cause it to contract and bring air in.<br>
slide135. Review The EMT should assess a patient’s tidal volume by:
observing for adequate chest rise.
assessing the facial area for cyanosis.
counting the patient’s respiratory rate.
measuring the patient’s oxygen saturation.<br>
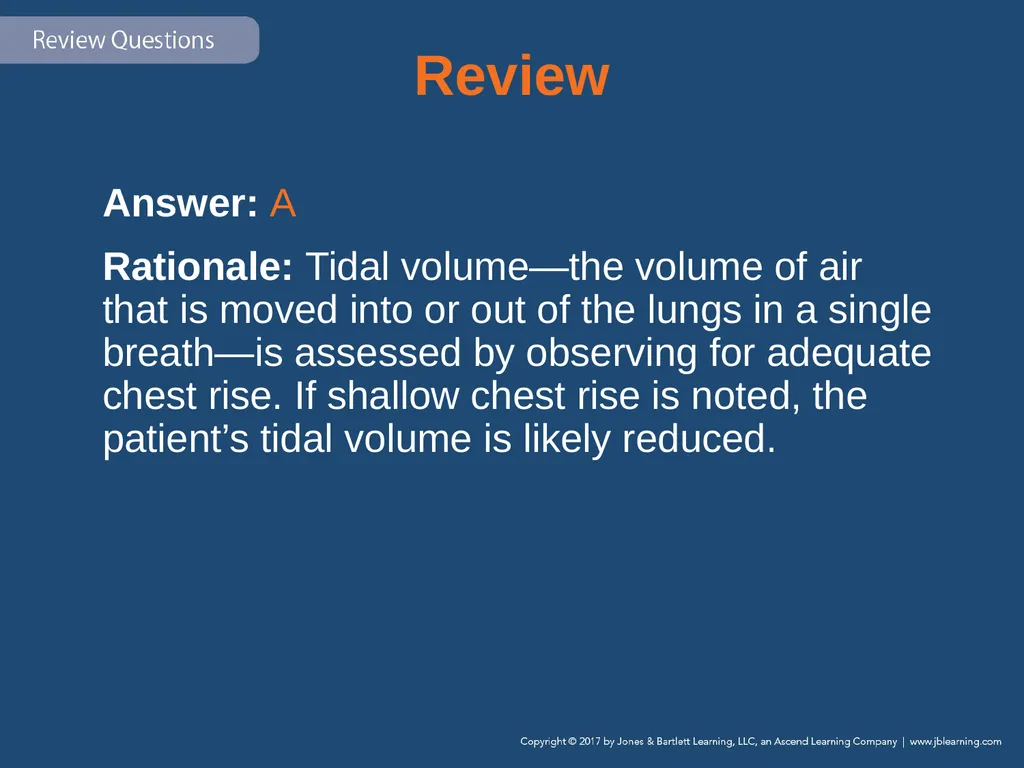
slide136. Review Answer: A
Rationale: Tidal volume—the volume of air that is moved into or out of the lungs in a single breath—is assessed by observing for adequate chest rise. If shallow chest rise is noted, the patient’s tidal volume is likely reduced.<br>
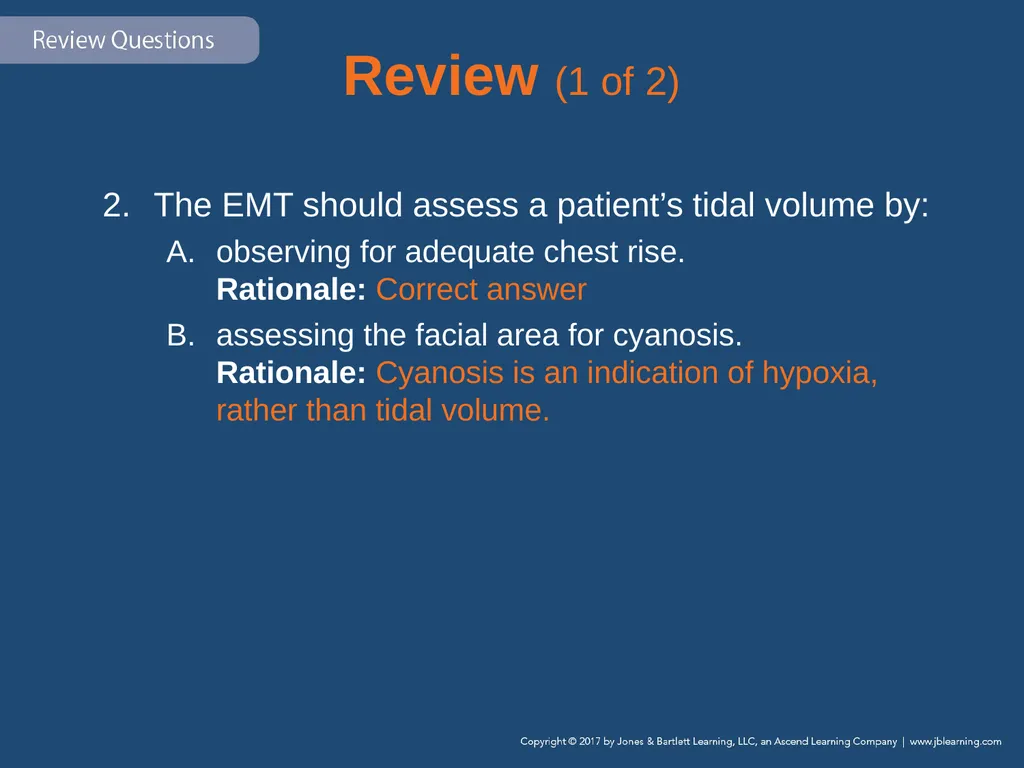
slide137. Review (1 of 2) The EMT should assess a patient’s tidal volume by:
observing for adequate chest rise. Rationale: Correct answer
assessing the facial area for cyanosis. Rationale: Cyanosis is an indication of hypoxia, rather than tidal volume.<br>
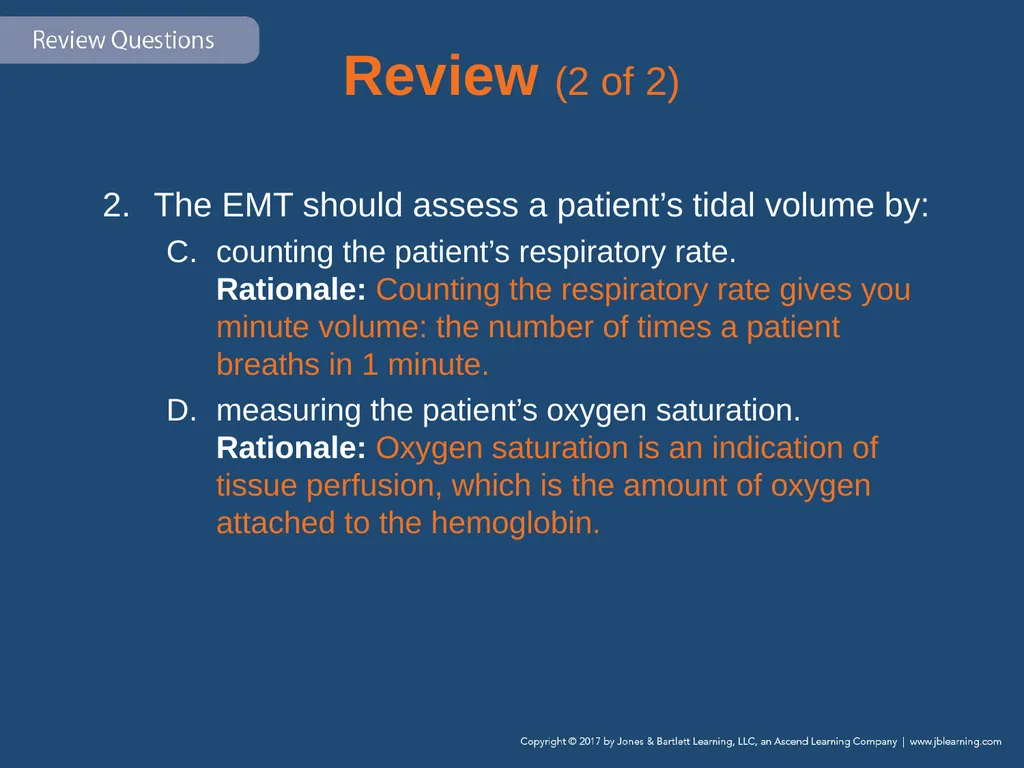
slide138. Review (2 of 2) The EMT should assess a patient’s tidal volume by:
counting the patient’s respiratory rate. Rationale: Counting the respiratory rate gives you minute volume: the number of times a patient breaths in 1 minute.
measuring the patient’s oxygen saturation. Rationale: Oxygen saturation is an indication of tissue perfusion, which is the amount of oxygen attached to the hemoglobin.<br>
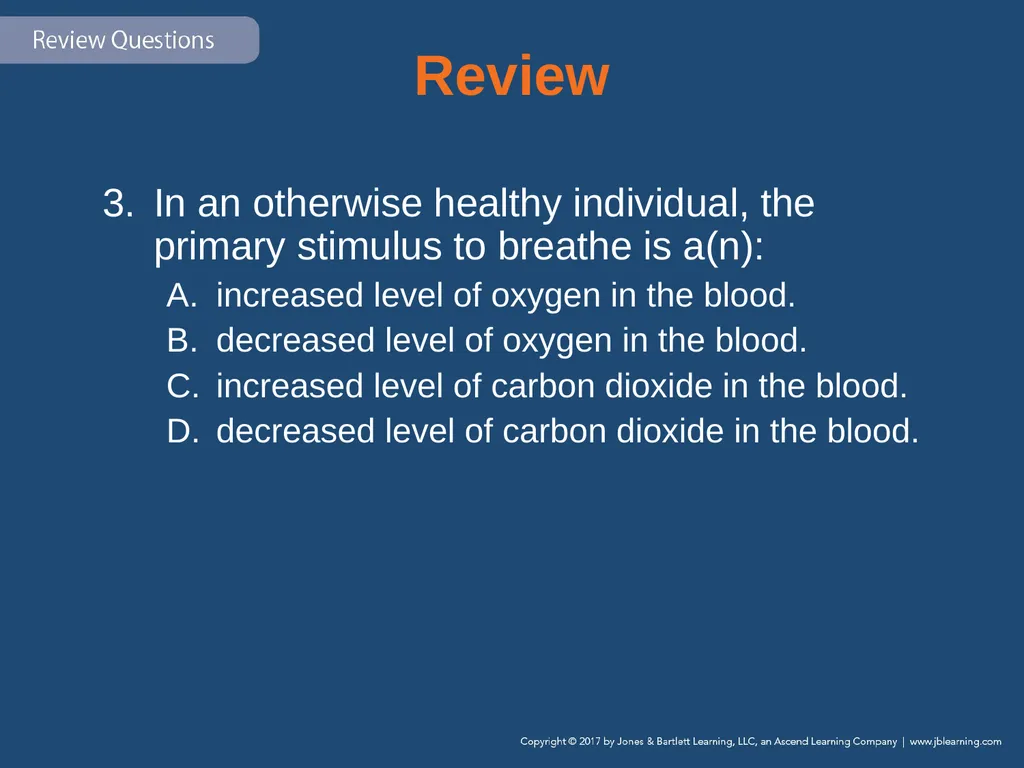
slide139. Review In an otherwise healthy individual, the primary stimulus to breathe is a(n):
increased level of oxygen in the blood.
decreased level of oxygen in the blood.
increased level of carbon dioxide in the blood.
decreased level of carbon dioxide in the blood.<br>
slide140. Review Answer: C
Rationale: Under control of the brain stem, rising levels of carbon dioxide in arterial blood normally stimulate breathing in an otherwise healthy patient.<br>
slide141. Review (1 of 2) In an otherwise healthy individual, the primary stimulus to breathe is a(n):
increased level of oxygen in the blood. Rationale: Increased levels of oxygen can be a result of hyperventilation syndrome.
decreased level of oxygen in the blood. Rationale: This is typically not normal in healthy individuals. It can be a sign of inadequate breathing and results in hypoxia.<br>
slide142. Review (2 of 2) In an otherwise healthy individual, the primary stimulus to breathe is a(n):
increased level of carbon dioxide in the blood. Rationale: Correct answer
decreased level of carbon dioxide in the blood. Rationale: This is usually not seen in healthy adults. It is typically a result of hyperventilation syndrome.<br>
slide143. Review Signs of adequate breathing in the adult include all of the following, EXCEPT:
pink, warm, dry skin.
shallow chest rise.
symmetrical chest movement.
a respiratory rate of 16 breaths/min.<br>
slide144. Review Answer: B
Rationale: Signs of inadequate breathing in the adult include a respiratory rate less than 12 breaths/min or greater than 20 breaths/min, shallow chest rise (reduced tidal volume), cyanosis, and asymmetrical chest movement (both sides of the chest do not move equally).<br>
slide145. Review (1 of 2) Signs of adequate breathing in the adult include all of the following, EXCEPT:
pink, warm, dry skin. Rationale: This shows that breathing and perfusion are adequate.
shallow chest rise. Rationale: Correct answer<br>
slide146. Review (2 of 2) Signs of adequate breathing in the adult include all of the following, EXCEPT:
symmetrical chest movement. Rationale: This shows that the mechanical process of breathing is adequate, equal, and symmetrical bilaterally.
a respiratory rate of 16 breaths/min. Rationale: This is a normal respiratory rate for an adult.<br>
slide147. Review During insertion of an oropharyngeal airway into an unconscious patient, she begins to vomit. The first thing you should do is:
turn the patient on her side.
remove the airway at once.
suction the patient’s mouth.
use a smaller-sized oral airway.<br>
slide148. Review Answer: A
Rationale: Whenever an unconscious patient begins to vomit—whether you are inserting an oropharyngeal airway or not—you should immediately turn the patient onto his or her side; this will allow drainage of vomit from the mouth and prevent aspiration. After the patient is on his or her side, remove the oral airway and suction the mouth.<br>
slide149. Review (1 of 2) During insertion of an oropharyngeal airway into an unconscious patient, she begins to vomit. The first thing you should do is:
turn the patient on her side. Rationale: Correct answer
remove the airway at once. Rationale: Remove the airway after the patient has been rolled onto her side.<br>
slide150. Review (2 of 2) During insertion of an oropharyngeal airway into an unconscious patient, she begins to vomit. The first thing you should do is:
suction the patient’s mouth. Rationale: This must be completed after the patient is positioned and the airway is removed.
use a smaller-sized oral airway. Rationale: Oropharyngeal airways are contraindicated if the patient has a gag reflex.<br>
slide151. Review In which of the following patients would a nasopharyngeal airway be contraindicated?
A semiconscious patient with a gag reflex
An unconscious patient with an intact gag reflex
A patient who fell 20 feet and landed on his or her head
An unconscious patient who gags when you insert an oral airway<br>
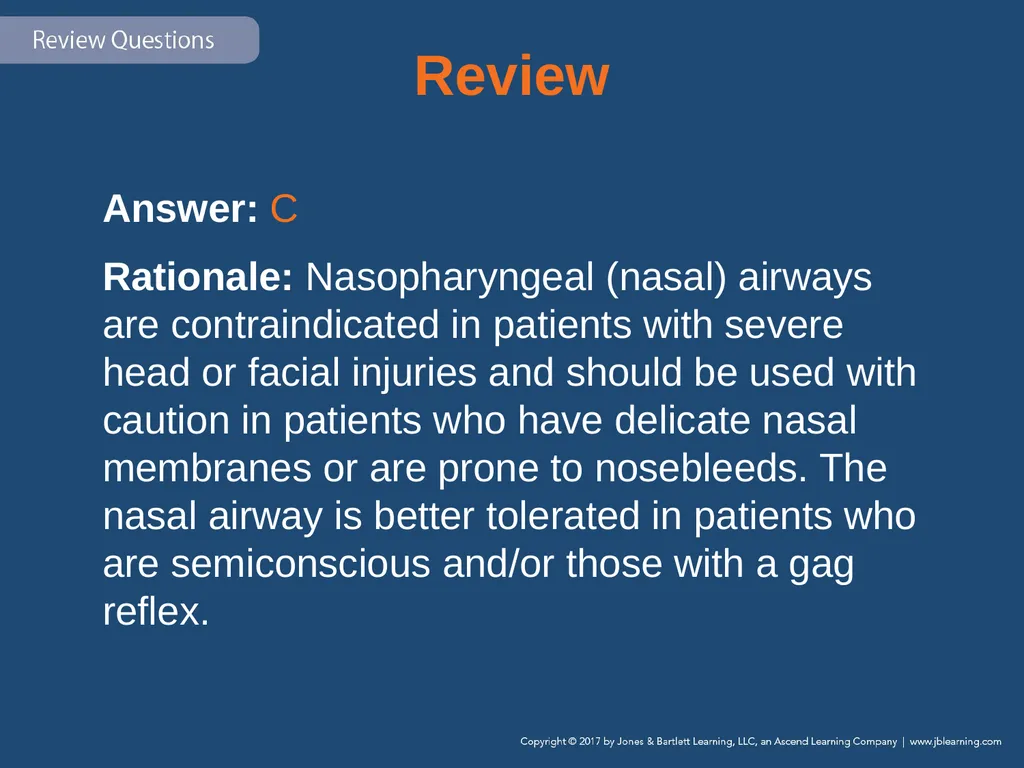
slide152. Review Answer: C
Rationale: Nasopharyngeal (nasal) airways are contraindicated in patients with severe head or facial injuries and should be used with caution in patients who have delicate nasal membranes or are prone to nosebleeds. The nasal airway is better tolerated in patients who are semiconscious and/or those with a gag reflex.<br>
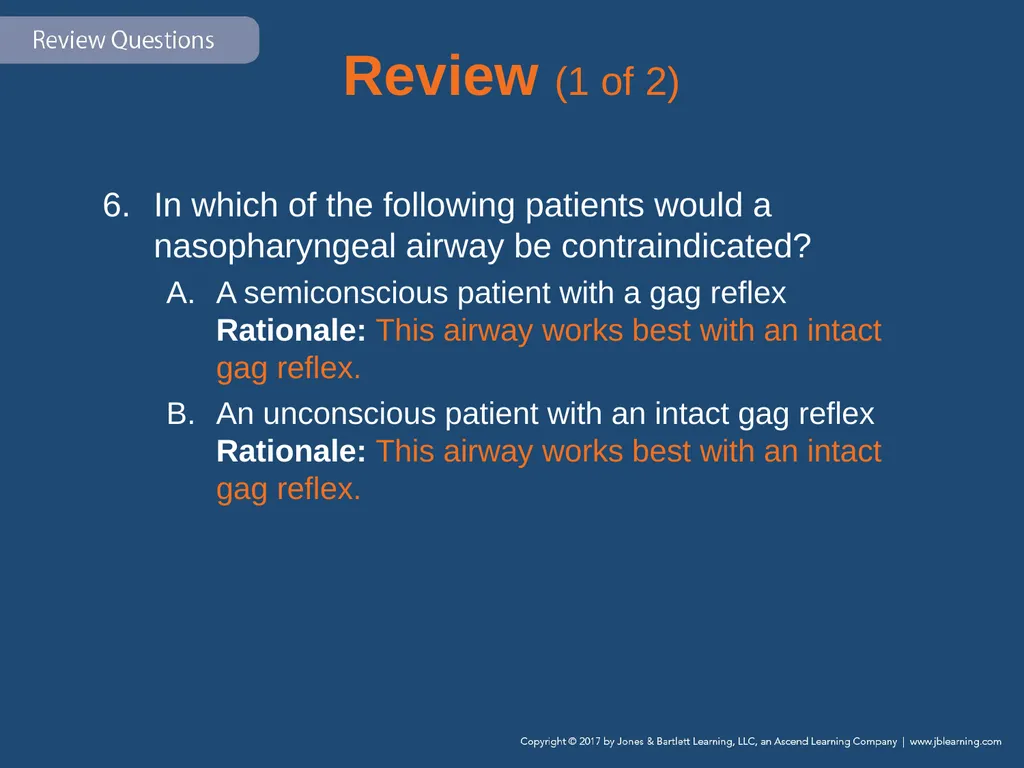
slide153. Review (1 of 2) In which of the following patients would a nasopharyngeal airway be contraindicated?
A semiconscious patient with a gag reflex Rationale: This airway works best with an intact gag reflex.
An unconscious patient with an intact gag reflex Rationale: This airway works best with an intact gag reflex.<br>
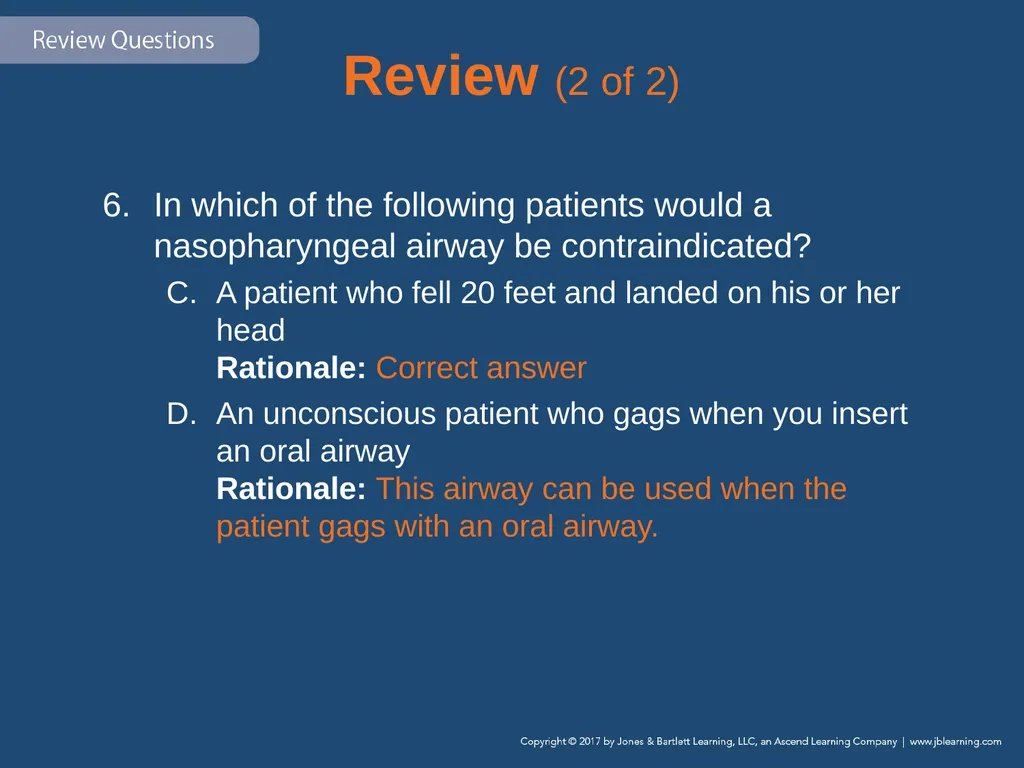
slide154. Review (2 of 2) In which of the following patients would a nasopharyngeal airway be contraindicated?
A patient who fell 20 feet and landed on his or her head Rationale: Correct answer
An unconscious patient who gags when you insert an oral airway Rationale: This airway can be used when the patient gags with an oral airway.<br>
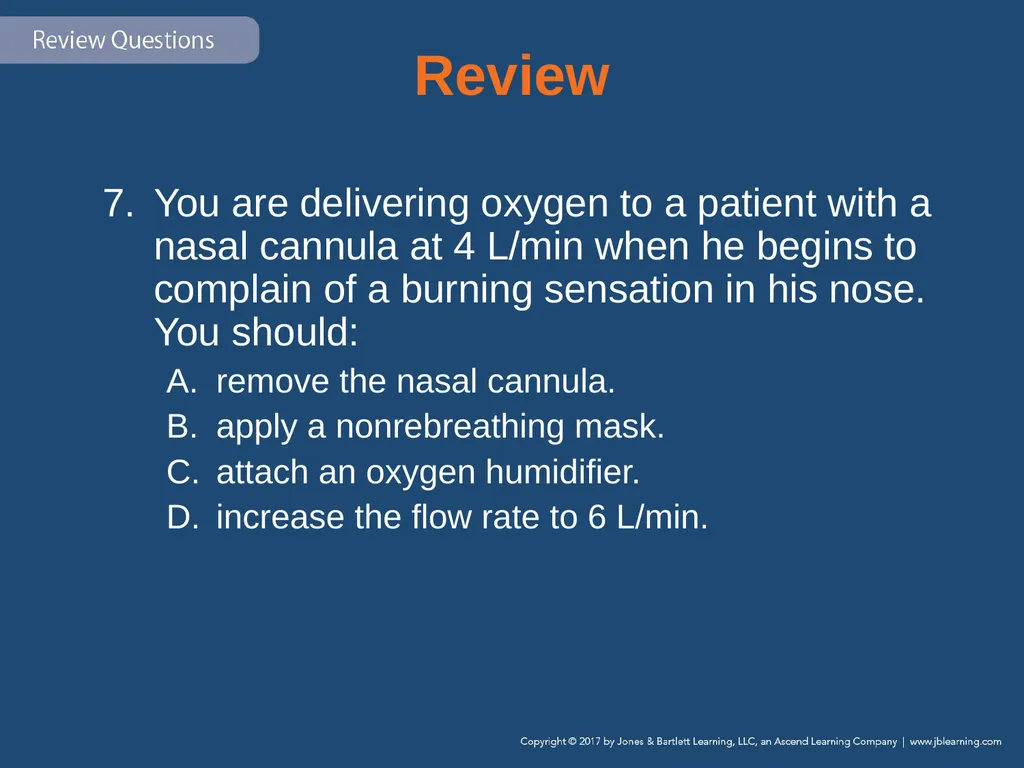
slide155. Review You are delivering oxygen to a patient with a nasal cannula at 4 L/min when he begins to complain of a burning sensation in his nose. You should:
A. remove the nasal cannula.
B. apply a nonrebreathing mask.
C. attach an oxygen humidifier.
D. increase the flow rate to 6 L/min.<br>
slide156. Review Answer: C
Rationale: Administering “dry” oxygen through a nasal cannula—especially over a prolonged period of time—can result in drying of the nasal membranes, in which case the patient might complain of a burning sensation in the nose. Humidified oxygen will serve to keep the nasal membranes moist.<br>
slide157. Review (1 of 2) You are delivering oxygen to a patient with a nasal cannula at 4 L/min when he begins to complain of a burning sensation in his nose. You should:
remove the nasal cannula. Rationale: The oxygen should be humidified.
apply a nonrebreathing mask. Rationale: This can still cause an irritation due to providing “dry” oxygen.<br>
slide158. Review (2 of 2) You are delivering oxygen to a patient with a nasal cannula at 4 L/min when he begins to complain of a burning sensation in his nose. You should:
attach an oxygen humidifier. Rationale: Correct answer
increase the flow rate to 6 L/min. Rationale: The oxygen should be humidified.<br>
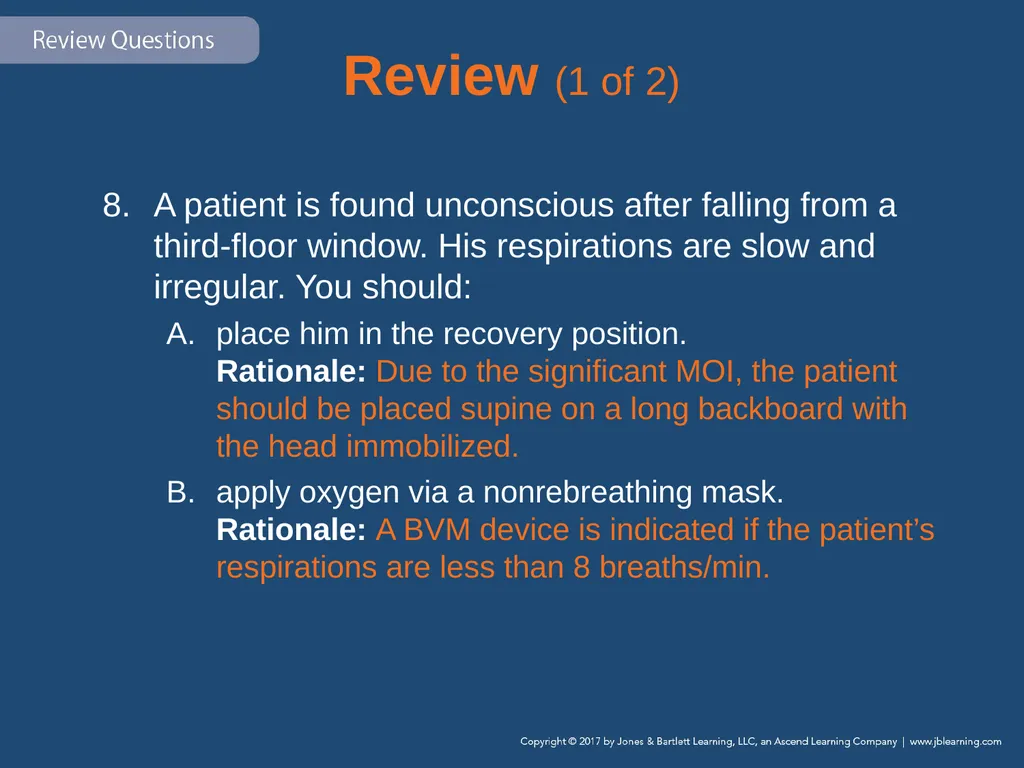
slide159. Review A patient is found unconscious after falling from a third-floor window. His respirations are slow and irregular. You should:
place him in the recovery position.
apply oxygen via a nonrebreathing mask.
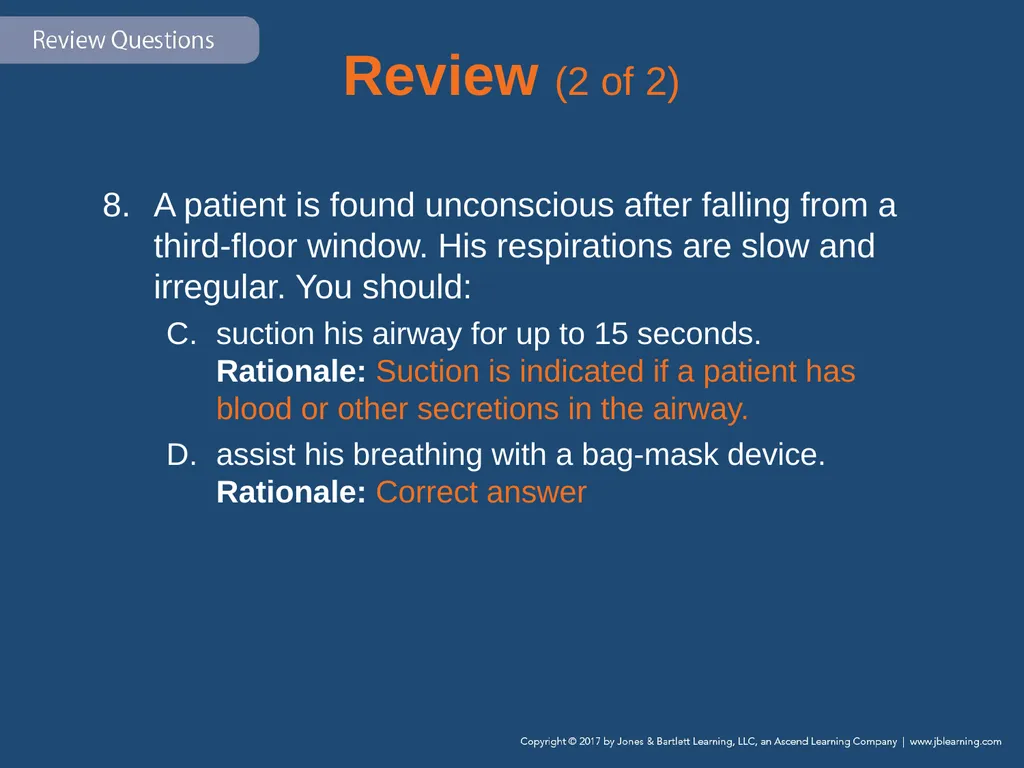
suction his airway for up to 15 seconds.
assist his breathing with a bag-mask device.<br>
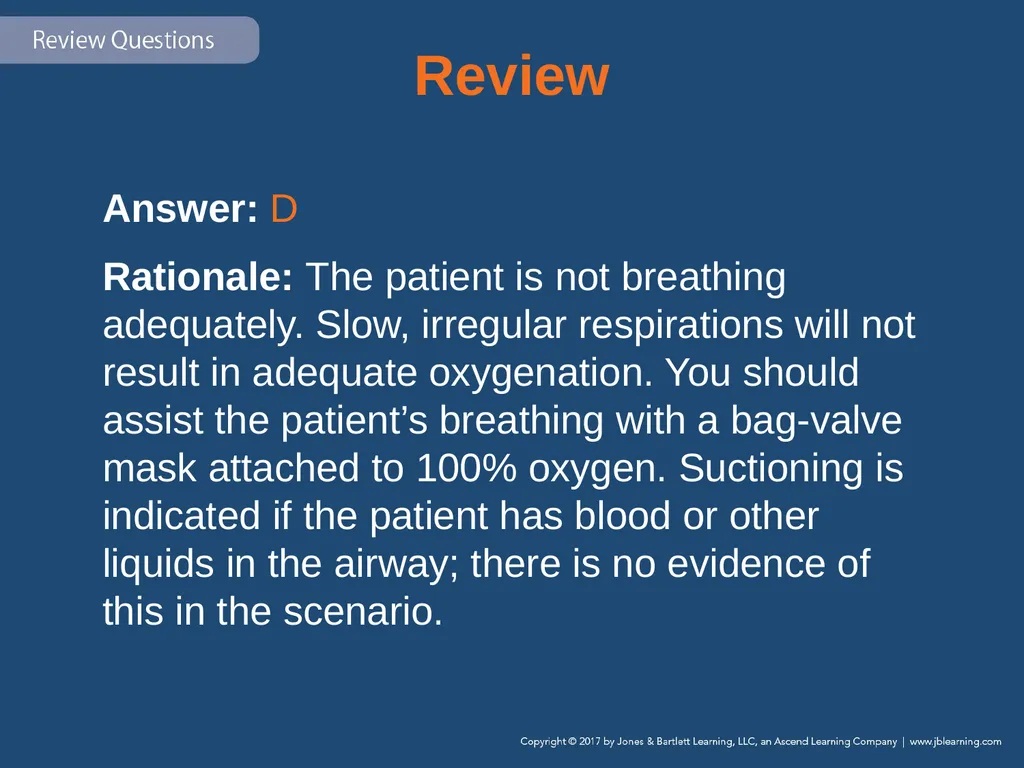
slide160. Review Answer: D
Rationale: The patient is not breathing adequately. Slow, irregular respirations will not result in adequate oxygenation. You should assist the patient’s breathing with a bag-valve mask attached to 100% oxygen. Suctioning is indicated if the patient has blood or other liquids in the airway; there is no evidence of this in the scenario.<br>
slide161. Review (1 of 2) A patient is found unconscious after falling from a third-floor window. His respirations are slow and irregular. You should:
place him in the recovery position. Rationale: Due to the significant MOI, the patient should be placed supine on a long backboard with the head immobilized.
apply oxygen via a nonrebreathing mask. Rationale: A BVM device is indicated if the patient’s respirations are less than 8 breaths/min.<br>
slide162. Review (2 of 2) A patient is found unconscious after falling from a third-floor window. His respirations are slow and irregular. You should:
suction his airway for up to 15 seconds. Rationale: Suction is indicated if a patient has blood or other secretions in the airway.
assist his breathing with a bag-mask device. Rationale: Correct answer<br>
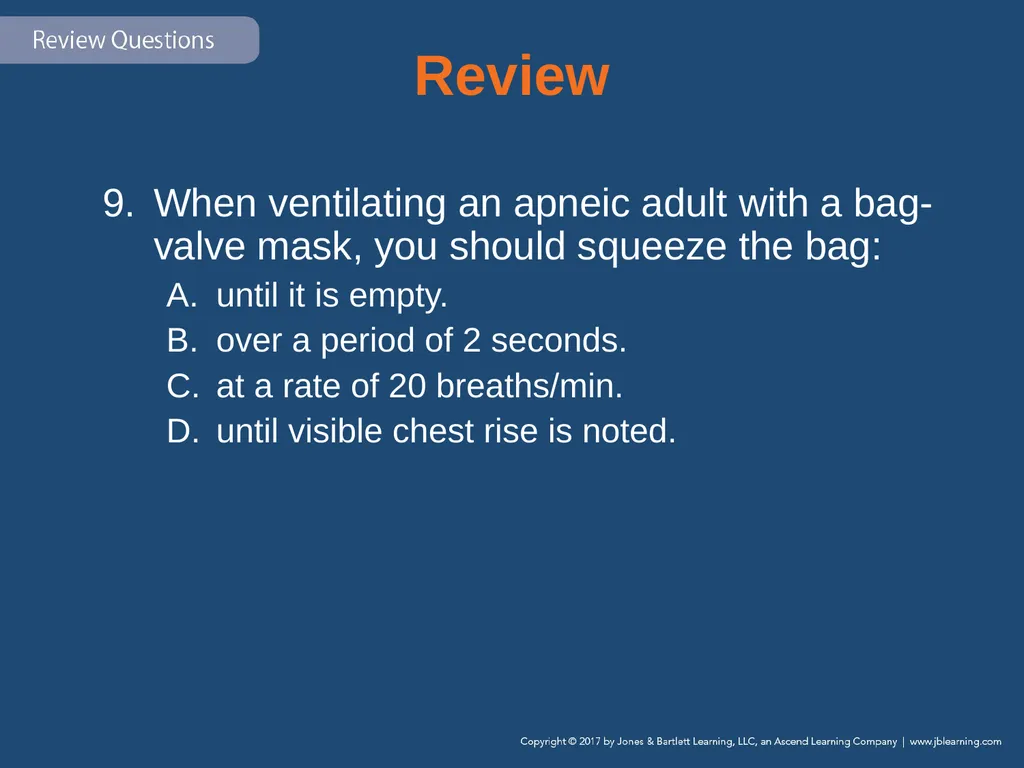
slide163. Review When ventilating an apneic adult with a bag-valve mask, you should squeeze the bag:
until it is empty.
over a period of 2 seconds.
at a rate of 20 breaths/min.
until visible chest rise is noted.<br>
slide164. Review Answer: D
Rationale: When ventilating any apneic patient with a bag-valve mask, you should squeeze the bag over a period of 1 second and observe for visible chest rise. Ventilate the apneic adult at a rate of 10 to 12 breaths/min (one breath every 5 seconds). Ventilate infants and children at a rate of 12 to 20 breaths/min (one breath every 3 seconds).<br>
slide165. Review (1 of 2) When ventilating an apneic adult with a bag-valve mask, you should squeeze the bag:
until it is empty. Rationale: An appropriately sized bag for an adult will not totally empty.
over a period of 2 seconds. Rationale: You should squeeze the bag over a period of 1 second.<br>
slide166. Review (2 of 2) When ventilating an apneic adult with a bag-valve mask, you should squeeze the bag:
at a rate of 20 breaths/min. Rationale: Ventilate the apneic adult at a rate of 10 to 12 breaths/min (or one breath every 5 seconds).
until visible chest rise is noted. Rationale: Correct answer<br>
slide167. Review You and your partner are ventilating an apneic adult when you notice that his stomach is becoming distended. You should:
suction his airway for up to 15 seconds.
reposition his head.
increase the rate and volume of your ventilations.
decrease your ventilation rate but use more volume.<br>
slide168. Review Answer: B
Rationale: Gastric distention occurs when air enters the stomach. Severe gastric distention can result in vomiting and aspiration if not recognized and treated. To minimize the amount of air that enters the stomach during ventilations, you should reposition the patient’s head.<br>
slide169. Review (1 of 2) You and your partner are ventilating an apneic adult when you notice that his stomach is becoming distended. You should:
suction his airway for up to 15 seconds. Rationale: Suctioning is indicated when there is blood or secretions in the airway.
reposition his head. Rationale: Correct answer<br>
slide170. Review (2 of 2) You and your partner are ventilating an apneic adult when you notice that his stomach is becoming distended. You should:
increase the rate and volume of your ventilations. Rationale: This action may result in even more air going into the stomach.
decrease your ventilation rate but use more volume. Rationale: This action may result in even more air going into the stomach.<br>
Airway Management<br>
slide2. National EMS Education Standard Competencies (1 of 6) Airway Management, Respiration, and Artificial Ventilation
Applies knowledge of general anatomy and physiology to patient assessment and management in order to assure a patent airway, adequate mechanical ventilation, and respiration for patients of all ages.<br>
slide3. National EMS Education Standard Competencies (2 of 6) Airway Management
Airway anatomy
Airway assessment
Techniques of assuring a patent airway<br>
slide4. National EMS Education Standard Competencies (3 of 6) Respiration
Anatomy of the respiratory system
Physiology and pathophysiology of respiration
Pulmonary ventilation
Oxygenation
Respiration (external, internal, cellular)<br>
slide5. National EMS Education Standard Competencies (4 of 6) Respiration (cont’d)
Assessment and management of adequate and inadequate ventilation
Supplemental oxygen therapy
Assessment and management of adequate and inadequate ventilation
Artificial ventilation<br>
slide6. National EMS Education Standard Competencies (5 of 6) Artificial Ventilation (cont’d)
Minute ventilation
Alveolar ventilation
Effect of artificial ventilation on cardiac output<br>
slide7. National EMS Education Standard Competencies (6 of 6) Pathophysiology
Applies fundamental knowledge of the pathophysiology of respiration and perfusion to patient assessment and management.<br>
slide8. Introduction (1 of 2) The primary component of caring for patients is ensuring that they can breathe adequately.
When the ability to breathe is disrupted:
Oxygen delivery to tissues and cells is compromised.
Vital organs may not function normally.
Brain tissue will begin to die within 4 to 6 minutes.<br>
slide9. Introduction (2 of 2) Oxygen reaches body tissues and cells through breathing and circulation.
During inhalation, oxygen moves from the atmosphere into the lungs.
Oxygen-enriched blood is pumped through the body by the heart.
You must be able to locate the parts of the respiratory system and understand how the system works.<br>
slide10. Anatomy of the Respiratory System (1 of 3) © Jones & Bartlett Learning.<br>
slide11. Anatomy of the Respiratory System (2 of 3) The respiratory system consists of all the structures that make up the airway and help us breathe, or ventilate.
The airway is divided into the upper and lower airways.<br>
slide12. Anatomy of the Respiratory System (3 of 3) Structures that help us breathe
Diaphragm
Chest wall muscles
Accessory muscles of breathing
Nerves from the brain and spinal cord to those muscles<br>
slide13. Anatomy of the Upper Airway (1 of 7) Upper airway consists of:
Nose
Mouth
Jaw
Oral cavity
Pharynx
Larynx<br>
slide14. Anatomy of the Upper Airway (2 of 7) The upper airway’s main function is to warm, filter, and humidify air as it enters the body.
Pharynx
Muscular tube extending from nose and mouth to level of esophagus and trachea
Composed, from top to bottom, of the nasopharynx, oropharynx, and laryngopharynx<br>
slide15. Anatomy of the Upper Airway (3 of 7) Nasopharynx
Filters out dust and small particles
Warms and humidifies air as it enters the body © Jones & Bartlett Learning.<br>
slide16. Anatomy of the Upper Airway (4 of 7) Oropharynx
Posterior portion of the oral cavity
Entrance for respiratory and digestive system
The epiglottis is superior to the larynx.<br>
slide17. Anatomy of the Upper Airway (5 of 7) © Jones & Bartlett Learning.<br>
slide18. Anatomy of the Upper Airway (6 of 7) Larynx
Complex structure formed by many independent cartilaginous structures
Marks where the upper airway ends and the lower airway begins © Jones & Bartlett Learning.<br>
slide19. Anatomy of the Upper Airway (7 of 7) Larynx (cont’d)
Thyroid cartilage forms a “V” shape anteriorly
Cricoid cartilage forms the lowest portion of the larynx
Glottis is the area between the vocal cords<br>
slide20. Anatomy of the Lower Airway (1 of 6) The lower airway’s function is to deliver oxygen to the alveoli.
Lower airway includes:
Trachea
Bronchi
Lungs<br>
slide21. Anatomy of the Lower Airway (2 of 6) Trachea
Conduit for air entry into the lungs
Divides at the carina into two main stem bronchi, right and left
Bronchi are supported by cartilage.
Bronchi distribute oxygen to the lungs.<br>
slide22. Anatomy of the Lower Airway (3 of 6) © Jones & Bartlett Learning.<br>
slide23. Anatomy of the Lower Airway (4 of 6) Trachea (cont’d)
Bronchioles are made of smooth muscle; they dilate and constrict as oxygen passes through them.
Smaller bronchioles connect to alveoli.
Oxygen is transported back to the heart and distributed to the rest of the body.<br>
slide24. Anatomy of the Lower Airway (5 of 6) The heart and great vessels (vena cava and aorta) are found in the thoracic cavity. © Jones & Bartlett Learning. © Jones & Bartlett Learning.<br>
slide25. Anatomy of the Lower Airway (6 of 6) The mediastinum—the space between the lungs—contains:
Heart
Great vessels
Esophagus
Trachea
Major bronchi
Many nerves<br>
slide26. Physiology of Breathing (1 of 2) The respiratory and cardiovascular systems work together.
Ensure a constant supply of oxygen and nutrients is delivered to cells
Remove carbon dioxide and waste products<br>
slide27. Physiology of Breathing (2 of 2) © Jones & Bartlett Learning.<br>
slide28. Ventilation (1 of 7) Physical act of moving air into and out of the lungs
Inhalation
Active, muscular part of breathing
The diaphragm and intercostal muscles contract.<br>
slide29. Ventilation (2 of 7) Inhalation (cont’d)
The lungs require the movement of the chest and supporting structures to expand.
Partial pressure: the amount of gas in the air or dissolved in fluid (blood)
Oxygen and carbon dioxide both diffuse until the partial pressures in the air and the blood are equal.<br>
slide30. Ventilation (3 of 7) © Jones & Bartlett Learning.<br>
slide31. Ventilation (4 of 7) Inhalation (cont’d)
Inspiration focuses on delivering oxygen to the alveoli.
Tidal volume
Dead space<br>
slide32. Ventilation (5 of 7) Exhalation
Does not normally require muscular effort
Passive process
Diaphragm and intercostal muscles relax
Smaller thorax compresses air into the lungs<br>
slide33. Ventilation (6 of 7) Exhalation (cont’d)
Air can enter and leave the lungs only if it travels through the trachea. © Jones & Bartlett Learning.<br>
slide34. Ventilation (7 of 7) Regulation of ventilation involves a complex series of receptors and feedback loops.
Failure to meet the body’s need for oxygen may result in hypoxia.
Based on pH changes in the blood and cerebrospinal fluid
Patients with COPD have difficulty eliminating carbon dioxide through exhalation.<br>
slide35. Oxygenation Process of loading oxygen molecules onto hemoglobin molecules in bloodstream
Required for internal respiration to take place
Does not guarantee that internal respiration is taking place
Ventilation without oxygenation can occur where oxygen levels have been depleted (eg, mines, confined spaces).<br>
slide36. Respiration (1 of 4) Actual exchange of oxygen and carbon dioxide in the alveoli and tissues of the body
Cells take energy from nutrients through metabolism.<br>
slide37. Respiration (2 of 4) External respiration (pulmonary respiration)
Brings fresh air into the respiratory system
Exchanges oxygen and carbon dioxide between alveoli and blood in pulmonary capillaries © Jones & Bartlett Learning.<br>
slide38. Respiration (3 of 4) Internal respiration
Exchange of oxygen and carbon dioxide between systemic circulatory system and cells © Jones & Bartlett Learning.<br>
slide39. Respiration (4 of 4) Eventually all cells will die if deprived of oxygen. © Jones & Bartlett Learning.<br>
slide40. Pathophysiology of Respiration (1 of 7) Factors in the nervous system
Chemoreceptors monitor levels of:
Oxygen
Carbon dioxide
Hydrogen ions
pH of cerebrospinal fluid
Provide feedback to the respiratory centers<br>
slide41. Pathophysiology of Respiration (2 of 7) Ventilation/perfusion ratio and mismatch
Air and blood flow must be directed to the same place at the same time.
Ventilation and perfusion must be matched.
Failure to match is the cause of most abnormalities of oxygen and carbon dioxide exchange.<br>
slide42. Pathophysiology of Respiration (3 of 7) Ventilation/perfusion ratio and mismatch (cont’d)
Gas exchange does not take place.
Lack of O2 in bloodstream
CO2 is recirculated within bloodstream
Severe hypoxemia can occur<br>
slide43. Pathophysiology of Respiration (4 of 7) Factors affecting pulmonary ventilation
Maintaining a patent airway is critical.
Intrinsic factors:
Infections
Allergic reactions
Unresponsiveness (tongue obstruction)
Extrinsic factors:
Trauma
Foreign body airway obstruction<br>
slide44. Pathophysiology of Respiration (5 of 7) Factors affecting respiration
External factors:
Atmospheric pressure
Partial pressure of O2
Internal factors:
Pneumonia
Pulmonary edema
COPD/emphysema<br>
slide45. Pathophysiology of Respiration (6 of 7) Circulatory compromise
Trauma emergencies typically obstruct blood flow to individual cells and tissue:
Pulmonary embolism
Simple or tension pneumothorax
Open pneumothorax
Hemothorax
Hemopneumothorax<br>
slide46. Pathophysiology of Respiration (7 of 7) Circulatory compromise (cont’d)
Other causes:
Blood loss
Anemia
Hypovolemic shock
Vasodilatory shock<br>
slide47. Patient Assessment (1 of 7) Recognizing adequate breathing
Between 12 and 20 breaths/min
Regular pattern of inhalation and exhalation
Bilateral clear and equal lung sounds
Regular, equal chest rise and fall
Adequate depth (tidal volume)<br>
slide48. Patient Assessment (2 of 7) Recognizing abnormal breathing
Fewer than 12 breaths/min
More than 20 breaths/min
Irregular rhythm
Diminished, absent, or noisy auscultated breath sounds
Reduced flow of expired air at nose and mouth<br>
slide49. Patient Assessment (3 of 7) Recognizing abnormal breathing (cont’d)
Unequal or inadequate chest expansion
Increased effort of breathing
Shallow depth
Skin that is pale, cyanotic, cool, or moist
Skin pulling in around ribs or above clavicles during inspiration<br>
slide50. Patient Assessment (4 of 7) A patient may appear to be breathing after the heart has stopped.
Called agonal gasps
Cheyne-Stokes respirations are often seen in patients with stroke or head injury. © Jones & Bartlett Learning.<br>
slide51. Patient Assessment (5 of 7) Ataxic respirations
Irregular or unidentifiable pattern
May follow serious head injuries
Kussmaul respirations
Deep, rapid respirations
Common in patients with metabolic acidosis
Patients with inadequate breathing need to be treated immediately.<br>
slide52. Patient Assessment (6 of 7) Assessment of respiration
Even though the patient may be ventilating appropriately, respiration may be compromised.
Level of consciousness and skin color are excellent indicators of respiration.<br>
slide53. Patient Assessment (7 of 7) Assessment of respiration (cont’d)
Also consider oxygenation
Pulse oximetry is considered a routine vital sign
Can be used as part of any patient assessment<br>
slide54. Opening the Airway (1 of 3) Emergency medical care begins with ensuring an open airway.
Rapidly assess whether an unconscious patient has an open airway and is breathing adequately.
Position the patient correctly.
Supine position is most effective.<br>
slide55. Opening the Airway (2 of 3) Unconscious patients should be moved as a unit.
Most common airway obstruction is the tongue. © Jones & Bartlett Learning.<br>
slide56. Opening the Airway (3 of 3) Other causes of airway obstruction:
Dentures (false teeth)
Blood
Vomitus
Mucus
Food
Other foreign objects<br>
slide57. Head Tilt–Chin Lift Maneuver (1 of 2) Will open the airway in most patients
For patients who have not sustained or are not suspected of having sustained trauma © Jones & Bartlett Learning.<br>
slide58. Head Tilt–Chin Lift Maneuver (2 of 2) Follow these steps:
With the patient supine, position yourself beside the patient’s head.
Place the heel of one hand on the forehead, and apply firm backward pressure with the palm.
Place the fingertips of the other hand under the lower jaw.
Lift the chin upward, with the entire lower jaw.<br>
slide59. Jaw-Thrust Maneuver (1 of 4) If you suspect a cervical spine injury, use this maneuver.
Follow these steps:
Kneel above the patient’s head.
Place your fingers behind the angles of the lower jaw.
Move the jaw upward.
Use your thumbs to help position the jaw.<br>
slide60. Jaw-Thrust Maneuver (2 of 4) Once the airway has been opened, look at the chest and observe for movement.
With complete airway obstruction, there will be no movement of air.
Chest wall movement alone does not indicate that breathing is adequate.<br>
slide61. Jaw-Thrust Maneuver (3 of 4) Even if the airway is opened, the mouth may be closed.
For the cross-finger technique:
Place the tips of your index finger and thumb on the patient’s teeth.
Push your thumb on the lower teeth.
Push index finger on the upper teeth.
The index finger and the thumb cross over each other.<br>
slide62. Jaw-Thrust Maneuver (4 of 4) © Jones & Bartlett Learning. Courtesy of MIEMSS. © Jones & Bartlett Learning. Courtesy of MIEMSS.<br>
slide63. Suctioning (1 of 2) You must keep the airway clear to ventilate properly.
Portable, hand-operated, and fixed equipment is essential for resuscitation. © Jones & Bartlett Learning. Courtesy of MIEMSS. © Jones & Bartlett Learning. © Jones & Bartlett Learning.<br>
slide64. Suctioning (2 of 2) A portable or fixed unit should have:
Wide-bore, thick-walled, nonkinking tubing
Plastic, rigid pharyngeal suction tips
Nonrigid plastic catheters
A nonbreakable, disposable collection bottle
Water supply for rinsing the tips<br>
slide65. Techniques of Suctioning (1 of 4) Inspect the equipment regularly.
To operate the suction unit:
Check the unit for proper assembly of its parts.
Test the suctioning unit to ensure vacuum pressure of more than 300 mm Hg.
Select and attach the appropriate suction catheter to the tubing.<br>
slide66. Techniques of Suctioning (2 of 4) Never suction the mouth or nose for more than 15 seconds at one time for adult patients, 10 seconds for children, and 5 seconds for infants.
Suctioning can result in hypoxia.<br>
slide67. Techniques of Suctioning (3 of 4) When patients have secretions or vomitus that cannot be suctioned easily:
Remove the catheter from the patient’s mouth.
Log roll the patient to the side.
Clear the mouth carefully with a gloved finger.<br>
slide68. Techniques of Suctioning (4 of 4) If the patient produces frothy secretions as quickly as you can suction them:
Suction the airway for 15 seconds (less in infants and children).
Ventilate for 2 minutes.
Continue this alternating pattern until all secretions have been cleared.<br>
slide69. Basic Airway Adjuncts (1 of 4) Prevent obstruction by the tongue and allow for passage of air and oxygen to the lungs
Oropharyngeal airways
Keep the tongue from blocking the upper airway
Make it easier to suction the oropharynx if necessary<br>
slide70. Basic Airway Adjuncts (2 of 4) Oropharyngeal airways (cont’d)
Indications:
Unresponsive patients without a gag reflex
Apneic patients being ventilated with a bag-valve mask (BVM)
Contraindications:
Conscious patients
Any patient who has an intact gag reflex<br>
slide71. Basic Airway Adjuncts (3 of 4) Nasopharyngeal airways
Indications:
Patient who is unresponsive or has an altered LOC
Patient who has an intact gag reflex
Patient who is unable to maintain his or her own airway spontaneously<br>
slide72. Basic Airway Adjuncts (4 of 4) Nasopharyngeal airways (cont’d)
Indications:
Semiconscious or unconscious patients with an intact gag reflex
Patients who will not tolerate an oropharyngeal airway
Contraindications:
Severe head injury with blood in the nose
History of fractured nasal bone<br>
slide73. Maintaining the Airway (1 of 2) Use the recovery position.
Used to help maintain a clear airway in an unconscious patient who is not injured and is breathing on his or her own © Jones & Bartlett Learning. Courtesy of MIEMSS.<br>
slide74. Maintaining the Airway (2 of 2) Take the following steps:
Roll the patient onto either side so that the head, shoulder, and torso move at the same time without twisting.
Extend the patient’s lower arm and place the upper hand under his or her cheek.
Not appropriate for patients with suspected spinal injuries<br>
slide75. Supplemental Oxygen (1 of 9) Always give oxygen to patients who are hypoxic/
Some tissues and organs need a constant supply of oxygen to function normally.
Never withhold oxygen from any patient who might benefit from it.<br>
slide76. Supplemental Oxygen (2 of 9) Supplemental oxygen equipment
Become familiar with how oxygen is stored.
Oxygen cylinders contain compressed gas.
Liquid oxygen is becoming a more commonly used alternative.<br>
slide77. Supplemental Oxygen (3 of 9) Safety considerations
Handle gas cylinders carefully.
Make sure the correct pressure regulator is firmly attached before transport.
A puncture hole in a tank can turn it into a deadly missile.
Secure cylinders when stored on ambulance and when in use during transport.<br>
slide78. Supplemental Oxygen (4 of 9) Pin-indexing system
Prevents such mistakes as an oxygen regulator being accidentally connected to a carbon dioxide cylinder
Every cylinder of a specific gas type has a given pattern and a given number of pins.<br>
slide79. Supplemental Oxygen (5 of 9) Pressure regulators
Reduce the cylinder’s pressure to a useful therapeutic range
Usually 40 to 70 psi
Final attachment for delivering the gas is either a quick-connect female fitting or a flowmeter.<br>
slide80. Supplemental Oxygen (6 of 9) Flowmeters
Usually permanently attached to pressure regulators on emergency medical equipment
Pressure-compensated flowmeter
Bourdon-gauge flowmeter<br>
slide81. Supplemental Oxygen (7 of 9) Hazards of supplemental oxygen:
Combustion
Oxygen toxicity<br>
slide82. Supplemental Oxygen (8 of 9) Combustion
Oxygen does not burn or explode, but does speed up the combustion process.
Keep any sources of fire away.
Make sure the area is adequately ventilated.
Never leave an oxygen cylinder standing unattended.<br>
slide83. Supplemental Oxygen (9 of 9) Oxygen toxicity
Not all patients need high concentrations of oxygen.
Oxygen can have detrimental effects in patients with certain illnesses (COPD).
When pulse oximetry available, tailor oxygen therapy; administer the minimum amount necessary to maintain oxygen saturation at or above 94%.<br>
slide84. Oxygen-Delivery Equipment Nonrebreathing masks
Bag-valve masks
Nasal cannulas<br>
slide85. Nonrebreathing Masks (1 of 2) Preferred way to give oxygen in the prehospital setting
To patients who are breathing adequately but are suspected of having hypoxia
Combination mask and reservoir bag system © Jones & Bartlett Learning.<br>
slide86. Nonrebreathing Masks (2 of 2) Make sure the reservoir bag is full before placing the mask on the patient.
Adjust the flow rate so the bag does not collapse when the patient inhales.
Usually 10 to 15 L/min
When oxygen therapy is discontinued, remove the mask.<br>
slide87. Nasal Cannulas (1 of 2) Deliver oxygen through two small, tubelike prongs that fit into the nostrils
Can provide 24% to 44% inspired oxygen when the flowmeter is set at 1–6 L/min © Jones & Bartlett Learning. Courtesy of MIEMSS.<br>
slide88. Nasal Cannulas (2 of 2) When you anticipate a long transport time, consider using humidification.
Limited use in the prehospital setting
A patient who breathes through the mouth, or has a nasal obstruction, will not benefit.
Always try to give high-flow oxygen through a nonrebreathing mask.<br>
slide89. Partial Rebreathing Masks Similar to nonrebreathing masks
There is no one-way valve between the mask and the reservoir.
Patients rebreathe a small amount of exhaled air.
Advantageous if patient is hyperventilating<br>
slide90. Venturi Masks (1 of 2) A number of settings can vary the percentage of oxygen while a constant flow is maintained.
Accomplished by the Venturi principle © Jones & Bartlett Learning. Courtesy of MIEMSS.<br>
slide91. Venturi Masks (2 of 2) Medium-flow devices that deliver 24% to 40% oxygen
Useful in long-term management of physiologically stable patients<br>
slide92. Tracheostomy Masks (1 of 2) Patients with tracheostomies do not breathe through their mouth and nose. © Jones & Bartlett Learning.<br>
slide93. Tracheostomy Masks (2 of 2) Tracheostomy masks cover the tracheostomy hole and have a strap that goes around the neck.
May not be available in an emergency setting
Improvise by using a face mask instead, placed at the tracheostomy opening.<br>
slide94. Humidification Some EMS systems provide humidified oxygen.
During extended transport
Many EMS systems do not use humidified oxygen in the prehospital setting.
For certain conditions such as croup
Dry oxygen is not considered harmful for short-term use.<br>
slide95. Assisted and Artificial Ventilation (1 of 17) Probably the most important skills in EMS at any level
Basic airway and ventilation techniques are extremely effective.
Follow standard precautions as needed when managing a patient’s airway.<br>
slide96. Assisted and Artificial Ventilation (2 of 17) Assisting ventilation in respiratory distress/failure
Intervene quickly to prevent further deterioration.
Two treatment options: assisted ventilation and CPAP<br>
slide97. Assisted and Artificial Ventilation (3 of 17) Signs and symptoms of inadequate ventilation:
Altered mental status
Inadequate minute volume
Excessive accessory muscle use and fatigue<br>
slide98. Assisted and Artificial Ventilation (4 of 17) When assisting with a BVM:
Explain the procedure to the patient.
Place the mask over the nose and mouth.
Squeeze the bag each time the patient breathes.
After the initial 5 to 10 breaths, deliver an appropriate tidal volume.
Maintain an adequate minute volume.<br>
slide99. Assisted and Artificial Ventilation (5 of 17) Artificial ventilation
Patients in respiratory arrest need immediate treatment to live.
Once a patient is not breathing, begin artificial ventilation immediately via:
Mouth-to-mask technique
One- or two-person BVM
Manually triggered ventilation device<br>
slide100. Assisted and Artificial Ventilation (6 of 17) Normal ventilation versus positive-pressure ventilation
In normal breathing, the diaphragm contracts and negative pressure is generated in the chest cavity.
Positive-pressure ventilation generated by a device (such as a BVM) that forces air into the chest cavity.<br>
slide101. Assisted and Artificial Ventilation (7 of 17) With positive-pressure ventilation:
Increased intrathoracic pressure reduces the blood pumped by the heart.
More volume is required to have the same effects as normal breathing.
Air is forced into the stomach, causing gastric distention.<br>
slide102. Assisted and Artificial Ventilation (8 of 17) Mouth-to-mouth and mouth-to-mask ventilation
Barrier device is routinely used in mouth-to-mouth ventilations
Mask with an oxygen inlet provides oxygen during mouth-to-mask ventilation<br>
slide103. Assisted and Artificial Ventilation (9 of 17) Signs of adequate ventilations:
Patient’s color improves
Chest rises adequately
No resistance when ventilating
You hear and feel air escape as the patient exhales<br>
slide104. Assisted and Artificial Ventilation (10 of 17) Bag-valve mask
Most common method used to ventilate patients in the field
Provides less tidal volume than mouth-to-mask ventilation
An experienced EMT can provide adequate tidal volume. © American Academy of Orthopaedic Surgeons.<br>
slide105. Bag-valve mask (cont’d)
If you have difficulty ventilating with a BVM, switch to another method.
The volume of oxygen is based on observing chest rise and fall.
Whenever possible, work with your partner to provide BVM ventilation. Assisted and Artificial Ventilation (11 of 17)<br>
slide106. Gastric distention
Occurs when artificial ventilation fills the stomach with air
Most commonly affects children
Most likely to occur when you ventilate the patient too forcefully or too rapidly
May also occur when the airway is obstructed Assisted and Artificial Ventilation (12 of 17)<br>
slide107. Assisted and Artificial Ventilation (13 of 17) Gastric distention (cont’d)
To prevent or alleviate distention:
Ensure the patient’s airway is appropriately positioned
Ventilate at the appropriate rate
Ventilate with the appropriate volume
If the stomach appears distended, recheck and reposition the head and perform rescue breathing.<br>
slide108. Assisted and Artificial Ventilation (14 of 17) Passive ventilation
Expansion and contraction create a “pump” for air movement.
Benefits patients who are receiving chest compressions
Can be enhanced using oropharyngeal airway and supplemental oxygen<br>
slide109. Assisted and Artificial Ventilation (15 of 17) Manually triggered ventilation devices
Also known as flow-restricted, oxygen-powered ventilation devices
Allow a single rescuer to use both hands to maintain the mask-to-face seal while providing positive-pressure ventilation
Reduces rescuer fatigue<br>
slide110. Assisted and Artificial Ventilation (16 of 17) Manually triggered ventilation devices (cont’d)
May be difficult to maintain adequate ventilation without assistance
Should not be used routinely
Should not be used in patients with COPD or suspected cervical spine or chest injuries<br>
slide111. Assisted and Artificial Ventilation (17 of 17) Automatic transport ventilator (ATV)/resuscitator
Manually triggered device attached to a control box
Allows the variables of ventilation to be set
Lacks the sophisticated control of a hospital ventilator
Frees the EMT to perform other tasks<br>
slide112. Continuous Positive Airway Pressure (CPAP) (1 of 7) Noninvasive ventilatory support for respiratory distress
Many people diagnosed with obstructive sleep apnea wear a CPAP unit at night.
Becoming widely used at the EMT level © 3660 Group/Custom Medical Stock Photo.<br>
slide113. Continuous Positive Airway Pressure (CPAP) (2 of 7) Mechanism
Increases pressure in the lungs
Opens collapsed alveoli
Pushes more oxygen across the alveolar membrane
Forces interstitial fluid back into the pulmonary circulation<br>
slide114. Continuous Positive Airway Pressure (CPAP) (3 of 7) Mechanism (cont’d)
Therapy is delivered through a face mask held to the head with a strapping system.
Use caution with patients with potentially low blood pressure.<br>
slide115. Continuous Positive Airway Pressure (CPAP) (4 of 7) Indications
Patient is alert and able to follow commands
Patient displays obvious signs of moderate to severe respiratory distress
Patient is breathing rapidly
Pulse oximetry reading is less than 90%<br>
slide116. Continuous Positive Airway Pressure (CPAP) (5 of 7) Contraindications
Patient in respiratory arrest
Signs and symptoms of pneumothorax or chest trauma
Patient who has a tracheostomy
Active gastrointestinal bleeding or vomiting
Patient who is unable to follow verbal commands.<br>
slide117. Continuous Positive Airway Pressure (CPAP) (6 of 7) Application
Resistance creates back pressure that pushes open smaller airway structures as the patient exhales
7.0 to 10.0 cm H2O is acceptable.<br>
slide118. Continuous Positive Airway Pressure (CPAP) (7 of 7) Complications
Some patients may find CPAP claustrophobic.
Risk of pneumothorax
Can lower the patient’s blood pressure
If the patient shows signs of deterioration, remove CPAP and begin positive-pressure ventilation using a BVM.<br>
slide119. Special Considerations (1 of 3) Stomas and tracheostomy tubes
Patients who have had a laryngectomy have a permanent tracheal stoma.
Known as a tracheostomy © A.A.O.S. 1982 .<br>
slide120. Special Considerations (2 of 3) Stomas and tracheostomy tubes (cont’d)
Neither the head tilt–chin lift maneuver nor the jaw-thrust maneuver is required.
If the patient has a tracheostomy tube, ventilate through the tube with a BVM.<br>
slide121. Special Considerations (3 of 3) Stomas and tracheostomy tubes (cont’d)
If the patient has a stoma but no tube is in place, use an infant or child mask with your BVM to make a seal over the stoma.<br>
slide122. Foreign Body Airway Obstruction (1 of 7) If a foreign body completely blocks the airway, it is a true emergency.
Will result in death if not treated immediately
In an adult, usually occurs during a meal
In a child, can occur while eating, playing with small toys, or crawling<br>
slide123. Foreign Body Airway Obstruction (2 of 7) The tongue is the most common airway obstruction in an unconscious patient.
Causes of airway obstruction that do not involve foreign bodies:
Swelling, from infection or acute allergic reaction
Trauma (tissue damage from injury)<br>
slide124. Foreign Body Airway Obstruction (3 of 7) Early recognition is crucial.
Mild airway obstruction
Patients can still exchange air, but will have respiratory distress.
Noisy breathing, wheezing, coughing
With good air exchange, do not interfere with the patient’s efforts to expel the object on his or her own.<br>
slide125. Foreign Body Airway Obstruction (4 of 7) Mild airway obstruction (cont’d)
With poor air exchange, the patient may have increased difficulty breathing, stridor, and cyanosis.
Treat immediately.<br>
slide126. Foreign Body Airway Obstruction (5 of 7) Severe airway obstruction
Patients cannot breathe, talk, or cough.
Patient may use the universal distress signal, begin to turn cyanotic, and have extreme difficulty breathing. © Jones & Bartlett Learning. Courtesy of MIEMSS.<br>
slide127. Foreign Body Airway Obstruction (6 of 7) Severe airway obstruction (cont’d)
Provide immediate treatment to the conscious patient.
If not treated, the patient will become unconscious and die.
If the patient is unresponsive, not breathing, and has no pulse, begin CPR with chest compressions.<br>
slide128. Emergency Medical Care for Foreign Body Airway Obstruction Perform a head tilt–chin lift maneuver to clear a tongue obstruction.
Large obstructions should be swept forward out of the mouth with your gloved index finger.
Abdominal thrusts are the most effective method of dislodging and forcing out an object.<br>
slide129. Dental Appliances Can cause an airway obstruction
Examples: crown, bridge, dentures, piece of braces
Manually remove the appliance before providing ventilations.
Leave well-fitting dentures in place.
Loose dentures interfere with the process and should be removed.<br>
slide130. Facial Bleeding Airway problems can be particularly challenging in patients with serious facial bleeding.
The blood supply to the face is very rich.
Injuries can result in severe tissue swelling and bleeding into the airway.
Control bleeding with direct pressure, and suction as necessary.<br>
slide131. Review Breathing is controlled by an area in the:
lungs.
brain stem.
spinal cord.
diaphragm.<br>
slide132. Review Answer: B
Rationale: The pons and the medulla are the respiratory centers in the brain stem that control breathing.<br>
slide133. Review (1 of 2) Breathing is controlled by an area in the:
lungs. Rationale: The lungs contain small pockets called alveoli where the exchange of oxygen and carbon dioxide takes place.
brain stem. Rationale: Correct answer<br>
slide134. Review (2 of 2) Breathing is controlled by an area in the:
spinal cord. Rationale: Impulses are sent down the spinal cord from the brain stem.
diaphragm. Rationale: The diaphragm receives the impulses that cause it to contract and bring air in.<br>
slide135. Review The EMT should assess a patient’s tidal volume by:
observing for adequate chest rise.
assessing the facial area for cyanosis.
counting the patient’s respiratory rate.
measuring the patient’s oxygen saturation.<br>
slide136. Review Answer: A
Rationale: Tidal volume—the volume of air that is moved into or out of the lungs in a single breath—is assessed by observing for adequate chest rise. If shallow chest rise is noted, the patient’s tidal volume is likely reduced.<br>
slide137. Review (1 of 2) The EMT should assess a patient’s tidal volume by:
observing for adequate chest rise. Rationale: Correct answer
assessing the facial area for cyanosis. Rationale: Cyanosis is an indication of hypoxia, rather than tidal volume.<br>
slide138. Review (2 of 2) The EMT should assess a patient’s tidal volume by:
counting the patient’s respiratory rate. Rationale: Counting the respiratory rate gives you minute volume: the number of times a patient breaths in 1 minute.
measuring the patient’s oxygen saturation. Rationale: Oxygen saturation is an indication of tissue perfusion, which is the amount of oxygen attached to the hemoglobin.<br>
slide139. Review In an otherwise healthy individual, the primary stimulus to breathe is a(n):
increased level of oxygen in the blood.
decreased level of oxygen in the blood.
increased level of carbon dioxide in the blood.
decreased level of carbon dioxide in the blood.<br>
slide140. Review Answer: C
Rationale: Under control of the brain stem, rising levels of carbon dioxide in arterial blood normally stimulate breathing in an otherwise healthy patient.<br>
slide141. Review (1 of 2) In an otherwise healthy individual, the primary stimulus to breathe is a(n):
increased level of oxygen in the blood. Rationale: Increased levels of oxygen can be a result of hyperventilation syndrome.
decreased level of oxygen in the blood. Rationale: This is typically not normal in healthy individuals. It can be a sign of inadequate breathing and results in hypoxia.<br>
slide142. Review (2 of 2) In an otherwise healthy individual, the primary stimulus to breathe is a(n):
increased level of carbon dioxide in the blood. Rationale: Correct answer
decreased level of carbon dioxide in the blood. Rationale: This is usually not seen in healthy adults. It is typically a result of hyperventilation syndrome.<br>
slide143. Review Signs of adequate breathing in the adult include all of the following, EXCEPT:
pink, warm, dry skin.
shallow chest rise.
symmetrical chest movement.
a respiratory rate of 16 breaths/min.<br>
slide144. Review Answer: B
Rationale: Signs of inadequate breathing in the adult include a respiratory rate less than 12 breaths/min or greater than 20 breaths/min, shallow chest rise (reduced tidal volume), cyanosis, and asymmetrical chest movement (both sides of the chest do not move equally).<br>
slide145. Review (1 of 2) Signs of adequate breathing in the adult include all of the following, EXCEPT:
pink, warm, dry skin. Rationale: This shows that breathing and perfusion are adequate.
shallow chest rise. Rationale: Correct answer<br>
slide146. Review (2 of 2) Signs of adequate breathing in the adult include all of the following, EXCEPT:
symmetrical chest movement. Rationale: This shows that the mechanical process of breathing is adequate, equal, and symmetrical bilaterally.
a respiratory rate of 16 breaths/min. Rationale: This is a normal respiratory rate for an adult.<br>
slide147. Review During insertion of an oropharyngeal airway into an unconscious patient, she begins to vomit. The first thing you should do is:
turn the patient on her side.
remove the airway at once.
suction the patient’s mouth.
use a smaller-sized oral airway.<br>
slide148. Review Answer: A
Rationale: Whenever an unconscious patient begins to vomit—whether you are inserting an oropharyngeal airway or not—you should immediately turn the patient onto his or her side; this will allow drainage of vomit from the mouth and prevent aspiration. After the patient is on his or her side, remove the oral airway and suction the mouth.<br>
slide149. Review (1 of 2) During insertion of an oropharyngeal airway into an unconscious patient, she begins to vomit. The first thing you should do is:
turn the patient on her side. Rationale: Correct answer
remove the airway at once. Rationale: Remove the airway after the patient has been rolled onto her side.<br>
slide150. Review (2 of 2) During insertion of an oropharyngeal airway into an unconscious patient, she begins to vomit. The first thing you should do is:
suction the patient’s mouth. Rationale: This must be completed after the patient is positioned and the airway is removed.
use a smaller-sized oral airway. Rationale: Oropharyngeal airways are contraindicated if the patient has a gag reflex.<br>
slide151. Review In which of the following patients would a nasopharyngeal airway be contraindicated?
A semiconscious patient with a gag reflex
An unconscious patient with an intact gag reflex
A patient who fell 20 feet and landed on his or her head
An unconscious patient who gags when you insert an oral airway<br>
slide152. Review Answer: C
Rationale: Nasopharyngeal (nasal) airways are contraindicated in patients with severe head or facial injuries and should be used with caution in patients who have delicate nasal membranes or are prone to nosebleeds. The nasal airway is better tolerated in patients who are semiconscious and/or those with a gag reflex.<br>
slide153. Review (1 of 2) In which of the following patients would a nasopharyngeal airway be contraindicated?
A semiconscious patient with a gag reflex Rationale: This airway works best with an intact gag reflex.
An unconscious patient with an intact gag reflex Rationale: This airway works best with an intact gag reflex.<br>
slide154. Review (2 of 2) In which of the following patients would a nasopharyngeal airway be contraindicated?
A patient who fell 20 feet and landed on his or her head Rationale: Correct answer
An unconscious patient who gags when you insert an oral airway Rationale: This airway can be used when the patient gags with an oral airway.<br>
slide155. Review You are delivering oxygen to a patient with a nasal cannula at 4 L/min when he begins to complain of a burning sensation in his nose. You should:
A. remove the nasal cannula.
B. apply a nonrebreathing mask.
C. attach an oxygen humidifier.
D. increase the flow rate to 6 L/min.<br>
slide156. Review Answer: C
Rationale: Administering “dry” oxygen through a nasal cannula—especially over a prolonged period of time—can result in drying of the nasal membranes, in which case the patient might complain of a burning sensation in the nose. Humidified oxygen will serve to keep the nasal membranes moist.<br>
slide157. Review (1 of 2) You are delivering oxygen to a patient with a nasal cannula at 4 L/min when he begins to complain of a burning sensation in his nose. You should:
remove the nasal cannula. Rationale: The oxygen should be humidified.
apply a nonrebreathing mask. Rationale: This can still cause an irritation due to providing “dry” oxygen.<br>
slide158. Review (2 of 2) You are delivering oxygen to a patient with a nasal cannula at 4 L/min when he begins to complain of a burning sensation in his nose. You should:
attach an oxygen humidifier. Rationale: Correct answer
increase the flow rate to 6 L/min. Rationale: The oxygen should be humidified.<br>
slide159. Review A patient is found unconscious after falling from a third-floor window. His respirations are slow and irregular. You should:
place him in the recovery position.
apply oxygen via a nonrebreathing mask.
suction his airway for up to 15 seconds.
assist his breathing with a bag-mask device.<br>
slide160. Review Answer: D
Rationale: The patient is not breathing adequately. Slow, irregular respirations will not result in adequate oxygenation. You should assist the patient’s breathing with a bag-valve mask attached to 100% oxygen. Suctioning is indicated if the patient has blood or other liquids in the airway; there is no evidence of this in the scenario.<br>
slide161. Review (1 of 2) A patient is found unconscious after falling from a third-floor window. His respirations are slow and irregular. You should:
place him in the recovery position. Rationale: Due to the significant MOI, the patient should be placed supine on a long backboard with the head immobilized.
apply oxygen via a nonrebreathing mask. Rationale: A BVM device is indicated if the patient’s respirations are less than 8 breaths/min.<br>
slide162. Review (2 of 2) A patient is found unconscious after falling from a third-floor window. His respirations are slow and irregular. You should:
suction his airway for up to 15 seconds. Rationale: Suction is indicated if a patient has blood or other secretions in the airway.
assist his breathing with a bag-mask device. Rationale: Correct answer<br>
slide163. Review When ventilating an apneic adult with a bag-valve mask, you should squeeze the bag:
until it is empty.
over a period of 2 seconds.
at a rate of 20 breaths/min.
until visible chest rise is noted.<br>
slide164. Review Answer: D
Rationale: When ventilating any apneic patient with a bag-valve mask, you should squeeze the bag over a period of 1 second and observe for visible chest rise. Ventilate the apneic adult at a rate of 10 to 12 breaths/min (one breath every 5 seconds). Ventilate infants and children at a rate of 12 to 20 breaths/min (one breath every 3 seconds).<br>
slide165. Review (1 of 2) When ventilating an apneic adult with a bag-valve mask, you should squeeze the bag:
until it is empty. Rationale: An appropriately sized bag for an adult will not totally empty.
over a period of 2 seconds. Rationale: You should squeeze the bag over a period of 1 second.<br>
slide166. Review (2 of 2) When ventilating an apneic adult with a bag-valve mask, you should squeeze the bag:
at a rate of 20 breaths/min. Rationale: Ventilate the apneic adult at a rate of 10 to 12 breaths/min (or one breath every 5 seconds).
until visible chest rise is noted. Rationale: Correct answer<br>
slide167. Review You and your partner are ventilating an apneic adult when you notice that his stomach is becoming distended. You should:
suction his airway for up to 15 seconds.
reposition his head.
increase the rate and volume of your ventilations.
decrease your ventilation rate but use more volume.<br>
slide168. Review Answer: B
Rationale: Gastric distention occurs when air enters the stomach. Severe gastric distention can result in vomiting and aspiration if not recognized and treated. To minimize the amount of air that enters the stomach during ventilations, you should reposition the patient’s head.<br>
slide169. Review (1 of 2) You and your partner are ventilating an apneic adult when you notice that his stomach is becoming distended. You should:
suction his airway for up to 15 seconds. Rationale: Suctioning is indicated when there is blood or secretions in the airway.
reposition his head. Rationale: Correct answer<br>
slide170. Review (2 of 2) You and your partner are ventilating an apneic adult when you notice that his stomach is becoming distended. You should:
increase the rate and volume of your ventilations. Rationale: This action may result in even more air going into the stomach.
decrease your ventilation rate but use more volume. Rationale: This action may result in even more air going into the stomach.<br>