
Constructing perpendicular bisectors using
LO
Published · 47 slides · 0 views
1 / 1

Description
Constructing perpendicular bisectors using properties of rhombuses (from 6.4 Constructions) KS3 Mastery PD Materials: Exemplified Key Ideas Materials for use in the classroom or to support professional development discussions Summer 2021
Related Topics
Share
Embed code
Download this presentation From Below
"Constructing perpendicular bisectors using" is the property of its rightful owner. Permission is granted to download and print the materials on this website for personal, non-commercial use only, and to display it on your personal computer provided you do not modify the materials and that you retain all copyright notices contained in the materials. By downloading content from our website, you accept the terms of this agreement.
Presentation Transcript
01
Constructing perpendicular bisectors using properties of rhombuses (from 6.4 Constructions) KS3 Mastery PD Materials: Exemplified Key Ideas
Materials for use in the classroom or to support professional development discussions Summer 2021<br>
Materials for use in the classroom or to support professional development discussions Summer 2021<br>
02
About this resource These slides are designed to complement the 6.4 Constructions Core Concept document and its associated Theme Overview document 6 Geometry, both found in the Secondary Mastery Professional Development pages.
These slides re-present the key examples from the Core Concept document so that the examples can be used either directly in the classroom or with a group of teachers. There are prompt questions alongside the examples, and further clarification in the notes.
These slides do not fully replicate the Core Concept document, so should be used alongside it. Reference to specific page numbers, and to other useful NCETM resources, can be found in the notes for each slide.
This slide deck is not designed to be a complete PD session, rather it is a selection of resources that you can adapt and use as needed when planning a session with a group of teachers.<br>
These slides re-present the key examples from the Core Concept document so that the examples can be used either directly in the classroom or with a group of teachers. There are prompt questions alongside the examples, and further clarification in the notes.
These slides do not fully replicate the Core Concept document, so should be used alongside it. Reference to specific page numbers, and to other useful NCETM resources, can be found in the notes for each slide.
This slide deck is not designed to be a complete PD session, rather it is a selection of resources that you can adapt and use as needed when planning a session with a group of teachers.<br>
03
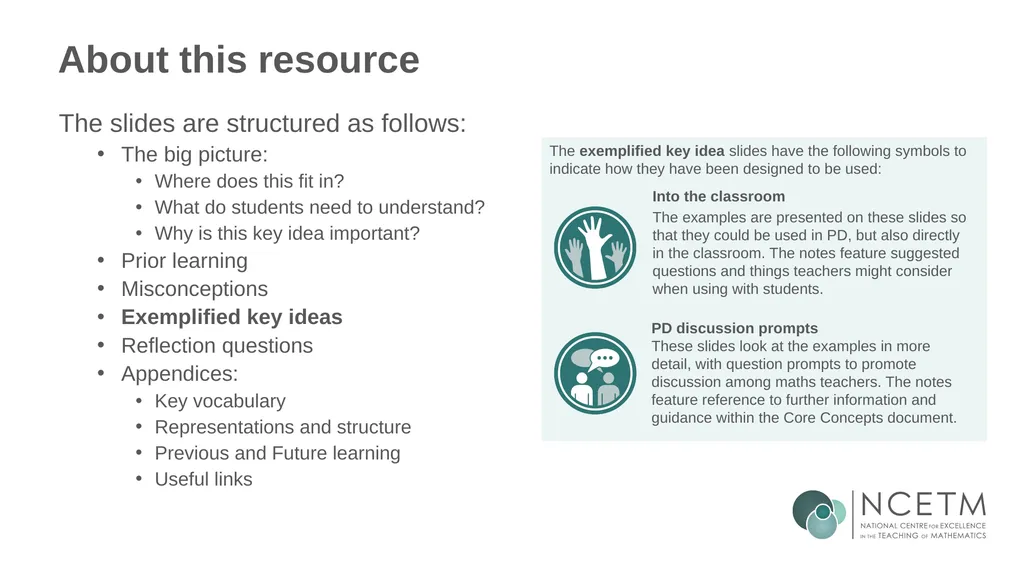
About this resource The slides are structured as follows:
The big picture:
Where does this fit in?
What do students need to understand?
Why is this key idea important?
Prior learning
Misconceptions
Exemplified key ideas
Reflection questions
Appendices:
Key vocabulary
Representations and structure
Previous and Future learning
Useful links The exemplified key idea slides have the following symbols to indicate how they have been designed to be used: Into the classroom
The examples are presented on these slides so that they could be used in PD, but also directly in the classroom. The notes feature suggested questions and things teachers might consider when using with students. PD discussion prompts
These slides look at the examples in more detail, with question prompts to promote discussion among maths teachers. The notes feature reference to further information and guidance within the Core Concepts document.<br>
The big picture:
Where does this fit in?
What do students need to understand?
Why is this key idea important?
Prior learning
Misconceptions
Exemplified key ideas
Reflection questions
Appendices:
Key vocabulary
Representations and structure
Previous and Future learning
Useful links The exemplified key idea slides have the following symbols to indicate how they have been designed to be used: Into the classroom
The examples are presented on these slides so that they could be used in PD, but also directly in the classroom. The notes feature suggested questions and things teachers might consider when using with students. PD discussion prompts
These slides look at the examples in more detail, with question prompts to promote discussion among maths teachers. The notes feature reference to further information and guidance within the Core Concepts document.<br>
04
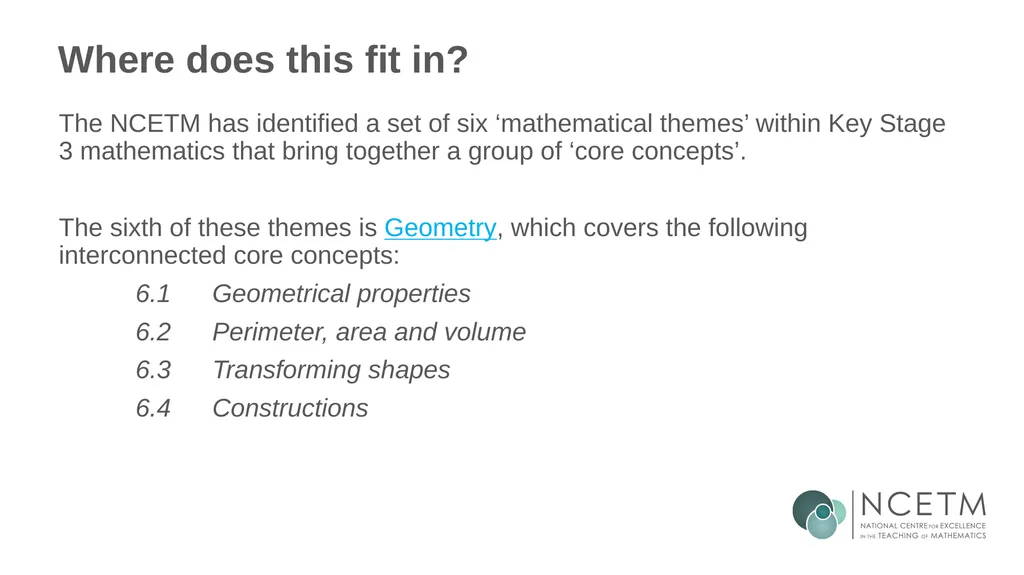
Where does this fit in? The NCETM has identified a set of six ‘mathematical themes’ within Key Stage 3 mathematics that bring together a group of ‘core concepts’.
The sixth of these themes is Geometry, which covers the following interconnected core concepts:
6.1 Geometrical properties
6.2 Perimeter, area and volume
6.3 Transforming shapes
6.4 Constructions<br>
The sixth of these themes is Geometry, which covers the following interconnected core concepts:
6.1 Geometrical properties
6.2 Perimeter, area and volume
6.3 Transforming shapes
6.4 Constructions<br>
05
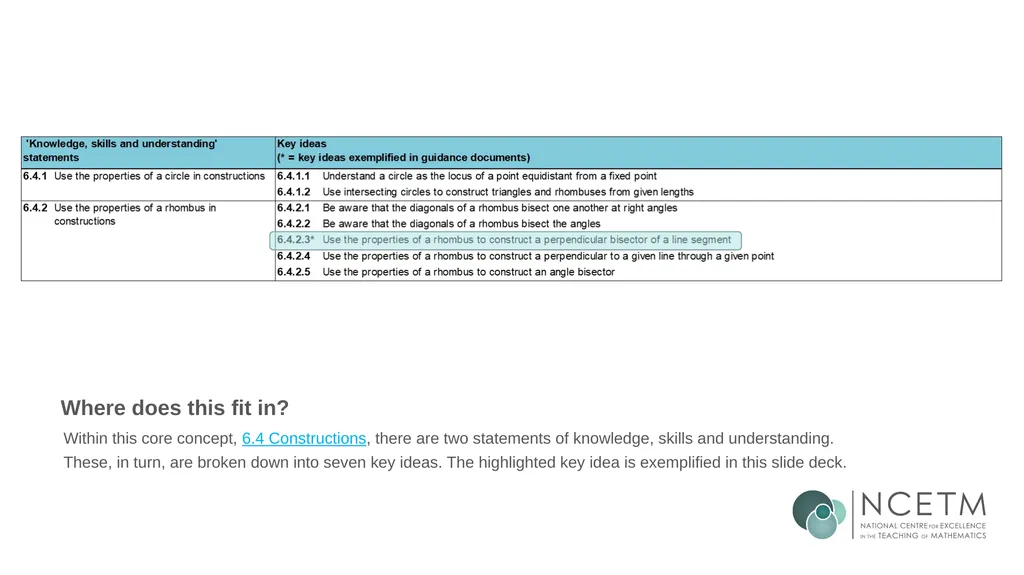
Where does this fit in? Within this core concept, 6.4 Constructions, there are two statements of knowledge, skills and understanding.
These, in turn, are broken down into seven key ideas. The highlighted key idea is exemplified in this slide deck.<br>
These, in turn, are broken down into seven key ideas. The highlighted key idea is exemplified in this slide deck.<br>
06
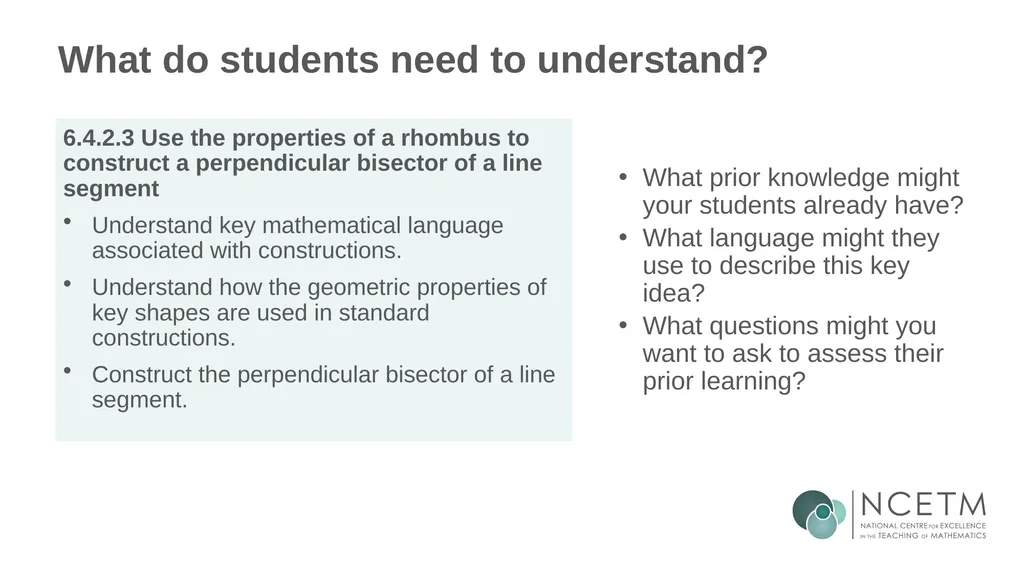
What do students need to understand? What prior knowledge might your students already have?
What language might they use to describe this key idea?
What questions might you want to ask to assess their prior learning? 6.4.2.3 Use the properties of a rhombus to construct a perpendicular bisector of a line segment
Understand key mathematical language associated with constructions.
Understand how the geometric properties of key shapes are used in standard constructions.
Construct the perpendicular bisector of a line segment.<br>
What language might they use to describe this key idea?
What questions might you want to ask to assess their prior learning? 6.4.2.3 Use the properties of a rhombus to construct a perpendicular bisector of a line segment
Understand key mathematical language associated with constructions.
Understand how the geometric properties of key shapes are used in standard constructions.
Construct the perpendicular bisector of a line segment.<br>
07
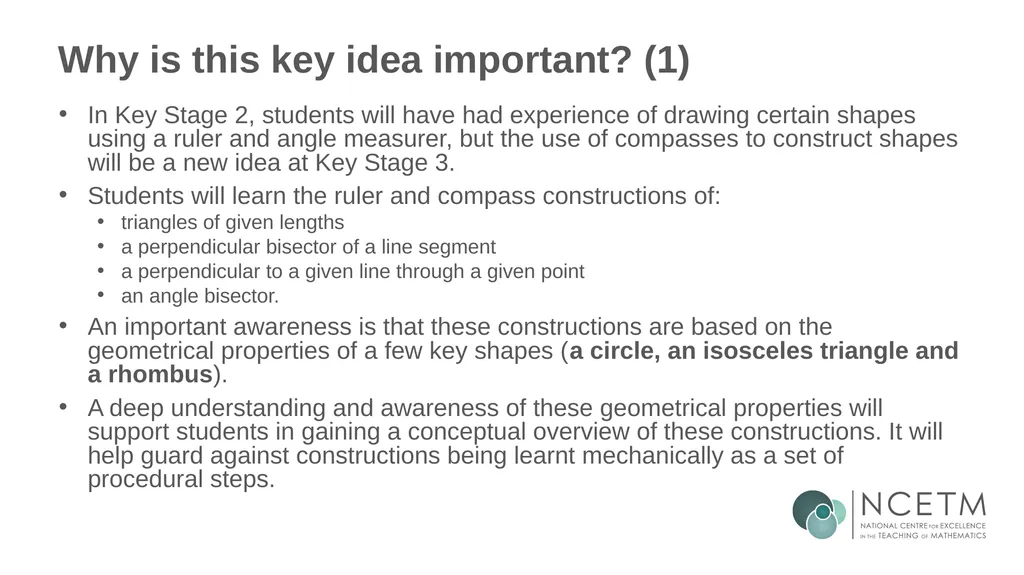
Why is this key idea important? (1) In Key Stage 2, students will have had experience of drawing certain shapes using a ruler and angle measurer, but the use of compasses to construct shapes will be a new idea at Key Stage 3.
Students will learn the ruler and compass constructions of:
triangles of given lengths
a perpendicular bisector of a line segment
a perpendicular to a given line through a given point
an angle bisector.
An important awareness is that these constructions are based on the geometrical properties of a few key shapes (a circle, an isosceles triangle and a rhombus).
A deep understanding and awareness of these geometrical properties will support students in gaining a conceptual overview of these constructions. It will help guard against constructions being learnt mechanically as a set of procedural steps.<br>
Students will learn the ruler and compass constructions of:
triangles of given lengths
a perpendicular bisector of a line segment
a perpendicular to a given line through a given point
an angle bisector.
An important awareness is that these constructions are based on the geometrical properties of a few key shapes (a circle, an isosceles triangle and a rhombus).
A deep understanding and awareness of these geometrical properties will support students in gaining a conceptual overview of these constructions. It will help guard against constructions being learnt mechanically as a set of procedural steps.<br>
08
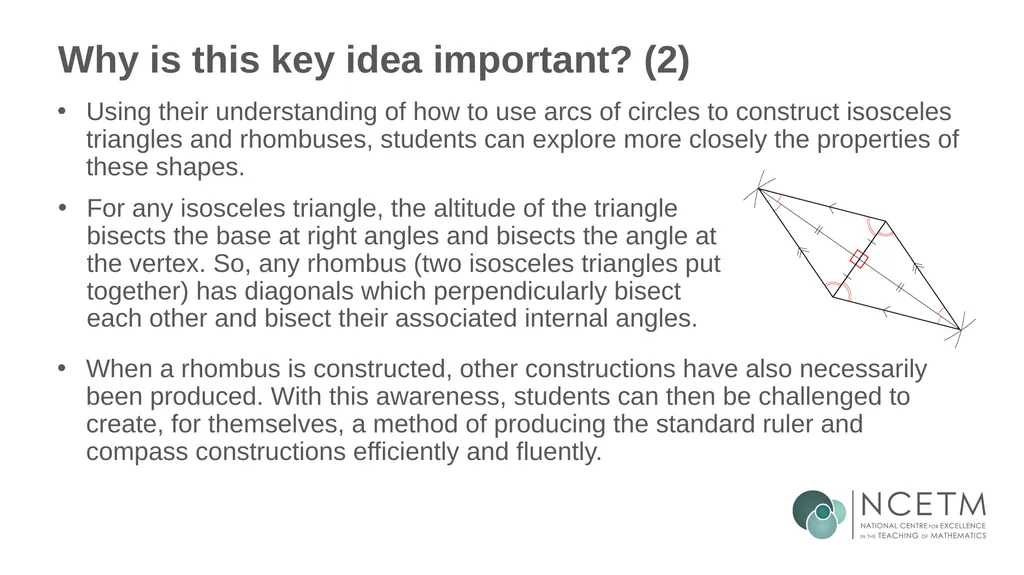
Why is this key idea important? (2) Using their understanding of how to use arcs of circles to construct isosceles triangles and rhombuses, students can explore more closely the properties of these shapes. For any isosceles triangle, the altitude of the triangle bisects the base at right angles and bisects the angle at the vertex. So, any rhombus (two isosceles triangles put together) has diagonals which perpendicularly bisect each other and bisect their associated internal angles. When a rhombus is constructed, other constructions have also necessarily been produced. With this awareness, students can then be challenged to create, for themselves, a method of producing the standard ruler and compass constructions efficiently and fluently.<br>
09
Prior learning What prior knowledge might your students already have?
What language might they use to describe this key idea?
What questions might you want to ask to assess their prior learning?<br>
What language might they use to describe this key idea?
What questions might you want to ask to assess their prior learning?<br>
10
Checking prior learning The following slides contain questions for checking prior learning.
What representations might students use to support their understanding of these questions?
What variation might you put in place for these questions to fully assess students’ understanding of the concept?
How might changing the language of each question change the difficulty?
Why are these such crucial pre-requisites for this key idea?<br>
What representations might students use to support their understanding of these questions?
What variation might you put in place for these questions to fully assess students’ understanding of the concept?
How might changing the language of each question change the difficulty?
Why are these such crucial pre-requisites for this key idea?<br>
11
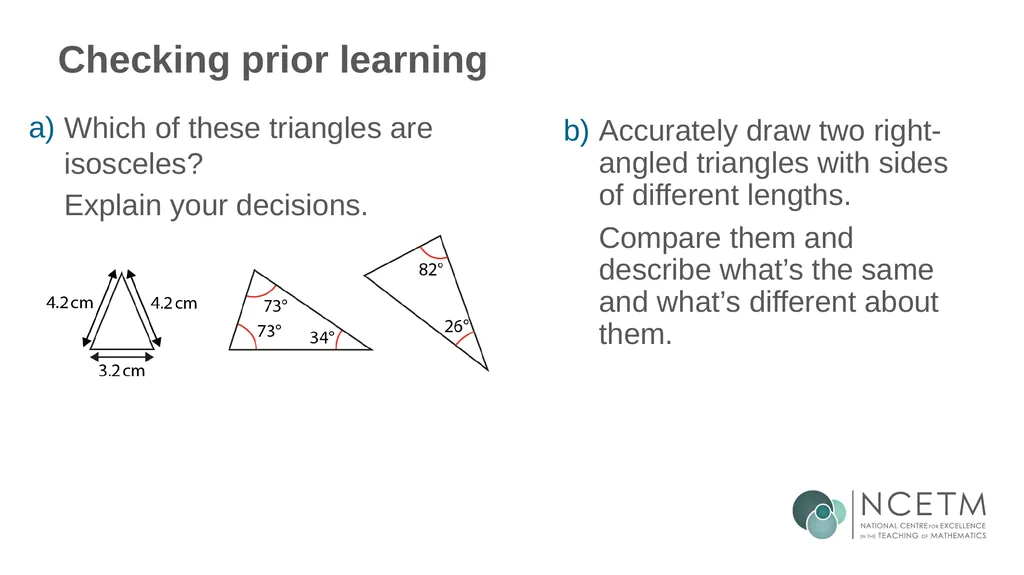
Checking prior learning Accurately draw two right-angled triangles with sides of different lengths.
Compare them and describe what’s the same and what’s different about them. b) Which of these triangles are isosceles?
Explain your decisions. a)<br>
Compare them and describe what’s the same and what’s different about them. b) Which of these triangles are isosceles?
Explain your decisions. a)<br>
12
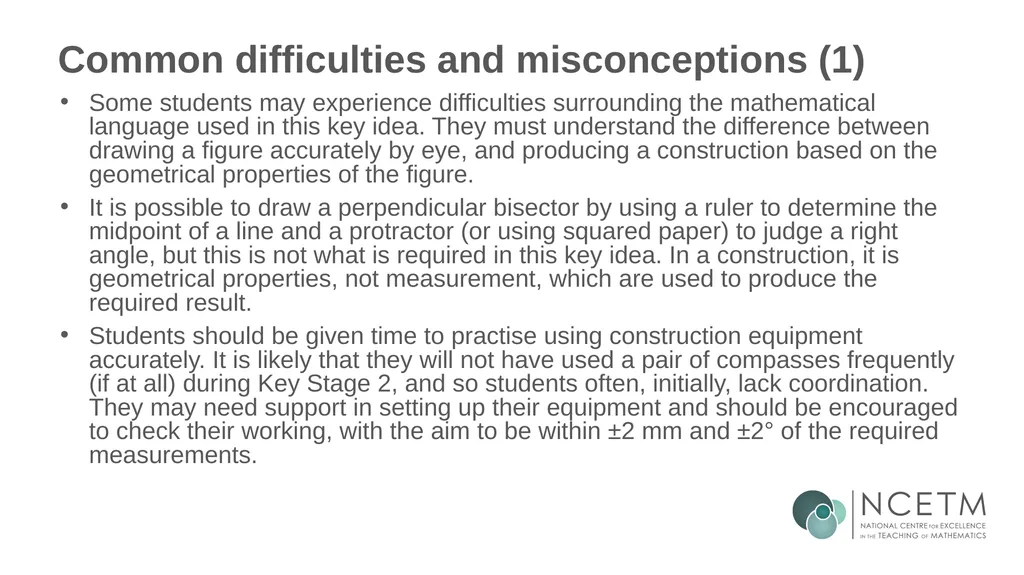
Common difficulties and misconceptions What aspects of this key idea might pupils find challenging?
What misconceptions might pupils have? When teaching this topic, you may find students encounter difficulties with…
The accuracy required in constructions
Using the geometric properties of circles and rhombuses
More information, and some suggestions for overcoming these challenges, can be found on the following slides<br>
What misconceptions might pupils have? When teaching this topic, you may find students encounter difficulties with…
The accuracy required in constructions
Using the geometric properties of circles and rhombuses
More information, and some suggestions for overcoming these challenges, can be found on the following slides<br>
13
Common difficulties and misconceptions (1) Some students may experience difficulties surrounding the mathematical language used in this key idea. They must understand the difference between drawing a figure accurately by eye, and producing a construction based on the geometrical properties of the figure.
It is possible to draw a perpendicular bisector by using a ruler to determine the midpoint of a line and a protractor (or using squared paper) to judge a right angle, but this is not what is required in this key idea. In a construction, it is geometrical properties, not measurement, which are used to produce the required result.
Students should be given time to practise using construction equipment accurately. It is likely that they will not have used a pair of compasses frequently (if at all) during Key Stage 2, and so students often, initially, lack coordination. They may need support in setting up their equipment and should be encouraged to check their working, with the aim to be within ±2 mm and ±2° of the required measurements.<br>
It is possible to draw a perpendicular bisector by using a ruler to determine the midpoint of a line and a protractor (or using squared paper) to judge a right angle, but this is not what is required in this key idea. In a construction, it is geometrical properties, not measurement, which are used to produce the required result.
Students should be given time to practise using construction equipment accurately. It is likely that they will not have used a pair of compasses frequently (if at all) during Key Stage 2, and so students often, initially, lack coordination. They may need support in setting up their equipment and should be encouraged to check their working, with the aim to be within ±2 mm and ±2° of the required measurements.<br>
14
Common difficulties and misconceptions (2) This key idea is heavily linked to the geometric properties of both circles and rhombuses. You may wish to consider your schemes of learning as to when this key idea is introduced.
If there is significant time between work on the properties of 2D shapes and these constructions, then it is worthwhile revising the relevant geometric properties before you begin to introduce constructions. Students must be able to identify the geometric properties of circles and rhombuses, and understand how these properties enable key constructions.
Difficulties occur for students when they are trying to memorise the various steps in the construction of circles and rhombuses, with no link to other knowledge they might have about geometrical properties. Students will be helped considerably in this if they are aware that constructing a perpendicular bisector of a line segment is not an isolated concept but linked to the properties of circles and rhombuses.<br>
If there is significant time between work on the properties of 2D shapes and these constructions, then it is worthwhile revising the relevant geometric properties before you begin to introduce constructions. Students must be able to identify the geometric properties of circles and rhombuses, and understand how these properties enable key constructions.
Difficulties occur for students when they are trying to memorise the various steps in the construction of circles and rhombuses, with no link to other knowledge they might have about geometrical properties. Students will be helped considerably in this if they are aware that constructing a perpendicular bisector of a line segment is not an isolated concept but linked to the properties of circles and rhombuses.<br>
15
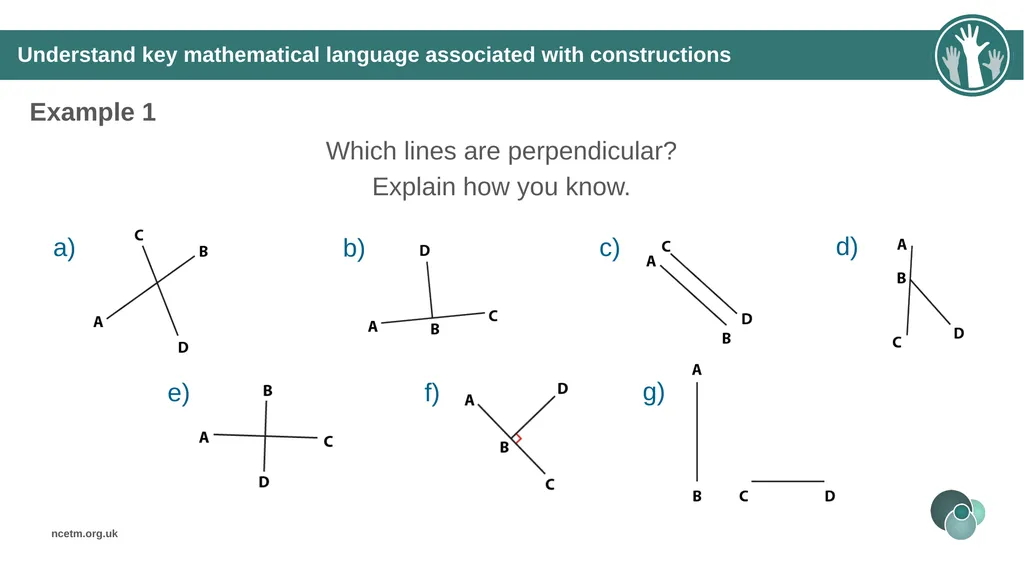
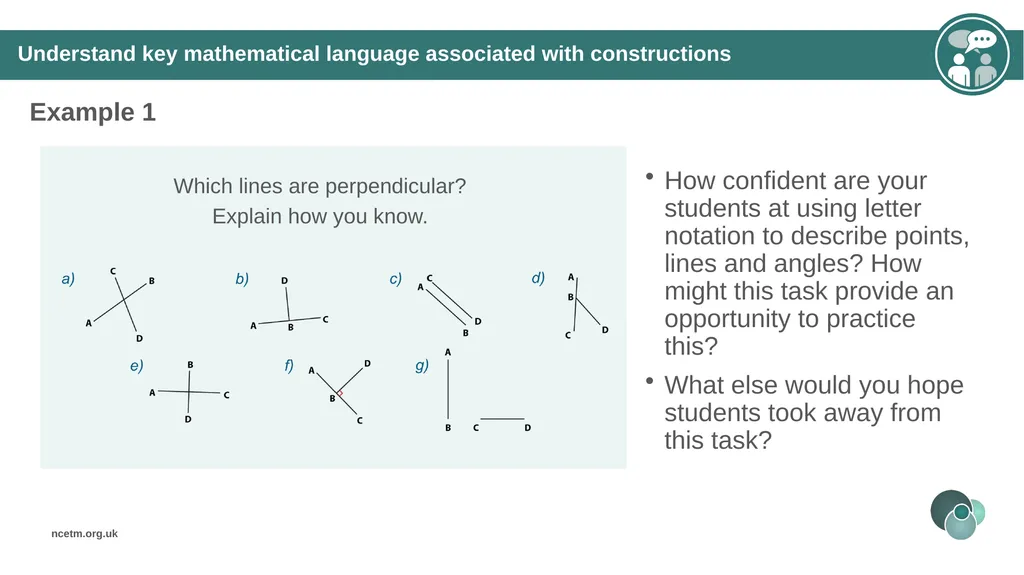
Understand key mathematical language associated with constructions Example 1 Which lines are perpendicular?
Explain how you know. a) b) c) d) e) f) g)<br>
Explain how you know. a) b) c) d) e) f) g)<br>
16
Understand key mathematical language associated with constructions Example 1 How confident are your students at using letter notation to describe points, lines and angles? How might this task provide an opportunity to practice this?
What else would you hope students took away from this task?<br>
What else would you hope students took away from this task?<br>
17
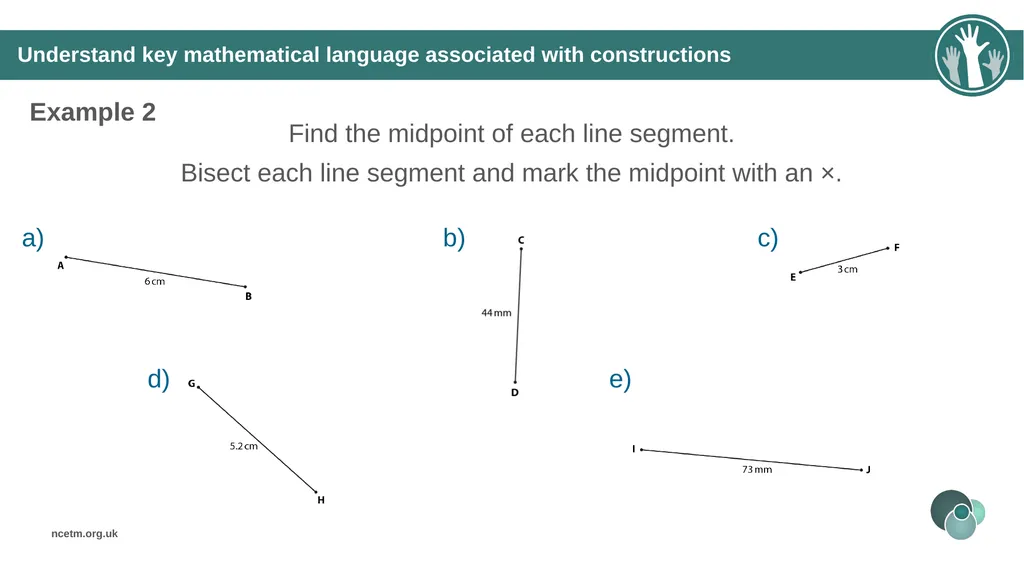
Understand key mathematical language associated with constructions Example 2 Find the midpoint of each line segment.
Bisect each line segment and mark the midpoint with an ×. a) b) c) d) e)<br>
Bisect each line segment and mark the midpoint with an ×. a) b) c) d) e)<br>
18
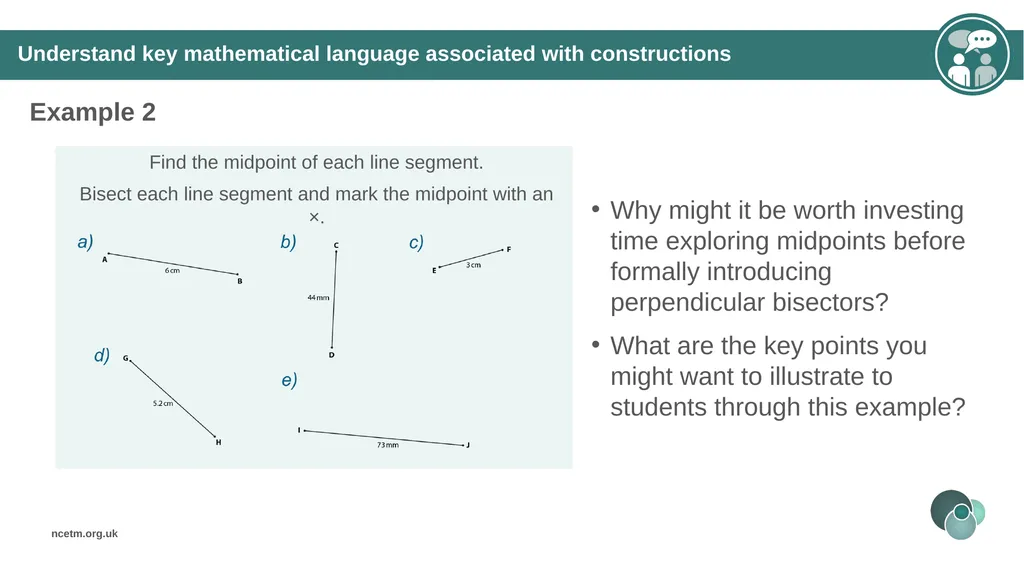
Understand key mathematical language associated with constructions Example 2 Why might it be worth investing time exploring midpoints before formally introducing perpendicular bisectors?
What are the key points you might want to illustrate to students through this example?<br>
What are the key points you might want to illustrate to students through this example?<br>
19
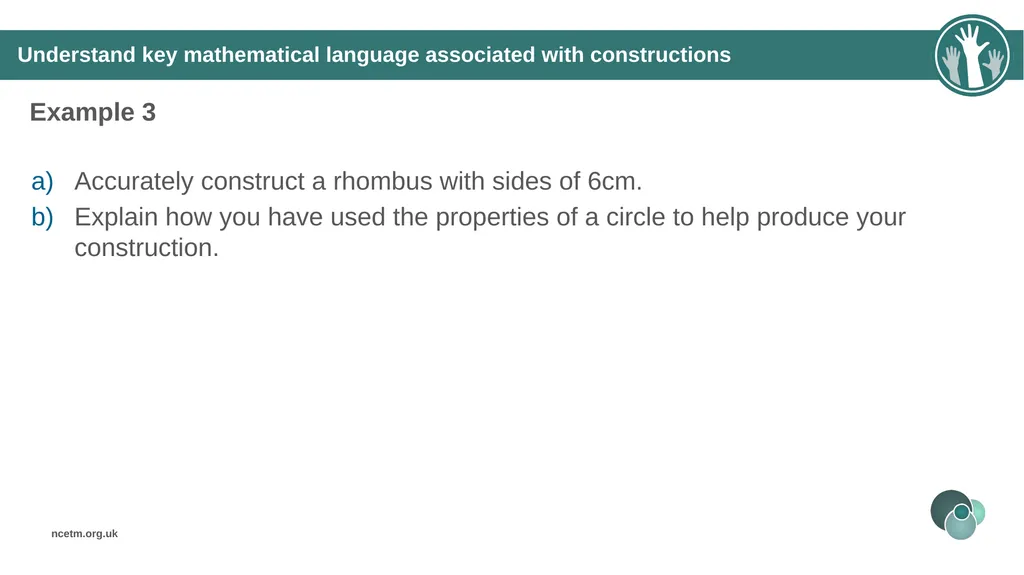
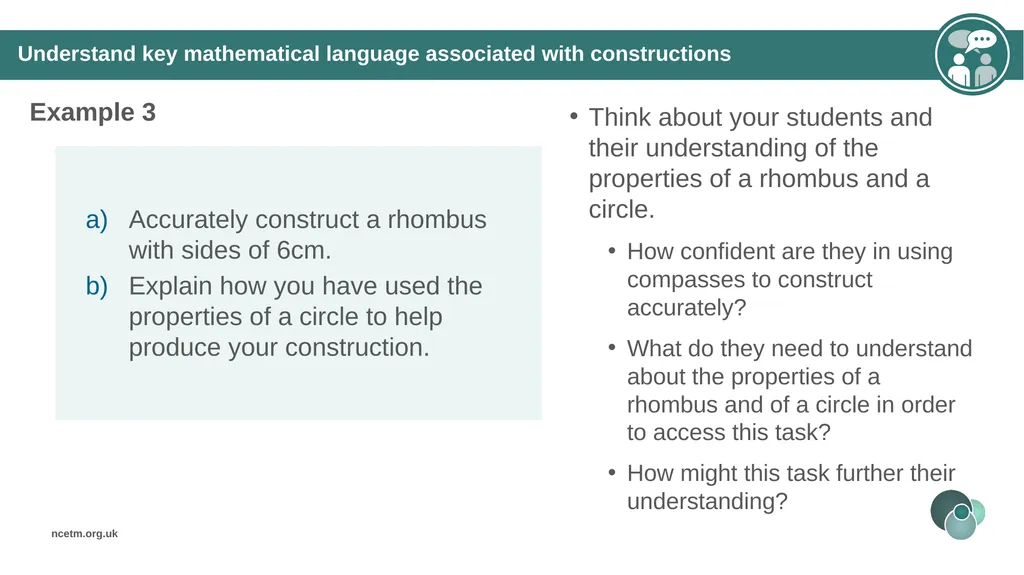
Understand key mathematical language associated with constructions Example 3 Accurately construct a rhombus with sides of 6cm.
Explain how you have used the properties of a circle to help produce your construction.<br>
Explain how you have used the properties of a circle to help produce your construction.<br>
20
Understand key mathematical language associated with constructions Example 3 Think about your students and their understanding of the properties of a rhombus and a circle.
How confident are they in using compasses to construct accurately?
What do they need to understand about the properties of a rhombus and of a circle in order to access this task?
How might this task further their understanding?<br>
How confident are they in using compasses to construct accurately?
What do they need to understand about the properties of a rhombus and of a circle in order to access this task?
How might this task further their understanding?<br>
21
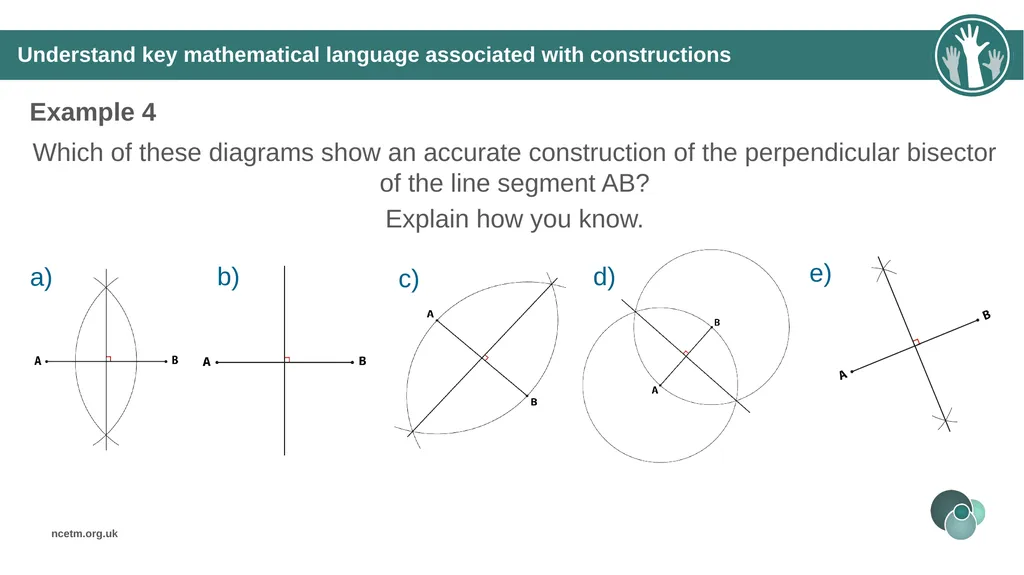
Understand key mathematical language associated with constructions Example 4 Which of these diagrams show an accurate construction of the perpendicular bisector of the line segment AB?
Explain how you know. a) b) c) d) e)<br>
Explain how you know. a) b) c) d) e)<br>
22
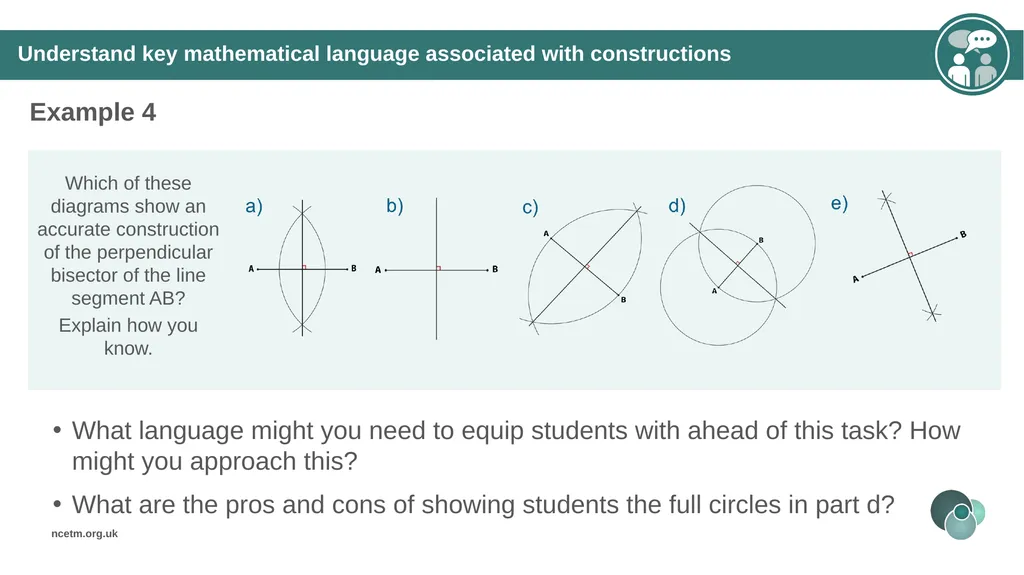
Understand key mathematical language associated with constructions Example 4 What language might you need to equip students with ahead of this task? How might you approach this?
What are the pros and cons of showing students the full circles in part d? Which of these diagrams show an accurate construction of the perpendicular bisector of the line segment AB?
Explain how you know.<br>
What are the pros and cons of showing students the full circles in part d? Which of these diagrams show an accurate construction of the perpendicular bisector of the line segment AB?
Explain how you know.<br>
23
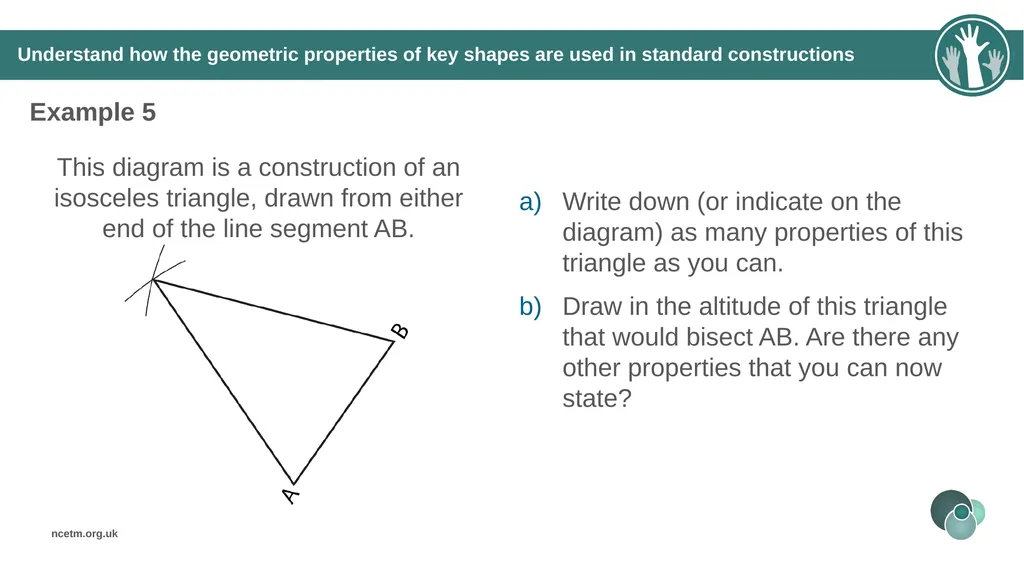
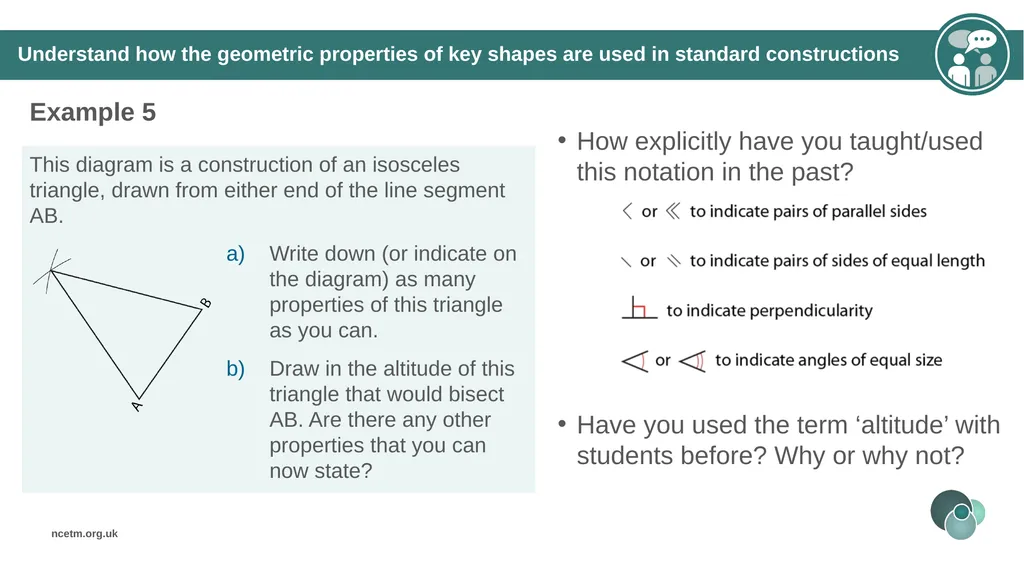
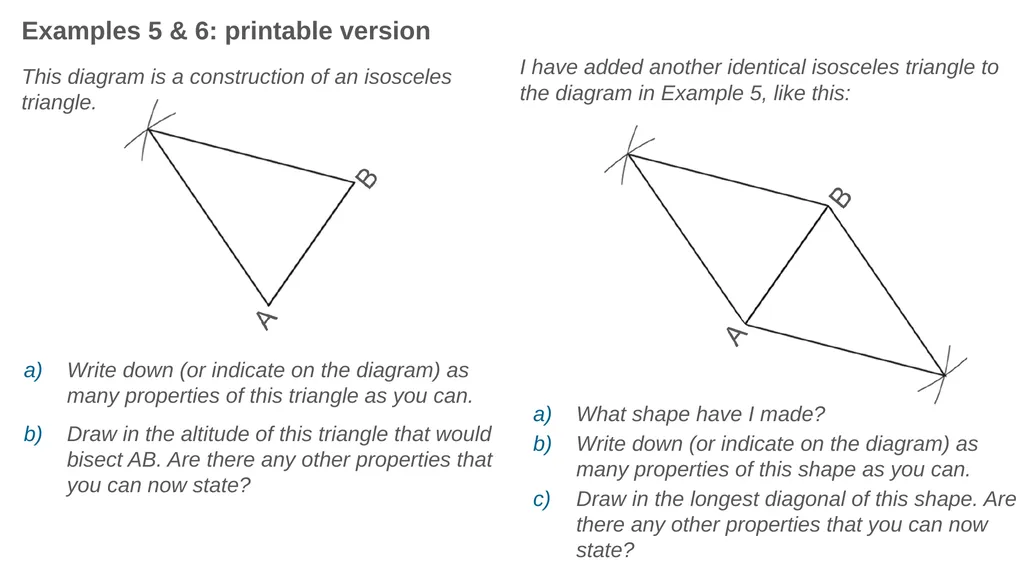
Understand how the geometric properties of key shapes are used in standard constructions Example 5 This diagram is a construction of an isosceles triangle, drawn from either end of the line segment AB. Write down (or indicate on the diagram) as many properties of this triangle as you can.
Draw in the altitude of this triangle that would bisect AB. Are there any other properties that you can now state?<br>
Draw in the altitude of this triangle that would bisect AB. Are there any other properties that you can now state?<br>
24
Understand how the geometric properties of key shapes are used in standard constructions Example 5 How explicitly have you taught/used this notation in the past? Have you used the term ‘altitude’ with students before? Why or why not?<br>
25
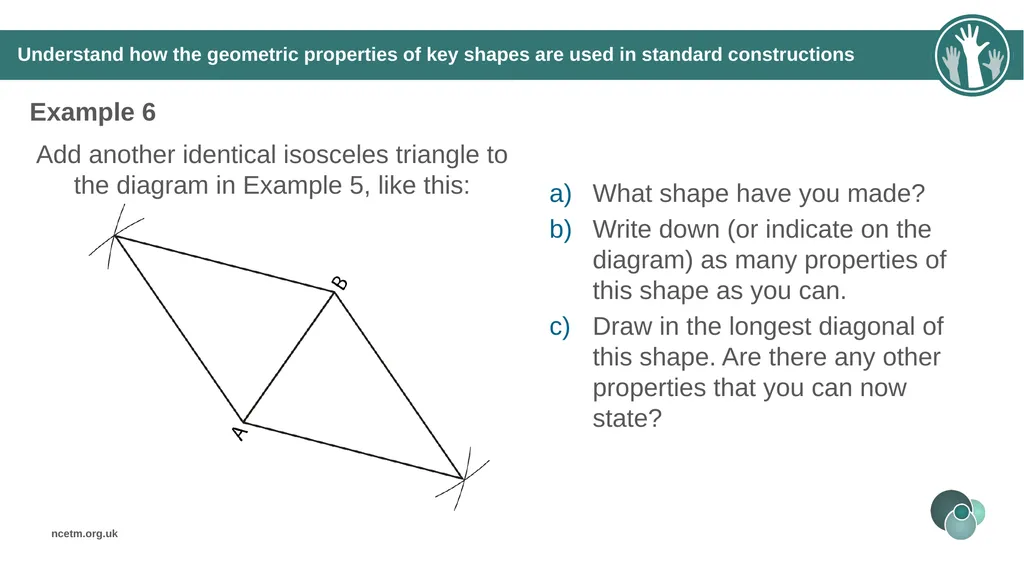
Understand how the geometric properties of key shapes are used in standard constructions Example 6 Add another identical isosceles triangle to the diagram in Example 5, like this: What shape have you made?
Write down (or indicate on the diagram) as many properties of this shape as you can.
Draw in the longest diagonal of this shape. Are there any other properties that you can now state?<br>
Write down (or indicate on the diagram) as many properties of this shape as you can.
Draw in the longest diagonal of this shape. Are there any other properties that you can now state?<br>
26
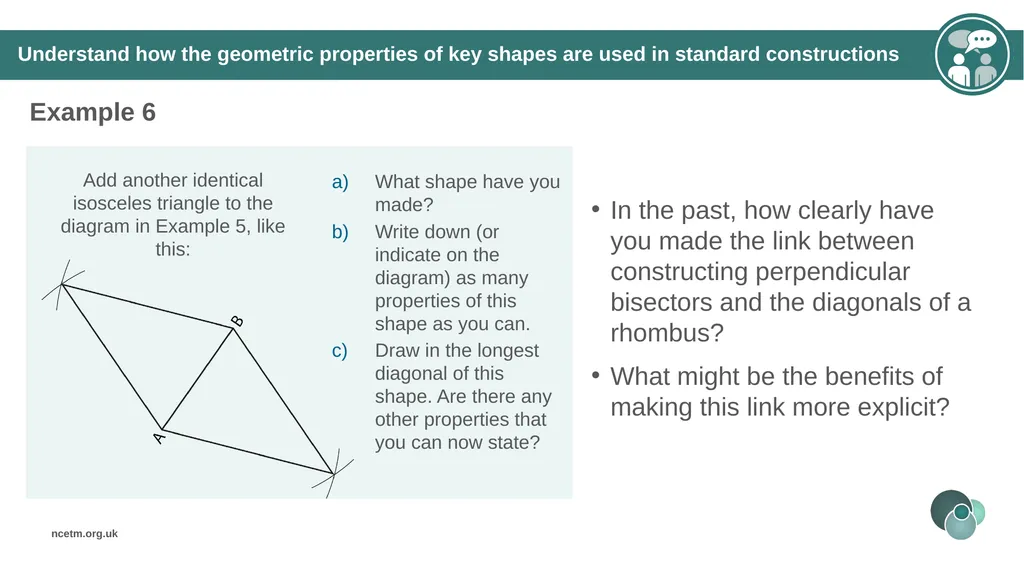
Understand how the geometric properties of key shapes are used in standard constructions Example 6 In the past, how clearly have you made the link between constructing perpendicular bisectors and the diagonals of a rhombus?
What might be the benefits of making this link more explicit?<br>
What might be the benefits of making this link more explicit?<br>
27
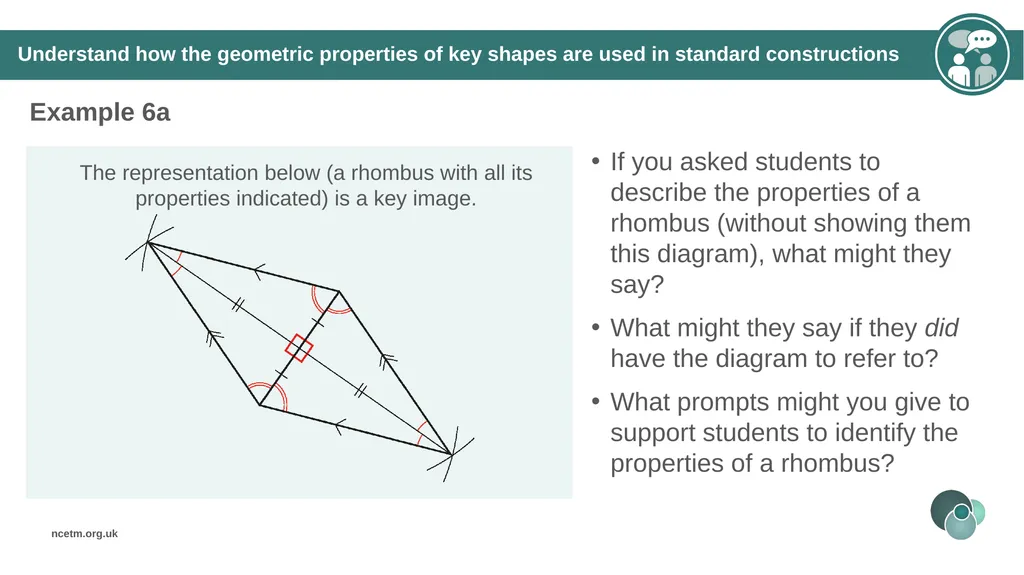
Understand how the geometric properties of key shapes are used in standard constructions Example 6a If you asked students to describe the properties of a rhombus (without showing them this diagram), what might they say?
What might they say if they did have the diagram to refer to?
What prompts might you give to support students to identify the properties of a rhombus?<br>
What might they say if they did have the diagram to refer to?
What prompts might you give to support students to identify the properties of a rhombus?<br>
28
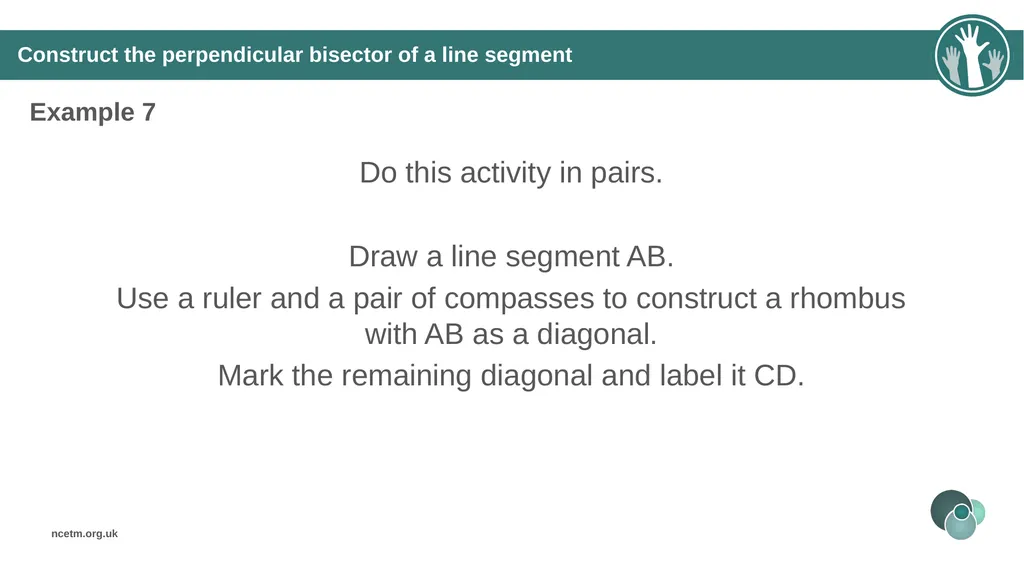
Construct the perpendicular bisector of a line segment Example 7 Do this activity in pairs.
Draw a line segment AB.
Use a ruler and a pair of compasses to construct a rhombus with AB as a diagonal.
Mark the remaining diagonal and label it CD.<br>
Draw a line segment AB.
Use a ruler and a pair of compasses to construct a rhombus with AB as a diagonal.
Mark the remaining diagonal and label it CD.<br>
29
Construct the perpendicular bisector of a line segment Example 7 Compare this example to example 3. What is the same/different? What might students get out of the different emphasis in these two tasks?
How often do your students work in pairs? How might you structure this task to ensure students work together effectively?<br>
How often do your students work in pairs? How might you structure this task to ensure students work together effectively?<br>
30
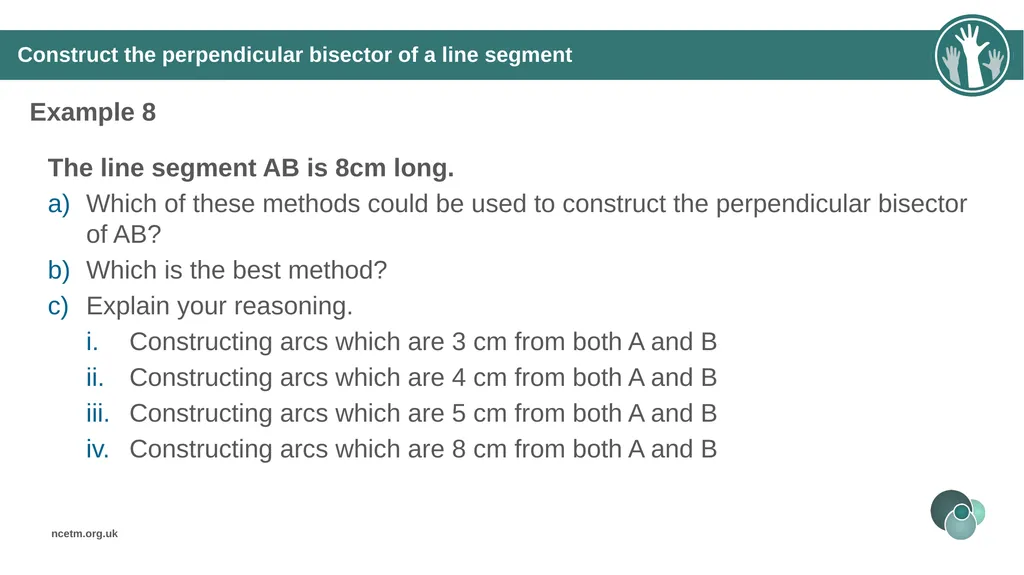
Construct the perpendicular bisector of a line segment Example 8 The line segment AB is 8cm long.
Which of these methods could be used to construct the perpendicular bisector of AB?
Which is the best method?
Explain your reasoning.
Constructing arcs which are 3 cm from both A and B
Constructing arcs which are 4 cm from both A and B
Constructing arcs which are 5 cm from both A and B
Constructing arcs which are 8 cm from both A and B<br>
Which of these methods could be used to construct the perpendicular bisector of AB?
Which is the best method?
Explain your reasoning.
Constructing arcs which are 3 cm from both A and B
Constructing arcs which are 4 cm from both A and B
Constructing arcs which are 5 cm from both A and B
Constructing arcs which are 8 cm from both A and B<br>
31
Construct the perpendicular bisector of a line segment Example 8 Why might it be useful for students to compare different methods/arc lengths?
Would you prefer students to attempt these constructions or to try and visualise these? Why?<br>
Would you prefer students to attempt these constructions or to try and visualise these? Why?<br>
32
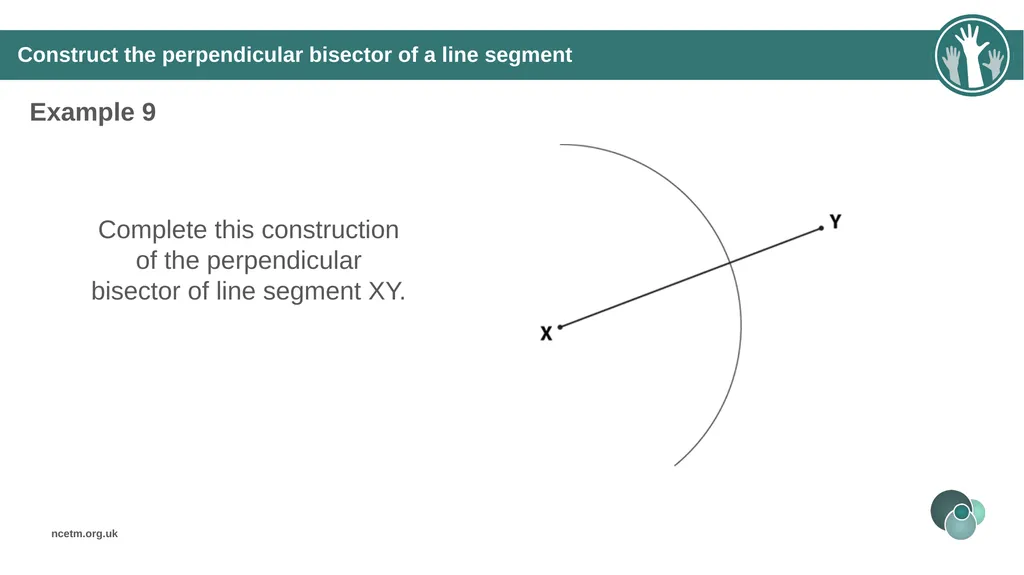
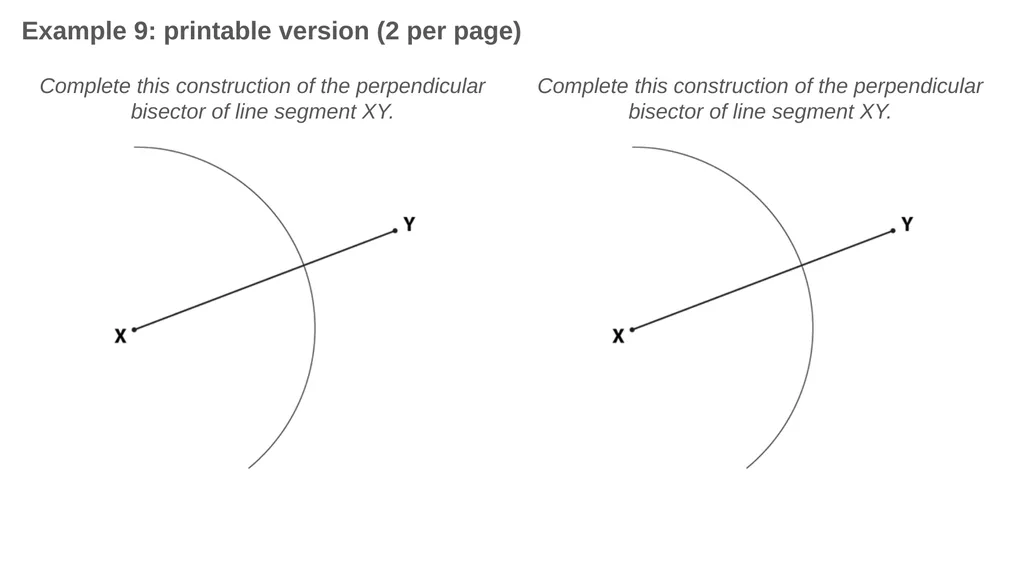
Construct the perpendicular bisector of a line segment Example 9 Complete this construction of the perpendicular bisector of line segment XY.<br>
33
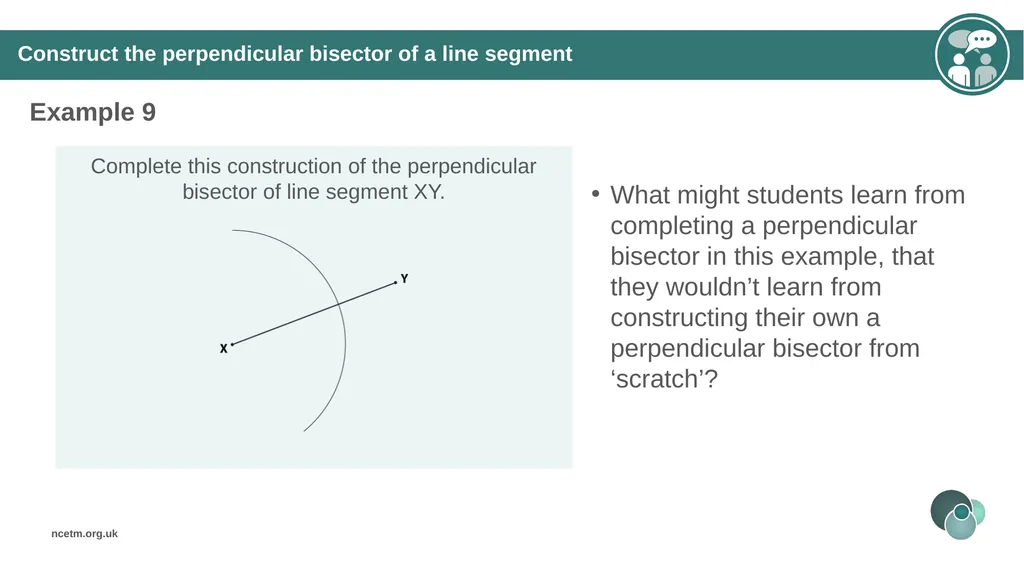
Construct the perpendicular bisector of a line segment Example 9 What might students learn from completing a perpendicular bisector in this example, that they wouldn’t learn from constructing their own a perpendicular bisector from ‘scratch’? Complete this construction of the perpendicular bisector of line segment XY.<br>
34
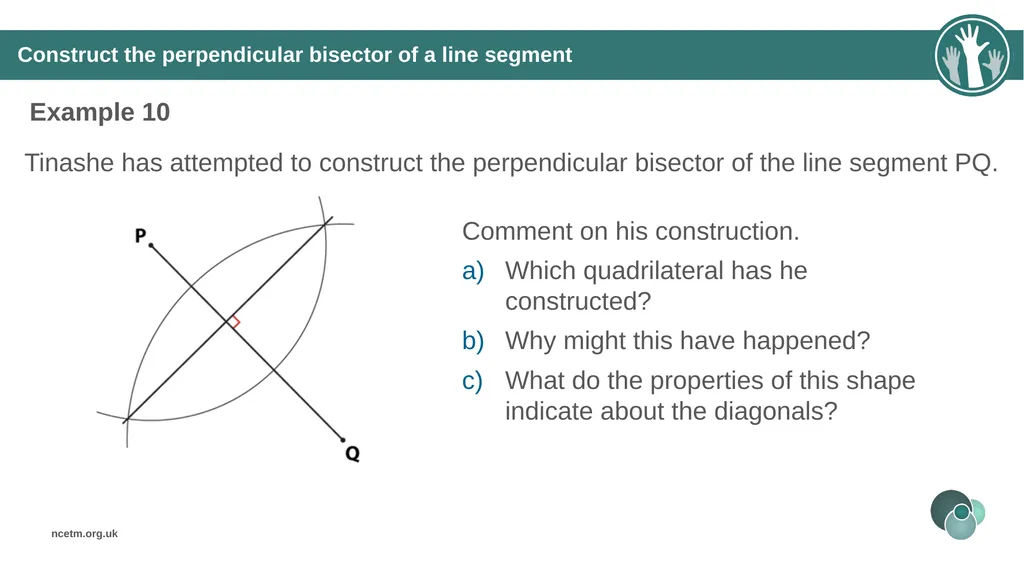
Construct the perpendicular bisector of a line segment Example 10 Tinashe has attempted to construct the perpendicular bisector of the line segment PQ. Comment on his construction.
Which quadrilateral has he constructed?
Why might this have happened?
What do the properties of this shape indicate about the diagonals?<br>
Which quadrilateral has he constructed?
Why might this have happened?
What do the properties of this shape indicate about the diagonals?<br>
35
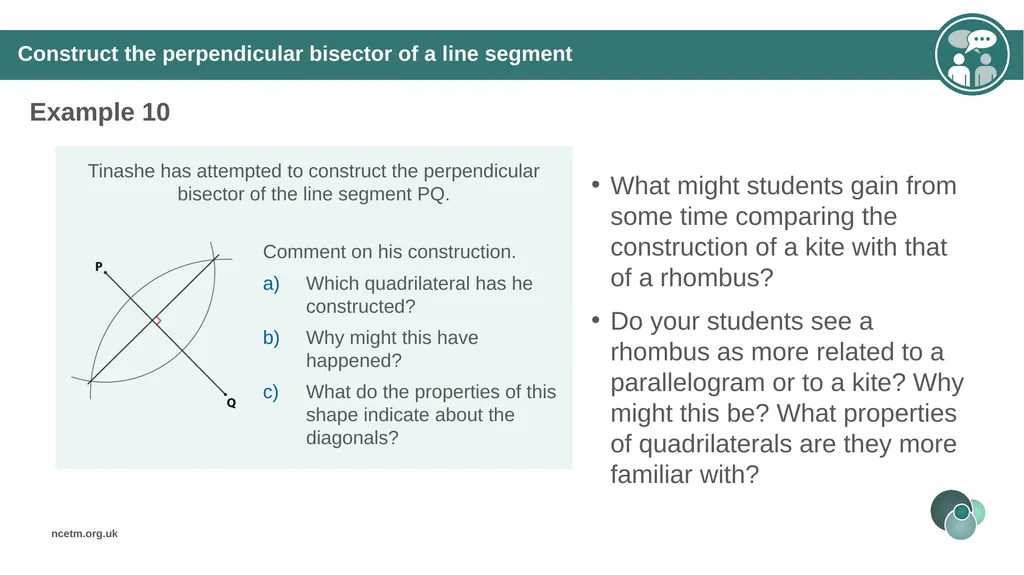
Construct the perpendicular bisector of a line segment Example 10 What might students gain from some time comparing the construction of a kite with that of a rhombus?
Do your students see a rhombus as more related to a parallelogram or to a kite? Why might this be? What properties of quadrilaterals are they more familiar with?<br>
Do your students see a rhombus as more related to a parallelogram or to a kite? Why might this be? What properties of quadrilaterals are they more familiar with?<br>
36
Reflection questions What other mathematical concepts will be supported by students’ stronger understanding of this key idea?
What mathematical language will you continue to use to support pupils to make connections with other areas?
Which representations might you continue to use to further develop students’ understanding?<br>
What mathematical language will you continue to use to support pupils to make connections with other areas?
Which representations might you continue to use to further develop students’ understanding?<br>
37
Appendices You may choose to use the following slides when planning or delivering a PD session. They cover:
Key vocabulary
Representations and structure
Previous learning
Future learning
Printable versions of Examples 2, 5, 6 and 9
Library of links<br>
Key vocabulary
Representations and structure
Previous learning
Future learning
Printable versions of Examples 2, 5, 6 and 9
Library of links<br>
38
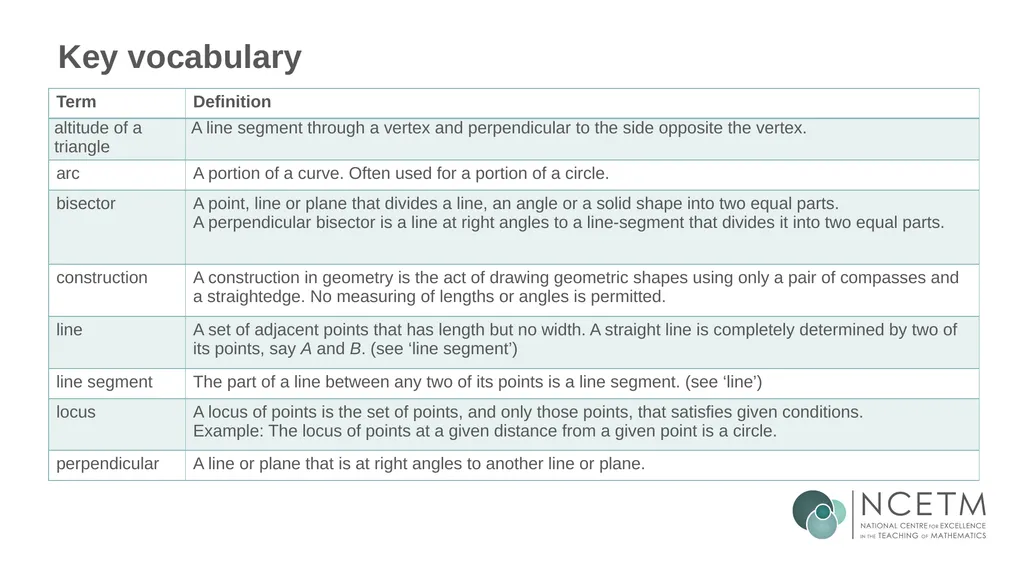
Key vocabulary<br>
39
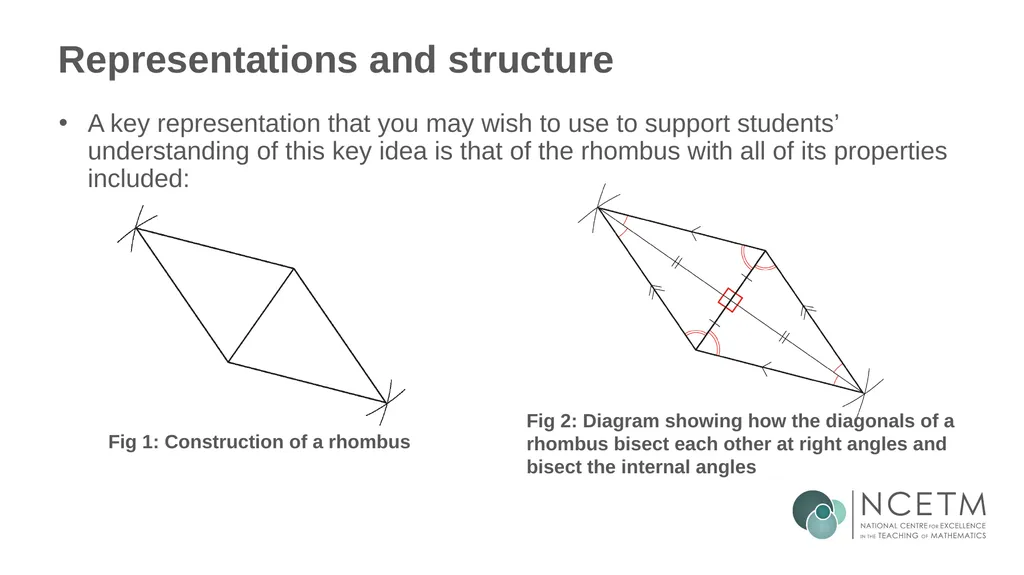
Representations and structure A key representation that you may wish to use to support students’ understanding of this key idea is that of the rhombus with all of its properties included: Fig 1: Construction of a rhombus Fig 2: Diagram showing how the diagonals of a rhombus bisect each other at right angles and bisect the internal angles<br>
40
Previous learning From Upper Key Stage 2, students will bring experience of:
drawing 2D shapes using given dimensions and angles
recognising, describing and building simple 3D shapes, including making nets
comparing and classifying geometric shapes based on their properties and sizes, and finding unknown angles in any triangles, quadrilaterals and regular polygons
illustrating and naming parts of circles, including radius, diameter and circumference, and knowing that the diameter is twice the radius
recognising angles where they meet at a point, are on a straight line or are vertically opposite, and finding missing angles
drawing and translating simple shapes on the coordinate plane and reflecting them in the axes.<br>
drawing 2D shapes using given dimensions and angles
recognising, describing and building simple 3D shapes, including making nets
comparing and classifying geometric shapes based on their properties and sizes, and finding unknown angles in any triangles, quadrilaterals and regular polygons
illustrating and naming parts of circles, including radius, diameter and circumference, and knowing that the diameter is twice the radius
recognising angles where they meet at a point, are on a straight line or are vertically opposite, and finding missing angles
drawing and translating simple shapes on the coordinate plane and reflecting them in the axes.<br>
41
Future learning (1) In KS4, students will build on the core concepts in this mathematical theme to:
interpret and use fractional {and negative} scale factors for enlargements
{describe the changes and invariance achieved by combinations of rotations, reflections and translations}
identify and apply circle definitions and properties, including: centre, radius, chord, diameter, circumference, tangent, arc, sector and segment
{apply and prove the standard circle theorems concerning angles, radii, tangents and chords, and use them to prove related results}
construct and interpret plans and elevations of 3D shapes
interpret and use bearings
calculate arc lengths, angles and areas of sectors of circles
calculate surface areas and volumes of spheres, pyramids, cones and composite solids
Please note: Braces { } indicate additional mathematical content to be taught to more highly attaining students.<br>
interpret and use fractional {and negative} scale factors for enlargements
{describe the changes and invariance achieved by combinations of rotations, reflections and translations}
identify and apply circle definitions and properties, including: centre, radius, chord, diameter, circumference, tangent, arc, sector and segment
{apply and prove the standard circle theorems concerning angles, radii, tangents and chords, and use them to prove related results}
construct and interpret plans and elevations of 3D shapes
interpret and use bearings
calculate arc lengths, angles and areas of sectors of circles
calculate surface areas and volumes of spheres, pyramids, cones and composite solids
Please note: Braces { } indicate additional mathematical content to be taught to more highly attaining students.<br>
42
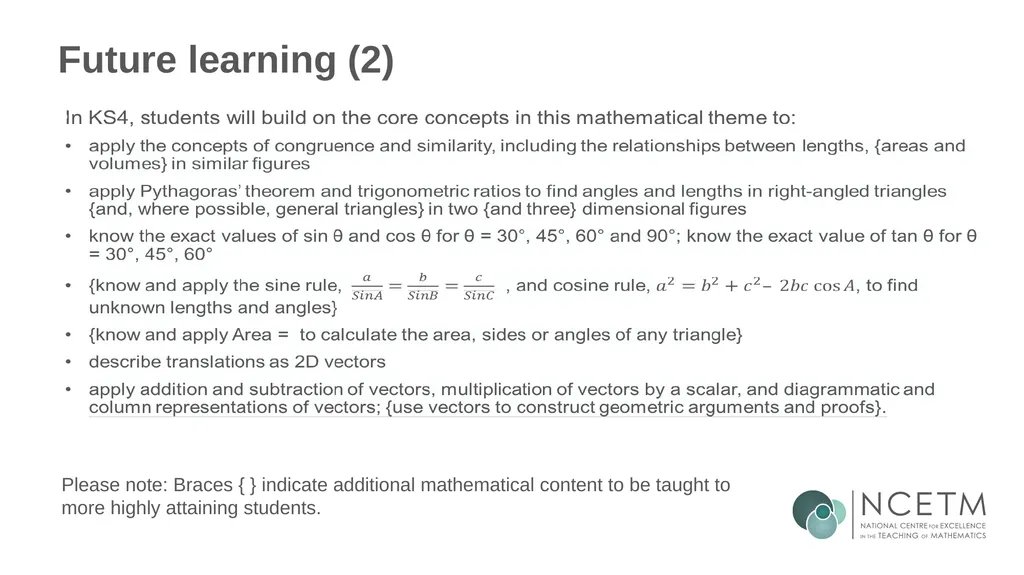
Future learning (2) Please note: Braces { } indicate additional mathematical content to be taught to more highly attaining students.<br>
43
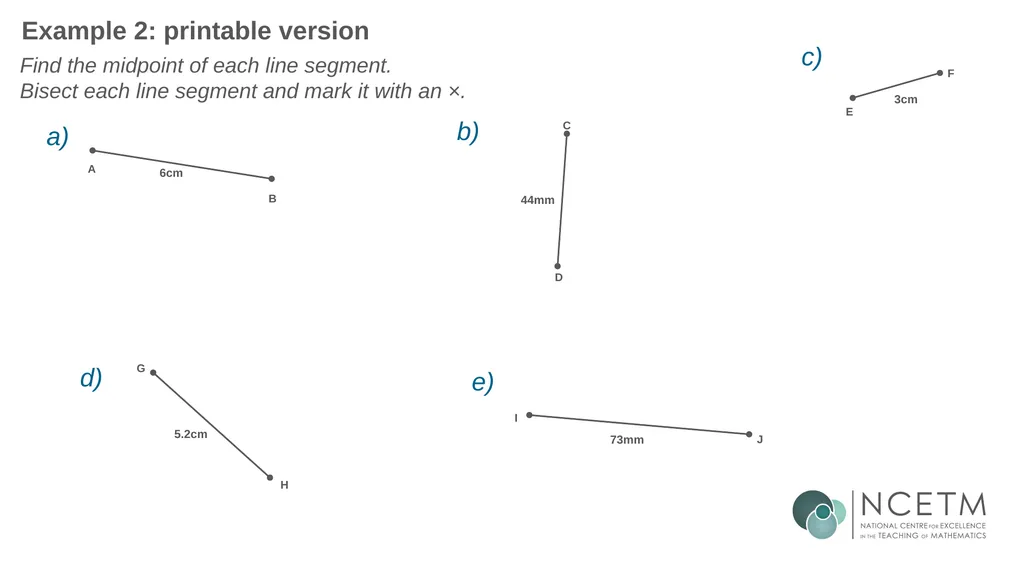
Example 2: printable version Find the midpoint of each line segment.
Bisect each line segment and mark it with an ×. a) b) c) d) e)<br>
Bisect each line segment and mark it with an ×. a) b) c) d) e)<br>
44
Examples 5 & 6: printable version This diagram is a construction of an isosceles triangle. Write down (or indicate on the diagram) as many properties of this triangle as you can.
Draw in the altitude of this triangle that would bisect AB. Are there any other properties that you can now state? I have added another identical isosceles triangle to the diagram in Example 5, like this: What shape have I made?
Write down (or indicate on the diagram) as many properties of this shape as you can.
Draw in the longest diagonal of this shape. Are there any other properties that you can now state?<br>
Draw in the altitude of this triangle that would bisect AB. Are there any other properties that you can now state? I have added another identical isosceles triangle to the diagram in Example 5, like this: What shape have I made?
Write down (or indicate on the diagram) as many properties of this shape as you can.
Draw in the longest diagonal of this shape. Are there any other properties that you can now state?<br>
45
Example 9: printable version (2 per page) Complete this construction of the perpendicular bisector of line segment XY. Complete this construction of the perpendicular bisector of line segment XY.<br>
46
Library of links The following resources from the NCETM website have been referred to within this slide deck:
NCETM Secondary Mastery Professional Development
6 Geometry Theme Overview Document
6.4 Constructions Core Concept Document
Using mathematical representations at KS3 | NCETM
Insights from experienced teachers | NCETM
NCETM primary mastery professional development materials
NCETM primary assessment materials<br>
NCETM Secondary Mastery Professional Development
6 Geometry Theme Overview Document
6.4 Constructions Core Concept Document
Using mathematical representations at KS3 | NCETM
Insights from experienced teachers | NCETM
NCETM primary mastery professional development materials
NCETM primary assessment materials<br>