EV3 Classroom: Touch Sensor BEGINNER PROGRAMMING

Published  . 0 views
↓ Download
EV3 Classroom: Touch Sensor BEGINNER PROGRAMMING
1 / 1
EV3 Classroom: Touch Sensor BEGINNER PROGRAMMING - slide 1 of 13 EV3 Classroom: Touch Sensor BEGINNER PROGRAMMING - slide 2 of 13 EV3 Classroom: Touch Sensor BEGINNER PROGRAMMING - slide 3 of 13 EV3 Classroom: Touch Sensor BEGINNER PROGRAMMING - slide 4 of 13 EV3 Classroom: Touch Sensor BEGINNER PROGRAMMING - slide 5 of 13 EV3 Classroom: Touch Sensor BEGINNER PROGRAMMING - slide 6 of 13 EV3 Classroom: Touch Sensor BEGINNER PROGRAMMING - slide 7 of 13 EV3 Classroom: Touch Sensor BEGINNER PROGRAMMING - slide 8 of 13 EV3 Classroom: Touch Sensor BEGINNER PROGRAMMING - slide 9 of 13 EV3 Classroom: Touch Sensor BEGINNER PROGRAMMING - slide 10 of 13 EV3 Classroom: Touch Sensor BEGINNER PROGRAMMING - slide 11 of 13 EV3 Classroom: Touch Sensor BEGINNER PROGRAMMING - slide 12 of 13 EV3 Classroom: Touch Sensor BEGINNER PROGRAMMING - slide 13 of 13
Description: EV3 Classroom: Touch Sensor BEGINNER PROGRAMMING LESSON Lesson Objectives Learn how to use the Touch Sensor Learn how to use the Wait For Block Learn the difference between the Wait For Block and the Sensor Blocks Learn when to use Start

Related Topics

Download Presentation

"EV3 Classroom: Touch Sensor BEGINNER PROGRAMMING" is the property of its rightful owner. Permission is granted to download and print the materials on this website for personal, non-commercial use only, and to display it on your personal computer provided you do not modify the materials and that you retain all copyright notices contained in the materials. By downloading content from our website, you accept the terms of this agreement.

Presentation Transcript

slide1. EV3 Classroom: Touch Sensor BEGINNER PROGRAMMING LESSON<br>
slide2. Lesson Objectives Learn how to use the Touch Sensor
Learn how to use the Wait For Block
Learn the difference between the Wait For Block and the Sensor Blocks
Learn when to use Start Moving Block © EV3Lessons.com, 2020, (Last edit: 12/21/19) 2<br>
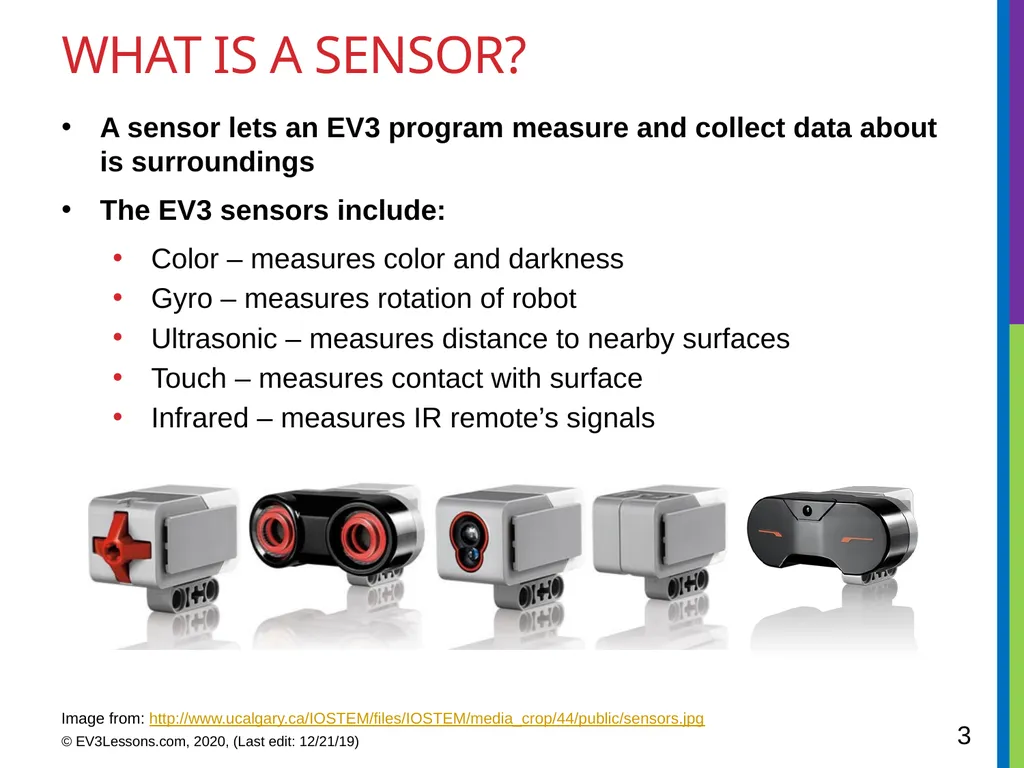
slide3. What is a sensor? A sensor lets an EV3 program measure and collect data about is surroundings
The EV3 sensors include:
Color – measures color and darkness
Gyro – measures rotation of robot
Ultrasonic – measures distance to nearby surfaces
Touch – measures contact with surface
Infrared – measures IR remote’s signals © EV3Lessons.com, 2020, (Last edit: 12/21/19) 3 Image from: http://www.ucalgary.ca/IOSTEM/files/IOSTEM/media_crop/44/public/sensors.jpg<br>
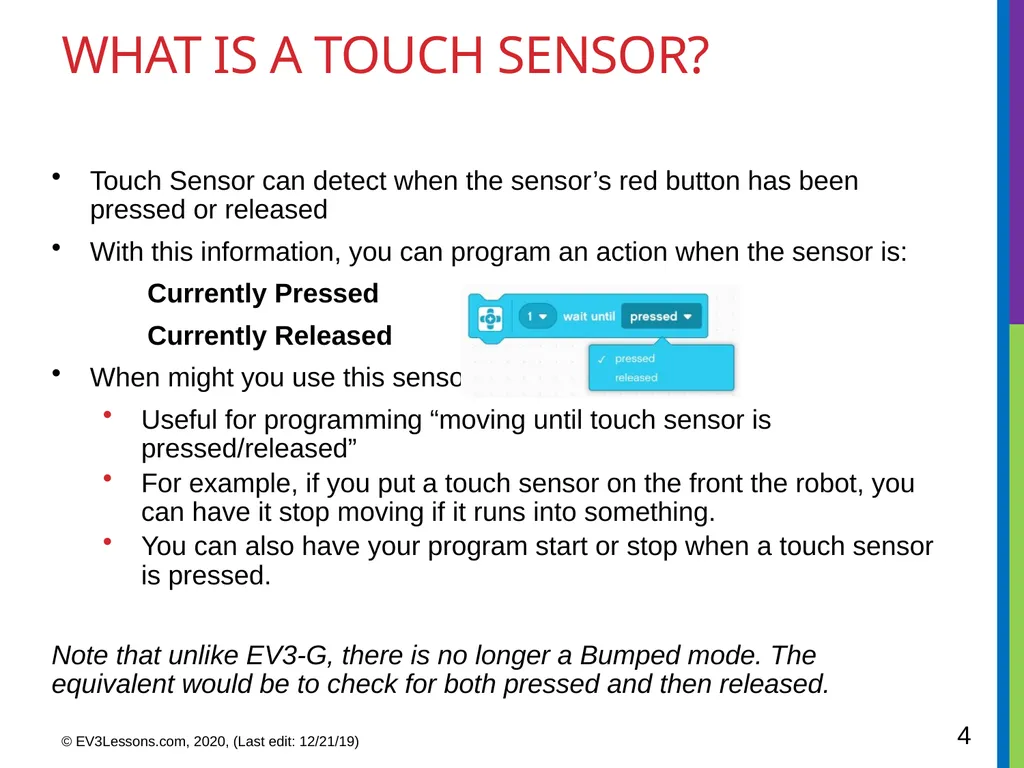
slide4. WHAT IS A TOUCH SENSOR? Touch Sensor can detect when the sensor’s red button has been pressed or released
With this information, you can program an action when the sensor is:
Currently Pressed
Currently Released
When might you use this sensor?
Useful for programming “moving until touch sensor is pressed/released”
For example, if you put a touch sensor on the front the robot, you can have it stop moving if it runs into something.
You can also have your program start or stop when a touch sensor is pressed.

Note that unlike EV3-G, there is no longer a Bumped mode. The equivalent would be to check for both pressed and then released. © EV3Lessons.com, 2020, (Last edit: 12/21/19) 4<br>
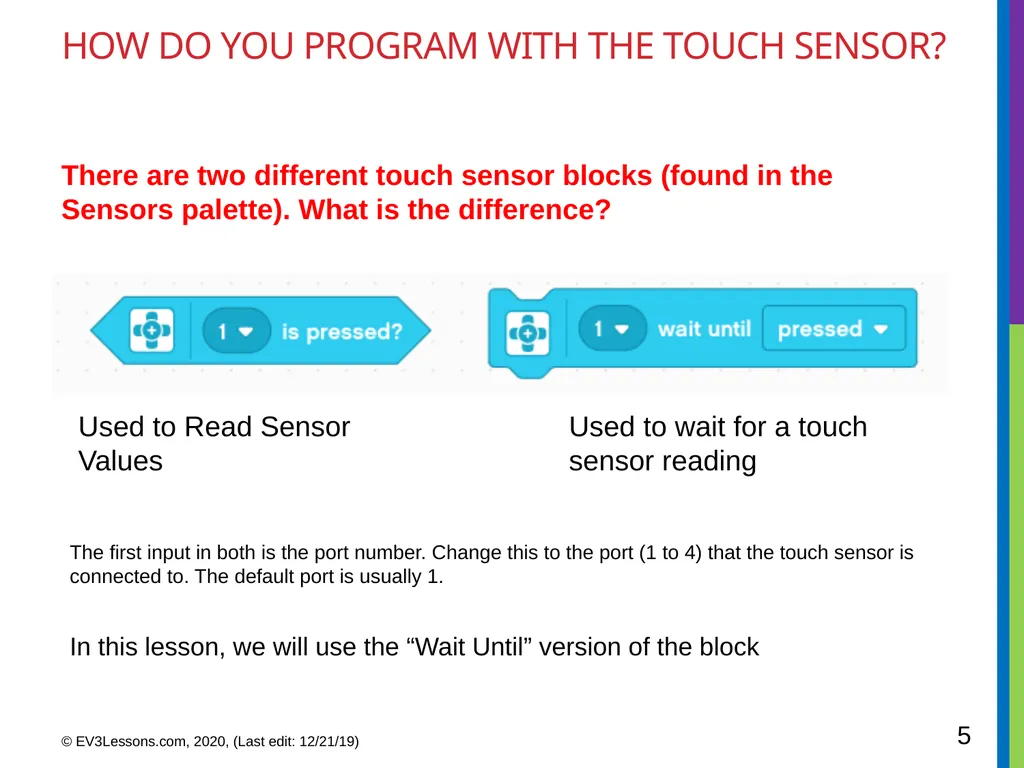
slide5. HOW Do you program with the Touch Sensor? Used to Read Sensor Values © EV3Lessons.com, 2020, (Last edit: 12/21/19) 5 Used to wait for a touch sensor reading There are two different touch sensor blocks (found in the Sensors palette). What is the difference? The first input in both is the port number. Change this to the port (1 to 4) that the touch sensor is connected to. The default port is usually 1. In this lesson, we will use the “Wait Until” version of the block<br>
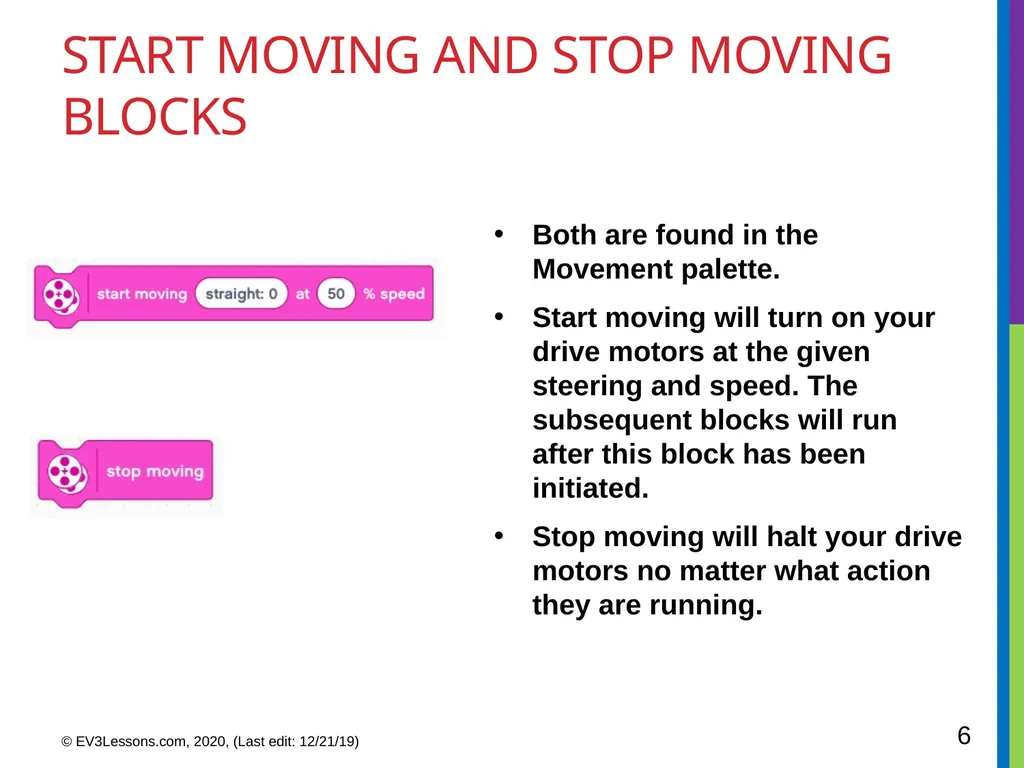
slide6. Start Moving and Stop Moving Blocks Both are found in the Movement palette.
Start moving will turn on your drive motors at the given steering and speed. The subsequent blocks will run after this block has been initiated.
Stop moving will halt your drive motors no matter what action they are running. © EV3Lessons.com, 2020, (Last edit: 12/21/19) 6<br>
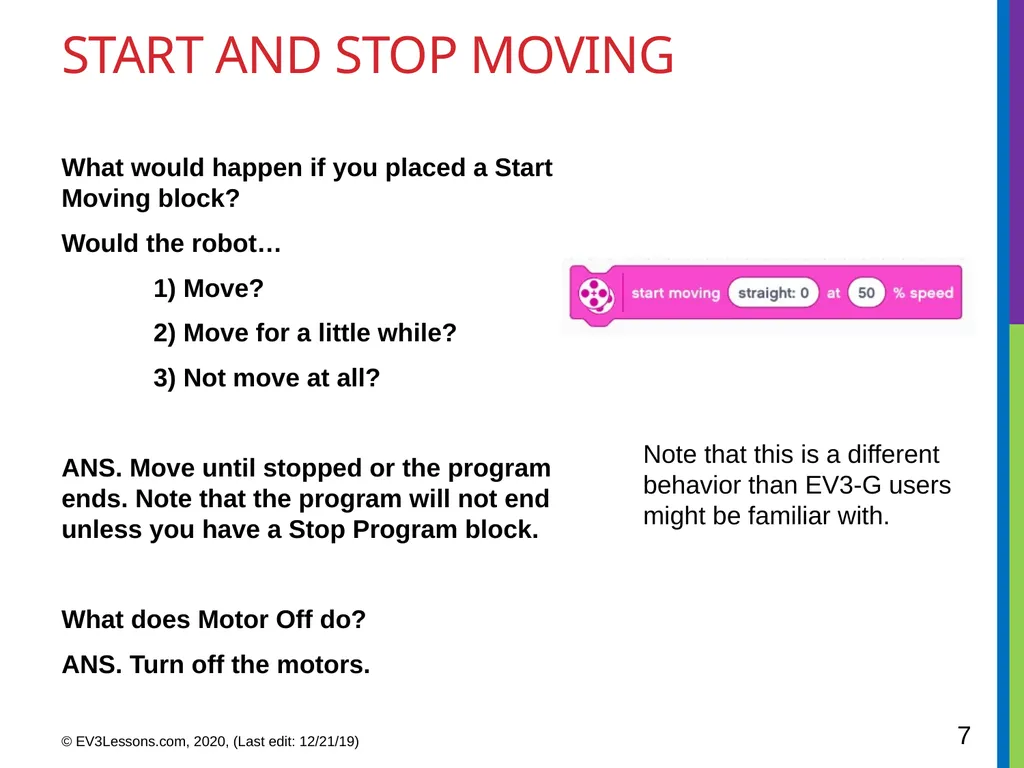
slide7. Start and stop Moving © EV3Lessons.com, 2020, (Last edit: 12/21/19) 7 What would happen if you placed a Start Moving block?
Would the robot…
1) Move?
2) Move for a little while?
3) Not move at all?

ANS. Move until stopped or the program ends. Note that the program will not end unless you have a Stop Program block.

What does Motor Off do?
ANS. Turn off the motors. Note that this is a different behavior than EV3-G users might be familiar with.<br>
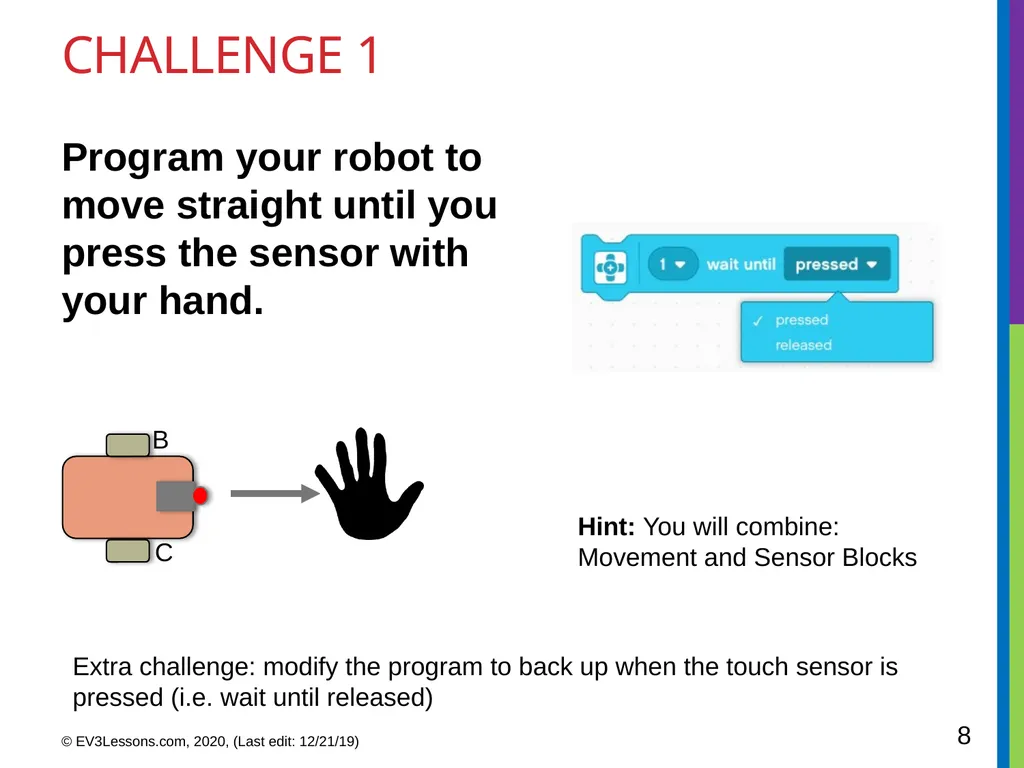
slide8. CHALLENGE 1 Program your robot to move straight until you press the sensor with your hand. © EV3Lessons.com, 2020, (Last edit: 12/21/19) 8 Hint: You will combine: Movement and Sensor Blocks B C Extra challenge: modify the program to back up when the touch sensor is pressed (i.e. wait until released)<br>
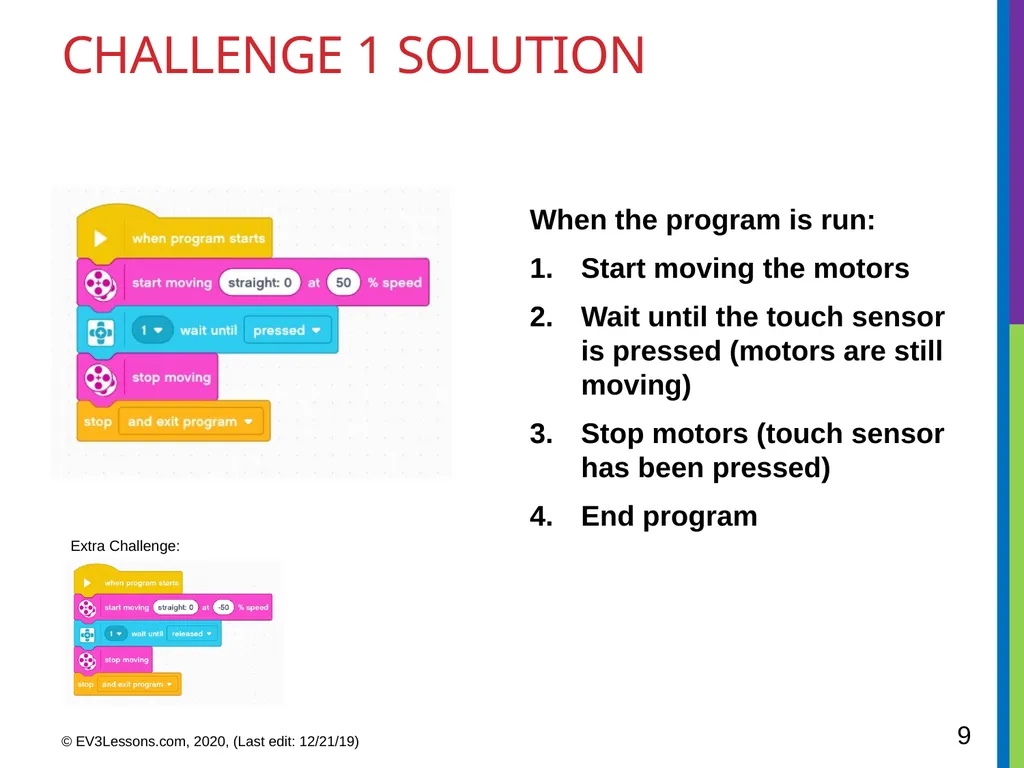
slide9. Challenge 1 Solution © EV3Lessons.com, 2020, (Last edit: 12/21/19) 9 When the program is run:
Start moving the motors
Wait until the touch sensor is pressed (motors are still moving)
Stop motors (touch sensor has been pressed)
End program Extra Challenge:<br>
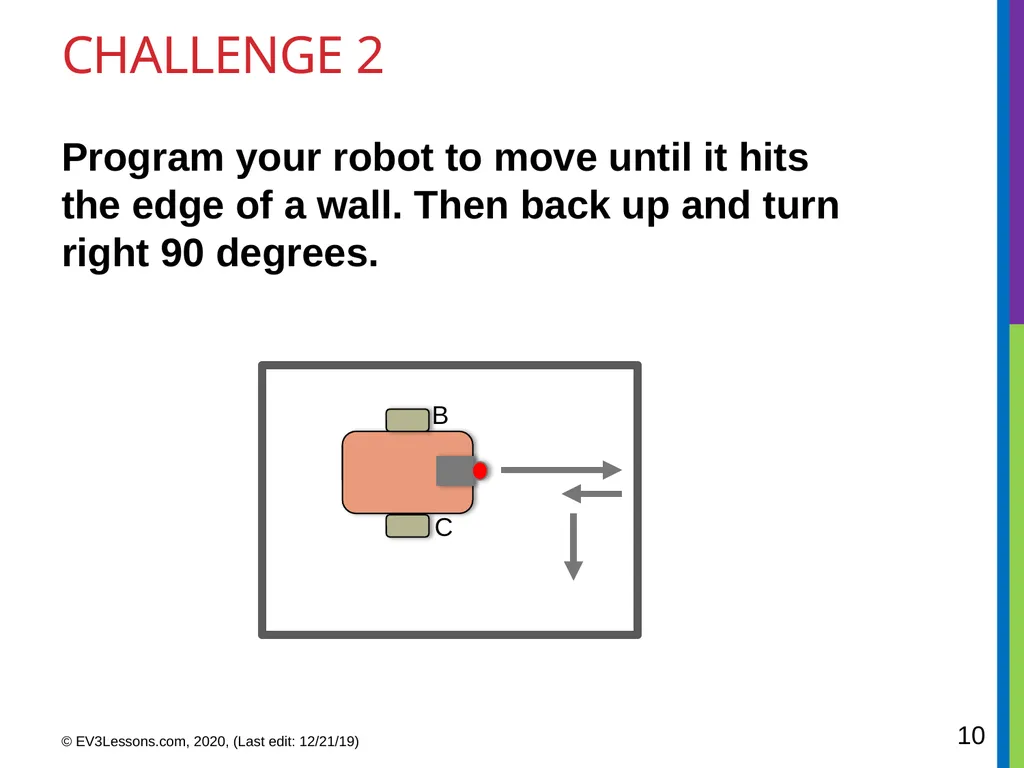
slide10. CHALLENGE 2 Program your robot to move until it hits the edge of a wall. Then back up and turn right 90 degrees. © EV3Lessons.com, 2020, (Last edit: 12/21/19) 10 B C<br>
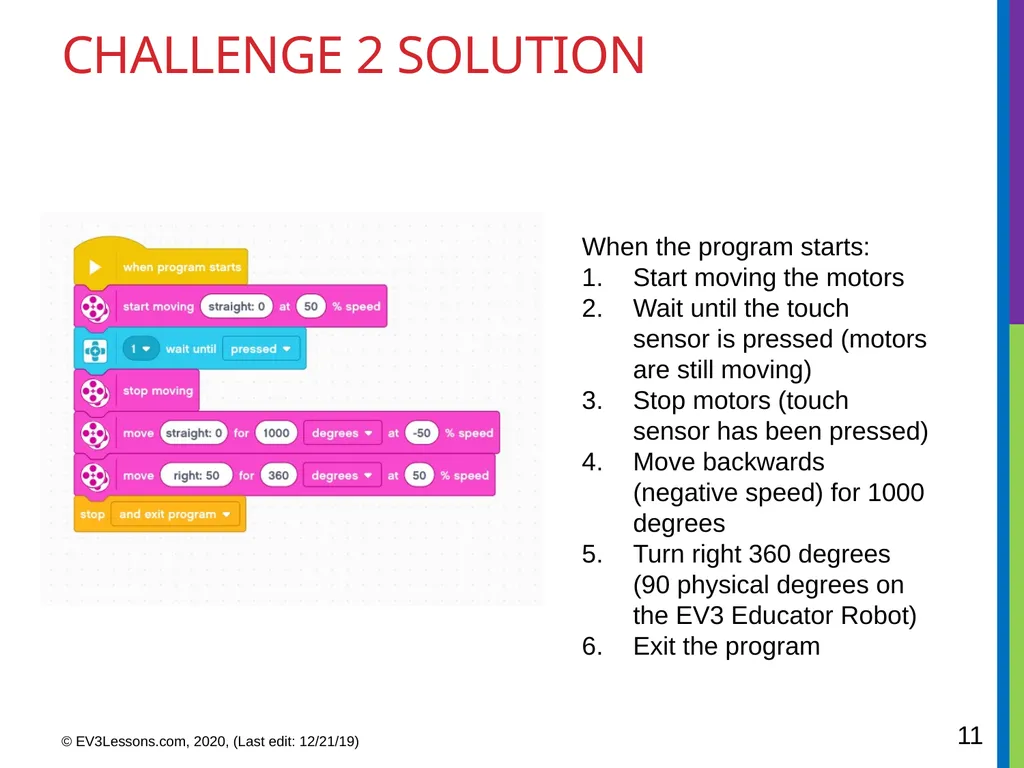
slide11. Challenge 2 Solution © EV3Lessons.com, 2020, (Last edit: 12/21/19) 11 When the program starts:
Start moving the motors
Wait until the touch sensor is pressed (motors are still moving)
Stop motors (touch sensor has been pressed)
Move backwards (negative speed) for 1000 degrees
Turn right 360 degrees (90 physical degrees on the EV3 Educator Robot)
Exit the program<br>
slide12. DISCUSSION Why did you use START MOVING Block for these challenges?
You want to read the sensor while the motor is on.
Why do we use the TOUCH SENSOR WAIT UNTIL BLOCK in these challenges?
We need to program to wait for the correct reading
What is the difference between PRESSED and RELEASED?
PRESSED = pushed in
RELEASED = not pushed What are some situations you might want to use each of these for?
PRESSED = running into a wall
RELEASED = no longer touching a wall © EV3Lessons.com, 2020, (Last edit: 12/21/19) 12<br>
slide13. CREDITS This tutorial was created by Sanjay Seshan and Arvind Seshan
More lessons are available at www.ev3lessons.com © EV3Lessons.com, 2020, (Last edit: 12/21/19) 13 This work is licensed under a Creative Commons Attribution-NonCommercial-ShareAlike 4.0 International License.<br>