
Finance self service journal entry training


Description: Finance self service journal entry training February 8, 2021 Penney Doughtie Finance Self Service Journal Entry Training Training includes: Security Access to Enter a Journal Entry in Banner Security Access to Xtender Definition of a
Related Topics
Download Presentation
"Finance self service journal entry training" is the property of its rightful owner. Permission is granted to download and print the materials on this website for personal, non-commercial use only, and to display it on your personal computer provided you do not modify the materials and that you retain all copyright notices contained in the materials. By downloading content from our website, you accept the terms of this agreement.
Presentation Transcript
slide1. Finance self service
journal entry training February 8, 2021
Penney Doughtie<br>
slide2. Finance Self Service Journal Entry Training Training includes:
Security Access to Enter a Journal Entry in Banner
Security Access to Xtender
Definition of a Journal Entry
Log into Finance Self Service
Create a Journal Entry in Finance Self Service
Attach Scanned Documents to Journal Entry
Copy, Reverse, Delete a Journal Entry
Approve Journal Entry
Month End Schedule and Timing of Journal Entries
Required Backup Documentation 2<br>
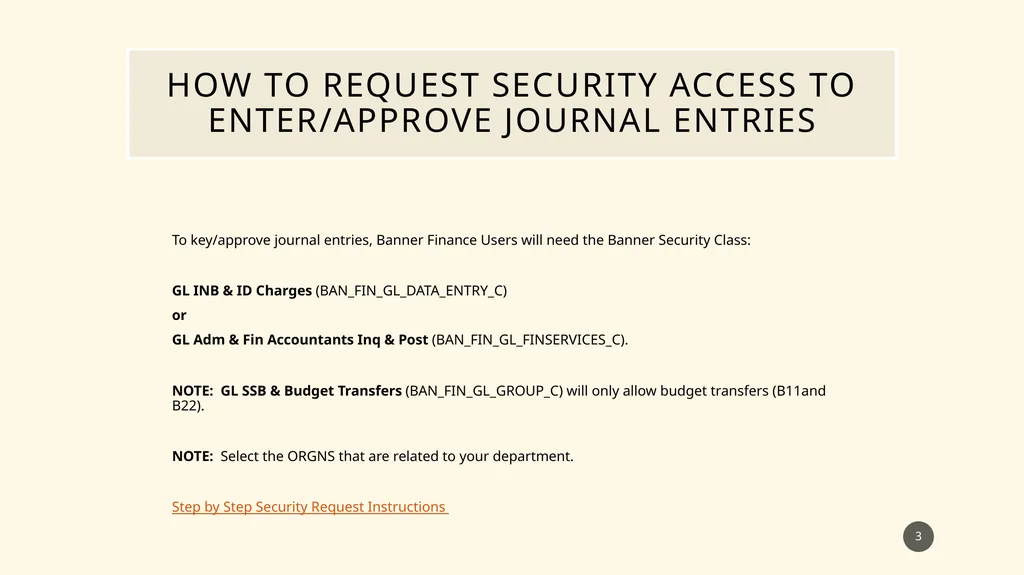
slide3. How TO REQUEST security access to enter/approve journal entries To key/approve journal entries, Banner Finance Users will need the Banner Security Class:
GL INB & ID Charges (BAN_FIN_GL_DATA_ENTRY_C)
or
GL Adm & Fin Accountants Inq & Post (BAN_FIN_GL_FINSERVICES_C).
NOTE: GL SSB & Budget Transfers (BAN_FIN_GL_GROUP_C) will only allow budget transfers (B11and B22).
NOTE: Select the ORGNS that are related to your department.
Step by Step Security Request Instructions 3<br>
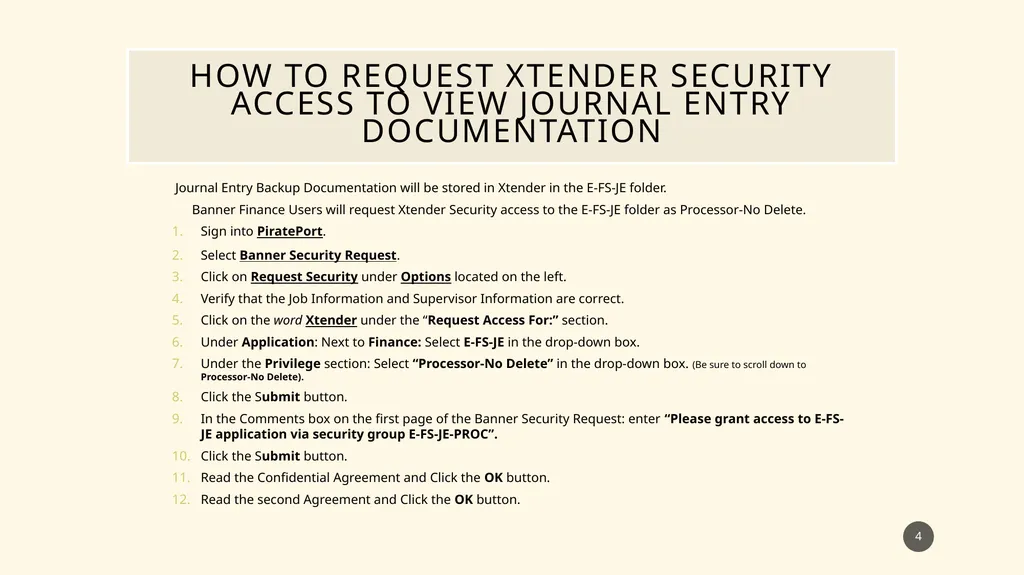
slide4. How TO REQUEST Xtender security access to view journal entry documentation Journal Entry Backup Documentation will be stored in Xtender in the E-FS-JE folder.
Banner Finance Users will request Xtender Security access to the E-FS-JE folder as Processor-No Delete.
Sign into PiratePort.
Select Banner Security Request.
Click on Request Security under Options located on the left.
Verify that the Job Information and Supervisor Information are correct.
Click on the word Xtender under the “Request Access For:” section.
Under Application: Next to Finance: Select E-FS-JE in the drop-down box.
Under the Privilege section: Select “Processor-No Delete” in the drop-down box. (Be sure to scroll down to Processor-No Delete).
Click the Submit button.
In the Comments box on the first page of the Banner Security Request: enter “Please grant access to E-FS-JE application via security group E-FS-JE-PROC”.
Click the Submit button.
Read the Confidential Agreement and Click the OK button.
Read the second Agreement and Click the OK button. 4<br>
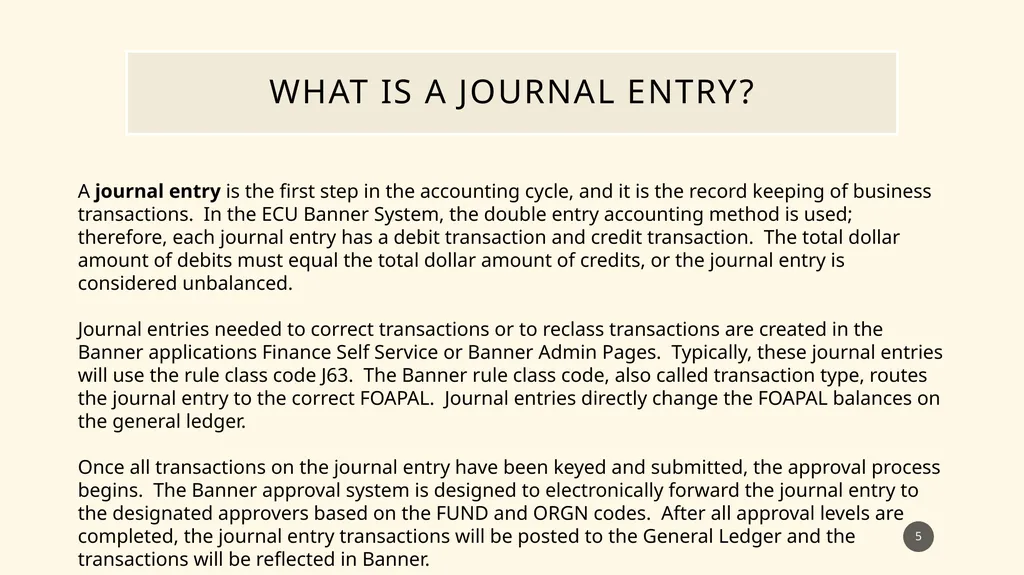
slide5. What is a Journal Entry? A journal entry is the first step in the accounting cycle, and it is the record keeping of business transactions. In the ECU Banner System, the double entry accounting method is used; therefore, each journal entry has a debit transaction and credit transaction. The total dollar amount of debits must equal the total dollar amount of credits, or the journal entry is considered unbalanced.
Journal entries needed to correct transactions or to reclass transactions are created in the Banner applications Finance Self Service or Banner Admin Pages. Typically, these journal entries will use the rule class code J63. The Banner rule class code, also called transaction type, routes the journal entry to the correct FOAPAL. Journal entries directly change the FOAPAL balances on the general ledger.
Once all transactions on the journal entry have been keyed and submitted, the approval process begins. The Banner approval system is designed to electronically forward the journal entry to the designated approvers based on the FUND and ORGN codes. After all approval levels are completed, the journal entry transactions will be posted to the General Ledger and the transactions will be reflected in Banner. 5<br>
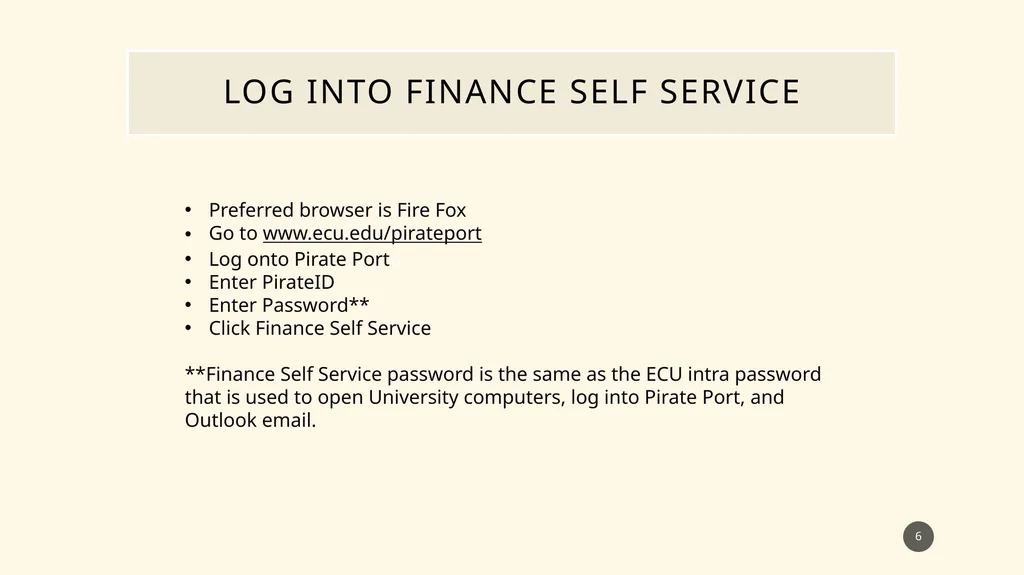
slide6. Log into Finance Self Service 6 Preferred browser is Fire Fox
Go to www.ecu.edu/pirateport
Log onto Pirate Porto
Enter PirateID
Enter Password**
Click Finance Self Service
**Finance Self Service password is the same as the ECU intra password that is used to open University computers, log into Pirate Port, and Outlook email.<br>
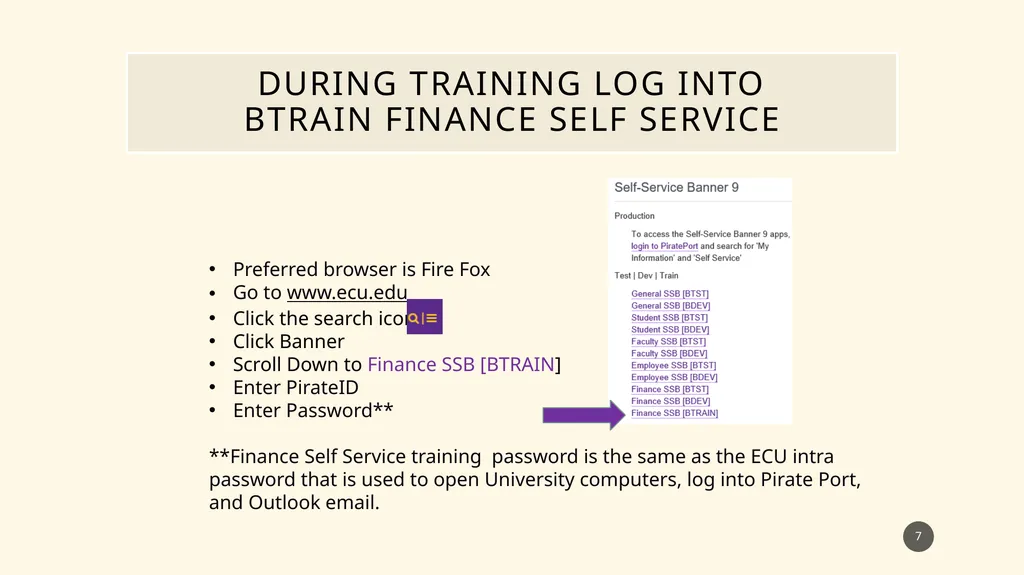
slide7. During training Log into BTRAIN Finance Self Service 7 Preferred browser is Fire Fox
Go to www.ecu.edu
Click the search icon
Click Banner
Scroll Down to Finance SSB [BTRAIN]
Enter PirateID
Enter Password**
**Finance Self Service training password is the same as the ECU intra password that is used to open University computers, log into Pirate Port, and Outlook email.<br>
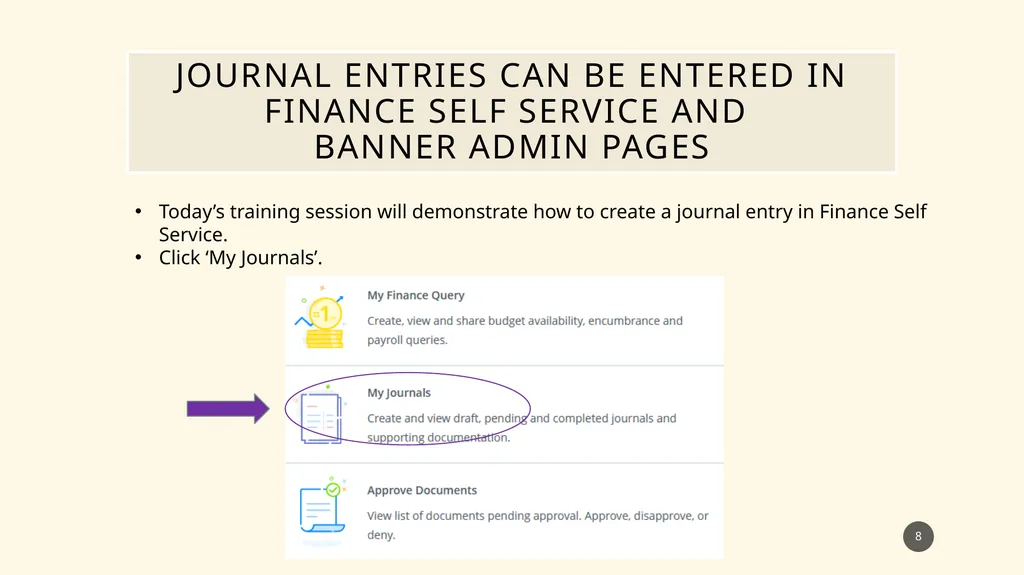
slide8. Journal Entries CAN BE ENTERED IN FINANCE SELF SERVICE AND BANNER ADMIN PAGES Today’s training session will demonstrate how to create a journal entry in Finance Self Service.
Click ‘My Journals’. 8<br>
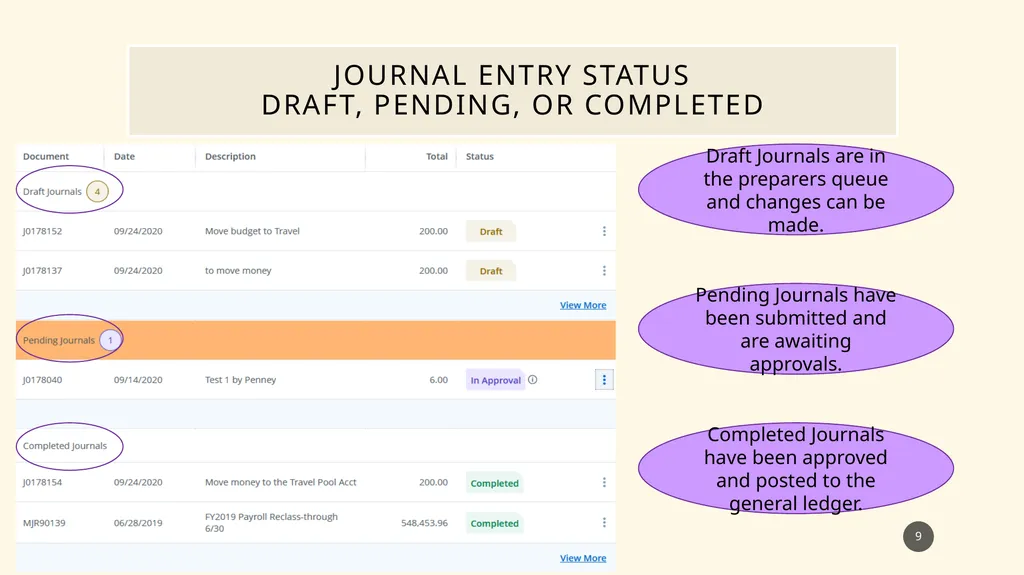
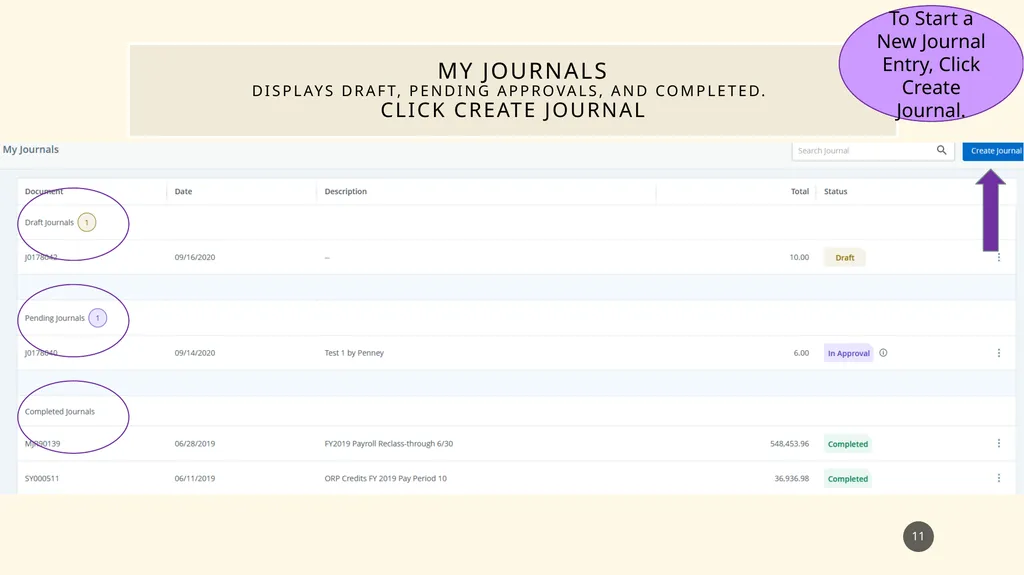
slide9. Journal Entry Status Draft, pending, or completed Finance Self Service Journal Entry Training Finance Self Service Journal Entry Training 9 Draft Journals are in the preparers queue and changes can be made. Pending Journals have been submitted and are awaiting approvals. Completed Journals have been approved and posted to the general ledger.<br>
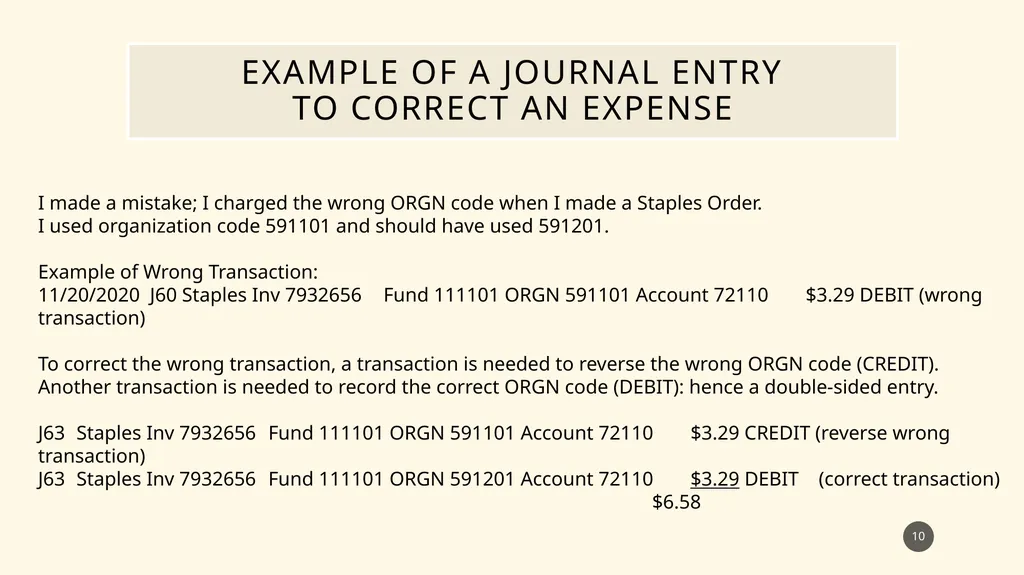
slide10. Example of A Journal Entry to correct an expense 10 I made a mistake; I charged the wrong ORGN code when I made a Staples Order.
I used organization code 591101 and should have used 591201.
Example of Wrong Transaction:
11/20/2020 J60 Staples Inv 7932656 Fund 111101 ORGN 591101 Account 72110 $3.29 DEBIT (wrong transaction)
To correct the wrong transaction, a transaction is needed to reverse the wrong ORGN code (CREDIT).
Another transaction is needed to record the correct ORGN code (DEBIT): hence a double-sided entry.
J63 Staples Inv 7932656 Fund 111101 ORGN 591101 Account 72110 $3.29 CREDIT (reverse wrong transaction)
J63 Staples Inv 7932656 Fund 111101 ORGN 591201 Account 72110 $3.29 DEBIT (correct transaction)
$6.58<br>
slide11. My Journals Displays Draft, Pending Approvals, and Completed. Click Create Journal Finance Self Service Journal Entry Training Finance Self Service Journal Entry Training 11 To Start a New Journal Entry, Click
Create Journal.<br>
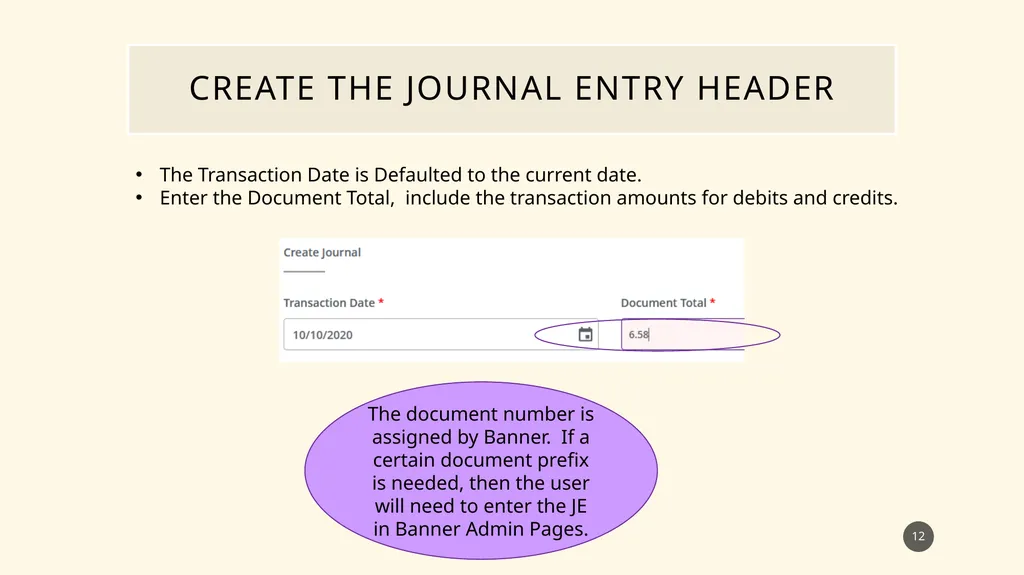
slide12. Create the journal entry header 12 The document number is assigned by Banner. If a certain document prefix is needed, then the user will need to enter the JE in Banner Admin Pages. The Transaction Date is Defaulted to the current date.
Enter the Document Total, include the transaction amounts for debits and credits.<br>
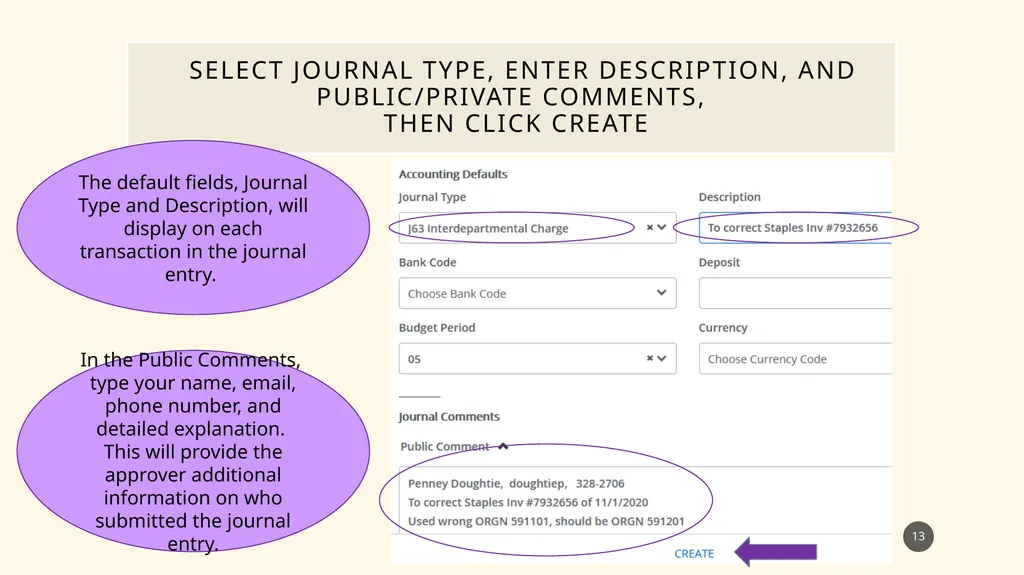
slide13. Select journal type, Enter Description, and public/private comments, Then click create 13 In the Public Comments, type your name, email, phone number, and detailed explanation. This will provide the approver additional information on who submitted the journal entry. The default fields, Journal Type and Description, will display on each transaction in the journal entry.<br>
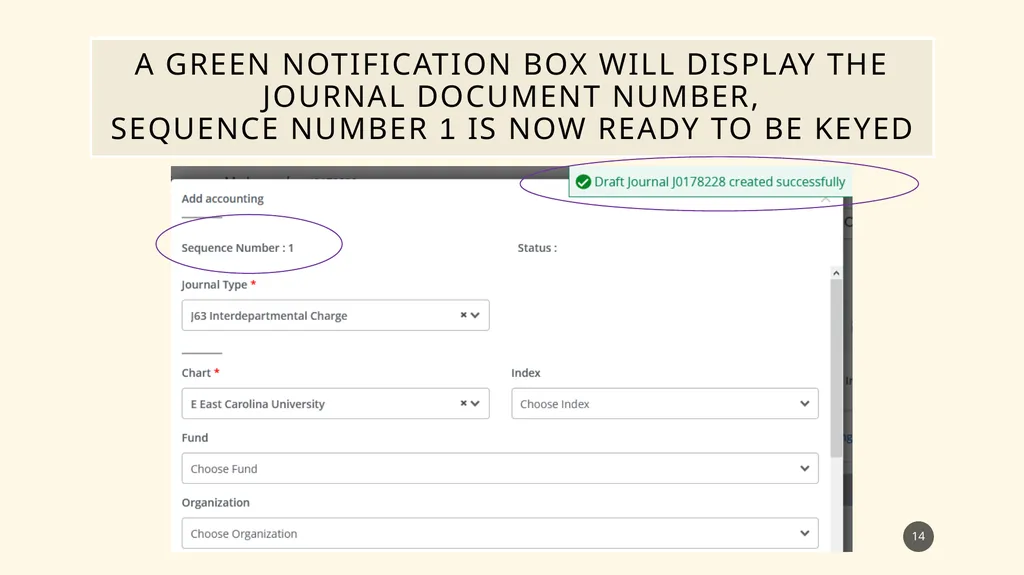
slide14. A green notification box will display the Journal document number, Sequence number 1 is now ready to be keyed Finance Self Service Journal Entry Training Finance Self Service Journal Entry Training 14<br>
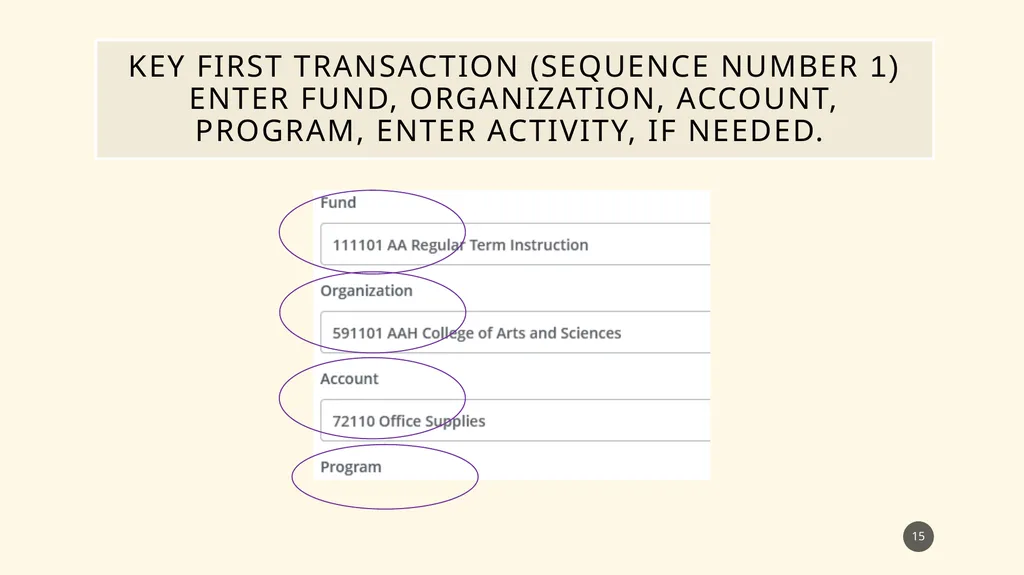
slide15. Key first transaction (Sequence number 1) Enter fund, Organization, account, Program, Enter activity, if needed. 15<br>
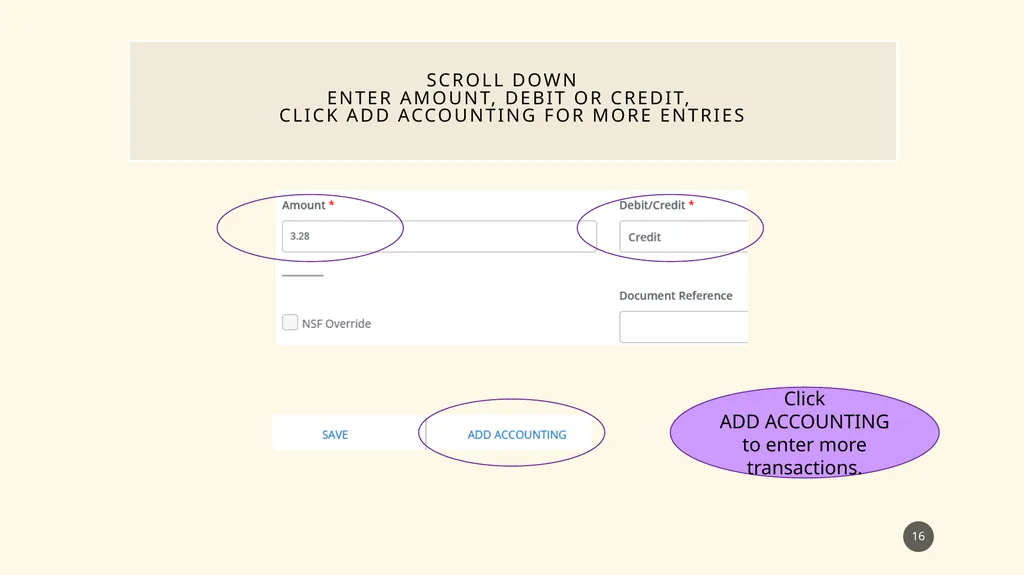
slide16. Scroll Down Enter amount, Debit or credit, click Add Accounting for more entries 16 Click
ADD ACCOUNTING to enter more transactions.<br>
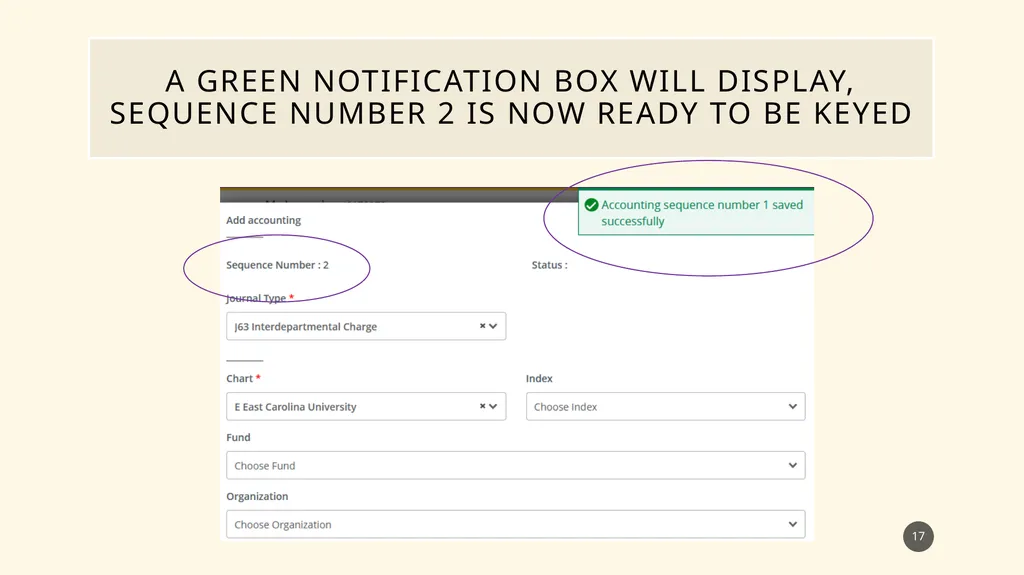
slide17. A green notification box will display, Sequence number 2 is now ready to be keyed 17<br>
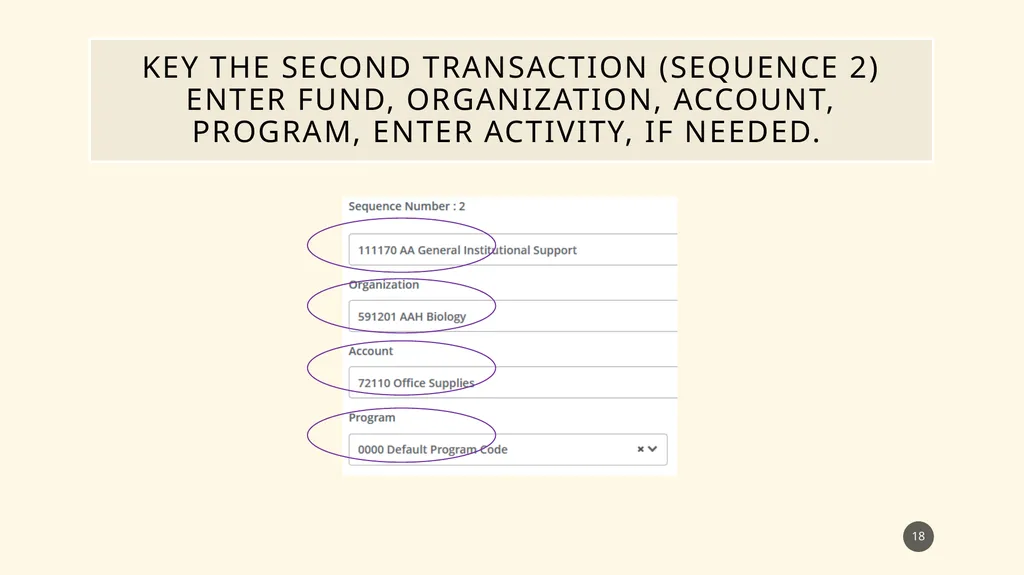
slide18. Key the Second transaction (Sequence 2) Enter fund, Organization, account, Program, Enter activity, if needed. 18<br>
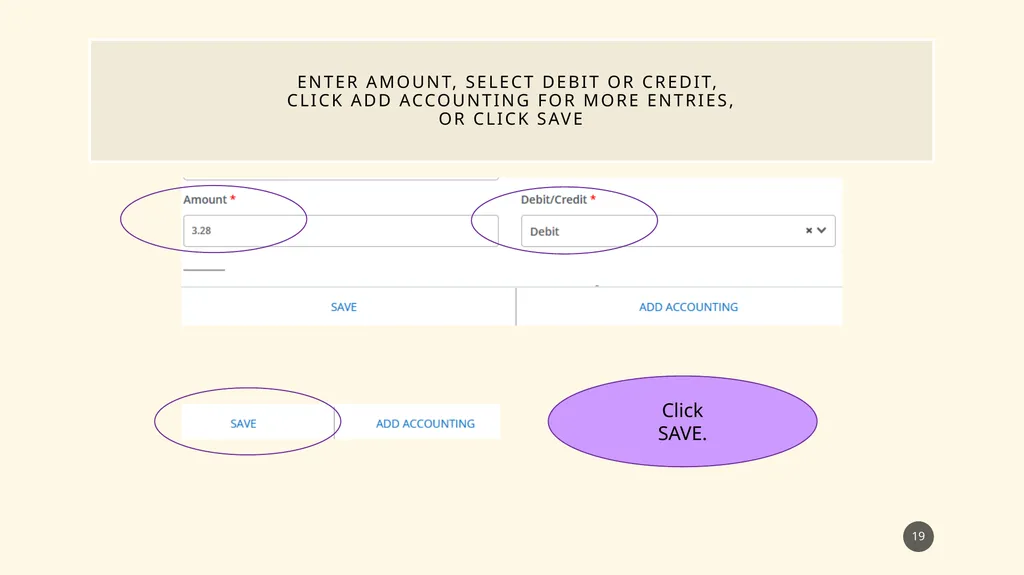
slide19. Enter amount, Select debit or credit, click Add Accounting for more entries, Or click save Finance Self Service Journal Entry Training Finance Self Service Journal Entry Training 19 Click
SAVE.<br>
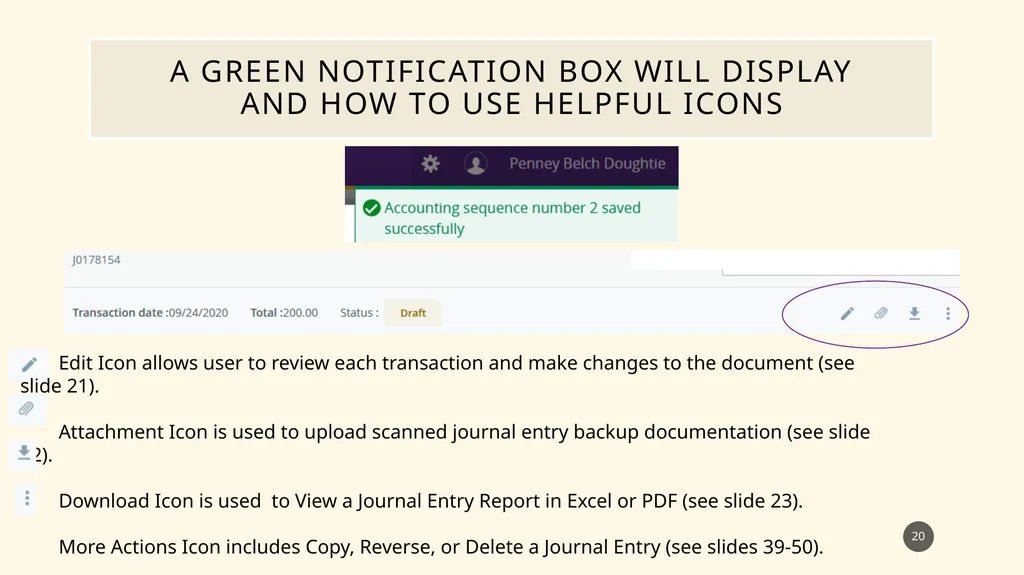
slide20. A green notification box will display and how to use helpful icons Finance Self Service Journal Entry Training Finance Self Service Journal Entry Training 20 Edit Icon allows user to review each transaction and make changes to the document (see slide 21).
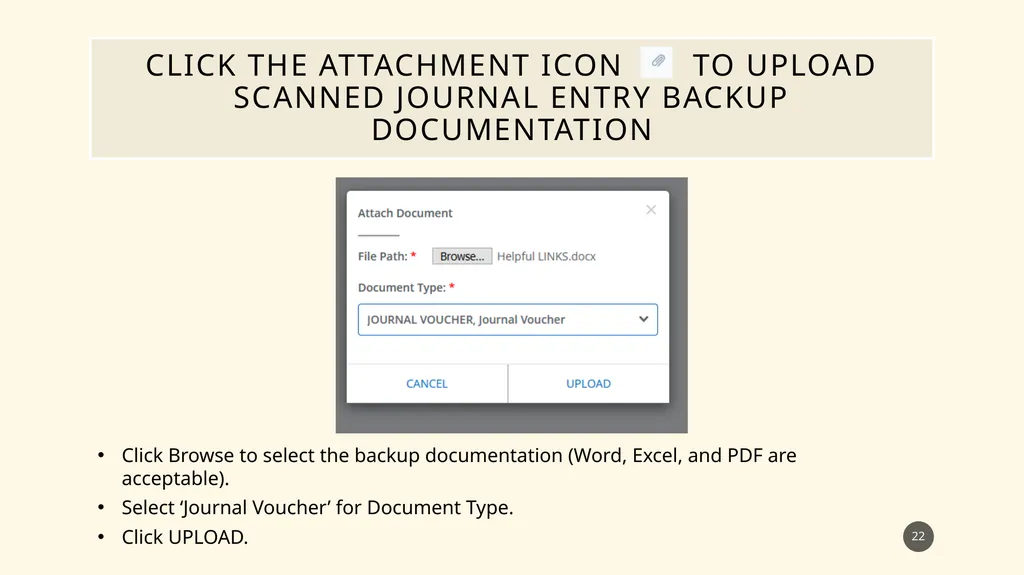
Attachment Icon is used to upload scanned journal entry backup documentation (see slide 22).
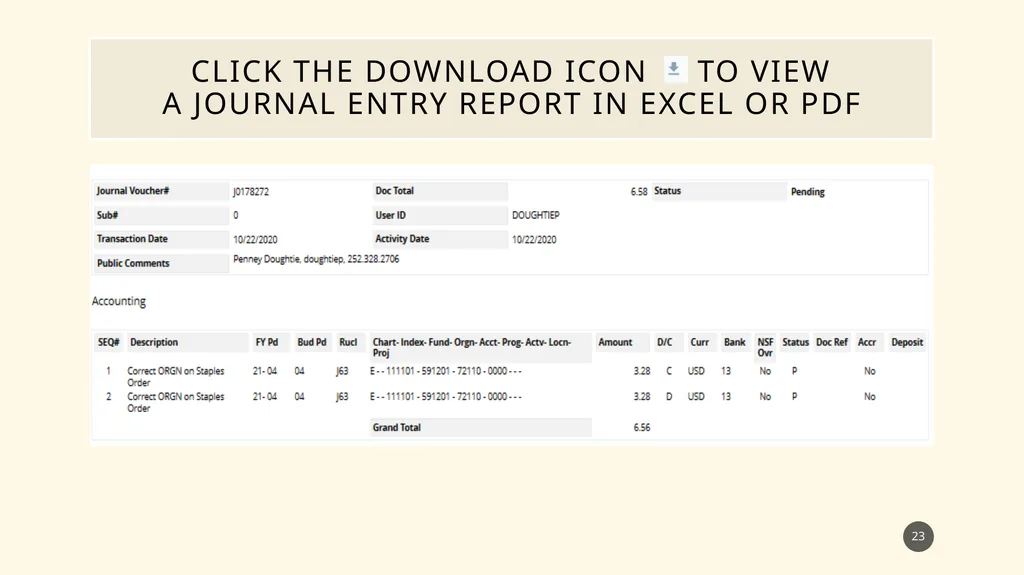
Download Icon is used to View a Journal Entry Report in Excel or PDF (see slide 23).
More Actions Icon includes Copy, Reverse, or Delete a Journal Entry (see slides 39-50).<br>
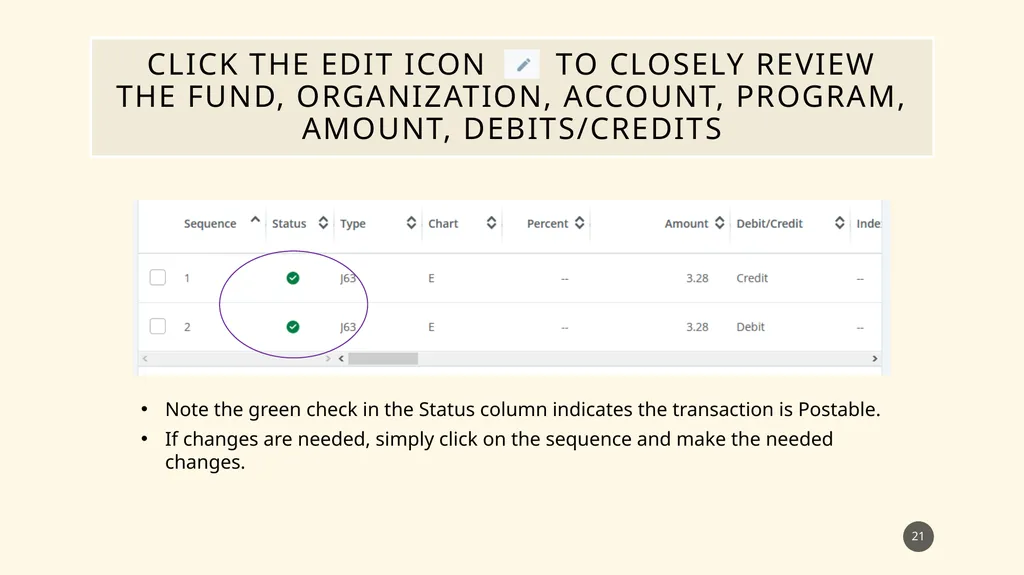
slide21. Click the Edit Icon to Closely review The fund, Organization, account, Program, amount, Debits/credits Finance Self Service Journal Entry Training Finance Self Service Journal Entry Training 21 Note the green check in the Status column indicates the transaction is Postable.
If changes are needed, simply click on the sequence and make the needed changes.<br>
slide22. Click the Attachment Icon to upload scanned journal entry backup documentation 22 Click Browse to select the backup documentation (Word, Excel, and PDF are acceptable).
Select ‘Journal Voucher’ for Document Type.
Click UPLOAD.<br>
slide23. Click the Download Icon to View a Journal Entry Report in Excel or PDF Finance Self Service Journal Entry Training Finance Self Service Journal Entry Training 23<br>
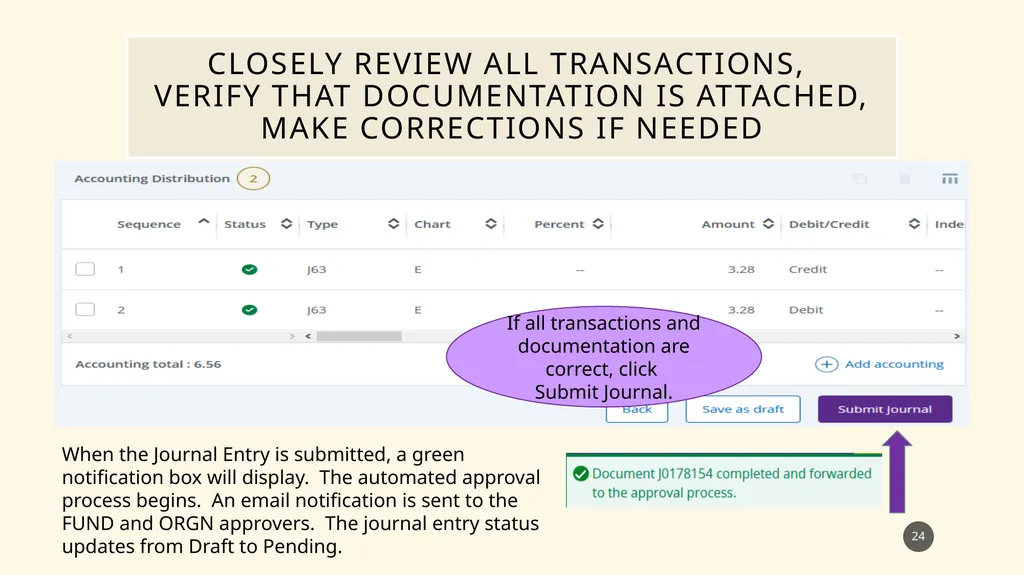
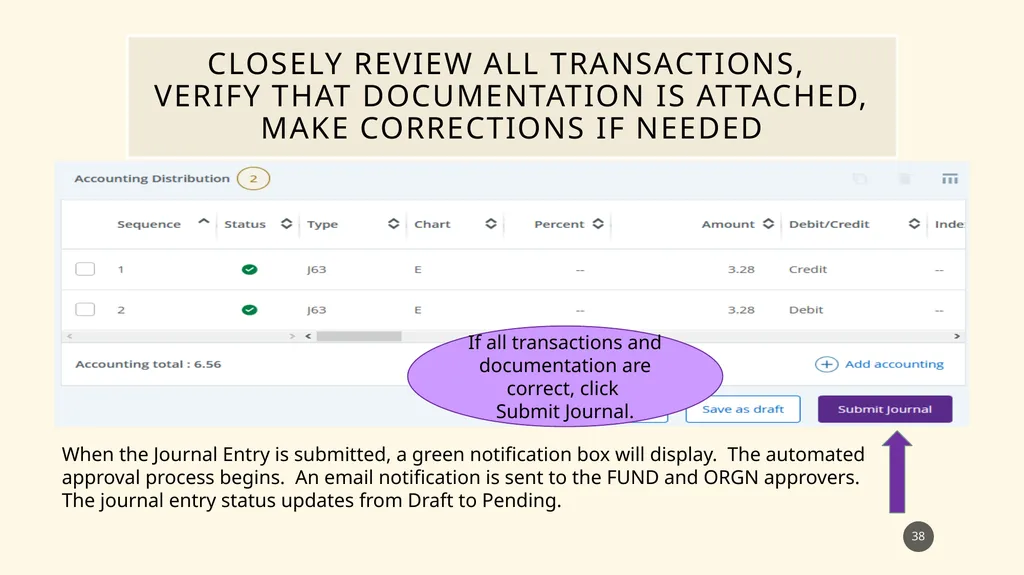
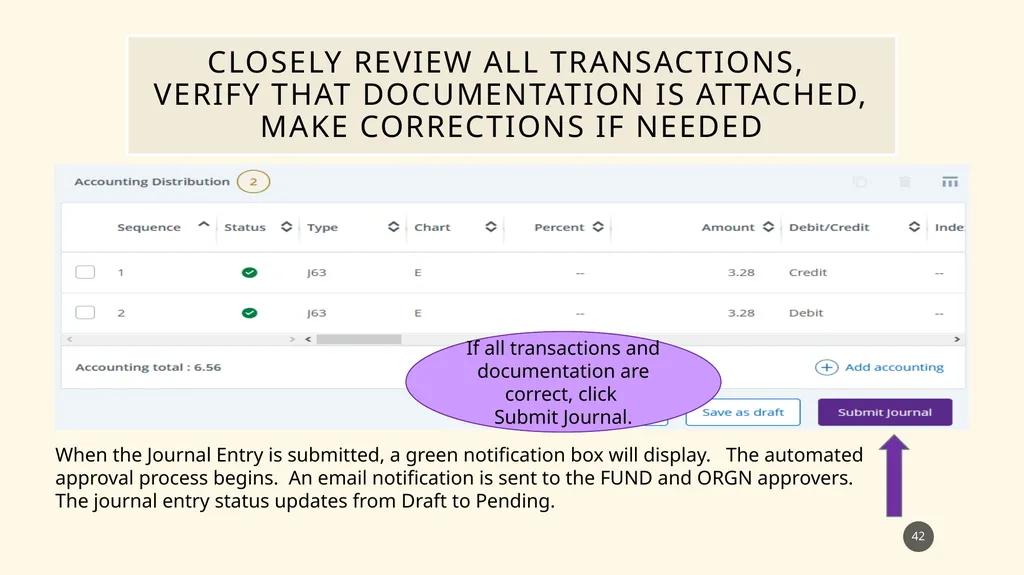
slide24. Closely review all transactions, verify that Documentation is attached, make corrections if needed Finance Self Service Journal Entry Training Finance Self Service Journal Entry Training 24 When the Journal Entry is submitted, a green notification box will display. The automated approval process begins. An email notification is sent to the FUND and ORGN approvers. The journal entry status updates from Draft to Pending. If all transactions and documentation are correct, click
Submit Journal.<br>
slide25. Approval routing Finance Self Service Journal Entry Training Finance Self Service Journal Entry Training 25 Automated emails are sent to the next approver for every completed document. Every document will receive an ORGN approval and a FUND approval, both of which are required. There are some divisions that require more than one ORGN approval so there may be multiple ORGN level approvals on one document.
ORGN level approvals will have LVL1 and LVL2 in the queue description. These approvals are required before the document will proceed to the FUND level approval.
All FUND level approvals will have LVL3 in the queue description. Once the document has been approved at this level, the document will proceed to posting in Banner. Every FUND type will be approved (State, Grant, ITF, Foundation).
***NOTE, only one approval is need for each approval level.<br>
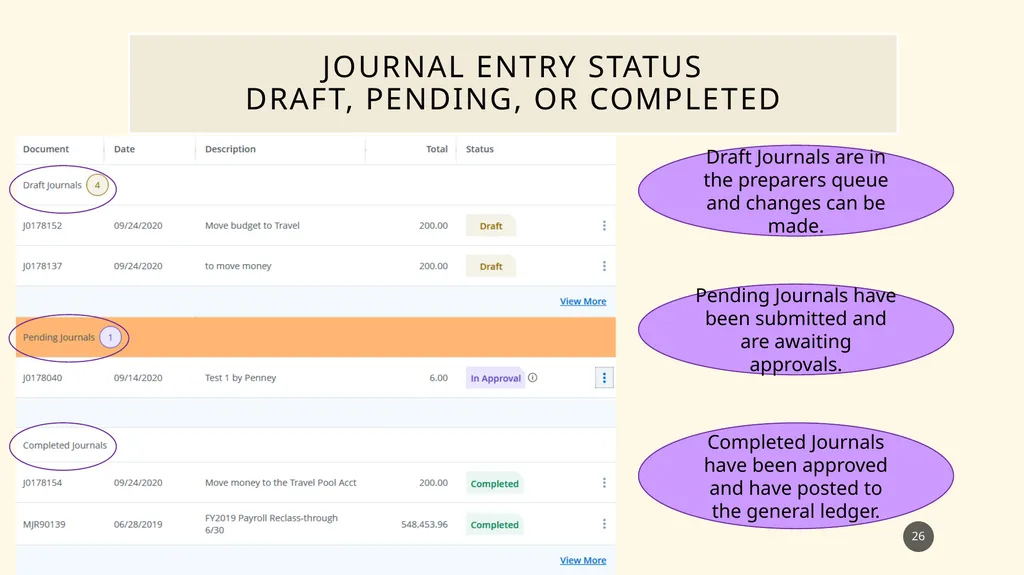
slide26. Journal Entry Status Draft, pending, or completed Finance Self Service Journal Entry Training Finance Self Service Journal Entry Training 26 Draft Journals are in the preparers queue and changes can be made. Pending Journals have been submitted and are awaiting approvals. Completed Journals have been approved and have posted to the general ledger.<br>
slide27. Example of a Journal Entry to correct a deposit I made a mistake; I entered a deposit and used the wrong ACCOUNT code.
I used account code 50143 and should have used 50154.
Example of Wrong Transaction:
11/20/2020 XYZ Mr. Smith Receipt #2706 Fund 111101 ORGN 591101 Account 50143 $125.00 CREDIT
To correct the wrong transaction, a transaction is needed to reverse the wrong ACCOUNT code (DEBIT). Another transaction is needed to record the correct ACCOUNT code (CREDIT); hence a double-sided entry.
J63 Deposit Fund 111101 ORGN 591101 Account 50143 $125.00 DEBIT
J63 Deposit Fund 111101 ORGN 591101 Account 50154 $125.00 CREDIT 27<br>
slide28. My Journals Displays Draft, Pending Approvals, and Completed. Click Create Journal Finance Self Service Journal Entry Training Finance Self Service Journal Entry Training 28 To Start a New Journal Entry, Click
Create Journal.<br>
slide29. Create the journal entry header 29 The document number is assigned by Banner. If a certain document prefix is needed, then the user will need to enter the JE in Banner Admin Pages. The Transaction Date is Defaulted to the current date.
Enter the Document Total, include the transaction amounts for debits and credits.<br>
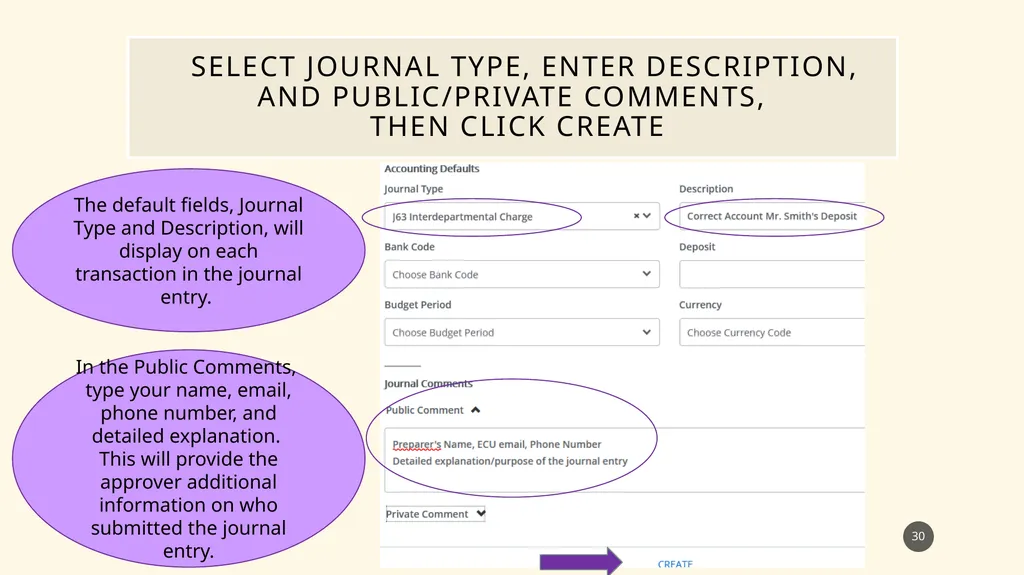
slide30. Select journal type, Enter Description, and public/private comments, Then click create 30 The default fields, Journal Type and Description, will display on each transaction in the journal entry. In the Public Comments, type your name, email, phone number, and detailed explanation. This will provide the approver additional information on who submitted the journal entry.<br>
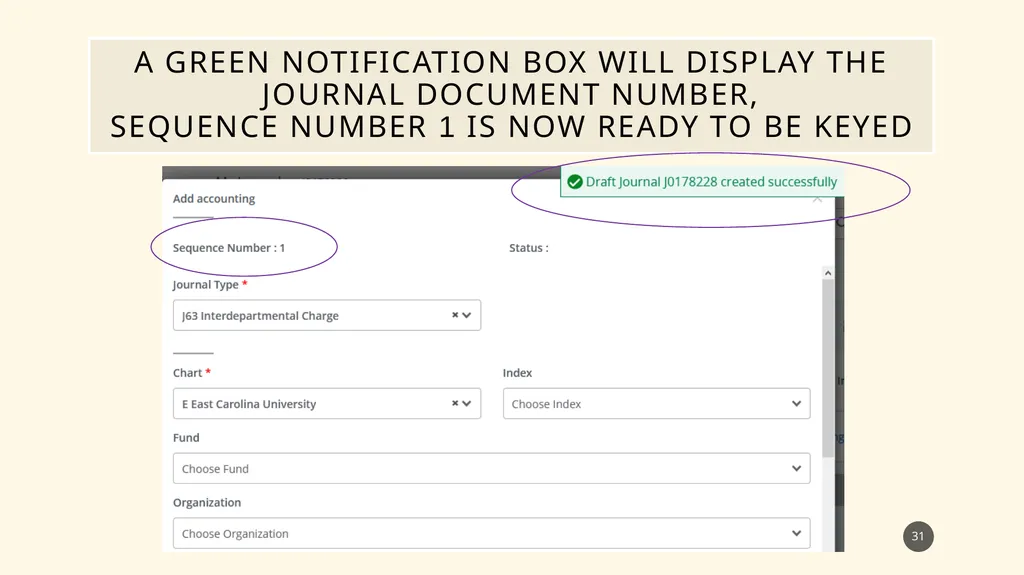
slide31. A green notification box will display The Journal document number, Sequence number 1 is now ready to be keyed Finance Self Service Journal Entry Training Finance Self Service Journal Entry Training 31<br>
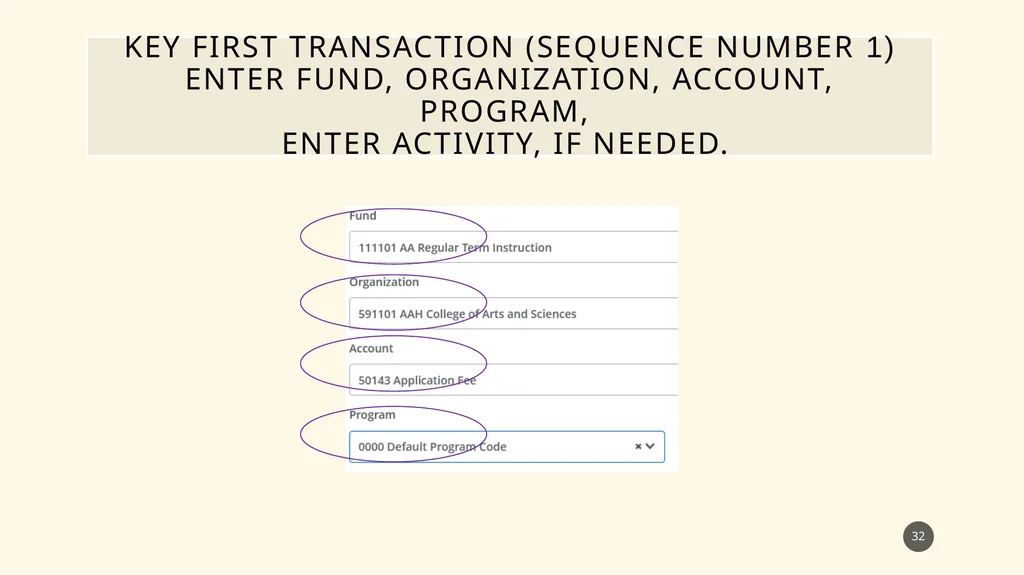
slide32. Key first transaction (Sequence number 1) Enter fund, Organization, account, Program, Enter activity, if needed. 32<br>
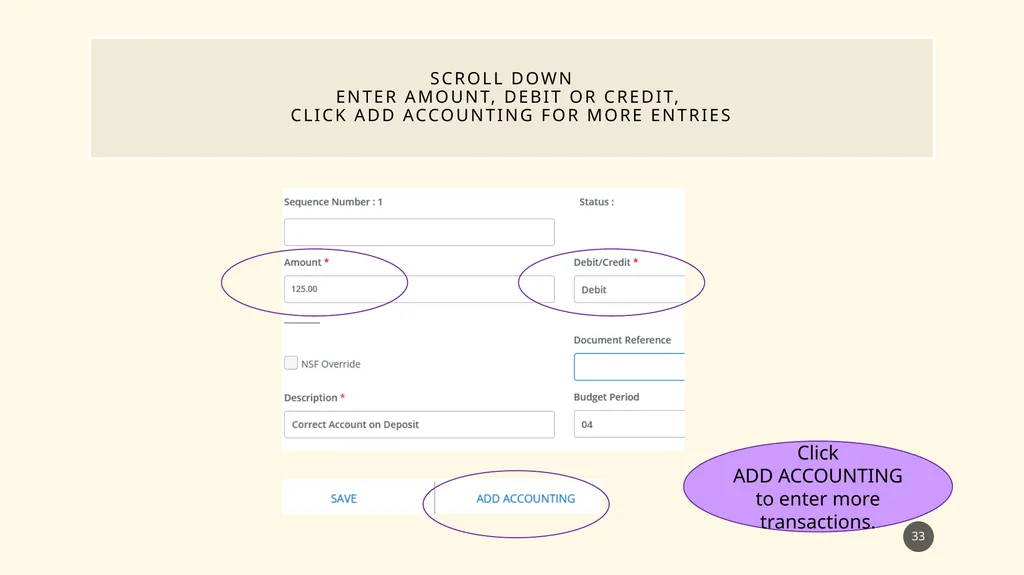
slide33. Scroll Down Enter amount, Debit or credit, click Add Accounting for more entries 33 Click
ADD ACCOUNTING to enter more transactions.<br>
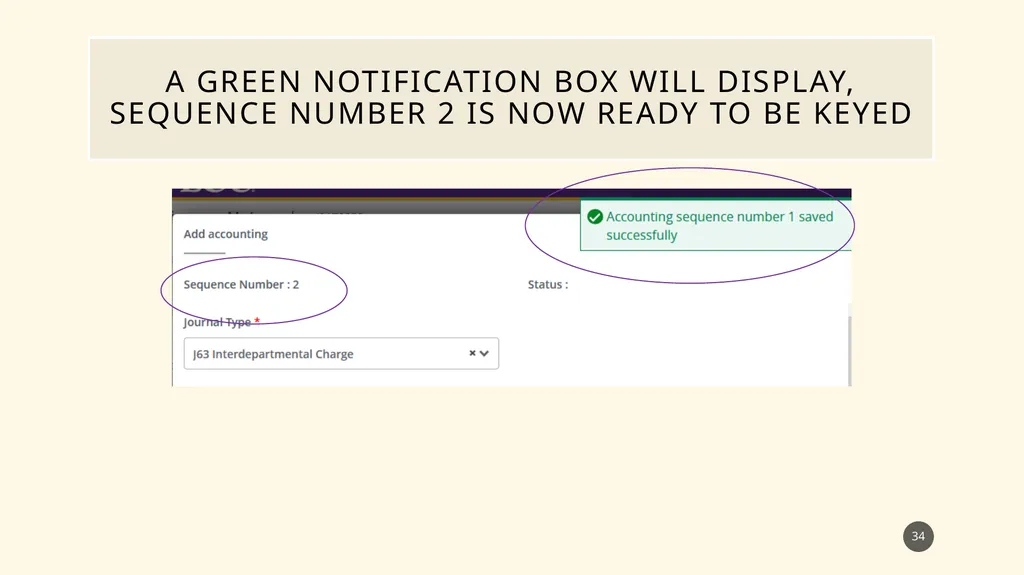
slide34. A green notification box will display, Sequence number 2 is now ready to be keyed 34<br>
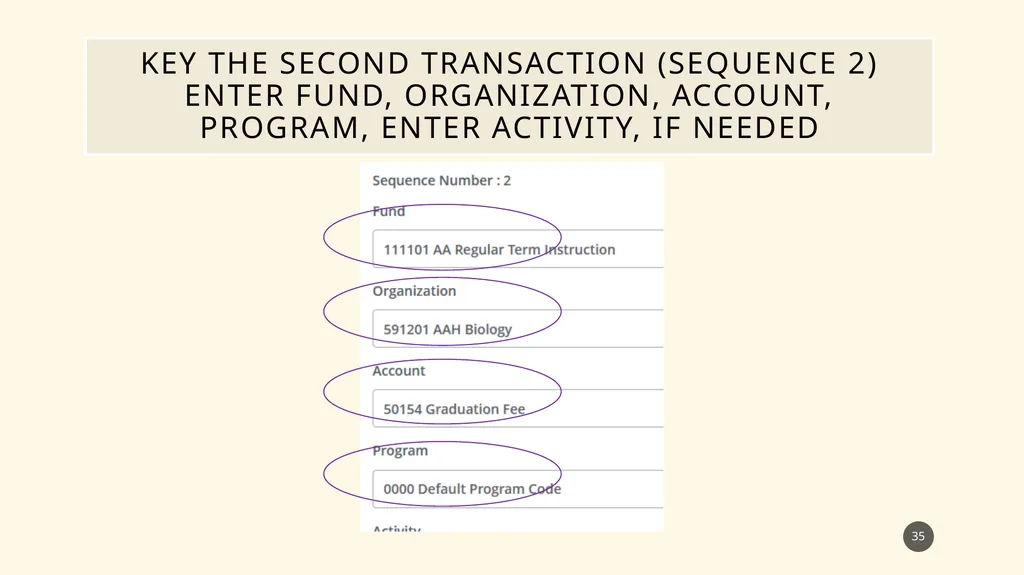
slide35. Key the Second transaction (Sequence 2) Enter fund, Organization, account, Program, Enter activity, if needed 35<br>
slide36. Enter amount, Select debit or credit, click Add Accounting for more entries Or click save 36 Click
SAVE.<br>
slide37. A green notification box will display and how to use helpful icons 37 Edit Icon allows user to review each transaction and make changes to the document (see slide 21).
Attachment Icon is used to upload scanned journal entry backup documentation (see slide 22).
Download Icon is used to View a Journal Entry Report in Excel or PDF (see slide 23).
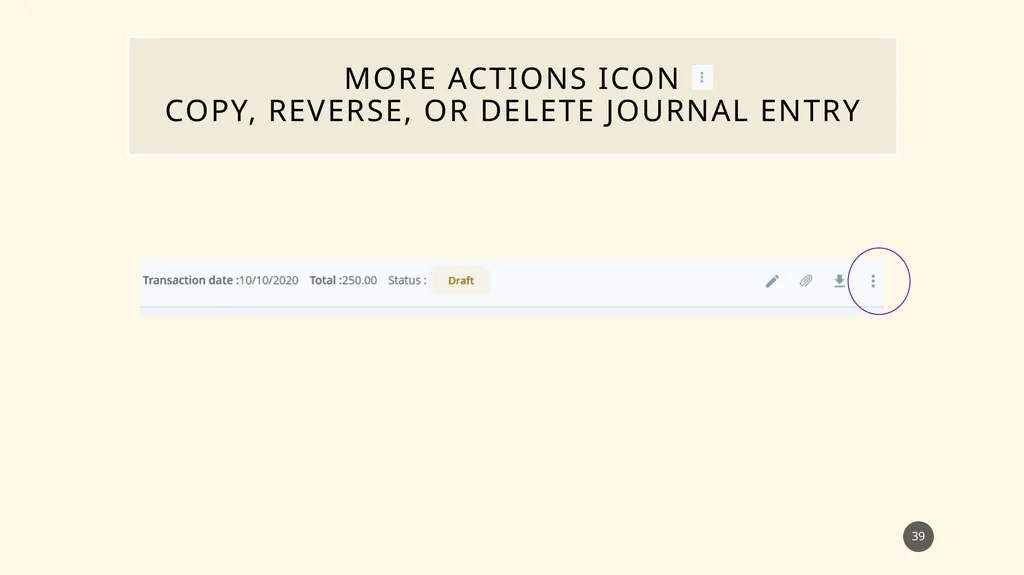
More Actions Icon includes Copy, Reverse, or Delete a Journal Entry (see slides 39-50).<br>
slide38. Closely review all transactions, verify that Documentation is attached, make corrections if needed Finance Self Service Journal Entry Training Finance Self Service Journal Entry Training 38 When the Journal Entry is submitted, a green notification box will display. The automated approval process begins. An email notification is sent to the FUND and ORGN approvers. The journal entry status updates from Draft to Pending. If all transactions and documentation are correct, click
Submit Journal.<br>
slide39. More Actions Icon Copy, Reverse, or Delete Journal entry Finance Self Service Journal Entry Training Finance Self Service Journal Entry Training 39<br>
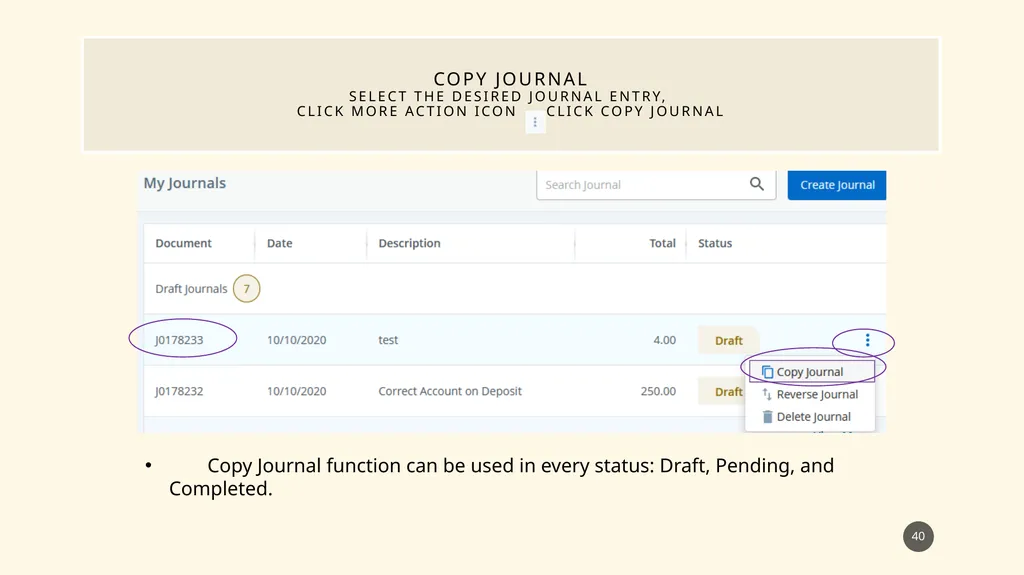
slide40. Copy Journal Select the desired Journal Entry, click More Action icon , Click Copy journal Finance Self Service Journal Entry Training Finance Self Service Journal Entry Training 40 Copy Journal function can be used in every status: Draft, Pending, and Completed.<br>
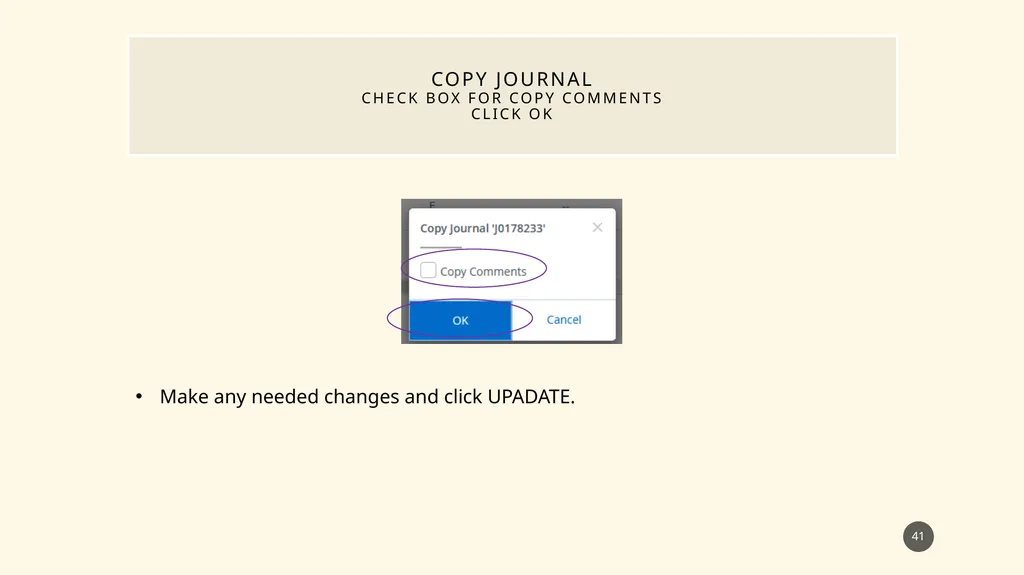
slide41. Copy Journal check box for Copy Comments Click ok 41 Make any needed changes and click UPADATE.<br>
slide42. Closely review all transactions, verify that Documentation is attached, make corrections if needed Finance Self Service Journal Entry Training Finance Self Service Journal Entry Training 42 When the Journal Entry is submitted, a green notification box will display. The automated approval process begins. An email notification is sent to the FUND and ORGN approvers. The journal entry status updates from Draft to Pending. If all transactions and documentation are correct, click
Submit Journal.<br>
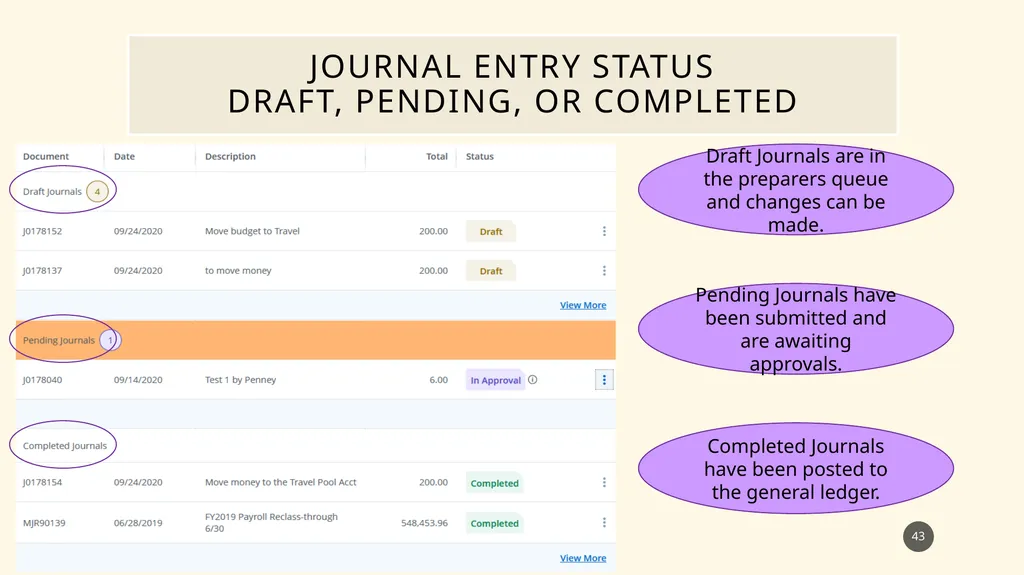
slide43. Journal Entry Status Draft, pending, or completed 43 Draft Journals are in the preparers queue and changes can be made. Pending Journals have been submitted and are awaiting approvals. Completed Journals have been posted to the general ledger.<br>
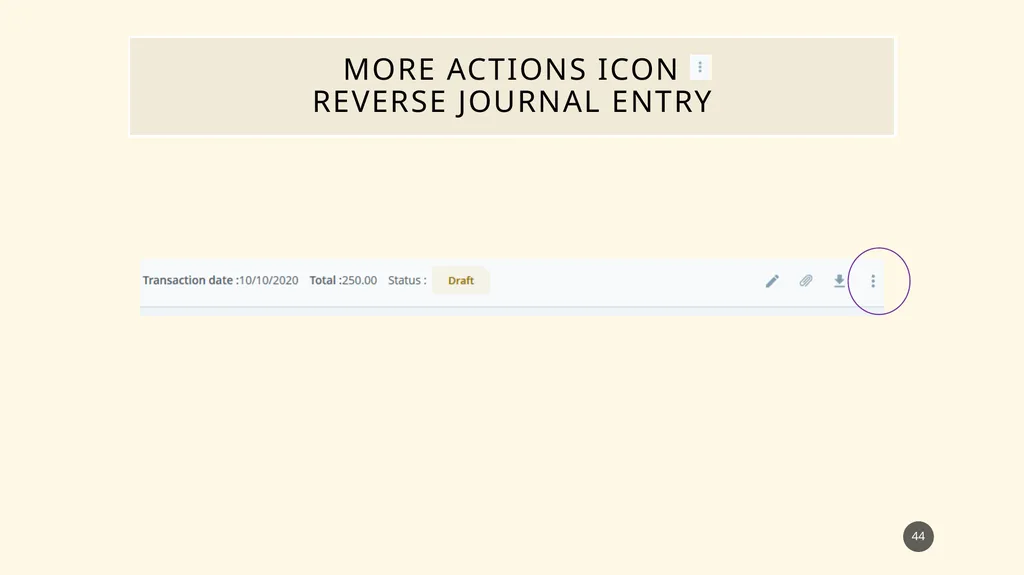
slide44. More Actions Icon Reverse Journal Entry Finance Self Service Journal Entry Training Finance Self Service Journal Entry Training 44<br>
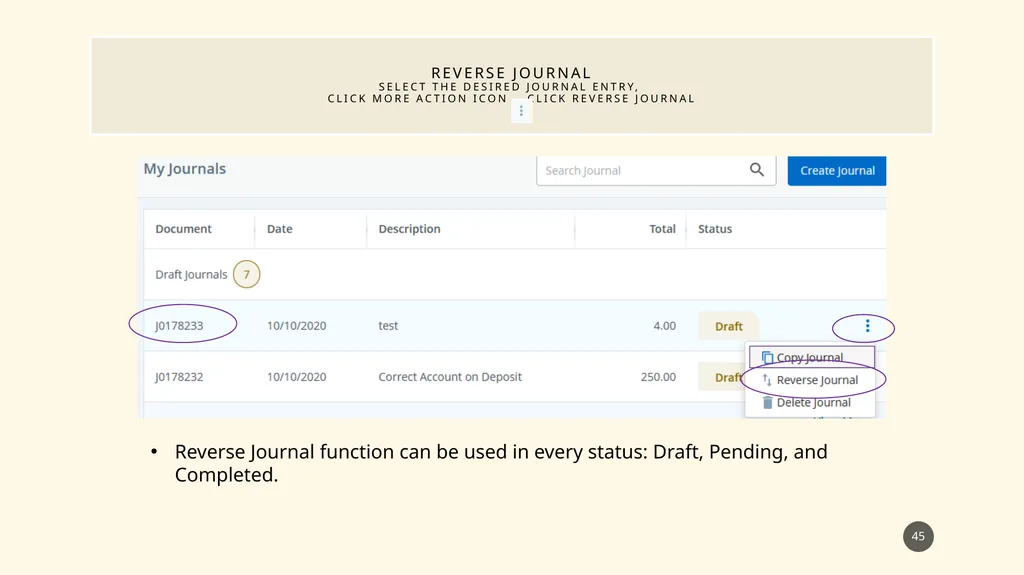
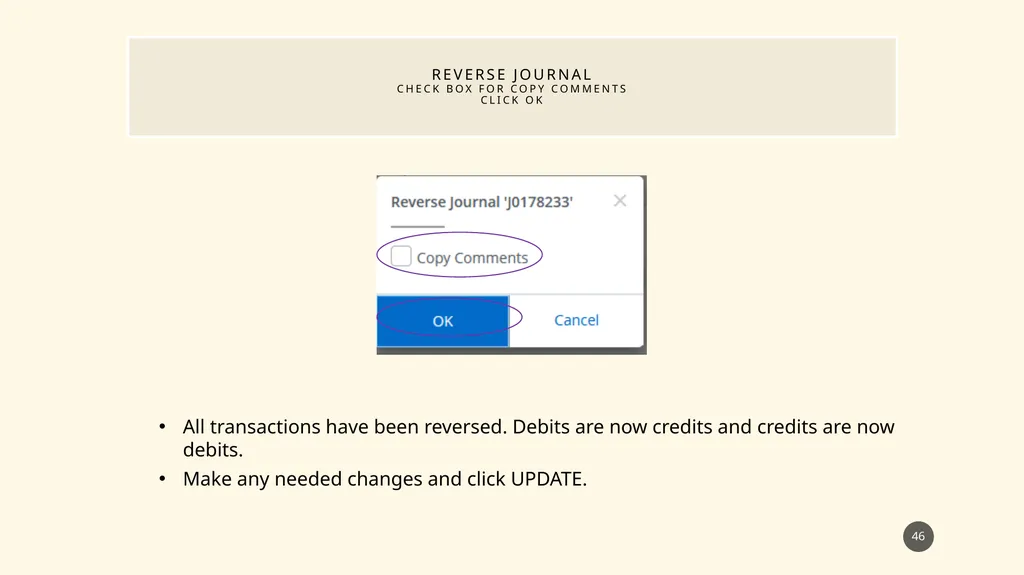
slide45. reverse Journal Select the desired Journal Entry, click More Action icon ,Click reverse journal Finance Self Service Journal Entry Training Finance Self Service Journal Entry Training 45 Reverse Journal function can be used in every status: Draft, Pending, and Completed.<br>
slide46. reverse Journal check box for Copy Comments Click ok 46 All transactions have been reversed. Debits are now credits and credits are now debits.
Make any needed changes and click UPDATE.<br>
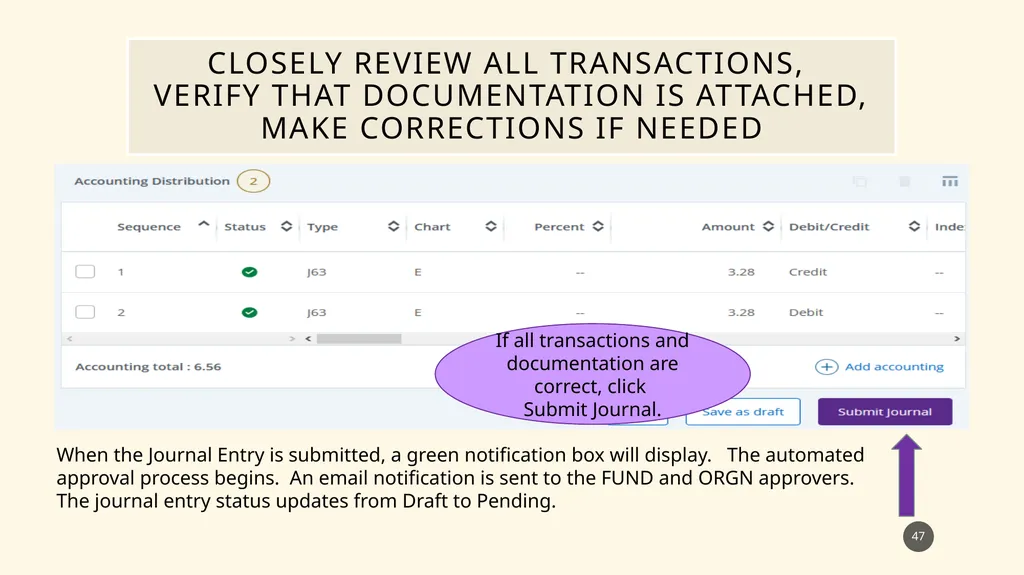
slide47. Closely review all transactions, verify that Documentation is attached, make corrections if needed Finance Self Service Journal Entry Training Finance Self Service Journal Entry Training 47 When the Journal Entry is submitted, a green notification box will display. The automated approval process begins. An email notification is sent to the FUND and ORGN approvers. The journal entry status updates from Draft to Pending. If all transactions and documentation are correct, click
Submit Journal.<br>
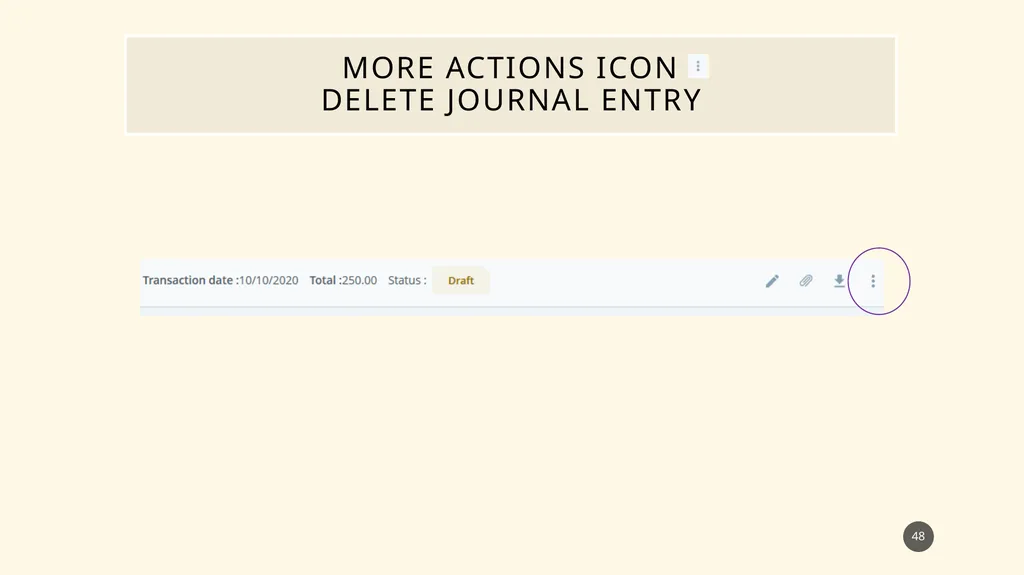
slide48. More Actions Icon Delete Journal Entry Finance Self Service Journal Entry Training Finance Self Service Journal Entry Training 48<br>
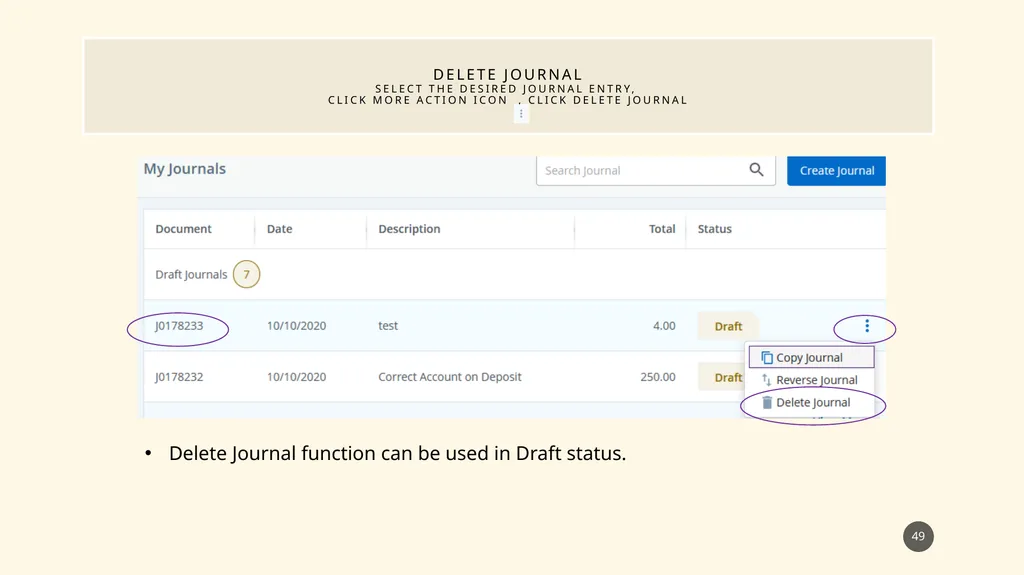
slide49. delete Journal Select the desired Journal Entry, click More Action icon , Click delete journal Finance Self Service Journal Entry Training Finance Self Service Journal Entry Training 49 Delete Journal function can be used in Draft status.<br>
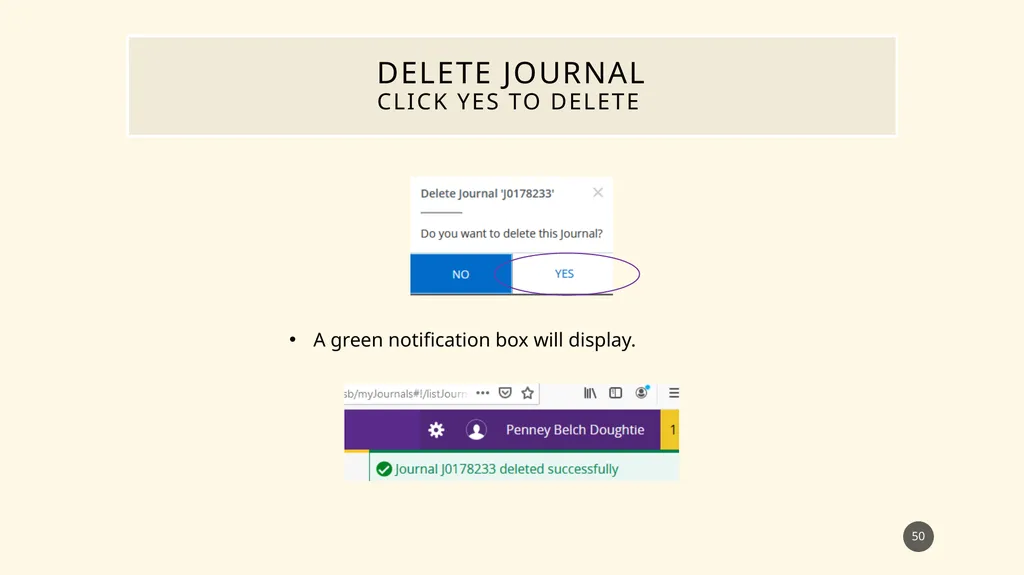
slide50. delete Journal Click Yes to delete 50 A green notification box will display.<br>
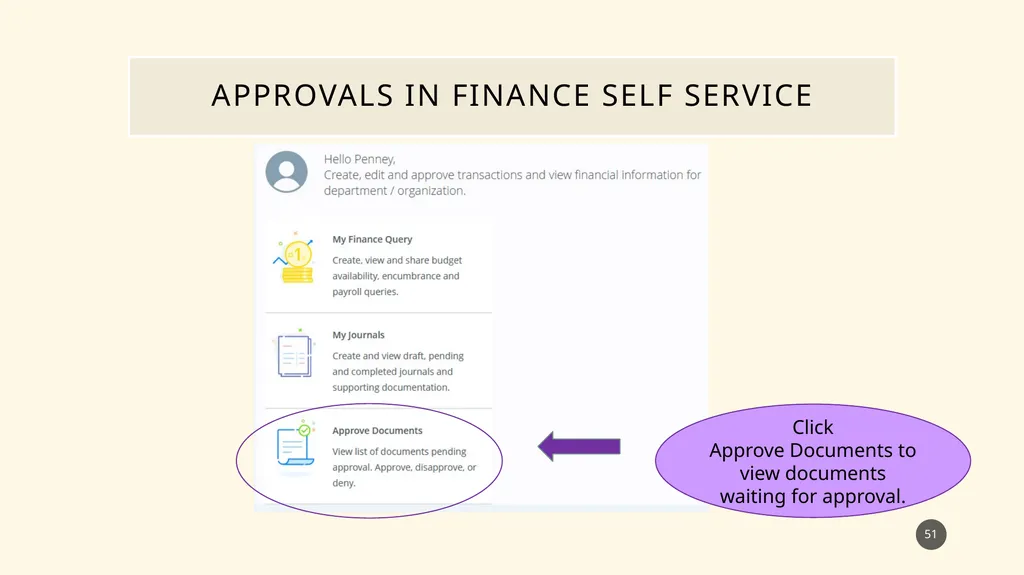
slide51. Approvals in Finance Self Service 51 Click
Approve Documents to view documents waiting for approval.<br>
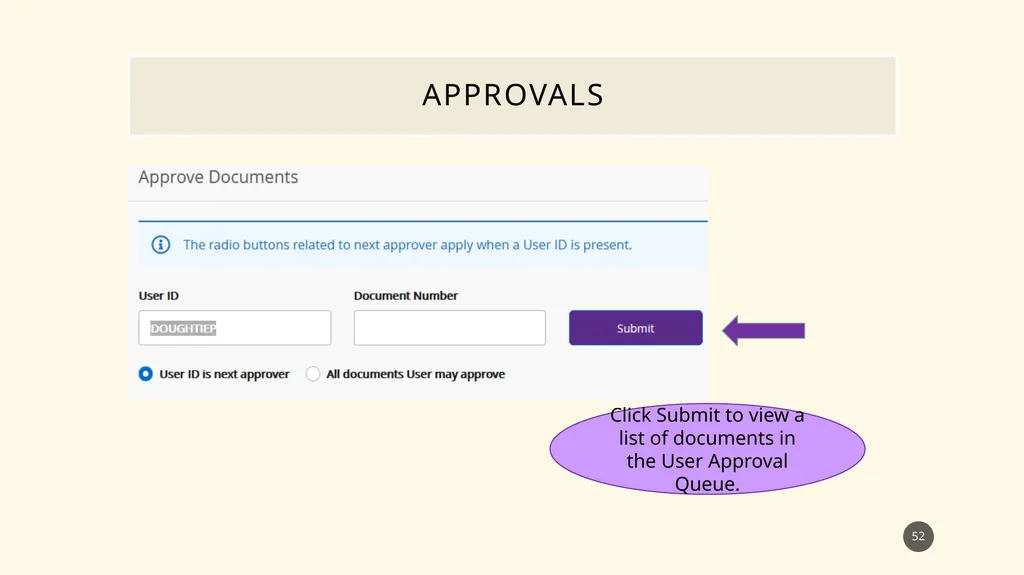
slide52. approvals 52 Click Submit to view a list of documents in the User Approval Queue.<br>
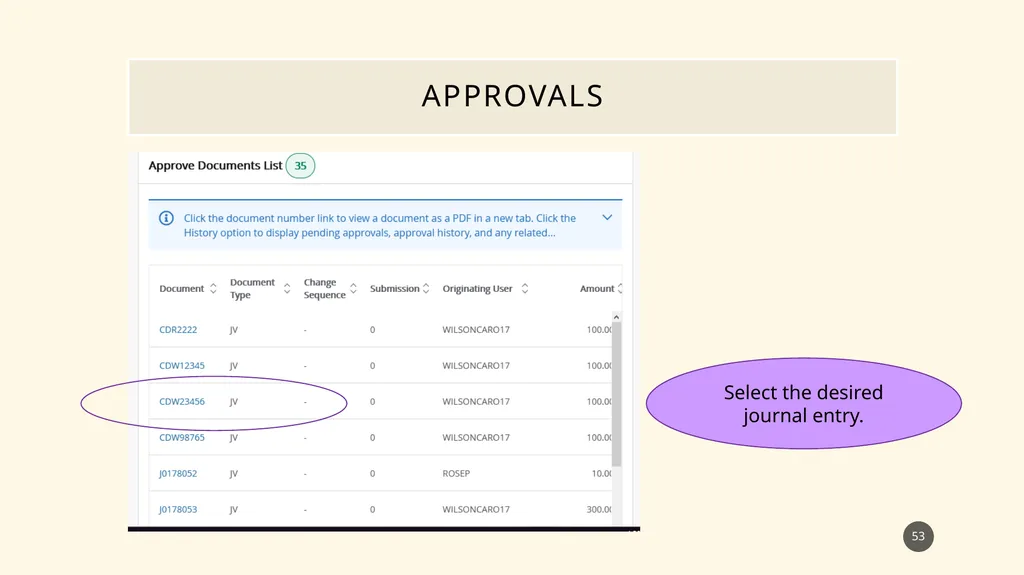
slide53. approvals 53 Select the desired journal entry.<br>
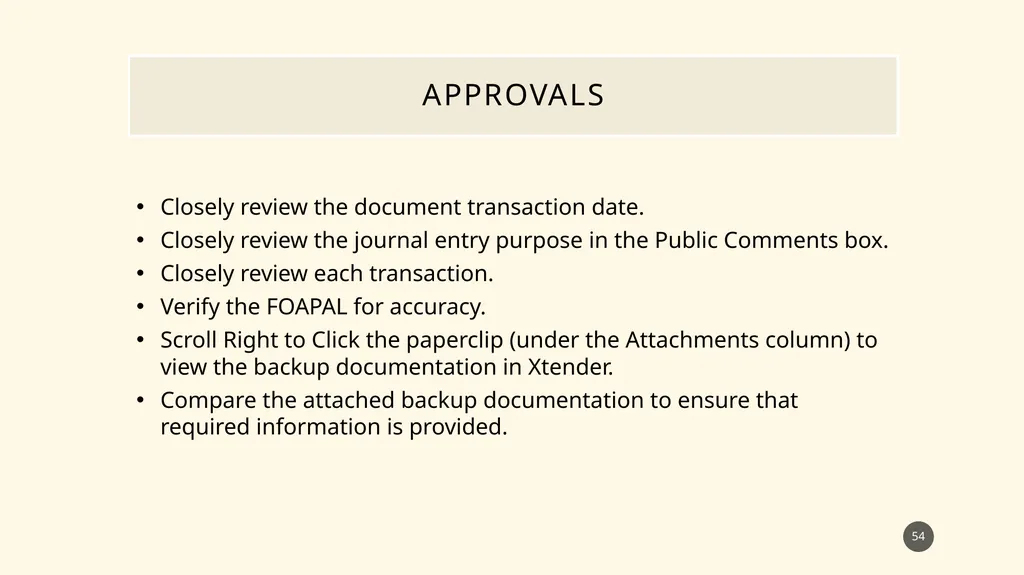
slide54. approvals 54 Closely review the document transaction date.
Closely review the journal entry purpose in the Public Comments box.
Closely review each transaction.
Verify the FOAPAL for accuracy.
Scroll Right to Click the paperclip (under the Attachments column) to view the backup documentation in Xtender.
Compare the attached backup documentation to ensure that required information is provided.<br>
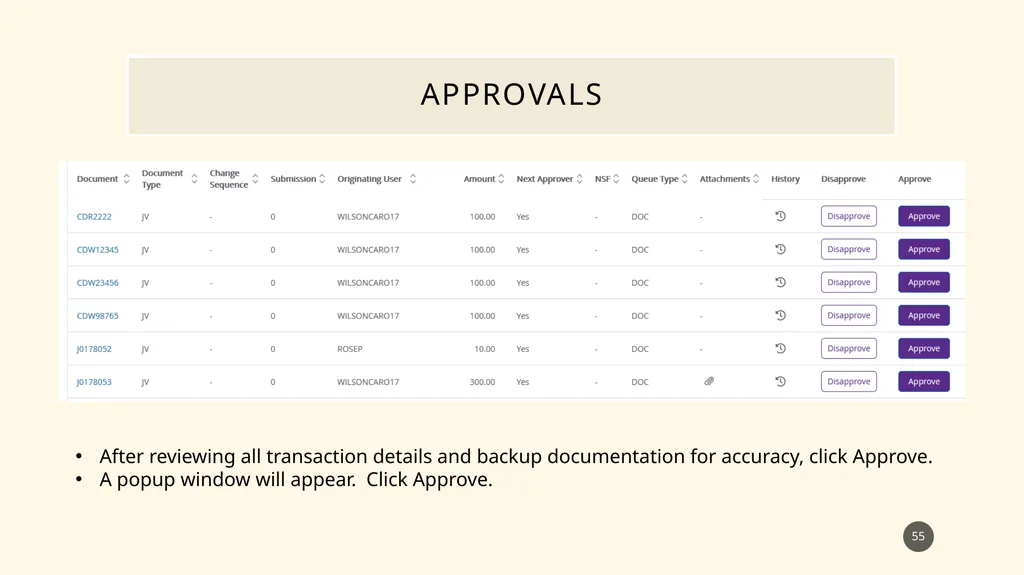
slide55. approvals Finance Self Service Journal Entry Training Finance Self Service Journal Entry Training 55 After reviewing all transaction details and backup documentation for accuracy, click Approve.
A popup window will appear. Click Approve.<br>
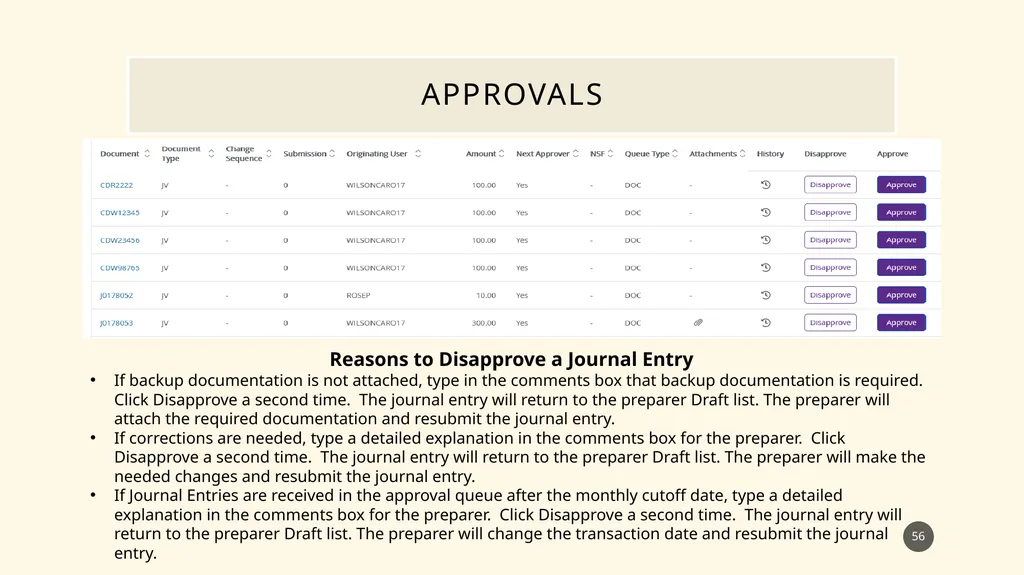
slide56. approvals Finance Self Service Journal Entry Training Finance Self Service Journal Entry Training 56 Reasons to Disapprove a Journal Entry
If backup documentation is not attached, type in the comments box that backup documentation is required. Click Disapprove a second time. The journal entry will return to the preparer Draft list. The preparer will attach the required documentation and resubmit the journal entry.
If corrections are needed, type a detailed explanation in the comments box for the preparer. Click Disapprove a second time. The journal entry will return to the preparer Draft list. The preparer will make the needed changes and resubmit the journal entry.
If Journal Entries are received in the approval queue after the monthly cutoff date, type a detailed explanation in the comments box for the preparer. Click Disapprove a second time. The journal entry will return to the preparer Draft list. The preparer will change the transaction date and resubmit the journal entry.<br>
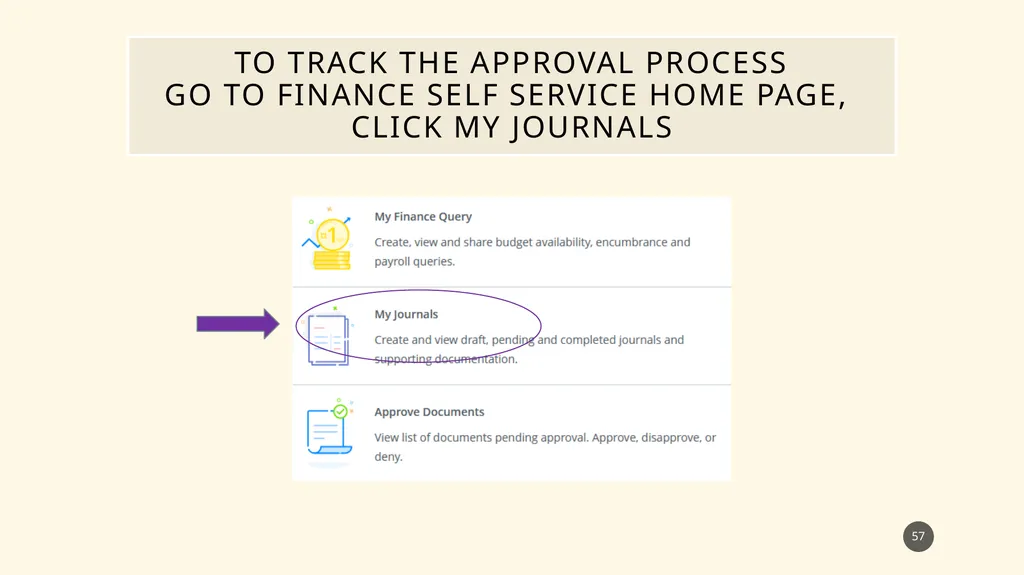
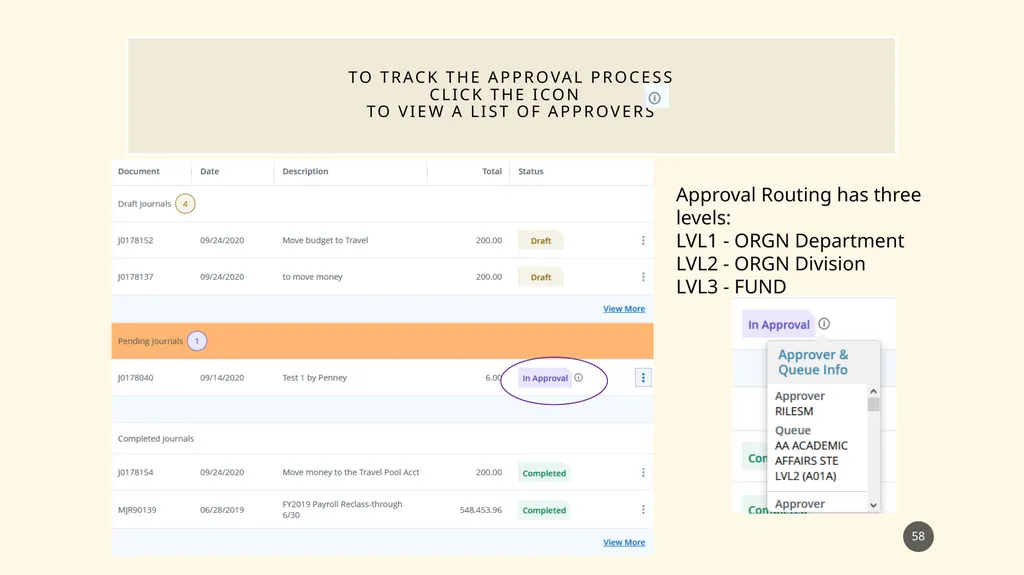
slide57. To track the Approval Process go to Finance Self Service Home Page, click My Journals 57<br>
slide58. To track the Approval Process Click the Icon To View A list of Approvers 58 Approval Routing has three levels:
LVL1 - ORGN Department
LVL2 - ORGN Division
LVL3 - FUND<br>
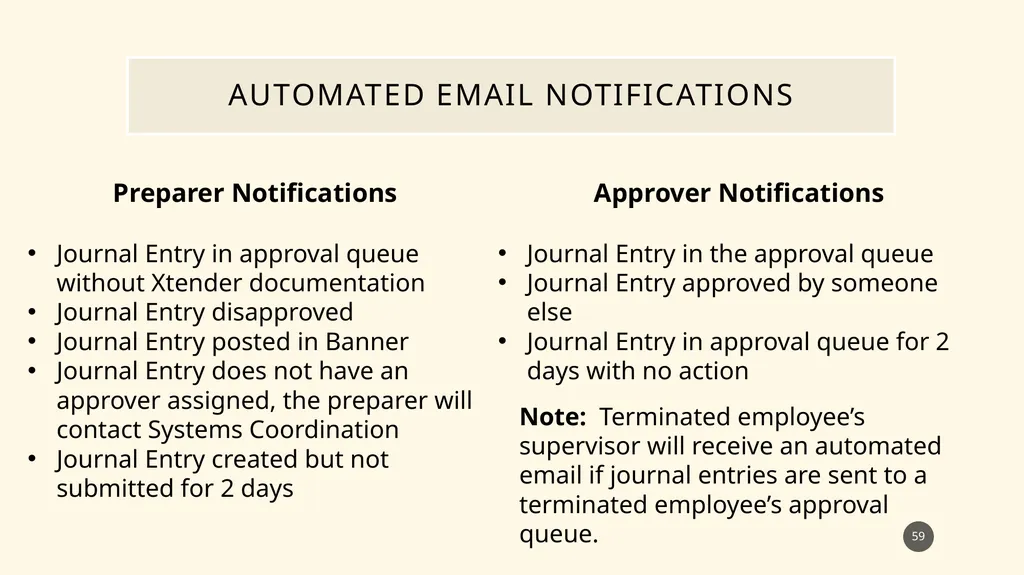
slide59. Automated email notifications Preparer Notifications
Journal Entry in approval queue without Xtender documentation
Journal Entry disapproved
Journal Entry posted in Banner
Journal Entry does not have an approver assigned, the preparer will contact Systems Coordination
Journal Entry created but not submitted for 2 days 59 Approver Notifications
Journal Entry in the approval queue
Journal Entry approved by someone else
Journal Entry in approval queue for 2 days with no action Note: Terminated employee’s supervisor will receive an automated email if journal entries are sent to a terminated employee’s approval queue.<br>
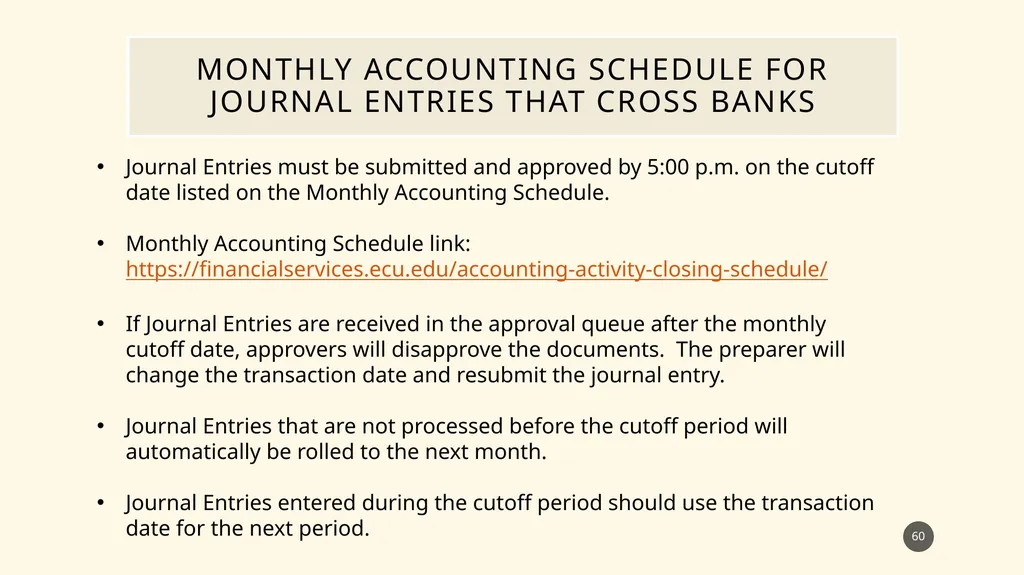
slide60. Monthly Accounting schedule for Journal Entries that cross banks Journal Entries must be submitted and approved by 5:00 p.m. on the cutoff date listed on the Monthly Accounting Schedule.
Monthly Accounting Schedule link: https://financialservices.ecu.edu/accounting-activity-closing-schedule/
If Journal Entries are received in the approval queue after the monthly cutoff date, approvers will disapprove the documents. The preparer will change the transaction date and resubmit the journal entry.
Journal Entries that are not processed before the cutoff period will automatically be rolled to the next month.
Journal Entries entered during the cutoff period should use the transaction date for the next period. 60<br>
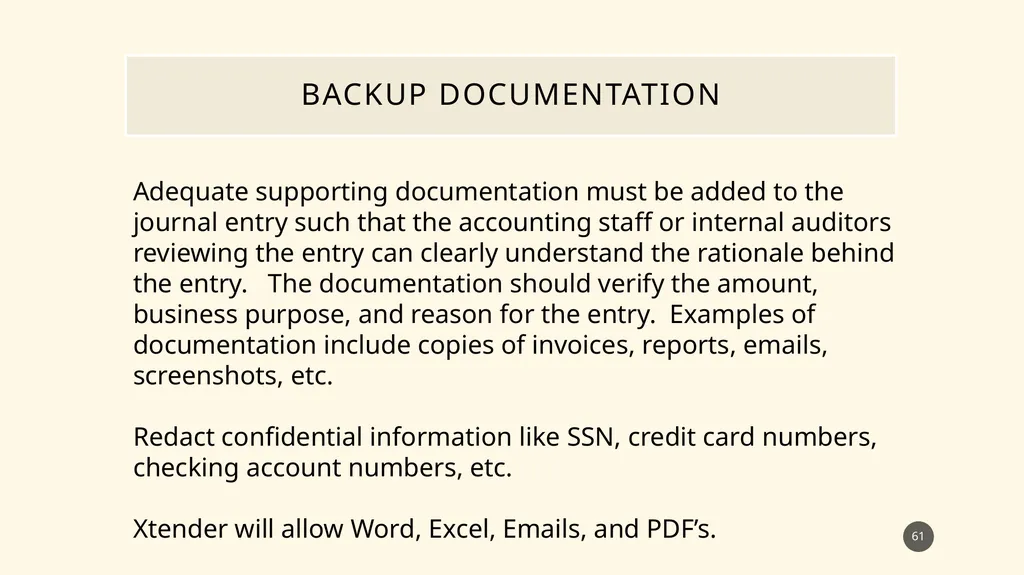
slide61. Backup Documentation Adequate supporting documentation must be added to the journal entry such that the accounting staff or internal auditors reviewing the entry can clearly understand the rationale behind the entry. The documentation should verify the amount, business purpose, and reason for the entry. Examples of documentation include copies of invoices, reports, emails, screenshots, etc.
Redact confidential information like SSN, credit card numbers, checking account numbers, etc.
Xtender will allow Word, Excel, Emails, and PDF’s. 61<br>
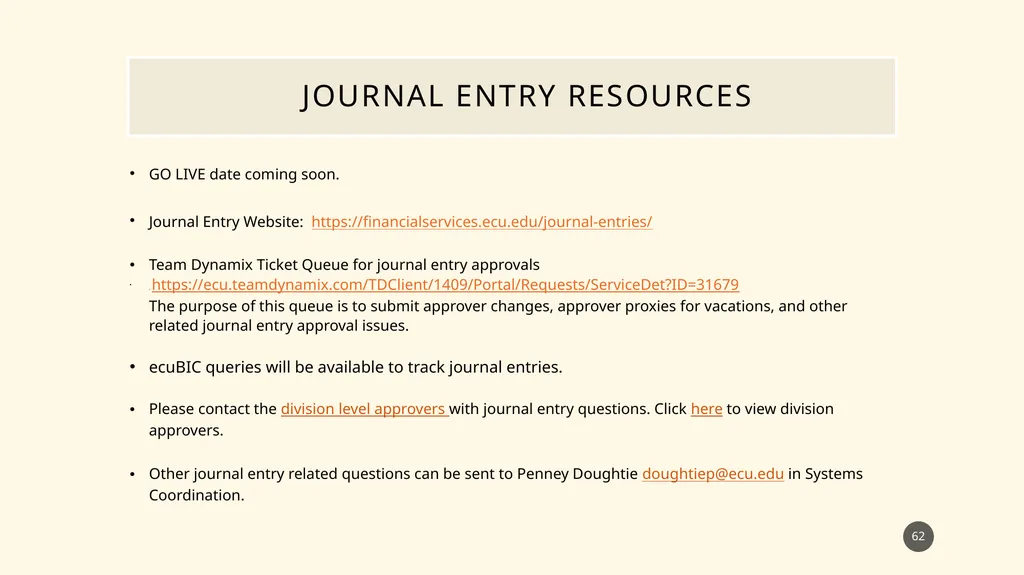
slide62. Journal entry Resources GO LIVE date coming soon.
Journal Entry Website: https://financialservices.ecu.edu/journal-entries/.
Team Dynamix Ticket Queue for journal entry approvals
. https://ecu.teamdynamix.com/TDClient/1409/Portal/Requests/ServiceDet?ID=31679
The purpose of this queue is to submit approver changes, approver proxies for vacations, and other related journal entry approval issues.
ecuBIC queries will be available to track journal entries.
Please contact the division level approvers with journal entry questions. Click here to view division approvers.
Other journal entry related questions can be sent to Penney Doughtie doughtiep@ecu.edu in Systems Coordination. 62<br>
slide63. Thank you for participating in Journal Entry Training 63<br>
Penney Doughtie<br>
slide2. Finance Self Service Journal Entry Training Training includes:
Security Access to Enter a Journal Entry in Banner
Security Access to Xtender
Definition of a Journal Entry
Log into Finance Self Service
Create a Journal Entry in Finance Self Service
Attach Scanned Documents to Journal Entry
Copy, Reverse, Delete a Journal Entry
Approve Journal Entry
Month End Schedule and Timing of Journal Entries
Required Backup Documentation 2<br>
slide3. How TO REQUEST security access to enter/approve journal entries To key/approve journal entries, Banner Finance Users will need the Banner Security Class:
GL INB & ID Charges (BAN_FIN_GL_DATA_ENTRY_C)
or
GL Adm & Fin Accountants Inq & Post (BAN_FIN_GL_FINSERVICES_C).
NOTE: GL SSB & Budget Transfers (BAN_FIN_GL_GROUP_C) will only allow budget transfers (B11and B22).
NOTE: Select the ORGNS that are related to your department.
Step by Step Security Request Instructions 3<br>
slide4. How TO REQUEST Xtender security access to view journal entry documentation Journal Entry Backup Documentation will be stored in Xtender in the E-FS-JE folder.
Banner Finance Users will request Xtender Security access to the E-FS-JE folder as Processor-No Delete.
Sign into PiratePort.
Select Banner Security Request.
Click on Request Security under Options located on the left.
Verify that the Job Information and Supervisor Information are correct.
Click on the word Xtender under the “Request Access For:” section.
Under Application: Next to Finance: Select E-FS-JE in the drop-down box.
Under the Privilege section: Select “Processor-No Delete” in the drop-down box. (Be sure to scroll down to Processor-No Delete).
Click the Submit button.
In the Comments box on the first page of the Banner Security Request: enter “Please grant access to E-FS-JE application via security group E-FS-JE-PROC”.
Click the Submit button.
Read the Confidential Agreement and Click the OK button.
Read the second Agreement and Click the OK button. 4<br>
slide5. What is a Journal Entry? A journal entry is the first step in the accounting cycle, and it is the record keeping of business transactions. In the ECU Banner System, the double entry accounting method is used; therefore, each journal entry has a debit transaction and credit transaction. The total dollar amount of debits must equal the total dollar amount of credits, or the journal entry is considered unbalanced.
Journal entries needed to correct transactions or to reclass transactions are created in the Banner applications Finance Self Service or Banner Admin Pages. Typically, these journal entries will use the rule class code J63. The Banner rule class code, also called transaction type, routes the journal entry to the correct FOAPAL. Journal entries directly change the FOAPAL balances on the general ledger.
Once all transactions on the journal entry have been keyed and submitted, the approval process begins. The Banner approval system is designed to electronically forward the journal entry to the designated approvers based on the FUND and ORGN codes. After all approval levels are completed, the journal entry transactions will be posted to the General Ledger and the transactions will be reflected in Banner. 5<br>
slide6. Log into Finance Self Service 6 Preferred browser is Fire Fox
Go to www.ecu.edu/pirateport
Log onto Pirate Porto
Enter PirateID
Enter Password**
Click Finance Self Service
**Finance Self Service password is the same as the ECU intra password that is used to open University computers, log into Pirate Port, and Outlook email.<br>
slide7. During training Log into BTRAIN Finance Self Service 7 Preferred browser is Fire Fox
Go to www.ecu.edu
Click the search icon
Click Banner
Scroll Down to Finance SSB [BTRAIN]
Enter PirateID
Enter Password**
**Finance Self Service training password is the same as the ECU intra password that is used to open University computers, log into Pirate Port, and Outlook email.<br>
slide8. Journal Entries CAN BE ENTERED IN FINANCE SELF SERVICE AND BANNER ADMIN PAGES Today’s training session will demonstrate how to create a journal entry in Finance Self Service.
Click ‘My Journals’. 8<br>
slide9. Journal Entry Status Draft, pending, or completed Finance Self Service Journal Entry Training Finance Self Service Journal Entry Training 9 Draft Journals are in the preparers queue and changes can be made. Pending Journals have been submitted and are awaiting approvals. Completed Journals have been approved and posted to the general ledger.<br>
slide10. Example of A Journal Entry to correct an expense 10 I made a mistake; I charged the wrong ORGN code when I made a Staples Order.
I used organization code 591101 and should have used 591201.
Example of Wrong Transaction:
11/20/2020 J60 Staples Inv 7932656 Fund 111101 ORGN 591101 Account 72110 $3.29 DEBIT (wrong transaction)
To correct the wrong transaction, a transaction is needed to reverse the wrong ORGN code (CREDIT).
Another transaction is needed to record the correct ORGN code (DEBIT): hence a double-sided entry.
J63 Staples Inv 7932656 Fund 111101 ORGN 591101 Account 72110 $3.29 CREDIT (reverse wrong transaction)
J63 Staples Inv 7932656 Fund 111101 ORGN 591201 Account 72110 $3.29 DEBIT (correct transaction)
$6.58<br>
slide11. My Journals Displays Draft, Pending Approvals, and Completed. Click Create Journal Finance Self Service Journal Entry Training Finance Self Service Journal Entry Training 11 To Start a New Journal Entry, Click
Create Journal.<br>
slide12. Create the journal entry header 12 The document number is assigned by Banner. If a certain document prefix is needed, then the user will need to enter the JE in Banner Admin Pages. The Transaction Date is Defaulted to the current date.
Enter the Document Total, include the transaction amounts for debits and credits.<br>
slide13. Select journal type, Enter Description, and public/private comments, Then click create 13 In the Public Comments, type your name, email, phone number, and detailed explanation. This will provide the approver additional information on who submitted the journal entry. The default fields, Journal Type and Description, will display on each transaction in the journal entry.<br>
slide14. A green notification box will display the Journal document number, Sequence number 1 is now ready to be keyed Finance Self Service Journal Entry Training Finance Self Service Journal Entry Training 14<br>
slide15. Key first transaction (Sequence number 1) Enter fund, Organization, account, Program, Enter activity, if needed. 15<br>
slide16. Scroll Down Enter amount, Debit or credit, click Add Accounting for more entries 16 Click
ADD ACCOUNTING to enter more transactions.<br>
slide17. A green notification box will display, Sequence number 2 is now ready to be keyed 17<br>
slide18. Key the Second transaction (Sequence 2) Enter fund, Organization, account, Program, Enter activity, if needed. 18<br>
slide19. Enter amount, Select debit or credit, click Add Accounting for more entries, Or click save Finance Self Service Journal Entry Training Finance Self Service Journal Entry Training 19 Click
SAVE.<br>
slide20. A green notification box will display and how to use helpful icons Finance Self Service Journal Entry Training Finance Self Service Journal Entry Training 20 Edit Icon allows user to review each transaction and make changes to the document (see slide 21).
Attachment Icon is used to upload scanned journal entry backup documentation (see slide 22).
Download Icon is used to View a Journal Entry Report in Excel or PDF (see slide 23).
More Actions Icon includes Copy, Reverse, or Delete a Journal Entry (see slides 39-50).<br>
slide21. Click the Edit Icon to Closely review The fund, Organization, account, Program, amount, Debits/credits Finance Self Service Journal Entry Training Finance Self Service Journal Entry Training 21 Note the green check in the Status column indicates the transaction is Postable.
If changes are needed, simply click on the sequence and make the needed changes.<br>
slide22. Click the Attachment Icon to upload scanned journal entry backup documentation 22 Click Browse to select the backup documentation (Word, Excel, and PDF are acceptable).
Select ‘Journal Voucher’ for Document Type.
Click UPLOAD.<br>
slide23. Click the Download Icon to View a Journal Entry Report in Excel or PDF Finance Self Service Journal Entry Training Finance Self Service Journal Entry Training 23<br>
slide24. Closely review all transactions, verify that Documentation is attached, make corrections if needed Finance Self Service Journal Entry Training Finance Self Service Journal Entry Training 24 When the Journal Entry is submitted, a green notification box will display. The automated approval process begins. An email notification is sent to the FUND and ORGN approvers. The journal entry status updates from Draft to Pending. If all transactions and documentation are correct, click
Submit Journal.<br>
slide25. Approval routing Finance Self Service Journal Entry Training Finance Self Service Journal Entry Training 25 Automated emails are sent to the next approver for every completed document. Every document will receive an ORGN approval and a FUND approval, both of which are required. There are some divisions that require more than one ORGN approval so there may be multiple ORGN level approvals on one document.
ORGN level approvals will have LVL1 and LVL2 in the queue description. These approvals are required before the document will proceed to the FUND level approval.
All FUND level approvals will have LVL3 in the queue description. Once the document has been approved at this level, the document will proceed to posting in Banner. Every FUND type will be approved (State, Grant, ITF, Foundation).
***NOTE, only one approval is need for each approval level.<br>
slide26. Journal Entry Status Draft, pending, or completed Finance Self Service Journal Entry Training Finance Self Service Journal Entry Training 26 Draft Journals are in the preparers queue and changes can be made. Pending Journals have been submitted and are awaiting approvals. Completed Journals have been approved and have posted to the general ledger.<br>
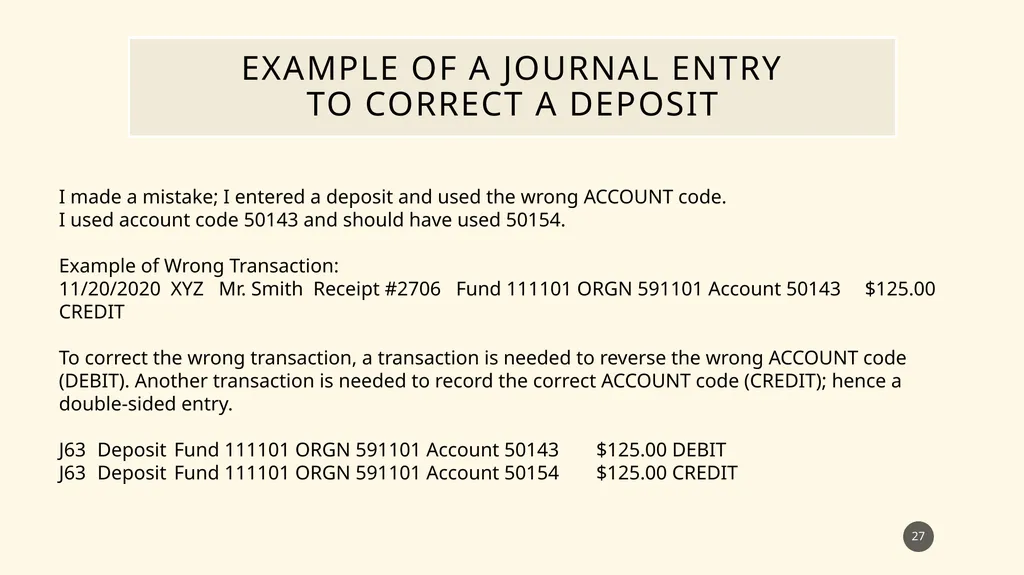
slide27. Example of a Journal Entry to correct a deposit I made a mistake; I entered a deposit and used the wrong ACCOUNT code.
I used account code 50143 and should have used 50154.
Example of Wrong Transaction:
11/20/2020 XYZ Mr. Smith Receipt #2706 Fund 111101 ORGN 591101 Account 50143 $125.00 CREDIT
To correct the wrong transaction, a transaction is needed to reverse the wrong ACCOUNT code (DEBIT). Another transaction is needed to record the correct ACCOUNT code (CREDIT); hence a double-sided entry.
J63 Deposit Fund 111101 ORGN 591101 Account 50143 $125.00 DEBIT
J63 Deposit Fund 111101 ORGN 591101 Account 50154 $125.00 CREDIT 27<br>
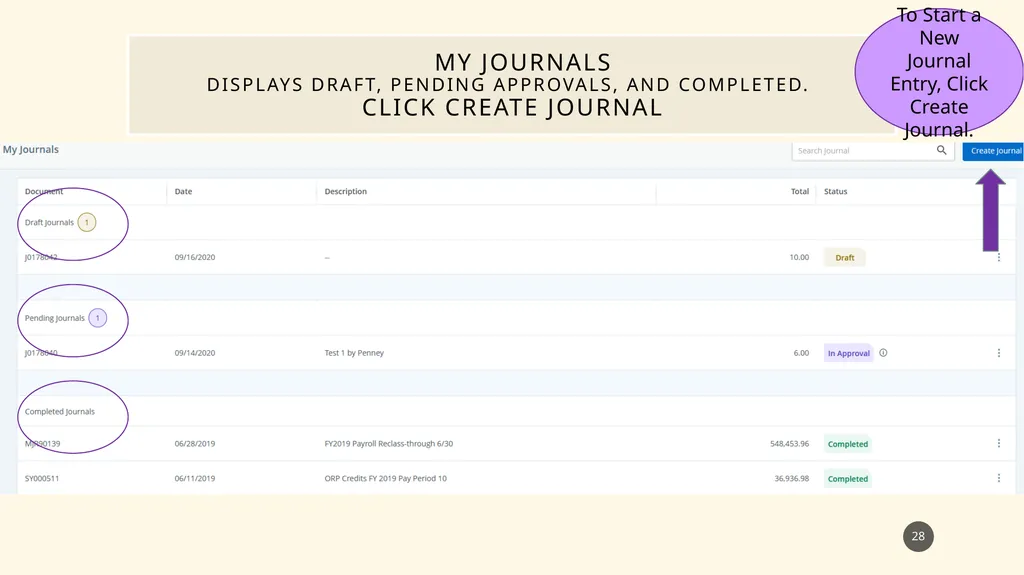
slide28. My Journals Displays Draft, Pending Approvals, and Completed. Click Create Journal Finance Self Service Journal Entry Training Finance Self Service Journal Entry Training 28 To Start a New Journal Entry, Click
Create Journal.<br>
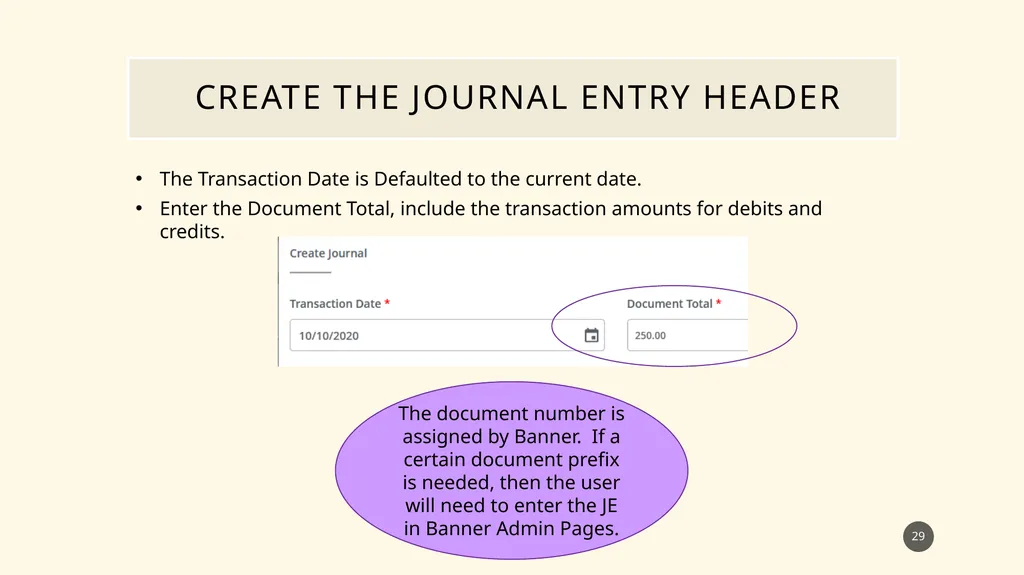
slide29. Create the journal entry header 29 The document number is assigned by Banner. If a certain document prefix is needed, then the user will need to enter the JE in Banner Admin Pages. The Transaction Date is Defaulted to the current date.
Enter the Document Total, include the transaction amounts for debits and credits.<br>
slide30. Select journal type, Enter Description, and public/private comments, Then click create 30 The default fields, Journal Type and Description, will display on each transaction in the journal entry. In the Public Comments, type your name, email, phone number, and detailed explanation. This will provide the approver additional information on who submitted the journal entry.<br>
slide31. A green notification box will display The Journal document number, Sequence number 1 is now ready to be keyed Finance Self Service Journal Entry Training Finance Self Service Journal Entry Training 31<br>
slide32. Key first transaction (Sequence number 1) Enter fund, Organization, account, Program, Enter activity, if needed. 32<br>
slide33. Scroll Down Enter amount, Debit or credit, click Add Accounting for more entries 33 Click
ADD ACCOUNTING to enter more transactions.<br>
slide34. A green notification box will display, Sequence number 2 is now ready to be keyed 34<br>
slide35. Key the Second transaction (Sequence 2) Enter fund, Organization, account, Program, Enter activity, if needed 35<br>
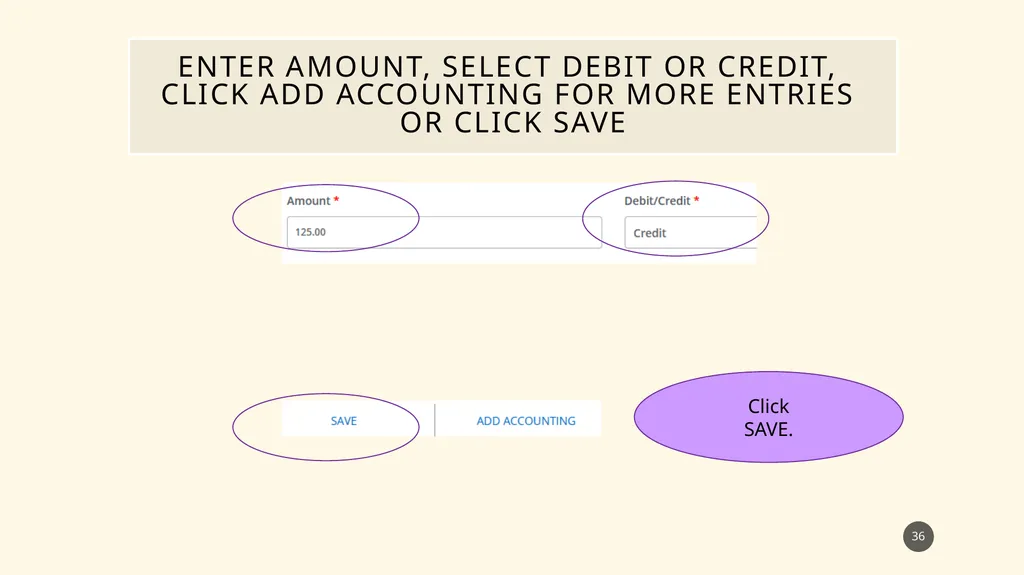
slide36. Enter amount, Select debit or credit, click Add Accounting for more entries Or click save 36 Click
SAVE.<br>
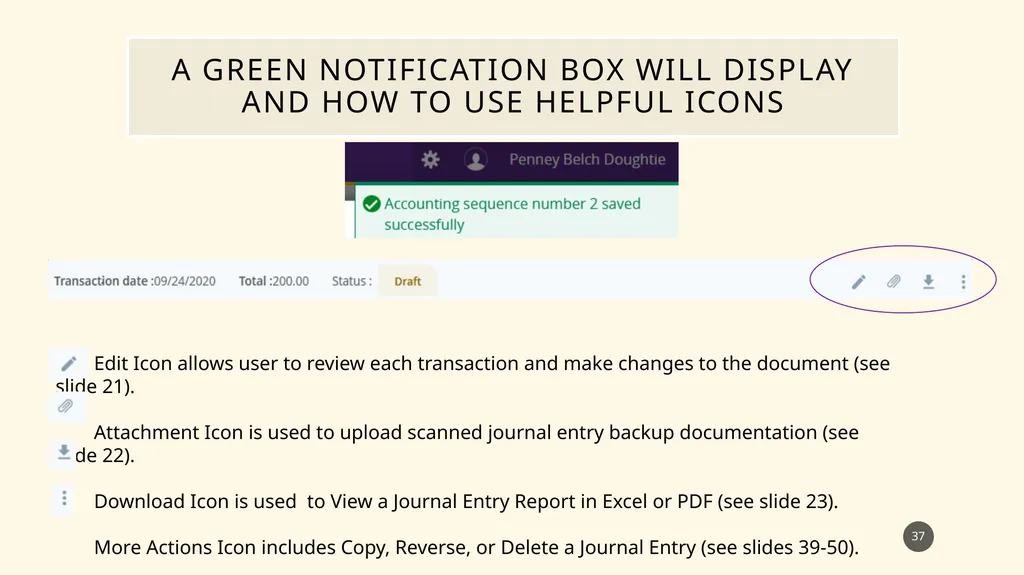
slide37. A green notification box will display and how to use helpful icons 37 Edit Icon allows user to review each transaction and make changes to the document (see slide 21).
Attachment Icon is used to upload scanned journal entry backup documentation (see slide 22).
Download Icon is used to View a Journal Entry Report in Excel or PDF (see slide 23).
More Actions Icon includes Copy, Reverse, or Delete a Journal Entry (see slides 39-50).<br>
slide38. Closely review all transactions, verify that Documentation is attached, make corrections if needed Finance Self Service Journal Entry Training Finance Self Service Journal Entry Training 38 When the Journal Entry is submitted, a green notification box will display. The automated approval process begins. An email notification is sent to the FUND and ORGN approvers. The journal entry status updates from Draft to Pending. If all transactions and documentation are correct, click
Submit Journal.<br>
slide39. More Actions Icon Copy, Reverse, or Delete Journal entry Finance Self Service Journal Entry Training Finance Self Service Journal Entry Training 39<br>
slide40. Copy Journal Select the desired Journal Entry, click More Action icon , Click Copy journal Finance Self Service Journal Entry Training Finance Self Service Journal Entry Training 40 Copy Journal function can be used in every status: Draft, Pending, and Completed.<br>
slide41. Copy Journal check box for Copy Comments Click ok 41 Make any needed changes and click UPADATE.<br>
slide42. Closely review all transactions, verify that Documentation is attached, make corrections if needed Finance Self Service Journal Entry Training Finance Self Service Journal Entry Training 42 When the Journal Entry is submitted, a green notification box will display. The automated approval process begins. An email notification is sent to the FUND and ORGN approvers. The journal entry status updates from Draft to Pending. If all transactions and documentation are correct, click
Submit Journal.<br>
slide43. Journal Entry Status Draft, pending, or completed 43 Draft Journals are in the preparers queue and changes can be made. Pending Journals have been submitted and are awaiting approvals. Completed Journals have been posted to the general ledger.<br>
slide44. More Actions Icon Reverse Journal Entry Finance Self Service Journal Entry Training Finance Self Service Journal Entry Training 44<br>
slide45. reverse Journal Select the desired Journal Entry, click More Action icon ,Click reverse journal Finance Self Service Journal Entry Training Finance Self Service Journal Entry Training 45 Reverse Journal function can be used in every status: Draft, Pending, and Completed.<br>
slide46. reverse Journal check box for Copy Comments Click ok 46 All transactions have been reversed. Debits are now credits and credits are now debits.
Make any needed changes and click UPDATE.<br>
slide47. Closely review all transactions, verify that Documentation is attached, make corrections if needed Finance Self Service Journal Entry Training Finance Self Service Journal Entry Training 47 When the Journal Entry is submitted, a green notification box will display. The automated approval process begins. An email notification is sent to the FUND and ORGN approvers. The journal entry status updates from Draft to Pending. If all transactions and documentation are correct, click
Submit Journal.<br>
slide48. More Actions Icon Delete Journal Entry Finance Self Service Journal Entry Training Finance Self Service Journal Entry Training 48<br>
slide49. delete Journal Select the desired Journal Entry, click More Action icon , Click delete journal Finance Self Service Journal Entry Training Finance Self Service Journal Entry Training 49 Delete Journal function can be used in Draft status.<br>
slide50. delete Journal Click Yes to delete 50 A green notification box will display.<br>
slide51. Approvals in Finance Self Service 51 Click
Approve Documents to view documents waiting for approval.<br>
slide52. approvals 52 Click Submit to view a list of documents in the User Approval Queue.<br>
slide53. approvals 53 Select the desired journal entry.<br>
slide54. approvals 54 Closely review the document transaction date.
Closely review the journal entry purpose in the Public Comments box.
Closely review each transaction.
Verify the FOAPAL for accuracy.
Scroll Right to Click the paperclip (under the Attachments column) to view the backup documentation in Xtender.
Compare the attached backup documentation to ensure that required information is provided.<br>
slide55. approvals Finance Self Service Journal Entry Training Finance Self Service Journal Entry Training 55 After reviewing all transaction details and backup documentation for accuracy, click Approve.
A popup window will appear. Click Approve.<br>
slide56. approvals Finance Self Service Journal Entry Training Finance Self Service Journal Entry Training 56 Reasons to Disapprove a Journal Entry
If backup documentation is not attached, type in the comments box that backup documentation is required. Click Disapprove a second time. The journal entry will return to the preparer Draft list. The preparer will attach the required documentation and resubmit the journal entry.
If corrections are needed, type a detailed explanation in the comments box for the preparer. Click Disapprove a second time. The journal entry will return to the preparer Draft list. The preparer will make the needed changes and resubmit the journal entry.
If Journal Entries are received in the approval queue after the monthly cutoff date, type a detailed explanation in the comments box for the preparer. Click Disapprove a second time. The journal entry will return to the preparer Draft list. The preparer will change the transaction date and resubmit the journal entry.<br>
slide57. To track the Approval Process go to Finance Self Service Home Page, click My Journals 57<br>
slide58. To track the Approval Process Click the Icon To View A list of Approvers 58 Approval Routing has three levels:
LVL1 - ORGN Department
LVL2 - ORGN Division
LVL3 - FUND<br>
slide59. Automated email notifications Preparer Notifications
Journal Entry in approval queue without Xtender documentation
Journal Entry disapproved
Journal Entry posted in Banner
Journal Entry does not have an approver assigned, the preparer will contact Systems Coordination
Journal Entry created but not submitted for 2 days 59 Approver Notifications
Journal Entry in the approval queue
Journal Entry approved by someone else
Journal Entry in approval queue for 2 days with no action Note: Terminated employee’s supervisor will receive an automated email if journal entries are sent to a terminated employee’s approval queue.<br>
slide60. Monthly Accounting schedule for Journal Entries that cross banks Journal Entries must be submitted and approved by 5:00 p.m. on the cutoff date listed on the Monthly Accounting Schedule.
Monthly Accounting Schedule link: https://financialservices.ecu.edu/accounting-activity-closing-schedule/
If Journal Entries are received in the approval queue after the monthly cutoff date, approvers will disapprove the documents. The preparer will change the transaction date and resubmit the journal entry.
Journal Entries that are not processed before the cutoff period will automatically be rolled to the next month.
Journal Entries entered during the cutoff period should use the transaction date for the next period. 60<br>
slide61. Backup Documentation Adequate supporting documentation must be added to the journal entry such that the accounting staff or internal auditors reviewing the entry can clearly understand the rationale behind the entry. The documentation should verify the amount, business purpose, and reason for the entry. Examples of documentation include copies of invoices, reports, emails, screenshots, etc.
Redact confidential information like SSN, credit card numbers, checking account numbers, etc.
Xtender will allow Word, Excel, Emails, and PDF’s. 61<br>
slide62. Journal entry Resources GO LIVE date coming soon.
Journal Entry Website: https://financialservices.ecu.edu/journal-entries/.
Team Dynamix Ticket Queue for journal entry approvals
. https://ecu.teamdynamix.com/TDClient/1409/Portal/Requests/ServiceDet?ID=31679
The purpose of this queue is to submit approver changes, approver proxies for vacations, and other related journal entry approval issues.
ecuBIC queries will be available to track journal entries.
Please contact the division level approvers with journal entry questions. Click here to view division approvers.
Other journal entry related questions can be sent to Penney Doughtie doughtiep@ecu.edu in Systems Coordination. 62<br>
slide63. Thank you for participating in Journal Entry Training 63<br>